
Official S2000 HOW TO / DIY
 11-28-2007, 08:49 AM
#1
Munkyw3rkz.webs.com
Thread Starter
Join Date: Jun 2003
Location: PUTTIN UR MOUTH ON CURBZ CPT, SoCal
Posts: 22,166
Likes: 0
Received 1 Like
on
1 Post
well i hope others can pitch in some good info and stop a lot of the  filling the board with repeats....
O2 Cell Fix
this installation will remove CEL (check engine light) that is caused when you install a test pipe (no cat) or high flow cat.
when this light comes on from your install of a new exhaust , be aware that this has no effect on the performance of your car. its just a stupid reminder that the o2 (oxygen) sensor is finding a problem caused when you removed or did something to the stock catalytic converter.
notes before starting
- you might have space for only 1 spark plug anti-fouler, sometimes using 1 will work / sometimes not
- having an electric drill helps out tremendously , those battery operated ones dont have that much power; they will still work but will be a pain
- this may still not solve your problem of the light; a small amount of people that try this 'quick fix' still cant get the light to go off
STEP 1
-purchase 2 spark plug anti foulers at your local auto parts store
-18 mm size
-made by HELP brand / part number 42002
-HELP has also another part number 42009 and are shorter in length than the 42002, i have heard they worked , but i am not 100 percent

STEP 2
-disconnect the negative terminal on your battery. this will reset your ecu
-take one of the anti foulers and drill out its center using a 1/2 bit ,
-this will increase its hole size and allow your stock o2 sensor to fit

STEP 3
-screw the drilled spark plug anti-fouler on top of the original
-be sure to use some kind of anti-seize on the treads. in case you need to remove your fix with ease


STEP 4
-unscrew your stock o2 sensor and place your cel / ses fix in
-use anti seize on the threads
-clean your cell (by wiping it off with a paper towel)


STEP 5
-reinstall your o2 sensor
-use anti seize on the threads

STEP 6
-reconnect your battery (your ecu is reset)
-you have just solved the problem of the 'damn light keeps coming on'
ps. its cost me 8 dollars for the pack of 2 spark plug anti-foulers
Modified by S@nt0s at 10:46 AM 11/28/2007
filling the board with repeats....O2 Cell Fix
this installation will remove CEL (check engine light) that is caused when you install a test pipe (no cat) or high flow cat.
when this light comes on from your install of a new exhaust , be aware that this has no effect on the performance of your car. its just a stupid reminder that the o2 (oxygen) sensor is finding a problem caused when you removed or did something to the stock catalytic converter.
notes before starting
- you might have space for only 1 spark plug anti-fouler, sometimes using 1 will work / sometimes not
- having an electric drill helps out tremendously , those battery operated ones dont have that much power; they will still work but will be a pain
- this may still not solve your problem of the light; a small amount of people that try this 'quick fix' still cant get the light to go off
STEP 1
-purchase 2 spark plug anti foulers at your local auto parts store
-18 mm size
-made by HELP brand / part number 42002
-HELP has also another part number 42009 and are shorter in length than the 42002, i have heard they worked , but i am not 100 percent
STEP 2
-disconnect the negative terminal on your battery. this will reset your ecu
-take one of the anti foulers and drill out its center using a 1/2 bit ,
-this will increase its hole size and allow your stock o2 sensor to fit
STEP 3
-screw the drilled spark plug anti-fouler on top of the original
-be sure to use some kind of anti-seize on the treads. in case you need to remove your fix with ease
STEP 4
-unscrew your stock o2 sensor and place your cel / ses fix in
-use anti seize on the threads
-clean your cell (by wiping it off with a paper towel)
STEP 5
-reinstall your o2 sensor
-use anti seize on the threads
STEP 6
-reconnect your battery (your ecu is reset)
-you have just solved the problem of the 'damn light keeps coming on'
ps. its cost me 8 dollars for the pack of 2 spark plug anti-foulers
Modified by S@nt0s at 10:46 AM 11/28/2007
 11-28-2007, 09:44 AM
#2
Munkyw3rkz.webs.com
Thread Starter
Join Date: Jun 2003
Location: PUTTIN UR MOUTH ON CURBZ CPT, SoCal
Posts: 22,166
Likes: 0
Received 1 Like
on
1 Post
EK fogs on AP1 bumper

I would suggest cutting the backs out of the vents first to allow you to cut your design more easily

Draw initial design by using the supplied foglight frame as a guide. You can always make it bigger, but you will have a tough time securing the foglight to the bumper if you cut too much away

use a rotory tool and a heated blade to remove the uneeded plastic. I also work in a dental lab....so this might not be as convenient for others


I ended up cutting away about 3 different times, but this is what the hole ended up looking like.

You actually have to cut a little outside the bumper vent to get the fog frame to lay flat. You can see this in the lower left hand part of the cut. You will need to do lots of test fitting to get your ideal fitting. It is a bit of a bitch because you will always have a gap somewhere

You then secure the lights to the frame.

placed 2 black screws on the outside of the fog frame to push to the somewhat convex frames inward and line up with the line of the bumper. They are completely unnoticeable and very effective


After securing the fogs to the bumper, wire it and zip tie the wires in the desired position. I would suggest running the wires on the most bottom part of the bumper. Otherwise you will have issues when trying to put the bumper back on. Also, the EK fogs are incompatible with the AEM V2 CAI....Ask me how I know? The filter for the intake sits exactly in the spot where your right foglight needs to sit when trying to install the bumper again. I was forced to switch back to my stock airbox for now
11-28-2007, 09:44 AM
#3
Munkyw3rkz.webs.com
Thread Starter
Join Date: Jun 2003
Location: PUTTIN UR MOUTH ON CURBZ CPT, SoCal
Posts: 22,166
Likes: 0
Received 1 Like
on
1 Post
Front 4pt strut bar
<TABLE WIDTH="90%" CELLSPACING=0 CELLPADDING=0 ALIGN=CENTER><TR><TD>Quote, originally posted by Shy_GuyAP1 »</TD></TR><TR><TD CLASS="quote">Well it's on the car, and let me tell you it was the biggest bitch I have ever dealt with as far as strutbars come.
BIG PAINS IN MY ********!!!
Tools required -
14mil extended length socket
14mil wrench
14mil standard length socket
Extensions
10mil socket
13mil wrench
7mil? allen
Spare tire jack
3friends with nothing better to do on a Friday night
Flat head screw driver
Phillips head
Step 1 - Remove airbox, 3x 10mm bolts, disconnect assortment of vacuum lines, o2 sensor and various over lines and such
Step 2 - Unbolt strut tower? 2x 14mm bolts on both sides, the typical mounting location of strutbars
Step 3 - Unbolt rack and pinion mount, 2x 14mm bolts
Step 4 - Jack up the car
Step 5 - lower entire assembly into place
Step 6 - Put the two pinion bolts down through the holes
Step 7 - Put the upper strut brace over the bolts on the nonjacked side, this will make it seem like the other side won't fit.
Step 8 - Get a friend to stand on the wheel on the jack side lowering the suspension assembly
Step 9 - Allow the suspension assembly to come back up through the holes.
Step 10 - Tighten everything up everywhere.
Step 11 - Reassemble airbox
Step 12 - Enjoy the understeer

I don't it did anything, but I think if I add a rear brace it will work balance things out and increase the overall rigidity of the chassis and reduce body flex, and increase handling.
After spending an hour and a half on it I'm not in the mood to remove it, so when I get the rear one I won't have to put it back in. We weren't sure how to put it in so there were all kinds of things we tried. I actually stood on the strut bar to lower it in place enough to bolt the lower bolts in.
11-28-2007, 09:45 AM
#4
Munkyw3rkz.webs.com
Thread Starter
Join Date: Jun 2003
Location: PUTTIN UR MOUTH ON CURBZ CPT, SoCal
Posts: 22,166
Likes: 0
Received 1 Like
on
1 Post
Tracy sports header install
<TABLE WIDTH="90%" CELLSPACING=0 CELLPADDING=0 ALIGN=CENTER><TR><TD>Quote, originally posted by Cornering Artist »</TD></TR><TR><TD CLASS="quote">first take off your heat shield..... with the bolt i have Circled in the pic below...do not remove just pull hard and the heat sheild comes out


then take off the top part of the header heat shield...

take off the header nuts....

now go under the car and remove the o2 sensor from the stock header....

then remove header from the cat......

this bracket can be removed its connected to the stock header and you dont need it with the tracy sports header....and it just gets in the way when trying to slide the header out..

the header slides out threw the bottom

i was able to use my Dounut and my gasket again cuz my car is still very new

slide the new header up threw the bottom put the o2 sensor back on...well its pretty self explanatory now

im not the best at Explaining things but i hope this helps...</TD></TR></TABLE>
<TABLE WIDTH="90%" CELLSPACING=0 CELLPADDING=0 ALIGN=CENTER><TR><TD>Quote, originally posted by Cornering Artist »</TD></TR><TR><TD CLASS="quote">first take off your heat shield..... with the bolt i have Circled in the pic below...do not remove just pull hard and the heat sheild comes out
then take off the top part of the header heat shield...
take off the header nuts....
now go under the car and remove the o2 sensor from the stock header....
then remove header from the cat......
this bracket can be removed its connected to the stock header and you dont need it with the tracy sports header....and it just gets in the way when trying to slide the header out..
the header slides out threw the bottom
i was able to use my Dounut and my gasket again cuz my car is still very new
slide the new header up threw the bottom put the o2 sensor back on...well its pretty self explanatory now
im not the best at Explaining things but i hope this helps...</TD></TR></TABLE>
11-28-2007, 07:08 PM
#6
Honda-Tech Member
<TABLE WIDTH="90%" CELLSPACING=0 CELLPADDING=0 ALIGN=CENTER><TR><TD>Quote, originally posted by Quick Silver »</TD></TR><TR><TD CLASS="quote">As the strikers become older they star to get worn due to the constant friction between them and the top's latches.
The wear of these parts creates play between the latch and the striker and this causes a squeaking sound that its anoying enough to drive anyone insane making noise even while taking the slightest of turns (this is specially embarasing if you have a passenger with you )
)
You can always buy new strikers or try swaping them from one side to another to give the latches a fresh surface to rest against OR...
you can do this:
go to your local Home Depot and buy yourself a box of #31 O-rings from the plumbing section (by the faucets)
they should look something like this:


Dimensions are: O.D: 9/16" I.D: 5/16" x 1/8"
Outside Diameter: 9/16"
Inside Diameter: 5/16"
then install them over the latches' pin as shown:
(you can can as an option use a bit of superglue to fix them against the pre-existing rubber stopper)


this will create a better seal between the latch and the striker preventing them form rubbing and making that horrible squeaking noise :D
Best part of all the O-Rings are $1.97 for a box of 10
Took the car around some tight turns, in and out some driveways where previous to the washers the top would have squeaked and got NO squeaking :cool:
I'll post updates as of how they washers will hold up after a few days</TD></TR></TABLE>
The wear of these parts creates play between the latch and the striker and this causes a squeaking sound that its anoying enough to drive anyone insane making noise even while taking the slightest of turns (this is specially embarasing if you have a passenger with you
)You can always buy new strikers or try swaping them from one side to another to give the latches a fresh surface to rest against OR...
you can do this:
go to your local Home Depot and buy yourself a box of #31 O-rings from the plumbing section (by the faucets)
they should look something like this:
Dimensions are: O.D: 9/16" I.D: 5/16" x 1/8"
Outside Diameter: 9/16"
Inside Diameter: 5/16"
then install them over the latches' pin as shown:
(you can can as an option use a bit of superglue to fix them against the pre-existing rubber stopper)
this will create a better seal between the latch and the striker preventing them form rubbing and making that horrible squeaking noise :D
Best part of all the O-Rings are $1.97 for a box of 10
Took the car around some tight turns, in and out some driveways where previous to the washers the top would have squeaked and got NO squeaking :cool:
I'll post updates as of how they washers will hold up after a few days
</TD></TR></TABLE>
11-29-2007, 06:15 PM
#7
Munkyw3rkz.webs.com
Thread Starter
Join Date: Jun 2003
Location: PUTTIN UR MOUTH ON CURBZ CPT, SoCal
Posts: 22,166
Likes: 0
Received 1 Like
on
1 Post
****<U>STARTER</U>******
**** Disconnect Battery ****
1) Remove Intake
2) Remove Accessory Belt
3) Remove top bolt of Alternator, losen lower and rotate away so you can get to the top starter bolt. (see any tranny removal thread) Remove bolt with long extension.
----
4) Remove intake support bracket (black bar) bolt (14mm on back/top of intake manifold) - Push water hose out of clip.
5) Jack up car, put on stands. (I did front only)
6) Unclip wire harnesses from intake support bracket, remove lower 14mm bolt and remove.
7) Remove power cable from back of starter. 12mm under rubber boot.
8) Remove other cable (spade connector - above power cable - you can't really see it - it pulls straight off, don't need to press anything)
9) Note the position of the knock sensor - the cable that you just took off with the spade connector shares wires with the knock sensor so its easy to spot. It has a green plastic ring on it too. The knock sensor is plastic and brittle. Don't break it. Seriously, its easy to do and a bitch to replace when the engine is in the car. (I didn't this time, but have broken it on other engine swaps).
10) Remove both 10mm bolts to fuel line bracket on frame where the hardline connects to the flexible one. This will give you more wiggle room to get the starter out.
11) Remove 14mm lower starter bolt. I used a 3/8's breaker bar and deep socket. It was the perfect length. Starter is now loose.
12) Back starter out of hole in block while paying attention to the knock sensor.
13) Twist and rotate starter to get it out. Takes a little time and finesse. Don't forget about that knock sensor.
14) Reverse steps to put it all back together. Getting the spade connector back on is a little bit of a pain because you can't see it. But just lay there on your back and fiddle with it. You'll get it eventually.
Trending Topics
12-02-2007, 03:30 PM
#8
Will you make something up for me please?
Join Date: Sep 2001
Location: SoCal
Posts: 6,155
Likes: 0
Received 0 Likes
on
0 Posts
I know you're a mod, and can most likely remove this post to organized it better, so I'll mention it here. (PM's aren't working for me this evening).
I'm not sure what type of partnership we have with http://www.s2ki.com, but there are TONS of good DIY posts on there, along with a FAQ that organizes them all. Maybe we can include some of them here. I noticed that the NSX forum had a "partnership" with an NSX site and some of the FAQs were shared. NSXPrime, I believe.
"Under The Hood" forum DIY thread: http://www.s2ki.com/forums/ind...08435
"S2000 Talk" forum (General information FAQ): http://www.s2ki.com/forums/ind...54011
"Electronics" forum (Stereo, electrical issues FAQ): http://www.s2ki.com/forums/ind...95344
Those are just a few examples.
12-03-2007, 11:17 AM
#9
Munkyw3rkz.webs.com
Thread Starter
Join Date: Jun 2003
Location: PUTTIN UR MOUTH ON CURBZ CPT, SoCal
Posts: 22,166
Likes: 0
Received 1 Like
on
1 Post
Im not a Mod just another jow blow like you! but we do not have a partnership with S2Ki so the links should be up i would say... i can save the pics and add them myself so that this thread is not a link thread to other sites.
12-09-2007, 01:17 PM
#11
Will you make something up for me please?
Join Date: Sep 2001
Location: SoCal
Posts: 6,155
Likes: 0
Received 0 Likes
on
0 Posts
<TABLE WIDTH="90%" CELLSPACING=0 CELLPADDING=0 ALIGN=CENTER><TR><TD>Quote, originally posted by Ricey McRicerton »</TD></TR><TR><TD CLASS="quote">Question on the EK fogs (aside from wanting to see the pictures). Where do you guys mount the switch?</TD></TR></TABLE>
What year S2000 do you have? Some of the earlier models (with the center console "flip-up" cup holder) have a little compartment right behind the cup holder. Some put a pack of gum or a garage door opener there. Some mount a custome switch there. I'll try to find a pic.
EDIT:

What year S2000 do you have? Some of the earlier models (with the center console "flip-up" cup holder) have a little compartment right behind the cup holder. Some put a pack of gum or a garage door opener there. Some mount a custome switch there. I'll try to find a pic.
EDIT:
12-14-2007, 05:56 PM
#12
Honda-Tech Member
Join Date: Jun 2003
Location: NYC bitchessss
Posts: 9,555
Likes: 0
Received 0 Likes
on
0 Posts
Speed sensor wire cut going into the black box.....best free DIY...
For the nOObiessssss it allows the top to go down while moving...just have to put the E brake up one click.
For the nOObiessssss it allows the top to go down while moving...just have to put the E brake up one click.
12-17-2007, 05:12 AM
#13
Honda-Tech Member
Join Date: Mar 2004
Location: London, UK
Posts: 7,536
Likes: 0
Received 0 Likes
on
0 Posts
Use the defogger and turn the AC off.
1) Turn the ignition switch "on," but dont start the car.
2) Turn fan speed off.
3) Turn temperature **** all the way to the left (blue area).
4) Turn vent **** to all the way to the left (panel position).
5) Turn the ignitions switch "off."
6) Hold down both air recirculation button and a/c button while turning the ignition switch "on." Nothing lights up initially, keep waiting. The orange air recirculation indicator on the button will start flashing.
7) Continue holding both buttons until the orange air recirculation indicator stops flashing, then let go.
12-18-2007, 10:49 AM
#14
Honda-Tech Member
Join Date: Mar 2004
Location: London, UK
Posts: 7,536
Likes: 0
Received 0 Likes
on
0 Posts
01-26-2008, 03:29 PM
#15
Honda-Tech Member
Join Date: Mar 2004
Location: London, UK
Posts: 7,536
Likes: 0
Received 0 Likes
on
0 Posts
Cusco/Safety21 roll bar comes with everything needed:
Bars
Backing Plates
Nuts, bolts, washers, and lock washers (to mount the bars to the chassis)
Allen bolts/lock nuts (to connect the bars together)
Here�s the tools you�ll be needing:
Jack & Jack Stands
Power Drill & Bits
Dremmel & sanding drums/cutting discs
12mm wrench and socket
14mm socket
17mm wrench and socket
Allen Wrench
Phillips screwdriver
Small Flathead screwdriver (for the plastic clips)
Flashlight (optional for those dark corners)
A friend! (Optional, I did this by myself, but in some areas, an extra hand may help)
99% of this Install is done TOP UP. The only time I had the top down was when I was finishing up and tightening the nuts and bolts that hold the bars together.
1. Remove the Seats (For Driver and Passenger)
Slide the seats all the way back to get easy access to the front bolts. Remove the two 12mm bolts. A wobble extension would help with the fronts, as it is hard to get at them straight, if you don�t have a wobble, you might have to use a wrench.
Slide the seats forward and remove the two 14mm bolts in the rear.
The driver seat has a seatbelt sensor plug that you need to unplug in order to remove the seat completely. Tilt the seat and unplug it. Remove both seats.
2. Removal of the plastic trunk cover (2 pieces)
There are 2 pieces to this, pry out panel B.
To do this, remove the 3 clips that are visible, then pry the panel out bottom first. You can now remove this piece.
On to the larger panel A. There are 4 clips holding it down, press the center in with your small flathead then pry them up and out.You�ll have to remove this part through the trunk, so start by removing the trunk lining.The spare tire needs to be relocated or removed anyway. Once the trunk lining is out of the way, push up on panel A because there are white clips holding it down, then remove the plastic trunk cover through the trunk

3. Removal of plastic cover behind the seats
There will be two hooks on each side of the car (4 total).
Pry the hinged cover off of those and remove them with a socket or Phillips screwdriver.
The panel is held in by clips so just pry the cover off, removing the cover on both sides allows you access to the screws that hold the center console in place. Remove these 2 screws in preparation to remove the center console.

4. Removal of the Center Console (Storage areas)
You�ll need to go through the trunk and remove the rectangular plastic cover on the backside of the center console. It�s held in by 2 screws on each side, which become visible after you removed the panels up in step 2 (picture 2 &3 below). Once the screws are removed, pry it off, it�s just held in by clips on the top side.


Remove the 3 phillips screws shown:

Move back to the inside of the car and open the secret compartment, there will be 4 screws that you can see (2 on each side). Remove these.

Now at the base of the center console, pull up on the perforated leather armrest (its held down by clips), so you can have access to the 2 screws that hold down the base of the center console. Remove the 2 screws.

The center console should be free now, just slightly held in by the stock roll bar covers and 2 plugs: the trunk release plug and the power outlet plug. Unplug both of these so you can fully remove the center console from the car. The picture is of the backside of the center console, showing the plugs that need to be unplugged.

With this out of the way, you now have a gaping hole in the center of your car that will help with installing the rear legs of the bar. Your car should look like the picture below now, minus the bar already installed of course!

5. Adjusting the rear plastic corner panels out of the way
To allow room for the drill to drill straight down, I had to adjust the plastic panels out of the way. Just remove the 3 fasteners (each is a different type) and push it out of the way as shown. It takes a little finesse, but depending on how big your drill is, if you adjust it out of the way as much as I did, your drill will not be able to drill straight down and the panels won�t get in the way.
The driver side has a plug connected to it, so unplug the connector showed in the picture and then move the panel. 3 Fastener locations are circled, the passenger side has the same fasteners.

6. Mounting the Roll Bar main hoop
Put the main hoop in the car, and connect the rear legs using the hex bolt and nut. If you have the bare 4 point bar, meaning just the main hoop and legs, move on to the next step below. If you have the harness bar, I would recommend loosely mounting it to the main hoop right now before you are about to drill the main hoop legs because the legs on the main hoop have a little play. It would be bad to accidentally mount the legs too close to each other not allowing enough room for the harness bar to be attached. This goes the same for the rear legs and the 5point conversion bar if you have it. Loosely mount this bar connecting the two rear legs so that they are spaced correctly from each other.
The Japanese instructions tell you to scrape off all of the sound deadening material on the chassis (the gummy stuff) so the roll bar has a nice flat surface to mount to. Of all the pictures I�ve seen, most people don�t do it, probably because it�s a pain in the *** to do. But if you wanted to remove this material, most people bust out the dry ice and a scraper. I didn�t do it because I was lazy.
Heck, a lot of people don�t even cut the carpet up like I did, they just drill through the carpet and mount the bar on top of the carpet! You can do as you like, but at the bare minimum I suggest cutting the carpet because the bar follows the contours of the floor pan and mounting it over the carpet, I think, would make the bar sit funny. Not removing the sound deadening material isn�t so bad because when you tighten the backing plates and the bar, sandwiching the chassis, the material tends to get squished flat anyway.
Push the Main hoop back as far as you can, the mounting plate will hit the hump where the stock seat bolts to. Mounting the bar back as much as possible is VERY important because this will allow the rear legs to sit flat.
Make sure the main hoop is mounted as central as possible, there is enough room for the bar to be accidentally biased to one side of the car or the other so be careful and make sure that there is equal distance from the bar to the door sills on both sides.
Once you have the main hoop where you want it, cut the carpet, then position the carpet out of the way and set the bar on the chassis. You are ready to drill, reference the pictures to see which hole I drilled first. I drilled this single hole on each side just to keep the bar in position while I go to mount the rear bars. It might be easier to have a friend hold the bar in place while you drill, but is not necessary. Use your tap to put a pilot mark so your drill doesn�t slide all over the place, then begin drilling.

Mount the bolt in there, but don�t put the nut on the bottom yet. Just leave the bolt in the hole so the bar doesn�t slide forward. When I mounted the fronts down first, for some reason the rear legs were floating, so I just loosened up the front (leaving the bolt in) and allowed the rears to touch the chassis then I drilled the rears and everything was good�
7. Mounting roll bar rear legs
Jack up the rear of the car (use the bottom of the differential as the jack up point)
Mount your jack stands on the reinforced parts of the chassis (check your owners manual if you do not know where these are).
Remove the rear wheels.
I accessed the rear as shown below, this is where it pays to be on the smaller size:
First make sure the legs sit flat on the chassis.
Next is to find the perfect spot, this takes a little luck/guessing. Basically you need to set the base of the legs as close to the rubber grommet as possible (ie. towards the sides of the car).
If you set it too far from the rubber grommet (ie. towards the center of the car), you will end up drilling into a different part of the chassis where the backing plate cannot go.
I ended up marking the two rear most holes in the legs and drilling them out.
Then mounted the backing plate to the bottom of the chassis to make sure the plate is in the correct place (ie. not overlapping the rubber grommet) and to make sure the plate will fit fine.
Check to make sure the rear legs do not hit the stock roll bar covers. I have about 1-2mm clearance on mine.
Once confirmed these holes are fine, mark the other holes and drill them out. I was lazy and didn�t want to remove the legs completely, so I just pushed them out of the way to the side�If they are loosely mounted you will have enough play to do this as well, and drilled the holes.
Once all holes are drilled in the rear, mount the backing plates and install all bolts and nuts. Usually the lock washers go on the nut side. You can tighten these right now.


Picture below is the passenger side backing plate, notice if you have the rear legs in the correct position, the rubber grommet will fit directly where it should in the backing plate. You can also use this picture as a reference of how close the holes should be from the rubber grommet when you try to position it from above:

8. Back to the main hoop
You have 1 of 4 holes drilled already, drill the rest of them out, mount the backing plate, nuts and bolts.


9. Put the car back together!
*If you have the harness bar mounted, remove it so you can put the center console back. *Reverse the instructions on removing it to install it, don�t forget to plug the trunk release and power outlet plugs back in! Put the bottom of it in first (under the leather armrest near the shifter), then move the rest of it into place, lifting up the secret compartment will help because the hinges for it need to fit into a small slot. Mount it down under the leather armrest, then the two screws under the vented panels behind the seats, then the 3 screws on the back side of the secret compartment, then the 4 screws near the hinges of the secret compartment.
*Put the vented panel behind the seats back in, it just snaps back into place. I opted to leave all 4 hangers out, but you can put 2 back in for the cleaner look. I don�t think the 2 behind the main hoop bars fit in, so just leave those out (and its too late to put those in anyway, the bar is in the way!).
*Install the panel behind the center console, the top snaps in, the bottom screws in w/ 2 phillips screws.
*Reposition the plastic corner pieces back down, clip the plug back in on the driver side, install the 3 fasteners on both sides.
*Next you need to cut the plastic panel A cover to accommodate for the rear legs. Just cut two half circle shapes with your dremmel. Once this is done, install this panel and panel B back into place. I don�t have pictures of this, because I didn�t do it yet, but this should be easy to figure out how to do.
*Tighten all the nuts and bolts down on the mounting plates of the roll bar (if you haven�t done so already). Use a 12mm wrench to hold one side and a 12mm socket or wrench for the other.
*Mount the harness bar back onto the main hoop and proceed to tighten all bars (hex screw and nuts). Reinstall the rear wheels, lower the car back onto the ground.
*Make sure your seats are still in the forward most position on the sliders and put the seats in. Mount the rears of the seats first, slide the seat back, then mount the fronts.
*If you want to keep your spare tire, a relocator is included, but I just left mine out, the relocator would move the tire more into the middle of the already limited trunk space.
*Reinstall trunk interior pieces.
10. Checkup
Slowly put the top down. The only part that I noticed is that in the top down position, the cloth gets creased where the rear legs are, but there�s nothing to help this. Just make sure the legs don�t hit the glass (if you have a glass rear window).
Finished!


Bars
Backing Plates
Nuts, bolts, washers, and lock washers (to mount the bars to the chassis)
Allen bolts/lock nuts (to connect the bars together)
Here�s the tools you�ll be needing:
Jack & Jack Stands
Power Drill & Bits
Dremmel & sanding drums/cutting discs
12mm wrench and socket
14mm socket
17mm wrench and socket
Allen Wrench
Phillips screwdriver
Small Flathead screwdriver (for the plastic clips)
Flashlight (optional for those dark corners)
A friend! (Optional, I did this by myself, but in some areas, an extra hand may help)
99% of this Install is done TOP UP. The only time I had the top down was when I was finishing up and tightening the nuts and bolts that hold the bars together.
1. Remove the Seats (For Driver and Passenger)
Slide the seats all the way back to get easy access to the front bolts. Remove the two 12mm bolts. A wobble extension would help with the fronts, as it is hard to get at them straight, if you don�t have a wobble, you might have to use a wrench.
Slide the seats forward and remove the two 14mm bolts in the rear.
The driver seat has a seatbelt sensor plug that you need to unplug in order to remove the seat completely. Tilt the seat and unplug it. Remove both seats.
2. Removal of the plastic trunk cover (2 pieces)
There are 2 pieces to this, pry out panel B.
To do this, remove the 3 clips that are visible, then pry the panel out bottom first. You can now remove this piece.
On to the larger panel A. There are 4 clips holding it down, press the center in with your small flathead then pry them up and out.You�ll have to remove this part through the trunk, so start by removing the trunk lining.The spare tire needs to be relocated or removed anyway. Once the trunk lining is out of the way, push up on panel A because there are white clips holding it down, then remove the plastic trunk cover through the trunk
3. Removal of plastic cover behind the seats
There will be two hooks on each side of the car (4 total).
Pry the hinged cover off of those and remove them with a socket or Phillips screwdriver.
The panel is held in by clips so just pry the cover off, removing the cover on both sides allows you access to the screws that hold the center console in place. Remove these 2 screws in preparation to remove the center console.
4. Removal of the Center Console (Storage areas)
You�ll need to go through the trunk and remove the rectangular plastic cover on the backside of the center console. It�s held in by 2 screws on each side, which become visible after you removed the panels up in step 2 (picture 2 &3 below). Once the screws are removed, pry it off, it�s just held in by clips on the top side.
Remove the 3 phillips screws shown:
Move back to the inside of the car and open the secret compartment, there will be 4 screws that you can see (2 on each side). Remove these.
Now at the base of the center console, pull up on the perforated leather armrest (its held down by clips), so you can have access to the 2 screws that hold down the base of the center console. Remove the 2 screws.
The center console should be free now, just slightly held in by the stock roll bar covers and 2 plugs: the trunk release plug and the power outlet plug. Unplug both of these so you can fully remove the center console from the car. The picture is of the backside of the center console, showing the plugs that need to be unplugged.
With this out of the way, you now have a gaping hole in the center of your car that will help with installing the rear legs of the bar. Your car should look like the picture below now, minus the bar already installed of course!
5. Adjusting the rear plastic corner panels out of the way
To allow room for the drill to drill straight down, I had to adjust the plastic panels out of the way. Just remove the 3 fasteners (each is a different type) and push it out of the way as shown. It takes a little finesse, but depending on how big your drill is, if you adjust it out of the way as much as I did, your drill will not be able to drill straight down and the panels won�t get in the way.
The driver side has a plug connected to it, so unplug the connector showed in the picture and then move the panel. 3 Fastener locations are circled, the passenger side has the same fasteners.
6. Mounting the Roll Bar main hoop
Put the main hoop in the car, and connect the rear legs using the hex bolt and nut. If you have the bare 4 point bar, meaning just the main hoop and legs, move on to the next step below. If you have the harness bar, I would recommend loosely mounting it to the main hoop right now before you are about to drill the main hoop legs because the legs on the main hoop have a little play. It would be bad to accidentally mount the legs too close to each other not allowing enough room for the harness bar to be attached. This goes the same for the rear legs and the 5point conversion bar if you have it. Loosely mount this bar connecting the two rear legs so that they are spaced correctly from each other.
The Japanese instructions tell you to scrape off all of the sound deadening material on the chassis (the gummy stuff) so the roll bar has a nice flat surface to mount to. Of all the pictures I�ve seen, most people don�t do it, probably because it�s a pain in the *** to do. But if you wanted to remove this material, most people bust out the dry ice and a scraper. I didn�t do it because I was lazy.
Heck, a lot of people don�t even cut the carpet up like I did, they just drill through the carpet and mount the bar on top of the carpet! You can do as you like, but at the bare minimum I suggest cutting the carpet because the bar follows the contours of the floor pan and mounting it over the carpet, I think, would make the bar sit funny. Not removing the sound deadening material isn�t so bad because when you tighten the backing plates and the bar, sandwiching the chassis, the material tends to get squished flat anyway.
Push the Main hoop back as far as you can, the mounting plate will hit the hump where the stock seat bolts to. Mounting the bar back as much as possible is VERY important because this will allow the rear legs to sit flat.
Make sure the main hoop is mounted as central as possible, there is enough room for the bar to be accidentally biased to one side of the car or the other so be careful and make sure that there is equal distance from the bar to the door sills on both sides.
Once you have the main hoop where you want it, cut the carpet, then position the carpet out of the way and set the bar on the chassis. You are ready to drill, reference the pictures to see which hole I drilled first. I drilled this single hole on each side just to keep the bar in position while I go to mount the rear bars. It might be easier to have a friend hold the bar in place while you drill, but is not necessary. Use your tap to put a pilot mark so your drill doesn�t slide all over the place, then begin drilling.
Mount the bolt in there, but don�t put the nut on the bottom yet. Just leave the bolt in the hole so the bar doesn�t slide forward. When I mounted the fronts down first, for some reason the rear legs were floating, so I just loosened up the front (leaving the bolt in) and allowed the rears to touch the chassis then I drilled the rears and everything was good�
7. Mounting roll bar rear legs
Jack up the rear of the car (use the bottom of the differential as the jack up point)
Mount your jack stands on the reinforced parts of the chassis (check your owners manual if you do not know where these are).
Remove the rear wheels.
I accessed the rear as shown below, this is where it pays to be on the smaller size:
First make sure the legs sit flat on the chassis.
Next is to find the perfect spot, this takes a little luck/guessing. Basically you need to set the base of the legs as close to the rubber grommet as possible (ie. towards the sides of the car).
If you set it too far from the rubber grommet (ie. towards the center of the car), you will end up drilling into a different part of the chassis where the backing plate cannot go.
I ended up marking the two rear most holes in the legs and drilling them out.
Then mounted the backing plate to the bottom of the chassis to make sure the plate is in the correct place (ie. not overlapping the rubber grommet) and to make sure the plate will fit fine.
Check to make sure the rear legs do not hit the stock roll bar covers. I have about 1-2mm clearance on mine.
Once confirmed these holes are fine, mark the other holes and drill them out. I was lazy and didn�t want to remove the legs completely, so I just pushed them out of the way to the side�If they are loosely mounted you will have enough play to do this as well, and drilled the holes.
Once all holes are drilled in the rear, mount the backing plates and install all bolts and nuts. Usually the lock washers go on the nut side. You can tighten these right now.
Picture below is the passenger side backing plate, notice if you have the rear legs in the correct position, the rubber grommet will fit directly where it should in the backing plate. You can also use this picture as a reference of how close the holes should be from the rubber grommet when you try to position it from above:
8. Back to the main hoop
You have 1 of 4 holes drilled already, drill the rest of them out, mount the backing plate, nuts and bolts.
9. Put the car back together!
*If you have the harness bar mounted, remove it so you can put the center console back. *Reverse the instructions on removing it to install it, don�t forget to plug the trunk release and power outlet plugs back in! Put the bottom of it in first (under the leather armrest near the shifter), then move the rest of it into place, lifting up the secret compartment will help because the hinges for it need to fit into a small slot. Mount it down under the leather armrest, then the two screws under the vented panels behind the seats, then the 3 screws on the back side of the secret compartment, then the 4 screws near the hinges of the secret compartment.
*Put the vented panel behind the seats back in, it just snaps back into place. I opted to leave all 4 hangers out, but you can put 2 back in for the cleaner look. I don�t think the 2 behind the main hoop bars fit in, so just leave those out (and its too late to put those in anyway, the bar is in the way!).
*Install the panel behind the center console, the top snaps in, the bottom screws in w/ 2 phillips screws.
*Reposition the plastic corner pieces back down, clip the plug back in on the driver side, install the 3 fasteners on both sides.
*Next you need to cut the plastic panel A cover to accommodate for the rear legs. Just cut two half circle shapes with your dremmel. Once this is done, install this panel and panel B back into place. I don�t have pictures of this, because I didn�t do it yet, but this should be easy to figure out how to do.
*Tighten all the nuts and bolts down on the mounting plates of the roll bar (if you haven�t done so already). Use a 12mm wrench to hold one side and a 12mm socket or wrench for the other.
*Mount the harness bar back onto the main hoop and proceed to tighten all bars (hex screw and nuts). Reinstall the rear wheels, lower the car back onto the ground.
*Make sure your seats are still in the forward most position on the sliders and put the seats in. Mount the rears of the seats first, slide the seat back, then mount the fronts.
*If you want to keep your spare tire, a relocator is included, but I just left mine out, the relocator would move the tire more into the middle of the already limited trunk space.
*Reinstall trunk interior pieces.
10. Checkup
Slowly put the top down. The only part that I noticed is that in the top down position, the cloth gets creased where the rear legs are, but there�s nothing to help this. Just make sure the legs don�t hit the glass (if you have a glass rear window).
Finished!
03-16-2008, 03:15 PM
#16
Honda-Tech Member
Join Date: Mar 2004
Location: London, UK
Posts: 7,536
Likes: 0
Received 0 Likes
on
0 Posts
Thanks to shamoo
Hardtop Install.
Thanks to searching around http://www.s2ki.com and https://honda-tech.com, I was able to complete this install without any issues. Before I begin, I would like to thank the poster who made this on S2KI, as I used his how-to thread quite a bit.
http://www.s2ki.com/forums/ind...10158
The following link was also helpful, and it's also included in the hardtop kit as a manual.
http://www.jayhondaaccessories...p.pdf
EDIT: The pictures are being displayed slightly smaller than I expected. I will fix later.
When the top is scheduled to be delivered, make sure someone is home to check for damage and possibly assist the driver in unloading the box. The box is 115lbs and quite large, so it may be awkward when lifting. Most of the box is empty space, reinforcements, and padding. Of the deliveries I've seen of hardtops on the forums, they come in a pretty large box truck, so make sure you don't live in a small development like me where it takes 30 minutes for the driver to figure out how to leave.

Here's the box right after unloading it from the truck. I made sure to ask the driver what the process is if there is any damage. He gave me his freight company's contact number, insurance number, as well as the sender of the hardtop's number (Hardtopguy).

There were a bunch of footprints and scratch marks all over the top of the box lid. I hope they took this advice.

When I opened the box, I realized that it would take nothing short of a nuclear blast to damage anything inside. It was packed VERY well, so I must thank Honda/Hardtopguy for this. Please note that member Davizzle of http://www.s2ki.com claimed the box, so it's his if he wants it.

Well, let's get on with the install. The first and easiest thing to do was to install the two rubber bumper/stoppers on the little metal tabs of the softop. They just slide right on. Make sure they're put on snugly, so when the top is closed, it doesn't put pressure on the fabric. When the top is fully opened, these rubber stoppers are meant to give cushion to the two halves of the top that fold onto each other. They don't touch currently, even with the hardtop pushing down on it. I guess it doesn't hurt to keep it there.


Next, you want to remove the door sills. I started on the driver's side, but the passenger side is exactly the same. I took pictures of the driver's side process because there is an extra wiring harness for the hardtop defroster system. The door sill is held on by 3 white plastic clips. Just pull up firmly and it will pop out. Make sure you collect the plastic clips if they fall to the ground. They will slide back into the back of the door sill for use again later.

I need to clean under there!


Back to looking at the instructions I printed out from http://www.s2ki.com/forums/ind...10158.

The next step is to remove the rear panel behind the driver's seat. When I slid the seat forward, I noticed some nice treasures. 25 cents for tolls and the comment card from my first HPDE event.


As you can see, the rear panel is held on by 8mm bolts that also have a Phillips screw head. I started with a screwdriver, but it felt as though I may strip the screw. Changed to a 8mm socket and it came right out. After the two "hooks" are removed, the entire panel can pop out. It's held on by a few clips, just stick your fingers under there and pull outward. Please note that the passenger side doesn't have hooks. They have a "blank" that pops out, which then exposes the same 8mm screw/bolt.


Next you want to remove the side panel. This is the next panel you see behind the door sill. The door sill was removed so that you can remove this panel. You will see a single self tapping Phillips screw holding this in place. Unscrew this and this panel also pops out. It's held in by one white retaining clip (same as in the door sill), and a bunch of other clips built into the panel.


This is what the area looks like when the panel is removed.

For some older year S2000s, I believe the next step may be a bit gruesome. I hear that you have to pound some of the inner body panel in so that it follows the curve of the outer frame. I was a bit hesitant on this step, but then I realized that AP2>AP1 and I didn't have to do anything. For reference, this is what my area looks like.

This is what the S2KI member's car looked like. He had to pound the metal in in the circled area.

My driver's side hardtop catcher fit without any modifications. A trick to mount it is to note that it won't sit flush right away. Don't tighten all the bolts until they are all in evenly. As you tighten each bolt millimeter by millimeter, you'll notice that the catcher will fit perfectly. You will notice a somewhat long wire harness coming from the driver's side catcher. This will be the defroster wiring. On older model S2000's, I believe you plug this directly into the only available 2 pin connector near the bottom of the door area. On mine, I couldn't find any available connectors. Through HT and S2KI, I discovered that I didn't read the instructions carefully enough. With the newer AP2s, the hardtop kit includes a Y connector. You can use this to connect all the wires together. Afterwards, you can use the included cushion tape to arrange the wires behind the panel. I didn't use the tape.


Next step is to replace the stock brushes that are attached to the side panel you just removed. You can see that the brushes are very similar, but the one to the right (supplied in hardtop kit) has a slightly larger opening in the brush area to allow for the hardtop "pin" to go through. The brushes are held on by 2 black self tapping Phillips screws. Very easy. Remove the old one, and put the new one on. At this point, if you have an older S2000, you will want to install the new hardtop strikers. They are included in the kit, if you need them. Unfortunately I didn't take pictures since I didn't use them. If you use the search feature, you will find several how-to's on installing hardtop strikers.


Now remember to do the exact same process on the passenger side. After spending quite a long time carefully figuring out the driver's side, the passenger side only took me ~10 minutes. Finally, let's go ahead and remove the hardtop from the box. Remember to get a helping hand when doing so. Imagine how pissed you would be if you just dropped your $3K hardtop on the concrete! Check again for damages/scratches. I didn't find any. I used the cardboard and bubble wrap that was provided in the box and layed it right down on the driveway.


Straight from Japan? JDM, y0! I see the color code, and some other characters that most likely translate to AP2>AP1.

Test fit it onto the car. This was a bit sketchy, as I was worried that I'd scratch the paint. I put some of the wrapping paper on the rear of the car in case my dad decided to get lazy and drop the top onto the rear deck. I found that this step isn't really necessary, as the top doesn't really get near the area. Additionally, there is a soft rubber pad that will touch the car before the glass does. I tried a few times to get everything aligned, but failed to carefully read the instructions. You must make sure you align and lock the FRONT of the top against the front window first. That will make things much easier. The front catcher/locks are VERY tight (at least mine was). I felt like it would almost snap in my hands before the top would actually lock into place. I'm confident that there will be no leaks.

Who's your daddy? That guy!

I also realized (as per the instructions) that I did not loosen the 4 bolts pictured below. Doing so will allow the entire rear portion of the top to be very loose. That way you can align and adjust the rear of the top against the catcher "hole". The silver bolts are 10mm and the black ones are 14mm.

That black lever is the thing that locks the top into place once it's fully laighned in the catcher "hole." You want to start with the lever toward the
front of the car (unlocked position). As you wiggle the top and get things aligned, you will feel the top "click" into place as you move the lever.


When the top is UNLOCKED and layed on the catcher "hole", it should be ~14mm from the car. When it's locked, it should be about 8mm or so. Many people have said that hardtops usually don't need to be adjusted/aligned at all, and it's perfect right from the box. Unforatunately mine was not. Fortunately, however, now I know how to do it, and it's very easy. Once set, it only takes a couple of minutes (with 2 people) to unlock and remove the top. After the alignment is set, you can go ahead and pop on the two plastic panels that were provided in the hardtop kit. That will cover up the exposed section with the 4 bolts. The panels popped in very easily, but for some reason I could not get the rear to set perfectly. It's hardly noticable so I left it alone. Maybe I'll take care of it another time.

The final two pictures below show the hardtop on and locked. The alignment is still off, as the passenger side was almost 3cm from the car in the locked position. I fixed it shortly afterwards.


One of my co-workers said it now looks like a Miata! Anyway, I love the way it looks and I can't wait to drive it around when the weather is nicer, and after a fresh wash this weekend. My next step is to remove the windshield tape on the front to expose the Grand Prix White underneath. Hopefully there are no paint issues underneath. I will be waiting until the summertime to complete this, as it's going to be hot, and it should peel easier.
So far my experiences in driving with the new hardtop...
The wind noise is virtually eliminated, however there is more of a "hollow" sound now. I am able to hear the engine and exhaust significantly more. The car stock sounds like my Integra with a 2.36" Apexi World Sport cat-back exhaust. The radio sounds much better probably because the sound can now reflect on something solid. It may not be as noticable with the OEM stereo, but I definitely noticed it with my Alpine system.
At first, I was slightly worried as to how that black plastic piece above the window would look against my all white car. Turns out, that it matches just fine. The inside of the car is dark, and the rear window has some dark accents. This is only my 1st day actually having the top, and the car is spending most of the day in my work's parking lot. There is going to be some light rain today, so hopefully everything works out okay.
In terms of driving, the top does not squeak at all which is great. I don't know if it's a placebo affect, but the car actually feels stiffer! When I'm turning, it almost feels as though I have a stiffer rear sway bar, and the rear may come around easier. I haven't tested this fully yet, but that's a pretty interesting effect I'm feeling. I doubt it's a placebo effect as I didn't expect any changes in handling at all. The extra "stiffness" may actually be there because when I turned into the steep sloped driveway at my girlfriend's, the rear tire actually lifted off the ground mid way turning up! It certainly never did that before. My suspension "mods" simply consist of Espelir ASD springs w/OEM shocks, and a Cusco front strut bar.
Hardtop Install.
Thanks to searching around http://www.s2ki.com and https://honda-tech.com, I was able to complete this install without any issues. Before I begin, I would like to thank the poster who made this on S2KI, as I used his how-to thread quite a bit.
http://www.s2ki.com/forums/ind...10158
The following link was also helpful, and it's also included in the hardtop kit as a manual.
http://www.jayhondaaccessories...p.pdf
EDIT: The pictures are being displayed slightly smaller than I expected. I will fix later.
When the top is scheduled to be delivered, make sure someone is home to check for damage and possibly assist the driver in unloading the box. The box is 115lbs and quite large, so it may be awkward when lifting. Most of the box is empty space, reinforcements, and padding. Of the deliveries I've seen of hardtops on the forums, they come in a pretty large box truck, so make sure you don't live in a small development like me where it takes 30 minutes for the driver to figure out how to leave.
Here's the box right after unloading it from the truck. I made sure to ask the driver what the process is if there is any damage. He gave me his freight company's contact number, insurance number, as well as the sender of the hardtop's number (Hardtopguy).
There were a bunch of footprints and scratch marks all over the top of the box lid. I hope they took this advice.
When I opened the box, I realized that it would take nothing short of a nuclear blast to damage anything inside. It was packed VERY well, so I must thank Honda/Hardtopguy for this. Please note that member Davizzle of http://www.s2ki.com claimed the box, so it's his if he wants it.
Well, let's get on with the install. The first and easiest thing to do was to install the two rubber bumper/stoppers on the little metal tabs of the softop. They just slide right on. Make sure they're put on snugly, so when the top is closed, it doesn't put pressure on the fabric. When the top is fully opened, these rubber stoppers are meant to give cushion to the two halves of the top that fold onto each other. They don't touch currently, even with the hardtop pushing down on it. I guess it doesn't hurt to keep it there.
Next, you want to remove the door sills. I started on the driver's side, but the passenger side is exactly the same. I took pictures of the driver's side process because there is an extra wiring harness for the hardtop defroster system. The door sill is held on by 3 white plastic clips. Just pull up firmly and it will pop out. Make sure you collect the plastic clips if they fall to the ground. They will slide back into the back of the door sill for use again later.
I need to clean under there!
Back to looking at the instructions I printed out from http://www.s2ki.com/forums/ind...10158.
The next step is to remove the rear panel behind the driver's seat. When I slid the seat forward, I noticed some nice treasures. 25 cents for tolls and the comment card from my first HPDE event.
As you can see, the rear panel is held on by 8mm bolts that also have a Phillips screw head. I started with a screwdriver, but it felt as though I may strip the screw. Changed to a 8mm socket and it came right out. After the two "hooks" are removed, the entire panel can pop out. It's held on by a few clips, just stick your fingers under there and pull outward. Please note that the passenger side doesn't have hooks. They have a "blank" that pops out, which then exposes the same 8mm screw/bolt.
Next you want to remove the side panel. This is the next panel you see behind the door sill. The door sill was removed so that you can remove this panel. You will see a single self tapping Phillips screw holding this in place. Unscrew this and this panel also pops out. It's held in by one white retaining clip (same as in the door sill), and a bunch of other clips built into the panel.
This is what the area looks like when the panel is removed.
For some older year S2000s, I believe the next step may be a bit gruesome. I hear that you have to pound some of the inner body panel in so that it follows the curve of the outer frame. I was a bit hesitant on this step, but then I realized that AP2>AP1 and I didn't have to do anything.
For reference, this is what my area looks like.This is what the S2KI member's car looked like. He had to pound the metal in in the circled area.
My driver's side hardtop catcher fit without any modifications. A trick to mount it is to note that it won't sit flush right away. Don't tighten all the bolts until they are all in evenly. As you tighten each bolt millimeter by millimeter, you'll notice that the catcher will fit perfectly. You will notice a somewhat long wire harness coming from the driver's side catcher. This will be the defroster wiring. On older model S2000's, I believe you plug this directly into the only available 2 pin connector near the bottom of the door area. On mine, I couldn't find any available connectors. Through HT and S2KI, I discovered that I didn't read the instructions carefully enough. With the newer AP2s, the hardtop kit includes a Y connector. You can use this to connect all the wires together. Afterwards, you can use the included cushion tape to arrange the wires behind the panel. I didn't use the tape.
Next step is to replace the stock brushes that are attached to the side panel you just removed. You can see that the brushes are very similar, but the one to the right (supplied in hardtop kit) has a slightly larger opening in the brush area to allow for the hardtop "pin" to go through. The brushes are held on by 2 black self tapping Phillips screws. Very easy. Remove the old one, and put the new one on. At this point, if you have an older S2000, you will want to install the new hardtop strikers. They are included in the kit, if you need them. Unfortunately I didn't take pictures since I didn't use them. If you use the search feature, you will find several how-to's on installing hardtop strikers.
Now remember to do the exact same process on the passenger side. After spending quite a long time carefully figuring out the driver's side, the passenger side only took me ~10 minutes. Finally, let's go ahead and remove the hardtop from the box. Remember to get a helping hand when doing so. Imagine how pissed you would be if you just dropped your $3K hardtop on the concrete! Check again for damages/scratches. I didn't find any. I used the cardboard and bubble wrap that was provided in the box and layed it right down on the driveway.
Straight from Japan? JDM, y0! I see the color code, and some other characters that most likely translate to AP2>AP1.
Test fit it onto the car. This was a bit sketchy, as I was worried that I'd scratch the paint. I put some of the wrapping paper on the rear of the car in case my dad decided to get lazy and drop the top onto the rear deck. I found that this step isn't really necessary, as the top doesn't really get near the area. Additionally, there is a soft rubber pad that will touch the car before the glass does. I tried a few times to get everything aligned, but failed to carefully read the instructions. You must make sure you align and lock the FRONT of the top against the front window first. That will make things much easier. The front catcher/locks are VERY tight (at least mine was). I felt like it would almost snap in my hands before the top would actually lock into place. I'm confident that there will be no leaks.
Who's your daddy? That guy!
I also realized (as per the instructions
) that I did not loosen the 4 bolts pictured below. Doing so will allow the entire rear portion of the top to be very loose. That way you can align and adjust the rear of the top against the catcher "hole". The silver bolts are 10mm and the black ones are 14mm. That black lever is the thing that locks the top into place once it's fully laighned in the catcher "hole." You want to start with the lever toward the
front of the car (unlocked position). As you wiggle the top and get things aligned, you will feel the top "click" into place as you move the lever.
When the top is UNLOCKED and layed on the catcher "hole", it should be ~14mm from the car. When it's locked, it should be about 8mm or so. Many people have said that hardtops usually don't need to be adjusted/aligned at all, and it's perfect right from the box. Unforatunately mine was not. Fortunately, however, now I know how to do it, and it's very easy. Once set, it only takes a couple of minutes (with 2 people) to unlock and remove the top. After the alignment is set, you can go ahead and pop on the two plastic panels that were provided in the hardtop kit. That will cover up the exposed section with the 4 bolts. The panels popped in very easily, but for some reason I could not get the rear to set perfectly. It's hardly noticable so I left it alone. Maybe I'll take care of it another time.
The final two pictures below show the hardtop on and locked. The alignment is still off, as the passenger side was almost 3cm from the car in the locked position. I fixed it shortly afterwards.
One of my co-workers said it now looks like a Miata!
Anyway, I love the way it looks and I can't wait to drive it around when the weather is nicer, and after a fresh wash this weekend. My next step is to remove the windshield tape on the front to expose the Grand Prix White underneath. Hopefully there are no paint issues underneath. I will be waiting until the summertime to complete this, as it's going to be hot, and it should peel easier.So far my experiences in driving with the new hardtop...
The wind noise is virtually eliminated, however there is more of a "hollow" sound now. I am able to hear the engine and exhaust significantly more. The car stock sounds like my Integra with a 2.36" Apexi World Sport cat-back exhaust. The radio sounds much better probably because the sound can now reflect on something solid. It may not be as noticable with the OEM stereo, but I definitely noticed it with my Alpine system.
At first, I was slightly worried as to how that black plastic piece above the window would look against my all white car. Turns out, that it matches just fine. The inside of the car is dark, and the rear window has some dark accents. This is only my 1st day actually having the top, and the car is spending most of the day in my work's parking lot. There is going to be some light rain today, so hopefully everything works out okay.
In terms of driving, the top does not squeak at all which is great. I don't know if it's a placebo affect, but the car actually feels stiffer! When I'm turning, it almost feels as though I have a stiffer rear sway bar, and the rear may come around easier. I haven't tested this fully yet, but that's a pretty interesting effect I'm feeling. I doubt it's a placebo effect as I didn't expect any changes in handling at all. The extra "stiffness" may actually be there because when I turned into the steep sloped driveway at my girlfriend's, the rear tire actually lifted off the ground mid way turning up! It certainly never did that before. My suspension "mods" simply consist of Espelir ASD springs w/OEM shocks, and a Cusco front strut bar.
04-08-2008, 03:31 PM
#18
Junior Member
Join Date: May 2004
Location: nj
Posts: 359
Likes: 0
Received 0 Likes
on
0 Posts
bunch of people been aksing about the TB spacer on my car, so i threw this together.....
got my TB spacer from rob little bit ago. Here's a few pics of what is needed to modify for install.
I didn't take pics of the first few steps but they are pretty self explanitory.
step 1: remove upper intake tube that goes into TB
step 2: remove the sensor clips and lower coolant line from TB
step 3: remove the TB cable by losening the lock nut, you have to losen the bottom nut all the way down so the cable will come out of the bracket, you'll see what I mean when you do it.
step 4: remove the two bolts and two nuts that hold the TB on
step 5: remove the TB
step 6: scrape the old TB gasket off the manifold or TB whichever it sticks to.
step 7: remove the two studs in the manifold that held the TB on,these will be replaced my the bolts p2r supplied with the kit. can use pliers or "double nut" method.
step 8: reinstall the TB with the gaskets on each side, make sure to line them up so they match the ports on the TB. Use the four bolts and four washers supplied with the spacer.
step 9: plug all the sensors back in the TB
step 10: you have to remount the TB cable bracket so the cable will reach. here's some pics....
how it is stock.....
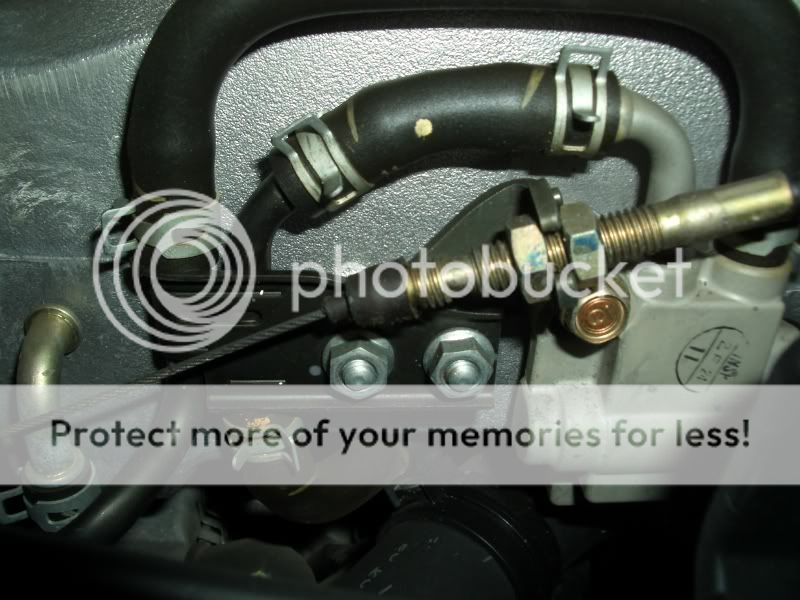
how i moved it. p2r says there is a replacement bracket in the works, and should be released shortly. for now this is what i did.....

you can see i basically took the bracket and slid it down one post and moved it to the outside of the bracket that holds the coolant lines. i have been running it this way for a while now and it doesn't move at all.
step 11: you have to extend the lower coolant line. i just used some hose i had laying around in my "honda parts box" here's a pic

step 12: replace the intake, I have the injen cold air and mine fit fine with a little adjusting.
here's how it should look when complete.....notice the p2r engraving is on the side and the nitrous port is on the bottom(not seen)

got my TB spacer from rob little bit ago. Here's a few pics of what is needed to modify for install.
I didn't take pics of the first few steps but they are pretty self explanitory.
step 1: remove upper intake tube that goes into TB
step 2: remove the sensor clips and lower coolant line from TB
step 3: remove the TB cable by losening the lock nut, you have to losen the bottom nut all the way down so the cable will come out of the bracket, you'll see what I mean when you do it.
step 4: remove the two bolts and two nuts that hold the TB on
step 5: remove the TB
step 6: scrape the old TB gasket off the manifold or TB whichever it sticks to.
step 7: remove the two studs in the manifold that held the TB on,these will be replaced my the bolts p2r supplied with the kit. can use pliers or "double nut" method.
step 8: reinstall the TB with the gaskets on each side, make sure to line them up so they match the ports on the TB. Use the four bolts and four washers supplied with the spacer.
step 9: plug all the sensors back in the TB
step 10: you have to remount the TB cable bracket so the cable will reach. here's some pics....
how it is stock.....
how i moved it. p2r says there is a replacement bracket in the works, and should be released shortly. for now this is what i did.....
you can see i basically took the bracket and slid it down one post and moved it to the outside of the bracket that holds the coolant lines. i have been running it this way for a while now and it doesn't move at all.
step 11: you have to extend the lower coolant line. i just used some hose i had laying around in my "honda parts box" here's a pic
step 12: replace the intake, I have the injen cold air and mine fit fine with a little adjusting.
here's how it should look when complete.....notice the p2r engraving is on the side and the nitrous port is on the bottom(not seen)
07-10-2008, 04:46 AM
#19
Honda-Tech Member
If you guys want, email me all of your DIYs and send me the images too. I'll host them on my site and create a collection that way the pictures will never be broken.
Email all your DIY/How-Tos to sean@springrates.com. I've been wanting to compose a list of S2000 DIYs for a while now.
Email all your DIY/How-Tos to sean@springrates.com. I've been wanting to compose a list of S2000 DIYs for a while now.
08-08-2008, 06:03 AM
#20
i ♥ my honda
Global Mod
Global Mod
Clutch Replacement:
(I did NOT write this, grabbed it from another website.)
Ill start under the hood by doing these in this order:
Tools: 12mm,10mm,14mm combo wrenches, 10mm,12mm,14mm sockets
14mm flex socket, 24"12" extensions, ratchet wrenches, a long handle makes it real easy to
loosen the tensioner. +/ - screwdrivers, torque wrenches, clutch alignment tool. Flashlight.
1 Remove air box, 10mm heads / Battery terminals 10mm stubby wrench
2 Accessory belt, 14mm head on a breaker bar for the tensioner
3 Heat shield on manifold, 12mm heads (I say heads because the threads are stated in manual)
4 Battery heat shield, 10mm Last bolt just loosens
5 Alternator top bolt out, loosen lower, 14mm
6 A/C pump bolts loosen 2x 14mm on top, remove forward most top bolt, disconnect wire from under car later
7 Disconnect two sensor plugs on head by the firewall
8 Disconnect vacuum hose (the one shown in manual at rear of head ((suction valve))
9 Mark steering joint, and remove 10mm bolt at front (other bolt loosened later)Make sure steering wheel is locked straight.
10 Swing alternator out a bit to get to upper starter bolt, 14mm remove but leave bolt resting on alternator,
YOU WILL WANT A 14mm FLEX SOCKET . . . + about 24" of extension, I recommend using duct tape so you wont drop the socket amid all the hoses and wires. You get at this bolt from an angle, and directly between the throttle body and alternator.
11 Disconnect power steering connectors, one big and one small (electrical)
12 Loosen exhaust manifold bolts at head 12mm (Keep Snug)
13 Remove 14mm bolt at rear of intake manifold, wiring harness support bar
14 Raise car, I recommend at least 24" clearance at body jack points. I managed to get here in 18 min.
When under car you will want these
10mm combo wrench, I use a gearwrench
12mm,14mm,17mm combo wrenches
12mm deep,12mm,14mm, 17mm socket, 6mm hex socket (short as possible)
24" and 12" extensions you'll need at least 36" for the top tranny bolts
Small crook needle nose pliers for removing plastic snap in wire holders
Ratchets, 3/8" and 1/2" drive with 1/2 to 3/8 adapter
Impact wrench with 17mm, 19mm deep sockets or short extension.
1 Remove splash shield
2 Remove front engine bump stop (I just leave mine off now)
3 Loosen rear steering joint bolt and slide joint back to disconnect, 10mm
4 Disconnect A/C wire and remove remaining bolts from pump (3)
5 Remove cable ground wire to engine block
6 Remove 14mm bolt on lower wiring harness support bar
7 Remove clutch slave cyl. 12mm open end wrench
8 Disconnect 02 sensor connectors, and tranny wiring harness
9 Remove cat. conv. use the deep 12mm socket and box end 12 wrench for the front two, 14mm combo for the rear
10 Loosen 3 lower driveshaft bolts(on each end), 6mm hex, if you cant get the wrench in there, remember the
shaft slides on cv joints. Parking brake should be on.
11 Remove 14mm bolts on exhaust manifold support, remove manifold. When your're up top again to remove
the manifold nuts, release the parking brake, and remove the shifter ****/lever. 10mm heads
12 Remove 19mm subframe bolts (The middle ones that come out)
13 Turn driveshaft 180*
14 Remove bolts that connect shifter box to tranny tunnel, 10mm
15 Loosen lower tranny to engine bolts, 14mm/17mm
16 Put the brake back on, then loosen the other 3 driveshaft bolts (each end) Mark driveshaft if it is not yet, and remove.
Now its time to support the subframe, I just use a 24" 2x4 on a jack placed under the front beam and the oil pan.
when supported, back out the front subframe bolts 3" (19mm) and the rear subframe bolts 3" (17mm)
When the subframe comes down a bit you can see exactly how for to back out the bolts by looking at the gap in the
threads.
With the subframe lowered and supported by the bolts you can now get to the top tranny bolts. (17mm)
Support the tranny and remove the 3 tranny crossbeam bolts at rear, remember to pull out the release fork
so the tranny will come all the way off the engine.
For the clutch you will need 12 point sockets, 10mm for the pressure plate, and 17mm for the flywheel.
I'll undo the PP bolts just by hand in a crisscross pattern, they aren't that tight. For the flywheel bolts,
I'll zip out those with a low power impact wrench so I don't need a flywheel holder. If you have a Toda
flywheel, you can use a 14mm deep socket through those holes to hold the FW. If not you can use a big
screwdriver or prybar to hold the starter teeth on the FW. When putting the tranny back in, remember to
have to alignment pins in place, and that perfect alignment between tranny/engine is just as important
as a clutch alignment tool. It will slip right on
When putting the cat back in, it will be good to leave the exhaust man. loose, sometimes it's a tight fit with
aftermarket cat-back systems.
The plastic white ring around the inner shift boot comes out a special way, you will see little arrows that
point to where the barbs are. Take a small but long flat head screwdriver and insert just inside the ring
through the hole in the rubber boot while lifting on the boot at the same time.
I have found that the clutch change has a negligible effect on the front end alignment.
Remember this is my quick way of pulling my tranny, I may have left something out, so double check with
the manual before starting. So there you have it, and I'm going out in a few to do it again . . .
OH yeah, none of my clutch discs have exhibited any undue wear, just a bit of scorching - so you may be better off with an OEM disc and a heavy duty PP. Im working on the noise thing, with interesting results.
09-22-2008, 06:16 AM
#21
i ♥ my honda
Global Mod
Global Mod
Originally Posted by shamoo
Recently I decided to finally get rid of my daily driver Civic since it cost a little too much money constantly fixing it. My 07 S2000 has now become my daily driver, which I have been basically driving daily anyway. Warranty just finished ~800 miles ago and now I don't have a car to carry things in.
....until now....
I did some searching on hitch solutions for the S2000 and decided on the Chase Race system. You can check out http://www.chaserace.com for more details. The system was ~$450 or so. I also purchased the wiring harness. With shipping and everything, it came out to just about $550. It's more expensive than some other hitches, and definitely more than the home-made ones, but that's okay.
It came by UPS about a week later fresh from Doug Chase's powdercoater guy. The parts box was a bit beat up, but nothing was missing. Doug also stuck on a sticker, which I left on there because I thought it was pretty neato looking. :D It also came packaged REALLY nice. It took me quite a few minutes to remove all that stuck on cardboard.


You first have to remove the rear bumper. There are 3 clips on top that are visible when you open the trunk. The come out pretty easily with a flathead screwdriver. Pop the middle up, and the entire clip pops out.

There are also 2 screws in each rear wheel well (towards the top and rear) that need to be removed. It was a bit of a pain to remove since the tire was in the way. I would recommend removing the rear tires. In my case, it wasn't feasible since I drove up on ramps. Since there was only a wooden block holding the front wheels, I didn't want the car rolling back on me.
Put a bit of painters tape on the bottom of the fender where the bumper meets. As you pull the sides of the bumper outward, you don't want to accidentally hit the metal. After that, just pull the entire bumper toward the rear. Remember to remove the wire harness that connects to the license plate light. It was so dirty that I could hardly see what to grab on the clip.
Oh yeah, there are also two more clips underneath the bumper on the black plastic portion. The clips there did me in, as I was not successful in removing them nicely. I eventually snapped them off. They are still off after I finished, but I will zip tie it back another time.
Here's what it should look like once off.


Look how loaded with pebbles it is under there.

I also accidentally clipped the left taillight a bit. Grr!! You can see the yellow circled portion.

I know my 255 rears aren't as meaty as some of yours, but it looks it from here. I'm used to tiny little Civic/Integra 195-205mm tires from back in the day. For suspension, I only have those Espelir ASD springs. Yep, need new tires soon.

The problem I had was that I had a Buddy Club Pro Spec dual exhaust system. The portion where the exhaust pipes split was too far back compared to the OEM system. Thus, I was not able to use my Buddy Club with this hitch. It wasn't necessarily a bad thing, as I thought my Buddy Club was waaaay too loud. I was happy to go back to OEM. If anyone's interested, it's for sale. Here, I finally removed the pipes to the Buddy Club.

The Chase Race hitch comes with two plates that attach to the rear of the bumper support. The entire support is easily removed with only 5 bolts. 2 on the passenger side, and 3 on the driver's side. 12mm bolts that aren't that tight at all. Install the plates as shown but do not tighten them down yet. I learned this the hard way because I had to loosen them so many times to get things to line up.


You can see here where the plate sandwiches between.

Unfortunately, because of this, the entire bumper support now mounts a few millimeters more back. You will see in a later picture that the little bumper plug for the tow hook now hits the metal inside. It doesn't pop off, but it does stick out a bit. I will have to figure out what to do with that later.
Now you will want to work on the rear mount of the hitch. It comes with a plate that you must attach to the lower differential bracket/mount thing. Remove the two 14mm bolts (which were surprisingly not that tight), mount the plate, and reattach with the supplied longer bolts. Here you can also see that the OEM exhaust gives you plenty of room to put this in. With the Buddy Club, this entire area is taken up by the pipe split.

Now, I didn't take much more pictures here because I started getting frustrated with the alignment. Like I said previously, make sure the metal plates on each side of the exhaust are loose, because otherwise you won't be able to slide the hitch joints into them. You are able to adjust the height of the entire hitch by quite a bit. It can mount quite lower (so the bar is closer to the ground), but why would you want to do that with a lowered car? I mounted it as close to the top as I could. In this picture, it's at it's maximum height. While the car was jacked up and on the ramps, it looked a bit funny having the hitch so low, but when the car is finally lowered, it looked perfect. I took a few pictures from different angles so you can see how it looks and how far it sticks out. Overall, I'm happy with the final product.
You can also see where the stupid little bumper/tow hook cover sticks out.


Okay....so I wasn't done yet. The day was still young, and I still need to transport my bikes somehow, right?
Went to my local bike shop and purchased the T2 Thule bike carrier. It's the model 917 with the 1.25 inch receiver.

I wasn't prepared for how much it actually cost. $370something plus tax or whatever. But it came out to $420. Whoops! Heehee.

So I opened it up... I think if Optimus Prime blew up, I would have better luck putting him together than working with these metal parts. I started looking through the instructions, which did me absolutely no good. I eventually figured it out without the manual and went at it.

Stuck it all in, and started testing it out with my bikes. Eventually tightened everything down and voila!


The entire hitch also folds up against the car pretty easily too. There's a little lever there that you hold and it moves up. I tested driving the car (without the bikes) and everything was solid. Tomorrow I'm going to Diablo Freeride Park for the first time with my S2000. Let's see how it goes!
Hope you enjoyed...
....until now....
I did some searching on hitch solutions for the S2000 and decided on the Chase Race system. You can check out http://www.chaserace.com for more details. The system was ~$450 or so. I also purchased the wiring harness. With shipping and everything, it came out to just about $550. It's more expensive than some other hitches, and definitely more than the home-made ones, but that's okay.
It came by UPS about a week later fresh from Doug Chase's powdercoater guy. The parts box was a bit beat up, but nothing was missing. Doug also stuck on a sticker, which I left on there because I thought it was pretty neato looking. :D It also came packaged REALLY nice. It took me quite a few minutes to remove all that stuck on cardboard.
You first have to remove the rear bumper. There are 3 clips on top that are visible when you open the trunk. The come out pretty easily with a flathead screwdriver. Pop the middle up, and the entire clip pops out.
There are also 2 screws in each rear wheel well (towards the top and rear) that need to be removed. It was a bit of a pain to remove since the tire was in the way. I would recommend removing the rear tires. In my case, it wasn't feasible since I drove up on ramps. Since there was only a wooden block holding the front wheels, I didn't want the car rolling back on me.
Put a bit of painters tape on the bottom of the fender where the bumper meets. As you pull the sides of the bumper outward, you don't want to accidentally hit the metal. After that, just pull the entire bumper toward the rear. Remember to remove the wire harness that connects to the license plate light. It was so dirty that I could hardly see what to grab on the clip.
Oh yeah, there are also two more clips underneath the bumper on the black plastic portion. The clips there did me in, as I was not successful in removing them nicely. I eventually snapped them off. They are still off after I finished, but I will zip tie it back another time.
Here's what it should look like once off.
Look how loaded with pebbles it is under there.
I also accidentally clipped the left taillight a bit. Grr!! You can see the yellow circled portion.
I know my 255 rears aren't as meaty as some of yours, but it looks it from here. I'm used to tiny little Civic/Integra 195-205mm tires from back in the day. For suspension, I only have those Espelir ASD springs. Yep, need new tires soon.
The problem I had was that I had a Buddy Club Pro Spec dual exhaust system. The portion where the exhaust pipes split was too far back compared to the OEM system. Thus, I was not able to use my Buddy Club with this hitch. It wasn't necessarily a bad thing, as I thought my Buddy Club was waaaay too loud. I was happy to go back to OEM. If anyone's interested, it's for sale.
Here, I finally removed the pipes to the Buddy Club.The Chase Race hitch comes with two plates that attach to the rear of the bumper support. The entire support is easily removed with only 5 bolts. 2 on the passenger side, and 3 on the driver's side. 12mm bolts that aren't that tight at all. Install the plates as shown but do not tighten them down yet. I learned this the hard way because I had to loosen them so many times to get things to line up.
You can see here where the plate sandwiches between.
Unfortunately, because of this, the entire bumper support now mounts a few millimeters more back. You will see in a later picture that the little bumper plug for the tow hook now hits the metal inside. It doesn't pop off, but it does stick out a bit. I will have to figure out what to do with that later.
Now you will want to work on the rear mount of the hitch. It comes with a plate that you must attach to the lower differential bracket/mount thing. Remove the two 14mm bolts (which were surprisingly not that tight), mount the plate, and reattach with the supplied longer bolts. Here you can also see that the OEM exhaust gives you plenty of room to put this in. With the Buddy Club, this entire area is taken up by the pipe split.
Now, I didn't take much more pictures here because I started getting frustrated with the alignment. Like I said previously, make sure the metal plates on each side of the exhaust are loose, because otherwise you won't be able to slide the hitch joints into them. You are able to adjust the height of the entire hitch by quite a bit. It can mount quite lower (so the bar is closer to the ground), but why would you want to do that with a lowered car? I mounted it as close to the top as I could. In this picture, it's at it's maximum height. While the car was jacked up and on the ramps, it looked a bit funny having the hitch so low, but when the car is finally lowered, it looked perfect. I took a few pictures from different angles so you can see how it looks and how far it sticks out. Overall, I'm happy with the final product.
You can also see where the stupid little bumper/tow hook cover sticks out.
Okay....so I wasn't done yet. The day was still young, and I still need to transport my bikes somehow, right?
Went to my local bike shop and purchased the T2 Thule bike carrier. It's the model 917 with the 1.25 inch receiver.
I wasn't prepared for how much it actually cost. $370something plus tax or whatever. But it came out to $420. Whoops! Heehee.
So I opened it up... I think if Optimus Prime blew up, I would have better luck putting him together than working with these metal parts. I started looking through the instructions, which did me absolutely no good. I eventually figured it out without the manual and went at it.
Stuck it all in, and started testing it out with my bikes. Eventually tightened everything down and voila!
The entire hitch also folds up against the car pretty easily too. There's a little lever there that you hold and it moves up. I tested driving the car (without the bikes) and everything was solid. Tomorrow I'm going to Diablo Freeride Park for the first time with my S2000. Let's see how it goes!
Hope you enjoyed...
12-07-2008, 08:33 AM
#22
Junior Member
Join Date: Dec 2008
Location: Fort Lauderdale, FL
Posts: 377
Likes: 0
Received 0 Likes
on
0 Posts
here's my contribution since I didn't see it covered already...
word, so you've got your S, now make sure you're taking care of it here's all the info I have at the moment to keep care of your S2000's top.
*** the first mod is the fix for the rag top elastic straps that wear out. this will cause the top to not fold down as far as it should or in an extreme case, keep it from folding down at all. if you get the stock replacements from the dealer they're riveted in and it'll be a big mission to replace. www.modifry.com sells replacement parts that lock into the rivets so all you have to do is cut out the old straps and put in the new ones, no drilling. I did this mod start to finish in 15 minutes including reading the directions first. I'd say even a newb could do this no problem
http://www.modifry.com/products/ctf/index.htm
*** the next thing is to make sure the rubber seals for the top don't dry out. this will keep you from having leaks and also keep the seals from making noise. the gangster stuff to use is Shin-Etsu grease, Honda part #08798-9013. this is job is easy, just takes a little time. just dab a little on your finger and rub it onto all the rubber seals on the top. there's a seal that goes around the front windshield, then on the top itself there's seals around the side windows. if your seals were a little dry like mine you'll sell the rubber shine up kinda like using armor all as the grease soaks in. a little of this stuff goes a long way! the bottle you get from the dealer would last ten S2000 owners a lifetime! so don't go too crazy or you'll have a mess
http://www.hondaautomotiveparts.com/...VIN+Number+---
*** now for the top itself, S2000 convertible tops are made of vinyl, even though it looks like fabric to me, smarter people than me say otherwise I tried RaggTopp brand cleaner and protectant and it worked great! it's pretty simple to use, just wet the top and spray the cleaner stuff on. then brush with a gentle brush or rag to loosen everything and rinse the top off really good when you're done. I did this first when I was washing the car since you make a little bit of a mess and I didn't want that stuff on the paint. once I finished cleaning the whole car and the top was dry I used the RaggTopp vinyl protectant. they suggest you put the protectant on every 3-5 weeks to keep the top from fading, it's kinda like sunblock for the top. I'm gonna do it every 3 weeks and see how that works, Florida's sun can be brutal. autogeek suggests getting a good convertible protectant onto the top as soon as possible to get the most life out of it and to keep it from fading. I have one other brand of cleaner and protectant coming just to try, autogeek rated that product high like the RaggTopp.
here's autogeek's section on ragtop care...
http://www.autogeek.net/covtopplas.html
word, so you've got your S, now make sure you're taking care of it
here's all the info I have at the moment to keep care of your S2000's top.*** the first mod is the fix for the rag top elastic straps that wear out. this will cause the top to not fold down as far as it should or in an extreme case, keep it from folding down at all. if you get the stock replacements from the dealer they're riveted in and it'll be a big mission to replace. www.modifry.com sells replacement parts that lock into the rivets so all you have to do is cut out the old straps and put in the new ones, no drilling. I did this mod start to finish in 15 minutes including reading the directions first. I'd say even a newb could do this no problem
http://www.modifry.com/products/ctf/index.htm
*** the next thing is to make sure the rubber seals for the top don't dry out. this will keep you from having leaks and also keep the seals from making noise. the gangster stuff to use is Shin-Etsu grease, Honda part #08798-9013. this is job is easy, just takes a little time. just dab a little on your finger and rub it onto all the rubber seals on the top. there's a seal that goes around the front windshield, then on the top itself there's seals around the side windows. if your seals were a little dry like mine you'll sell the rubber shine up kinda like using armor all as the grease soaks in. a little of this stuff goes a long way! the bottle you get from the dealer would last ten S2000 owners a lifetime! so don't go too crazy or you'll have a mess
http://www.hondaautomotiveparts.com/...VIN+Number+---
*** now for the top itself, S2000 convertible tops are made of vinyl, even though it looks like fabric to me, smarter people than me say otherwise
I tried RaggTopp brand cleaner and protectant and it worked great! it's pretty simple to use, just wet the top and spray the cleaner stuff on. then brush with a gentle brush or rag to loosen everything and rinse the top off really good when you're done. I did this first when I was washing the car since you make a little bit of a mess and I didn't want that stuff on the paint. once I finished cleaning the whole car and the top was dry I used the RaggTopp vinyl protectant. they suggest you put the protectant on every 3-5 weeks to keep the top from fading, it's kinda like sunblock for the top. I'm gonna do it every 3 weeks and see how that works, Florida's sun can be brutal. autogeek suggests getting a good convertible protectant onto the top as soon as possible to get the most life out of it and to keep it from fading. I have one other brand of cleaner and protectant coming just to try, autogeek rated that product high like the RaggTopp.here's autogeek's section on ragtop care...
http://www.autogeek.net/covtopplas.html
05-16-2009, 08:47 AM
#23
Honda-Tech Member
Join Date: Jun 2004
Location: St. Paul, MN, U.S. of A
Posts: 1,072
Likes: 0
Received 0 Likes
on
0 Posts

Thread
Thread Starter
Forum
Replies
Last Post
Moderators Owned Me
Honda Prelude
12
10-05-2006 02:12 PM