
LED taillights
 02-01-2011, 11:44 AM
#1
Honda-Tech Member
Thread Starter

I saw a 92 hatch with LED taillights that looked stock, they were behind red plastic. I've been looking for a write up on how to do that to my 90 dx. The only thing I saw was for that same model and the person said it was impossible, I saw it the other day so clearly it isn't. Can anyone send me in the right direction?
 02-01-2011, 01:01 PM
#2
Honda-Tech Member
this might help you
Am in the process of making a new set, but these where my old ones:
Right then Chaps, this is really very easy. All you have to do is get a great big Hammer, then�.
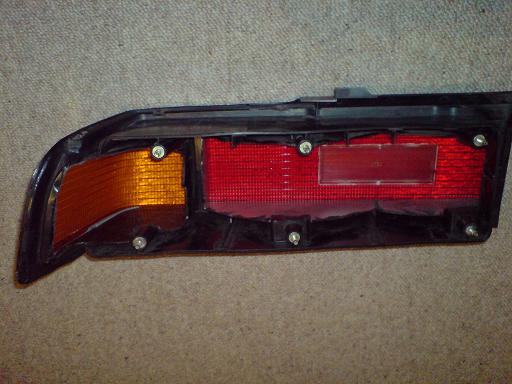
1. Prepare the cluster by cutting away the plastic
2. Choose a design for your lights
Make yourself a design from a 9 x 37 grid.
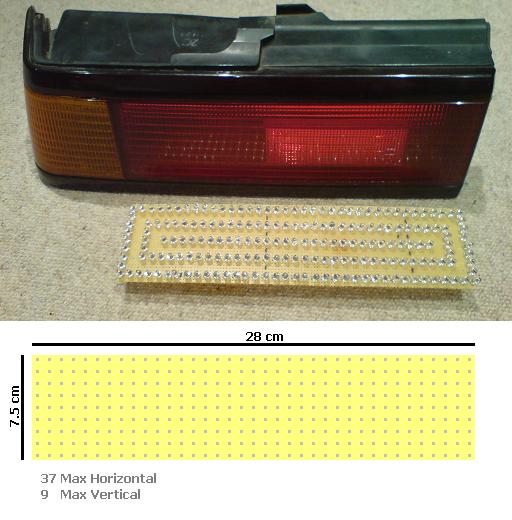
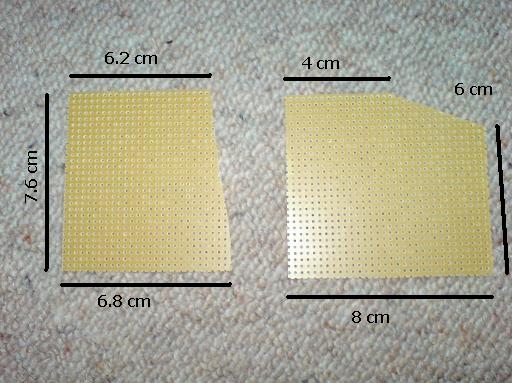
3. Measure the hole you made and cut a Circuit board to fit.
These images are of the shapes I used for the indicators.
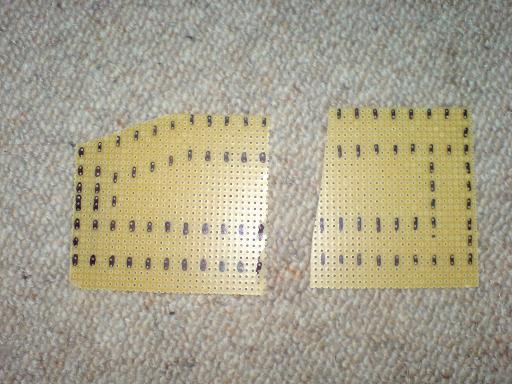
4. Draw your design onto your circuit board.
Drawing the design on makes it easier to put the LEDs in later, because you don't have to recount the holes. It also allows you to double check exactly how many LEDs you need.
5. Once you know how many LEDs you need use this website http://led.linear1.org/led.wiz to determine your design.
It's a great website that clearly shows you how many LEDs you have to solder in serial and how many resistors you need. It also tells you what strength resistors you need.
The picture below is an example I used for the Break Light.
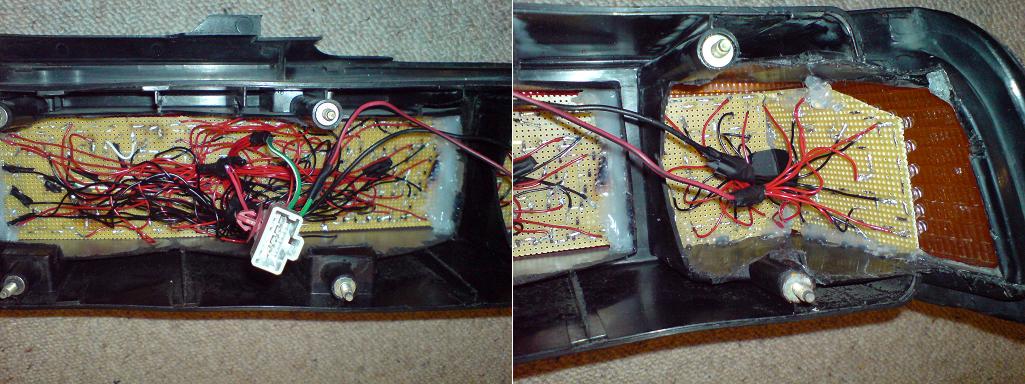
6. Now mount your LEDs onto the circuit board.
- LEDs are directional. Look at the Head of the LED. Inside the LED, the shorter part is the positive side.
- I cut the pins short, put the LEDs through the circuit board holes and then bend the pins down to keep them in place. This makes it easily to solder them together.
- At the end of a row of LEDs you need to solder in the resistor to the negate end. I chose to thread the resistor through the Circuit board.
The resistors get EXTREMELY hot when you solder them on.

7. Connect all your lots of serial LEDs in parallel.
- Solder Red cables to the positive ends of the LED strings and Black to the negative end and then solder all same colored ends together.
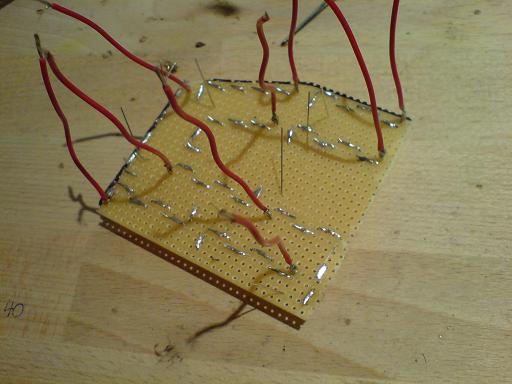
8. Connect the Voltage Regulators
This is the circuit diagram I made
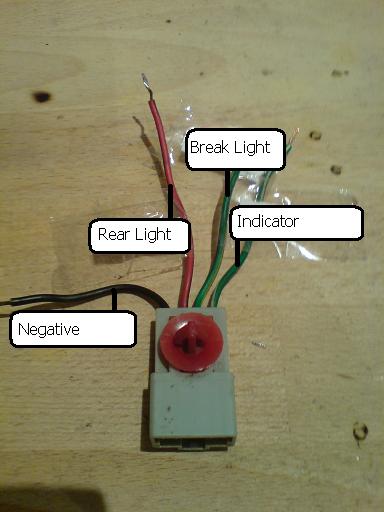
9. Cut the connector from the bulb sockets and connect it to the Voltage regulators.
Another picture to follow
10. Solder the Ground wire from the Voltage Regulator to a ground point.
I have chosen to solder it to the screw mount which firmly sits on the car.
Picture to follow soon.

11. Glue the circuit board into place
- I used a hot glue gun, so I can remove the circuit board again if I have to.
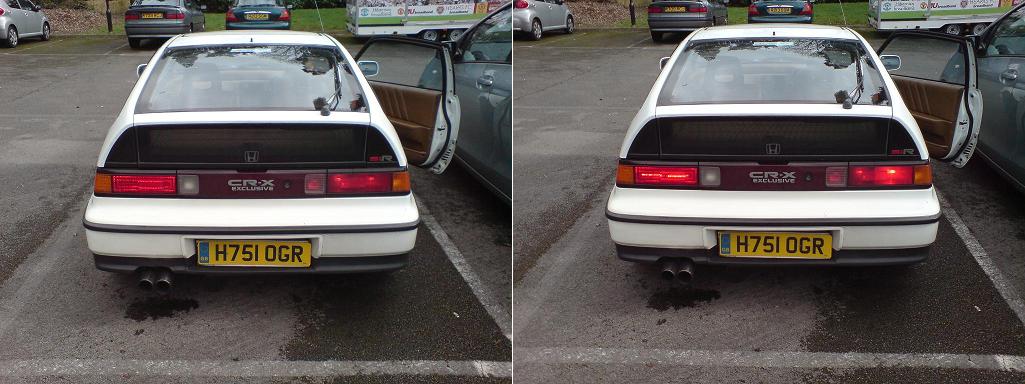
Now that you have spent hours slaving on your kitchen desk, stand back and look at your results.
Here are some pictures of the cluster on my car in comparison to the standard light
Tips I picked up along the way / Questions
- Should I convert the indicators aswell?
In my opinion: No.
If you have decided to convert the Indicators aswell, then you need to change the flasher relay under your steering wheel.
- What strength LEDs should I buy?
I choose 5000mcd for the rear light, 8000mcd for the break light. For the Indicators I used 4500mcd LEDs, which I would now say are not strong enough.
- Do I need to use Voltage regulators?
No, but if you don�t then your car could blow LEDs when the voltage is higher when your battery is being charged.
- Can I use any rear cluster?
Yes, but by Law you have to have a red rear deflector, you can buy these as stick on strips.
- What is the minimum number of LEDs I need to use for each circuit?
Personally I would say 30 is minimum.
Right then Chaps, this is really very easy. All you have to do is get a great big Hammer, then�.
1. Prepare the cluster by cutting away the plastic
2. Choose a design for your lights
Make yourself a design from a 9 x 37 grid.
3. Measure the hole you made and cut a Circuit board to fit.
These images are of the shapes I used for the indicators.
4. Draw your design onto your circuit board.
Drawing the design on makes it easier to put the LEDs in later, because you don't have to recount the holes. It also allows you to double check exactly how many LEDs you need.
5. Once you know how many LEDs you need use this website http://led.linear1.org/led.wiz to determine your design.
It's a great website that clearly shows you how many LEDs you have to solder in serial and how many resistors you need. It also tells you what strength resistors you need.
The picture below is an example I used for the Break Light.
6. Now mount your LEDs onto the circuit board.
- LEDs are directional. Look at the Head of the LED. Inside the LED, the shorter part is the positive side.
- I cut the pins short, put the LEDs through the circuit board holes and then bend the pins down to keep them in place. This makes it easily to solder them together.
- At the end of a row of LEDs you need to solder in the resistor to the negate end. I chose to thread the resistor through the Circuit board.
The resistors get EXTREMELY hot when you solder them on.
7. Connect all your lots of serial LEDs in parallel.
- Solder Red cables to the positive ends of the LED strings and Black to the negative end and then solder all same colored ends together.
8. Connect the Voltage Regulators
This is the circuit diagram I made
9. Cut the connector from the bulb sockets and connect it to the Voltage regulators.
Another picture to follow
10. Solder the Ground wire from the Voltage Regulator to a ground point.
I have chosen to solder it to the screw mount which firmly sits on the car.
Picture to follow soon.
11. Glue the circuit board into place
- I used a hot glue gun, so I can remove the circuit board again if I have to.
Now that you have spent hours slaving on your kitchen desk, stand back and look at your results.
Here are some pictures of the cluster on my car in comparison to the standard light
Tips I picked up along the way / Questions
- Should I convert the indicators aswell?
In my opinion: No.
If you have decided to convert the Indicators aswell, then you need to change the flasher relay under your steering wheel.
- What strength LEDs should I buy?
I choose 5000mcd for the rear light, 8000mcd for the break light. For the Indicators I used 4500mcd LEDs, which I would now say are not strong enough.
- Do I need to use Voltage regulators?
No, but if you don�t then your car could blow LEDs when the voltage is higher when your battery is being charged.
- Can I use any rear cluster?
Yes, but by Law you have to have a red rear deflector, you can buy these as stick on strips.
- What is the minimum number of LEDs I need to use for each circuit?
Personally I would say 30 is minimum.
02-01-2011, 01:19 PM
#3
Honda-Tech Member
Join Date: Jan 2008
Location: klamath falls, oregon, united states
Posts: 137
Likes: 0
Received 1 Like
on
1 Post
hmm i was actualy thinking about try that exact same thing on some old cracked and buste light that i have... thanks for the info will help alot when i got to do this

Trending Topics
02-11-2011, 12:39 PM
#11
Honda-Tech Member

Join Date: Feb 2011
Posts: 5
Likes: 0
Received 0 Likes
on
0 Posts
Great post Thank you. I've been looking for a while and was thinking I was just going to have to figure it out for myself. You have saved me from a potential wast thank you.
05-19-2013, 08:02 AM
#12
B*a*n*n*e*d

Join Date: Dec 2009
Posts: 1,371
Likes: 0
Received 0 Likes
on
0 Posts
This post is amazing, but theres no way after seeing all that wiring at the end that I could handle that.
If you were to do JUST the red area in the center and not the indicator part, would it make it alot easier with the wiring?
Keep in mind oem crx lights here in the USA have that bulb on the very end of the tail lights were as the OP's tail lights were the amber wrap around style, would that make things complicated leaving that outside bulb just a bulb?
 07-26-2017, 09:27 AM
#14
Honda-Tech Member

Join Date: Jan 2012
Posts: 3
Likes: 0
Received 0 Likes
on
0 Posts

As before..get some cheapo Sonar lights
Clean the middle plastic
Weld flat plastic back-support..
Stick your favourite COB lights / colors
Some wiring/soldering skills needed
06-05-2018, 08:07 AM
#16
Honda-Tech Member
Join Date: Jan 2012
Posts: 3
Likes: 0
Received 0 Likes
on
0 Posts
For those guys that asked for scrolling (sequential) turn signals...here are the youtube links..
Now if it is not allowed to post foreign site links PLEASE admins you're free to download and embed the vids..Enjoy
Darkness
Daylight
Front
Now if it is not allowed to post foreign site links PLEASE admins you're free to download and embed the vids..Enjoy
Darkness
Daylight
Front
 06-09-2018, 10:47 AM
#19
Honda-Tech Member
Join Date: Jan 2012
Posts: 3
Likes: 0
Received 0 Likes
on
0 Posts
Yes..it's not easy to come up with a project every 6 months..
And yes they are completely custom.even had to clean out the internals of those aftermarket tail-lights..the ones with three round sections
Lights consist of COB lights and Sequential DRL's that can ease things out for personal preference
And yes they are completely custom.even had to clean out the internals of those aftermarket tail-lights..the ones with three round sections
Lights consist of COB lights and Sequential DRL's that can ease things out for personal preference

Thread
Thread Starter
Forum
Replies
Last Post
fminusmic
Honda CRX / EF Civic (1988 - 1991)
1
05-03-2018 06:31 AM
SpoonSleeper
Honda CRX / EF Civic (1988 - 1991)
5
10-05-2003 07:47 AM
Fuster_Cluck
Honda Civic / Del Sol (1992 - 2000)
12
11-29-2002 01:44 PM