
JBPnoman/NotARacist/DblDtchRddr/whatever-you-want-to-call me build thread

 01-15-2014, 05:40 PM
#53
Anyway I'm liking this build. Keep an eye out when I start mine in a month. Go autoworks mini ram turbo kit will be the 1st post.
01-15-2014, 05:48 PM
#54


Besides, there's plenty of room between the bed and bathroom door for her to get dressed
 01-15-2014, 06:21 PM
#55
WHEEL Slayer
Following this build. Waiting a bit before starting my own thread on my DX build
01-16-2014, 01:20 AM
#56
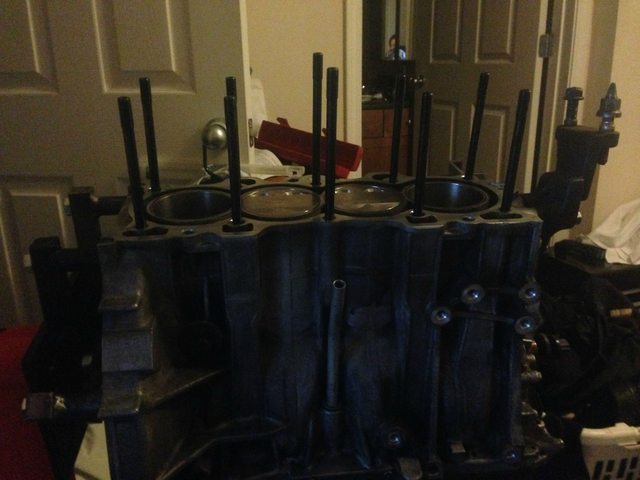
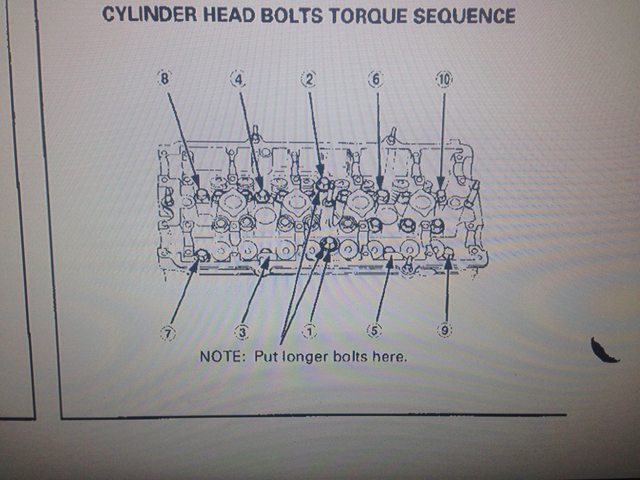
Decided to go ahead and install my head studs tonight.
Head studs laid out (not actually threaded in yet, just in their respective places)
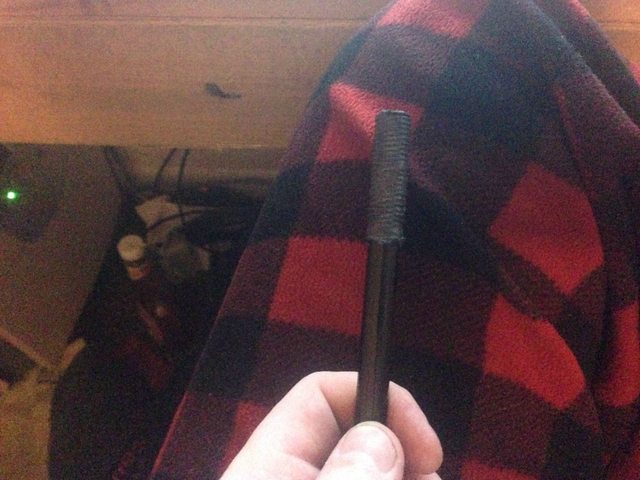
If you're following along to build your own motor, now is the point where you use a thread chaser and clean those holes. Done? Good, now do it again. You can't get those little ******* too clean. I chased mine with an ARP thread chaser, then sprayed some brake cleaner down the hole, then used compressed air to dry the holes out, then used the ARP thread chaser again. You're just cleaning, here, not cutting new threads - if you feel resistance, you're doing something wrong. Lube the everliving **** out of the head studs with the included fastener assembly lube. Like I said when I did the main studs, you seriously can't use too much of this ****.
All lubed up and ready to go
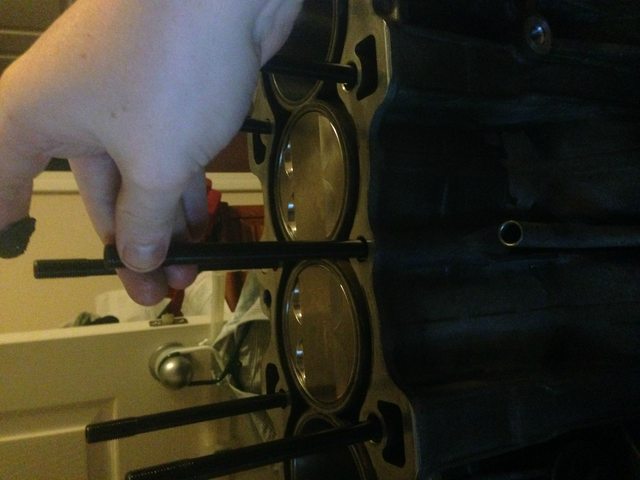
Hand tightening them in. Yes, they have a hex keyhole in the top of them. No, you shouldn't need to use it. ARP's definition of "hand tight" is "tighten until they stop moving, then loosen them 1/8th of a turn". Unlike bolts, studs don't need to be torqued down into whatever they're holding. The nut gets torqued down, and the nut and stud work together to form a kind of clamp on whatever you're fastening.
Hand tightened in
All 10 installed
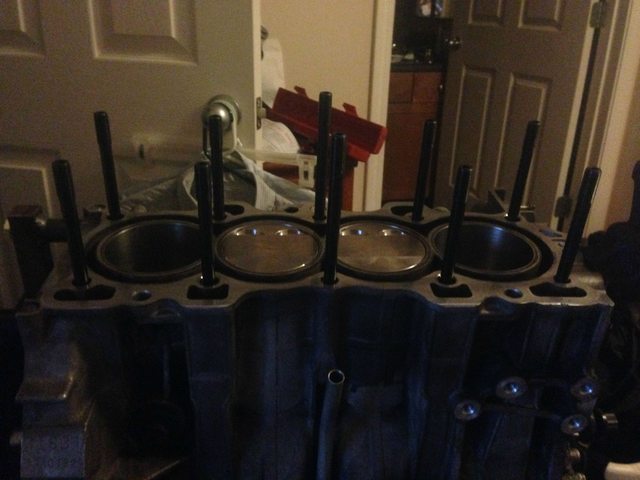
Yes, the middle two are supposed to be longer. At least, that's what the FSM says
Head studs laid out (not actually threaded in yet, just in their respective places)
If you're following along to build your own motor, now is the point where you use a thread chaser and clean those holes. Done? Good, now do it again. You can't get those little ******* too clean. I chased mine with an ARP thread chaser, then sprayed some brake cleaner down the hole, then used compressed air to dry the holes out, then used the ARP thread chaser again. You're just cleaning, here, not cutting new threads - if you feel resistance, you're doing something wrong. Lube the everliving **** out of the head studs with the included fastener assembly lube. Like I said when I did the main studs, you seriously can't use too much of this ****.
All lubed up and ready to go
Hand tightening them in. Yes, they have a hex keyhole in the top of them. No, you shouldn't need to use it. ARP's definition of "hand tight" is "tighten until they stop moving, then loosen them 1/8th of a turn". Unlike bolts, studs don't need to be torqued down into whatever they're holding. The nut gets torqued down, and the nut and stud work together to form a kind of clamp on whatever you're fastening.
Hand tightened in
All 10 installed
Yes, the middle two are supposed to be longer. At least, that's what the FSM says
01-16-2014, 06:21 PM
#57
Ferio Wdm Edition
Good **** bro, i was just wondering on cleaning the threads, but didnt know how. Thanks!
01-19-2014, 05:59 PM
#58
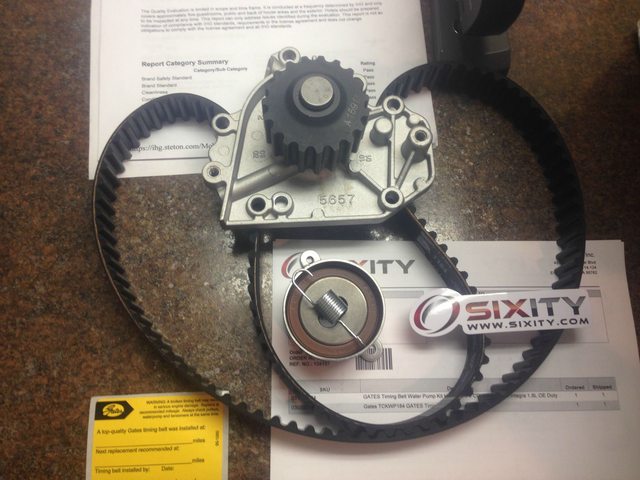
Minor update. Water pump kit came in yesterday, including the pump, timing belt, tensioner, and tensioner spring. Head gasket kit still hasn't shipped, nor has the "random plastics and bolts" order from EBH. I was stupid and didn't bother organizing any of the bolts that I took off of the motor in the first place, so I need to measure the ones that I think are the water pump bolts. If they aren't the right size, I'll call up EBH and and get those bolts ordered, too - hopefully they can ship them with my current order. I also need to get the guide shim ordered. If they can't stack them in with my current order, I'll just get them from the local Honda dealership, no biggy.
I'll toss up some pics of the pump kit when I get home.
I'll toss up some pics of the pump kit when I get home.
01-19-2014, 08:23 PM
#59
Boom, pictures!
Timing kit, all Gates
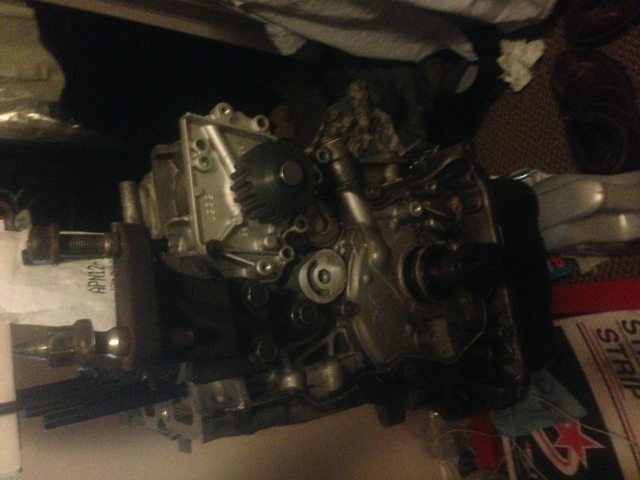
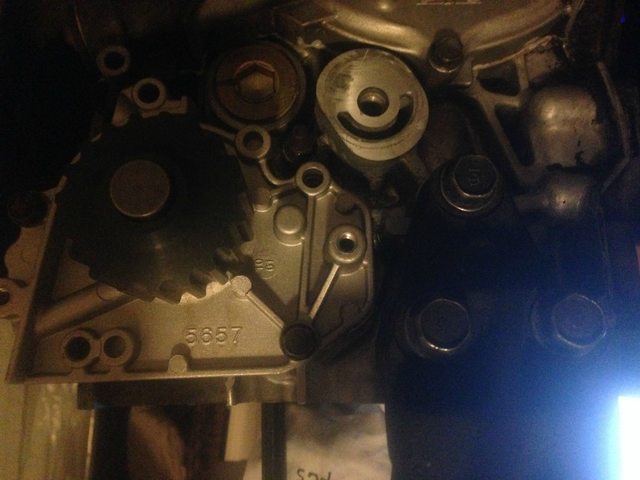
Water pump fabbed up. Turns out I have the wrong bolts, so I'll be ordering new ones
Closer pic
Also saw this gem at the local stop n' rob yesterday. Too bad it's rusted to ****

Timing kit, all Gates
Water pump fabbed up. Turns out I have the wrong bolts, so I'll be ordering new ones
Closer pic
Also saw this gem at the local stop n' rob yesterday. Too bad it's rusted to ****
01-19-2014, 10:22 PM
#60
B*a*n*n*e*d

Join Date: Dec 2013
Posts: 7
Likes: 0
Received 0 Likes
on
0 Posts
You should curl that block a few times before you assemble. Because your 4arm game is WEAK!
And I've out grown you.
And I've out grown you.
01-20-2014, 10:20 AM
#62
Yeah, I really should have had the block hydro'd before I started assembly, but honestly I just kind of gave up on cleaning it for now. I'll re-visit the cleaning and painting issue once it's fully assembled. Right now, having a complete motor is more important than having a shiny motor.
Just woke up to a voicemail from work saying I had a "very large box, the largest you've ever received here". I'm guessing it's all of my timing plastics and other random stuff, because a top end gasket kit shouldn't be that big
 01-20-2014, 11:42 AM
#63
Big box!
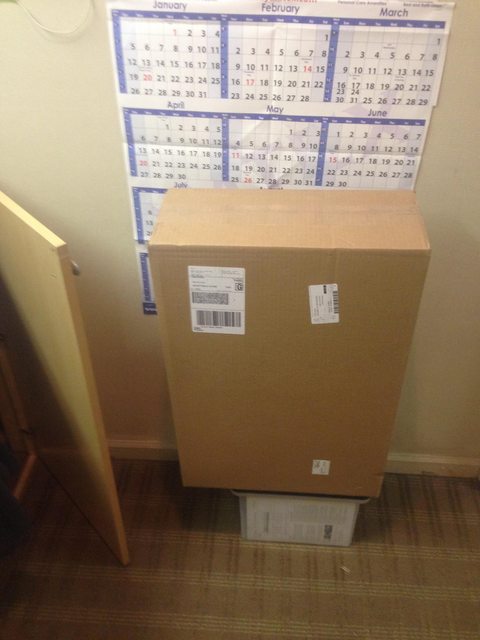
What could possibly be inside...
Well, I guess "waste not want not" isn't part of this particular company's mission statement. SO MUCH BOX. They also gave me a calendar that might just find a place in my apartment. I'll be off work at 9 tonight, so I'll start turning some wrenches and get the head installed!
I also just received a text notification that my plastics and hardware had shipped, so I'll probably be getting those within the next few days. Once that comes in, I'll have my completed and timed long block
01-20-2014, 07:23 PM
#64
Time to start fabbing some stuff up! The plastics and miscellaneous hardware should be here Wednesday. I'll be going through the local dealership to order the last couple things I missed.
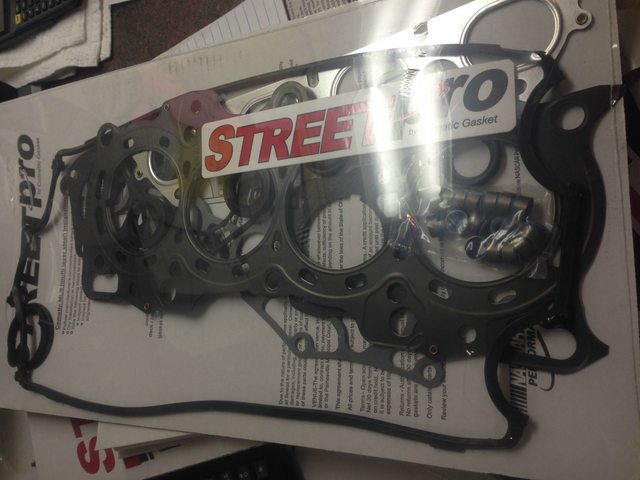
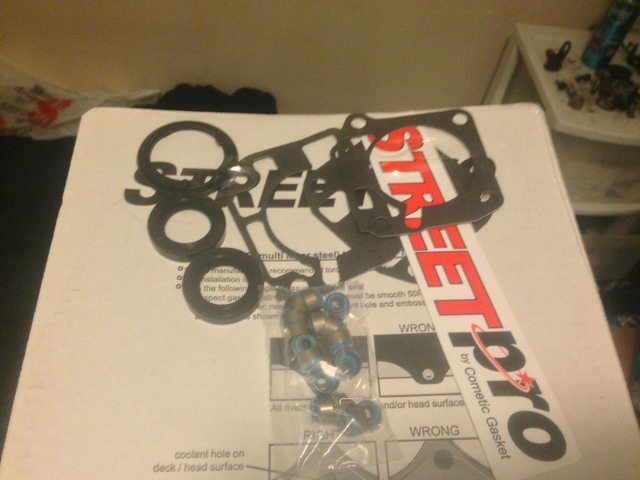
The Cometic kit is very complete. MLS head and exhaust manifold gaskets, heat insulated intake manifold gasket, rubber valve cover and spark plug tube gaskets, new valve stem seals, gear side cam seals, thermostat gasket, and even three different throttle body gaskets. No clue why they sent me three throttle body gaskets, but...oh well.
Complete kit, still in it's shrink wrap
If you're following along for the "how-to" part of the build, this is the part where you test your head and block mating surfaces. All you need is a machinist's straight edge (machinist's is important - your high school plastic ruler won't cut it). You can get one from many different tool suppliers, including Harbor Freight, Sears/Craftsman, or Snap-On. The procedure for the B18B1 motor is in the 98-01 Factory Service Manual, page 6-30. Maximum spec is .05mm, or .002". If it's less than .05mm, you're fine. If it's between .05mm and .2mm, take it to a machine shop and have it resurfaced. If it's more than .2mm out, just throw the head away and get a new one.
I did all of this back when I first bought the motor, so sorry, no pictures. Suffice to say, I used a Craftsman straight edge, and some Snap-On feeler gauges, and both my head and block had less than .001" of warpage. Well within spec.
Now then, gasket installation. The Cometic head gasket is awesome. Stock bore is 81mm. The MLS head gasket included in the kit is an 82mm gasket. Cometic highly recommends going up a size if you've had your block honed, and if you haven't had your block honed, you're doing it wrong to begin with. Cometic labels their head gasket with the word "up" - that side faces up off the block. It should slide over your head studs. When working with metal gaskets, it is very important to avoid bending, crimping, folding, or damaging it in any way! If the gasket gets a fold in it, just go ahead and throw it away - it'll never seal correctly.
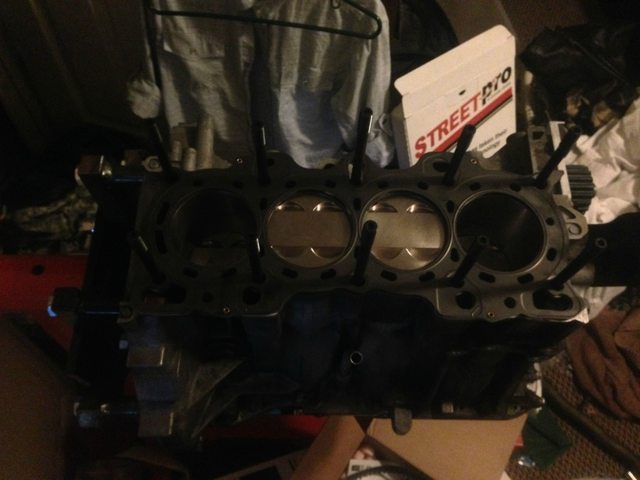
Here's that "up" I mentioned

Head gasket laid over the block
The rest of my thread is strictly mock-up. I don't have the tools necessary to replace my valve stem seals, so I'm just putting things together for now. I have the motor mocked up from oil pan to valve cover now. Rockers and cam caps not installed - there's a certain way to do it, and I'll be going over that when I get there. I also haven't installed the washers and nuts for the head studs. Honestly, I see no point in tightening them down only to have to remove them again for the valve stem seals. I'm also considering upgrading the valves, springs, and retainers for a future cam upgrade. I also plan on re-finishing my valve seats, dremel-style. If I do that, there will also be write-ups included for that.
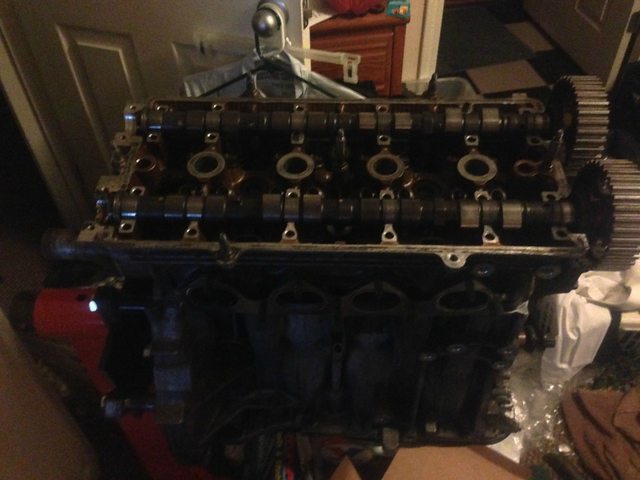
Head on, cams laying in their grooves
Valve cover on, gasket and spark plug gaskets installed, not bolted down

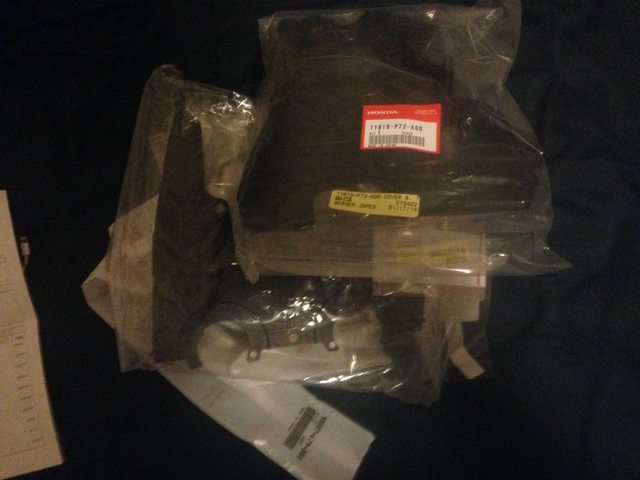
And here's what's left in the kit for now - it'll all be going in except the two extra throttle body gaskets
That's it for now! More updates will come as more parts and tools arrive.
The Cometic kit is very complete. MLS head and exhaust manifold gaskets, heat insulated intake manifold gasket, rubber valve cover and spark plug tube gaskets, new valve stem seals, gear side cam seals, thermostat gasket, and even three different throttle body gaskets. No clue why they sent me three throttle body gaskets, but...oh well.
Complete kit, still in it's shrink wrap
If you're following along for the "how-to" part of the build, this is the part where you test your head and block mating surfaces. All you need is a machinist's straight edge (machinist's is important - your high school plastic ruler won't cut it). You can get one from many different tool suppliers, including Harbor Freight, Sears/Craftsman, or Snap-On. The procedure for the B18B1 motor is in the 98-01 Factory Service Manual, page 6-30. Maximum spec is .05mm, or .002". If it's less than .05mm, you're fine. If it's between .05mm and .2mm, take it to a machine shop and have it resurfaced. If it's more than .2mm out, just throw the head away and get a new one.
I did all of this back when I first bought the motor, so sorry, no pictures. Suffice to say, I used a Craftsman straight edge, and some Snap-On feeler gauges, and both my head and block had less than .001" of warpage. Well within spec.
Now then, gasket installation. The Cometic head gasket is awesome. Stock bore is 81mm. The MLS head gasket included in the kit is an 82mm gasket. Cometic highly recommends going up a size if you've had your block honed, and if you haven't had your block honed, you're doing it wrong to begin with. Cometic labels their head gasket with the word "up" - that side faces up off the block. It should slide over your head studs. When working with metal gaskets, it is very important to avoid bending, crimping, folding, or damaging it in any way! If the gasket gets a fold in it, just go ahead and throw it away - it'll never seal correctly.
Here's that "up" I mentioned
Head gasket laid over the block
The rest of my thread is strictly mock-up. I don't have the tools necessary to replace my valve stem seals, so I'm just putting things together for now. I have the motor mocked up from oil pan to valve cover now. Rockers and cam caps not installed - there's a certain way to do it, and I'll be going over that when I get there. I also haven't installed the washers and nuts for the head studs. Honestly, I see no point in tightening them down only to have to remove them again for the valve stem seals. I'm also considering upgrading the valves, springs, and retainers for a future cam upgrade. I also plan on re-finishing my valve seats, dremel-style. If I do that, there will also be write-ups included for that.
Head on, cams laying in their grooves
Valve cover on, gasket and spark plug gaskets installed, not bolted down
And here's what's left in the kit for now - it'll all be going in except the two extra throttle body gaskets
That's it for now! More updates will come as more parts and tools arrive.
01-20-2014, 09:47 PM
#67
$155 and some change. $160-something after shipping. Just as a point of comparison, getting all of the same stuff from a mishmosh of online Honda dealerships would run just a hair shy of $200.

 01-22-2014, 07:53 PM
#70
Honda-Tech Member

Join Date: Sep 2012
Posts: 37
Likes: 0
Received 0 Likes
on
0 Posts
Well, in the end a motor will cost much less. Plus your motor doesn't mind other chicks sharing in the fun when you take them for a ride.
01-22-2014, 08:06 PM
#71
The jealousy part is definitely true though!
 01-24-2014, 06:19 AM
#73
Honda-Tech Member

Join Date: Feb 2013
Location: Des Moines IA
Posts: 117
Likes: 0
Received 0 Likes
on
0 Posts
engine looks good, keep up the good work. should still get a new pickup tube tho  jk.
jk.
jk.
01-24-2014, 02:11 PM
#74
Pfft, I'll show you some garbage
Got a call from the dealership in town, the last of my nuts and bolts arrived today. Unfortunately, I'm not feeling too hot, so I'll be picking them up tomorrow. Also, it's like...10 degrees outside. **** that.
Got a call from the dealership in town, the last of my nuts and bolts arrived today. Unfortunately, I'm not feeling too hot, so I'll be picking them up tomorrow. Also, it's like...10 degrees outside. **** that.
01-24-2014, 08:51 PM
#75
Time for a guide on how to replace your valve stem seals!
DIY: B18B1 (LS) Valve stem seal replacement
As far as difficulty level goes, if you're comfortable enough under the hood to pull a head, you're perfectly capable of replacing your valve stem seals. You'll be just one step short of fully disassembling your head doing this, so if you're also thinking about replacing your springs, retainers, keepers, and valve, or if you're thinking about getting a valve job, now's the time to do it. The process is fairly time intensive, so save your pennies and do it all at once.
Necessary tools:
Replacement seals. These are from Cometic, included in their PRO2004T top end gasket kit.
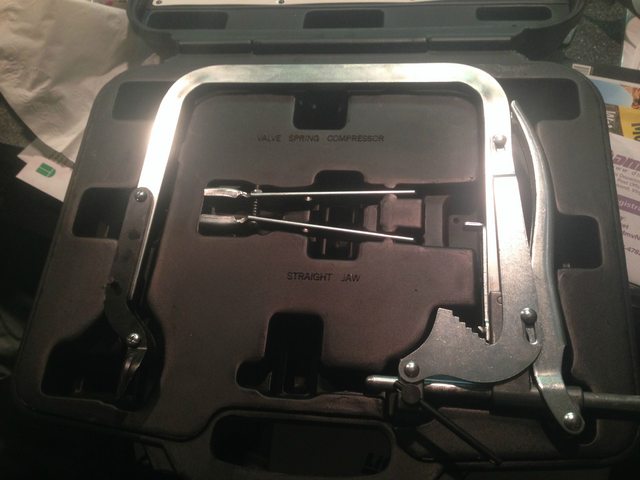
Valve spring compressor. Do yourself a favor and get ones that are made to handle recessed valve springs. The ones that you rent from Advance are for pushrod motors, and absolutely SUCK for the recessed springs in a B series motor. Unfortunately, I didn't know this beforehand, so...yeah. These are ****. Avoid them.
Valve spring compressor
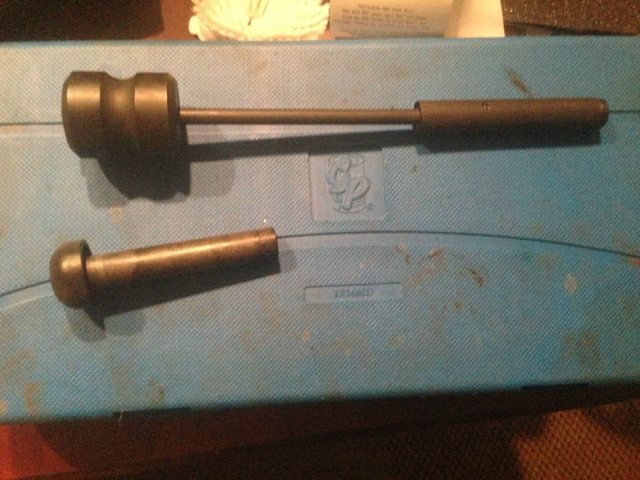
Valve stem seal puller and pusher. The proper tools are EXTREMELY expensive. When I say expensive, I mean $200+. Thankfully, my step brother works at a dealership and has access to this stuff, so I'm borrowing his. If you don't have access to them, I promise you, Autozone and Advance don't have them for rent. You can find an acceptable alternative on eBay for $10-$20, but they don't have an integrated slide hammer, so you'll be putting in a little more effort.
The proper tool
Other tools not pictured: O2 sensor socket, machinist's pick, and a dead blow hammer.
If you're using a shitty valve spring compressor like I am, you'll also need an O2 sensor socket. Why an O2 sensor socket? Because it has a chunk cut out of it, and you'll need to be able to get at the keepers with your pick. You'll also need the O2 sensor socket, in combination with your dead blow hammer, to soften up the seats and keepers before you start working. If you have the proper spring compressor, you don't need the O2 sensor socket - a standard 19mm deep well socket will work.
Procedure:
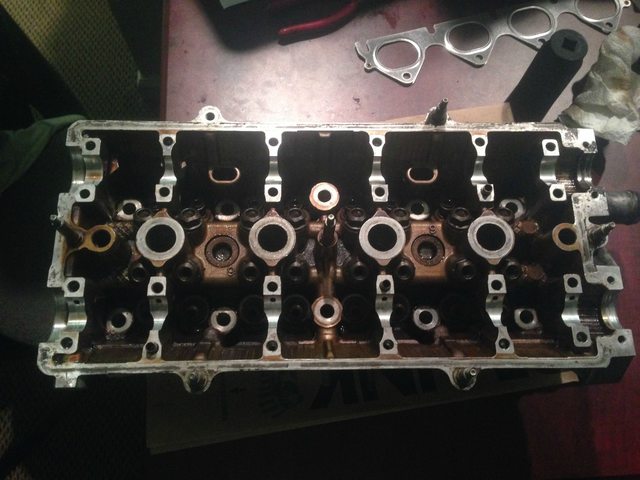
First off, you need the head off the motor. That also means your valve cover will be off, and your cams and cam caps will be removed. I didn't snap a pic of the head before removal, but if you take the head off your motor and remove the manifolds, you're seeing the starting point. Just pretend there's a picture here of what you're looking at.
Pull out your O2 sensor socket Place it flat on the retainer, then give it a few quick strikes with a dead blow hammer. What you're doing here is loosening up the assembly, especially the keepers. Those little ******* are a pain in the ***. Let me say that again - Those little ******* are a pain in the ***. No seriously, you'll end up hating them by the time you're done. If I had the right spring compressor, I might not hate these quite as much as I do. You don't need to beat the **** out of it, just a few solid taps and you're good. Once you've given each valve a few good hits, move on.
Now you need to put the spring compressor O2 sensor socket combination on one of your valves. The dimpled part of the compressor goes on the bottom of the valve, square in the middle. Make sure it's centered. If it isn't, you risk severely damaging your valve. Your O2 sensor socket goes directly on the valve spring retainer, with the open part facing in a direction that is easily accessible to you. The flat part of the compressor then goes onto the top of the O2 sensor socket.
It'll look like this
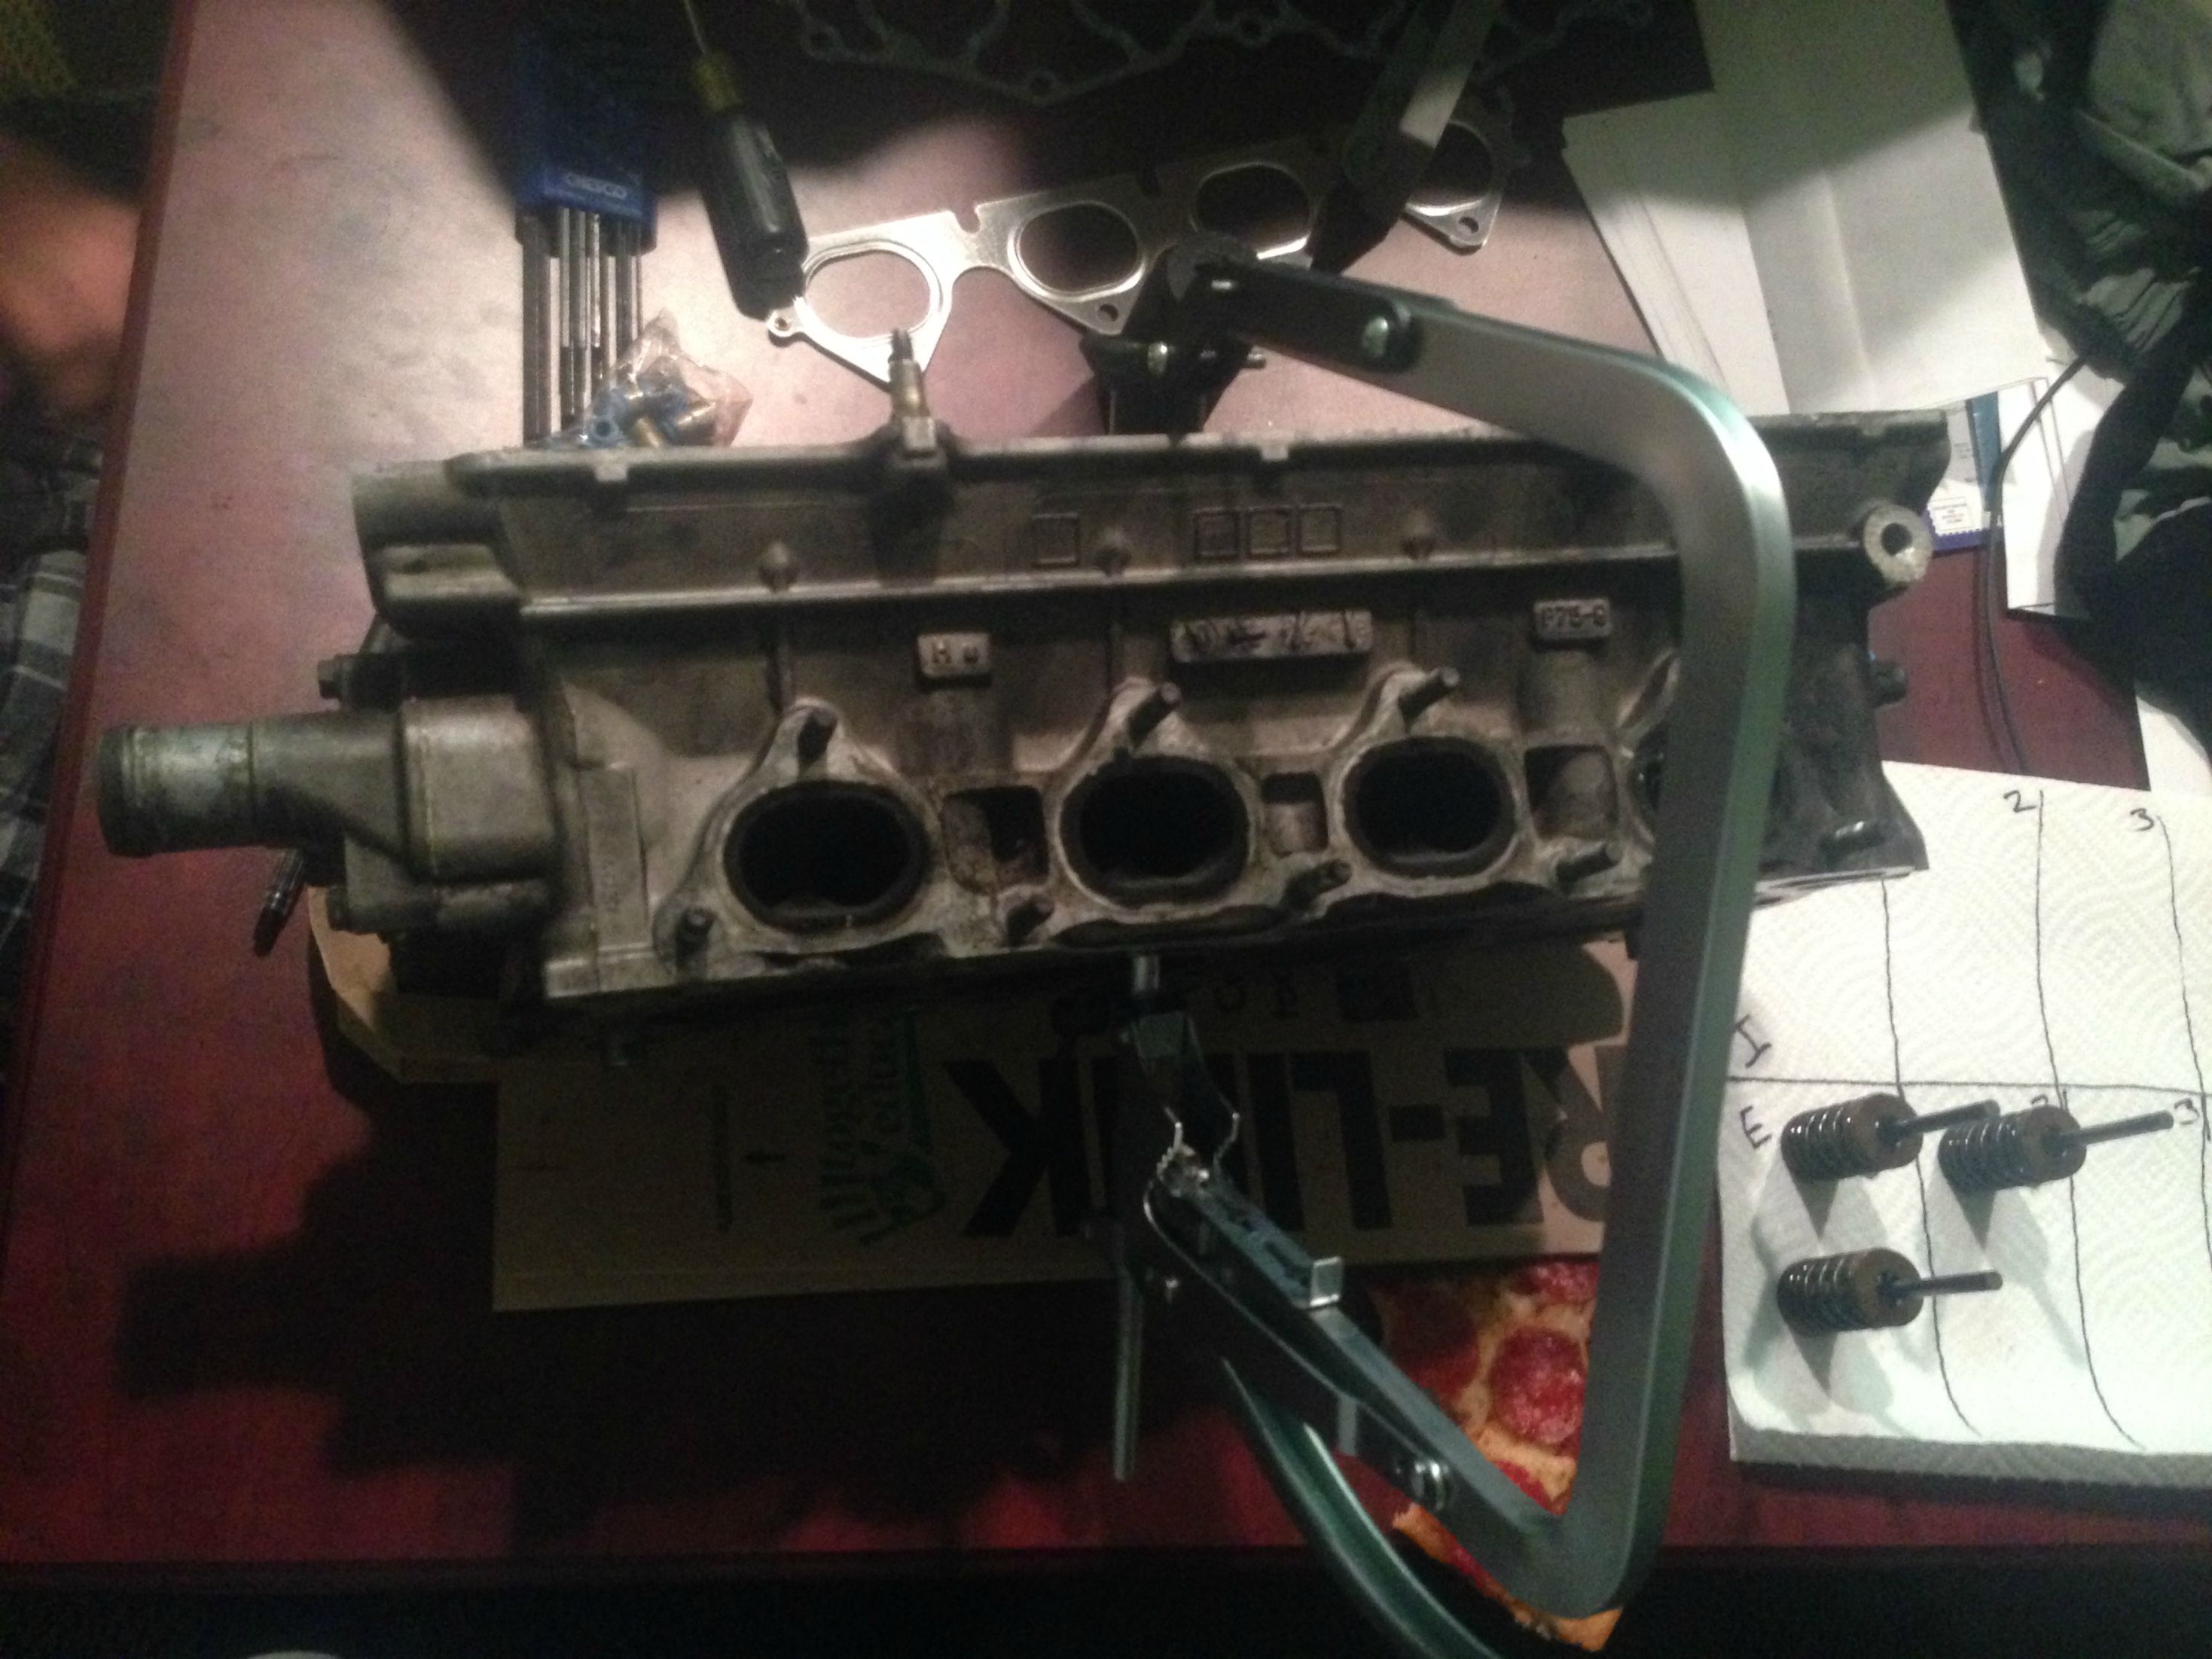
Dimpled end of compressor seated in valve
Flat part of compressor on socket
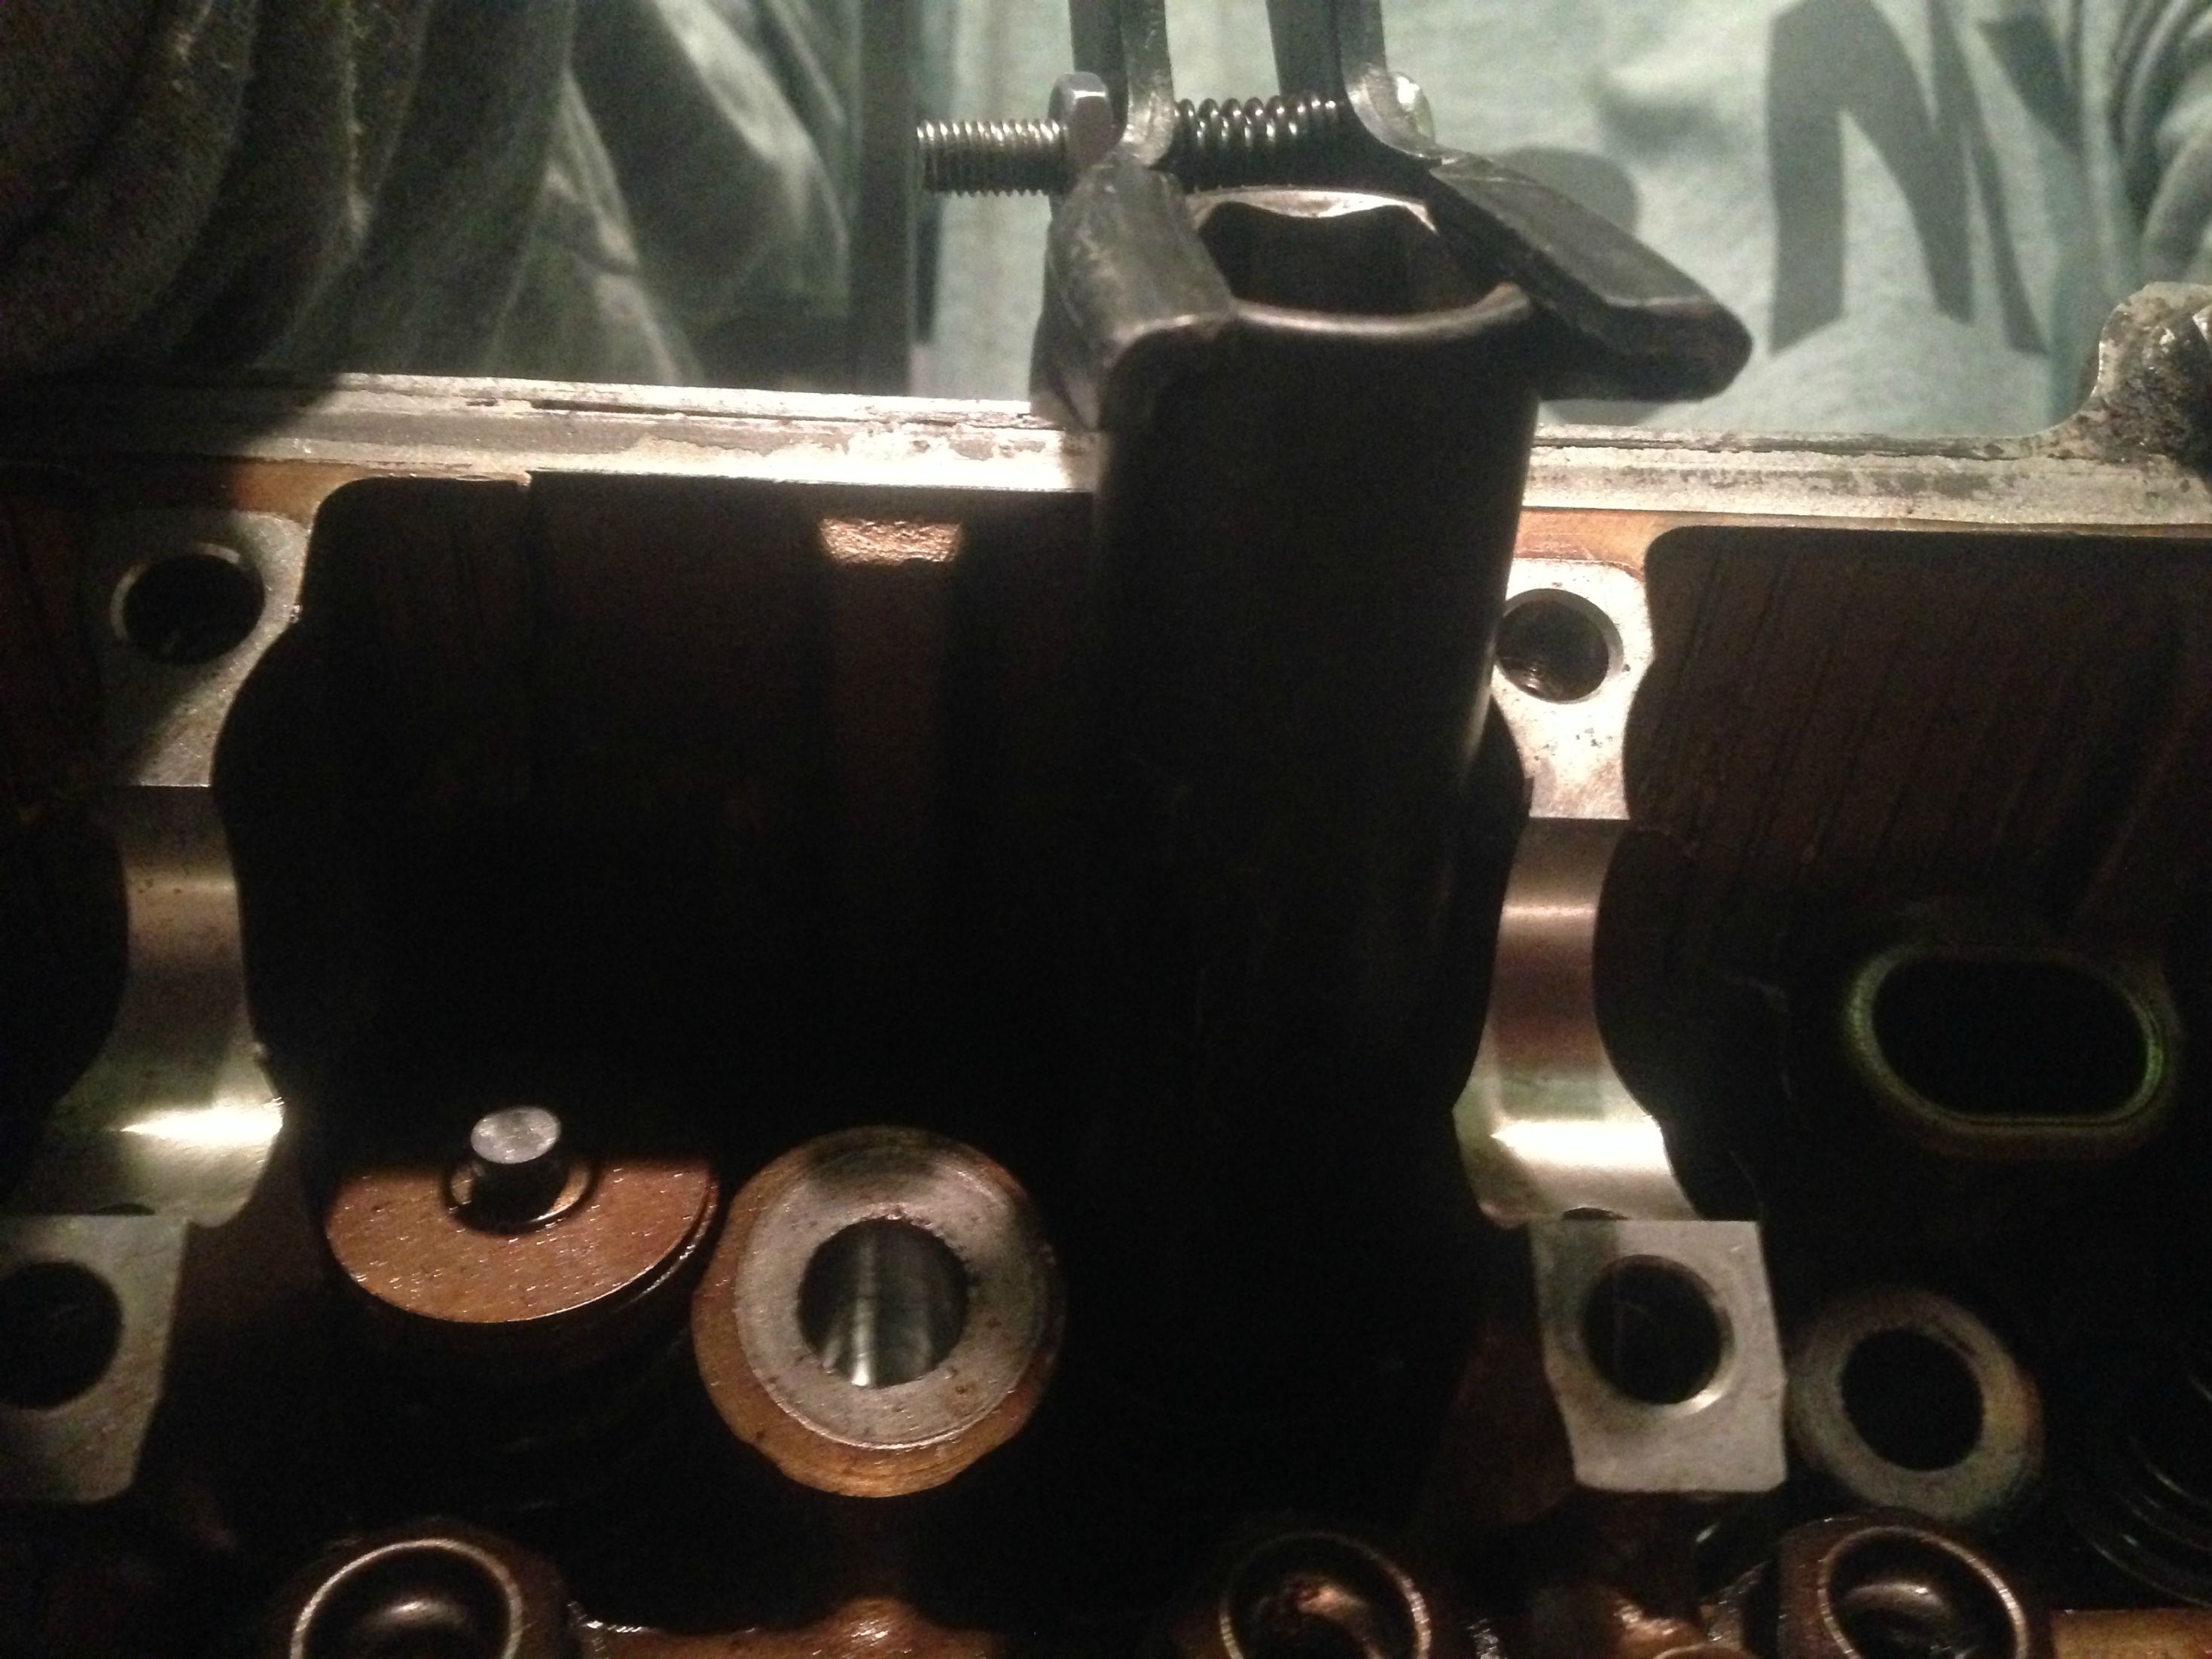
This is the hard (and possibly dangerous, if you do it wrong) part! Be very careful! Wear eye protection! Seriously, my step brother had a retainer hit him square in the face once. Now that everything's seated, compress away! Tighten that **** down. See that little cone looking thing still on top of your valve? Poke it with your machinist's pick. Be careful not to lose those little cone things! Those are your keepers - the bane of your existence. If you're lucky, they'll just fall right off when you compress the springs. I was only lucky with two of my valves. Once you have both retainers out, set them to the side. Slowly and carefully remove the compressor. Do it too fast, and your spring and retainer will go flying across the room. Let the compressor slip out of your hand, and your spring and retainer will go flying across the room. If your face happens to be in the way...well, sucks for you. I told you to wear eye protection!
Congratulations, you have successfully disassembled your head!...almost.
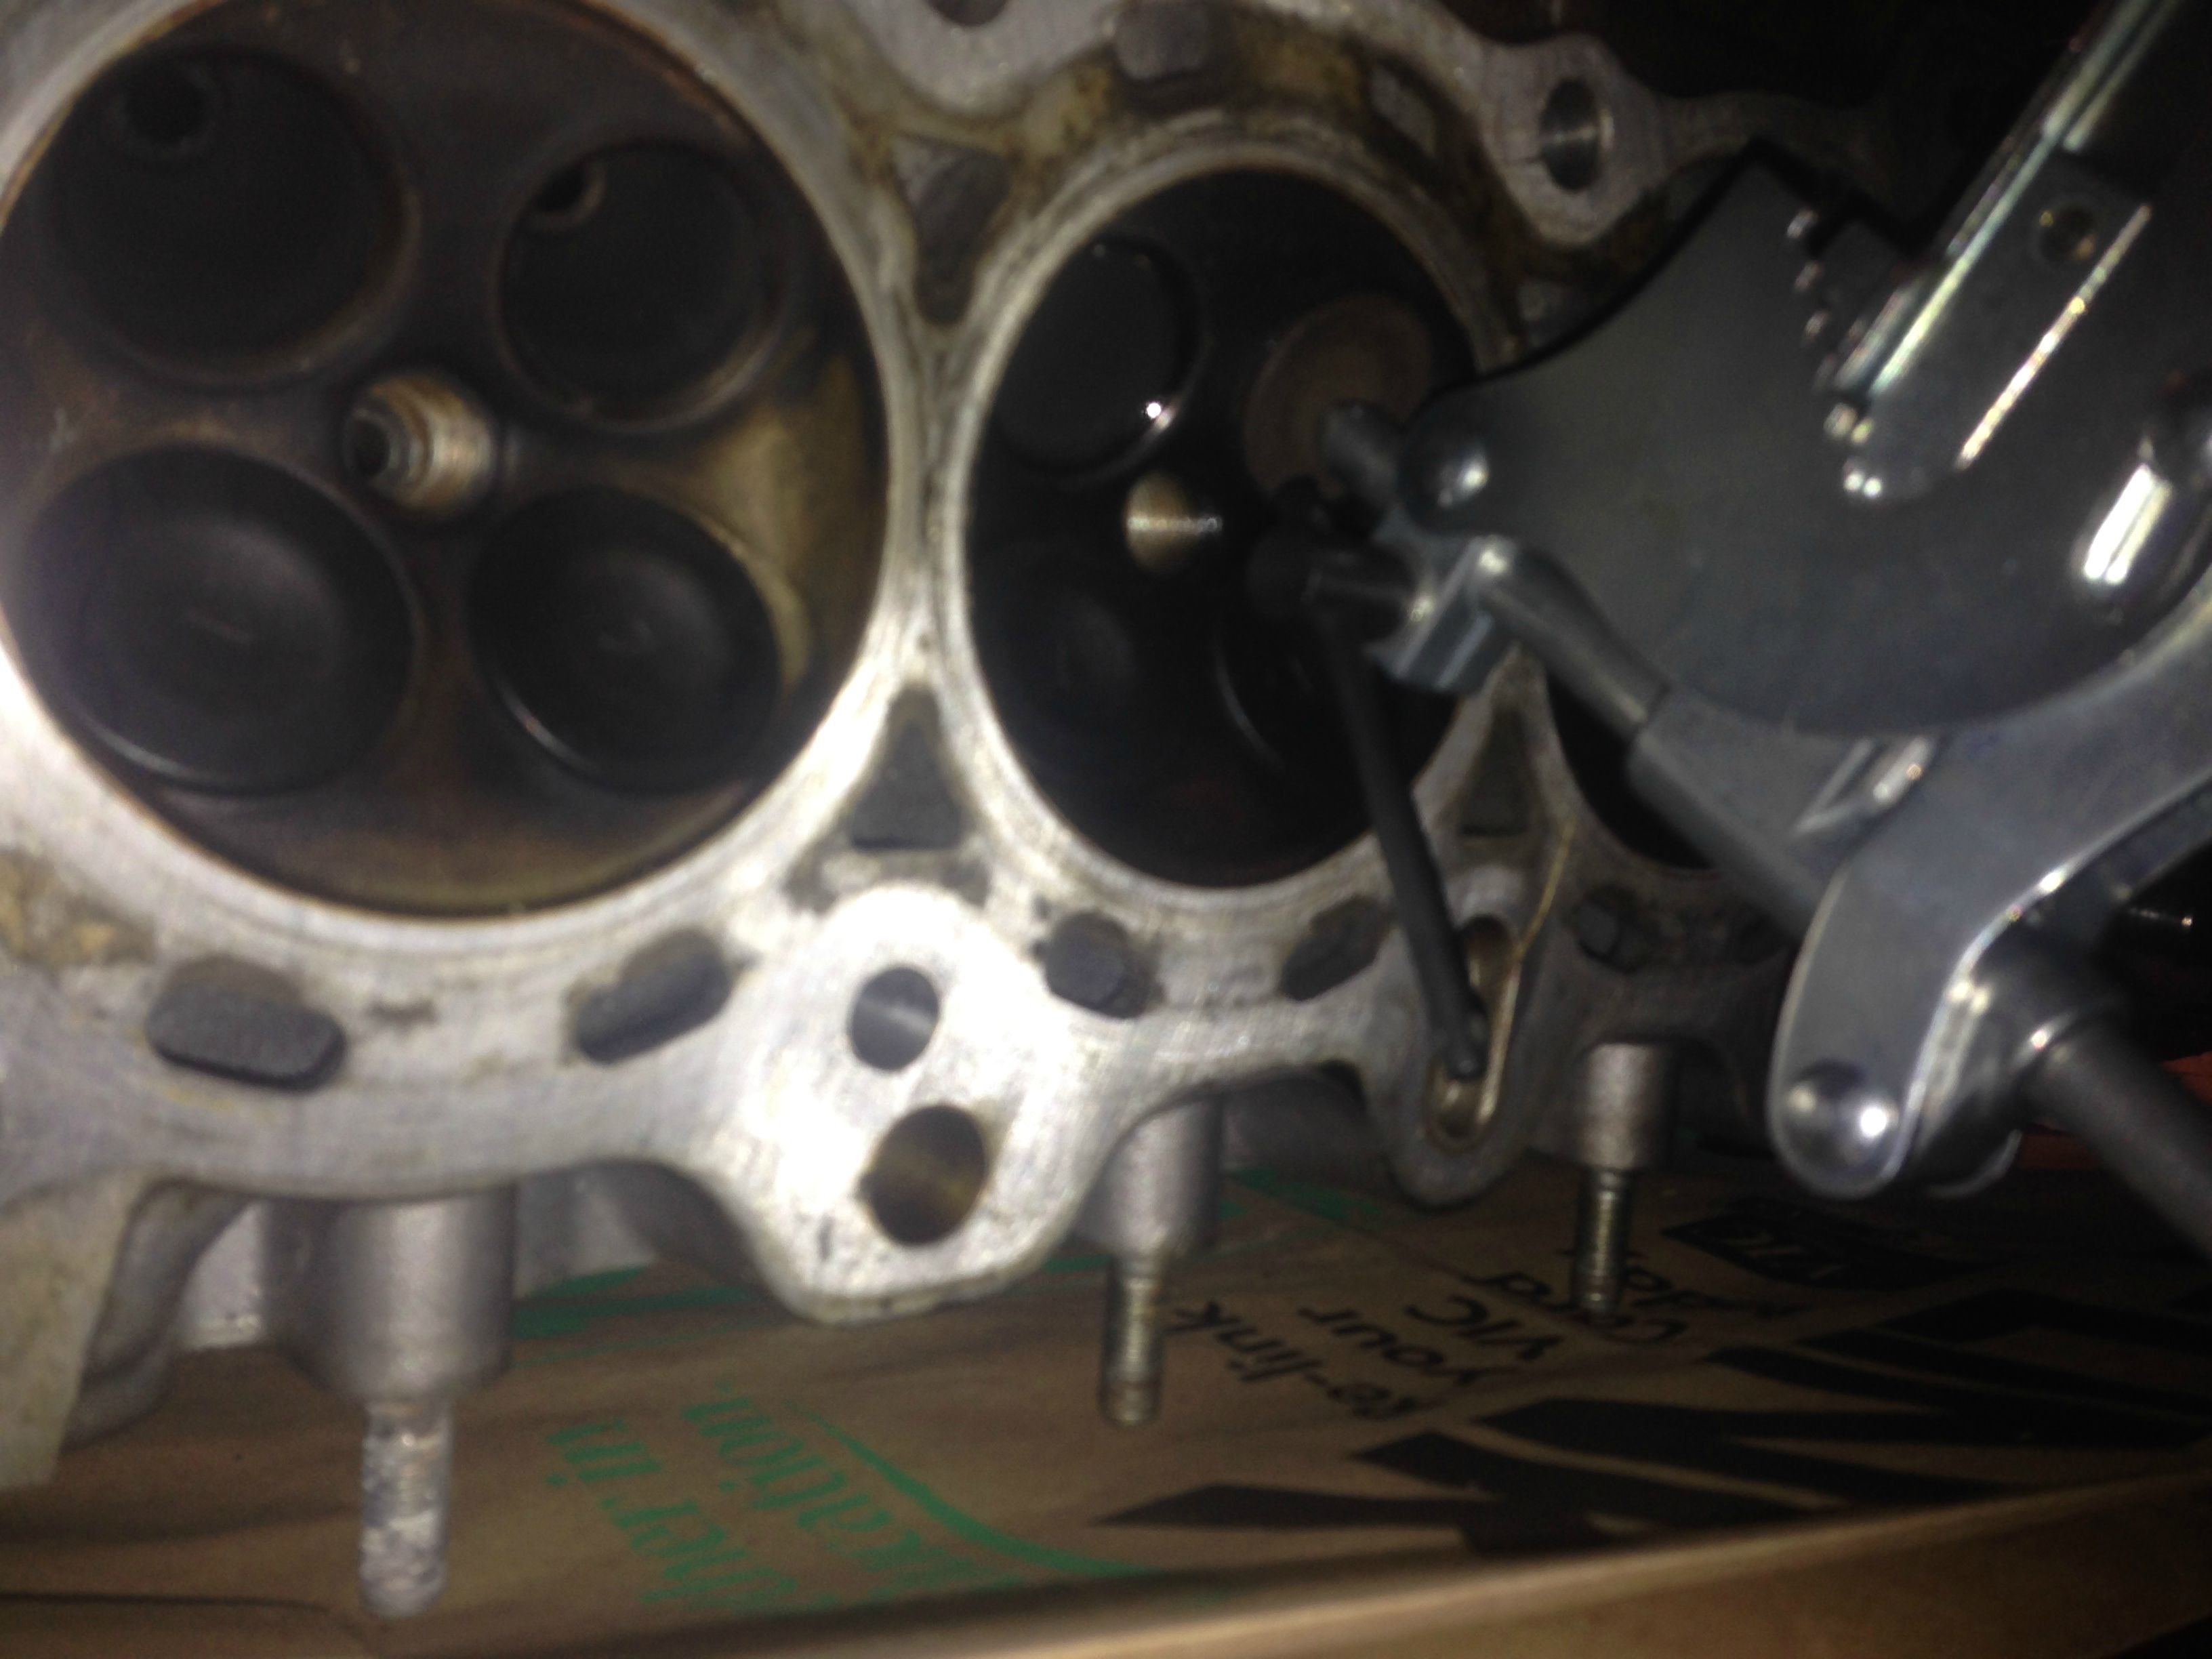
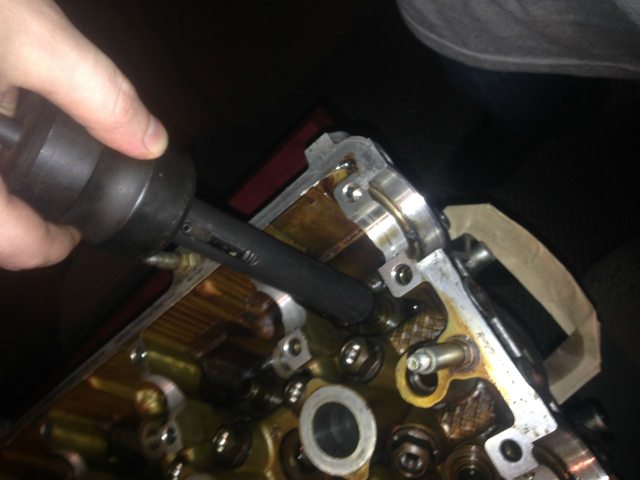
Now it's time to remove your valve stem seals. Compared to removing the valves, this part is obscenely easy. If you have a slide hammer style seal remover, open the grabber, place it over your valve stem seal, and close the grabber. Make sure you have it fully wrapped around the entire seal - When you look at my picture, it isn't fully on the seal. Unfortunately, my step brother brought home the wrong size puller, so he'll be bringing the correct sized tool home Monday. A couple good, solid slides, and your valve stem seal will pop off. If you're using the plier-style seal remover, pull and wiggle until it pops off.
Slide hammer (kind of) seated
If you're planning on replacing your valve guides, this is when you'll do it. I'm not replacing mine, but if you are, here's what the FSM says to do. Put your new valve guides in the freezer for about an hour. Put the cylinder head on a hot plate (or in the oven) to bring it up to 300*F. Do not use a torch - you'll warp the head. Do not exceed 300*F - you may loosen the valve seats. Use heavy gloves! If you grab a 300*F chunk of metal with your bare hands, you deserve the second and third degree burns, because you're an idiot. From the cam side, give the valve guides a few taps to move them ~2mm - this gets carbon deposits off of the guides, making them easier to remove. Flip the head over, and drive the guides out towards the cam side of the head. Remove the new guides from the freezer one at a time, as you're about to install it. Apply motor oil to the outside of the guide, and drive it in. Do this part quickly, so the head doesn't cool down too much. If it does, stick it back in the oven or on the hot plate. The new valve guides should have 13.75-14.25mm showing on the intake side, and 15.75-16.25mm showing on the exhaust side.
Now is also the time to recondition your valve seats. Bring your head to a machine shop and let them do it for you. If you happen to have the right tools laying around to do it, you probably also have a FSM to look up the procedure. You need a tool that can cut a 30*, 45*, and 60* seat. If you don't plan on taking your head to a machine shop, or reconditioning your valve seats, use a brass wire brush on a drill or Dremel and lightly clean the seat, as well as the valves. Make sure your brush is brass! Brass won't cut into hardened aluminum or steel.
Regardless of if you plan on replacing your valve guides, or having your valve seats professionally reconditioned, take your block to a machine shop. This is also the time where you need to re-check your head for warpage (if you did your guides). Even if you didn't do your guides, and even if you don't want to recondition your seats, have your local machine shop clean the head for you. A clean head is a happy head!
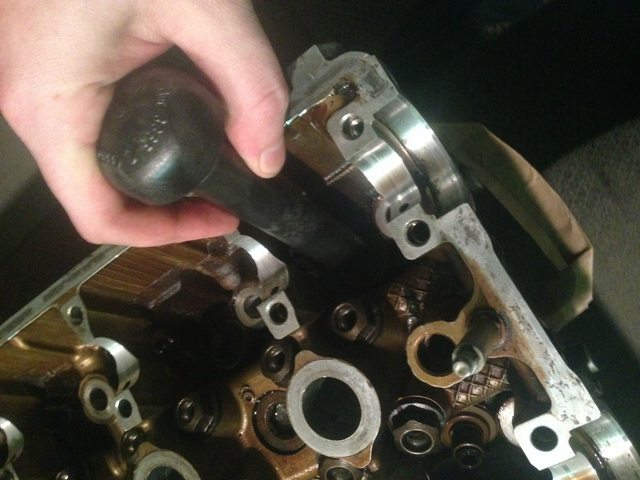
Now it's time to reinstall your valve stem seals. This part is easy. Lightly coat the inside of the seal with oil and place it over your valve guide. Put your valve stem seal install tool on top of the seal, and give it a couple whacks with your dead blow hammer. It's seated when it's on your valve guide completely.
Valve stem seal install tool, placed over the seal
Now reinstall your valves, springs, retainers, and keepers. In the famous words of the FSM, "Installation is reverse of removal".
Congratulations, you now have a refurbished head!
DIY: B18B1 (LS) Valve stem seal replacement
As far as difficulty level goes, if you're comfortable enough under the hood to pull a head, you're perfectly capable of replacing your valve stem seals. You'll be just one step short of fully disassembling your head doing this, so if you're also thinking about replacing your springs, retainers, keepers, and valve, or if you're thinking about getting a valve job, now's the time to do it. The process is fairly time intensive, so save your pennies and do it all at once.
Necessary tools:
Replacement seals. These are from Cometic, included in their PRO2004T top end gasket kit.
Valve spring compressor. Do yourself a favor and get ones that are made to handle recessed valve springs. The ones that you rent from Advance are for pushrod motors, and absolutely SUCK for the recessed springs in a B series motor. Unfortunately, I didn't know this beforehand, so...yeah. These are ****. Avoid them.
Valve spring compressor
Valve stem seal puller and pusher. The proper tools are EXTREMELY expensive. When I say expensive, I mean $200+. Thankfully, my step brother works at a dealership and has access to this stuff, so I'm borrowing his. If you don't have access to them, I promise you, Autozone and Advance don't have them for rent. You can find an acceptable alternative on eBay for $10-$20, but they don't have an integrated slide hammer, so you'll be putting in a little more effort.
The proper tool
Other tools not pictured: O2 sensor socket, machinist's pick, and a dead blow hammer.
If you're using a shitty valve spring compressor like I am, you'll also need an O2 sensor socket. Why an O2 sensor socket? Because it has a chunk cut out of it, and you'll need to be able to get at the keepers with your pick. You'll also need the O2 sensor socket, in combination with your dead blow hammer, to soften up the seats and keepers before you start working. If you have the proper spring compressor, you don't need the O2 sensor socket - a standard 19mm deep well socket will work.
Procedure:
First off, you need the head off the motor. That also means your valve cover will be off, and your cams and cam caps will be removed. I didn't snap a pic of the head before removal, but if you take the head off your motor and remove the manifolds, you're seeing the starting point. Just pretend there's a picture here of what you're looking at.
Pull out your O2 sensor socket Place it flat on the retainer, then give it a few quick strikes with a dead blow hammer. What you're doing here is loosening up the assembly, especially the keepers. Those little ******* are a pain in the ***. Let me say that again - Those little ******* are a pain in the ***. No seriously, you'll end up hating them by the time you're done. If I had the right spring compressor, I might not hate these quite as much as I do. You don't need to beat the **** out of it, just a few solid taps and you're good. Once you've given each valve a few good hits, move on.
Now you need to put the spring compressor O2 sensor socket combination on one of your valves. The dimpled part of the compressor goes on the bottom of the valve, square in the middle. Make sure it's centered. If it isn't, you risk severely damaging your valve. Your O2 sensor socket goes directly on the valve spring retainer, with the open part facing in a direction that is easily accessible to you. The flat part of the compressor then goes onto the top of the O2 sensor socket.
It'll look like this
Dimpled end of compressor seated in valve
Flat part of compressor on socket
This is the hard (and possibly dangerous, if you do it wrong) part! Be very careful! Wear eye protection! Seriously, my step brother had a retainer hit him square in the face once. Now that everything's seated, compress away! Tighten that **** down. See that little cone looking thing still on top of your valve? Poke it with your machinist's pick. Be careful not to lose those little cone things! Those are your keepers - the bane of your existence. If you're lucky, they'll just fall right off when you compress the springs. I was only lucky with two of my valves. Once you have both retainers out, set them to the side. Slowly and carefully remove the compressor. Do it too fast, and your spring and retainer will go flying across the room. Let the compressor slip out of your hand, and your spring and retainer will go flying across the room. If your face happens to be in the way...well, sucks for you. I told you to wear eye protection!
Congratulations, you have successfully disassembled your head!...almost.
Now it's time to remove your valve stem seals. Compared to removing the valves, this part is obscenely easy. If you have a slide hammer style seal remover, open the grabber, place it over your valve stem seal, and close the grabber. Make sure you have it fully wrapped around the entire seal - When you look at my picture, it isn't fully on the seal. Unfortunately, my step brother brought home the wrong size puller, so he'll be bringing the correct sized tool home Monday. A couple good, solid slides, and your valve stem seal will pop off. If you're using the plier-style seal remover, pull and wiggle until it pops off.
Slide hammer (kind of) seated
If you're planning on replacing your valve guides, this is when you'll do it. I'm not replacing mine, but if you are, here's what the FSM says to do. Put your new valve guides in the freezer for about an hour. Put the cylinder head on a hot plate (or in the oven) to bring it up to 300*F. Do not use a torch - you'll warp the head. Do not exceed 300*F - you may loosen the valve seats. Use heavy gloves! If you grab a 300*F chunk of metal with your bare hands, you deserve the second and third degree burns, because you're an idiot. From the cam side, give the valve guides a few taps to move them ~2mm - this gets carbon deposits off of the guides, making them easier to remove. Flip the head over, and drive the guides out towards the cam side of the head. Remove the new guides from the freezer one at a time, as you're about to install it. Apply motor oil to the outside of the guide, and drive it in. Do this part quickly, so the head doesn't cool down too much. If it does, stick it back in the oven or on the hot plate. The new valve guides should have 13.75-14.25mm showing on the intake side, and 15.75-16.25mm showing on the exhaust side.
Now is also the time to recondition your valve seats. Bring your head to a machine shop and let them do it for you. If you happen to have the right tools laying around to do it, you probably also have a FSM to look up the procedure. You need a tool that can cut a 30*, 45*, and 60* seat. If you don't plan on taking your head to a machine shop, or reconditioning your valve seats, use a brass wire brush on a drill or Dremel and lightly clean the seat, as well as the valves. Make sure your brush is brass! Brass won't cut into hardened aluminum or steel.
Regardless of if you plan on replacing your valve guides, or having your valve seats professionally reconditioned, take your block to a machine shop. This is also the time where you need to re-check your head for warpage (if you did your guides). Even if you didn't do your guides, and even if you don't want to recondition your seats, have your local machine shop clean the head for you. A clean head is a happy head!
Now it's time to reinstall your valve stem seals. This part is easy. Lightly coat the inside of the seal with oil and place it over your valve guide. Put your valve stem seal install tool on top of the seal, and give it a couple whacks with your dead blow hammer. It's seated when it's on your valve guide completely.
Valve stem seal install tool, placed over the seal
Now reinstall your valves, springs, retainers, and keepers. In the famous words of the FSM, "Installation is reverse of removal".
Congratulations, you now have a refurbished head!