
DIY: del Sol Rear Window and Trim
 04-23-2009, 12:15 AM
#1
Sol to Sol
Thread Starter
Bear with me, its my first write up, so here goes!
I AM NOT RESPONSIBLE IF YOU BREAK ANYTHING!!! THIS IS ONLY HOW I DID IT!
I did this because the rear trim piece was falling apart, the defogger wasn't working, and the tint had to be replaced. I won't get into how I did the tint and defogger, I just followed the directions on the boxes. Also because I didn't see anything like this.
First, look at 'Courtney's build' (https://honda-tech.com/forums/showth...=2506898)(skip to page 9 if you have seen it before, and scroll down a bit), and see how to get to the rear panel, by taking out the trim pieces.
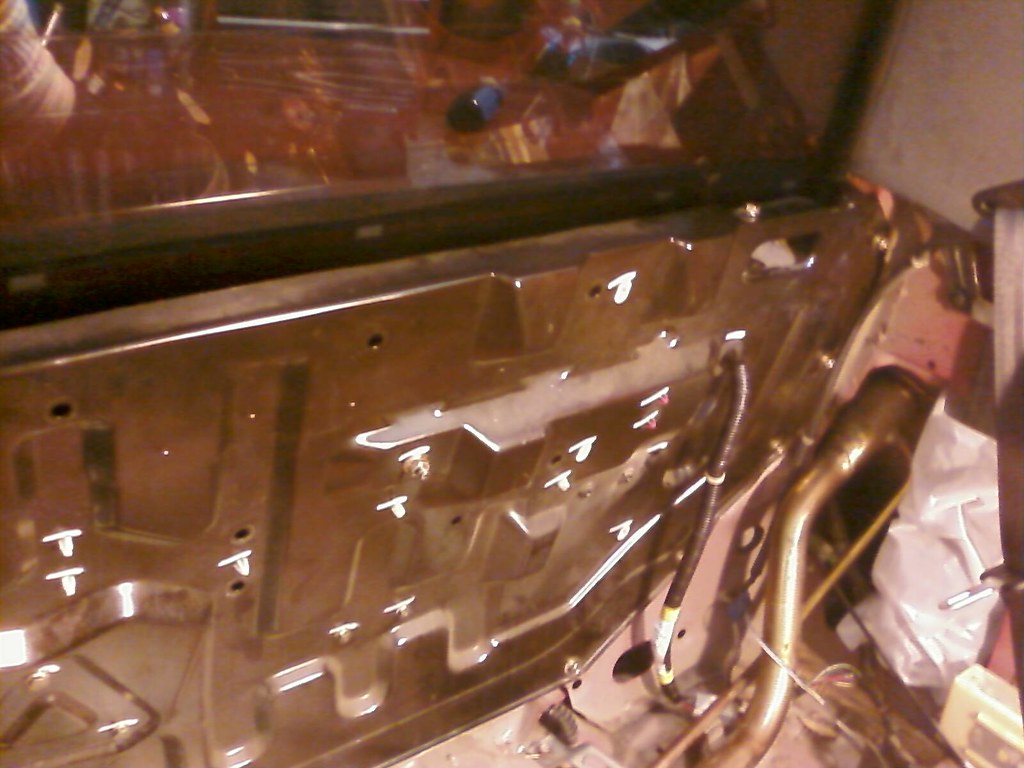
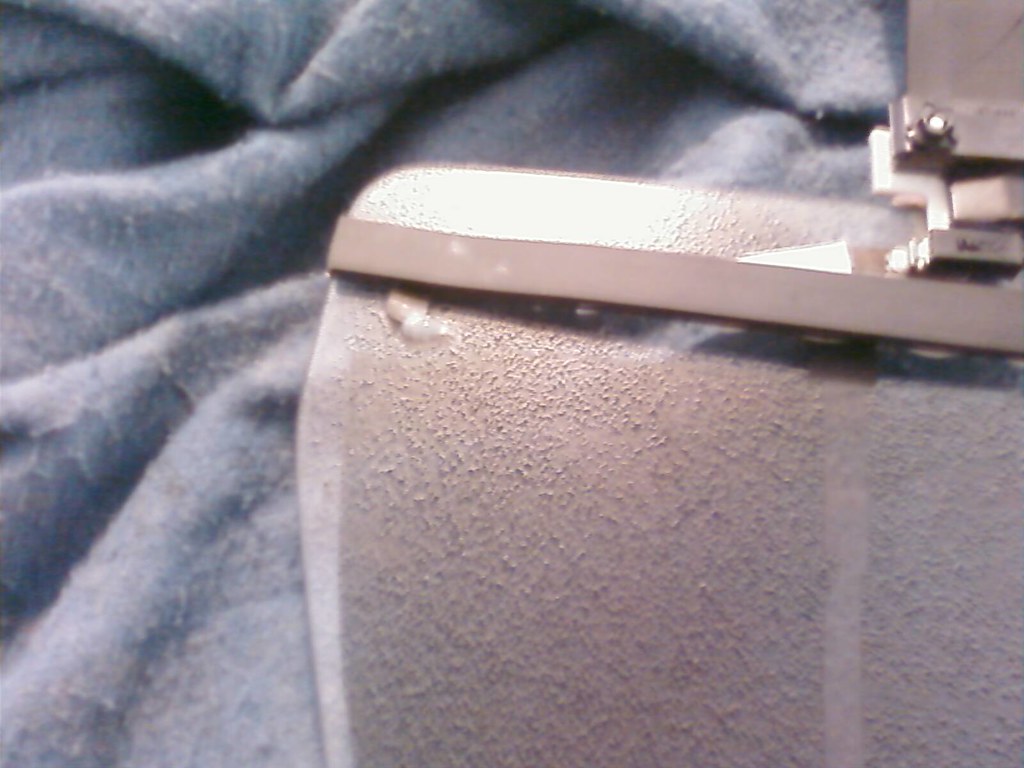
Now you should be here. (please forgive my crappy cellphone pics)
Roll the window down all the way.
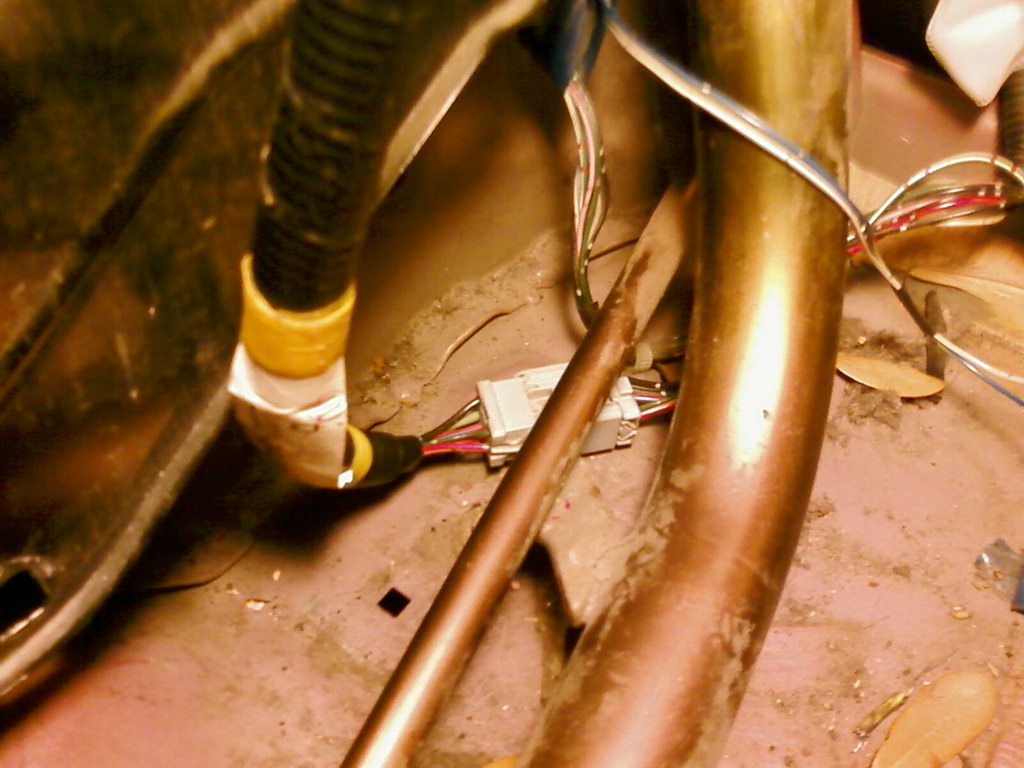
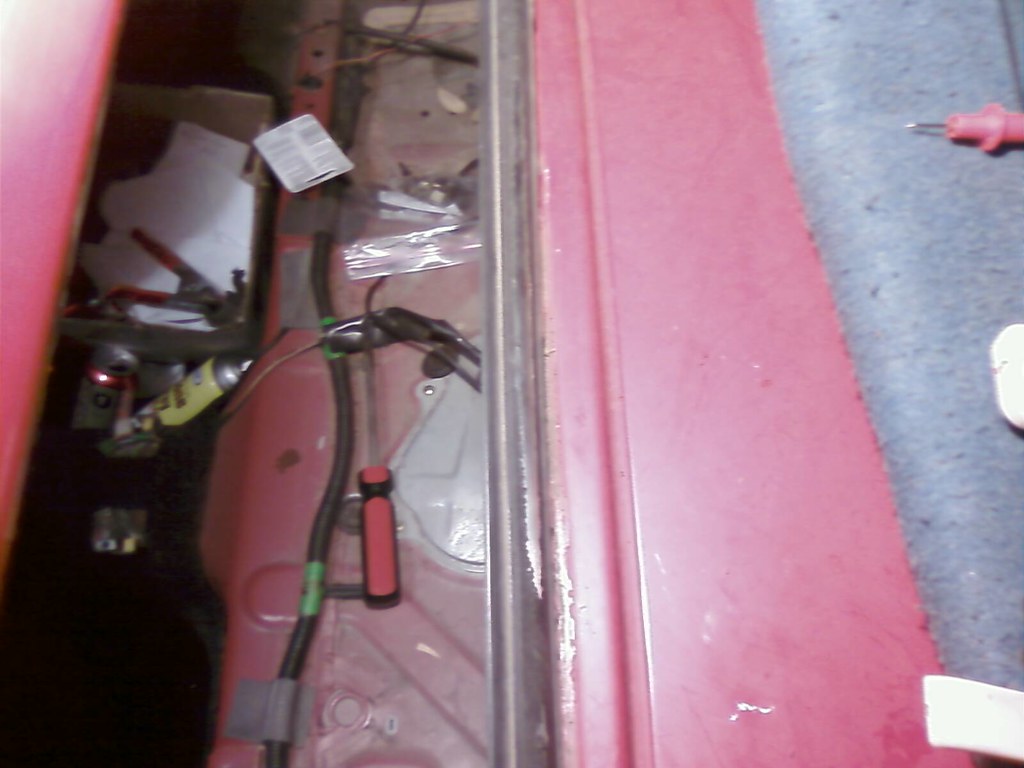
Disconnect this plug under the fuel filler. Pop the connector out of the floor pan. I tilted it, and used a screwdriver just right, and it popped loose, and I'm able to use it again. I also think you can buy one if you have to cut it to get it loose.
On the panel, ONLY LOOSEN the inner 2 nuts, and the 4 bolts Under those nuts, DO NOT REMOVE THESE, OR YOU MAY BREAK YOUR WINDOW!!!
Now remove all the bolts around the outside of the panel.
CAREFULLY, and I mean it!! CAREFULLY start to pull the panel toward the front of the car, its held in by some 'putty like' weatherstripping. (pics of that later) If you go slowly it should give way eventually.
You can also try a small putty knife to loosen it (don't scratch the paint!), but it should loosen on its own.
IF YOU TORQUE THE PANEL TOO MUCH TRYING TO REMOVE IT, YOU CAN BREAK THE GLASS!!! (thats why it helps to loosen and not remove those bolts.)
Now that the panel is loose, carefully lay it flat, and put a furniture mat or beach towel between the window and the panel so the pad/towel is sandwiched.
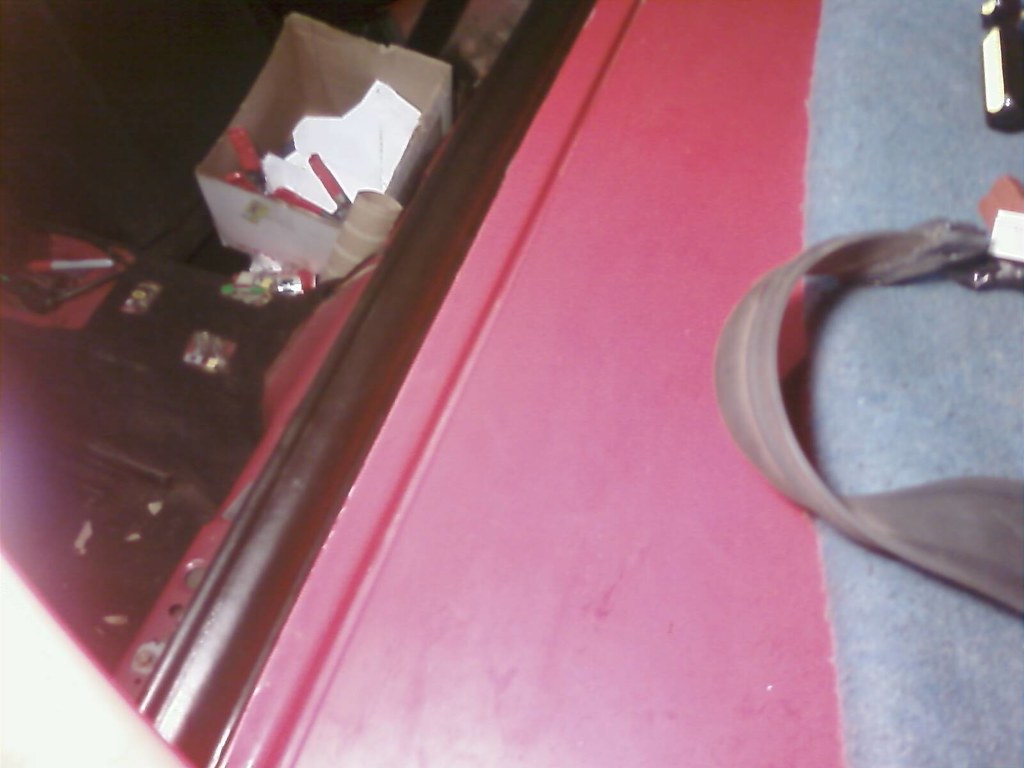
Look inside the channel, and see if anything 'interesting' is there. I found a feather, TONS of leaves (hell the whole car has tons, as you might see in some pics), and a video members card! How the hell did THAT get there!?! lol
Clean what you can, and shoot some air down the drains (one is in the pic above, black thing top left) to be sure they aren't clogged.
Mark the nuts that hold the window, so they will go back in the same place. Sharpie, or whatever, no one will see it later.
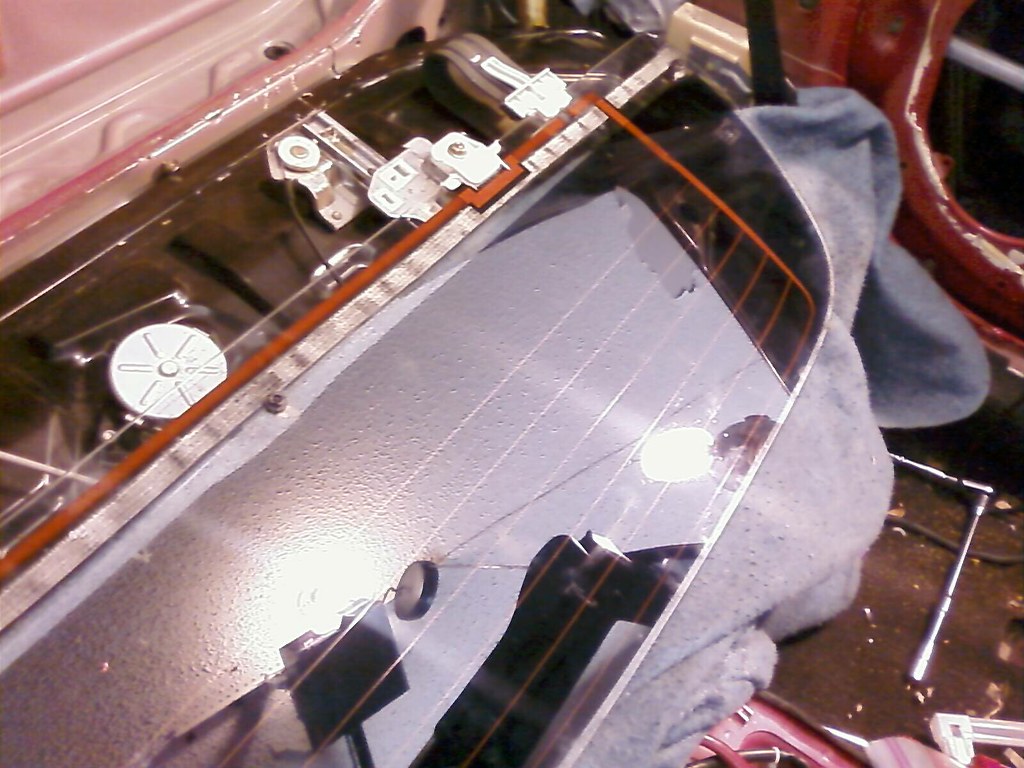
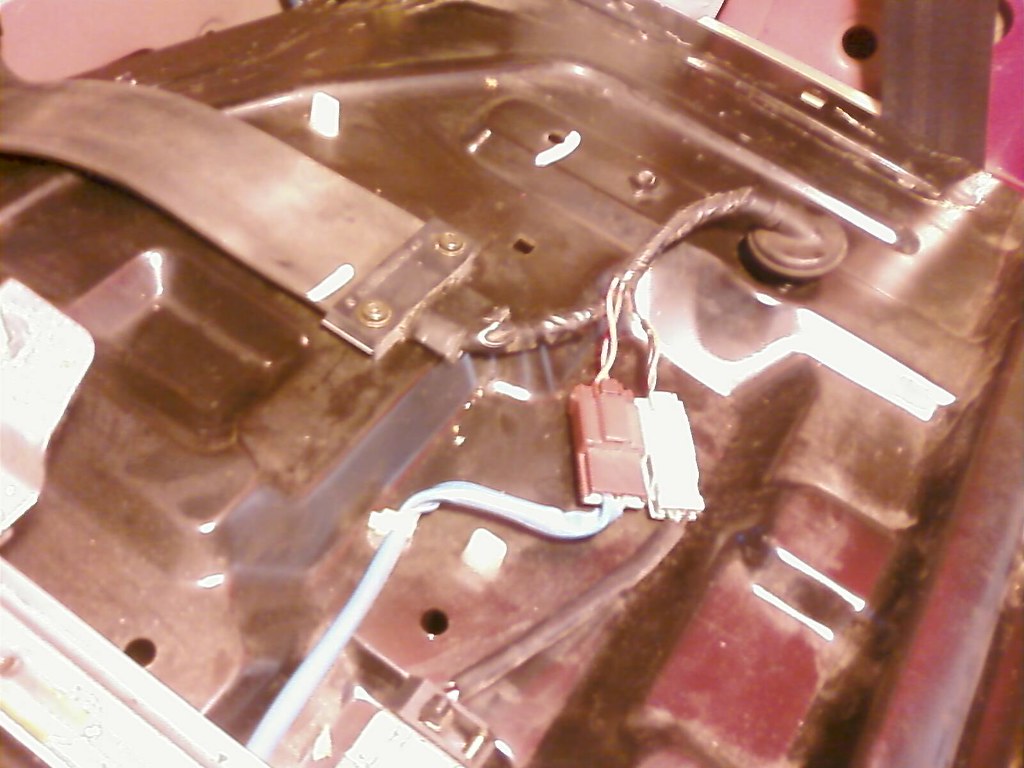
Now you can undo the nuts that hold the window, then carefully lift it to the rear of the car (having a helper is AWESOME! Thanks Fred!).You can set it up in the channel and agents the trunk firewall, just keep a finger on it so it wont go anywhere. Have a towel or something hanging down from the trunk to protect the window from scratches. Now look on the drivers side of the panel, you will see the two plugs and two screws that will need to be unplugged. Also push the grommet thru as seen in pic.
Now your rear window is free!!! Place a mat down on a flat surface, and carefully extract the window from the car and lay it on the mat. Below you will see it finished with new tint and fixed defogger. I could only get 3/4 wide rubber weatherstripping to replace the non existent OEM stuff as also seen in the next two pics... I got auto rubber instead of regular home improvement style, because there are times when you get water on the inside accidentally, and I dont want it to deteriorate like the OEM stuff did. Hopefully this will fit my needs. I got it at Da Zone for $10. It dosent matter how WIDE it is, just dont go too TALL or it may stress the window every time you roll it up.

Clean where the weatherstrip is going to go. Be careful if you are using a razor to help remove the old stuff. NO, I didnt cut the defogger I just fixed!!! (altho, I thought I did!!) Anchor one end just under the plastic 'button' thing on the window where the OEM one used to live... Pull the strip to the other end before you pull the tape off, and cut it to size.
Now continue applying the strip until you get to the other end of the window. Pull the tape off as you go.
Once again helpers rule here!
Now, if all you were here for was to remove/replace the rear window then GTFO!! Your done! Just repeat the steps backwards.Hah, I kid, see below for the last steps...
If you were here to also see what you can do with the trim, here ya go...
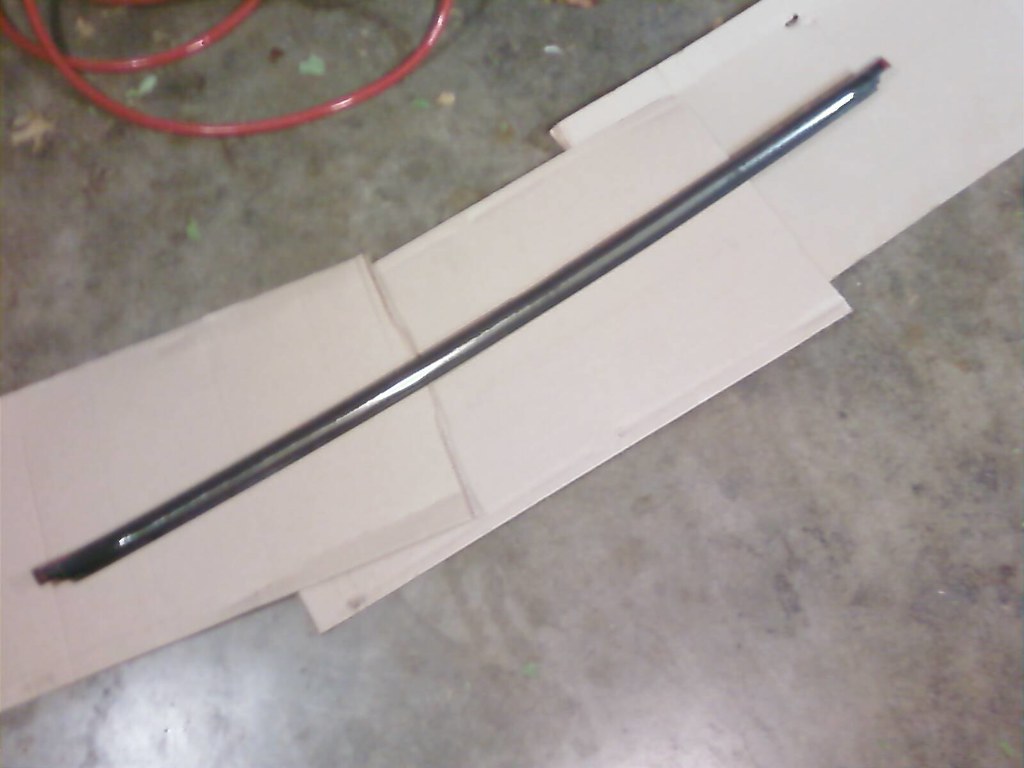
Here is what mine looked like... CRAP! The Rubber had dried up and was flaking off, and someone had painted the rest of the car w/o a good tape job.
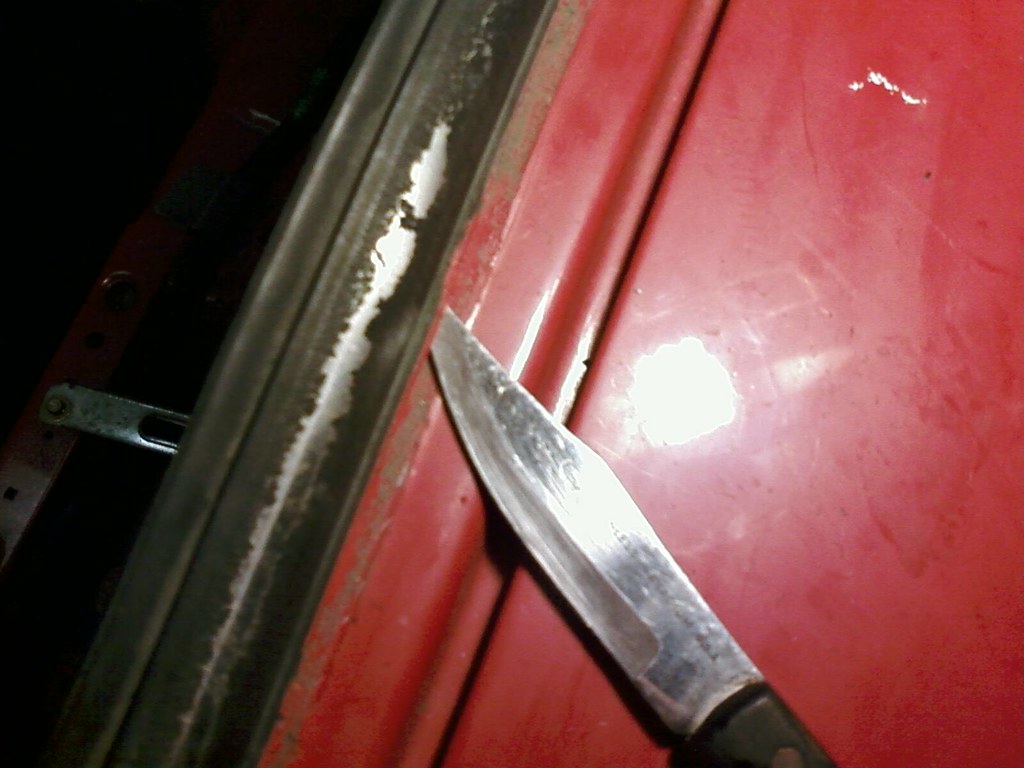
First cut the bond between it and the car (and/or paint like me) Use a utility knife or razer, just dont cut too deep!! (dont use a steak knife, thats just for demonstration.)
I believe you can remove it with the rear panel in. Either that or its just because I just did it, and its used to coming out, but you can try to rotate it out if all you want to do it rejuvenate or replace that piece only. Its pretty stout, the only worry would be the replaceable clips.
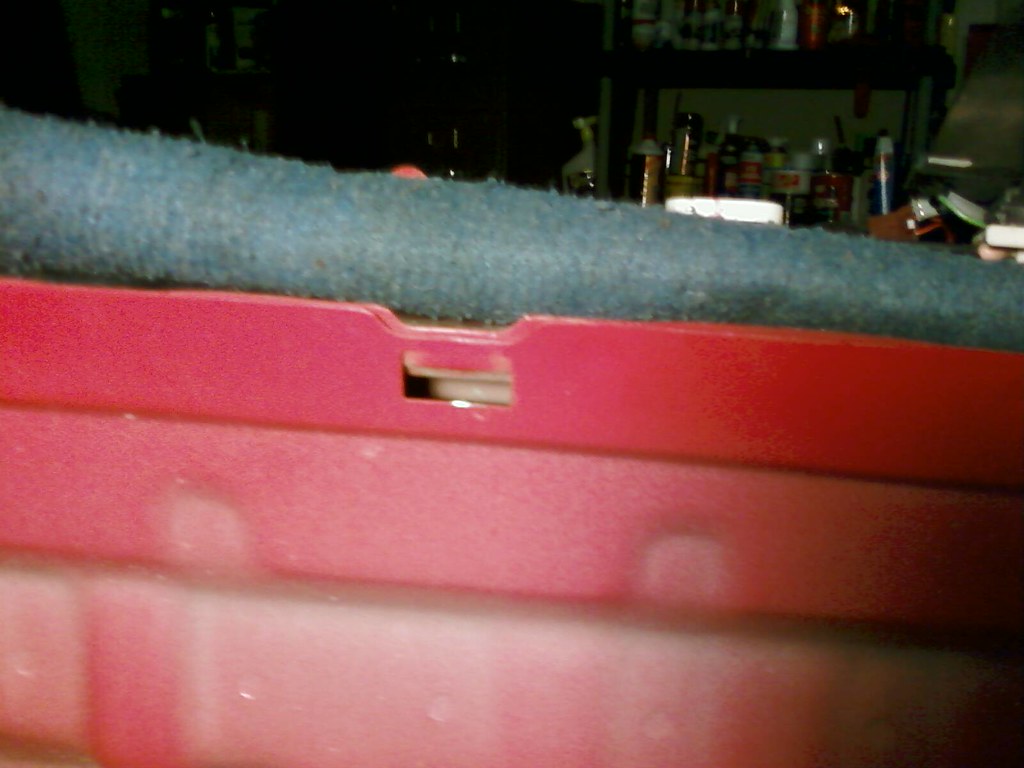
If they give a problem, I think you push on the inside flap on the clip thru the hole (see below)and lift up at the same time, but I just rotated the bottom to the top, and it popped right off! If you break any clips, Majestic has them.
Here are the clips that hold it in.

Here is the hole unencumbered by trim. (FYI, thats my Blue furniture pad protecting the rear window on the trunk, in case you wondered)
Now I put some cardboard down and got ready to recondition it.
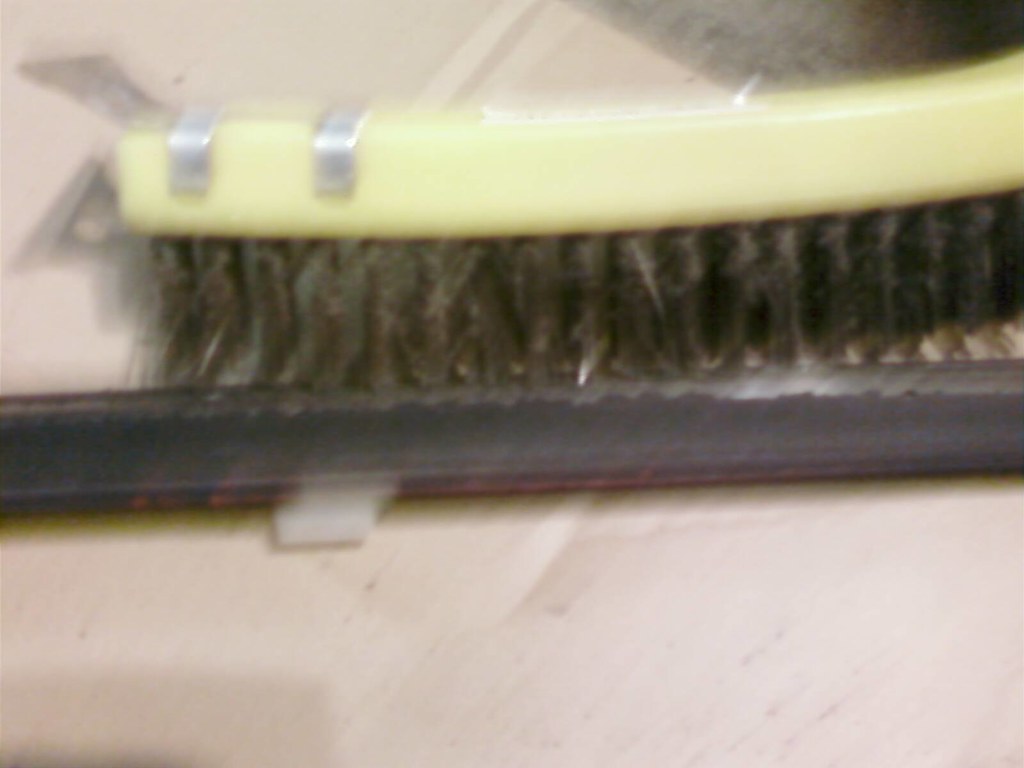
Put a wire brush on it to remove as much of the crusty rubber as possible. I didn't remove it all, just back to where the OEM stuff was sticking. (yes it needs FOCUS!!)
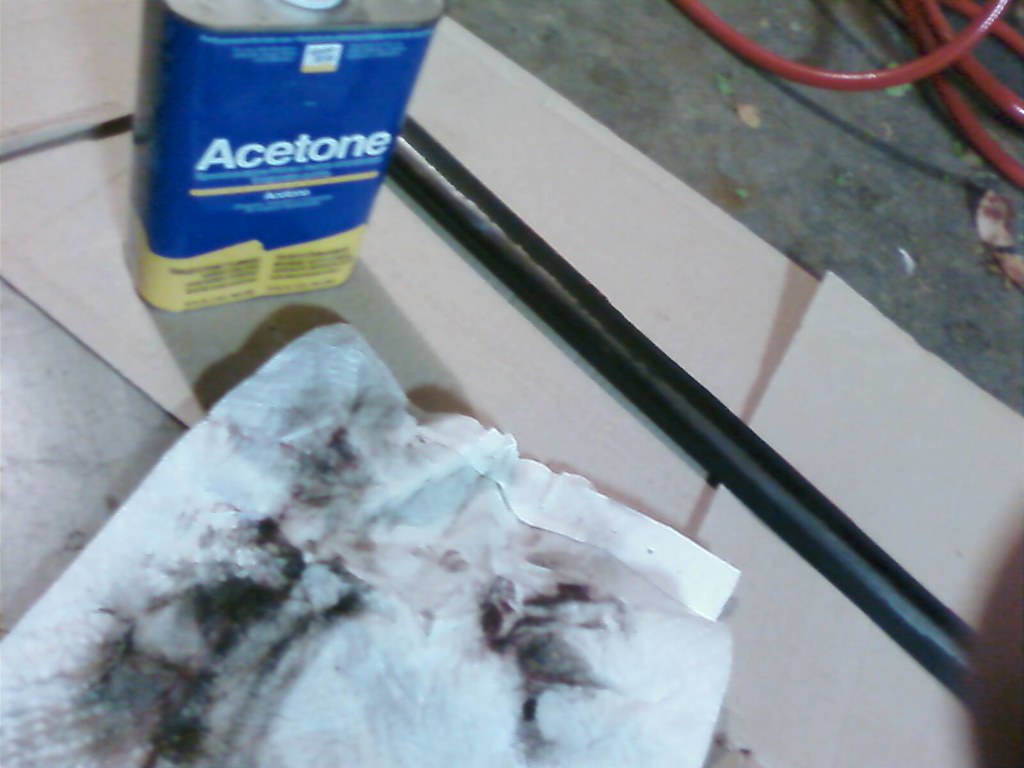
Cleaned it with some Acetone, and paper towels. x2
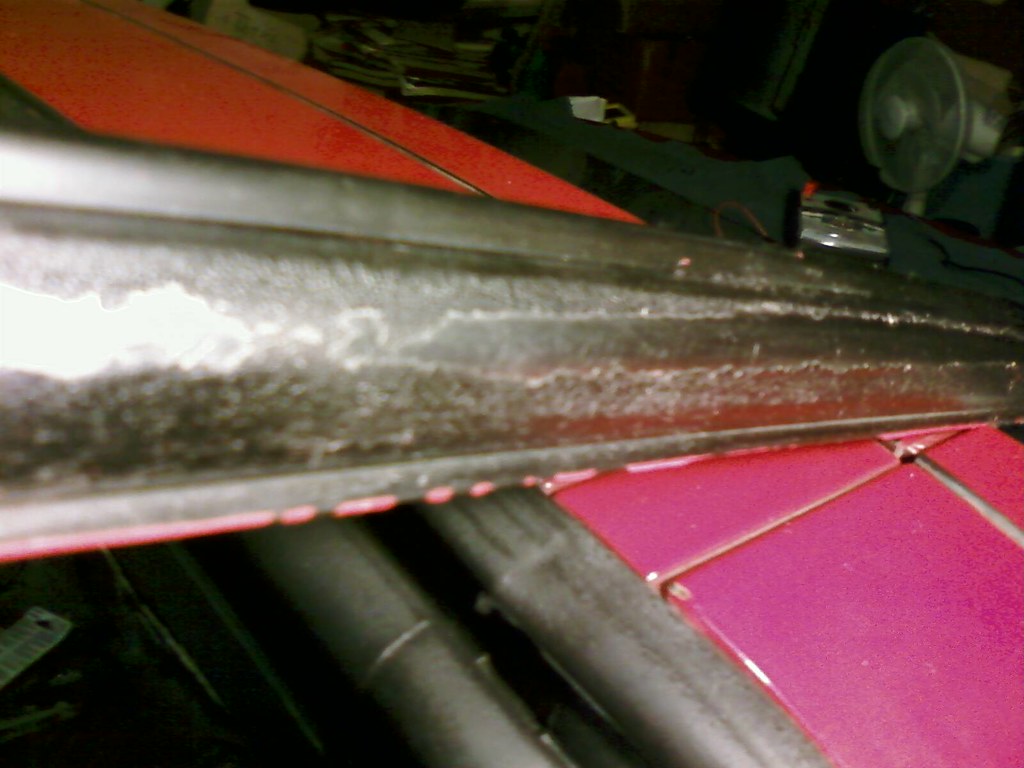
Then I sprayed it with a can of Plasti Dip. ($6 at the home/lowe places) Its like spray paint, but it leaves a rubber-like coating instead. I didn't take pics of that step, but after about 25 coats (a full can!) or so (follow the directions, wait at least 30 mins between coats) it filled in all the gaps left by the missing crusty OEM rubber. I covered it from end to end so it would look uniform. Once dry overnight, it was ready to put back in. Just tuck the ends down on each side, and slide the clips back in their holders. Make sure you do this OUTSIDE or in the GARAGE!!! Its was more toxic smelling than spraypaint (IMHO at least) Good thing is you dont have to sand it!! lol not sure you COULD!
Below is Before, After, and Installed.

OK, 'WINDOW ONLY' PEOPLE!! START READING AGAIN!!!
Now that the trim is back, its time to finish the window. Grease the rails with white lithium grease, but not too much to get on the window later. Now, as said above, install is the reverse of removal.
Clean the old rear panel seal off with a putty knife. (Using just your thumb will rub a blister into it QUICK!! , I forgot to take pic to prove that lol)
You also should use this opportunity to make your window weathertite, otherwise you may have perpetually foggy windows in the morning... Thanks to The Honda Guy (from HT) who gave me the link to buy it
http://www.bernardiparts.com/Honda-D...8712-0003.aspx. I used the part # and got some from my local Stealership.

Here it is applied, the "dripping" parts happened in Japan, NOT by ME!! lol)

As you might see above, I have the 2 bolts (one visible at bottom left) at the bottom center in, so I can use them as a fulcrum to ease the rear panel into place.
Now that its there, loosely put the bolts (loctite'd) back around the perimeter, but dont tighten them yet.
Roll the window up, and make sure everything moves smoothly, and nothing snags or binds.
With the window all the way up, tighten all the bolts up. Apply Loctite so you dont have rattling in a year. Do the bolts under the nuts, then the nuts next. Finish with the outside ones, starting at the center bottom, and working outward/upward. Just touching on the first pass, then back thru once or twice more to get the sealer to sink in uniformly.
Now it should be back to looking like the first pic (cause I took that one LAST!! lol) and you are done, save replacing the trim!!
Hope you enjoied my first DIY, I had fun doing it, and feel free to critque it.
If I ommitted something, or you have a question, please ask here, I check this forum daily.
Good Luck All!!
I AM NOT RESPONSIBLE IF YOU BREAK ANYTHING!!! THIS IS ONLY HOW I DID IT!
I did this because the rear trim piece was falling apart, the defogger wasn't working, and the tint had to be replaced. I won't get into how I did the tint and defogger, I just followed the directions on the boxes. Also because I didn't see anything like this.
First, look at 'Courtney's build' (https://honda-tech.com/forums/showth...=2506898)(skip to page 9 if you have seen it before, and scroll down a bit), and see how to get to the rear panel, by taking out the trim pieces.
Now you should be here. (please forgive my crappy cellphone pics)
Roll the window down all the way.
Disconnect this plug under the fuel filler. Pop the connector out of the floor pan. I tilted it, and used a screwdriver just right, and it popped loose, and I'm able to use it again. I also think you can buy one if you have to cut it to get it loose.
On the panel, ONLY LOOSEN the inner 2 nuts, and the 4 bolts Under those nuts, DO NOT REMOVE THESE, OR YOU MAY BREAK YOUR WINDOW!!!
Now remove all the bolts around the outside of the panel.
CAREFULLY, and I mean it!! CAREFULLY start to pull the panel toward the front of the car, its held in by some 'putty like' weatherstripping. (pics of that later) If you go slowly it should give way eventually.
You can also try a small putty knife to loosen it (don't scratch the paint!), but it should loosen on its own.
IF YOU TORQUE THE PANEL TOO MUCH TRYING TO REMOVE IT, YOU CAN BREAK THE GLASS!!! (thats why it helps to loosen and not remove those bolts.)
Now that the panel is loose, carefully lay it flat, and put a furniture mat or beach towel between the window and the panel so the pad/towel is sandwiched.
Look inside the channel, and see if anything 'interesting' is there. I found a feather, TONS of leaves (hell the whole car has tons, as you might see in some pics), and a video members card! How the hell did THAT get there!?! lol
Clean what you can, and shoot some air down the drains (one is in the pic above, black thing top left) to be sure they aren't clogged.
Mark the nuts that hold the window, so they will go back in the same place. Sharpie, or whatever, no one will see it later.
Now you can undo the nuts that hold the window, then carefully lift it to the rear of the car (having a helper is AWESOME! Thanks Fred!).You can set it up in the channel and agents the trunk firewall, just keep a finger on it so it wont go anywhere. Have a towel or something hanging down from the trunk to protect the window from scratches. Now look on the drivers side of the panel, you will see the two plugs and two screws that will need to be unplugged. Also push the grommet thru as seen in pic.
Now your rear window is free!!! Place a mat down on a flat surface, and carefully extract the window from the car and lay it on the mat. Below you will see it finished with new tint and fixed defogger. I could only get 3/4 wide rubber weatherstripping to replace the non existent OEM stuff as also seen in the next two pics... I got auto rubber instead of regular home improvement style, because there are times when you get water on the inside accidentally, and I dont want it to deteriorate like the OEM stuff did. Hopefully this will fit my needs. I got it at Da Zone for $10. It dosent matter how WIDE it is, just dont go too TALL or it may stress the window every time you roll it up.
Clean where the weatherstrip is going to go. Be careful if you are using a razor to help remove the old stuff. NO, I didnt cut the defogger I just fixed!!! (altho, I thought I did!!) Anchor one end just under the plastic 'button' thing on the window where the OEM one used to live... Pull the strip to the other end before you pull the tape off, and cut it to size.
Now continue applying the strip until you get to the other end of the window. Pull the tape off as you go.
Once again helpers rule here!
Now, if all you were here for was to remove/replace the rear window then GTFO!! Your done! Just repeat the steps backwards.Hah, I kid, see below for the last steps...
If you were here to also see what you can do with the trim, here ya go...
Here is what mine looked like... CRAP! The Rubber had dried up and was flaking off, and someone had painted the rest of the car w/o a good tape job.
First cut the bond between it and the car (and/or paint like me) Use a utility knife or razer, just dont cut too deep!! (dont use a steak knife, thats just for demonstration.)
I believe you can remove it with the rear panel in. Either that or its just because I just did it, and its used to coming out, but you can try to rotate it out if all you want to do it rejuvenate or replace that piece only. Its pretty stout, the only worry would be the replaceable clips.
If they give a problem, I think you push on the inside flap on the clip thru the hole (see below)and lift up at the same time, but I just rotated the bottom to the top, and it popped right off! If you break any clips, Majestic has them.
Here are the clips that hold it in.
Here is the hole unencumbered by trim. (FYI, thats my Blue furniture pad protecting the rear window on the trunk, in case you wondered)
Now I put some cardboard down and got ready to recondition it.
Put a wire brush on it to remove as much of the crusty rubber as possible. I didn't remove it all, just back to where the OEM stuff was sticking. (yes it needs FOCUS!!)
Cleaned it with some Acetone, and paper towels. x2
Then I sprayed it with a can of Plasti Dip. ($6 at the home/lowe places) Its like spray paint, but it leaves a rubber-like coating instead. I didn't take pics of that step, but after about 25 coats (a full can!) or so (follow the directions, wait at least 30 mins between coats) it filled in all the gaps left by the missing crusty OEM rubber. I covered it from end to end so it would look uniform. Once dry overnight, it was ready to put back in. Just tuck the ends down on each side, and slide the clips back in their holders. Make sure you do this OUTSIDE or in the GARAGE!!! Its was more toxic smelling than spraypaint (IMHO at least) Good thing is you dont have to sand it!! lol not sure you COULD!
Below is Before, After, and Installed.
OK, 'WINDOW ONLY' PEOPLE!! START READING AGAIN!!!
Now that the trim is back, its time to finish the window. Grease the rails with white lithium grease, but not too much to get on the window later. Now, as said above, install is the reverse of removal.
Clean the old rear panel seal off with a putty knife. (Using just your thumb will rub a blister into it QUICK!! , I forgot to take pic to prove that lol)
You also should use this opportunity to make your window weathertite, otherwise you may have perpetually foggy windows in the morning... Thanks to The Honda Guy (from HT) who gave me the link to buy it
http://www.bernardiparts.com/Honda-D...8712-0003.aspx. I used the part # and got some from my local Stealership.
Here it is applied, the "dripping" parts happened in Japan, NOT by ME!! lol)
As you might see above, I have the 2 bolts (one visible at bottom left) at the bottom center in, so I can use them as a fulcrum to ease the rear panel into place.
Now that its there, loosely put the bolts (loctite'd) back around the perimeter, but dont tighten them yet.
Roll the window up, and make sure everything moves smoothly, and nothing snags or binds.
With the window all the way up, tighten all the bolts up. Apply Loctite so you dont have rattling in a year. Do the bolts under the nuts, then the nuts next. Finish with the outside ones, starting at the center bottom, and working outward/upward. Just touching on the first pass, then back thru once or twice more to get the sealer to sink in uniformly.
Now it should be back to looking like the first pic (cause I took that one LAST!! lol) and you are done, save replacing the trim!!
Hope you enjoied my first DIY, I had fun doing it, and feel free to critque it.
If I ommitted something, or you have a question, please ask here, I check this forum daily.
Good Luck All!!
Last edited by JarvisW; 04-23-2009 at 12:24 AM.
 04-23-2009, 06:13 AM
#2
Junior Member
Join Date: Apr 2009
Location: MoCo, MD
Posts: 32
Likes: 0
Received 0 Likes
on
0 Posts
I just got a Del Sol and my trim piece is looking pretty crusty, as well. I wouldn't need to remove my entire window to take out that piece, right?? Do I need to take anything else apart to remove that strip, or anything to make it easier?
Thanks!
Thanks!
04-23-2009, 04:45 PM
#3
Sol to Sol
Thread Starter
if you can get it to roll out like I did, then I think so. But if not, you may have to at least pull the panel out a bit to get a screwdriver in there.
Cut it free from any paint or debris on the back lip, then try. It shouldn't hurt to try it.
Cut it free from any paint or debris on the back lip, then try. It shouldn't hurt to try it.
07-19-2009, 08:18 PM
#7
Sol to Sol
Thread Starter
Well, about to make a new thread for the rest of the build.
I hope this helps someone, it seems many Sol owners have either crusty trim, or a broken defogger.
I'll bump again with my suspension and interior thread.
I hope this helps someone, it seems many Sol owners have either crusty trim, or a broken defogger.
I'll bump again with my suspension and interior thread.
Trending Topics
07-19-2009, 08:28 PM
#8

If you just replace the rear weatherstrip, the leaking will go away. The rubber that seals it dries up over time. I had water leaking into my floorboards under my seats during hard rain. Replaced the rear weatherstrip and it doesn't leak there anymore. $60 well spent, and it looks better than if you had just repainted it. Plus, repainting it doesn't solve the sealing problem.
constructive criticism:
-Kinda hard to tell which bolts you are talking about loosening. I still don't know which bolts they are that you are referring to.
constructive criticism:
-Kinda hard to tell which bolts you are talking about loosening. I still don't know which bolts they are that you are referring to.
Last edited by trustdestruction; 07-19-2009 at 08:42 PM.

Thread
Thread Starter
Forum
Replies
Last Post
raverx3m
Honda Civic / Del Sol (1992 - 2000)
13
07-03-2013 12:57 PM
SilverGT
Honda Civic / Del Sol (1992 - 2000)
1
01-28-2007 10:26 PM