
Fixing Up a Turd: A Build Thread
 03-02-2016, 10:52 PM
#76
Anti-GDD White Knight Simp
Jorge Hurtado in S.A. is who tuned my car, seriously world class tuning and only charged around $450 for a full tuning session. Uses a dynapack hub dyno unlike everyone else in the area. Just be sure to have everything squared away before you bring it in, i.e. your motor was actually swapped right and won't break on the dyno. He hates that lol
Can't see any of your imagur hosted pics btw bro
While the motor is out the only other thing I can think of is take a look at the big rod ends, make sure they aren't discolored. If they are you know the rod got overheated from a bad bearing. Also, might want to change your valve seals. Supertech seals are cheap
 03-03-2016, 10:37 AM
#77

Lol the dyno won't be the first time the swap sees some hard pulls, so hopefully there won't be any issues if I go that route.
The images thing is really weird, I can still see them through the URL but they aren't embedding properly anymore, even in my old posts where they used to work fine. I guess Imgur has decided to stop allowing hotlinking or something, which I guess makes sense since they don't get any ad revenue from embedded pictures. For the moment I changed them to be links that will open a new window, but I guess it's time to find a different way to host my pictures.
Also, I forgot to mention in my last post that I ordered Type-R front calipers and 280mm Mini Cooper rotors, but I'm currently up in the air as to what pads I want to run.
Anyways, a complete list of parts on the way for the swap:
- JDM high compression B20B
- Exedy clutch kit
- Exedy master cylinder
- Exedy slave cylinder
- MyHondaHabit oil pan gasket and stud kit
- OEM rear crank seal
- OEM front crank seal
- OEM cam seals (timing belt side)
- OEM valve cover gasket
- OEM water hoses
- OEM oil pump O-ring
- OEM oil pump pickup seal
- OEM oil pan
- OEM power steering belt
- OEM air conditioning belt
- OEM alternator belt
- OEM crush washers for everything I remove
- OEM back timing cover
- Gates timing belt, water pump, and tensioner
- Felpro intake manifold gasket
- Felpro exhaust manifold gasket
- Cat to midpipe gasket
- Beck & Arnley motor mounts
- Beck & Arnley tie rod ends
- Energy Suspension steering rack bushings
- Energy Suspension lower ball joint boots (both lower ball joints are still pretty stiff but the boots are falling apart)
- Synchrotech carbon lined synchronizers
- Synchrotech 3-4 hub
- Synchrotech 3-4 sleeve
- NTN transmission bearings
- OEM transmission seals
- OEM shifter parts
- Energy Suspension shifter bushings
- Peak Performance 4-1 header w/2.5" collector (will do full 2.5" exhaust later, but got a good deal on the header)
And other crap I bought:
- Power Stop Reman ITR front calipers
- Power Stop Reman EP3 Si rear calipers
- 280mm Mini Cooper rotors for the front
- 260mm EP3 Si rotors for the rear
- OEM bottom window moldings and clips
- OEM tie rod boots
- Red leather door inserts
- Red leather armrest cover
Part 15
Last edited by MotorMouth93; 06-10-2016 at 11:49 AM.
03-08-2016, 09:17 PM
#79
Another quick update: I picked up my motor in Dallas over the weekend from JDMAlliance in Dallas. $600 out the door, which isn't great but not terrible either, and it beats the prices I could get by having it shipped in. After researching B20 upgrades it seems that you can get some decent gains with just cams and bolt-ons so I might go that route.
Unloading the engine from the back of the CR-V by myself was...interesting, I probably should have waited until a friend could come and help. But it worked out okay.
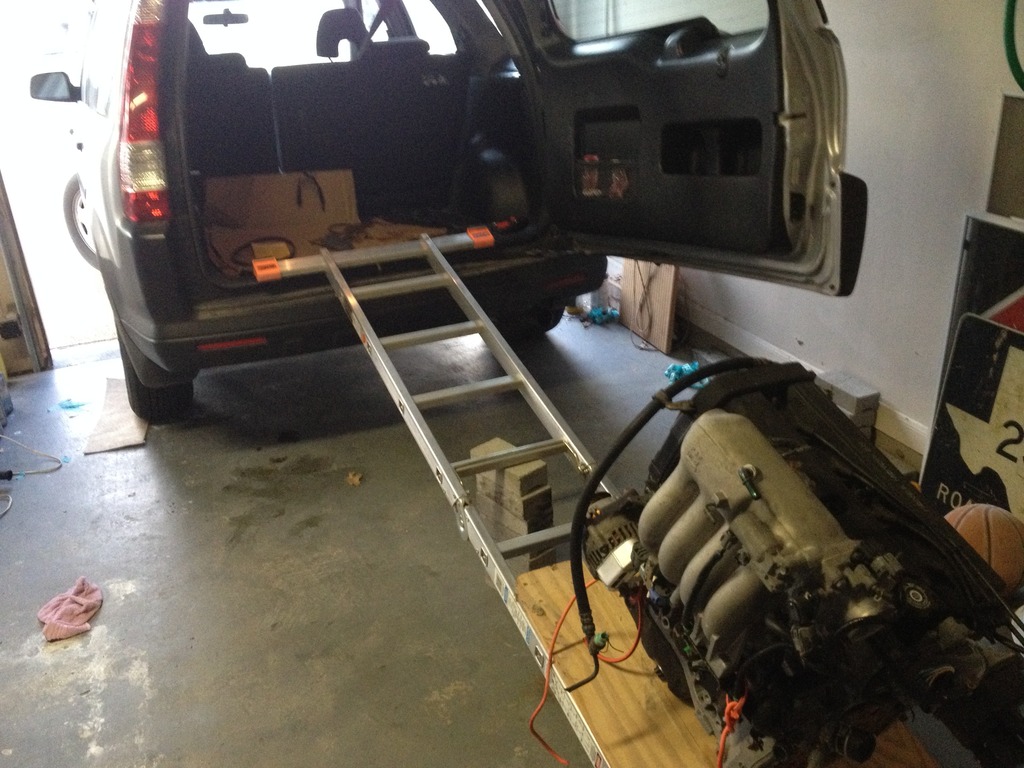
Everything stripped off, the importer said it had 63,xxx miles and it does look pretty clean, but they could have power washed it. Either way I'm replacing all the gaskets. If you know anyone who needs first gen CR-V engine accessories, let me know. They can have anything they want for the price of shipping, they'll probably end up in the dumpster if I can't get rid of it on CL in a week or so.
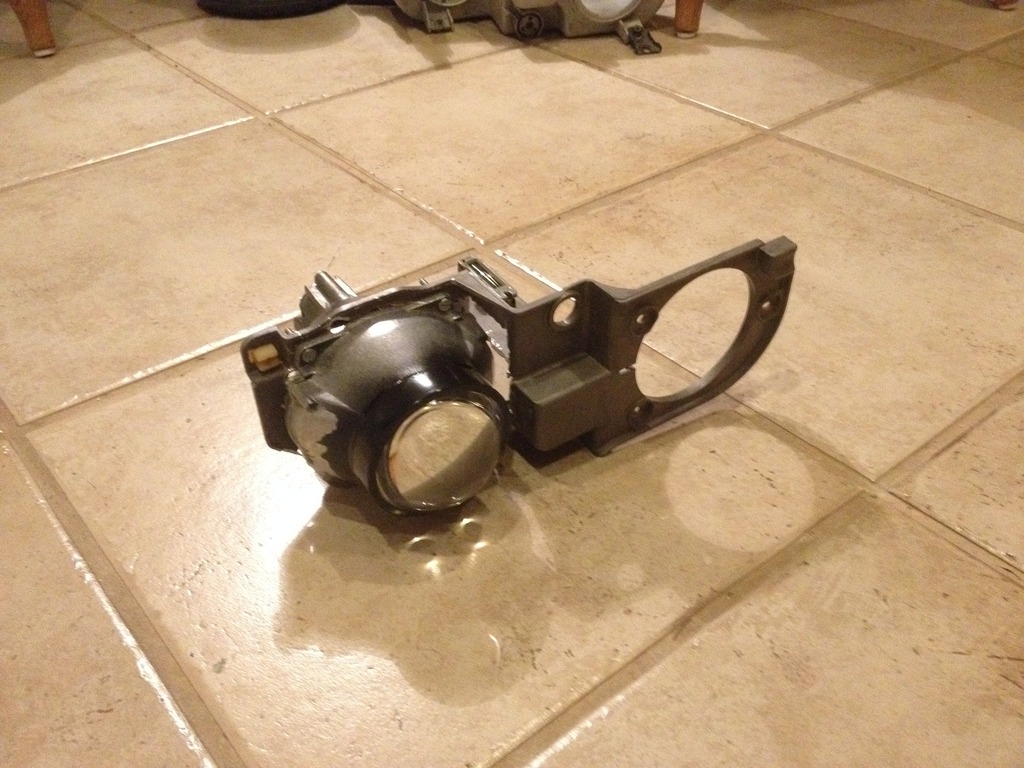
I also started redoing my HID retrofit. The junkyard projectors were worse than the stock halogens but at least I got some good ballasts for cheap out of it, the new projectors are 3" Morimoto FX-R's, the output looks great even up next to projectors like the TL and S2000, it's not as good as those but it's very, very close for a fraction of the price. It takes a ton of cutting to fit them in these brackets though, I made a 3D model of the bracket and then used that to make a template for where to cut and drill and everything lined up perfect the first time, I can post it if anyone is interesting in doing the same retrofit.
I also picked up an engine hoist and stand together for $100 on Craigslist, which is a lot less than I was expecting to pay, and I'm using Photobucket for my images now so hopefully future updates won't have problems with the pictures.
Question: Is there any reason for me to change the head gasket at this point? I wouldn't think so, but it would be WAY easier on an engine stand than it would be in the car.
Part 16
Unloading the engine from the back of the CR-V by myself was...interesting, I probably should have waited until a friend could come and help. But it worked out okay.
Everything stripped off, the importer said it had 63,xxx miles and it does look pretty clean, but they could have power washed it. Either way I'm replacing all the gaskets. If you know anyone who needs first gen CR-V engine accessories, let me know. They can have anything they want for the price of shipping, they'll probably end up in the dumpster if I can't get rid of it on CL in a week or so.
I also started redoing my HID retrofit. The junkyard projectors were worse than the stock halogens but at least I got some good ballasts for cheap out of it, the new projectors are 3" Morimoto FX-R's, the output looks great even up next to projectors like the TL and S2000, it's not as good as those but it's very, very close for a fraction of the price. It takes a ton of cutting to fit them in these brackets though, I made a 3D model of the bracket and then used that to make a template for where to cut and drill and everything lined up perfect the first time, I can post it if anyone is interesting in doing the same retrofit.
I also picked up an engine hoist and stand together for $100 on Craigslist, which is a lot less than I was expecting to pay, and I'm using Photobucket for my images now so hopefully future updates won't have problems with the pictures.
Question: Is there any reason for me to change the head gasket at this point? I wouldn't think so, but it would be WAY easier on an engine stand than it would be in the car.
Part 16
Last edited by MotorMouth93; 08-30-2017 at 06:57 AM.
03-09-2016, 06:54 AM
#80
Anti-GDD White Knight Simp
If this was a running motor at the time they pulled it, you'll be alright leaving the hg alone. If there does happen to be something wrong with it, it's really not much harder to replace in the car. If you're doing a B20vtec build, replace it when you swap the head.
03-16-2016, 08:49 AM
#81
I pulled the coolant plug on the side of the block last night and found this:
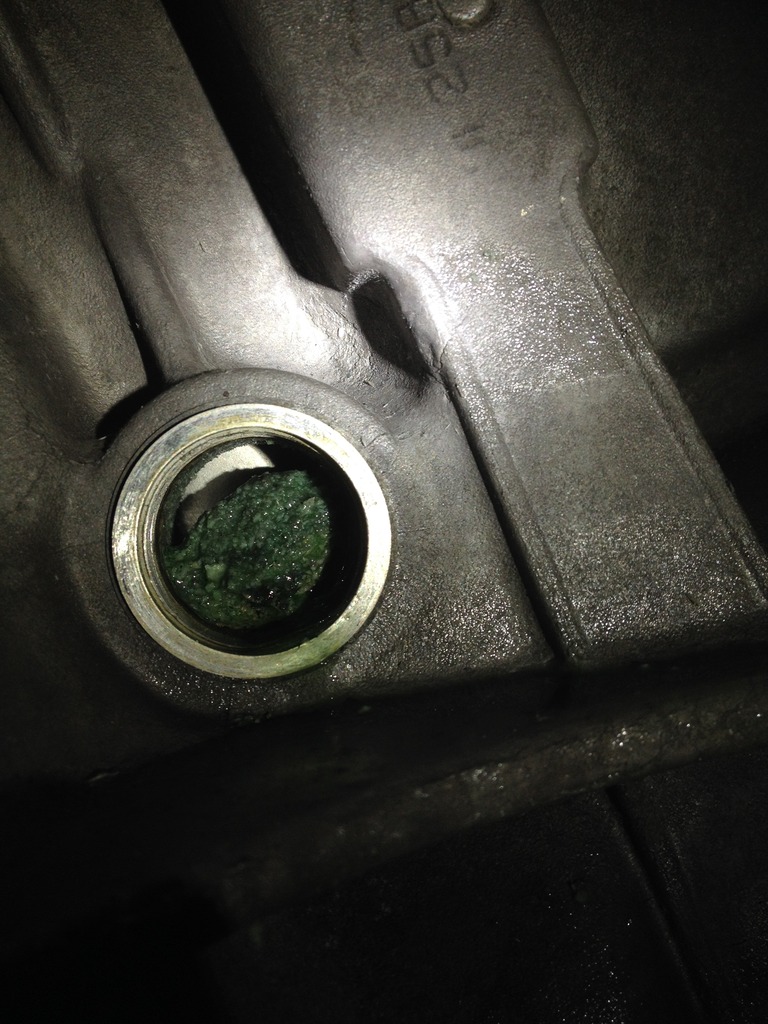
Then I scraped some of it out with a knife so I could see it better.
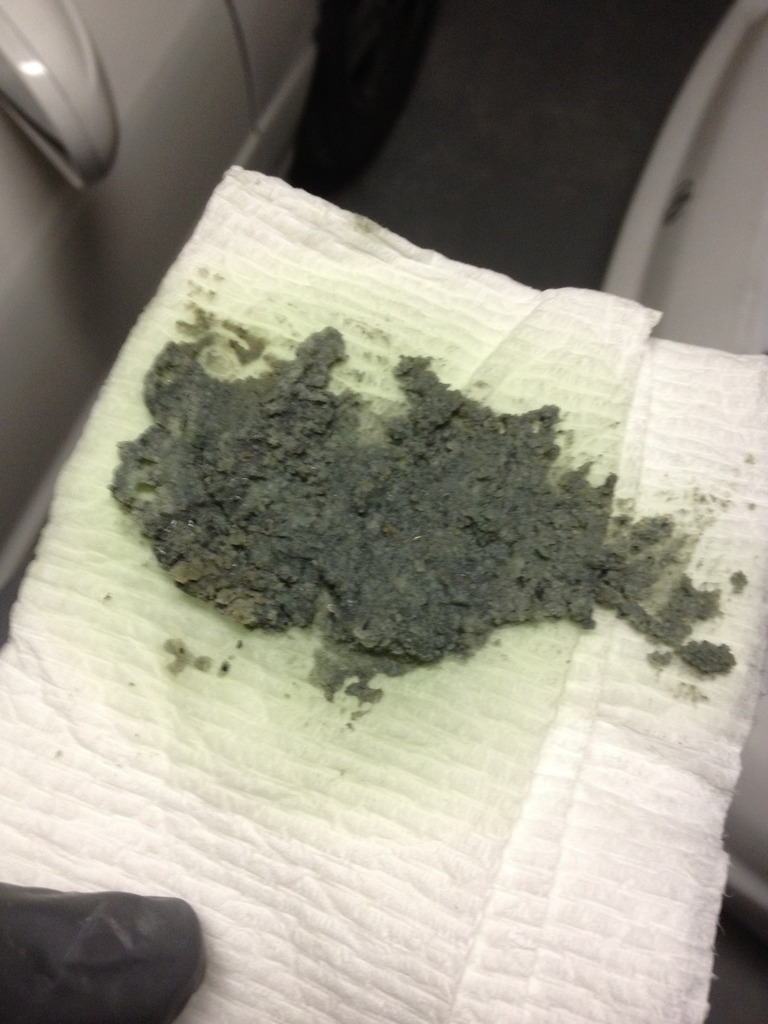
It seems like there's a good 3/4" of this crusty sediment at the bottom of the cylinder water jacket...is this normal? I've seen it mentioned before but usually in context of an old iron block motor..is this indicative of a bigger problem and should I try to get the importer to switch it out for a different one?
Also, I accidentally bought a Hondata S300 ECU yesterday, so I'm not sure how I feel about that...
Part 17
Then I scraped some of it out with a knife so I could see it better.
It seems like there's a good 3/4" of this crusty sediment at the bottom of the cylinder water jacket...is this normal? I've seen it mentioned before but usually in context of an old iron block motor..is this indicative of a bigger problem and should I try to get the importer to switch it out for a different one?
Also, I accidentally bought a Hondata S300 ECU yesterday, so I'm not sure how I feel about that...
Part 17
Last edited by MotorMouth93; 08-30-2017 at 06:58 AM.
03-16-2016, 01:09 PM
#82
Anti-GDD White Knight Simp
Never seen that stuff before, not sure what causes it but it will impede cooling efficiency for sure.
How do you accidentally buy an s300 lol
How do you accidentally buy an s300 lol
03-16-2016, 06:21 PM
#83
You are going to have to some how get the block flushed with pressure. I've seen build up's because people used tap water and have got bad deposits left but that is some next level ****. I would NOT install the motor until you pull the head off and take it to a shop to have them professionally clean the coolant ports out. The stuff on the towel is just what you were able to reach. I am positive if that is what the one port looks like that there are blocked coolant passages all over the block.
03-17-2016, 08:11 AM
#84
I was looking at it more last night and it seems the build up was limited to the recessed area where the port is, I hadn't realized that the port was set an inch or so lower than the bottom of the water jacket so I had thought that the gunk was all around, rather than some just sitting out of the flow by the port.
I also finally got the crank pulley off using two 24" breaker bars, but not before sheering off a 1/2 to 3/8 drive converter, after that I wisened up and got out my 1/2 impact sockets. I pulled the water pump and the passages behind it looked immaculate, and all the passages I can see from outside the block and behind the thermostat are also perfectly clean. If the build up was as bad as I had originally thought I think there would be more signs of it.
What I think I'll do is flush the block myself and see what comes out. If it looks bad I'll pull the head and consider having a shop do it.
3:00AM eBay bidding wars. I got it for $450 so not terrible, but I'll probably end up reselling it.
Last edited by MotorMouth93; 03-17-2016 at 08:50 AM.
03-20-2016, 09:28 PM
#85
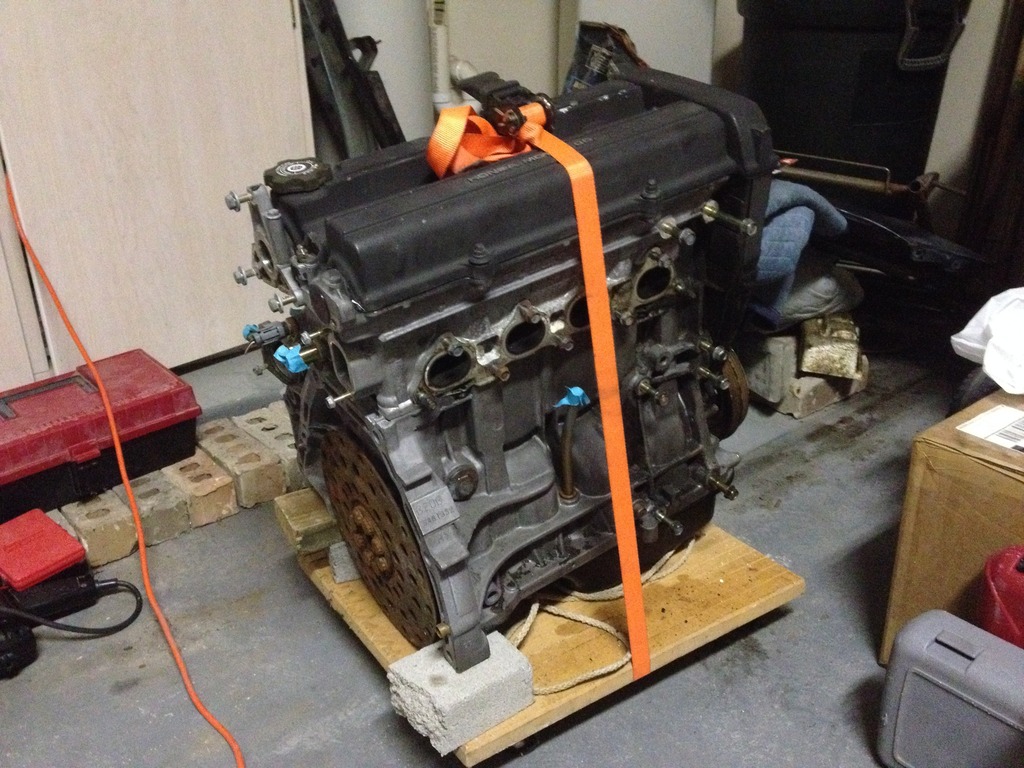
Made some progress with the motor this weekend, and also discovered some more setbacks.
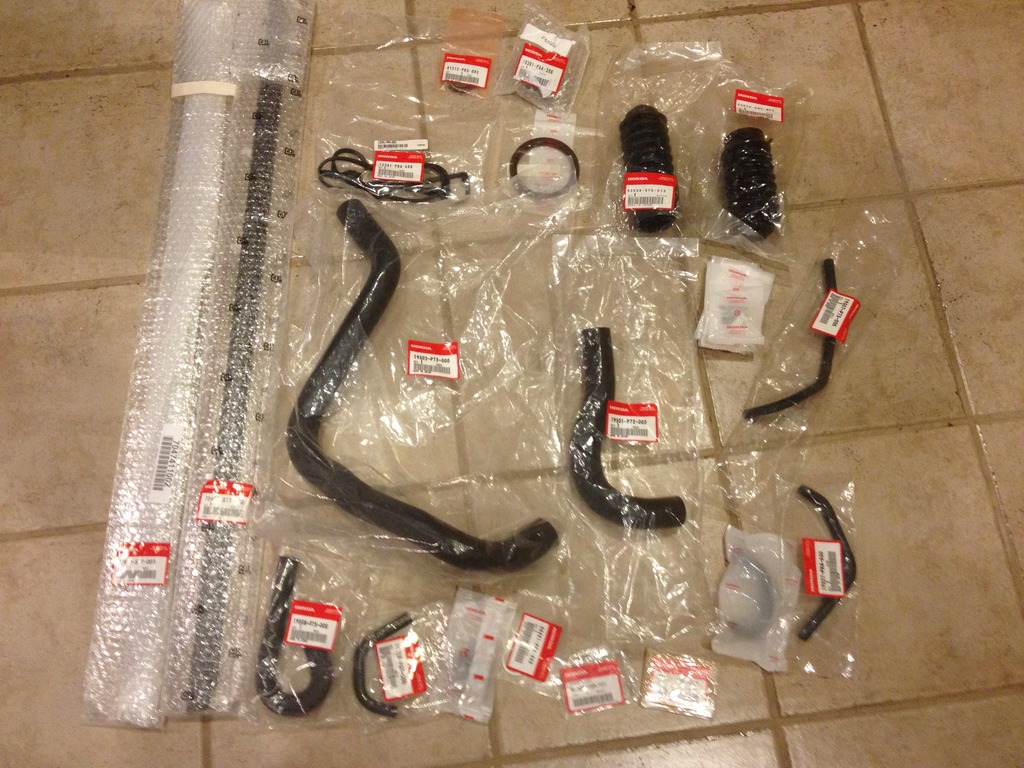
New parts! This makes me irrationally happy.
The back timing cover is warped and touching the timing belt, I should have noticed this when I picked up the motor and gotten a different one, so I'll have to replace that.
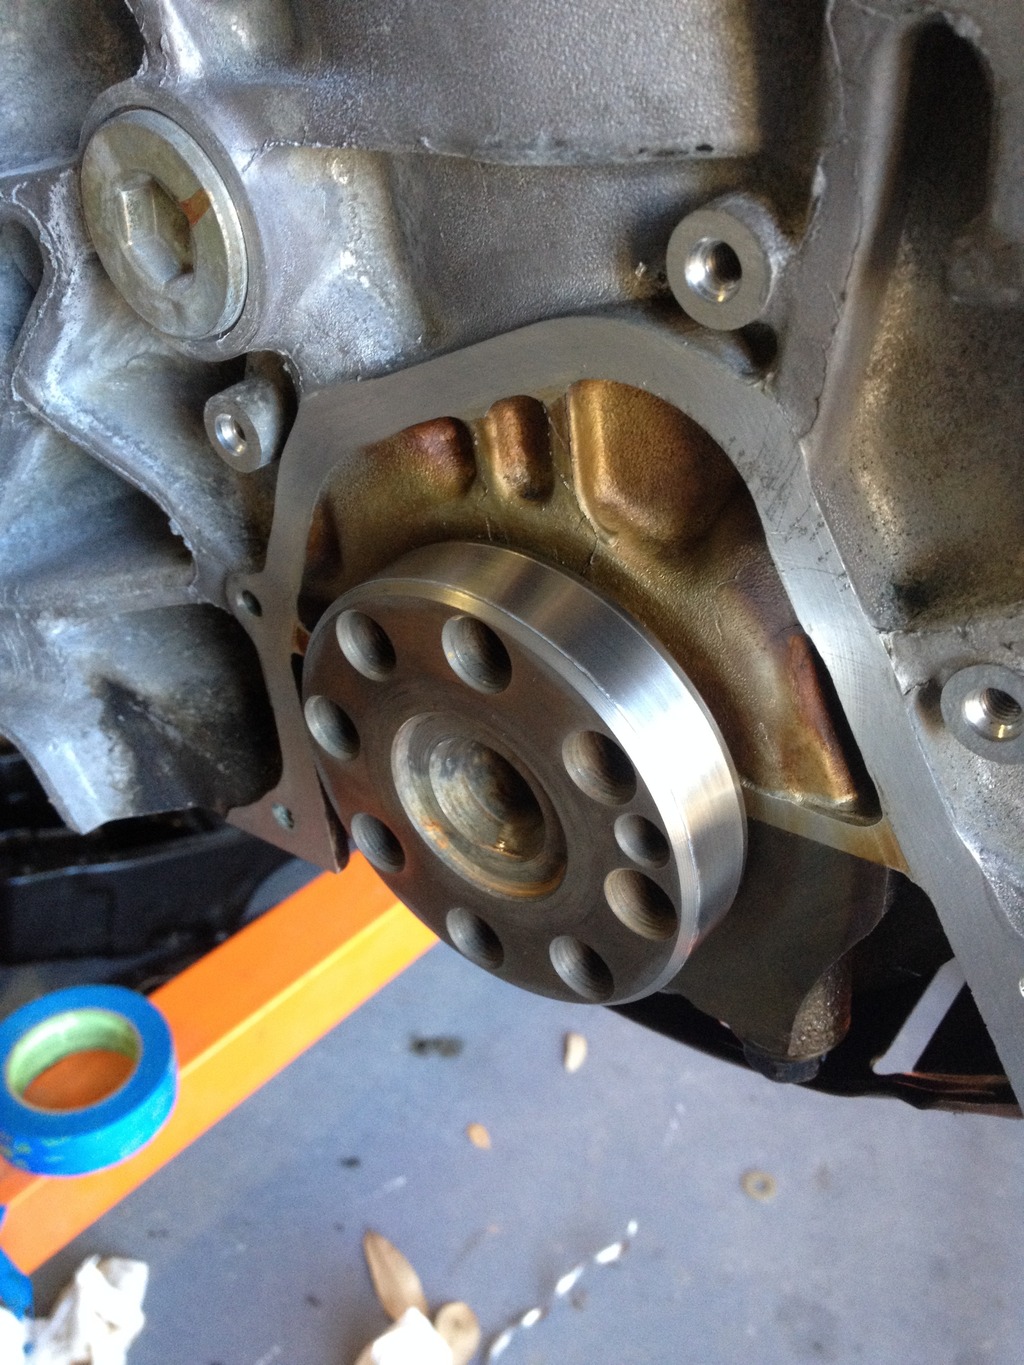
And when replacing the front main seal, I followed some rather poor advice and tried to put a screw into the old seal to pull it out, which resulted in my scratching the crankshaft. Completely my bad, I should not have tried to save a few minutes not removing the oil pump. After seeing how difficult the seal was to remove with the oil pump off, I can't imagine the screw trick working even without scratching the crankshaft.
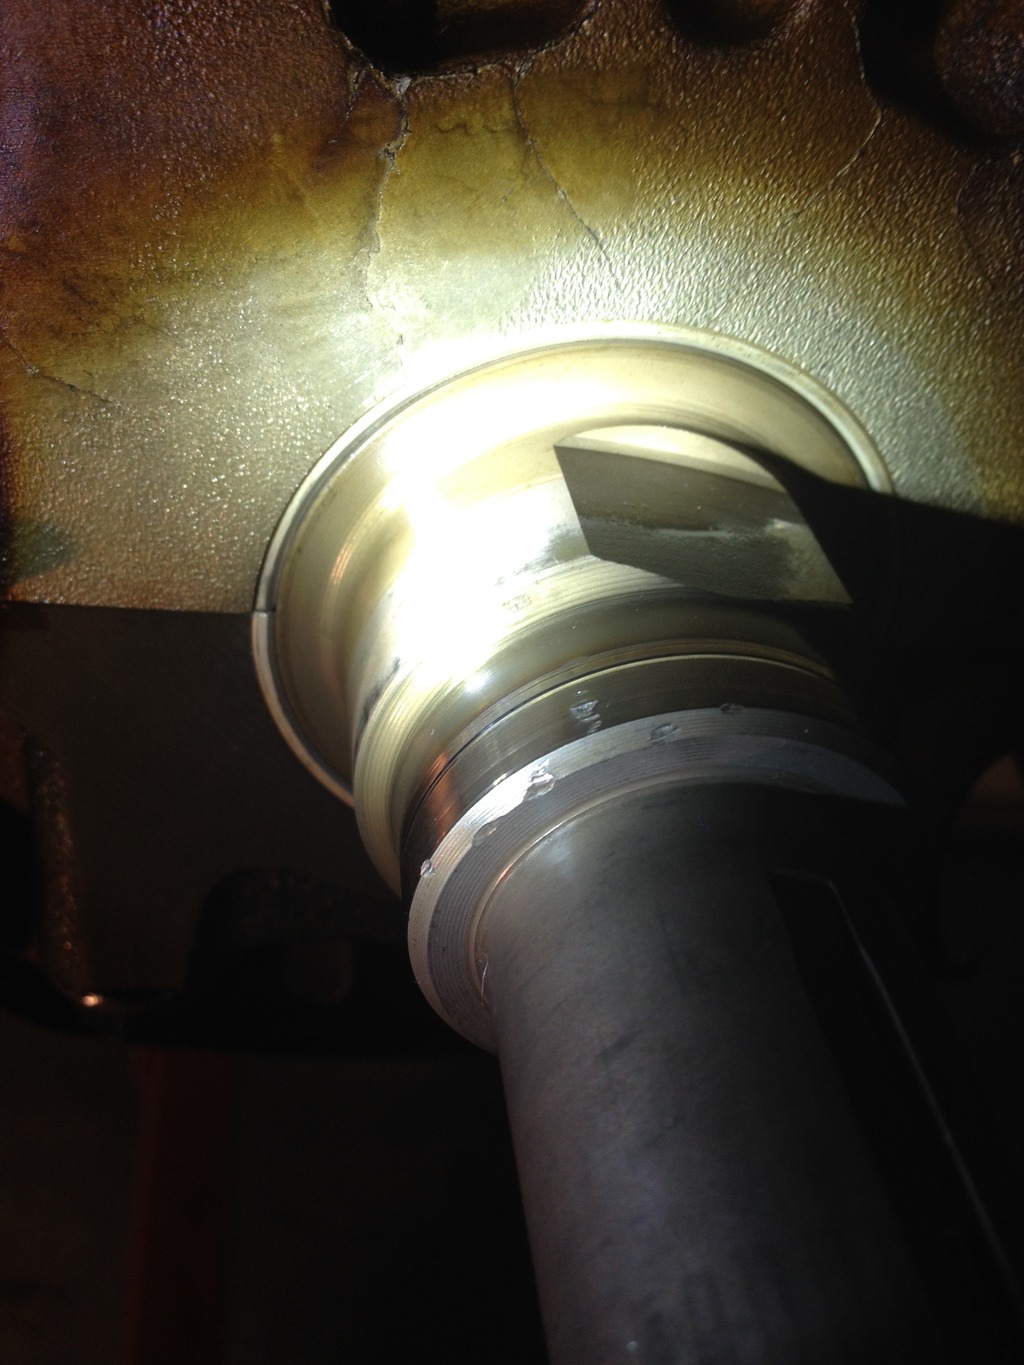
So I put on a sleeve and put it all back together. Maybe it's for the better though, as a small groove had started to wear into the shaft from the old seal.
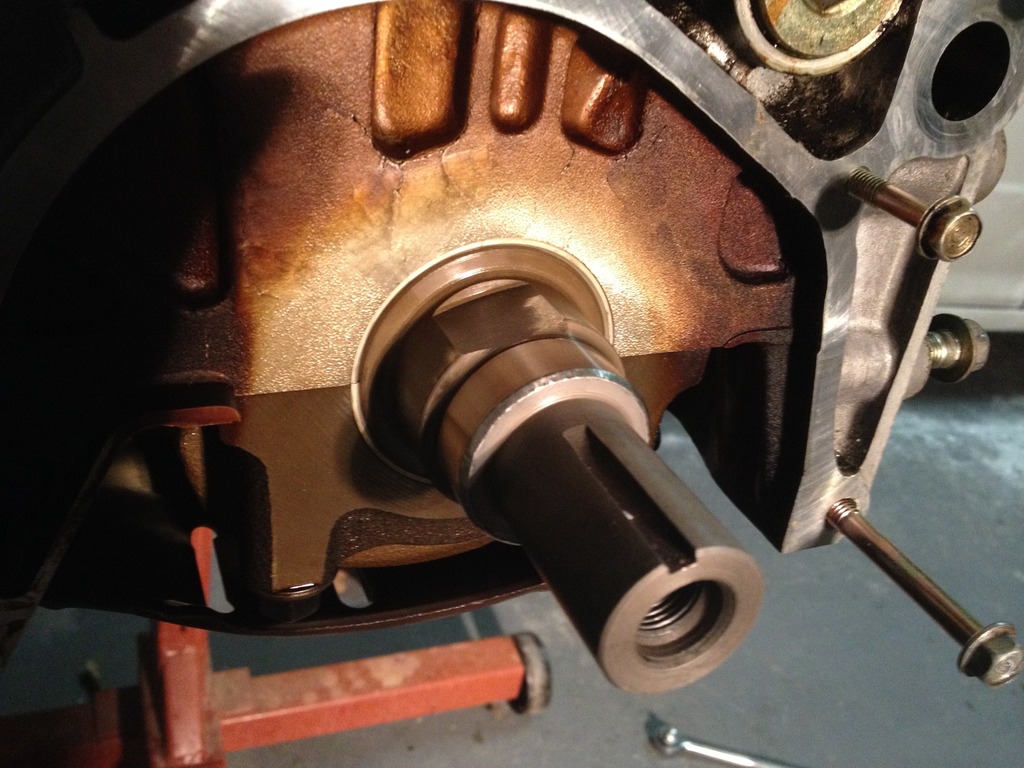
I went ahead and sleeved the rear seal surface for good measure, as it was also started to develop a small groove. I have no intentions of dealing with leaking oil seals anytime soon. This was kind of annoying to do since I had to suspend the motor from the hoist while doing the work because I can't set it down because the oil pan has to be off.
OEM Rear Main Seal installed.
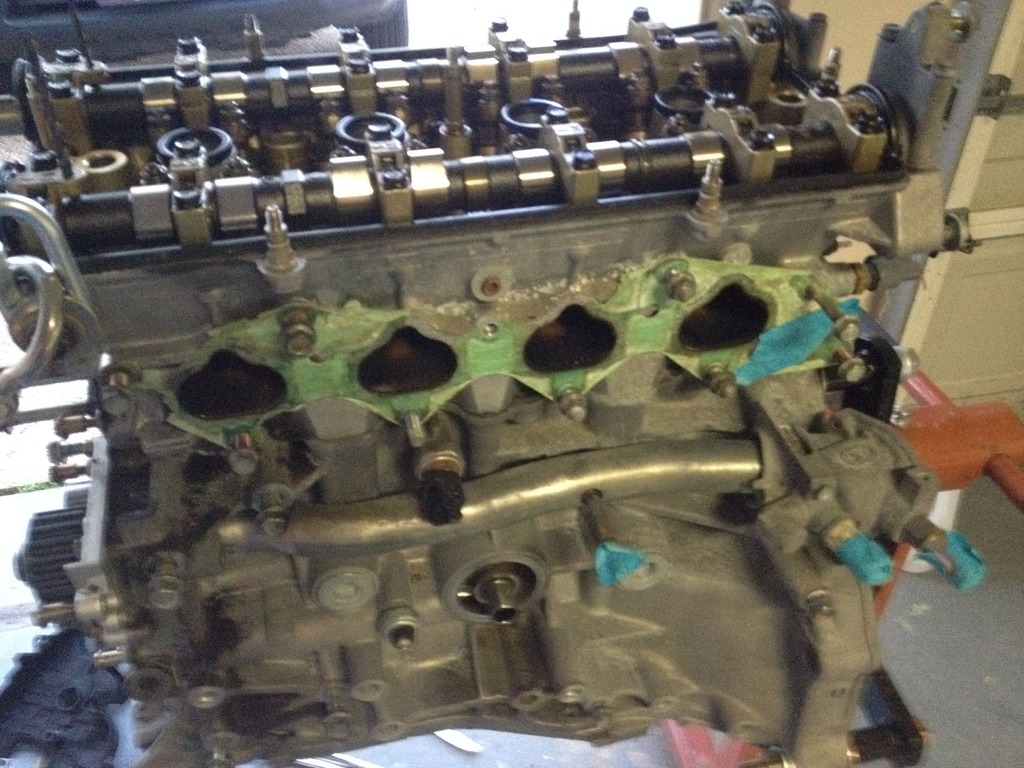
And I cleaned up the exhaust manifold gasket surface and then attempted the intake, it's ridiculously slow and I had no idea that paper could so seamlessly fuse to aluminum like this. Any tips for making this go faster? It eats razor blades like crazy, I maybe got 15% through it and had already ruined two of them.
I also discovered that my back timing cover was warped, which is something I should have noticed when I picked up the engine from the importer, but oh well. I'll have to order a new one so it doesn't scrape on the timing belt. I'll probably replace the cam oil seals while I'm at it since they are starting to leak a bit.
Part 18
New parts! This makes me irrationally happy.
The back timing cover is warped and touching the timing belt, I should have noticed this when I picked up the motor and gotten a different one, so I'll have to replace that.
And when replacing the front main seal, I followed some rather poor advice and tried to put a screw into the old seal to pull it out, which resulted in my scratching the crankshaft. Completely my bad, I should not have tried to save a few minutes not removing the oil pump. After seeing how difficult the seal was to remove with the oil pump off, I can't imagine the screw trick working even without scratching the crankshaft.
So I put on a sleeve and put it all back together. Maybe it's for the better though, as a small groove had started to wear into the shaft from the old seal.
I went ahead and sleeved the rear seal surface for good measure, as it was also started to develop a small groove. I have no intentions of dealing with leaking oil seals anytime soon. This was kind of annoying to do since I had to suspend the motor from the hoist while doing the work because I can't set it down because the oil pan has to be off.
OEM Rear Main Seal installed.
And I cleaned up the exhaust manifold gasket surface and then attempted the intake, it's ridiculously slow and I had no idea that paper could so seamlessly fuse to aluminum like this. Any tips for making this go faster? It eats razor blades like crazy, I maybe got 15% through it and had already ruined two of them.
I also discovered that my back timing cover was warped, which is something I should have noticed when I picked up the engine from the importer, but oh well. I'll have to order a new one so it doesn't scrape on the timing belt. I'll probably replace the cam oil seals while I'm at it since they are starting to leak a bit.
Part 18
Last edited by MotorMouth93; 08-30-2017 at 07:00 AM.
03-29-2016, 07:33 AM
#86
I got a good bit done over this 4 day easter weekend (thanks work, you da best).
My interior goodies finally showed up after I went to the post office, got a printout of the signature on the package, and then took it to my apartment complex. After that the package suddenly appeared when before they were claiming that they didn't have it.
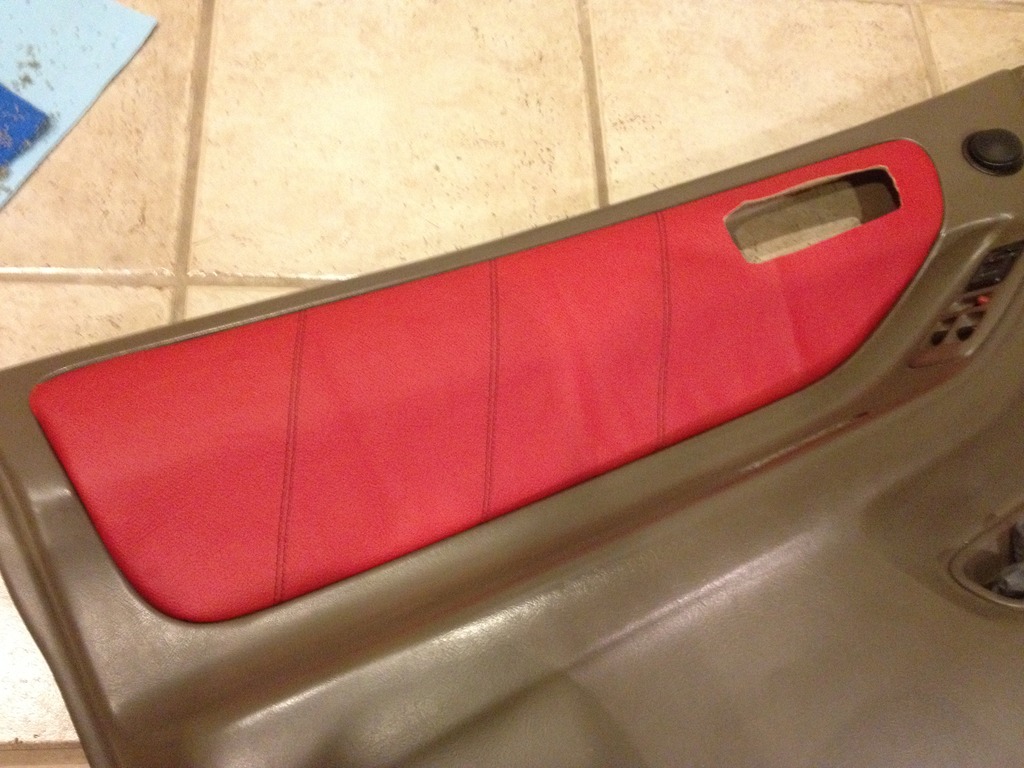
Red Armrest
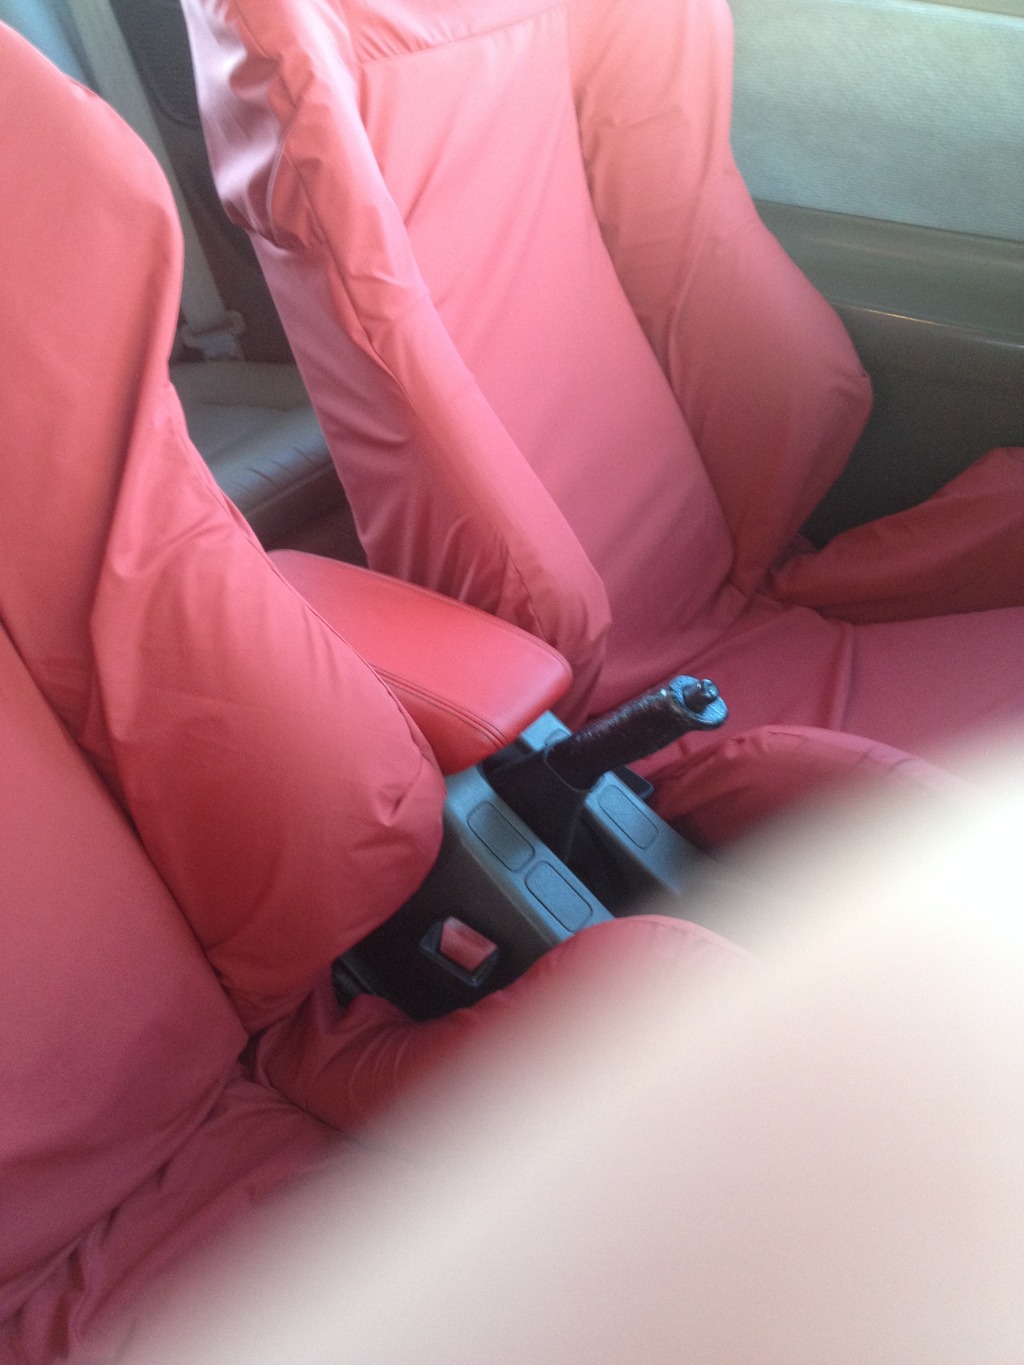
Red Door Inserts (test fit, they aren't glued in in this picture so are a bit wrinkled still)
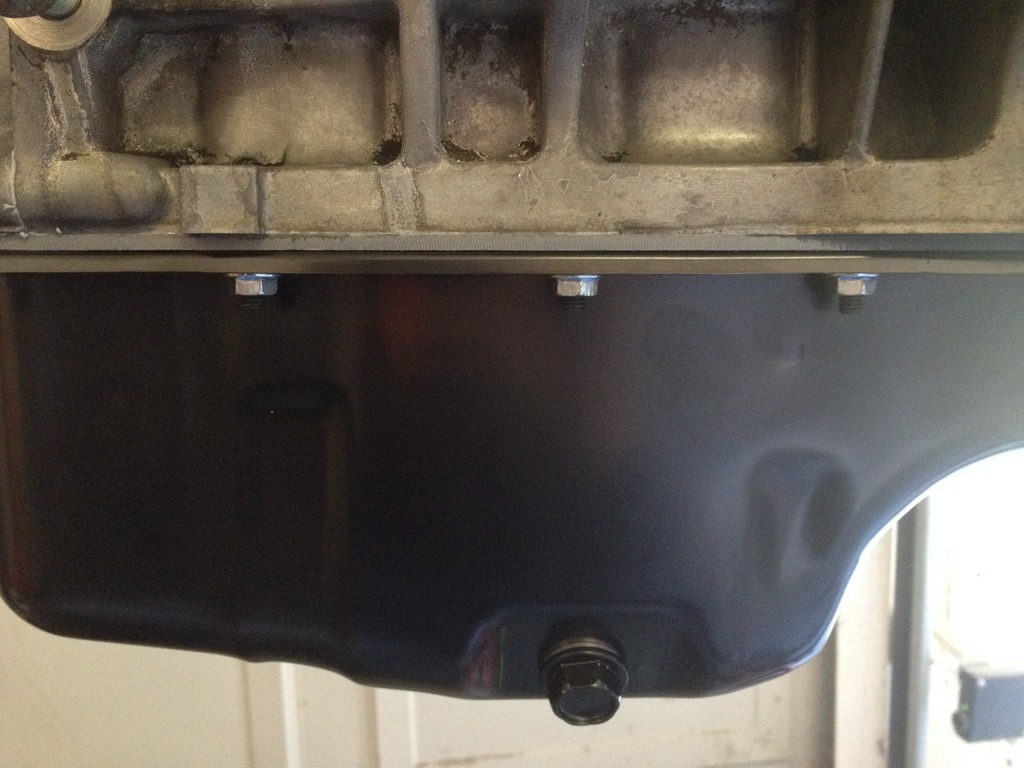
My new OEM oil pan also showed up, so I was able to install the MyHondaHabit oil pan gasket and stud kit. Seems to be high quality but we'll see how well it holds up when there's oil in it.
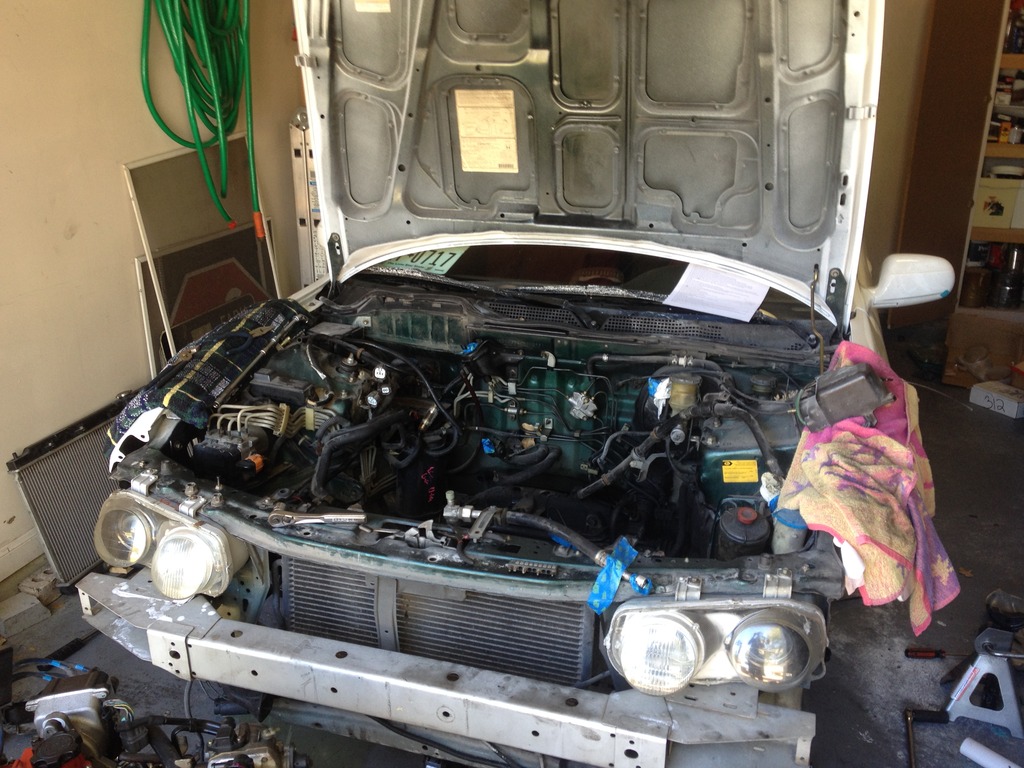
And I was also able to get the engine out, finally. Now I'm just waiting on a few more things to come in before I can put it all back together. I was amazed just how much dirt and oil had built up on the outside of the old engine, in some cases I could barely find the bolts to remove accessories, but I guess that's what happens with constant oil leaks for years. I just removed the PS pump and AC compressor entirely because they both need to have the oil gunk cleaned off and I think it's time for both systems to be drained and refilled with new fluid/refrigerant.
Part 19
My interior goodies finally showed up after I went to the post office, got a printout of the signature on the package, and then took it to my apartment complex. After that the package suddenly appeared when before they were claiming that they didn't have it.
Red Armrest
Red Door Inserts (test fit, they aren't glued in in this picture so are a bit wrinkled still)
My new OEM oil pan also showed up, so I was able to install the MyHondaHabit oil pan gasket and stud kit. Seems to be high quality but we'll see how well it holds up when there's oil in it.
And I was also able to get the engine out, finally. Now I'm just waiting on a few more things to come in before I can put it all back together. I was amazed just how much dirt and oil had built up on the outside of the old engine, in some cases I could barely find the bolts to remove accessories, but I guess that's what happens with constant oil leaks for years. I just removed the PS pump and AC compressor entirely because they both need to have the oil gunk cleaned off and I think it's time for both systems to be drained and refilled with new fluid/refrigerant.
Part 19
Last edited by MotorMouth93; 08-30-2017 at 07:02 AM.
04-15-2016, 02:25 PM
#87
Got a good amount done over the past couple weeks.
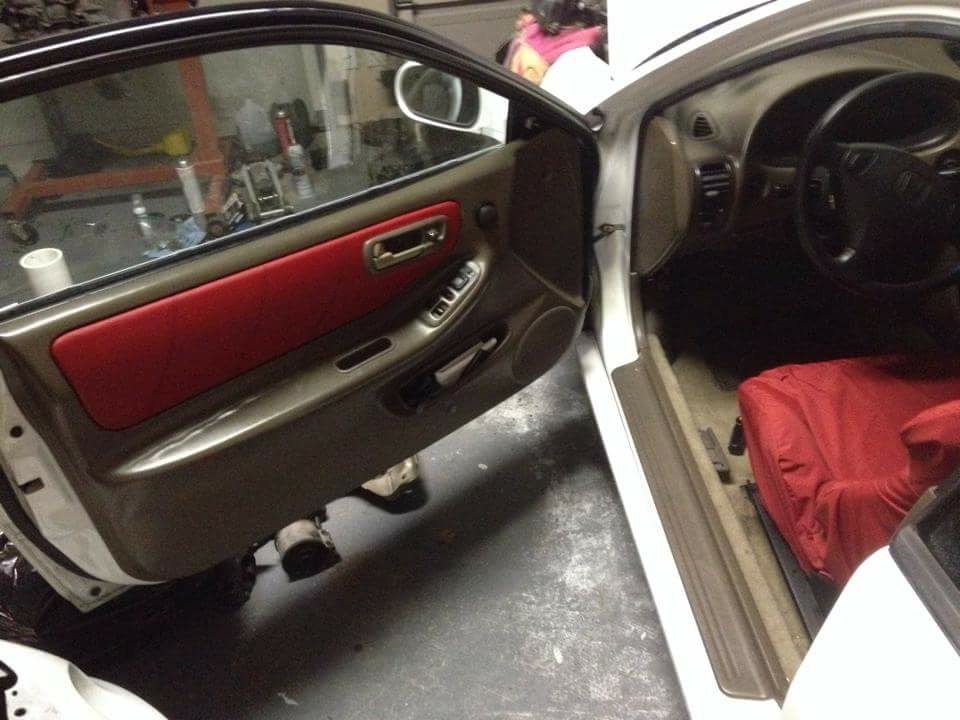
I finished gluing the leather onto the doors, I'm not entirely sure how I feel about it, but it's definitely better than the patchy gross looking cloth that was there before.
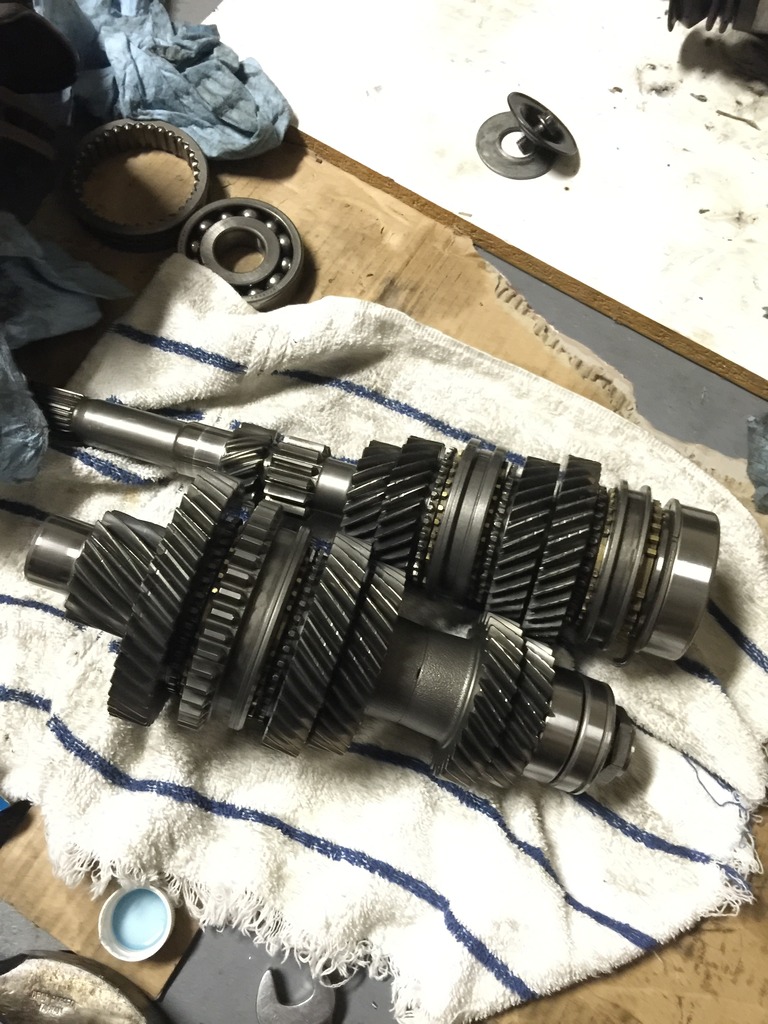
I also did the transmission rebuild, but I didn't take as many pictures as I would have liked since I just got a new phone to replace my 5 year old iPhone 4S and I'm trying not to get grease embedded in the new one.
I bought a rebuild kit from Synchrotech which included carbon lined synchros for gears 1-5, input shaft seal, axle seals, shift linkage seal, input shaft bearings, and countershaft bearings.
I think I need an adult in here.
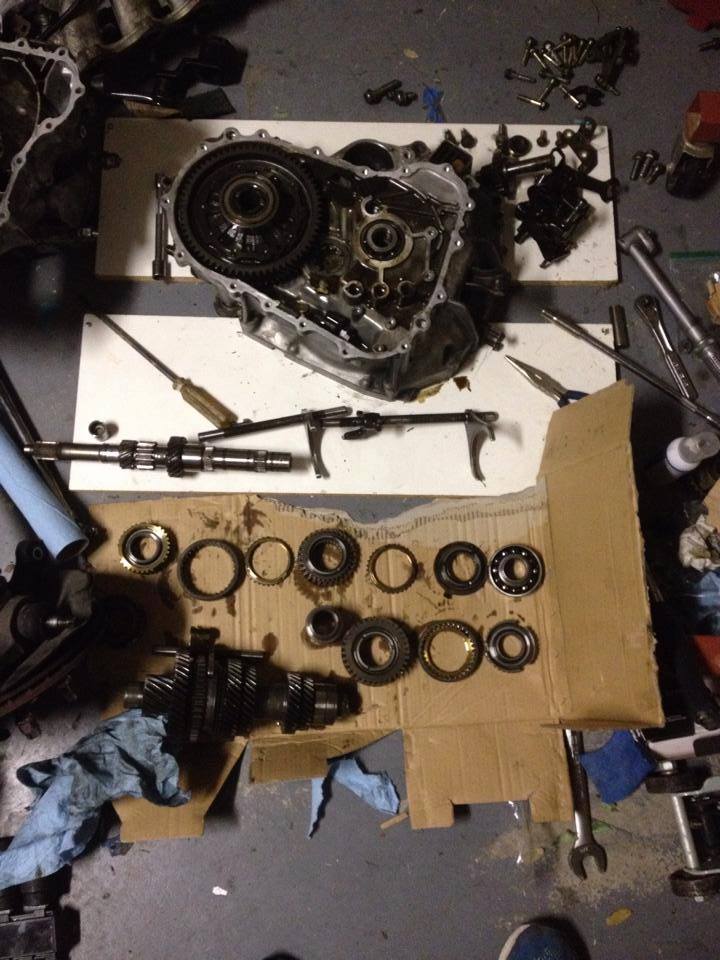
When I got into the transmission though I found that the 3-4 sleeve was trashed pretty badly from grinding almost every shift so I ended up buying a new sleeve and hub as well, also from Synchrotech. They messed up the order and sent me the wrong sleeve, but let me tell you, all the good stuff you hear about their customer service is 100% true. I emailed them on a Friday morning about the wrong part with photos showing that it didn't fit, and on Monday I had the correct part in my mailbox and a prepaid box to ship back the old one.
Here's the input shaft and countershaft after being reassembled. The new 3-4 hub was tighter than the old one so I took it to a transmission shop to have them press it on and they did it for free.
Strapping the input shaft and counter shaft together with some big zip ties made reassembly a breeze. Some of the tutorials I had read said this part was tricky, but just strap the shafts together and hold the shift forks in place with your thumbs and it'll drop right in.

Case halves together again. Each gear clicks in nicely and I have OEM shifter ball seat, polyurethane shifter bushings, and a sealed mil-spec steering U-joint on the way to replace the sloppy U-joint in the linkage, so hopefully when I'm done I'll have a shifter that feels almost like it's right in the transmission.
This process wasn't too bad other than the self inflicted stuff. If you ever want to attempt this yourself, just make sure you rent the large 3 arm puller, slide hammer set, and pilot bearing puller from Autozone (or any other parts store) before you tear into it. I wasted a lot of time trying to remove stuck bearings and gears with the wrong tools because I didn't want to make another trip to the parts store, only to end up at the parts store several hours later.
I'm hoping I can finish up with the engine tomorrow and get the block dropped back in the car on Sunday, but realistically it'll probably be another week.
Part 20
I finished gluing the leather onto the doors, I'm not entirely sure how I feel about it, but it's definitely better than the patchy gross looking cloth that was there before.
I also did the transmission rebuild, but I didn't take as many pictures as I would have liked since I just got a new phone to replace my 5 year old iPhone 4S and I'm trying not to get grease embedded in the new one.
I bought a rebuild kit from Synchrotech which included carbon lined synchros for gears 1-5, input shaft seal, axle seals, shift linkage seal, input shaft bearings, and countershaft bearings.
I think I need an adult in here.
When I got into the transmission though I found that the 3-4 sleeve was trashed pretty badly from grinding almost every shift so I ended up buying a new sleeve and hub as well, also from Synchrotech. They messed up the order and sent me the wrong sleeve, but let me tell you, all the good stuff you hear about their customer service is 100% true. I emailed them on a Friday morning about the wrong part with photos showing that it didn't fit, and on Monday I had the correct part in my mailbox and a prepaid box to ship back the old one.
Here's the input shaft and countershaft after being reassembled. The new 3-4 hub was tighter than the old one so I took it to a transmission shop to have them press it on and they did it for free.
Strapping the input shaft and counter shaft together with some big zip ties made reassembly a breeze. Some of the tutorials I had read said this part was tricky, but just strap the shafts together and hold the shift forks in place with your thumbs and it'll drop right in.
Case halves together again. Each gear clicks in nicely and I have OEM shifter ball seat, polyurethane shifter bushings, and a sealed mil-spec steering U-joint on the way to replace the sloppy U-joint in the linkage, so hopefully when I'm done I'll have a shifter that feels almost like it's right in the transmission.
This process wasn't too bad other than the self inflicted stuff. If you ever want to attempt this yourself, just make sure you rent the large 3 arm puller, slide hammer set, and pilot bearing puller from Autozone (or any other parts store) before you tear into it. I wasted a lot of time trying to remove stuck bearings and gears with the wrong tools because I didn't want to make another trip to the parts store, only to end up at the parts store several hours later.
I'm hoping I can finish up with the engine tomorrow and get the block dropped back in the car on Sunday, but realistically it'll probably be another week.
Part 20
Last edited by MotorMouth93; 08-30-2017 at 07:05 AM.
04-16-2016, 02:42 PM
#88
Anti-GDD White Knight Simp
I'm digging the red door inserts.
And you make the transmission rebuild sound not very scary at all, sounds fun. But expensive no doubt
And you make the transmission rebuild sound not very scary at all, sounds fun. But expensive no doubt
04-20-2016, 11:15 PM
#89
Bit of bad news...I was just about done with the motor and then decided to run a leakdown test on it before dropping it back in the car. Long story short, the motor is essentially an oversized paperweight. Only cylinder 4 was sealing properly, cylinder 3 seems to have an issue with the exhaust valves, and cylinders 1 and 2 are leaking badly but in a really bizarre way so I'm going to need to pull the intake manifold to figure out what's going on there.
At this point I have no idea what I'm going to do. The warranty on the engine was 30 days and it's taken longer than that, but I guess I'll call them and see if anything can be done. The lesson here is to never believe anything said about a used engine, this importer claims to compression test all engines, but in this case it's apparent that they didn't. They also claimed that it has 63k miles, but the depth of the grooves worn into the crankshaft, the nasty build up in the cooling system, and the fact that both cam seals behind the cam gears had been tampered with seems to indicate that that is also false.
Depending on what they tell me, I might pull the head this weekend to see what's going on with the cylinder leakage, since the bottom end seemed to be okay. Or I might just cut my losses, sell both of the **** engines I have in my garage on CL for a few hundred bucks total, and buy another B20 from a different importer, making sure to test it myself before handing over any money.
Sorry if this isn't coherent, I've been up too long.
04-21-2016, 10:35 AM
#90
I know the feeling man. I bought a JDM H23Avtec knowing full well importers don't have a clue what the mileage ever is. The guy sent me clean pictures of a pressure washed engine. Didn't care about that as I was going to replace every gasket, seal, belt anyway but after pulling my motor, stripping my old motor down about to swap everything over to the new one (turbo kit) I finally got around to pulling the valve cover off the motor. Engine sludge like i've never seen before.. followed up with 3 broken LMA's and 2 damaged rocker panels and shot cams. Lucky for me my cylinder head from my old one was in great shape so I just swapped parts over but holy fuuuuuuuuuck was I annoyed. Called the importer and they said if I want I could ship it back (a city over, 200 miles away) but would have to pay for shipping there and shipping for the new motor back. Just wasn't worth the headache. Long story short, I know the feels man.
My advice would be pull the head, take it to a machine shop and have it cleaned. Have the shop install new guides, seals, valve job etc. It will probably run around $300-400 but at least you will have a perfect running motor. Assuming your rings are good. I know it is more work than you wanted but you've already put a bunch into what you already have so you may as well. Trust me when I say all these motors are now old and worn so odds are not in your favour. most of them are 20 years old at this point. Just suck it up, fix what you have and enjoy a clean fresh rebuild.
My advice would be pull the head, take it to a machine shop and have it cleaned. Have the shop install new guides, seals, valve job etc. It will probably run around $300-400 but at least you will have a perfect running motor. Assuming your rings are good. I know it is more work than you wanted but you've already put a bunch into what you already have so you may as well. Trust me when I say all these motors are now old and worn so odds are not in your favour. most of them are 20 years old at this point. Just suck it up, fix what you have and enjoy a clean fresh rebuild.
04-25-2016, 12:16 AM
#91
Better news this time, it turns out my motor isn't a paperweight after all! I happened across a forum post stating that carbon will start to flake off in motors that sit for a while and it will get in the valve seats and cause leaks when testing, then it recommended you tap the valves with a hammer with the cylinder under pressure to blast the loose stuff out. Low and behold, that was what had happened, now each cylinder has acceptable levels of leakage.
Here's a picture of my new favorite toy. Picked it up on Craigslist for $175, which is about $300 less than new price. I bought a 650lbft impact gun to go with it and I have no idea how I ever lived without one.
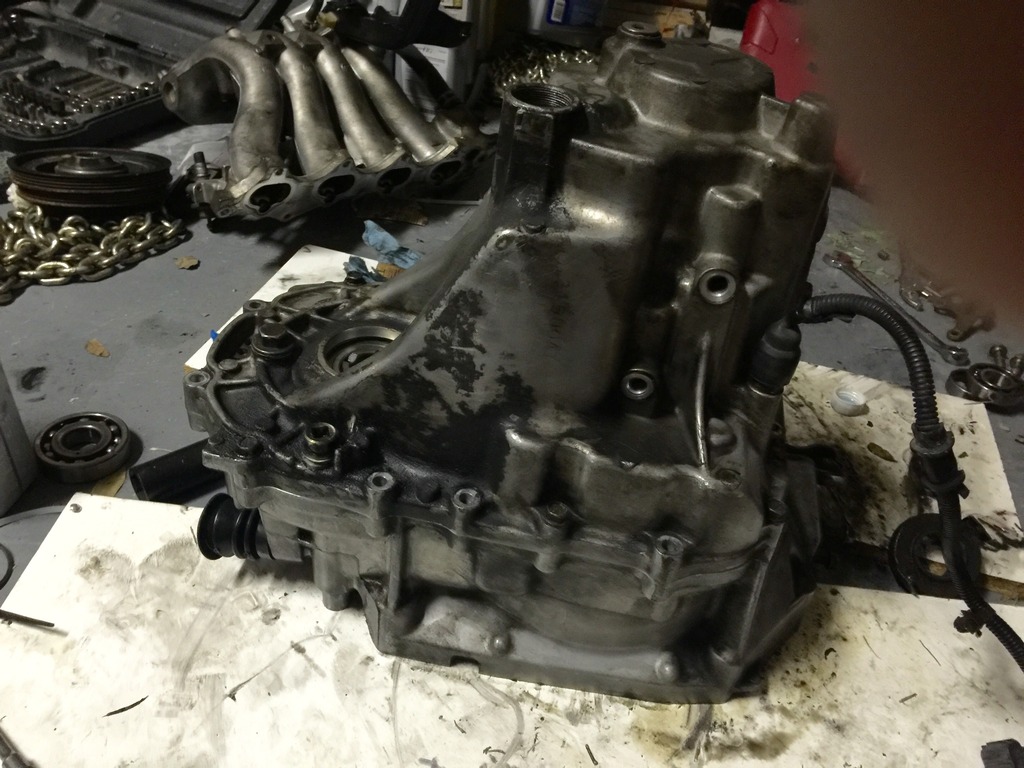
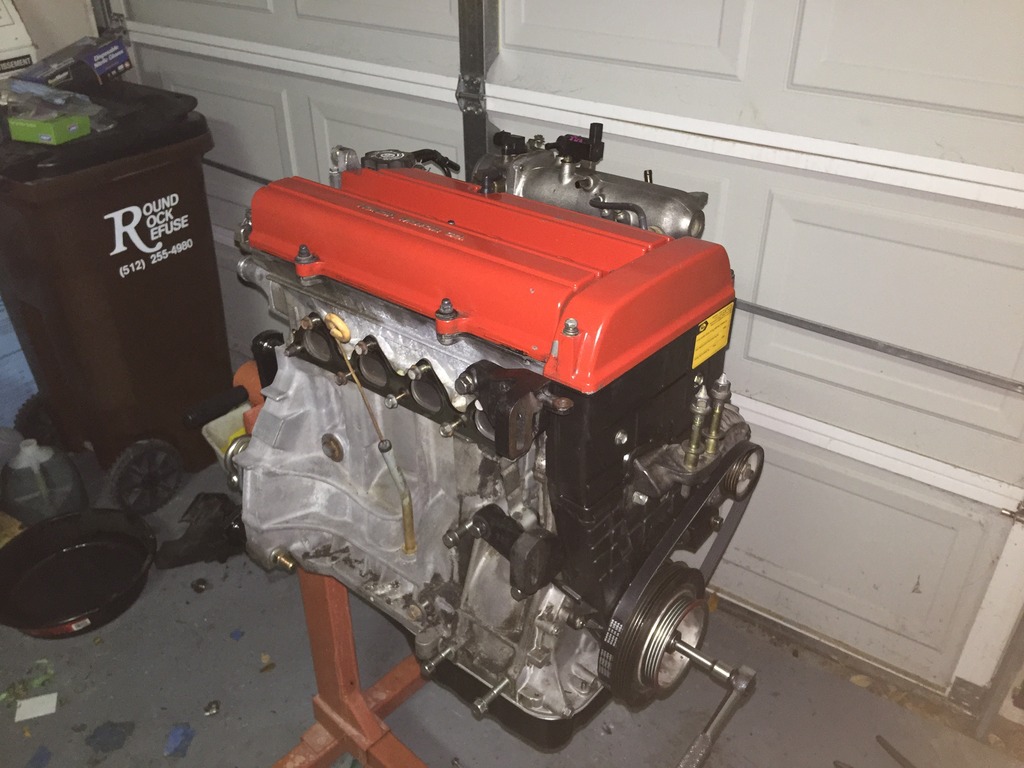
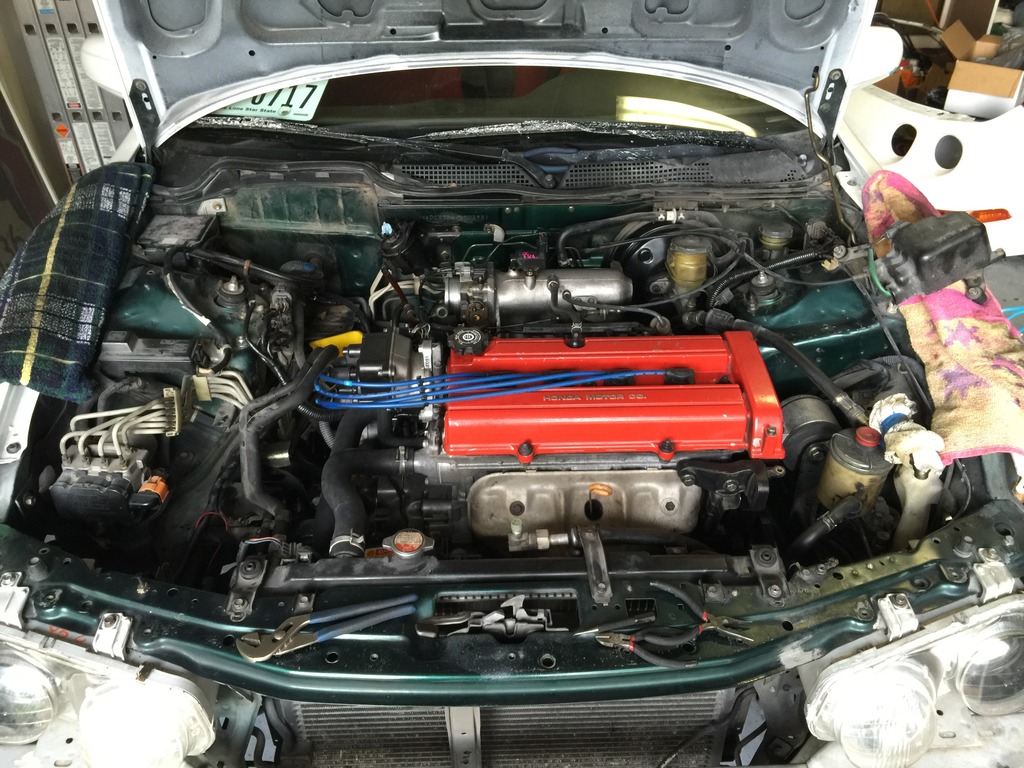
Anyways, I got most of the engine put back together, I installed the cam seal repair sleeves (some ******* scratched them up changing the seals so they were leaking) and the new cam seals, then my new back timing cover along with the water pump, timing belt, tensioner, and motor mount, then buttoned up the front side of the engine. I pulled the shiny red valve cover from my old engine and installed it on the new one with a new OEM valve cover gasket, and then finished rewrapping the engine harness and hooked it back up. (not shown)
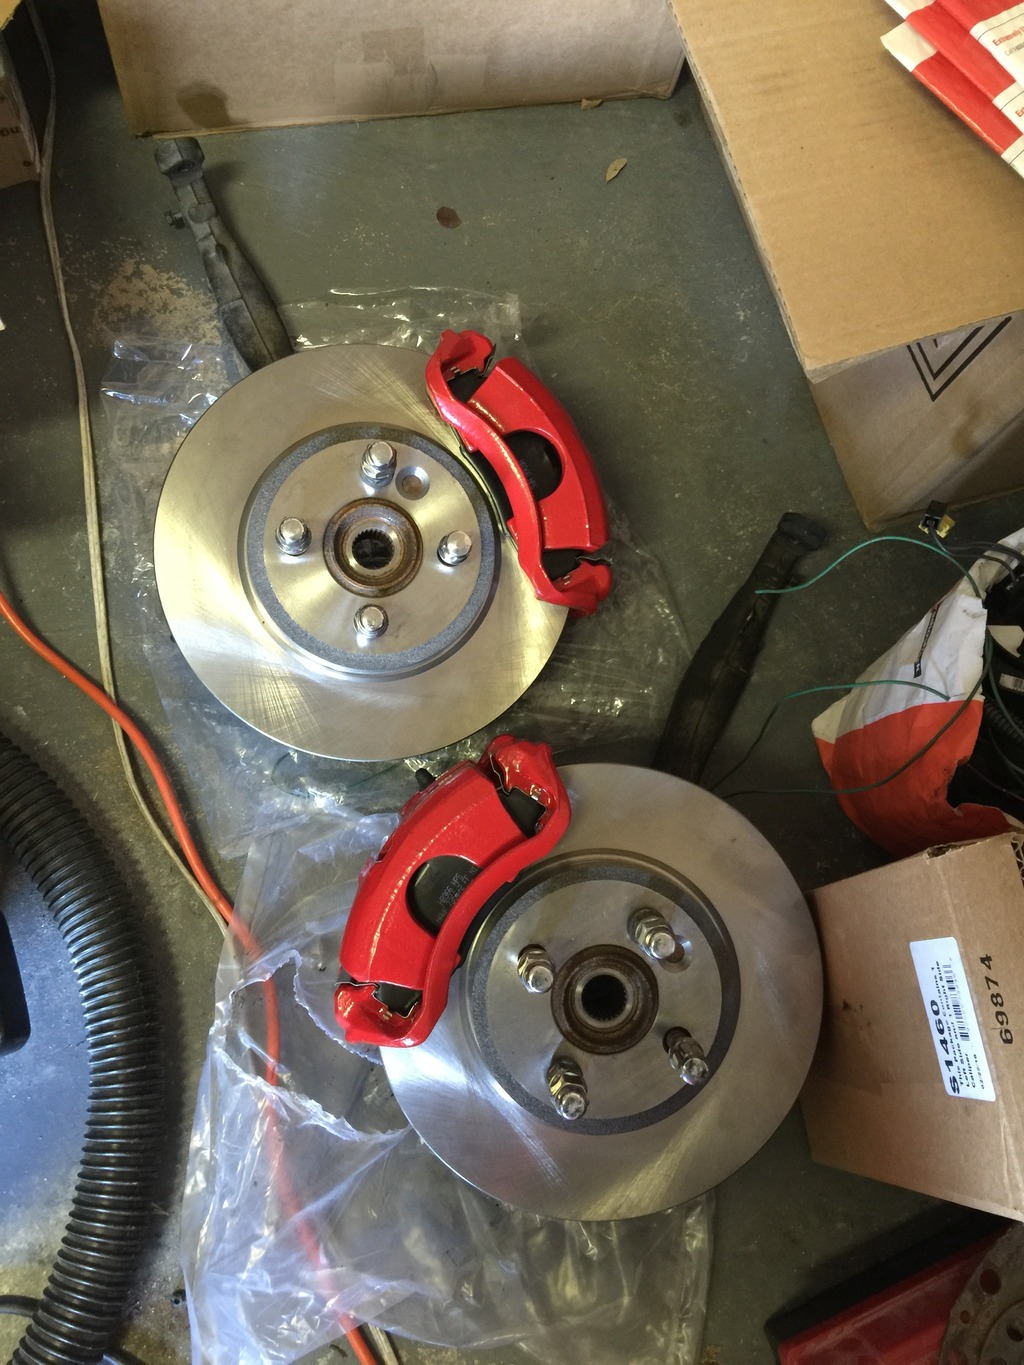
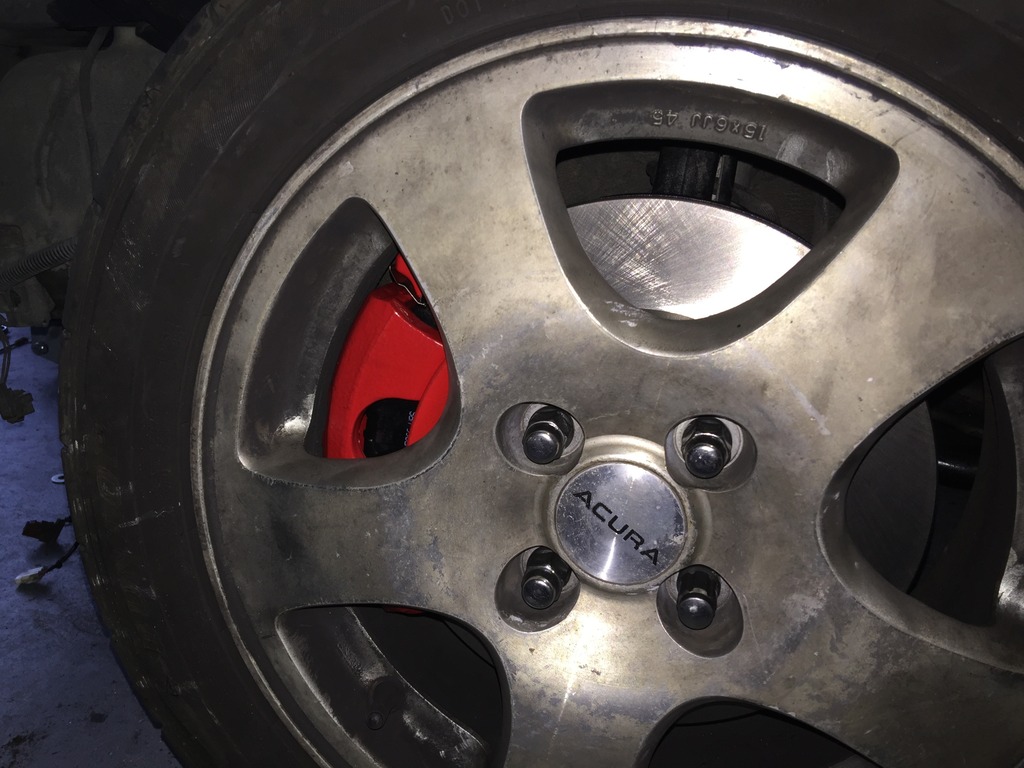
Using my new impact, I pulled the axle nuts off the front hubs/axle combos (which I had removed to make fitting the hoist easier) and installed Cooper rotors, rebuilt ITR front calipers, and Hawk HPS pads in TSX size. Even though they're only a bit bigger than the stock brakes, they look HUGE by comparison. I can't wait to get the rears done too and then put on some bronze wheels.
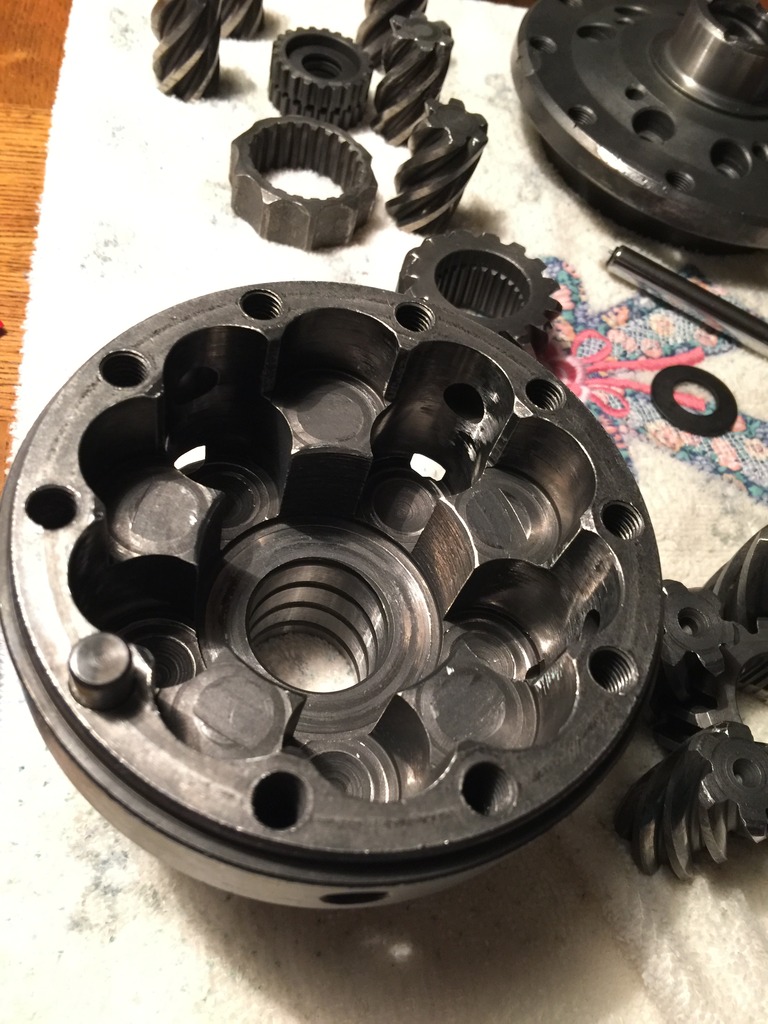
I also made a last minute addition to this build today. I had originally decided to just keep using the stock open differential because the LSD options were all $400+, but then I found a used OBX LSD for $120. At that price, I couldn't say no, even if they do have a somewhat dubious reputation. They seem to work pretty well for people who tear them down, clean up the insides, and rebuild them with better quality bolts and spring washers so I'm going to do just that. I tore it down and found that the insides were in excellent shape, but I'm still going to get a grinding bit on the dremel and smooth out a few rough edges and I have new washers and bolts on the way. I also feel like the fact that it's used reduces the chances of getting a lemon, and it's not like my 130whp B20 will put much stress on it. The only downside is that I just sealed up the transmission 2 days ago, so I'm going to have to open it up, clean all the dried Hondabond out, and do it all over.
Optimistically, I think she should be back on the road in 2-3 weeks.
Also, if you know anyone who wants a full set of recently rebuilt Integra brake calipers, I'm getting rid of mine. Rebuilt/painted silver about a year ago, less than 5k miles since then.
Does anyone know if it's okay to reuse the final drive ring gear bolts? I saw one thread claiming that they should always be replaced, but others where they get reused. Honda wants $5 each for them and I'd rather not spend $50 for 10 bolts, but I will if it's necessary.
Part 21
Here's a picture of my new favorite toy. Picked it up on Craigslist for $175, which is about $300 less than new price. I bought a 650lbft impact gun to go with it and I have no idea how I ever lived without one.
Anyways, I got most of the engine put back together, I installed the cam seal repair sleeves (some ******* scratched them up changing the seals so they were leaking) and the new cam seals, then my new back timing cover along with the water pump, timing belt, tensioner, and motor mount, then buttoned up the front side of the engine. I pulled the shiny red valve cover from my old engine and installed it on the new one with a new OEM valve cover gasket, and then finished rewrapping the engine harness and hooked it back up. (not shown)
Using my new impact, I pulled the axle nuts off the front hubs/axle combos (which I had removed to make fitting the hoist easier) and installed Cooper rotors, rebuilt ITR front calipers, and Hawk HPS pads in TSX size. Even though they're only a bit bigger than the stock brakes, they look HUGE by comparison. I can't wait to get the rears done too and then put on some bronze wheels.
I also made a last minute addition to this build today. I had originally decided to just keep using the stock open differential because the LSD options were all $400+, but then I found a used OBX LSD for $120. At that price, I couldn't say no, even if they do have a somewhat dubious reputation. They seem to work pretty well for people who tear them down, clean up the insides, and rebuild them with better quality bolts and spring washers so I'm going to do just that. I tore it down and found that the insides were in excellent shape, but I'm still going to get a grinding bit on the dremel and smooth out a few rough edges and I have new washers and bolts on the way. I also feel like the fact that it's used reduces the chances of getting a lemon, and it's not like my 130whp B20 will put much stress on it. The only downside is that I just sealed up the transmission 2 days ago, so I'm going to have to open it up, clean all the dried Hondabond out, and do it all over.
Optimistically, I think she should be back on the road in 2-3 weeks.
Also, if you know anyone who wants a full set of recently rebuilt Integra brake calipers, I'm getting rid of mine. Rebuilt/painted silver about a year ago, less than 5k miles since then.
Does anyone know if it's okay to reuse the final drive ring gear bolts? I saw one thread claiming that they should always be replaced, but others where they get reused. Honda wants $5 each for them and I'd rather not spend $50 for 10 bolts, but I will if it's necessary.
Part 21
Last edited by MotorMouth93; 08-30-2017 at 07:08 AM.
04-28-2016, 09:43 AM
#94
Started rebuilding the new-to-me diff. I picked up a Harbor Freight bearing separator and used it along with a puller I rented from Autozone to pull the bearings and the speed sensor gear off of the old differential and the single bearing that was stuck on the OBX differential, and oddly enough, it actually worked without breaking anything.
For the most part, the internals of the OBX look good, but one of the small gears has more wear than the others for whatever reason, I think it should be okay though. There were plenty of little burs from poor machining so I used a grinding bit on the dremel to smooth the edges before hosing everything down with brake cleaner.
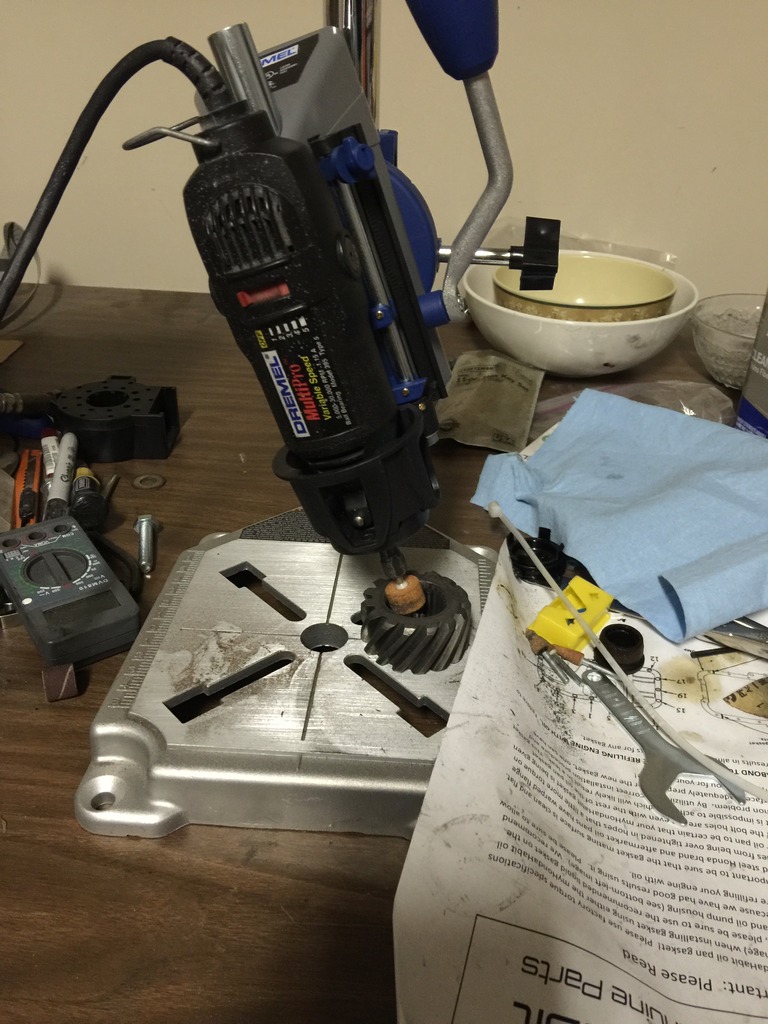
One of the gears that the axles seat in had barely any chamfer on the edge so I used a grinding stone to make it easier to insert the axle. This little dremel press thing is cheesy as hell but it does come in super handy from time to time.
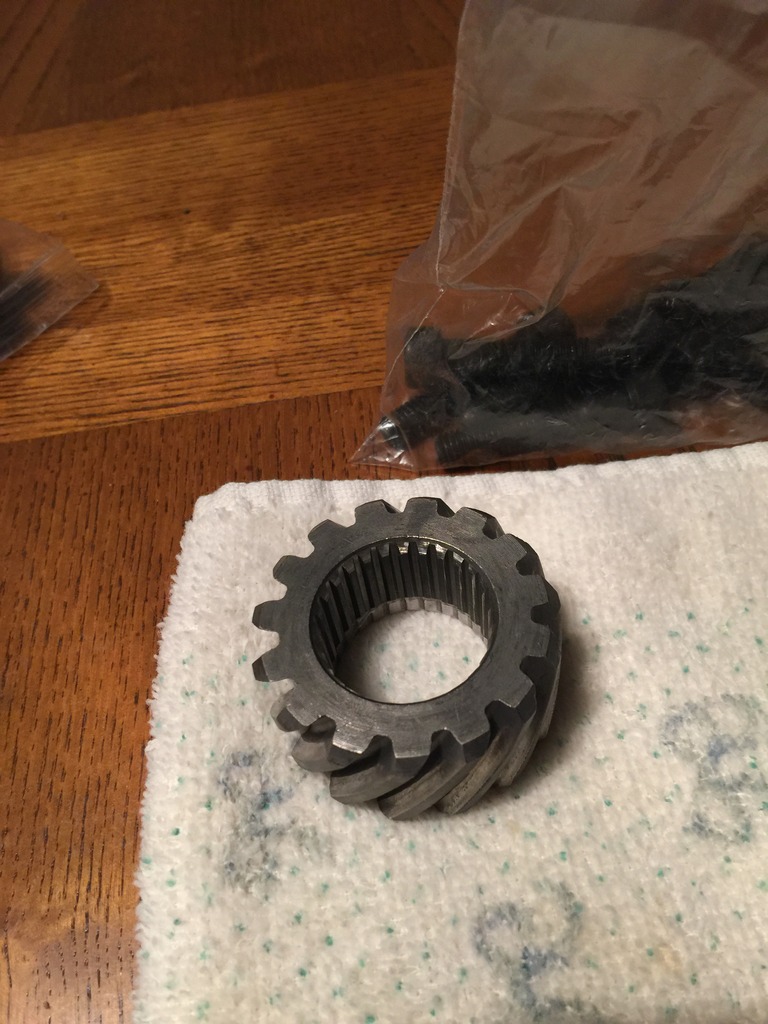
Ready for reassembly, I picked up a washer and bolt kit here since the original ones seem to be the cause of most of the issues with these things. The first time I opened it up the gears were all installed backwards, as in the gears that were supposed to be on the left were on the right, and the gears on the right were supposed to be on the left.
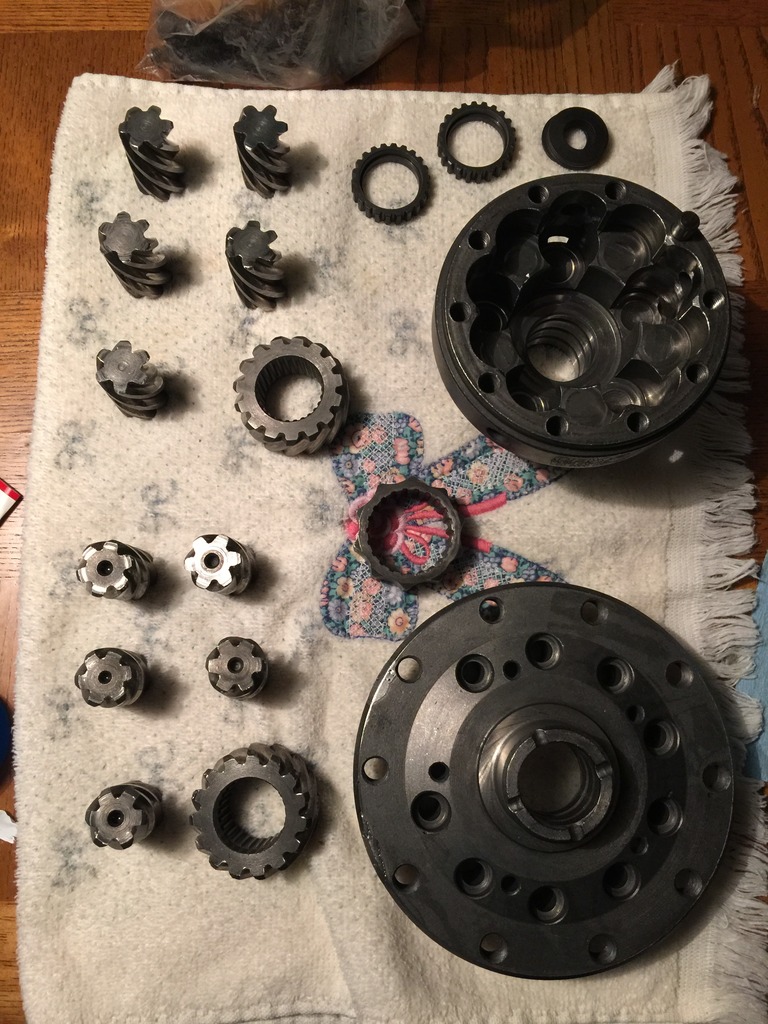
I didn't put it back together yet because I forgot to get blue locktite.
Part 22
For the most part, the internals of the OBX look good, but one of the small gears has more wear than the others for whatever reason, I think it should be okay though. There were plenty of little burs from poor machining so I used a grinding bit on the dremel to smooth the edges before hosing everything down with brake cleaner.
One of the gears that the axles seat in had barely any chamfer on the edge so I used a grinding stone to make it easier to insert the axle. This little dremel press thing is cheesy as hell but it does come in super handy from time to time.
Ready for reassembly, I picked up a washer and bolt kit here since the original ones seem to be the cause of most of the issues with these things. The first time I opened it up the gears were all installed backwards, as in the gears that were supposed to be on the left were on the right, and the gears on the right were supposed to be on the left.
I didn't put it back together yet because I forgot to get blue locktite.
Part 22
Last edited by MotorMouth93; 08-30-2017 at 07:09 AM.
04-29-2016, 08:50 AM
#95
I still can't believe people use these things. The fact it showed up assembled incorrectly just doesn't give me much faith in the product lol. But I know there is success with these after doing what you are doing, but still.
04-30-2016, 04:37 PM
#96
Anti-GDD White Knight Simp
Loving these updates man. Glad everything is going smoothly.
Why is the dremel press cheesey? I kind of want one
Why is the dremel press cheesey? I kind of want one
05-04-2016, 07:15 AM
#97
Just feels kinda flimsy and cheap.
Last weekend I got the engine pretty much reassembled, now I just need to convince my little brother to come help me drop it back in. He's a broke college kid though, so he'll probably do it for free food. Hoping I can try to start it up on Sunday.
New clutch bolted up to the freshly milled flywheel.
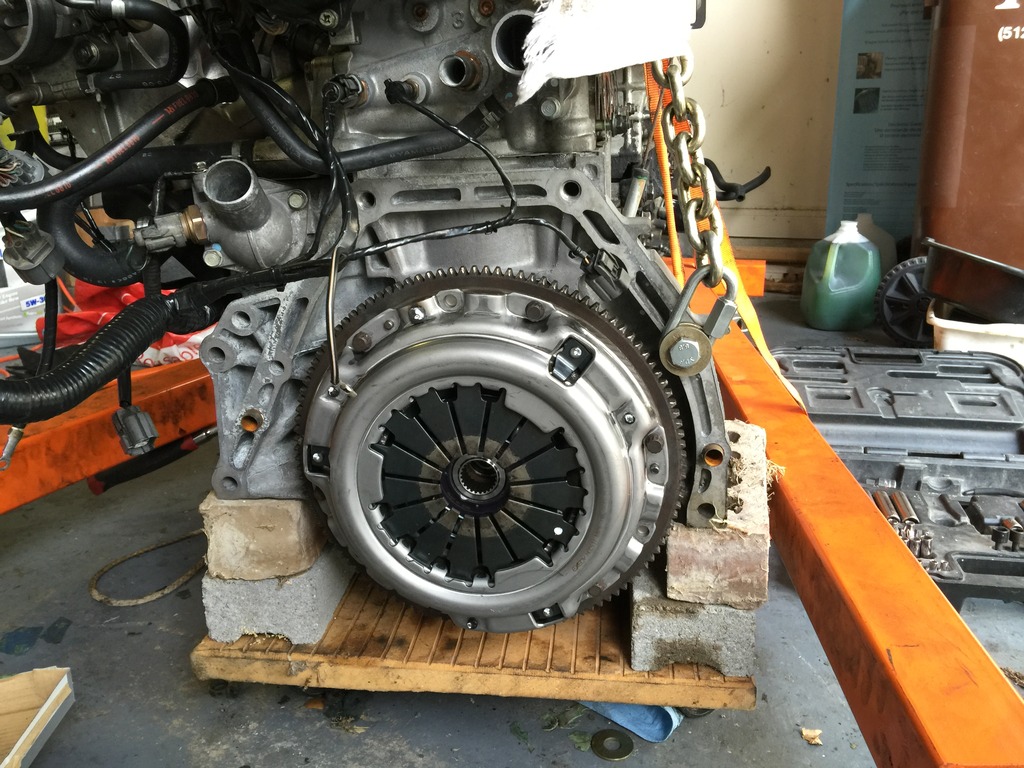
All the other crap bolted up.
When reinstalling an engine in these cars, how do you deal with the rear engine mount? When I pulled it, I pulled the 3 bolts that connected the rubber mount to the chassis and removed it all as one piece. For reinstallation is it better to bolt the mount into the car first? Or attach the mount to the engine first?
Also, I pulled the thermostat off the old engine out of curiosity and found out why it took so long for the car to warm up. A big chunk of the gasket around the "plunger" part of the thermostat had torn off so water was flowing through. It rendered the heater almost useless unless you had been driving for 20-30 minutes in the cold since it took so long to warm up. Also all the coolant passages were coated in nasty black scum stuff.
Part 23
Last weekend I got the engine pretty much reassembled, now I just need to convince my little brother to come help me drop it back in. He's a broke college kid though, so he'll probably do it for free food. Hoping I can try to start it up on Sunday.
New clutch bolted up to the freshly milled flywheel.
All the other crap bolted up.
When reinstalling an engine in these cars, how do you deal with the rear engine mount? When I pulled it, I pulled the 3 bolts that connected the rubber mount to the chassis and removed it all as one piece. For reinstallation is it better to bolt the mount into the car first? Or attach the mount to the engine first?
Also, I pulled the thermostat off the old engine out of curiosity and found out why it took so long for the car to warm up. A big chunk of the gasket around the "plunger" part of the thermostat had torn off so water was flowing through. It rendered the heater almost useless unless you had been driving for 20-30 minutes in the cold since it took so long to warm up. Also all the coolant passages were coated in nasty black scum stuff.
Part 23
Last edited by MotorMouth93; 08-30-2017 at 07:10 AM.
05-06-2016, 05:33 AM
#99
Anti-GDD White Knight Simp
If they are stiffer aftermarket mounts you need to get all mount and bracket bolts started first before tightening any
05-08-2016, 10:29 PM
#100
I got a lot done this weekend. The gist of it is that the engine is in the car and running.
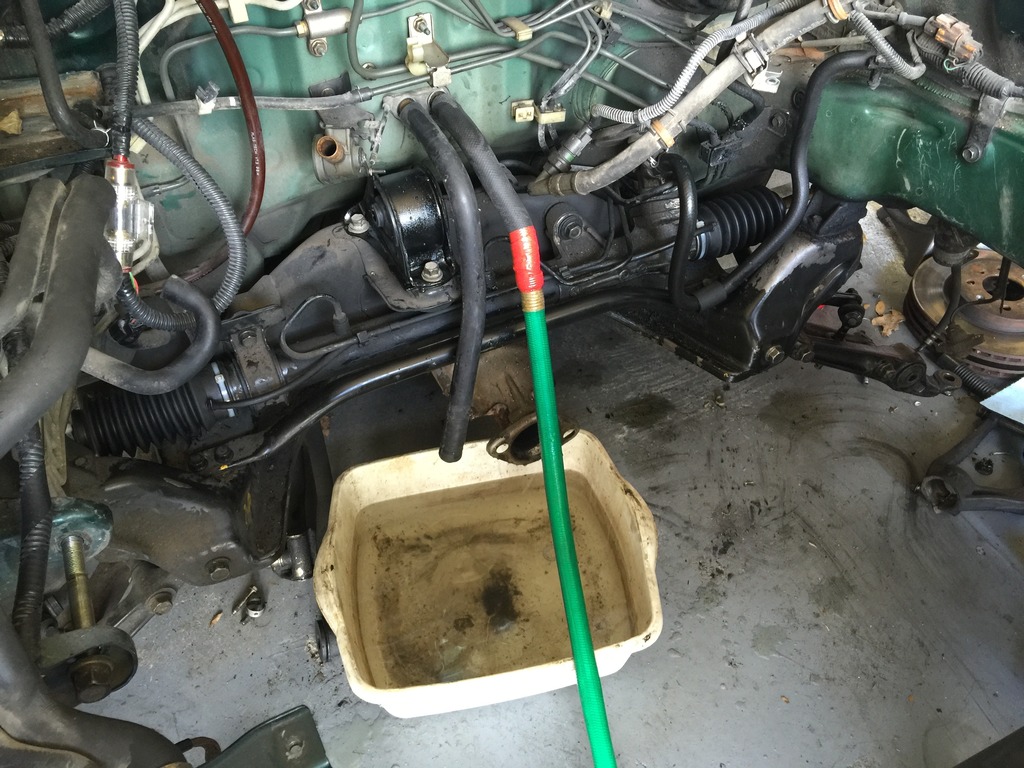
I started off yesterday by back flushing the heater core because I had no reason not to. The heater was working fine before but since everything is accessible it can't hurt to do it while it's extremely easy. A bit of buildup came out but nothing too serious, it flows with no issues. (gunk in the tub was already there)
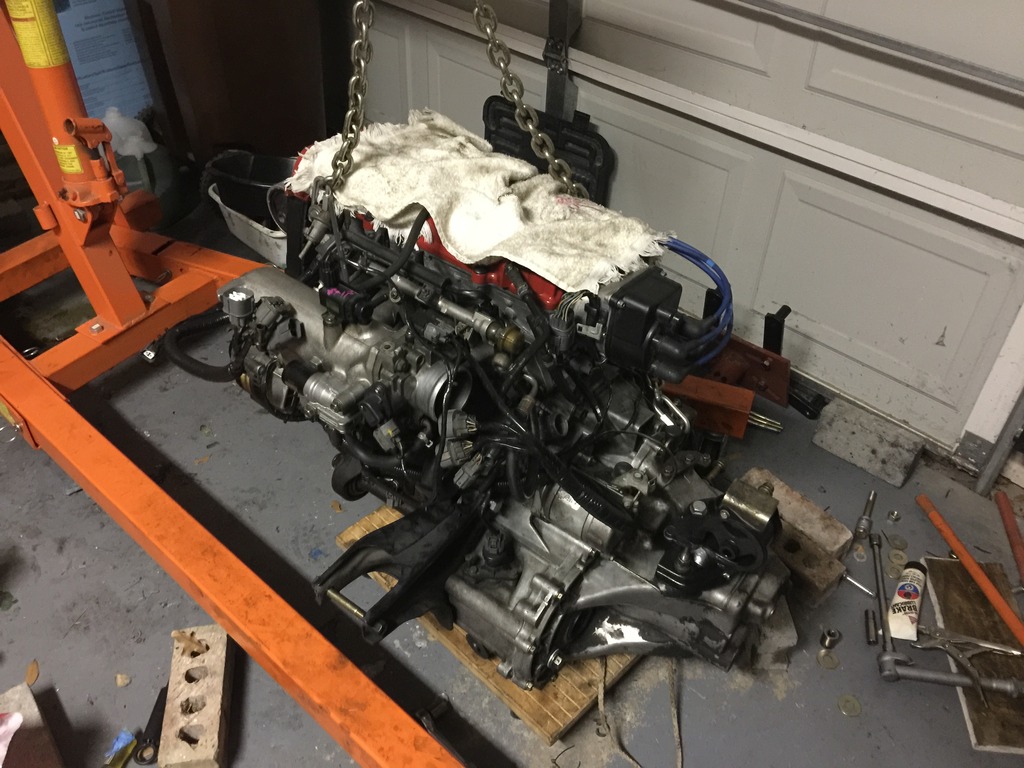
Then I started dropping the engine back in. My friends had better things to do than sit in a sweltering garage this weekend so I went ahead and did it myself. It actually wasn't too bad, even though I didn't have a load leveler and I only attached the chain at two points. I just hooked it up so the transmission side was hanging lower, lowered it enough to bolt in the trans mount, then lowered the other side into place.
Anyways, engine bolted in, new OEM water pipes and radiator installed, and pretty much everything but the power steering pump and a few other odds and ends installed.
After dropping the engine in I reinstalled the front suspension, which I had already replaced the brakes on. ITR calipers just barely fit under the 15" wheels. Speaking of which, new wheels should be on the way sometime next week so I can finally get rid of these nasty hammerheads.
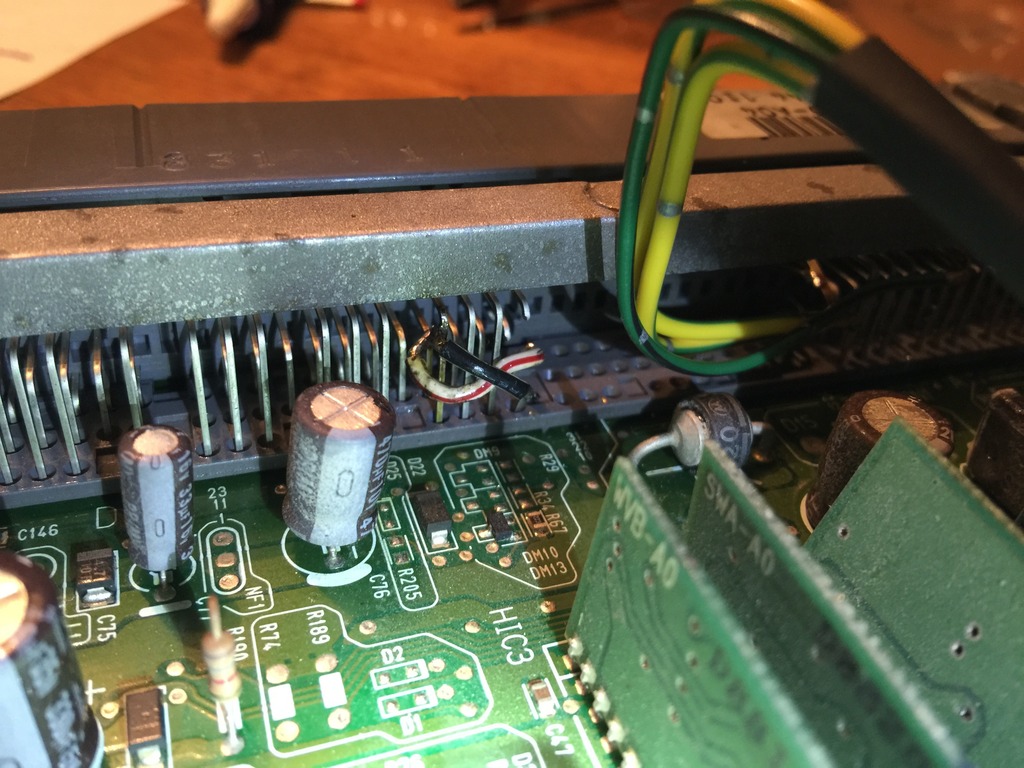
CKF bypass. I didn't feel like crawling around under the dash so I pulled the ECU, cut the C1 and C11 pins internally, and soldered the bypass wires. The result is an ECU that doesn't need a CKF and an unmolested wire harness.
I had a video of the startup but it was dark and crappy so I'll spare everyone. The motor seems to run fine, but I won't really know until I run it long enough to warm up fully and wind it out to redline a few times. The car is backed into the garage so I had to shut it off before it fumed up the whole house, and the brakes and clutch aren't bled yet. First drive should be this coming weekend.
Part 24
I started off yesterday by back flushing the heater core because I had no reason not to. The heater was working fine before but since everything is accessible it can't hurt to do it while it's extremely easy. A bit of buildup came out but nothing too serious, it flows with no issues. (gunk in the tub was already there)
Then I started dropping the engine back in. My friends had better things to do than sit in a sweltering garage this weekend so I went ahead and did it myself. It actually wasn't too bad, even though I didn't have a load leveler and I only attached the chain at two points. I just hooked it up so the transmission side was hanging lower, lowered it enough to bolt in the trans mount, then lowered the other side into place.
Anyways, engine bolted in, new OEM water pipes and radiator installed, and pretty much everything but the power steering pump and a few other odds and ends installed.
After dropping the engine in I reinstalled the front suspension, which I had already replaced the brakes on. ITR calipers just barely fit under the 15" wheels. Speaking of which, new wheels should be on the way sometime next week so I can finally get rid of these nasty hammerheads.
CKF bypass. I didn't feel like crawling around under the dash so I pulled the ECU, cut the C1 and C11 pins internally, and soldered the bypass wires. The result is an ECU that doesn't need a CKF and an unmolested wire harness.
I had a video of the startup but it was dark and crappy so I'll spare everyone. The motor seems to run fine, but I won't really know until I run it long enough to warm up fully and wind it out to redline a few times. The car is backed into the garage so I had to shut it off before it fumed up the whole house, and the brakes and clutch aren't bled yet. First drive should be this coming weekend.
Part 24
Last edited by MotorMouth93; 08-30-2017 at 07:12 AM.