

DIY: TSX Projector Retrofit into EF8/EF9 Headlights

Thread Starter
Honda-Tech Member
Joined: Nov 2005
Posts: 2,032
Likes: 0
From: CA, US
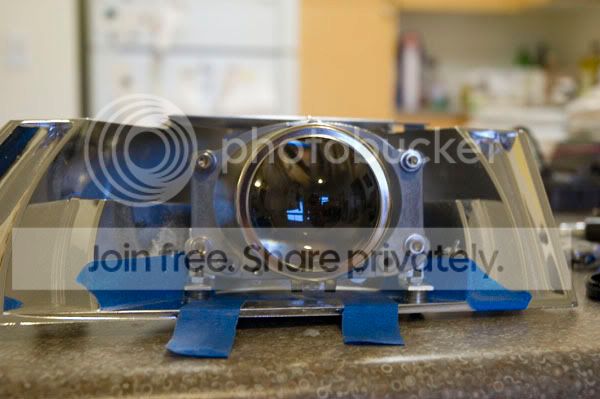
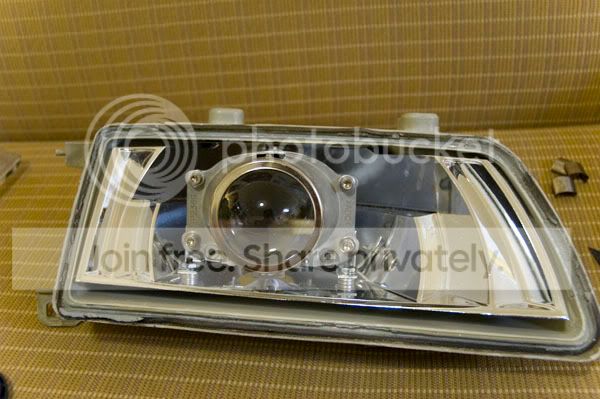
As per requests, the basics on how to throw some TSX projectors into your JDM headlights. If done correctly, your near finished product should look something like this:


(Projectors look crooked because I just threw them on there to line up the Fiber Images hood. If you use the method of mounting in this writeup, you still retain full OEM adjustability .) Don't mind my friend, he is quite literally a yo-yo master.
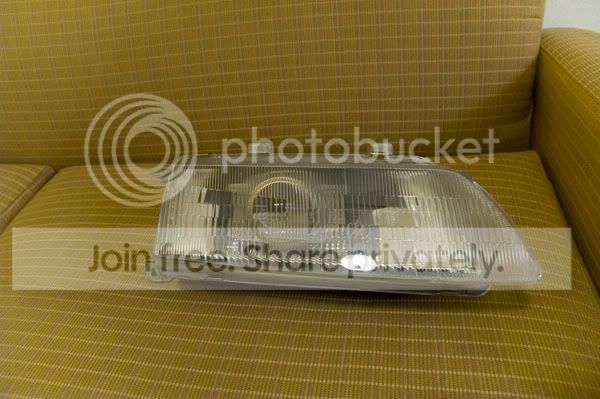
As you can see space is VERY tight in the EF8/EF9 headlight housing especially if you do what I did and kept the full adjustability of the headlamps. There is about 1/8" of clearance (or less) between the projector and the lens. This could be a good or bad thing depending on how you look at it. The closer the projector is to the flutes, the less distortion you get at the cutoff. I am currently still researching shroud options that will fit and will post up results once I find something that works (or make something that works).
This is my first attempt at a writeup, but not my first time doing custom work so i tried to make everything as detailed as possible. Also, the following is written with the assumption that you know how to take apart and adjust EF8/EF9 headlamps. If you don't know how to adjust or disassemble headlights, you should probably go and find out before attempting to retrofit projectors.
With that said, the following is just a general guideline on how I retrofitted TSX projectors into JDM EF8/EF9 headlights. Your process may vary depending on projector type, skill level, tools, etc. I am in no way responsible for any damages incurred to you, your headlamps, your car, your cousin's uncle, etc. Do this at your own risk and remember...measure twice, but cut once!
Total time per side: 45mins-1 hour My first side only took 30 minutes, but don't rush. I did and I'm glad I did it all perfectly, but I got lucky. The second side took me about 45 minutes.
Tools Required (that I used anyways):
>9mm socket + ratchet
>Sharpie brand or any other marker
>Needle-nose pliers
>Dremel or similar rotary tool with drum sander/cutoff wheel/high speed grinder attachments
>Phillips and Regular screwdrivers
>Rulers or measuring devices such as calipers
>Razor blades or a large military knife capable of penetrating a Kevlar vest (okay, not necessary but it was a gift )
)
Materials Required:
>Acura TSX clear lens projectors
>HID Ballasts, bulbs, ignitors
>Canned duster air (canned c02)
>Painter's tape
>Smallest L-brackets you can find that have the correct diameter hole for the TSX projectors (I got them at an ace hardware store)
>Mounting hardware (this is totally up to you, but I used all stainless hardware again from Ace) including: Bolts, nuts, #10 washers (about 40-50 of them), and lockwashers
>Blue Loctite
>Coffee and Cigarettes. Cigarettes optional and highly discouraged, but make sure you are 100% awake to do this. Coffee really helped me out.
Step 1: Take measurements of the bolt sizes you need and gather everything you need before you proceed. Trust me on this one, running to the hardware store 3 times in 1 day is not fun
Step 2: Follow the outline on the back of the reflector housing pictured below:
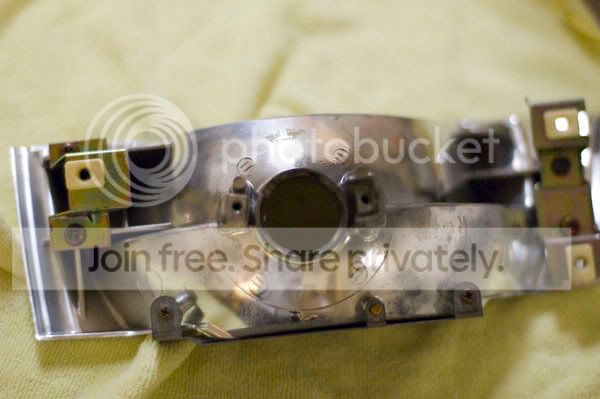
Step 3: Rough cut it out with the dremel + cut-off wheel then smooth it out with the drum sander. Do this is a well ventilated area unless you want the black lung. Okay, maybe not the black lung but please do not inhale the dust generated.
*Note* Depending on the projector used you may or may not need to cut out this area. I measured everything out beforehand and this seemed like the optimal place to start cutting.
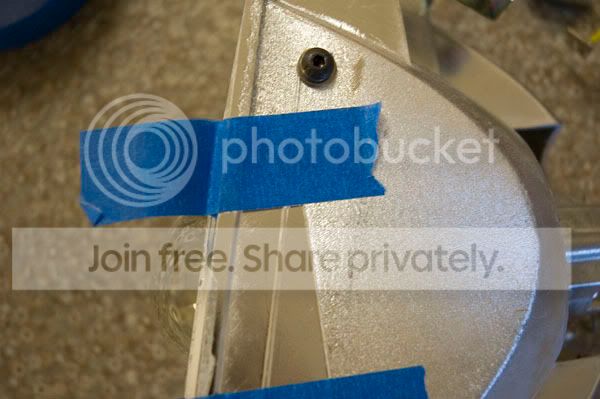
Step 4: Flip the reflector over and on the underside you should see aiming lines that point straight ahead of your car when the headlights are mounted. Place painters tape with a few inches of excess on this location.
Step 5: Flip the reflector over again and place tape parallel to the tape you placed on the bottom. Then tape up any places where the projector may rub on the reflector housing to prevent scratches during mock up.
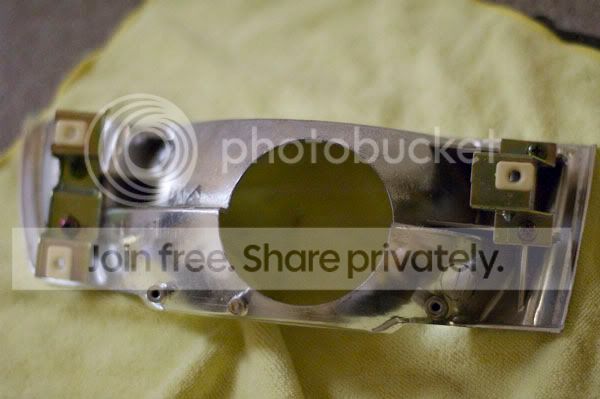
Step 6a: This picture is a bit ahead of the game but you can see exactly how I taped everything up.
Step 6b: Throw the projector in there. Okay, not really throw but just slip it in there and check for clearances.
Step 7: Mount up the hardware to your projector. If you want to colormod the TSX projectors now for more color now is the time. Don't worry about using locktite just yet. You may need to disassemble/reassemble a few time to get things right.
The order of how the hardware for the top of the projector should bolt up is as follows (from front to back -- front being the projector lens):
Bolt, lockwasher, washer |Projector| washer, nut
The order of how the hardware for the bottom of the projector should bolt up is as follows (from front to back -- front being the projector lens):
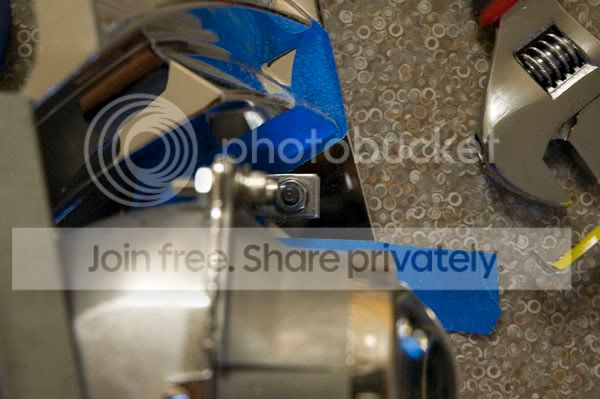
Bolt, lockwasher, washer |Projector| L-bracket, washer, nut
>>Also note form the picture that I mounted the L-bracket facing forwards. There simply isn't any space if you mount the L-bracket the other way<<
Step 8: Slip the hardware up'd projector into the reflector housing as far back as it can go and check for clearances. You probably won't have enough so mark where the projector rubs with a sharpie and use the dremel + sanding drum to slowly sand away areas that may rub or inhibit your ability to correctly mount the projector.
Step 9: This step is very confusing to type out, but let me try to break it down...
As a starting ground, use 6 #10 washers under each leg of the L-brackets to figure out where you need to drill holes. Make sure the L-brackets run parallel to the tape you applied in step 4 and 5 to ensure the projectors are pointed straight out.
Mark where the holes should be drilled with a sharpie and drill one hole first, run a bolt through it to make sure everything still lines up with your projector and washers then drill the second hole and run the bolt through that. Measure twice and cut once.
Bolt everything up and check for clearances all around again. The projector or mounting hardware should NOT rub on the reflector housing at all. The projector should look like it's suspended in air by the 6 #10 washers you used. Clearances are super tight so if the projector isn't far back enough the projector lens will rub on the headlight. This is why you mocked up the entire setup with #6 washers to space the projector up so you can push it back further. Later on you can take a few washers out to center the projector a bit better and gain some more clearance without unnecessarily cutting away at the reflector housing.
Step 10: Remove the projector from the reflector housing and proceed to use the air duster to get the reflector 100% clean. Then proceed to dust out the headlight housing and anything else that may have dust on it.
Step 11: Reassemble everything without locktite and proceed to place the reflector back into the headlight housing and reassemble.
Step 12: Put the headlights back onto your car without the lens and proceed to aim them correctly.
Everything else from here if completely up to you. If you want a shroud then go for it now. Just make sure you remember to use loctite when final-assembling everything.
Here are just a few extra supplemental pictures of how my install went (again, just the way I did it):
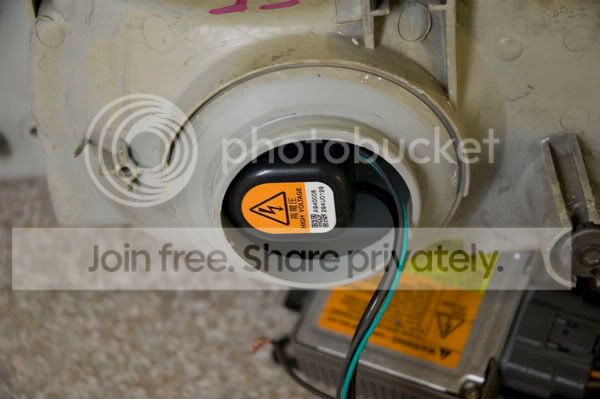
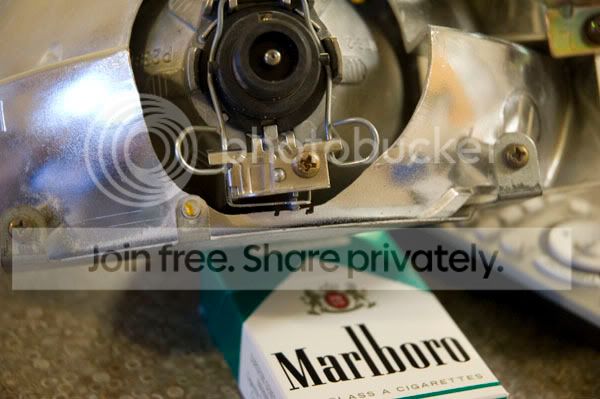
This idea could've worked as the ignitor fit perfectly to the backside, but I decided to mount the ignitors under the headlamp and run the rubber splash guards to cover everything up nicely:
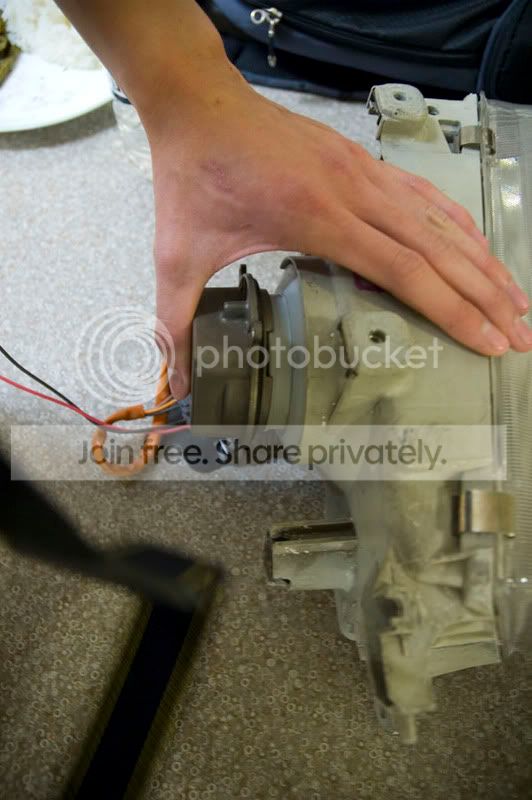
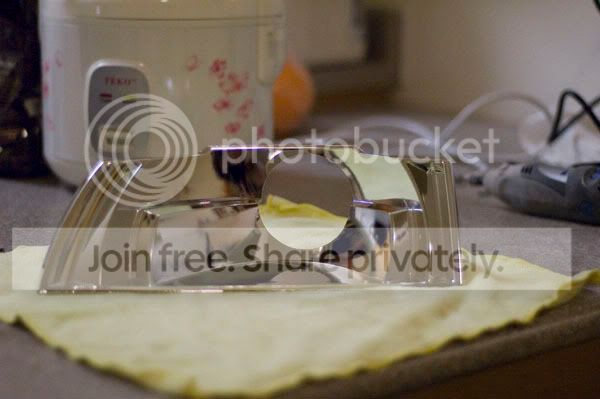
During mockup to make sure nothing rubbed, even on the lens (notice I have yet to remove the blue tape on the right reflector housing):
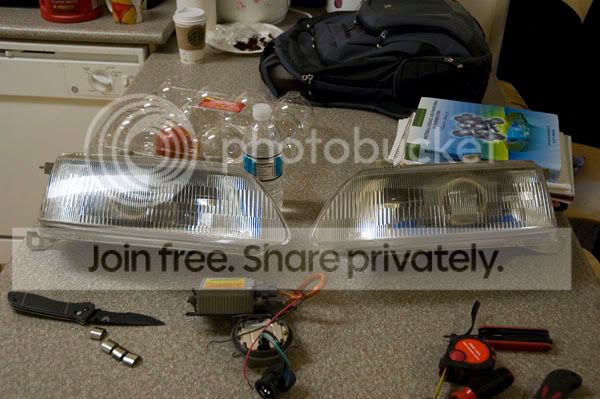
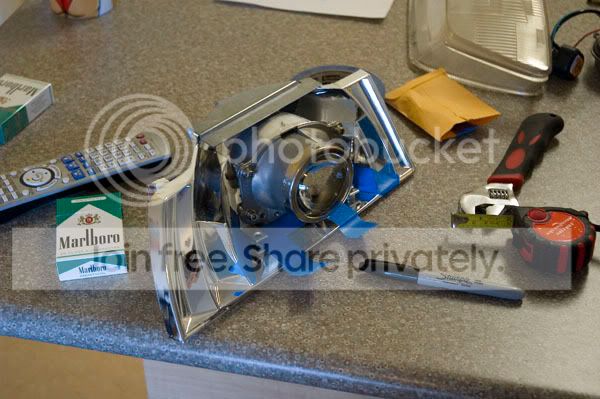
This picture looks kinda weird like the headlight looks super long cause I was using an 18-70mm lens, but the projector looks like the perfect size for the headlight. Almost perfectly centered and not too small or large:
Finish by resealing the lens back onto the headlight bucket. I highly recommend Nissan OEM Headlight/Tail-lamp sealant. Seals better than RTV or Honda-bond, no mess, and can be used multiple times (if you need to take the headlamps apart again).
Hope this helped someone in the Honda community out
Modified by 1989CivicSi at 11:39 PM 7/24/2008
Modified by 1989CivicSi at 6:11 PM 7/31/2008
Modified by 1989CivicSi at 6:34 PM 7/31/2008
(Projectors look crooked because I just threw them on there to line up the Fiber Images hood. If you use the method of mounting in this writeup, you still retain full OEM adjustability
.) Don't mind my friend, he is quite literally a yo-yo master. As you can see space is VERY tight in the EF8/EF9 headlight housing especially if you do what I did and kept the full adjustability of the headlamps. There is about 1/8" of clearance (or less) between the projector and the lens. This could be a good or bad thing depending on how you look at it. The closer the projector is to the flutes, the less distortion you get at the cutoff. I am currently still researching shroud options that will fit and will post up results once I find something that works (or make something that works).
This is my first attempt at a writeup, but not my first time doing custom work so i tried to make everything as detailed as possible. Also, the following is written with the assumption that you know how to take apart and adjust EF8/EF9 headlamps. If you don't know how to adjust or disassemble headlights, you should probably go and find out before attempting to retrofit projectors.
With that said, the following is just a general guideline on how I retrofitted TSX projectors into JDM EF8/EF9 headlights. Your process may vary depending on projector type, skill level, tools, etc. I am in no way responsible for any damages incurred to you, your headlamps, your car, your cousin's uncle, etc. Do this at your own risk and remember...measure twice, but cut once!
Total time per side: 45mins-1 hour My first side only took 30 minutes, but don't rush. I did and I'm glad I did it all perfectly, but I got lucky. The second side took me about 45 minutes.
Tools Required (that I used anyways):
>9mm socket + ratchet
>Sharpie brand or any other marker
>Needle-nose pliers
>Dremel or similar rotary tool with drum sander/cutoff wheel/high speed grinder attachments
>Phillips and Regular screwdrivers
>Rulers or measuring devices such as calipers
>Razor blades or a large military knife capable of penetrating a Kevlar vest (okay, not necessary but it was a gift
)Materials Required:
>Acura TSX clear lens projectors
>HID Ballasts, bulbs, ignitors
>Canned duster air (canned c02)
>Painter's tape
>Smallest L-brackets you can find that have the correct diameter hole for the TSX projectors (I got them at an ace hardware store)
>Mounting hardware (this is totally up to you, but I used all stainless hardware again from Ace) including: Bolts, nuts, #10 washers (about 40-50 of them), and lockwashers
>Blue Loctite
>Coffee and Cigarettes. Cigarettes optional and highly discouraged, but make sure you are 100% awake to do this. Coffee really helped me out.
Step 1: Take measurements of the bolt sizes you need and gather everything you need before you proceed. Trust me on this one, running to the hardware store 3 times in 1 day is not fun
Step 2: Follow the outline on the back of the reflector housing pictured below:
Step 3: Rough cut it out with the dremel + cut-off wheel then smooth it out with the drum sander. Do this is a well ventilated area unless you want the black lung. Okay, maybe not the black lung but please do not inhale the dust generated.
*Note* Depending on the projector used you may or may not need to cut out this area. I measured everything out beforehand and this seemed like the optimal place to start cutting.
Step 4: Flip the reflector over and on the underside you should see aiming lines that point straight ahead of your car when the headlights are mounted. Place painters tape with a few inches of excess on this location.
Step 5: Flip the reflector over again and place tape parallel to the tape you placed on the bottom. Then tape up any places where the projector may rub on the reflector housing to prevent scratches during mock up.
Step 6a: This picture is a bit ahead of the game but you can see exactly how I taped everything up.
Step 6b: Throw the projector in there. Okay, not really throw but just slip it in there and check for clearances.
Step 7: Mount up the hardware to your projector. If you want to colormod the TSX projectors now for more color now is the time. Don't worry about using locktite just yet. You may need to disassemble/reassemble a few time to get things right.
The order of how the hardware for the top of the projector should bolt up is as follows (from front to back -- front being the projector lens):
Bolt, lockwasher, washer |Projector| washer, nut
The order of how the hardware for the bottom of the projector should bolt up is as follows (from front to back -- front being the projector lens):
Bolt, lockwasher, washer |Projector| L-bracket, washer, nut
>>Also note form the picture that I mounted the L-bracket facing forwards. There simply isn't any space if you mount the L-bracket the other way<<
Step 8: Slip the hardware up'd projector into the reflector housing as far back as it can go and check for clearances. You probably won't have enough so mark where the projector rubs with a sharpie and use the dremel + sanding drum to slowly sand away areas that may rub or inhibit your ability to correctly mount the projector.
Step 9: This step is very confusing to type out, but let me try to break it down...
As a starting ground, use 6 #10 washers under each leg of the L-brackets to figure out where you need to drill holes. Make sure the L-brackets run parallel to the tape you applied in step 4 and 5 to ensure the projectors are pointed straight out.
Mark where the holes should be drilled with a sharpie and drill one hole first, run a bolt through it to make sure everything still lines up with your projector and washers then drill the second hole and run the bolt through that. Measure twice and cut once.
Bolt everything up and check for clearances all around again. The projector or mounting hardware should NOT rub on the reflector housing at all. The projector should look like it's suspended in air by the 6 #10 washers you used. Clearances are super tight so if the projector isn't far back enough the projector lens will rub on the headlight. This is why you mocked up the entire setup with #6 washers to space the projector up so you can push it back further. Later on you can take a few washers out to center the projector a bit better and gain some more clearance without unnecessarily cutting away at the reflector housing.
Step 10: Remove the projector from the reflector housing and proceed to use the air duster to get the reflector 100% clean. Then proceed to dust out the headlight housing and anything else that may have dust on it.
Step 11: Reassemble everything without locktite and proceed to place the reflector back into the headlight housing and reassemble.
Step 12: Put the headlights back onto your car without the lens and proceed to aim them correctly.
Everything else from here if completely up to you. If you want a shroud then go for it now. Just make sure you remember to use loctite when final-assembling everything.
Here are just a few extra supplemental pictures of how my install went (again, just the way I did it):
This idea could've worked as the ignitor fit perfectly to the backside, but I decided to mount the ignitors under the headlamp and run the rubber splash guards to cover everything up nicely:
During mockup to make sure nothing rubbed, even on the lens (notice I have yet to remove the blue tape on the right reflector housing):
This picture looks kinda weird like the headlight looks super long cause I was using an 18-70mm lens, but the projector looks like the perfect size for the headlight. Almost perfectly centered and not too small or large:
Finish by resealing the lens back onto the headlight bucket. I highly recommend Nissan OEM Headlight/Tail-lamp sealant. Seals better than RTV or Honda-bond, no mess, and can be used multiple times (if you need to take the headlamps apart again).
Hope this helped someone in the Honda community out
Modified by 1989CivicSi at 11:39 PM 7/24/2008
Modified by 1989CivicSi at 6:11 PM 7/31/2008
Modified by 1989CivicSi at 6:34 PM 7/31/2008
i want to do this, but dont the lines or ridges on the actual headlight throw light around so you wont get that perfect light cut off?
Junior Member
Joined: Dec 2007
Posts: 370
Likes: 0
<TABLE WIDTH="90%" CELLSPACING=0 CELLPADDING=0 ALIGN=CENTER><TR><TD>Quote, originally posted by pandarex »</TD></TR><TR><TD CLASS="quote">i want to do this, but dont the lines or ridges on the actual headlight throw light around so you wont get that perfect light cut off?</TD></TR></TABLE>
yes,
cutoff will be blurry and light will be filtered by the lense.
yes,
cutoff will be blurry and light will be filtered by the lense.
Thread Starter
Honda-Tech Member
Joined: Nov 2005
Posts: 2,032
Likes: 0
From: CA, US
<TABLE WIDTH="90%" CELLSPACING=0 CELLPADDING=0 ALIGN=CENTER><TR><TD>Quote, originally posted by pandarex »</TD></TR><TR><TD CLASS="quote">i want to do this, but dont the lines or ridges on the actual headlight throw light around so you wont get that perfect light cut off?</TD></TR></TABLE><TABLE WIDTH="90%" CELLSPACING=0 CELLPADDING=0 ALIGN=CENTER><TR><TD>Quote, originally posted by striker_18 »</TD></TR><TR><TD CLASS="quote">
yes,
cutoff will be blurry and light will be filtered by the lense.</TD></TR></TABLE>
Yes, the fluting affects the cutoff and output. After shooting the retrofit at a wall 100+ feet away tonight I'm king of reluctant to sand out a circle where the fluting is though. The cutoff is still there albeit blurry, and color is still visible especially with the colormod. A lot of work for not a lot of net return. I'm fairly happy with the results for now, but I can always sand them out later if it really bothers me
Honda-Tech Member
Joined: May 2006
Posts: 1,898
Likes: 0
From: in the land where we say hella.
SAnding the flutes down is HARD. i ruined my pair.  if you have any good luck doing them please, let me kno!
if you have any good luck doing them please, let me kno!
Trending Topics
Junior Member
Joined: Dec 2007
Posts: 370
Likes: 0
<TABLE WIDTH="90%" CELLSPACING=0 CELLPADDING=0 ALIGN=CENTER><TR><TD>Quote, originally posted by 1989CivicSi »</TD></TR><TR><TD CLASS="quote">
Yes, the fluting affects the cutoff and output. After shooting the retrofit at a wall 100+ feet away tonight I'm king of reluctant to sand out a circle where the fluting is though. The cutoff is still there albeit blurry, and color is still visible especially with the colormod. A lot of work for not a lot of net return. I'm fairly happy with the results for now, but I can always sand them out later if it really bothers me </TD></TR></TABLE>
make a mold out of your lenses, then buy some lexan at homedepot and using a hairdryer or heating gun, shape it up. Then, use some nissan sealant and you're good to go. Or, cut a round hole in the headlight lense and fill that with some clear lexan gluing it to the lense and call it a day.
Yes, the fluting affects the cutoff and output. After shooting the retrofit at a wall 100+ feet away tonight I'm king of reluctant to sand out a circle where the fluting is though. The cutoff is still there albeit blurry, and color is still visible especially with the colormod. A lot of work for not a lot of net return. I'm fairly happy with the results for now, but I can always sand them out later if it really bothers me
</TD></TR></TABLE>make a mold out of your lenses, then buy some lexan at homedepot and using a hairdryer or heating gun, shape it up. Then, use some nissan sealant and you're good to go. Or, cut a round hole in the headlight lense and fill that with some clear lexan gluing it to the lense and call it a day.
Honda-Tech Member
Joined: Dec 2005
Posts: 212
Likes: 0
From: Saugerties, NY
The lens dont totally ruin it as far as Im concerned. Sure it distorts the beam, but its not bad, sort of similar to HID reflectors. Nice knife by the way, Benchmade is the best.

Junior Member
Joined: Jun 2002
Posts: 301
Likes: 0
From: Toronto, Ontario, Canada
why not just buy aftermarket projectors with the clear lens..
Swap that lens out and put it on the OEM headlights?
Wayyy easier then sanding that glass down, if it's even possible.
It'll just cost you a set of headlights but very well worth it.
Swap that lens out and put it on the OEM headlights?
Wayyy easier then sanding that glass down, if it's even possible.
It'll just cost you a set of headlights but very well worth it.
Junior Member
Joined: Jan 2003
Posts: 657
Likes: 1
From: state college, pa, us
<TABLE WIDTH="90%" CELLSPACING=0 CELLPADDING=0 ALIGN=CENTER><TR><TD>Quote, originally posted by e46civic »</TD></TR><TR><TD CLASS="quote">The lens dont totally ruin it as far as Im concerned. Sure it distorts the beam, but its not bad, sort of similar to HID reflectors. Nice knife by the way, Benchmade is the best.</TD></TR></TABLE>
not bad for you maybe... but bad for everyone driving towards you.
the problem with the fluted lenses: GLARE!
try looking at your lights from 25ft or so.
it shouldn't hurt your eyes to look at them above the cutoff.
(you shouldn't have to squint)
if they do, it is glaring too much. you might as well have used a pnp kit.
do what denshu said and retrofit into an aftermarket housing.
or do what striker_18 said and make your own clear covers.
your output (and cutoff) will be 100x better!
Junior Member
Joined: Dec 2007
Posts: 370
Likes: 0
<TABLE WIDTH="90%" CELLSPACING=0 CELLPADDING=0 ALIGN=CENTER><TR><TD>Quote, originally posted by denshu »</TD></TR><TR><TD CLASS="quote">why not just buy aftermarket projectors with the clear lens..
Swap that lens out and put it on the OEM headlights?
Wayyy easier then sanding that glass down, if it's even possible.
It'll just cost you a set of headlights but very well worth it.</TD></TR></TABLE>
Making a set of lenses from lexan
Lexan = $15 for both
Heating fun = $10
Making your own mold = $3-5 (find some wood or something)
If you go the other route by buying another set of headlights and blah blah, that's 100+ of wasted money.
Honda-Tech Member
Joined: Dec 2005
Posts: 212
Likes: 0
From: Saugerties, NY
Im not saying that I would keep the fluted lens, just that its not bad. Ive personally done it, there isnt a lot of glare. Like I said, it looks like an HID reflector set up.
Thread Starter
Honda-Tech Member
Joined: Nov 2005
Posts: 2,032
Likes: 0
From: CA, US
Too lazy to read the above posts in depth but:
1) The glare isn't that bad at all. That was the point of mounting the projectors less than 1/8" away from the flutes.
2) The cutoff was definitely affected, but not in the sense that there was a lot of glare above the cutoff. I shot the retro out at a wall 100+ feet away and the glare was measured to be around 1 foot above the regular cutoff without the fluted lens. Not bad at all considering all those pics out there with pnp kits and 3 feet of glare on a garage door 2 feet away.
3) EF8/EF9 headlights are getting rare as hell. A clean set is even rarer. Just retrofitting them was a labor of love and if possible I'd like to maintain the lines of the EF with a bit more modernistic styling (which is why I'm so hesitant to sand out the flutes).
4) I will snap more pics and update this thread with cutoff pics and a few tips/tricks I learned along the way in a few weeks. New quarter just started up for me and I simply don't have time right now.
Thanks all for the input
Thread Starter
Honda-Tech Member
Joined: Nov 2005
Posts: 2,032
Likes: 0
From: CA, US
<TABLE WIDTH="90%" CELLSPACING=0 CELLPADDING=0 ALIGN=CENTER><TR><TD>Quote, originally posted by ap716 »</TD></TR><TR><TD CLASS="quote">so, the l brackets are just to hold it in place and not for rotational use correct?</TD></TR></TABLE>
Correct, if you have the projector pointed straight out like in the DIY then you should have no issue adjusting for pitch/yaw/elevation using the OEM reflector housing
<TABLE WIDTH="90%" CELLSPACING=0 CELLPADDING=0 ALIGN=CENTER><TR><TD>Quote, originally posted by hon da top »</TD></TR><TR><TD CLASS="quote">i think they look sick, nice work...really nice work </TD></TR></TABLE>
Thanks, always good to get some feedback
Honda-Tech Member
Joined: May 2006
Posts: 1,898
Likes: 0
From: in the land where we say hella.
Do you have any problem with the coolant resevior being so close to the driver side headlight making them touch each other? the bottle and the projector itself.
Thread Starter
Honda-Tech Member
Joined: Nov 2005
Posts: 2,032
Likes: 0
From: CA, US
If you look at the pics, everything is enclosed within the headlight bucket itself, just like OEM Even the rubber seal for the back of the headlight pops right back on there with the HID's plugged in
Even the rubber seal for the back of the headlight pops right back on there with the HID's plugged in
