


 Apr 1, 2015, 01:48 PM
Last edit by: IB Advertising
See related guides and technical advice from our community experts:
Browse all: Steering and Suspension Guides
- How to Replace Front and Rear Shocks
Step by step instructions for do-it-yourself repairs.
Browse all: Steering and Suspension Guides

5th Gen Accord Bilstein Shock Install and How To - Lots of Pics
Thread Starter
Honda-Tech Member
Joined: Jan 2003
Posts: 78
Likes: 0
Happy New Year everyone!
I installed some Bilstein shocks on my Accord last week and decided to make a how to on installing shocks and springs while I was at it. I tried to make it as detailed as possible so no questions are needed to perform the entire install. I would highly recommend having a friend around to help as some parts are a little hard to do by yourself. So here goes...
If you guys are too lazy to read...I narrated the how to and put it on youtube...
First, I am in no way responsible for your injuries or what happens to your car. PERFORM THE INSTALL AT YOUR OWN RISK! If you need help, get a experienced friend or don't bother and have a shop install your suspension.
Tools required:
Jack
Jack stands
Breaker bar
Socket wrench with assorted sockets and extensions (12,14,17mm at least)
17mm box wrench
6mm allen wrench
Hammer
Rubber mallet
Flat head screwdriver
Torque wrench
Spring compressor
WD-40
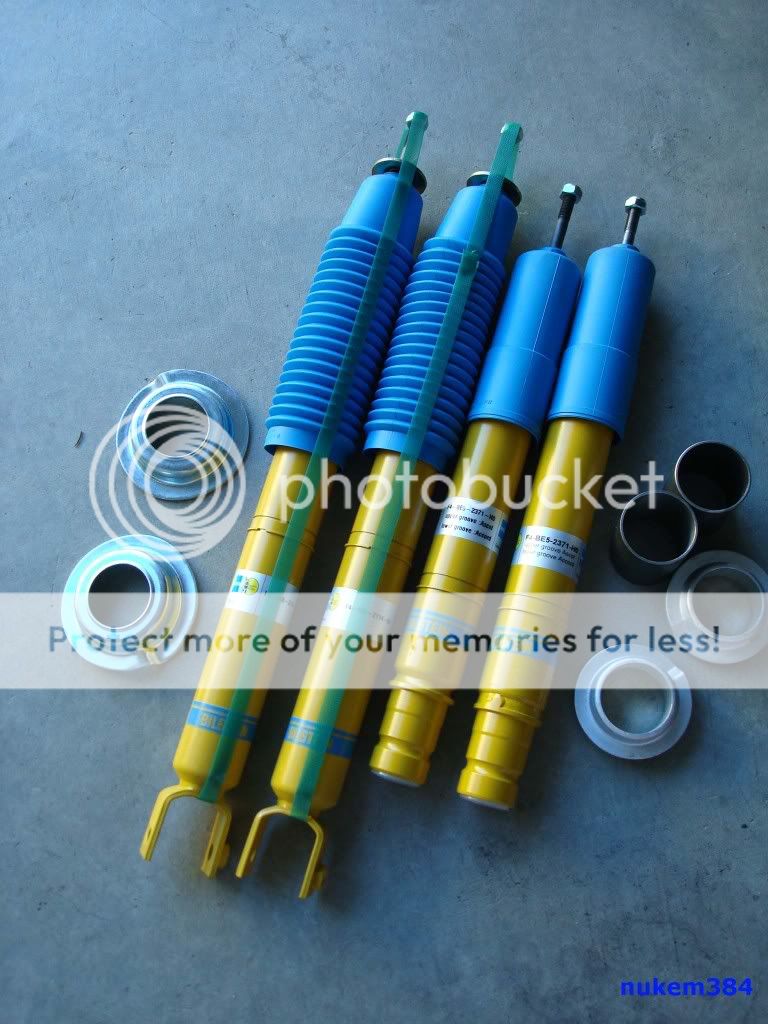
The hardware...


I decided to start with the rears first because I knew these were harder than the fronts in my opinion.
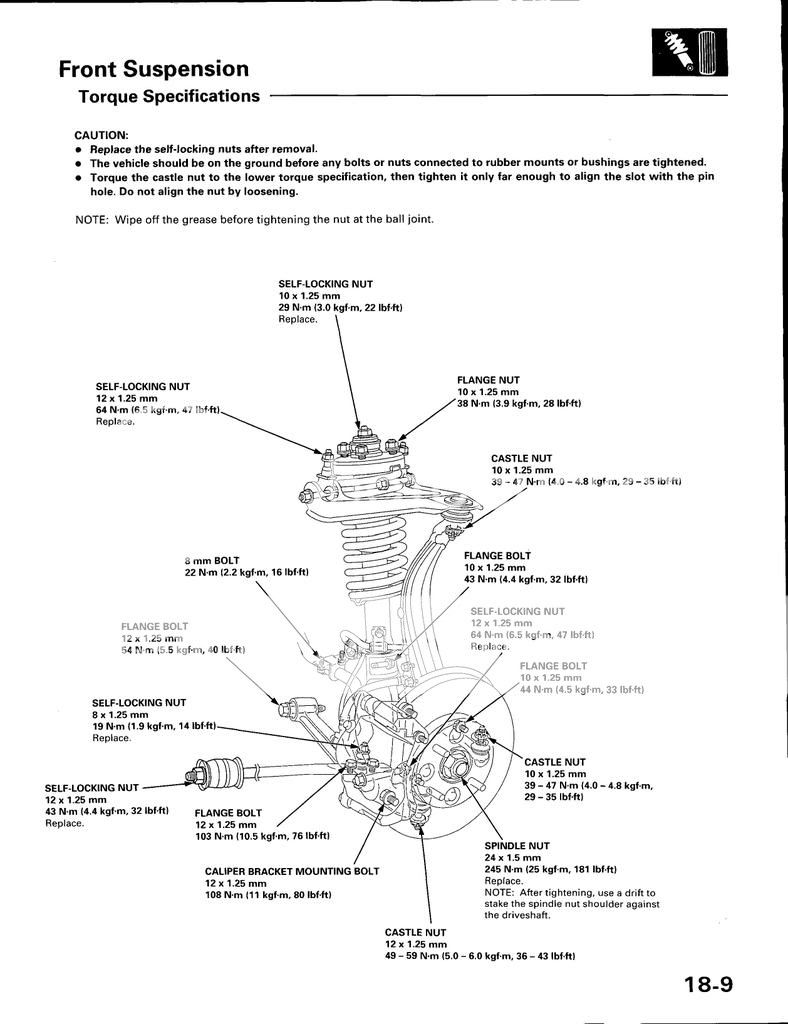
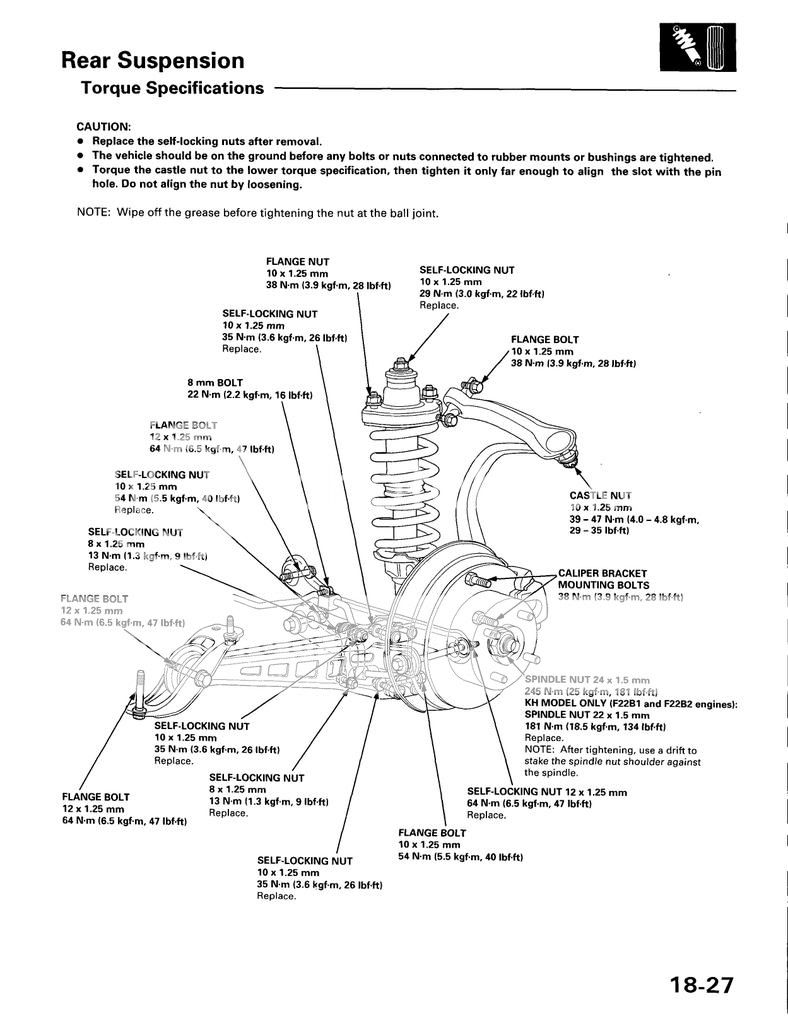
Here are a couple pics of the torque specs for all the bolts required to take the strut setup out and pertaining to the struts.
Step 1:
Jack up the car and put it on 4 jack stands. Never work underneath or on a car with just the jack holding the car up!
Step 2:
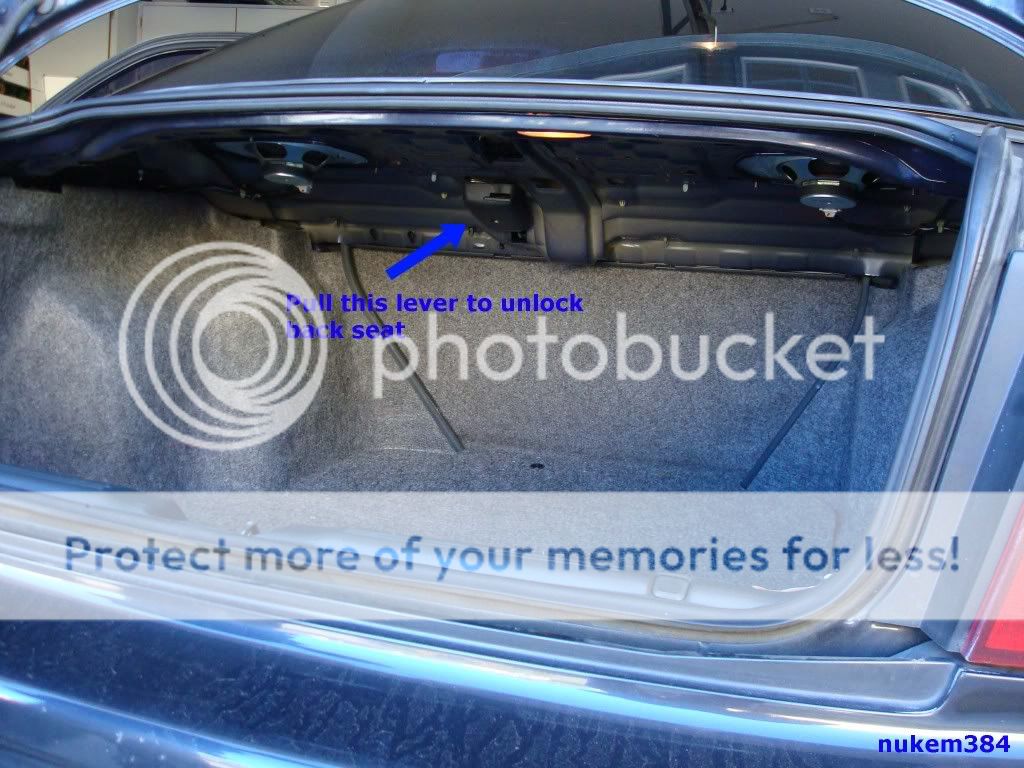
Unlock the trunk and pull the back seat down.

Put your key in the hole and turn clockwise...then pull the tab in the picture below and pull your back seat down from the inside.
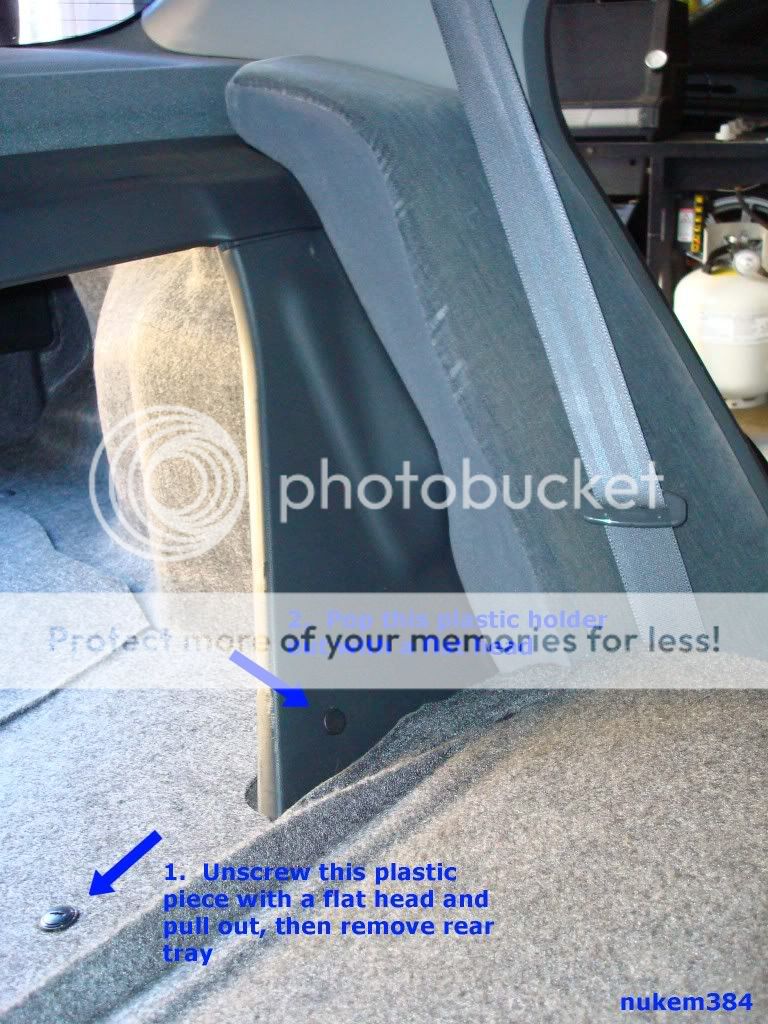
Step 3:
Remove the 2 plastic pieces and follow 1. and 2. in the picture.
Step 4:
Pull back triangular plastic piece to expose 14mm bolts holding strut body.

This is the contraption I used to get to the bolt closest to the frame (3 inch extension with a wobble joint).

Step 5:
Unbolt 2 14mm bolts that hold strut in place. To get to the other bolt, just peel back the trunk lining and it's right there.

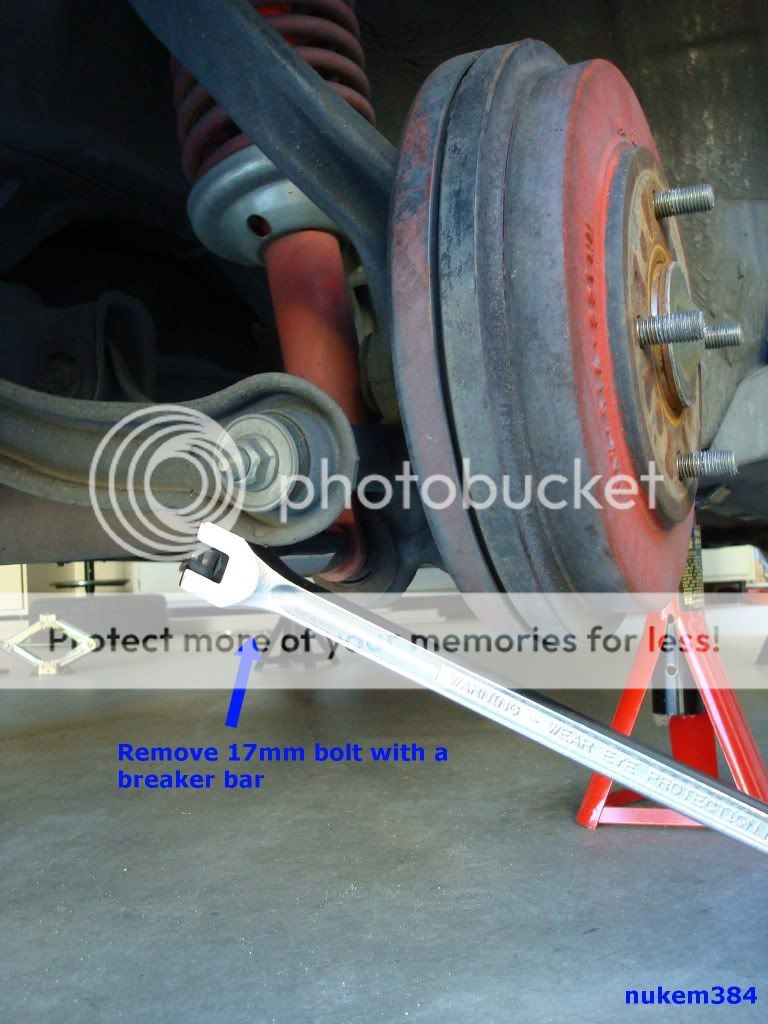
Step 6:
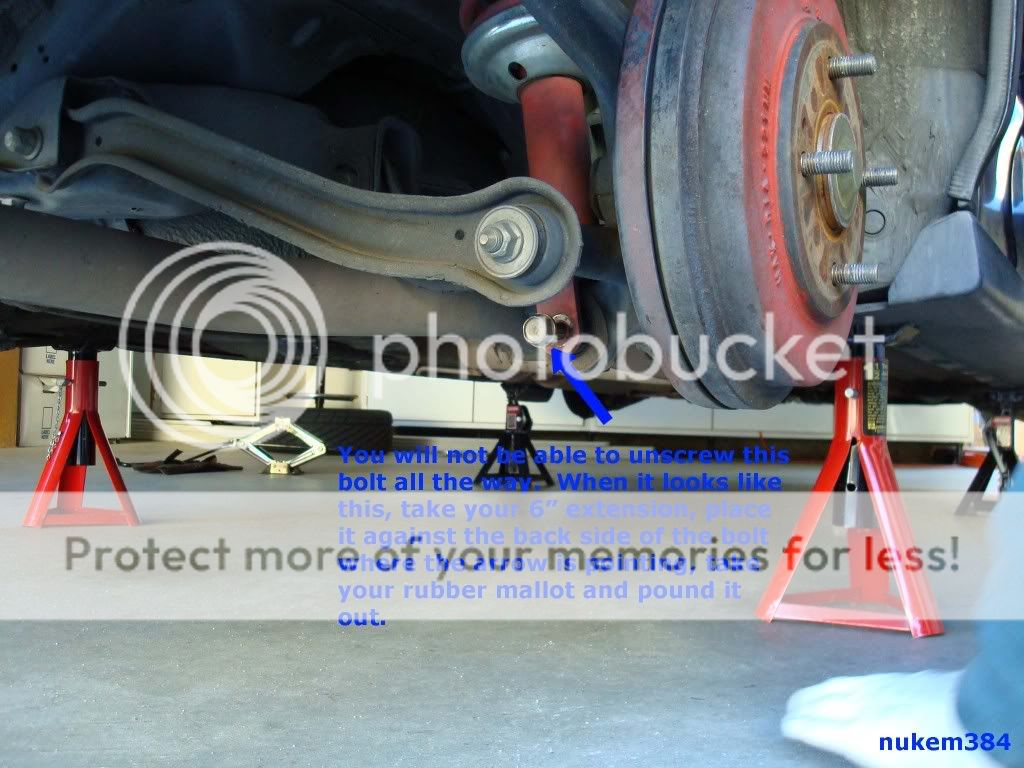
Unbolt the 17mm bolt with a breaker bar or socket wrench.
I found the easiest way to fully remove the bolt was to take your 6 inch extension, put it on the back of the bolt, aiming towards the rear of the car, and pound it out with a rubber mallet.
After the bolt is out, the strut will still be stuck on the Lower Control Arm (LCA), so give the shock body a firm kick and it will come off. You can also have a friend step on the drum or rotor and you can easily guide it off the LCA.
Step 7:
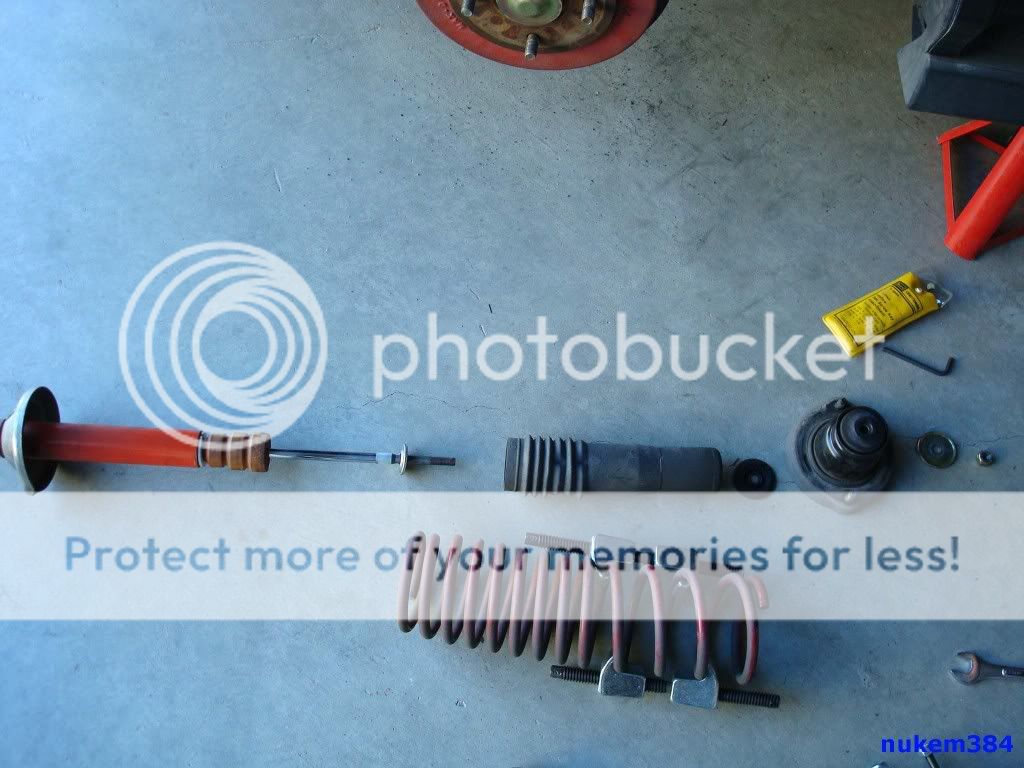
Compress the spring, then take your 17mm box wrench and 6mm allen wrench to unscrew top bolt.

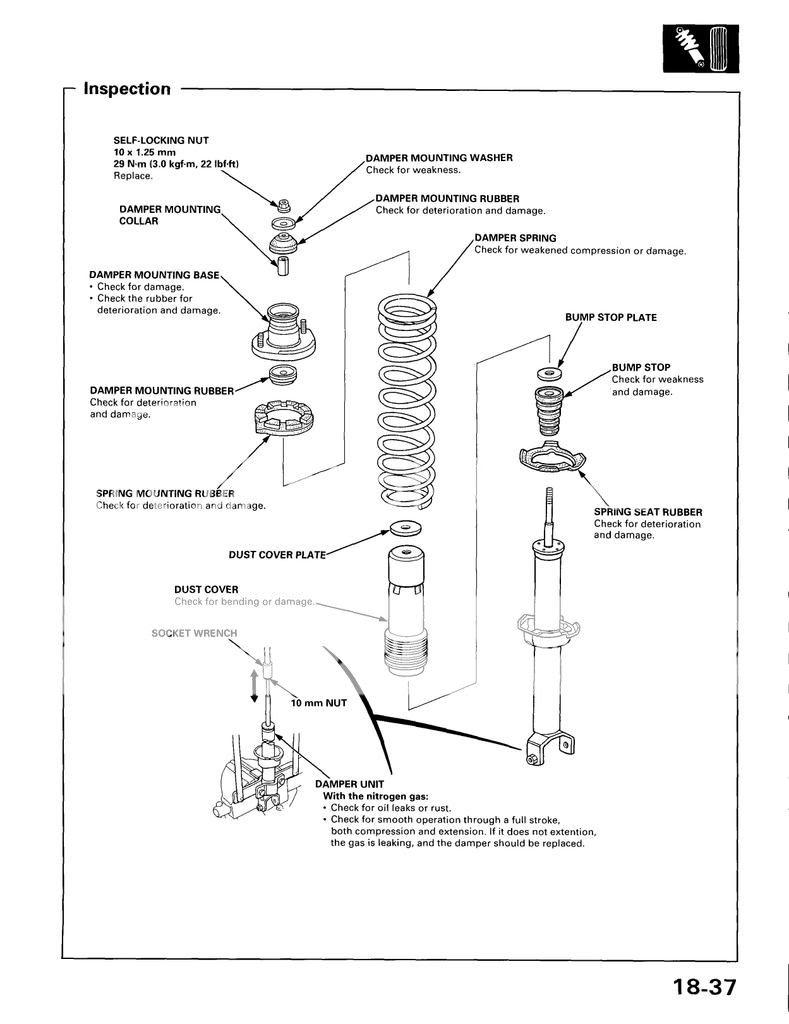
These are all the pieces of the suspension. If your aftermarket shocks don't come with something, reuse your stock pieces. If you have to reuse your stock bumpstop, you should cut about 1 inch off it for more travel with the aftermarket shocks. Don't cut off more than this though or you might wreck your shocks!
Step 8:
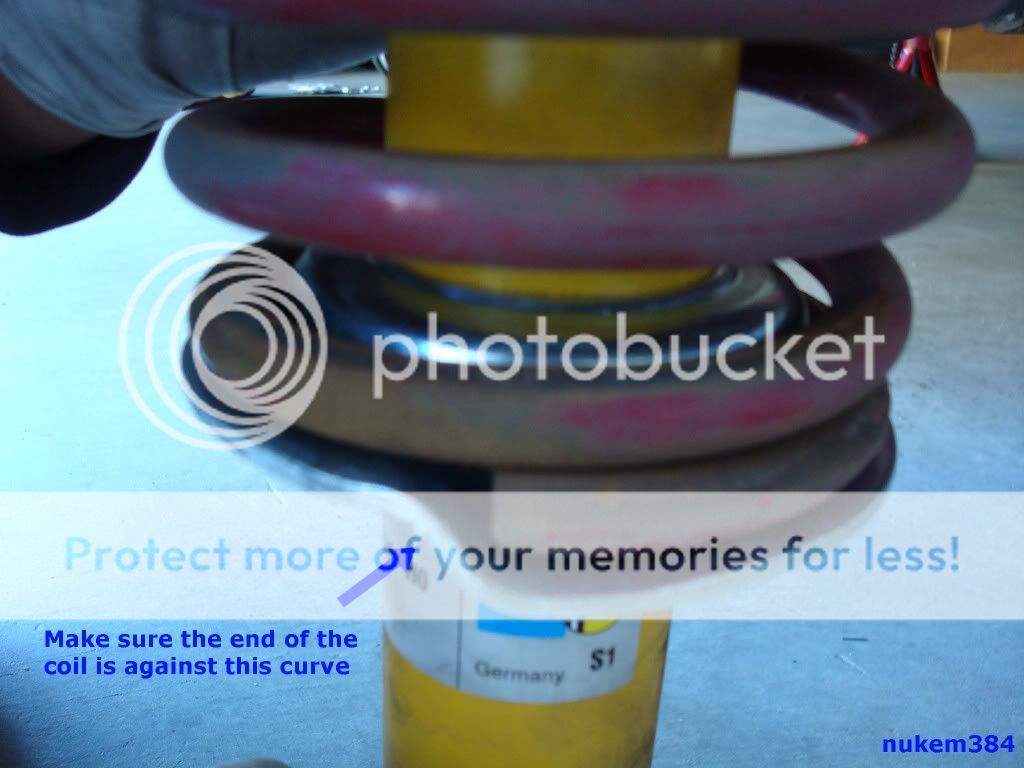
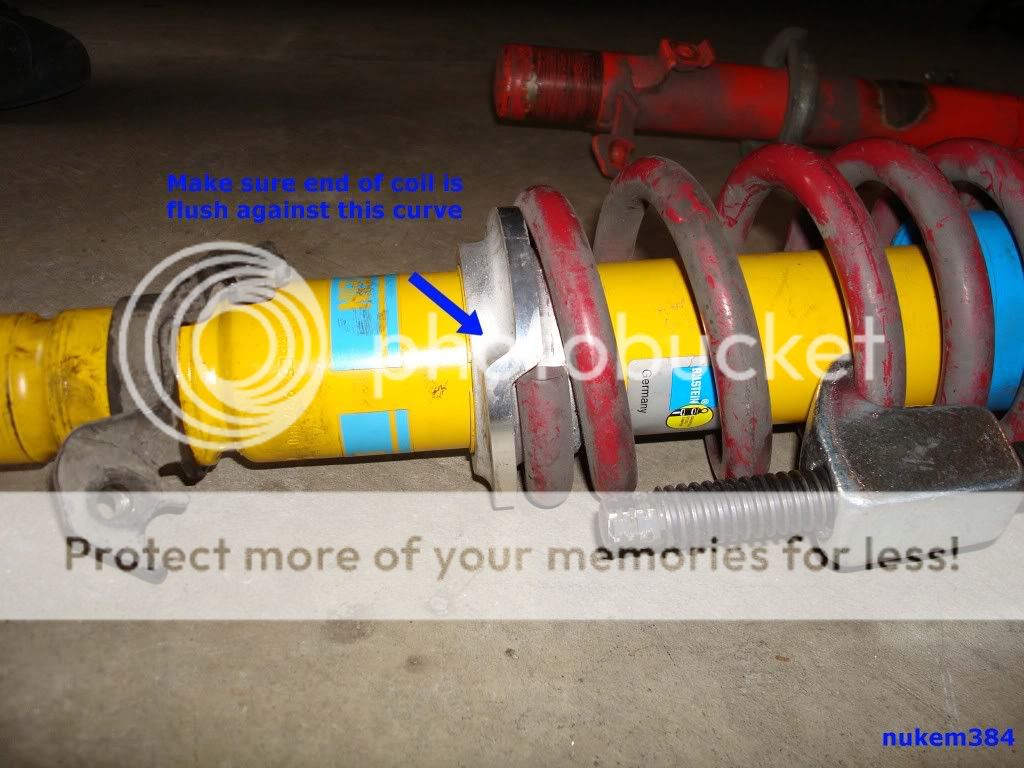
If you are installing new springs with your shocks, this would be the time to compress those and put them on your new shock body. Sometimes it is not necessary to compress lowering springs, but I did with my Eibach Sportlines just to make the job easier. Obviously a judgment call on your part. It is very important to place the end of the coil spring against this curve...
Step 9:
Reinstall all the suspension parts pictured above. To get the top hat back on, you might have to use some good old fashion muscle and force the spring down a bit to be able to screw the 17mm bolt back on top. After you've done that, uncompress the spring and put the strut back in the wheel well and loosely bolt the 2 14mm bolts on top back. To get the lower fork back on the LCA, have a friend step on the drum or rotor while you put it on the LCA. After you've done that, force a screw driver through the hole pointing towards the rear of the car.

Have your friend pull this screw driver up firmly to better line up the hole while you pound the bolt in from the other side with your rubber mallet. There will be a point when the bolt will not go any further. At this point, use your socket wrench and screw it in the rest of the way. After you've done this, tighten everything to the torque specs and you're done with one of the rears. Repeat for the other side.
Now on to the fronts...and yes I know most of these are pictures of the Bilstein's being taken out and not my old Koni Reds. I didn't have many good pictures of the Koni's being taken out anyway. I also realized I forgot to put the dust cover plate in and had to do the fronts twice, plus the brake bracket wasn't on correctly the first time either, as you'll see in some of the pictures.
Step 10:
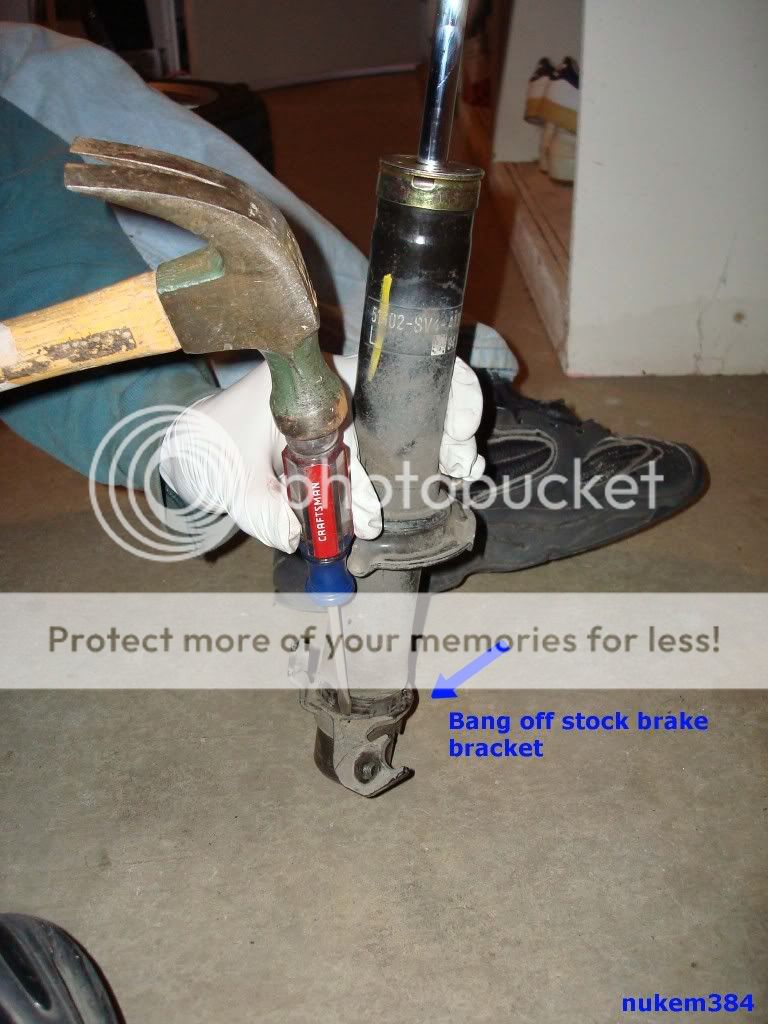
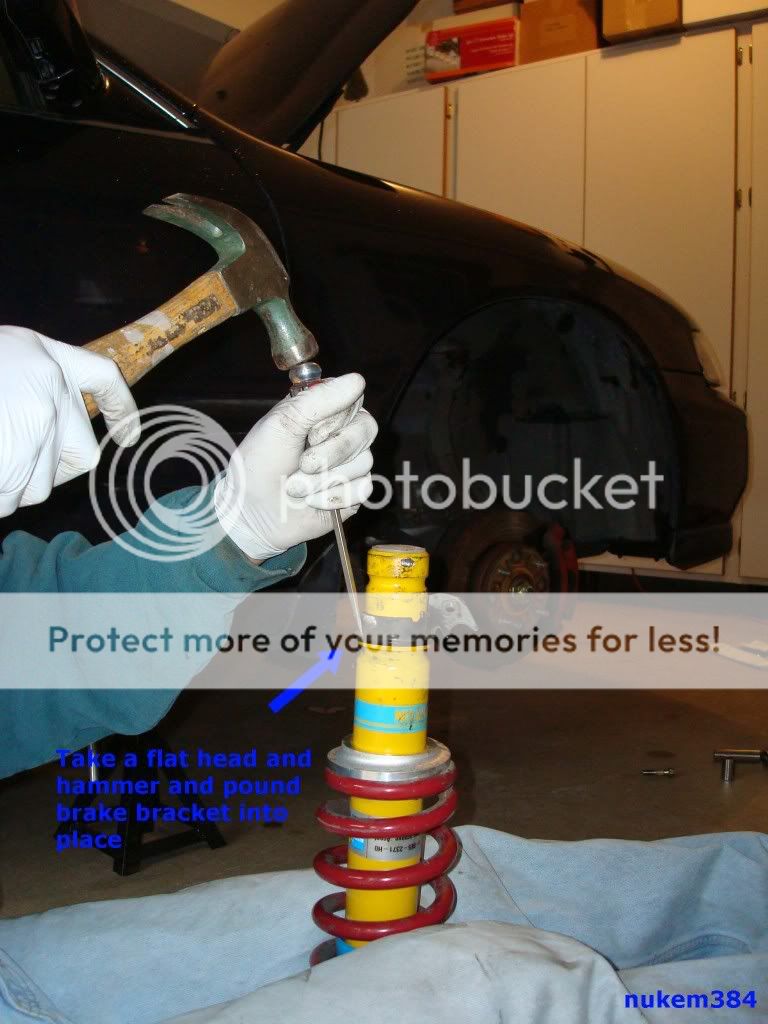
If your new shocks didn't come with brake brackets (like the Bilstein's), use your stock brake bracket. Use your flat head screw driver or pry bar and a HAMMER and give the bracket solid hits all the way around. I emphasize hammer because I tried with the rubber mallet first, and got no where due to the rubber absorbing a lot of the impact. It's a lot easier if you have your friend hold the shock while you are hammering.
Step 11:
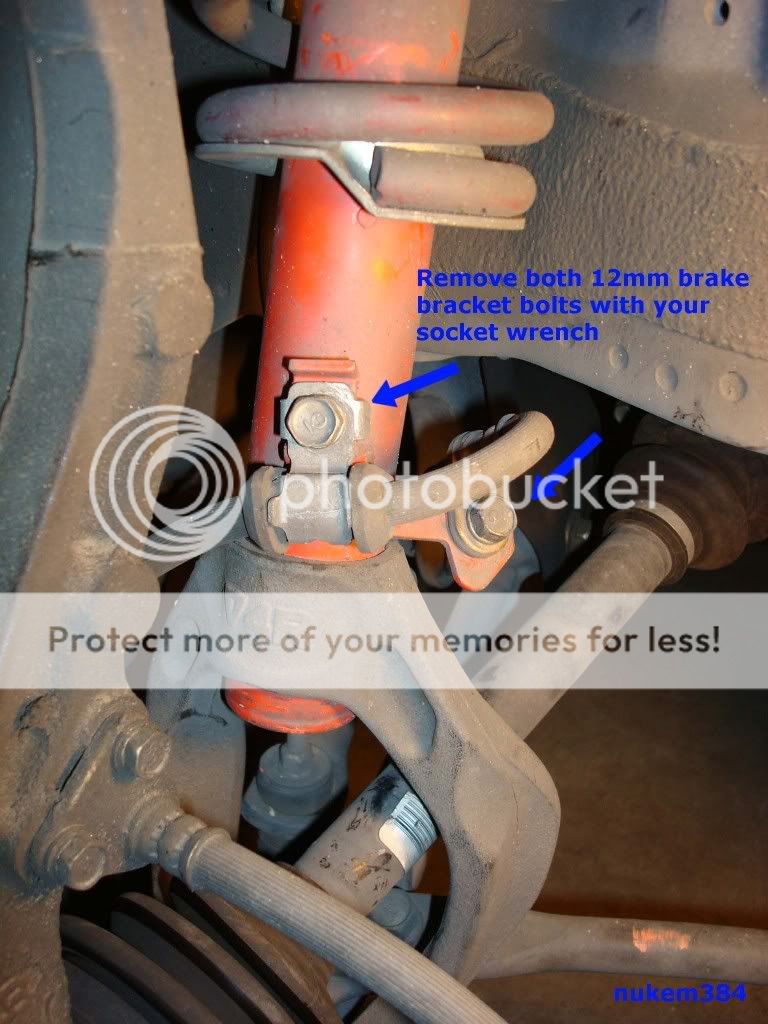
Unbolt the 2 12mm brake bracket bolts.
Step 12:
Unbolt the 14mm pinch bolt with your socket wrench
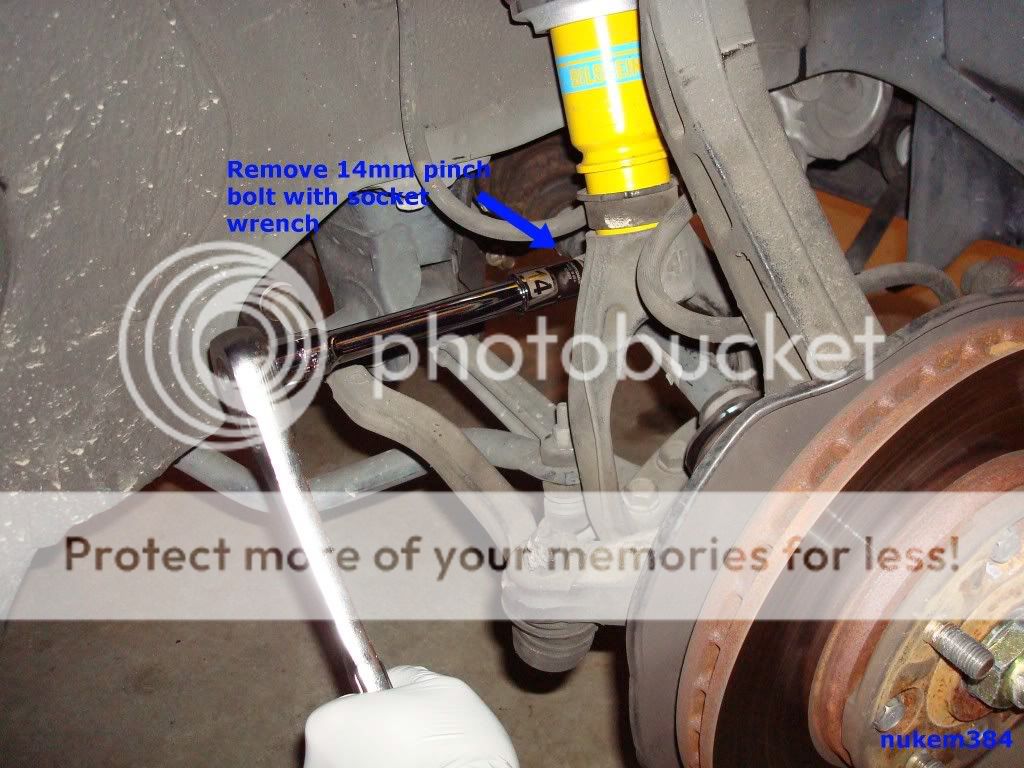
Step 13:
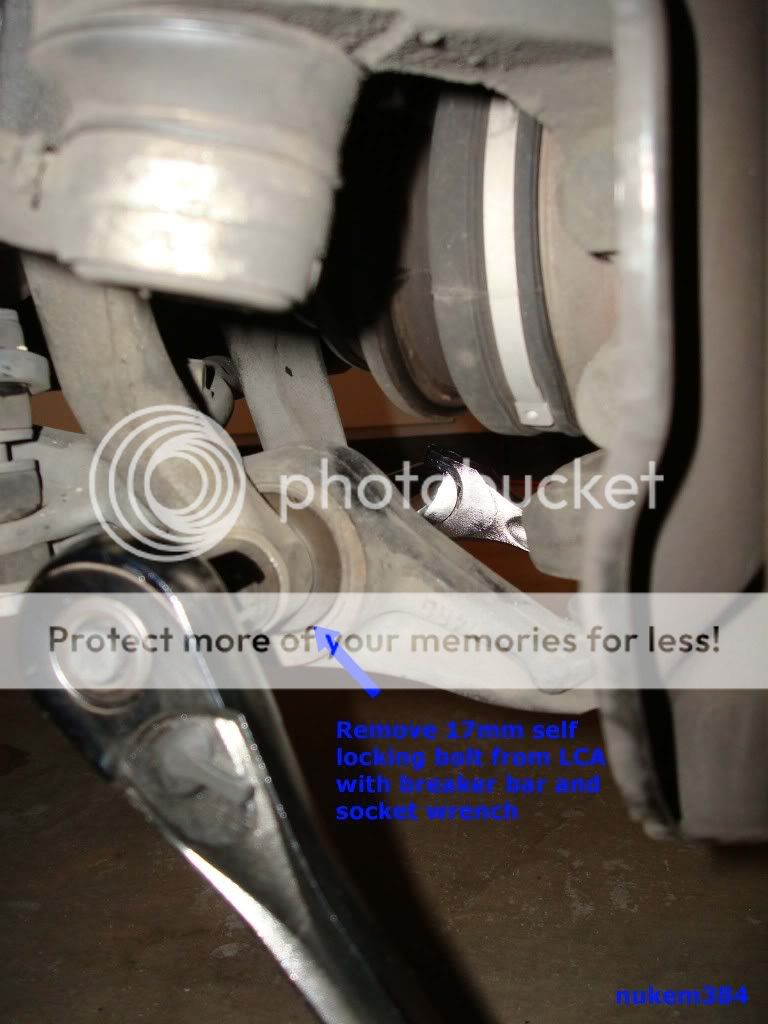
Unbolt the self locking nut from the LCA by using a 17mm breaker bar and socket wrench with 17mm socket.
Step 14:
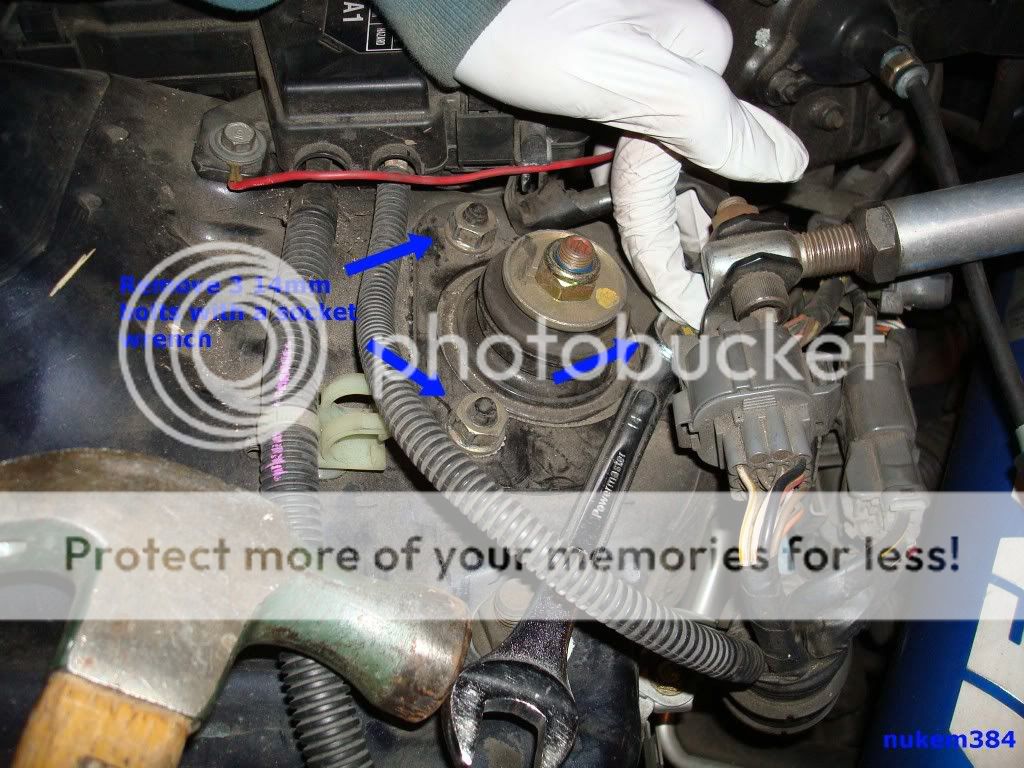
Unbolt the 3 14mm bolts in the engine bay. Shown is how I have to take the bolt off closest to the engine because of my strut bar.
Step 15:
Compress the spring, take the top hat off just like the rears. 17mm box wrench and 6mm allen wrench...

Components of the front strut setup, same as the back.
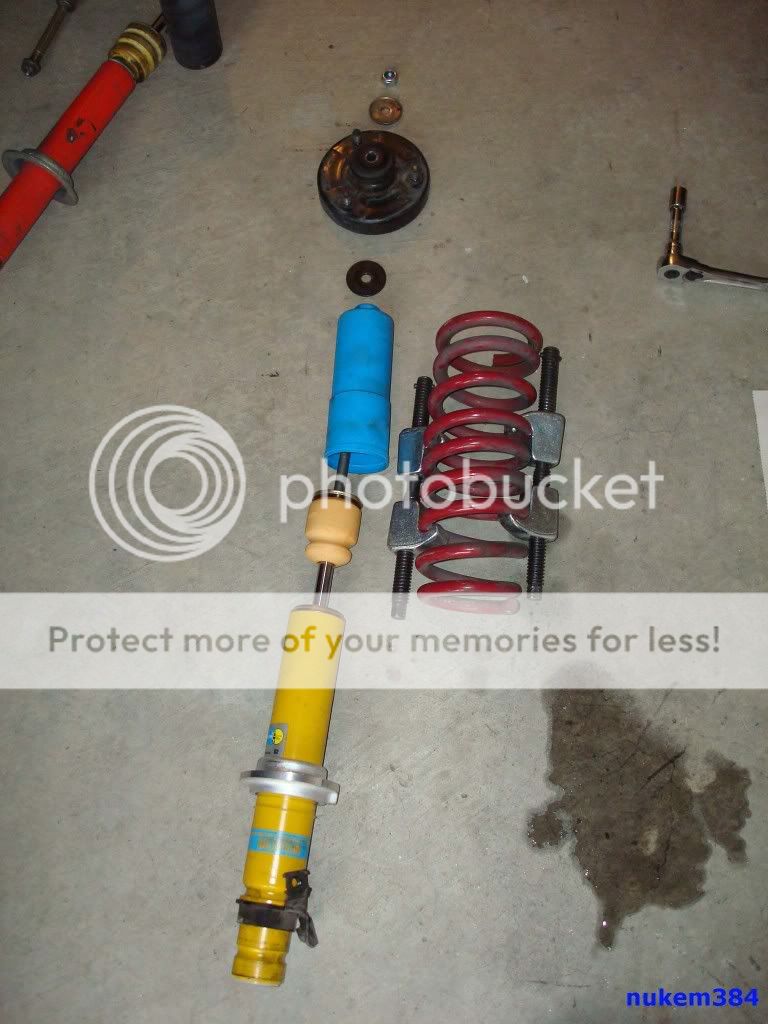
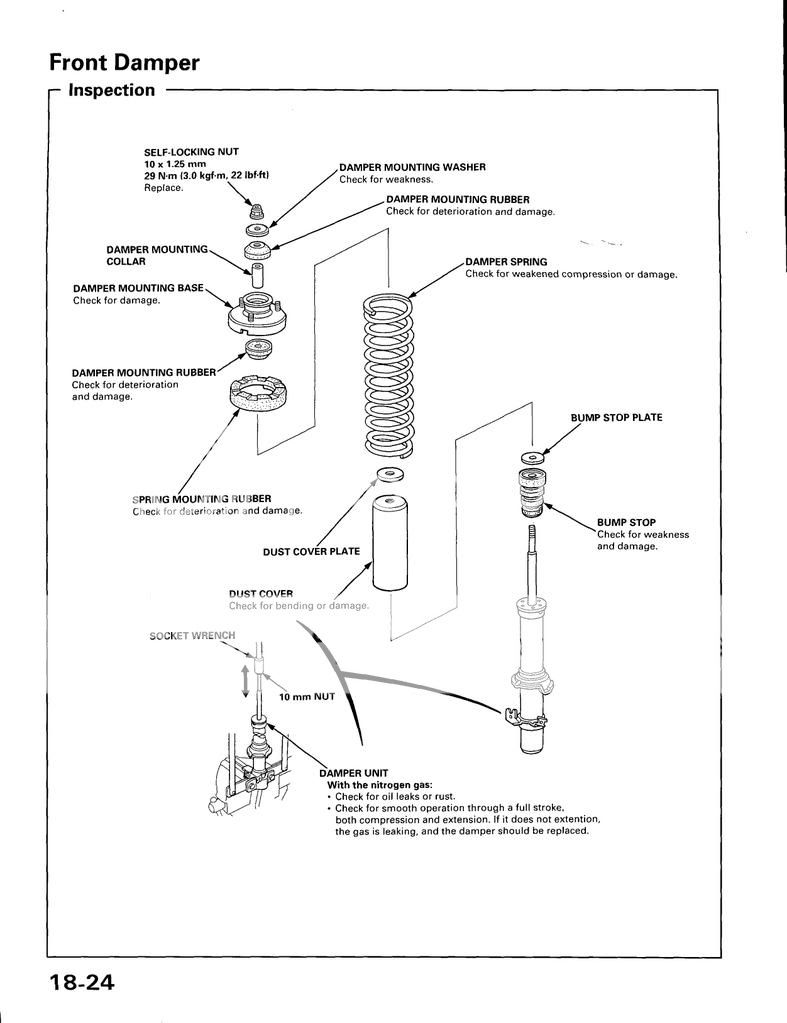
Make sure you have all these parts in this order and reassemble your strut setup. Obviously install your new spring if you have one.
Step 16:
Make sure the coil is against the curve, just like the rears. Again, you might have to use some good old fashion muscle to get the top hat back on. I only did with the rears. Tighten the top hat bolt and uncompress the spring.
Step 17:
Pound the brake bracket into place on the shock body. I found this easier with a little WD-40 on the shock body and inside the bracket. Just like when you took it off, pound it with solid hits and work your way around the shock body.
You might have noticed a little notch on the shock body like my old Koni's...
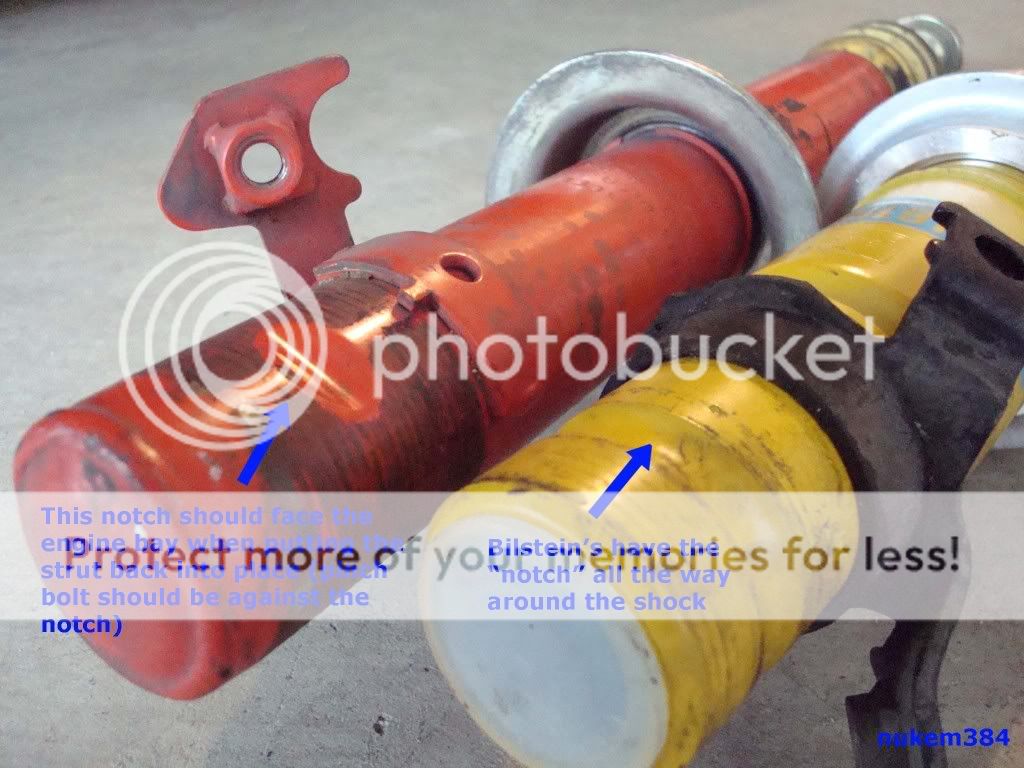
If you have this notch, it should be facing the engine bay in the wheel well. This is where the pinch bolt will be going through so you don't scratch up your shocks. The brake bracket will need to be installed in conjunction with the notch, so pay attention when you're hammering away.
That is pretty much it, install in reverse order and repeat for the other side. After that, you'll have some new shocks and/or springs to test out!
1 tip...I had a little trouble getting the fork back on the bottom of the shock. If you have this problem, you should loosely put the 3 14mm bolts in the engine bay back on so the strut setup has some play. Use WD-40 to lube the fork and shock. Put the fork against the shock, and use your rubber mallet to pound it into place. After it's mostly on, you can guide the fork to the LCA hole. Use your jack and put it under the LCA and pump it up a little. You will see the fork slide up on the shock. When it won't go any farther and you are jacking up the whole side of the car, reinstall the pinch bolt.
After you have completed the install, let your suspension settle for about a week, then get an alignment or your tires will suffer. To help get your camber back to 0, you should probably get camber kits if your car is lowered. I recommend Ingalls Camber Kits, had them on my car for like 5-6 years now and they are great.
Hope this guide was helpful and happy suspension installing!
Modified by nukem384 at 7:02 AM 1/2/2008
I installed some Bilstein shocks on my Accord last week and decided to make a how to on installing shocks and springs while I was at it. I tried to make it as detailed as possible so no questions are needed to perform the entire install. I would highly recommend having a friend around to help as some parts are a little hard to do by yourself. So here goes...
If you guys are too lazy to read...I narrated the how to and put it on youtube...
First, I am in no way responsible for your injuries or what happens to your car. PERFORM THE INSTALL AT YOUR OWN RISK! If you need help, get a experienced friend or don't bother and have a shop install your suspension.
Tools required:
Jack
Jack stands
Breaker bar
Socket wrench with assorted sockets and extensions (12,14,17mm at least)
17mm box wrench
6mm allen wrench
Hammer
Rubber mallet
Flat head screwdriver
Torque wrench
Spring compressor
WD-40
The hardware...
I decided to start with the rears first because I knew these were harder than the fronts in my opinion.
Here are a couple pics of the torque specs for all the bolts required to take the strut setup out and pertaining to the struts.
Step 1:
Jack up the car and put it on 4 jack stands. Never work underneath or on a car with just the jack holding the car up!
Step 2:
Unlock the trunk and pull the back seat down.
Put your key in the hole and turn clockwise...then pull the tab in the picture below and pull your back seat down from the inside.
Step 3:
Remove the 2 plastic pieces and follow 1. and 2. in the picture.
Step 4:
Pull back triangular plastic piece to expose 14mm bolts holding strut body.
This is the contraption I used to get to the bolt closest to the frame (3 inch extension with a wobble joint).
Step 5:
Unbolt 2 14mm bolts that hold strut in place. To get to the other bolt, just peel back the trunk lining and it's right there.
Step 6:
Unbolt the 17mm bolt with a breaker bar or socket wrench.
I found the easiest way to fully remove the bolt was to take your 6 inch extension, put it on the back of the bolt, aiming towards the rear of the car, and pound it out with a rubber mallet.
After the bolt is out, the strut will still be stuck on the Lower Control Arm (LCA), so give the shock body a firm kick and it will come off. You can also have a friend step on the drum or rotor and you can easily guide it off the LCA.
Step 7:
Compress the spring, then take your 17mm box wrench and 6mm allen wrench to unscrew top bolt.
These are all the pieces of the suspension. If your aftermarket shocks don't come with something, reuse your stock pieces. If you have to reuse your stock bumpstop, you should cut about 1 inch off it for more travel with the aftermarket shocks. Don't cut off more than this though or you might wreck your shocks!
Step 8:
If you are installing new springs with your shocks, this would be the time to compress those and put them on your new shock body. Sometimes it is not necessary to compress lowering springs, but I did with my Eibach Sportlines just to make the job easier. Obviously a judgment call on your part. It is very important to place the end of the coil spring against this curve...
Step 9:
Reinstall all the suspension parts pictured above. To get the top hat back on, you might have to use some good old fashion muscle and force the spring down a bit to be able to screw the 17mm bolt back on top. After you've done that, uncompress the spring and put the strut back in the wheel well and loosely bolt the 2 14mm bolts on top back. To get the lower fork back on the LCA, have a friend step on the drum or rotor while you put it on the LCA. After you've done that, force a screw driver through the hole pointing towards the rear of the car.
Have your friend pull this screw driver up firmly to better line up the hole while you pound the bolt in from the other side with your rubber mallet. There will be a point when the bolt will not go any further. At this point, use your socket wrench and screw it in the rest of the way. After you've done this, tighten everything to the torque specs and you're done with one of the rears. Repeat for the other side.
Now on to the fronts...and yes I know most of these are pictures of the Bilstein's being taken out and not my old Koni Reds. I didn't have many good pictures of the Koni's being taken out anyway. I also realized I forgot to put the dust cover plate in and had to do the fronts twice, plus the brake bracket wasn't on correctly the first time either, as you'll see in some of the pictures.
Step 10:
If your new shocks didn't come with brake brackets (like the Bilstein's), use your stock brake bracket. Use your flat head screw driver or pry bar and a HAMMER and give the bracket solid hits all the way around. I emphasize hammer because I tried with the rubber mallet first, and got no where due to the rubber absorbing a lot of the impact. It's a lot easier if you have your friend hold the shock while you are hammering.
Step 11:
Unbolt the 2 12mm brake bracket bolts.
Step 12:
Unbolt the 14mm pinch bolt with your socket wrench
Step 13:
Unbolt the self locking nut from the LCA by using a 17mm breaker bar and socket wrench with 17mm socket.
Step 14:
Unbolt the 3 14mm bolts in the engine bay. Shown is how I have to take the bolt off closest to the engine because of my strut bar.
Step 15:
Compress the spring, take the top hat off just like the rears. 17mm box wrench and 6mm allen wrench...
Components of the front strut setup, same as the back.
Make sure you have all these parts in this order and reassemble your strut setup. Obviously install your new spring if you have one.
Step 16:
Make sure the coil is against the curve, just like the rears. Again, you might have to use some good old fashion muscle to get the top hat back on. I only did with the rears. Tighten the top hat bolt and uncompress the spring.
Step 17:
Pound the brake bracket into place on the shock body. I found this easier with a little WD-40 on the shock body and inside the bracket. Just like when you took it off, pound it with solid hits and work your way around the shock body.
You might have noticed a little notch on the shock body like my old Koni's...
If you have this notch, it should be facing the engine bay in the wheel well. This is where the pinch bolt will be going through so you don't scratch up your shocks. The brake bracket will need to be installed in conjunction with the notch, so pay attention when you're hammering away.
That is pretty much it, install in reverse order and repeat for the other side. After that, you'll have some new shocks and/or springs to test out!
1 tip...I had a little trouble getting the fork back on the bottom of the shock. If you have this problem, you should loosely put the 3 14mm bolts in the engine bay back on so the strut setup has some play. Use WD-40 to lube the fork and shock. Put the fork against the shock, and use your rubber mallet to pound it into place. After it's mostly on, you can guide the fork to the LCA hole. Use your jack and put it under the LCA and pump it up a little. You will see the fork slide up on the shock. When it won't go any farther and you are jacking up the whole side of the car, reinstall the pinch bolt.
After you have completed the install, let your suspension settle for about a week, then get an alignment or your tires will suffer. To help get your camber back to 0, you should probably get camber kits if your car is lowered. I recommend Ingalls Camber Kits, had them on my car for like 5-6 years now and they are great.
Hope this guide was helpful and happy suspension installing!
Modified by nukem384 at 7:02 AM 1/2/2008
Last edited by nukem384; Sep 5, 2012 at 08:57 PM.


Trending Topics
Honda-Tech Member
Joined: Aug 2005
Posts: 891
Likes: 0
From: cedar park, tx, usa
very nice, love how u got tons of pics for the people that have yet to try this on their own cars, we all love pics!
Joined: May 2006
Posts: 1,184
Likes: 1
From: Free bullets if you find me sucka, Washington
Very nice write up, would be nice for some pictures to be resized but I vote for sticky! wish more people would do it...Ill be doing soon with my turbo install in march..anyway 
H-T Order of Merit
Joined: Aug 2002
Posts: 9,172
Likes: 7
From: somewhere in MI
<TABLE WIDTH="90%" CELLSPACING=0 CELLPADDING=0 ALIGN=CENTER><TR><TD>Quote, originally posted by EK_B »</TD></TR><TR><TD CLASS="quote">Put this in the FAQ!</TD></TR></TABLE>
was added to the FAQ when it was first posted
was added to the FAQ when it was first posted
Thread Starter
Honda-Tech Member
Joined: Jan 2003
Posts: 78
Likes: 0
thanks everyone for the great comments! just trying to make everyone's life easier if they want to install springs and shocks.
Joined: Sep 2008
Posts: 2
Likes: 0
From: Vancouver, B.C, Canada
Does anyone know if you can swap the entire suspension system in a 2000 Accord Coupe V6 EX with a 2002 Accord Coupe 4 Cylinder? Are they completely different or can you interchange some parts?
I went over a curb hardcore... if your asking yourself?
I went over a curb hardcore... if your asking yourself?
Honda-Tech Member

Joined: Oct 2002
Posts: 1,207
Likes: 1
From: OKC, USA
what is your experience/opinion on the bilstein? i notice that you previous had konis, can you give us a comparison of the two brand that you had.
thank you.
J
thank you.
J
Thread Starter
Honda-Tech Member
Joined: Jan 2003
Posts: 78
Likes: 0
i like the bilsteins better. even if you look at the shock body, they are a lot beefier than the koni reds. they are stiffer and give a better ride quality than the reds. the koni reds are really like bottom of the line, just something to get you by if your car is lowered.

Thread Starter
Honda-Tech Member
Joined: Jan 2003
Posts: 78
Likes: 0
its been going good. just working these days, the accord is my commuter car to work now, haha. yeah the sti comes out on the weekends.
