Honda Civic: How to Install Rear Fog Lamp
Rear fog lamps are a unique touch to add to your vehicle, replicating the look of the Euro-equivalent model. Continue reading to learn how to install these unique lamps onto your Honda Civic.
This article applies to the Honda Civic/Del Sol (1992-2000).
Rear fog lights are a relatively common sight in European cars, but they aren't available in many cars sold in the U.S. These extra lights give off a tremendous amount of light, making any vehicle more visible in the dark or in inclement weather. Be sure to check your state's laws because you may only be allowed a single light, rather than a pair of fog lights. In this case, most drivers prefer to place the single fog light on the driver's side of the vehicle.

Materials Needed
- Small screwdrivers
- Wire cables
- Wiring (T-tap) connectors
- Rear fog lamp switch
- Wire pigtails from combination light switch connector
- Bullet connectors
- WD-40 or similar lubricant
- Large pliers and small needle nose pliers
- Clean cloth
- Owner's manual
Pro Tip
You can often find the wire cables and the wire pigtails in junk yards.
Step 1 – Removing steering wheel covers and connect wires in footwell
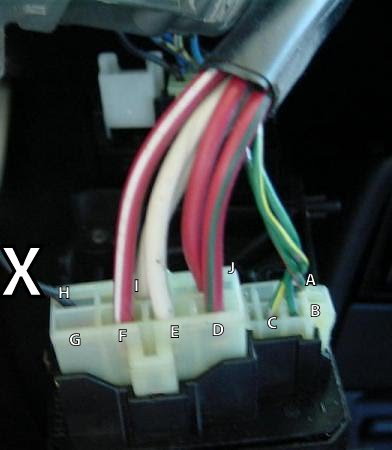
Carefully pry off the tabs that hold the steering wheel covers in place. Next, take the 10 or 12 gauge red wire. Pin one end of the wire into PIN-G (which will be empty) on the combination switch connector. Then, pin the other end into PIN-5 on the 7-pin C440 connector. Take the wire pigtails, and splice them to both ends of the red wire.
Pin the red/white wire into PIN-13 on the C501 connector. Start at the top left corner, and locate the connector from the wire side. The pin you're looking at brings power from fuse 20 to the rear fog lamp switch on the car's dashboard. Take fuse 7.5A, and plug it into fuse number 20.
Pro Tip
It's very important to measure out the proper length for the wires running from the combination switch to the fuse box.
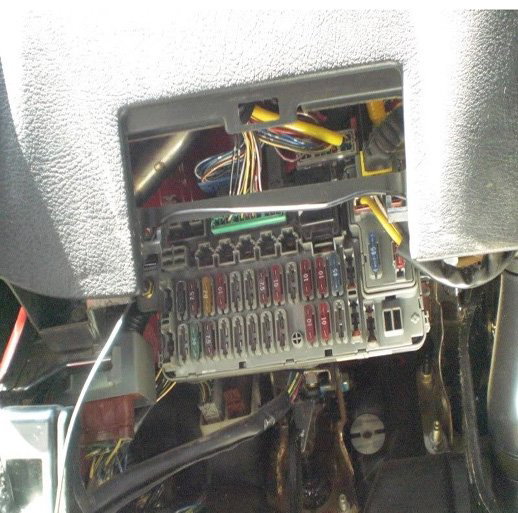
Step 2 – Remove the gauge cluster and wire the rear fog lamp switch pigtail
Gently remove the gauge cluster. Then, pry out and unplug the switches or blanks that are currently in the rear defogger switch location. You can avoid damaging your dashboard by covering your screwdriver with a cloth.
Wire the rear fog lamp switch pigtail using these steps:
- Connect red/white wire from PIN-E.
- Connect red/yellow wire from PIN-D.
- Connect red/black wire from PIN-C. You may need to use the T-tap connectors (or similar tools) to connect the red/black wire to the existing red/black wiring.
- Connect the black wire from PIN-B. You might also have to use T-taps for this step to connect the wire to the existing dimmer switch red wiring. This will be the smaller 18-gauge wire.
- Connect the black wire from PIN-A using the T-taps to connect the wire to the existing black ground wiring.
Next, plug in the rear window defogger and rear fog lamp switch connectors. Then, insert them into your car's dashboard. If necessary, use electrical tape to tape the wiring flush with the dashboard/gauge cluster wiring harness.
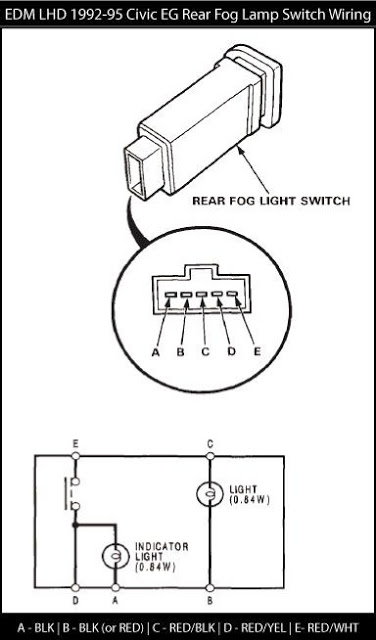
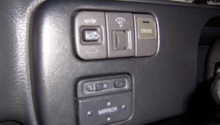
Figure 2. Euro-spec fog lamp switch. 
Figure 3. Remove the gauge cluster.
Step 3 – Rear wiring harness
Use your owner's manual as a guide to the wiring next to the driver's seat, the rear quarter panel removal, and cover for the back base of the vehicle's trunk.
Bring the red/yellow wire from the dashboard wiring harness through the blue junction connector, and into the fuse box underneath the dash. Pass it through with the collection of wires between the door and the driver's seat. Then, connect the wires to the large rear junction connector. Follow the wires along through or next to the rear wiring loom to the tailgate. Pass the wires through the connector close to the space where the connector leaves the cabin and enters the rubber tubing to the tailgate.
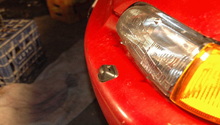
Step 4 – Install wiring lights in the trunk
Wind the red/yellow wire through the existing wiring looms until you reach the driver's side inner tail lamp, and then poke it through. The wire should end at the 4-pin connector of the inner tail lamp, at which point you should insert the pin into the open slot in the inner tail lamp connector.
De-pin just the male red/black wire that goes to the parking lamp bulb holder. Then, cut the black wire above the spot where it's split and taped. Remove the parking tail lamp bulb holder, and set it aside—you won't need it anymore.
De-pin the connector on the brake/tail/turn signal lamp harness, and then cut away the small tail lamp bulb on the harness. For this step, be sure to cut the red/black wire where it's split and taped. Tape up any exposed wiring.

Step 5 – Swap inner metal cylinder sleeve and bulb base pigtail assembly
Swap the inner metal cylinder sleeve and bulb base pigtail assembly from the black brake lamp bulb holder into the grey turn signal indicator bulb holder. Squirt a bit of WD-40 or similar lubricant between the metal and plastic to loosen it up. Then, use a pair of large pliers to grip the plastic at the base, and a pair of smaller needle nose pliers to grab onto the top of the metal cylinder, which should be sticking out. Slowly twist and pull it apart.
Step 6 – Install the bulbs
Start by installing the bulb and holder into the inner side driver's tail lamp. Pin the red/black wire in the same spot of the driver's side inner tail lamp where you took out the red/black wire before. Then, clip the green/white wire, and use bullet connectors to replace it with a red/yellow lead. Pin the wire to match the red/yellow on the opposite side. Reconnect the black wire with the bullet connectors.
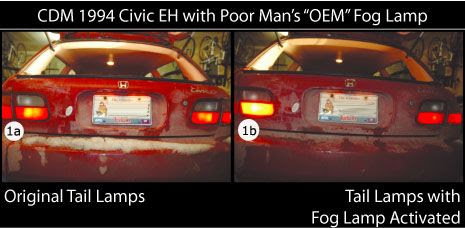
Test the bulbs by turning on the headlight, and pressing the rear fog lamp switch. If the lights aren't working, check to make sure that all of the connections are secure.
Related Discussions
- DIY Honda Civic 1992-1995 Rear Fog Lamp Retrofit Install Guide - Honda-Tech.com
- EDM/JDM Rear Fog Light - Honda-Tech.com