


DIY LMA removal/replacement writie up.

Thread Starter
Member
Joined: Dec 2004
Posts: 1,244
Likes: 0
From: Bowling Green, KY, United States
Hello H-T,
I'm currently in the process of rebuilding some of the parts in my PR3 B16A head. The parts I'm replacing are the valve springs, valve stem seals, valves, retainers, and more important to this thread, the Lost Motion Assemblies as well.
Being that my head is so old in comparison to the P30 heads and P72 heads I thought it was time to splurge and replace the ones that I have been sick of hearing for the past couple of years.
If anyone wants to know how to know if your LMA's are bad you can remove them per my instructions and push on them. If the spring sticks after you let off of them they are bad and need to be replaced. Or if you would like to check another way, make sure your valve lash is set correctly, then drive your car. If your car sounds like it's in need of a dire valve lash adj. when it's out of VTEC operation, and then shuts up and sounds fine when operating in VTEC then your lma's most likely need to be replaced.
Nontheless I thought I would save all of you the trouble of having to search through numerous threads (I hope this will qualify to be archived eventually, after I add pics of course) to find out how to physically by yourself replace your LMA's.
I am starting with this thread with the understanding that you all have the knowledge of how to use the proper valve spring compressor to remove your valve springs and retainers (don't lose those valve keepers whatever you do)!
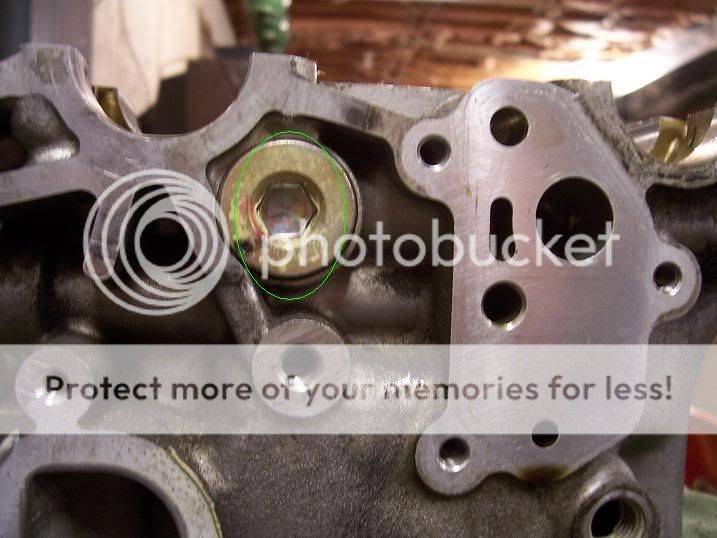
To get to the lma's you will have to remove the rocker shafts along with all of the rocker arms. You WILL also want to keep these in order and reinstall them just like they were originally. In order to remove these you will have to purchase a 10 MM allen wrench and remove the three bolts that conceal the rocker shafts. There is one located on the distributor side of the head and two located on the opposite end right across from one another. After those are removed you will need to remove the two oil control orifices on the side opposite the distributor by threading in a bolt to pull them out. Pictured below are the bolts you need to remove.

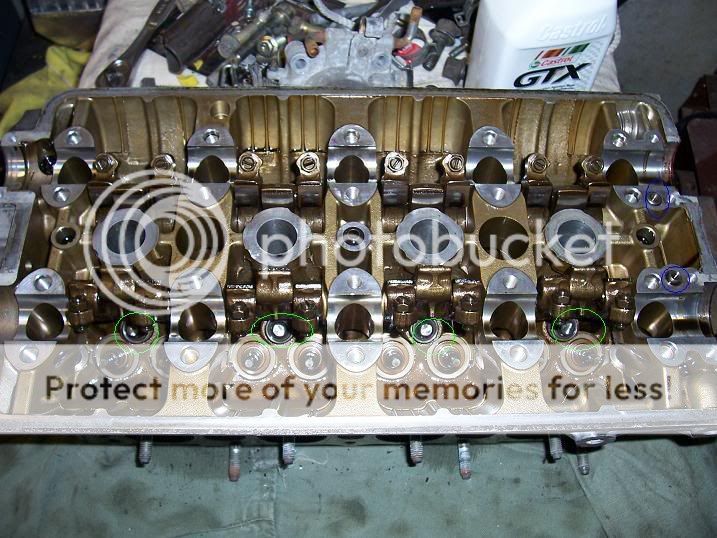
Here is a pic of the oil control orifices that need to have a bolt threaded in and the pulled out. They are circled in blue.
With those three allen bolt searing bolts removed and the two oil control orifices removed you are now able to slide the rocker shafts out of the head which ever way you want to. I will again emphasize that you make sure to keep the rocker arms in their proper order while removing them.
After you have removed both the rocker shafts and arms and placed them somewhere free of dirt and debris you can remove the LMA's. There is nothing to it really. They pull out with your hand really easily (or at least mine did). There are eight. While I was replacing mine I rubbed oil on the outsides of each LMA before installing them into place just for peace of mind.
Here is one of my old first gen. B16A LMA's :
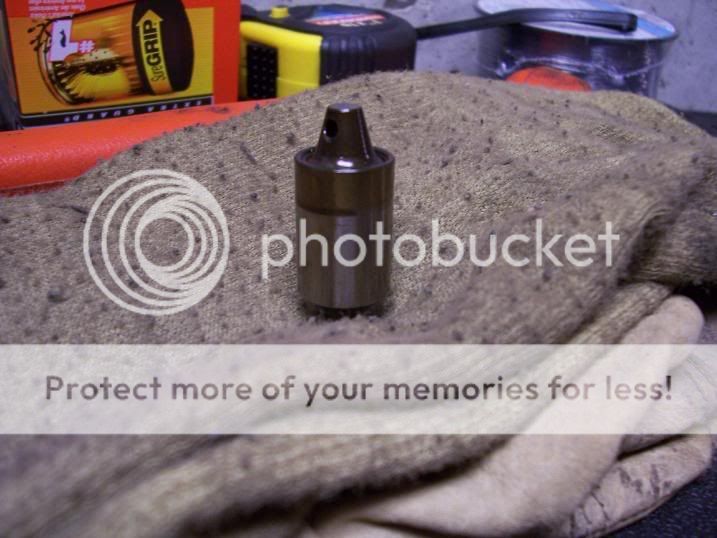
There is no difference in operation or function between the old smaller tapered in that is pictured here and the larger ones that I've installed. The design just changed slightly over the years.
Now you need to replace the rocker shafts and arms back into their original positions and then reinstall the searing bolts and the oil control orifices. Your old LMA's are now replaced and you're free to go.
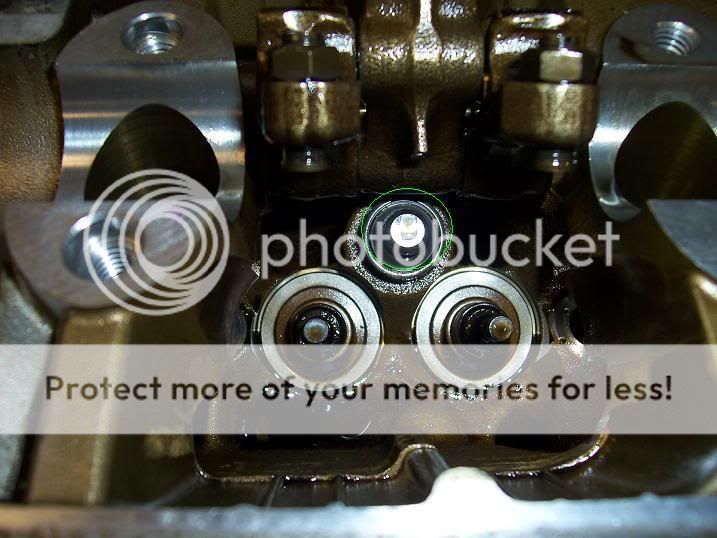
New LMA installed:
Honda DOES recommend that you replace the o-rings or washers on the oil control orifices and the searing bolts. Just for peace of mind as well the Honda torque specs for the searing bolts are 36 lb. ft.
If anyone has any advice or critiques please post them as I am learning as I go. Thanks for looking. Hope this helped.
I'm currently in the process of rebuilding some of the parts in my PR3 B16A head. The parts I'm replacing are the valve springs, valve stem seals, valves, retainers, and more important to this thread, the Lost Motion Assemblies as well.
Being that my head is so old in comparison to the P30 heads and P72 heads I thought it was time to splurge and replace the ones that I have been sick of hearing for the past couple of years.
If anyone wants to know how to know if your LMA's are bad you can remove them per my instructions and push on them. If the spring sticks after you let off of them they are bad and need to be replaced. Or if you would like to check another way, make sure your valve lash is set correctly, then drive your car. If your car sounds like it's in need of a dire valve lash adj. when it's out of VTEC operation, and then shuts up and sounds fine when operating in VTEC then your lma's most likely need to be replaced.
Nontheless I thought I would save all of you the trouble of having to search through numerous threads (I hope this will qualify to be archived eventually, after I add pics of course) to find out how to physically by yourself replace your LMA's.
I am starting with this thread with the understanding that you all have the knowledge of how to use the proper valve spring compressor to remove your valve springs and retainers (don't lose those valve keepers whatever you do)!
To get to the lma's you will have to remove the rocker shafts along with all of the rocker arms. You WILL also want to keep these in order and reinstall them just like they were originally. In order to remove these you will have to purchase a 10 MM allen wrench and remove the three bolts that conceal the rocker shafts. There is one located on the distributor side of the head and two located on the opposite end right across from one another. After those are removed you will need to remove the two oil control orifices on the side opposite the distributor by threading in a bolt to pull them out. Pictured below are the bolts you need to remove.
Here is a pic of the oil control orifices that need to have a bolt threaded in and the pulled out. They are circled in blue.
With those three allen bolt searing bolts removed and the two oil control orifices removed you are now able to slide the rocker shafts out of the head which ever way you want to. I will again emphasize that you make sure to keep the rocker arms in their proper order while removing them.
After you have removed both the rocker shafts and arms and placed them somewhere free of dirt and debris you can remove the LMA's. There is nothing to it really. They pull out with your hand really easily (or at least mine did). There are eight. While I was replacing mine I rubbed oil on the outsides of each LMA before installing them into place just for peace of mind.
Here is one of my old first gen. B16A LMA's :
There is no difference in operation or function between the old smaller tapered in that is pictured here and the larger ones that I've installed. The design just changed slightly over the years.
Now you need to replace the rocker shafts and arms back into their original positions and then reinstall the searing bolts and the oil control orifices. Your old LMA's are now replaced and you're free to go.
New LMA installed:
Honda DOES recommend that you replace the o-rings or washers on the oil control orifices and the searing bolts. Just for peace of mind as well the Honda torque specs for the searing bolts are 36 lb. ft.
If anyone has any advice or critiques please post them as I am learning as I go. Thanks for looking. Hope this helped.

Honda-Tech Member
Joined: Dec 2014
Posts: 88
Likes: 0
From: Chico, CA
I just rebuilt my gsr head, and torque spec for the allen's was 40ft lb's, and the oil control orifice's o rings turned out to be important for me. I ended up pulling the head a second time due in part to the fact that I did not replace such O-rings. (there's another in the center of the block controlling the pressurized oil that goes to the head) these o rings turned out to be important in my case, as I witnessed my valve covers flooded. Luckily I had turned then engine off before I ran the pump dry but it was a close call and scary experience. I just today finished re assembly and tomorrow morning I have one thing to do before I fire it up for the first time. Attach coolant line from IACV to coolant tube. This is my first top end rebuild, check out my thread for pics. it's called getting head in the closet or something. My LMA's checked out just fine, smoothly springing back to my push, so I reninstalled them to their original positions (as with every single other component) and checked my valve lash three times over.
Great pictures, and to those who may need LMA's, i'm sure this will be helpful!
Great pictures, and to those who may need LMA's, i'm sure this will be helpful!

Thread
Thread Starter
Forum
Replies
Last Post