When you click on links to various merchants on this site and make a purchase, this can result in this site earning a commission. Affiliate programs and affiliations include, but are not limited to, the eBay Partner Network.
Despite there being several writeups on this subject already, I would like to share what I believe is the most simple and effective way to put an RSX wheel on an EK civic. Keep in mind this method is dangerous as it literally involves taking out the thing that explodes and transplanting it into the new wheel. Do at your own risk and BE CAREFUL! I recommend having two people for this as I needed help holding the steering wheel still while I took off the nuts. This was inspired by another post here on Honda-tech, https://honda-tech.com/forums/honda-...civic-3320981/
We start with the RSX wheel. The center piece (I believe it's called the inflator) has four anti-tamper nuts on it. After looking for twelve point sockets like the post said, I couldn't find any small enough (locally). I decided to raid my toolbox and I got a few sockets:
12 point 3/8ths
12 point 9mm
6 point 9mm
6 point 3/8ths
The anti-tamper nuts on the RSX wheel came off with a 12 point 9mm if I recall correctly. If I'm wrong, just try all the ones I listed. Some of them needed some convincing with a hammer to get the socket on there good. After I got all four anti-tamper nuts off, I was able to take the inflator right out of the steering wheel (full RSX assembly 1st pic). While it was out, I had a kit with basic nuts and washers, and it happened to have nuts that threaded perfectly onto the studs, removing the need to use anti-tamper nuts.
M5 8mm nuts
Misc. washer that works with said nuts
Incase I ever have to take it out again for whatever reason, now all I need is an 8mm socket.
Next I took my EK wheel off my car. As I said before, be careful. I left the battery disconnected for about an hour before I even touched the car (negative first then positive). Do the normal procedure (take off two side bolts as well as side panels, and the cruise control piece. Center piece should come out and you can disconnect the cruise control, airbag, and horn). Once you have the EK horn and airbag assembly piece off the rest of the wheel, the bolts on it are bigger than the ones on the RSX airbag (2nd image). These ended up coming out with my 6 point 3/8ths socket. I did have to hammer them just a little as the size was slightly off, and the socket didn't go on all the way. This is where the second person is even more useful, as you really gotta get it on there good and apply steady but firm force.
The 4 anti-tamper nuts on the EK wheel should come off, and that's the most difficult part over with!
Note: The RSX inflator WILL NOT fit on the EK wheel, it is too small (for whatever weirdo wants an EK wheel on an RSX)
Now we get to the installation.
I got my EK inflator and it fit pretty good into the RSX wheel. It will be slightly off on the studs, but when you tighten it down it'll be solid. Here is where the 8mm nuts come in handy. Follow standard procedure for putting a nut on a stud (washer then nut) and you can tighten it down without using stupid sockets and worrying about anti-tamper nuts. For these nuts, I used Blue Loctite, although it was some kind of gel-type one that said it was good for vibrations. Anyway, after all four nuts are on it should be nice and sturdy. I put the inflator on the same way it came out, and I'd recommend you do the same.
Blue Loctite (or any medium strength vibration proof threadlocker)
Now you can just plug everything up. Remove the 19mm nut in the middle of the steering wheel of your car, and yank off the old wheel. Make sure the wires are completely out of the way, I just put mine back through the center hole. Once it's off, put the RSX wheel on without the center piece and then connect everything to the center piece. The horn adapter you can completely get rid of, as the horn is now just one piece. That horn wire (now without the 1-2 adapter) should plug into the bottom tab on the RSX center piece (image 3). I can't speak for cruise control at all because A) My cruise control is there but doesn't work and B) My RSX wheel was a gift and my friend didn't have the piece. Although the EK cruise control SHOULD just plug into the RSX cruise control. The airbag should now connect no problem because we swapped the inflator.
Now that everything's connected, MAKE SURE you didn't move the wheel and you kept it centered. NOW we can put the 19mm nut back on. Torque it to 36 ft-lbs and put Loctite (same blue Loctite as before). Now put the center piece on with everything connected and tighten down the sides with the bolts from the EK wheel. The only wire that should be somewhat in the way is the airbag wire. It kinda ends up tucking itself in a spot to the left, but make sure it goes there and is secure. After this, you should be done! Reconnect the battery and stand back as you put the key in the ignition. If you did it all correctly, it wont explode .
I had been given this airbag Christmas 2023 but didn't put it on due to the wiring issue with the 2 stage vs 1 stage airbag. The inflator swap also seemed annoying (it was) (which is why I'm doing this writeup). I didn't want to buy a Type R airbag either. Overall I think this is the most effective way to do the swap, no wiring mess no nothing just an inflator swap.
Appreciate this thread, doing this same swap on my 99 sedan atm and this was a life saver. I was dreading trying to remove, splice and solder SRS wires lol. Will report back with pics once finished.
Cruise control is easy, unfortunately I didn't take pics when I did mine.
Desolder and remove the steering wheel side (socket) connector from both button panels. Install the Civic connector onto the RSX panel... the pin spacing is slightly different so you will have to bend them a little to fit the Civic socket on the RSX button panel. Once you do this, the Civic connector coming from the cable reel will plug in and everything will work as intended, no cutting/splicing of wires or anything needed. You also gain a cancel button! (You always had one by pressing both buttons together on the old Civic wheel)
53011221[/url]]Cruise control is easy, unfortunately I didn't take pics when I did mine.
Desolder and remove the steering wheel side (socket) connector from both button panels. Install the Civic connector onto the RSX panel... the pin spacing is slightly different so you will have to bend them a little to fit the Civic socket on the RSX button panel. Once you do this, the Civic connector coming from the cable reel will plug in and everything will work as intended, no cutting/splicing of wires or anything needed. You also gain a cancel button! (You always had one by pressing both buttons together on the old Civic wheel)
I added my process to a thread I can�t find now, but here are some pics
53011365[/url]]I added my process to a thread I can�t find now, but here are some pics
Semi related to thread, do you know how the circuit logic works for the cancel button? From what I understand, the diodes stop the flow to both buttons, but doesn�t actually have a current connected via any pin. I�m attempting to wire them in as custom audio controls, and at the moment just planned to reuse the Civics controls, since the set/res buttons have corresponding lines that read battery voltage when on.
I would love to have 3 buttons if possible though.
Any idea how I might be able to achieve this?
For reference, my vehicle is a 1999 Civic EX 4AT (CDM), so the equivalent USDM would be the LX, but with all the bells and whistles the EXs got (power windows, power heated mirrors, etc etc).
So, I pulled a 2005 RSX wheel off a car with a Japanese VIN, expecting it to be PNP since the JDM RSX uses a single stage airbag. This however was not the case, and it had the USDM dual stage airbag in it. Not a problem, I thought, I�ll just do this swap.
That�s where the fun begins!
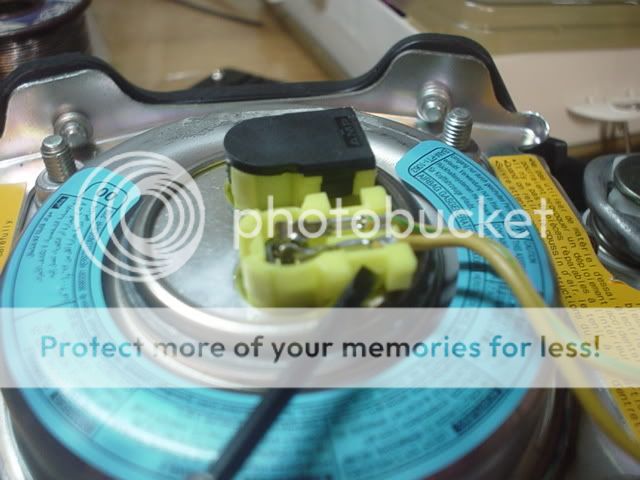
I tried OPs method, the 9mm 12pt socket works great for the anti tamper nuts on the RSX wheel, just needs some light hammering to get it on there. Here is a photo of the rear of the RSX airbag with the detonator removed.
My Civic wheel took a 10mm 12pt, same method. Now, the unfortunate part here is that the Civic detonator is much larger than the hole on the RSX wheel, and the screw holes don�t line up either. Here is a photo of the rear side of the Civic airbag with the detonator removed.
Now obviously this presented an issue. However the solution was to tackle the exact thing I was concerned about: splicing airbag wires.
Below I�ll walk through the precise process using photos from Confidence�s thread.
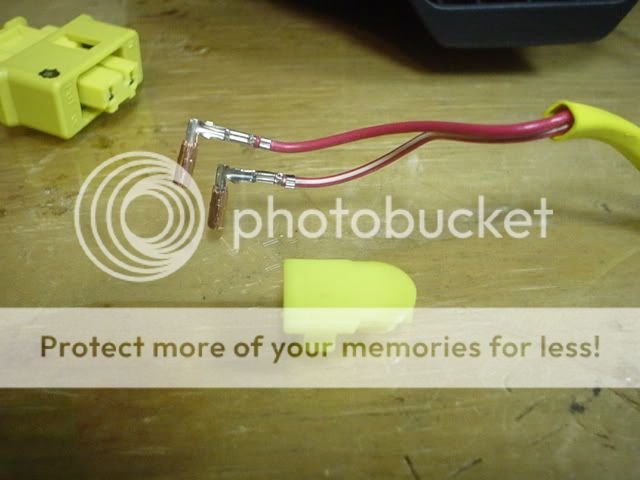
First, snip your Single Stage connector off the Civic airbag. I cut each cable independently to avoid any possible circuit completion. Even though there�s no power, I didn�t want to chance a detonation.
Next, use a flathead to remove the plastic wire lead covers on the RSX wheel, and gently pull the leads out with needle nose pliers.
Originally Posted by confidence
From here, we�re going to splice the wires together. From the RSX wheel, you want the set of YELLOW wires that go into the YELLOW receptacle.
IMPORTANT FOR THIS STEP!!
Double check your polarity for your wires. When looking at the Civic plug oriented with the two bumps on top, the left pin is power and right pin is ground, as shown on Confidence�s image here:
Originally Posted by confidence
Ensure the proper leads are tied to the correct wire! When looking at the Yellow RSX wires, the wire that connects to the Right lead and has the Green Stripe is ground, the solid yellow is power. (Seen below)
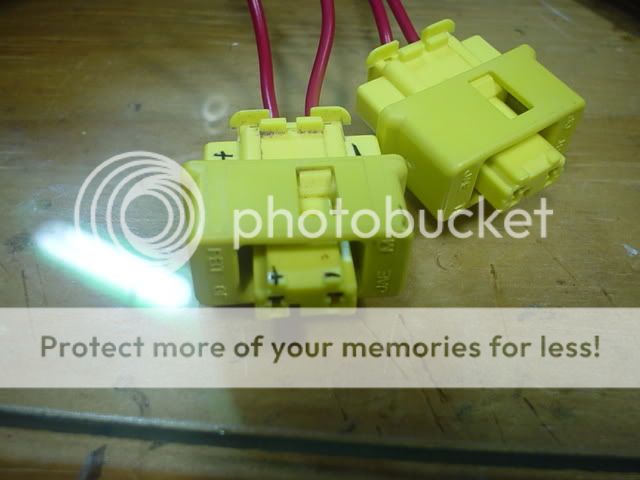
Once you have everything all put together, you should have something like this:
From here, simply reinstall the wheel & airbag and you�re good to go!
I didn�t get any SRS lights, nor any detonation, so I think it�s safe to say it was a success.
For anyone concerned about safety, another user in the thread linked confirmed that this method DOES properly deploy the airbag on impact.
I have a stereo that has a remote control that can skip/rewind/switch inputs (those are the 3 functions I want) and thought about maybe somehow putting a board into the RSX cruise control that could use the 3 buttons to emit those signals. Any idea how I'd go about this? Obviously ditch the CC board (mine doesn't work cuz no clutch safety switch) and get a custom board that interprets the inputs of the three buttons and then sends the same frequency signal to the stereo.
I have a stereo that has a remote control that can skip/rewind/switch inputs (those are the 3 functions I want) and thought about maybe somehow putting a board into the RSX cruise control that could use the 3 buttons to emit those signals. Any idea how I'd go about this? Obviously ditch the CC board (mine doesn't work cuz no clutch safety switch) and get a custom board that interprets the inputs of the three buttons and then sends the same frequency signal to the stereo.
I mean theoretically if the board from inside the remote controller could fit in a custom housing alongside the buttons it could work even just reusing the original RF signal projector since it should bounce enough in the car to send the signal even if it�s not pointed directly at it.
Basically a custom housing that would make the buttons press whatever buttons you need on that controller. Otherwise, hardwiring it might actually be easier. I�m planning on doing something similar with my OEM CC buttons too so if I figure that method out (wired), will update you here.
Semi related to thread, do you know how the circuit logic works for the cancel button? From what I understand, the diodes stop the flow to both buttons, but doesn�t actually have a current connected via any pin. I�m attempting to wire them in as custom audio controls, and at the moment just planned to reuse the Civics controls, since the set/res buttons have corresponding lines that read battery voltage when on.
I would love to have 3 buttons if possible though.
Any idea how I might be able to achieve this?
It just grounds both pins (set/resume) at the same time. Same as if you push them together on your two button civic wheel.


 .
.