When you click on links to various merchants on this site and make a purchase, this can result in this site earning a commission. Affiliate programs and affiliations include, but are not limited to, the eBay Partner Network.
Hey guys, I finally got around to doing a valve lash adjustment on my Integra and figured I would post up the results. The car is a 2000 LS auto, it just hit 200k miles and I am not sure if it has ever had an adjustment done (more than likely not). While I had it apart, I figured I would replace the plugs and wires, so unfortunately I can not comment on the valve lash correction results alone, but either way, the car is running much better and quieter too now. So on to the good stuff:
I had a set of feeler gauges with the following (most important) feelers:
0.0028, 0.003, 0.0036, 0.004, 0.005, 0.006, 0.007 and 0.008
My goal was to get to as close to min spec as humanly possible, so I set:
Intake to 0.003< Lash < 0.0036 (0.003 would fit with some drag and 0.0036 would not fit)
and
Exhaust to 0.006 < Lash < 0.007 (0.006 would fit with some drag and 0.007 would not fit)
The theory here was this would be the quietest and best performing setting (if done carefully), while still remaining within factory spec. (I think I nailed it)
I let the car sit in the garage for about 36 hours before touching it, so all measurements would be cold and accurate.
Tools used:
3/8" Ratchet
1/2" breaker bar (lash adjustment lock nuts were very hard to break loose, so I would recommend using a breaker bar and 6 point 12mm socket for more precision and less chance of breaking something)
10mm (valve cover) and 19mm (crank pulley) sockets
5/8" spark plug socket
24" extension (for turning crank pulley)
Floor jack and stands
12mm box end wrench (for holding valve lash lock nut)
Flat head screw driver (for adjusting valve lash)
Tire jack or what ever you use for taking off your wheels. ( the front drivers side wheel needs to be removed)
Feeler gauges (0.003-0.008") The intake side can be straight, but the exhaust side could be 45* offset to make it a little easier. (I still did the job without offset feeler gauges)
Torque wrench capable of measuring 7 to 80 ftlbs accurately
This would be a good time to confirm mechanical timing and set your ignition timing with a timing light
Parts:
NGK zfr5f-11 spark plugs (gapped to 0.043") and torqued to 13 ft lbs (copper v power)
Anti seize for spark plugs and lug nuts
New oem valve cover gasket and spark plug tube grommets
New oem spark plug wires
New oem 90442-PR3-000Washer, Head Cover (times 7 these are way too easy to lose -_- )
Spark plugs should be gapped to 0.043
(copper plugs came gapped to 0.032 and iridium were gapped to around 0.035)
The engine needs to be set to top dead center before beginning, so crank pulley must be at top dead center and cam pulleys should both be pointing up.
Top dead center for each cylinder will be done in the following order [ 1 > 3 > 4 > 2 ] with engine rotated counterclockwise and cam arrow positions at 12:00 (cylinder #1) , 9:00 #3, 6:00 #4 and finally cylinder #2 at 3:00
The passenger side cylinder, next to the distributor is #4 then 3, then 2 and the drivers side cylinder closest to the cam pullies is cylinder #1
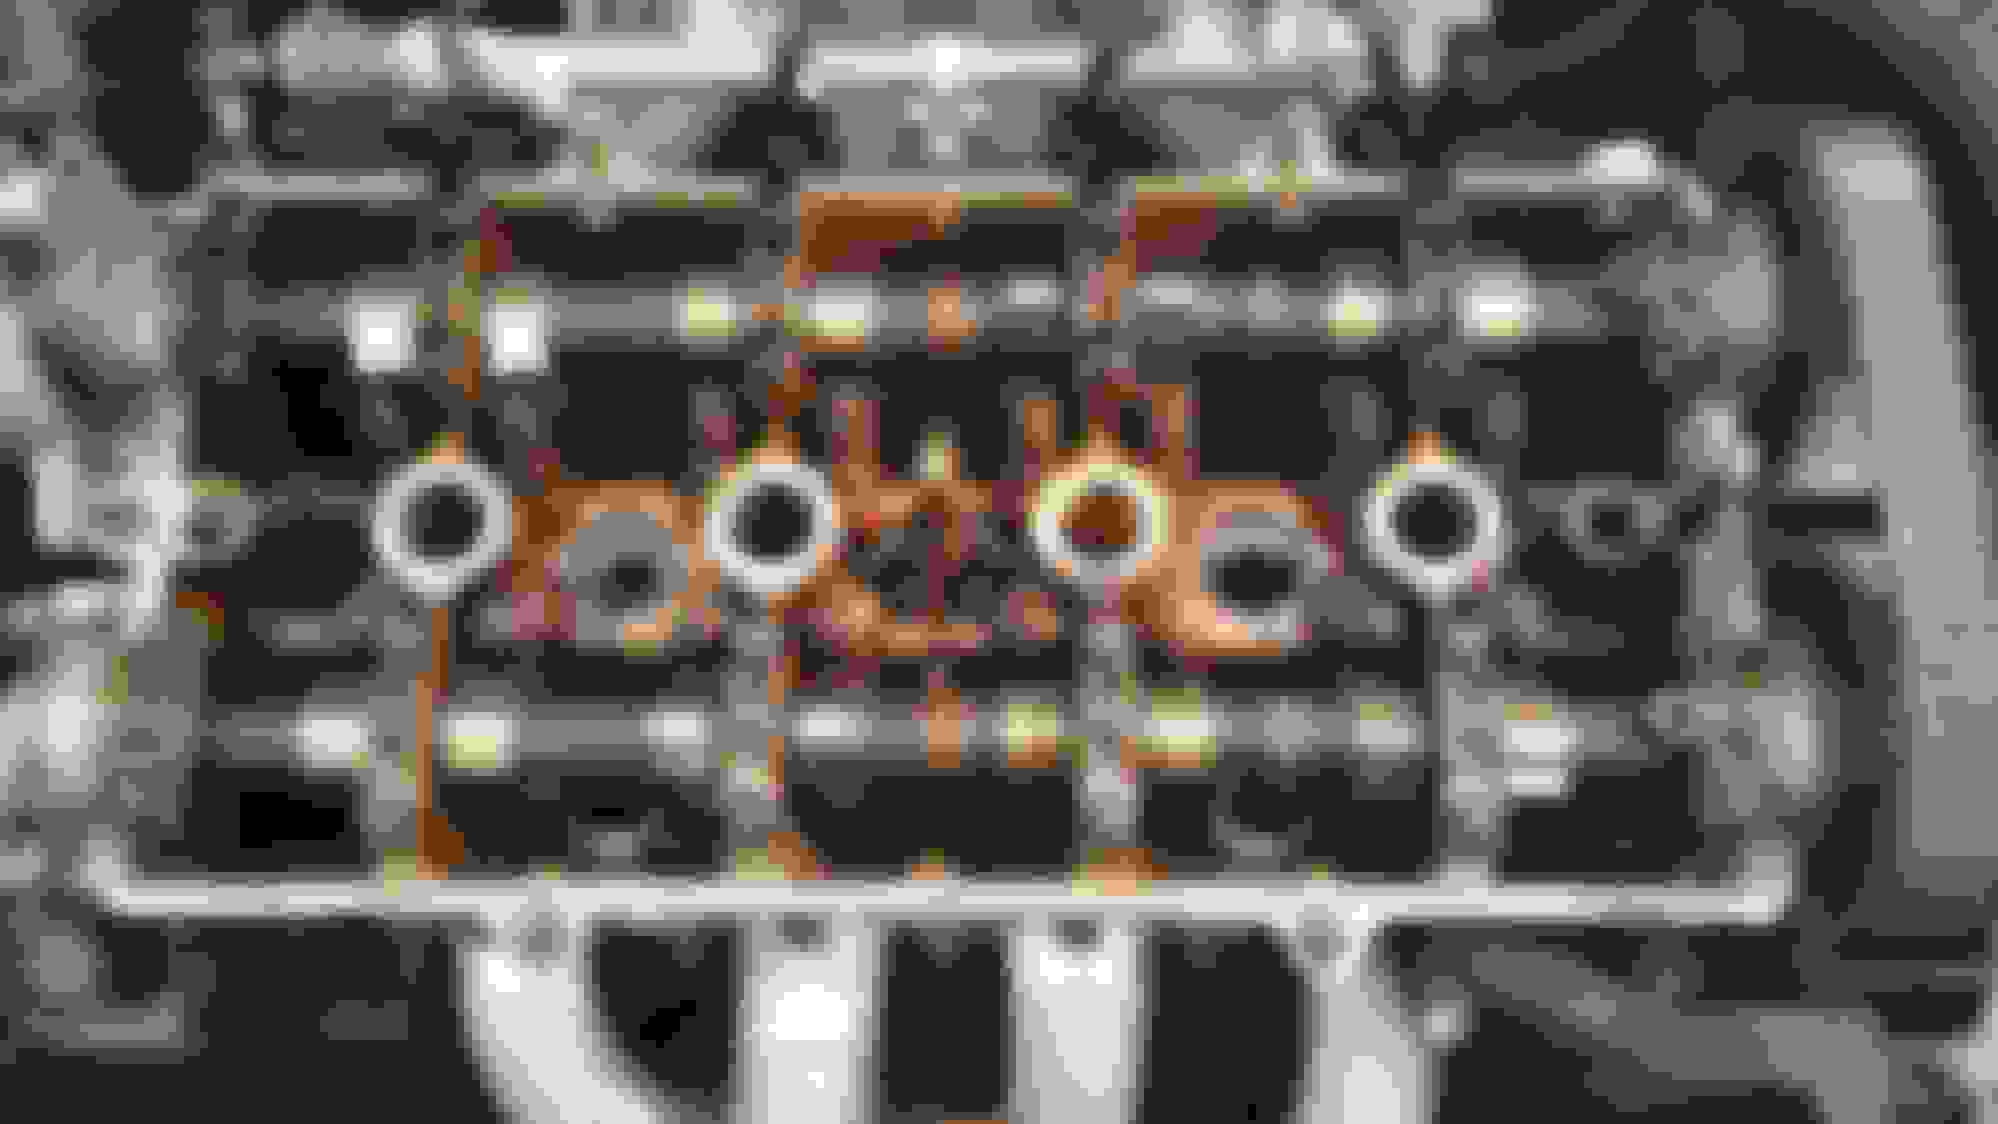
Crank Pulley Top Dead Center Marking aligned with pointer on timing cover. Cam Pulleys with arrows pointing up, signifying that cylinder 1 is at top dead center. Here is what the crank pulley looks like from the side with the front driver wheel taken off. It has a 19mm bolt for adjustment. Notes showing cam position per cylinder, order of operation for valve check, cylinder position and crank pulley position. Cylinder head with valve cover off. Here you can see the valve lash adjustment screws (flat head) and lock nuts (12mm nut)
My results:
Cylinder #1
Intake was perfect on first check at 0.003< Lash < 0.0036 , but the second check showed 0.004-0.005 so it was adjusted to 0.003-0.0036 on the second check and then third check after 3 full revolutions showed perfect.
Exhaust was a little loose (0.007-0.008) so I adjusted it to 0.006-0.007 The second check confirmed perfect
Cylinder #3
Intake was a bit too tight at 0.0028< Lash < 0.003 , so it was adjusted to 0.003-0.0036 . The second check confirmed perfect
Exhaust was a little loose (0.007-0.008) so I adjusted it to 0.006-0.007 The second check confirmed perfect
Cylinder #4
Intake was a tad loose on first check at around 0.004 , so it was adjusted to 0.003-0.0036 and the second check confirmed perfect
Exhaust was perfect at 0.006-0.007 The second check confirmed perfect as well
Cylinder #2
Intake was a little loose on first check at 0.004 < Lash < 0.005 , so it was adjusted to 0.003-0.0036 and the second check confirmed perfect
Exhaust was perfect at 0.006-0.007 The second check confirmed perfect
As a side note on the spark plugs:
I had installed iridium plugs a few years back and never gapped them, as everyone said that they would be gapped already.
Upon inspection of the old plugs, they were at about 0.035-0.037 and I wouldn't be surprised if they were even tighter when new.
Cylinder 4 (next to throttle body) showed very lean. Cylinders 2 and 3 looked stoich. Cylinder 1 looked a tad rich.
Cylinder 3 looked to have a bit of rust. Cylinder 1 had some weird red spots.
I had read that these engines ran better (just only lasted 30k miles vs 100k miles for iridiums) on the OEM NGK copper V-Powers, so I decided to give those a try.
I am happy I double checked their gap. They came pre gapped to 0.032 which is very far from the factory spec of 0.043
Spark plugs in the order 4>3>2>1
4 looks lean and 1 looks rich
I talked to my friend that is a Honda tech and he says that the lean cyl#4 and rich cyl# 1 is fairly common and there isn't much that I can do about that. As A side note, the car is much smoother and quieter now. Lowend torque seems to have improved a bit and It doesn't seem to struggle and surge as much when accelerating in the 2000-3000 rpm range any more. I am not sure how much this is attributed to properly gapped copper plugs and oem wires versus the valve adjustment, but either way I am happy. It even seems to vibrate less, when stopped in drive with the ac on, than it did before (I have a filled rear mount). I am hoping for a few extra mpgs and better starting too. Seems very good so far.
Last edited by CandyRedRC46; Oct 9, 2017 at 09:46 AM.
Very nice right up, glad it's running better. The only thing I would note is that the valves sometimes tighten up as apposed to getting too loose and that could cause an issue for you since you made yours as tight as they can be while staying in spec. As they say, "you'd rather hear them than smell them."
Very nice right up, glad it's running better. The only thing I would note is that the valves sometimes tighten up as apposed to getting too loose and that could cause an issue for you since you made yours as tight as they can be while staying in spec. As they say, "you'd rather hear them than smell them."
Yeah I will have give them a double check sometime in the future. My friend told me that generally they only need to be checked and adjusted once and then don't move around too much after that on these engines (B18b1 with stock valve train and limiter etc). I don't beat on the car (read slush box lol) and only one pair of valves just barely tightened up over 200k miles, so I'm not too worried about anything getting out of spec anytime soon.
Oh I'm very aware of those pictures lol, seen them many times. But yea, you're probably fine though if they were that close to spec after 200k miles then they've very likely been adjusted at least once. I can't recall what the recommended service interval is for them but over the years they will tighten/loosen somewhat.