

Window Run Channel Replacement Guide


Thread Starter
Honda-Tech Member
Joined: Oct 2015
Posts: 606
Likes: 31
From: London, UK
Mikey (Bitanga) asked me to do this a while back and here we are. Before I started I should mention Eric The Car Guy on YouTube.,I watched one of his videos to give me a good idea of what to expect. I also own a copy of "The Bible" AKA the Honda Shop Manual ;-)
I took plenty of pictures to show the 'steps' I took and how to go about it. I've also included a bit about greasing the regulator and checking for rust inside the door. I am quite thorough about most things so please let me know if a cut down version would be better. The details are just what I learned during the process so I thought they might be helpful to others.
Hope you find it useful.
Tools & Parts
Removal
1. First, remove the door card and place it in a safe place.
2. Remove the plastic cover grommets and pull it back. It will have sticky stuff around the edge so wear gloves if you wish. You could at this point remove it if you are replacing it too but to replace the run channel we just need access to the two bolts that hold the window to the regulator - more on this in a few steps.


3. Remove the power window switch from the door card(2 Phillips head screws) then connect it to the door harness.

4. Lower the glass
5. Peel off the channel guide cover, then remove the 3 screws. You may want to replace the guide cover or use some double sided tape when re-installing.


6. Remove the center channel guide by pulling it upward.


7. Carefully move the glass until you can see the 10mm bolts, then losen them. Slide the glass to the rear, then remove the glass as shown. Pull the back portion upward first and follow with the front, take care not to destroy it. Place the glass in a safe place along with you run channel guide and guide cover.


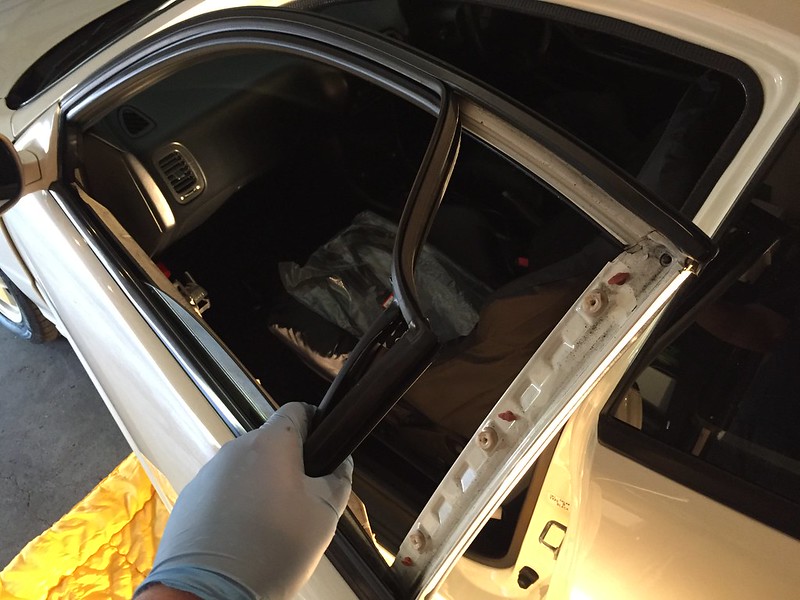
8. Remove the 3 clips from the run channel and the glass stopper, if you have one. Then peel and remove the run channel as shown.


At this point you can clean and regrease the regulator if you so choose. Can also check for any rust and junk inside the door and have a general clean up of the area behind the door panel.


Installation
9. Take out your new run channel and spray/apply silicone grease to the inside and outside of the run channel.

10. To install the run channel you want to start at the mirror. Squeeze the run channel together and at the same time push it into the front channel as shown. Slide it down into the front channel until it reaches the bottom.


11. Next, push the clips on the new channel into the locations on the rear of the door and then pinch the channel into the rest of the door. Check that everything sits as it should, some areas may need a little more work as shown. The channel will 'feel' right when it's where it wants to be.


Not quite sitting correctly yet.

How it should be.


12. Install the glass and secure it with the 2 10mm bolts, you should be able to see a mark where they were before. Be careful not to overtighten them.


13. Install the center channel guide and channel guide cover. NOTE: Make sure the center guide channel pin is installed in the correct orientation. It may need turning slightly. One side of mine did, the other side lined up first time - I didn't get any pictures of this but it's the tab behind that little grommet in the top corner of the glass. It slides up and down the run channel to keep the window in place.


14. Roll the glass up and down to see if it moves freely and remains in the channel all the way up and down. Make sure there are no gaps between the glass and the run channel when it is fully closed – if there is a gap, check your work, you may need to adjust the 10mm bolts that secure the glass to the regulator.

15. Disconnect the power window switch from the door harness, then install the power window switch on the door panel.
16. Reinstall the plastic cover. You may need new adhesive08712-0003 Honda Door Panel Shield Adhesive - Bernardi Parts
17. Install the door panel.
I took plenty of pictures to show the 'steps' I took and how to go about it. I've also included a bit about greasing the regulator and checking for rust inside the door. I am quite thorough about most things so please let me know if a cut down version would be better. The details are just what I learned during the process so I thought they might be helpful to others.
Hope you find it useful.
Tools & Parts
- Something to keep all your screws/clips in
- Phillips screwdriver
- Flat head pocket screwdriver
- Plastic trim tools
- 1/4" ratchet
- 1/4" extension
- 1/4" 10mm socket
- Latex/rubber gloves (optional)
- Something to kneel/lay on (optional)
- Your new OEM run channel
- You may also need pliers for some of the clips but be careful not to damage the paint if you use them.
- Good lighting
- Torch
- Shop towel/cloth/rag (optional)
- APC (optional)
- Microfibre cloth (optional)
- Multipurpose grease (optional)
- Silicone spray or paste - I found the spray to be much easier to work with and less messy.
Removal
1. First, remove the door card and place it in a safe place.
2. Remove the plastic cover grommets and pull it back. It will have sticky stuff around the edge so wear gloves if you wish. You could at this point remove it if you are replacing it too but to replace the run channel we just need access to the two bolts that hold the window to the regulator - more on this in a few steps.
3. Remove the power window switch from the door card(2 Phillips head screws) then connect it to the door harness.
4. Lower the glass
5. Peel off the channel guide cover, then remove the 3 screws. You may want to replace the guide cover or use some double sided tape when re-installing.
6. Remove the center channel guide by pulling it upward.
7. Carefully move the glass until you can see the 10mm bolts, then losen them. Slide the glass to the rear, then remove the glass as shown. Pull the back portion upward first and follow with the front, take care not to destroy it. Place the glass in a safe place along with you run channel guide and guide cover.
8. Remove the 3 clips from the run channel and the glass stopper, if you have one. Then peel and remove the run channel as shown.
At this point you can clean and regrease the regulator if you so choose. Can also check for any rust and junk inside the door and have a general clean up of the area behind the door panel.
Installation
9. Take out your new run channel and spray/apply silicone grease to the inside and outside of the run channel.
10. To install the run channel you want to start at the mirror. Squeeze the run channel together and at the same time push it into the front channel as shown. Slide it down into the front channel until it reaches the bottom.
11. Next, push the clips on the new channel into the locations on the rear of the door and then pinch the channel into the rest of the door. Check that everything sits as it should, some areas may need a little more work as shown. The channel will 'feel' right when it's where it wants to be.
Not quite sitting correctly yet.
How it should be.
12. Install the glass and secure it with the 2 10mm bolts, you should be able to see a mark where they were before. Be careful not to overtighten them.
13. Install the center channel guide and channel guide cover. NOTE: Make sure the center guide channel pin is installed in the correct orientation. It may need turning slightly. One side of mine did, the other side lined up first time - I didn't get any pictures of this but it's the tab behind that little grommet in the top corner of the glass. It slides up and down the run channel to keep the window in place.
14. Roll the glass up and down to see if it moves freely and remains in the channel all the way up and down. Make sure there are no gaps between the glass and the run channel when it is fully closed – if there is a gap, check your work, you may need to adjust the 10mm bolts that secure the glass to the regulator.
15. Disconnect the power window switch from the door harness, then install the power window switch on the door panel.
16. Reinstall the plastic cover. You may need new adhesive08712-0003 Honda Door Panel Shield Adhesive - Bernardi Parts
17. Install the door panel.
Last edited by Tom B; Aug 25, 2017 at 12:59 PM.
Honda-Tech Member


Joined: Nov 2006
Posts: 309
Likes: 3
From: Dublin, Ireland
 great write up. Oh and plus one regarding replacing the tape on the channel guide cover. After removing mine to go rust checking I didn't, thought it would be sticky enough only to have one fly off and be lost when I had the window down. Doh!

Thread Starter
Honda-Tech Member
Joined: Oct 2015
Posts: 606
Likes: 31
From: London, UK

Honda-Tech Member
Joined: Apr 2010
Posts: 276
Likes: 0
From: Seattle,WA
Great write up Tom! I literally started installing my new trim and moldings today. Did you use any sort of weatherstrip adhesive? The service manual is calling for Cemedine #8500 or equivalent. Pretty sure the part number is 08712-004, but I'm a little confused because the part number that supercedes it (007) is discontinued.. Trying to figure out if I should use a 3M weatherstrip adhesive or just not bother with one at all.
Trending Topics
Thread Starter
Honda-Tech Member
Joined: Oct 2015
Posts: 606
Likes: 31
From: London, UK
Great write up Tom! I literally started installing my new trim and moldings today. Did you use any sort of weatherstrip adhesive? The service manual is calling for Cemedine #8500 or equivalent. Pretty sure the part number is 08712-004, but I'm a little confused because the part number that supercedes it (007) is discontinued.. Trying to figure out if I should use a 3M weatherstrip adhesive or just not bother with one at all.

Thread
Thread Starter
Forum
Replies
Last Post
logikalfury
Honda Civic / Del Sol (1992 - 2000)
29
Apr 29, 2012 03:47 AM
pityocamptes
Honda Civic / Del Sol (1992 - 2000)
3
Apr 29, 2011 03:50 PM
Robo_Wop
Honda Civic / Del Sol (1992 - 2000)
8
Jul 28, 2006 07:01 AM
civicrtype2
Honda Civic / Del Sol (1992 - 2000)
7
Mar 5, 2005 11:54 PM