

DIY aftermarket to OEM foglight harness wiring instillation and wire tuck

This particular DIY is for a 96-98 civic but the same ideas could be applied to any year. I'm essentially following up on some DIY's written about wiring up an OEM fog light switch, so I will not include that step in my process. Here's a link to the DIY written by Dannyloski http://www.clubcivic.com/board/showthread.php?t=157783 
Now the reason for this is to use your engine harness that is already wired for fog lights and avoid chopping up your car. Most the DIY'S I found were telling me to connect it to the battery cut a hole in the firewall rubber seal here's a video on how NOT to do it, provided by spec D tuning.
Worst way to do this --->

In Dannyloski's DIY he tells you.
Now I'll save you some trouble. The only other connectors you will be needing are the brown 1 pin connectors. Go to the junk yard. Now obviously you can find the male side next to the windshield reservoir and behind your fuse box. but you can find both male and female connectors behind the cup holders of a 99-00 civic climate control harness. Here it is circled in yellow.

You can use these pin connectors if you can't find one.

Here are the tools I used not shown is a box cutter for the bumper and a soldering iron. I highly recommend a soldering iron for the best connection. Better do it right the first time.

Using this wiring diagram-
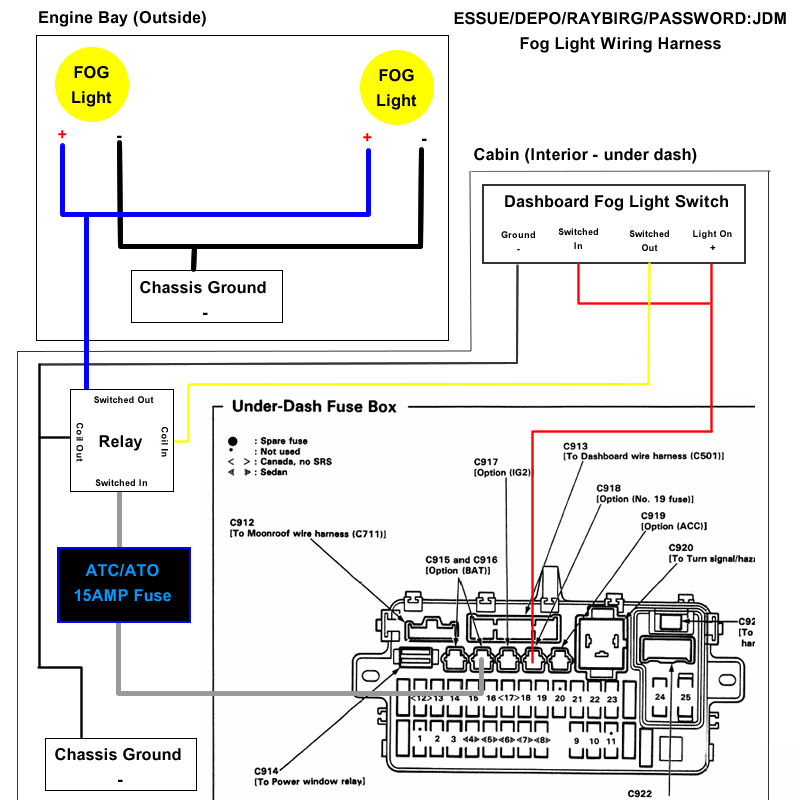
from this FAQ https://honda-tech.com/forums/honda-civic-del-sol-1992-2000-1/%5Bfaq%5D-fog-light-general-questions-thread-oem-depo-essue-raybrig-password-jdm-ebay-1812043/ by bpr0422 and the writeup for the OEM switch from the link at the top, cut your aftermarket harness and solder the corresponding wires to match the diagrams.
Enigine Harness
- Remove the wires to the relay completely from the engine bay harness and just leave black and blue wires without the relay or fuse.
-Measure the length you'll need from the driver side light to the brown plug in your engine bay behind the windshield reservoir and cut leaving MORE wire than you need. Strip the wires.
-Crimp a round terminal to the black for the ground.

-Solder your brown female connector plug or male wire connector pin to the blue wire. Wrap in electrical tape.
-Tape the end of the harness with the blue wire only and leave the black wire sticking out the side. You will tape it later.
Dash Harness
-Lay out the rest of your aftermarket engine harness with the relay and fuse, and aftermarket switch harness.
-Cut the excess blue wire and solder your other brown female connector plug or attach your male wire connector pin to the blue wire.
-Cut the excess black wire and solder it to the black ground wire from the switch harness.
-Cut your excess fuse wire and solder a brown male connector plug or female wire connector pin.
-Cut and solder the wire used to connect the two harnesses together (mine is red, yellow in the diagram) I just wired it to the new switch and got rid of the rest of the wire completely.
-Follow the switch wiring in the links I provided.
Installation outside
-Disconnect your battery
-Remove your bumper cut out the holes with a box cutter install the brackets and lights (I wont explain that)
-Feed the wires through the front of your a/c and pull them out the sides.


Proceed to zip tie.
-Feed the wire behind the headlight

-Attach the ground wire to the ground bolt on the frame

-Remove the windshield fluid reservoir bolt and feed the wire behind it


-Replace the bolt and connect the two plugs

see it?

-Plug the lights in and install your bumper.

Installation inside
-Remove your knee cover/fuse cover. Behind the fuse box I found an open space for a bolt on the frame to go for the relay.

-Connect the brown connector plugs.
-Attach the ground to the rest of the grounds on the frame.

I put the fuse and wires behind the plastic panel that covers the hood lever.

Here's the wire splicing for the OEM switch.

-Referring back to the FAQ diagram, connect the fuse plug to the option plug in your fuse box. I used c915 for the fuse and c916 for the switch because the c918 plug doesn't exist in my car, its just plastic. They turn on with the parking lights so it must have worked.
-feed the harness though the hole in your knee cover, and install your switch.

 -notice my light grey dark grey interior!


There ya go
Now the reason for this is to use your engine harness that is already wired for fog lights and avoid chopping up your car. Most the DIY'S I found were telling me to connect it to the battery cut a hole in the firewall rubber seal
here's a video on how NOT to do it, provided by spec D tuning. Worst way to do this --->
In Dannyloski's DIY he tells you.
You can get the Pigtail Harness for the OEM Switch at the Junkyard, since there are a number of plugs that will fit into the OEM Switch. My suggestion, just take a trip to the Junkyard with the OEM Switch and have at it until you find the correct one that will fit. To save you guys some trouble, the Plug off the Power Lock Harness in a 94-97 Accord will fit, this is located behind the Door Panel.
You can use these pin connectors if you can't find one.
Here are the tools I used not shown is a box cutter for the bumper and a soldering iron. I highly recommend a soldering iron for the best connection. Better do it right the first time.
Using this wiring diagram-
from this FAQ https://honda-tech.com/forums/honda-civic-del-sol-1992-2000-1/%5Bfaq%5D-fog-light-general-questions-thread-oem-depo-essue-raybrig-password-jdm-ebay-1812043/ by bpr0422
and the writeup for the OEM switch from the link at the top, cut your aftermarket harness and solder the corresponding wires to match the diagrams. Enigine Harness
- Remove the wires to the relay completely from the engine bay harness and just leave black and blue wires without the relay or fuse.
-Measure the length you'll need from the driver side light to the brown plug in your engine bay behind the windshield reservoir and cut leaving MORE wire than you need. Strip the wires.
-Crimp a round terminal to the black for the ground.
-Solder your brown female connector plug or male wire connector pin to the blue wire. Wrap in electrical tape.
-Tape the end of the harness with the blue wire only and leave the black wire sticking out the side. You will tape it later.
Dash Harness
-Lay out the rest of your aftermarket engine harness with the relay and fuse, and aftermarket switch harness.
-Cut the excess blue wire and solder your other brown female connector plug or attach your male wire connector pin to the blue wire.
-Cut the excess black wire and solder it to the black ground wire from the switch harness.
-Cut your excess fuse wire and solder a brown male connector plug or female wire connector pin.
-Cut and solder the wire used to connect the two harnesses together (mine is red, yellow in the diagram) I just wired it to the new switch and got rid of the rest of the wire completely.
-Follow the switch wiring in the links I provided.
Installation outside
-Disconnect your battery
-Remove your bumper cut out the holes with a box cutter install the brackets and lights (I wont explain that)
-Feed the wires through the front of your a/c and pull them out the sides.
Proceed to zip tie.
-Feed the wire behind the headlight
-Attach the ground wire to the ground bolt on the frame
-Remove the windshield fluid reservoir bolt and feed the wire behind it
-Replace the bolt and connect the two plugs
see it?
-Plug the lights in and install your bumper.
Installation inside
-Remove your knee cover/fuse cover. Behind the fuse box I found an open space for a bolt on the frame to go for the relay.
-Connect the brown connector plugs.
-Attach the ground to the rest of the grounds on the frame.
I put the fuse and wires behind the plastic panel that covers the hood lever.
Here's the wire splicing for the OEM switch.
-Referring back to the FAQ diagram, connect the fuse plug to the option plug in your fuse box. I used c915 for the fuse and c916 for the switch because the c918 plug doesn't exist in my car, its just plastic. They turn on with the parking lights so it must have worked.
-feed the harness though the hole in your knee cover, and install your switch.
-notice my light grey dark grey interior! There ya go
Last edited by deschlong; Nov 22, 2012 at 09:39 AM. Reason: Tidying up post formatting. :)
Honda-Tech Member
Joined: May 2010
Posts: 143
Likes: 0
From: joliet il
hate to be a jerk it is a good and thought out right up but oem fogs iirc cant be turned on with out the headlights being on.
if i upset you,
im sorry but hey heres a
bunny so please dont cry

i think thats a haiku
if i upset you,
im sorry but hey heres a
bunny so please dont cry
i think thats a haiku


You did recall correctly. The OEM fog lights turn on with the low beams. But I used my other option plugs because the one shown on the diagram (c918) does not exist in my car. I tried every other combination and thats the only one that worked. Besides I like them on with the parking lights because if you are driving in fog its easier to see with out headlights on...Jerk haha jk
Never heard that law but I looked up for colorado and found this http://search.jurisearch.com/NLLXML/...=1&nojumpmsg=0
so its ok to use them with/without low beams its not ok to use them with high beams.
But they are too low to the ground?! haha
so its ok to use them with/without low beams its not ok to use them with high beams.
Any motor vehicle may be equipped with not more than two fog lamps mounted on the front at a height of not less than twelve inches nor more than thirty inches above the level surface upon which the vehicle stands..

Thread
Thread Starter
Forum
Replies
Last Post
superchargedY8
Honda Civic / Del Sol (1992 - 2000)
1
Apr 7, 2009 07:09 PM
amej8
Honda Civic / Del Sol (1992 - 2000)
10
May 21, 2007 08:02 AM