

Tips for Replacing Rear Motor Mount?


Thread Starter
Honda-Tech Member
Joined: Jan 2012
Posts: 6
Likes: 0
I need to replace the rear motor mount on my 96 Accord. I was wondering if anybody had any tips, suggestions for doing this job? I think it would be a lot easier to use a lift for doing this.
Honda-Tech Member
Joined: Apr 2010
Posts: 407
Likes: 1
Get the car nice and high in the air and secured on jack stands, or a lift.
Remove the front motor mount plate that attaches with three bolts to the front of the block, there is no load on it when the engine is at rest.
Climb underneath and unbolt the fastener that holds the top of the mount to the rear bracket.
This is what the rear bracket is.
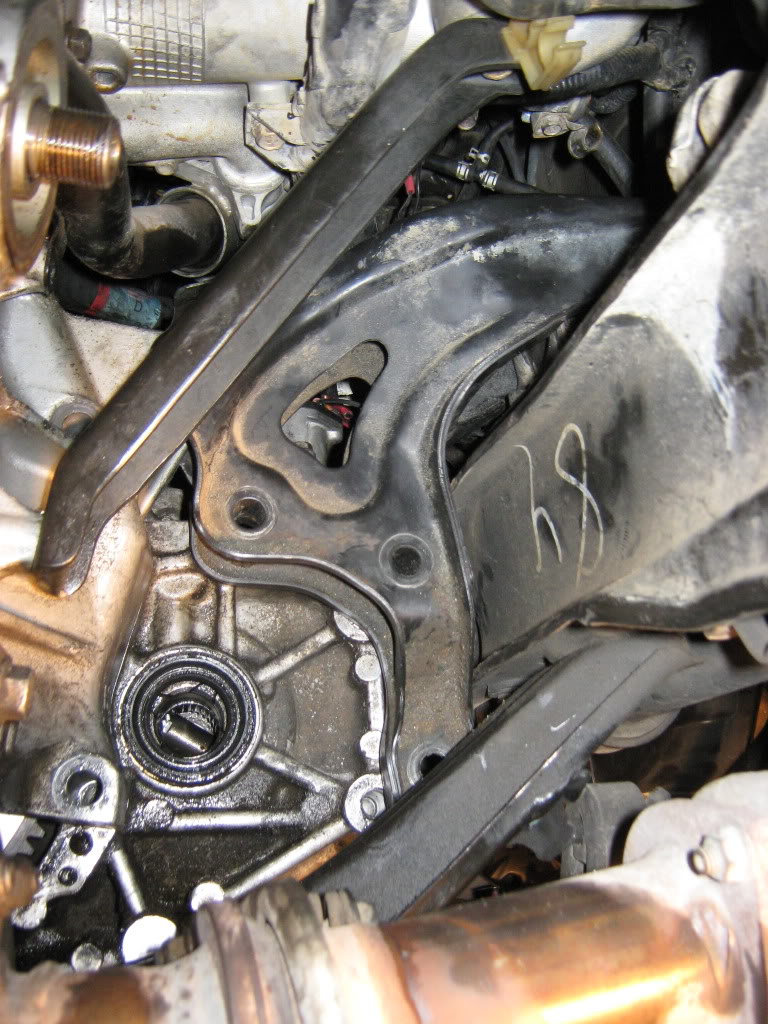
With that disconnected and the front mount plate off you should be able to tilt the motor forward some to give yourself a little more clearance to remove the actual mount.
Its just held in with three bolts to the chassis.
Good luck.
Remove the front motor mount plate that attaches with three bolts to the front of the block, there is no load on it when the engine is at rest.
Climb underneath and unbolt the fastener that holds the top of the mount to the rear bracket.
This is what the rear bracket is.
With that disconnected and the front mount plate off you should be able to tilt the motor forward some to give yourself a little more clearance to remove the actual mount.
Its just held in with three bolts to the chassis.
Good luck.

Honda-Tech Member
Joined: Mar 2009
Posts: 605
Likes: 0
From: atl
thats a nasty one mainly because the spot. if your like me and you cant get it from underneath remove the intake manifold and there it is. of course this is easily 20 times the amount of work needed to be done
all depends on what you wanna do though. why you replacing the mount?
all depends on what you wanna do though. why you replacing the mount?
Thread Starter
Honda-Tech Member
Joined: Jan 2012
Posts: 6
Likes: 0
My Accord shakes when at a complete stop, and it is only getting worse. It is clear that a few of the motor mounts need to be replaced.
Thanks for the help. Now I just need to find time to replace it.
Thanks for the help. Now I just need to find time to replace it.

Honda-Tech Member
Joined: Aug 2012
Posts: 8
Likes: 0
so get the eninge lifted up with a cherry picker, and unbolt the front mount bracket (3bolts) then unbolt the rear mount bracket and top bolt and tilt the engine forward? is this correct way to take the rear mount out? I am about to do it right now. i have changed the front and passenger side mount got. the rear mount then the two transmission mounts any tips would help.
Honda-Tech Member
Joined: Apr 2010
Posts: 407
Likes: 1
You have to take the front bracket off before moving the engine, the front mount stabilizes the engine from torsional forces so at rest there is no load on it.
You're good on the other steps.
You're good on the other steps.
Honda-Tech Member
Joined: Aug 2012
Posts: 8
Likes: 0
what is the best way to get to the rear mount bracket bolts(4)? i changed the front, side and two transmission mounts. I'm on the rear and got 3 bolts loose on the rear mount bracket I'm trying to get a good angle on the last bolt but it is very diffulcult any tips? I'm guessing removing some hoses to clear some space.
Trending Topics

Honda-Tech Member
Joined: May 2013
Posts: 10
Likes: 0
I don't know why people remove the intake manifold as well... or the front and side engine mounts to tilt the engine.

Honda-Tech Member
Joined: Aug 2011
Posts: 2,632
Likes: 5
"holmes" - As I've said/referenced before, on my 3rd and 5th gens where I had to replace the rear mount.....I never have removed the intake.
Different than the video - I used some long *** extentions to get my ratchet almost to the drivers tire.....I think there was a swivel and of course a good six point socket.
I too didn't do anything with the other mounts.....just the block of wood on the jack on the pan to help hold the engine/trans...from there go to town
Heck read the manual and they tell you that you have to remove the drivers cv shaft on a 3rd gen to replace the alternator.....never done that either - carb or FI - it comes out without removing the shaft....did my first over 20 years ago.
Different than the video - I used some long *** extentions to get my ratchet almost to the drivers tire.....I think there was a swivel and of course a good six point socket.
I too didn't do anything with the other mounts.....just the block of wood on the jack on the pan to help hold the engine/trans...from there go to town
Heck read the manual and they tell you that you have to remove the drivers cv shaft on a 3rd gen to replace the alternator.....never done that either - carb or FI - it comes out without removing the shaft
....did my first over 20 years ago.


B*a*n*n*e*d
Joined: Dec 2008
Posts: 12,028
Likes: 5
I couldn't work on it today because it rained. I will update tomorrow if I can get around to it if this works.
Honda-Tech Member
Joined: Aug 2011
Posts: 2,632
Likes: 5
Holmes - the mount set up is pretty much the same on the gens (3rd, 4th, 5th) so again I'm almost 100% positive that if you remove the braket on the trans - thru bolt - then the bolts holding the mount to the frame.......that joker will come right out......a little wiggle but it will come out.
B*a*n*n*e*d
Joined: Dec 2008
Posts: 12,028
Likes: 5
it was wet the last couple days and i was too busy to do it today...i will have it done at the latest by monday night...the clunking/whacking has been driving me nuts lately
the only issue i will have when pulling upper plenum is the bolt in the front driver corner...I think with a universal joint i can get to it but i can't be sure yet til i pull it
i really think this is going to be easy since i won't have to get underneath at all
the only issue i will have when pulling upper plenum is the bolt in the front driver corner...I think with a universal joint i can get to it but i can't be sure yet til i pull it
i really think this is going to be easy since i won't have to get underneath at all
MM Gruppe B

Joined: Feb 2009
Posts: 7,026
Likes: 109
From: 94577/Gaillimh
Honda-Tech Member
Joined: May 2013
Posts: 10
Likes: 0
it was wet the last couple days and i was too busy to do it today...i will have it done at the latest by monday night...the clunking/whacking has been driving me nuts lately
the only issue i will have when pulling upper plenum is the bolt in the front driver corner...I think with a universal joint i can get to it but i can't be sure yet til i pull it
i really think this is going to be easy since i won't have to get underneath at all
the only issue i will have when pulling upper plenum is the bolt in the front driver corner...I think with a universal joint i can get to it but i can't be sure yet til i pull it
i really think this is going to be easy since i won't have to get underneath at all
Work smarter, not harder. Watch the video, that's the easiest way to get to that mount. Hope that helps.
B*a*n*n*e*d
Joined: Dec 2008
Posts: 12,028
Likes: 5
Okay, so I finally ended up replacing this. Keep in mind that my car is the manual and I have the h22a on my car but they are similar in nature with the exception of the location of the fitv. You won't be able to do this with an automatic since the automatic mount is bigger and you won't be able to maneuver it outside and around the engine mount bracket.
I pulled the very top piece of the intake manifold. Keep in mind that I have the h22a and have the iab's so I tried to make sure the top of the two plenum gaskets stayed put and it did. The bottom one ripped when I separated the bottom plenum piece from the bottom intake manifold. No big deal as I had bought two gaskets just in case I had problems with both. I removed everything on the perimeter attached to the top of the intake manifold and left the iacv and coolant hoses and the fitv attached so that I didn't have to worry about coolant loss and it was not messy at all. I did have to loosen the fuel rail hose bolt that comes from the fuel filter. All of this took me about 25 minutes or so.
Then I jacked up the engine at the bottom passenger side of the transmission to relieve tension on the thorough bolt so I could remove the thorough bolt going through the old mount. Then I removed the four bolts that hold the mount to the subframe using a one foot extension. Like I said in an earlier post the front driver side bolt is in sort of a tight spot but it's still easily removable. Then I removed the 10mm bolt that holds the heater valve to the firewall. Then I jacked up the engine at the bottom passenger side of the transmission until it stopped going up and I just had to maneuver the mount around the engine mount bracket towards the firewall by pushing the heater valve hose kinda up and away. It's kinda of a tight fit but doable. Then I put the new mount back in and just put it all back together. I would say this all took me about an hour. And I never had to get under the car at all.
Ya, and my mount was busted. I bought it about two years ago so I'm kinda curious why it went out so early, but I have replaced just about everything suspension-wise and engine mount wise so I knew that had to be it. To be sure I just took off the front driver side wheel and grabbed the oil pan and pulled it and the engine shook so much i knew it was the rear mount.
MM Gruppe B
Joined: Feb 2009
Posts: 7,026
Likes: 109
From: 94577/Gaillimh
Honda-Tech Member
Joined: May 2013
Posts: 10
Likes: 0
Yeah, the Manual transmission rear engine mount is a lot skinnier than the automatic, and it doesn't have the vacuum line going to it. It should be easier to maneuver the engine mount out with the same procedure as the video.

Trial User
Joined: May 2015
Posts: 1
Likes: 0
From: Texas
I know this is an old thread, but wanted to share my experience with a 6th generation accord (4cyl automatic) rear motor mount.
In general, I mostly followed NutzAboutBolts video. My mount looked much different, and maybe more bulky. I did NOT have to remove the bracket which supports the intake as shown in the video. I did remove the throttle body (and not the heater hose at the firewall) to make room to maneuver out the bulky mount. I took the opportunity to clean the throttle body and iacv as well.
Removing two of the four mount-to-frame bolts were kind of a bitch, but doable. You have to lay on your back and blindly turn your wrench/ratchet, but certainly doable. old mount was terribly busted!
At first, I bought an aftermarket mount, but before install, I checked to see if the vacuum tube on the mount would hold vacuum.....and it didn't. So, I returned it and ordered a Honda mount...vacuum held. After install, no more vibration at idle!

Trial User
Joined: Oct 2018
Posts: 1
Likes: 0
I know this is an old thread, but wanted to share my experience with a 6th generation accord (4cyl automatic) rear motor mount.
In general, I mostly followed NutzAboutBolts video. My mount looked much different, and maybe more bulky. I did NOT have to remove the bracket which supports the intake as shown in the video. I did remove the throttle body (and not the heater hose at the firewall) to make room to maneuver out the bulky mount. I took the opportunity to clean the throttle body and iacv as well.
Removing two of the four mount-to-frame bolts were kind of a bitch, but doable. You have to lay on your back and blindly turn your wrench/ratchet, but certainly doable. old mount was terribly busted!
At first, I bought an aftermarket mount, but before install, I checked to see if the vacuum tube on the mount would hold vacuum.....and it didn't. So, I returned it and ordered a Honda mount...vacuum held. After install, no more vibration at idle!
In general, I mostly followed NutzAboutBolts video. My mount looked much different, and maybe more bulky. I did NOT have to remove the bracket which supports the intake as shown in the video. I did remove the throttle body (and not the heater hose at the firewall) to make room to maneuver out the bulky mount. I took the opportunity to clean the throttle body and iacv as well.
Removing two of the four mount-to-frame bolts were kind of a bitch, but doable. You have to lay on your back and blindly turn your wrench/ratchet, but certainly doable. old mount was terribly busted!
At first, I bought an aftermarket mount, but before install, I checked to see if the vacuum tube on the mount would hold vacuum.....and it didn't. So, I returned it and ordered a Honda mount...vacuum held. After install, no more vibration at idle!
