


Soldering wires together properly

Thread Starter
Old Fart
Joined: May 2004
Posts: 26,173
Likes: 18
From: kelowna, bc, canada
If you want a bulletproof connection when connecting wires together, this is the correct way to do it....
You will need, solder, [60/40 resin core] and soldering gun/pencil, liquid electrical tape, shrink tubing and 6" or so of scrap piece of wire.
Attachment 251137
Strip about 1/4" or so of insulation off each wire end you want to connect.
Attachment 251138
Split the strands of one of the wires in about 1/2.
Attachment 251139
Pull a single strand of wire from your scrap piece and place in the split end of the wire your soldering and wrap it around a few times.

Your done, it's clean and neat and it is bulletproof. 94
Push the two wire ends together and wrap with the single strand.

Wrap it tightly the full lenght of the uninsulated part and cut off the excess single strand.

Make sure there are no sharp wire ends sticking out and solder the two wraped leads.
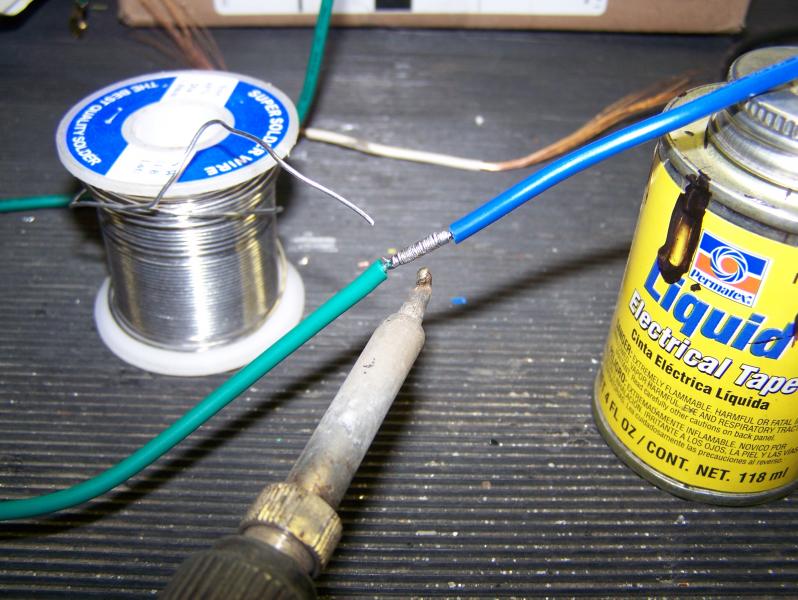
When soldering place a drop of solder on soldering gun/pencil tip, place tip on wire, [the solder will help transfer the heat] add a little more solder and once it "flows" add more solder to the oposite side of wire that the soldering tip is on, [the solder will be drawn towards the hot tip].
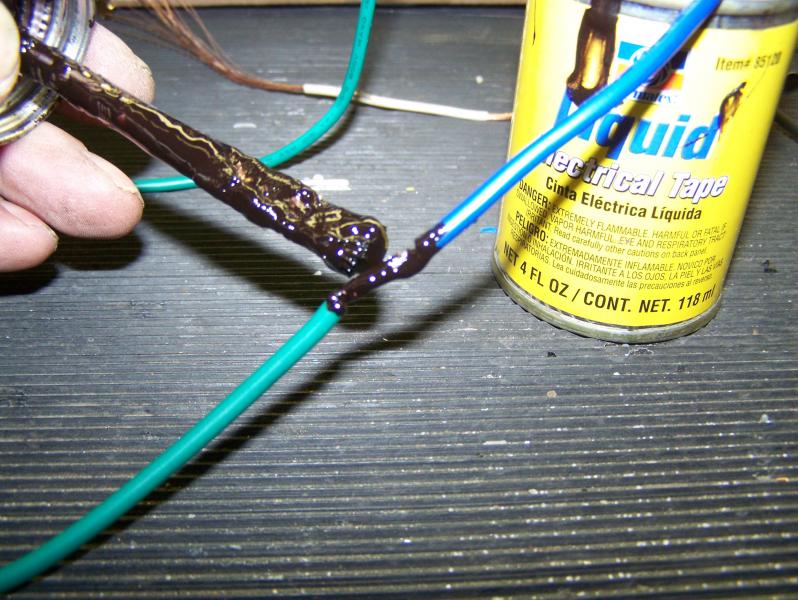
Add a little liquid electrical tape to the connection.
Cut a piece of shrink tubing just long enough to cover the soldered connection.
and shrink it.

Cut a longer piece, [x3] and place over the connection centering it.

and shrink it.
You will need, solder, [60/40 resin core] and soldering gun/pencil, liquid electrical tape, shrink tubing and 6" or so of scrap piece of wire.
Attachment 251137
Strip about 1/4" or so of insulation off each wire end you want to connect.
Attachment 251138
Split the strands of one of the wires in about 1/2.
Attachment 251139
Pull a single strand of wire from your scrap piece and place in the split end of the wire your soldering and wrap it around a few times.
Your done, it's clean and neat and it is bulletproof. 94
Push the two wire ends together and wrap with the single strand.
Wrap it tightly the full lenght of the uninsulated part and cut off the excess single strand.
Make sure there are no sharp wire ends sticking out and solder the two wraped leads.
When soldering place a drop of solder on soldering gun/pencil tip, place tip on wire, [the solder will help transfer the heat] add a little more solder and once it "flows" add more solder to the oposite side of wire that the soldering tip is on, [the solder will be drawn towards the hot tip].
Add a little liquid electrical tape to the connection.
Cut a piece of shrink tubing just long enough to cover the soldered connection.
and shrink it.
Cut a longer piece, [x3] and place over the connection centering it.
and shrink it.
Honda-Tech Member

Joined: Nov 2007
Posts: 2,695
Likes: 1
From: detroit, mi, usa
damn im not spending 10 minutes just to do one connection.
i think you are way over reacting, just twist together and solder. the connections will never break the wire will may but the connection is probably stronger than the wire
i think you are way over reacting, just twist together and solder. the connections will never break the wire will may but the connection is probably stronger than the wire
Honda-Tech Member
Joined: Nov 2005
Posts: 872
Likes: 0
From: Harrisburg, PA
exacty what i was thinking, also buy good heatshrink and you wont need liquid electrical tape and 2 layers of heatshrink
There is the correct way to do things and the acceptable way they both work short term but they are a different story in the long run.

Heat the work not the solder.
If the tip of the solder gun doesn't transfer heat over quick enoough clean the tip with sand paper.
Don't forget to put the heat shrink first than solder.
Don't put too much. Solder or the heat shrink won't fit.
If the tip of the solder gun doesn't transfer heat over quick enoough clean the tip with sand paper.
Don't forget to put the heat shrink first than solder.
Don't put too much. Solder or the heat shrink won't fit.
Thread Starter
Old Fart
Joined: May 2004
Posts: 26,173
Likes: 18
From: kelowna, bc, canada
By doing it my way I do not get the sharp strand ends that stick out and can poke a hole in the shrink tubing and short out.
Pushing the two wires together allows more contact between the strands of one wire with the other wires strands.
The wrap with the single strand packs the strand from each wire end much tighter together.
"exacty what i was thinking, also buy good heatshrink and you wont need liquid electrical tape and 2 layers of heatshrink"
I use good shrink wrap, the first layer is just long enough to cover the bare soldered wires and will bring the thickness of the soldered area to about the same as the rest of the wire with insulation on it, it also seals the liquid electrical tape over the soldered area making it airtight and waterproof, the second layer of shrink tubing is not just a second layer over the soldered area it also connects the insulated ends together so when bending the wire there will be no gaps.
If I was doing a wire tuck and had to extend leads I would spend the extra time for a "cleaner" connection, every connection you make has resistance, my way I cut the resistance to almost nothing, the only thing with less resistance is no connection, [continuous wire].
"Heat the work not the solder.
If the tip of the solder gun doesn't transfer heat over quick enoough clean the tip with sand paper.
Don't forget to put the heat shrink first than solder.
Don't put too much. Solder or the heat shrink won't fit."
A tip with a little drop of solder on it will transfer heat to the "work" much faster then a clean tip and 10 times faster then a sanded tip, a soldering tip should always be tinned, [have a layer of solder on it] and kept clean [wiped on a wet sponge after every use].94
Trending Topics
Honda-Tech Member
Joined: Aug 2010
Posts: 2,686
Likes: 1
From: Maryland
You definitly go a bit farther than I do when soldering, but it's justified when you get right down to it. I like the wrapping of a single strand around the bundle, definitly something I will start employing. Thanks for the write up fcm.
Honda-Tech Member

Joined: Jan 2012
Posts: 642
Likes: 0
You generally dont need binding wire with smaller gauge applications. I have done wiring work on military prototype vehicles and twist, solder, heatshrink in a nice loom is good. Another thing that helps is routing wires to minimize strain on the soldered connections 
Honda-Tech Member

Joined: Nov 2003
Posts: 5,986
Likes: 2
From: Kitchener, Ontario, CANADA
Thanks for posting this! I never thought to use liquid electrical tape.
The way you double-shrink the connection is exactly how I've been doing it for years and give excellent insurance.
I don't wrap the extra strand, but, before I put the small bit of heat-shrink on I trim any wire that could potentially poke through. The pic v8killaz posted shows a strand that could easily poke through the heat-shrink that should be trimmed off.
Another good tip when soldering many wires in a bundle is to stagger the connection points. This avoids a bulge of heat-shrunk wires and reduces the chance that stray wires could poke through the heat-shrink and short out.
The extra time one spends can easily pay itself off by avoiding 1 intermittent electrical problem. This may look overboard to some, but the more time your spend, the more insurance you are buying. DO IT ONCE.
A tip with a little drop of solder on it will transfer heat to the "work" much faster then a clean tip and 10 times faster then a sanded tip, a soldering tip should always be tinned, [have a layer of solder on it] and kept clean [wiped on a wet sponge after every use].94[/QUOTE]
Ive done this but when the wires arent hot enough the solder just forms ontop of the wire and doesnt melt threw the entire wire.
When you heat the work hot enough as you apply the solder directly on to the work it never touches the gun. And travels threw the entire wire. The pics you posted looks good but to someone just starting it could get frustrating

Here's a pic of the iron I use. The left is. A snap on butane torch. I use when working on the road or small electronics. And the right is a cheap weller from home depot get the job done. The snap on runs about 170:00 If I remember
Heres my ecu ground I just beefed up with a thicker gauge wire.


Ive done this but when the wires arent hot enough the solder just forms ontop of the wire and doesnt melt threw the entire wire.
When you heat the work hot enough as you apply the solder directly on to the work it never touches the gun. And travels threw the entire wire. The pics you posted looks good but to someone just starting it could get frustrating
Here's a pic of the iron I use. The left is. A snap on butane torch. I use when working on the road or small electronics. And the right is a cheap weller from home depot get the job done. The snap on runs about 170:00 If I remember
Heres my ecu ground I just beefed up with a thicker gauge wire.
Last edited by turbohatch96y7; Jan 15, 2012 at 10:42 PM.
Thread Starter
Old Fart
Joined: May 2004
Posts: 26,173
Likes: 18
From: kelowna, bc, canada
A tip with a little drop of solder on it will transfer heat to the "work" much faster then a clean tip and 10 times faster then a sanded tip, a soldering tip should always be tinned, [have a layer of solder on it] and kept clean [wiped on a wet sponge after every use].94
Ive done this but when the wires arent hot enough the solder just forms ontop of the wire and doesnt melt threw the entire wire.
When you heat the work hot enough as you apply the solder directly on to the work it never touches the gun. And travels threw the entire wire. The pics you posted looks good but to someone just starting it could get frustrating
Here's a pic of the iron I use. The left is. A snap on butane torch. I use when working on the road or small electronics. And the right is a cheap weller from home depot get the job done. The snap on runs about 170:00 If I remember
Heres my ecu ground I just beefed up with a thicker gauge wire.
[/QUOTE]If you read the post you will see that I explain that the tip goes on one side of the wire and to add solder to the other side..."add more solder to the opposite side of wire that the soldering tip is on"
Maybe I should have said the **** retentive way to solder.

I do this all day long, we wire custom cars and hot rods, everything from repairs to compete wiring jobs including wire tucks.
In the shop right now is a 52 Buick, we are doing the complete wiring with a semi tuck [fixing the last guys work] and adding power windows, locks and A/C.
Both the above cars are going to be DD show cars, so the wiring must be bulletproof and what does show must be perfect right down to the back taping of all harnesses for an original look.
As for your beefed up ECU ground, again being ****, I would have "opened" the terminal and got rid of the old wire and recrimped the terminal properly then soldered it and then recrimped the insulater holder, either way the ground will work, my way will just look better, more stock looking. 94
The other car in the shop is a 62 GMC pick up also a complete witing and tuck
I wasn't saying anything bad at all about ur solder method I just kinda skimmed threw it.
But as for the terminal that bastard was crimped good I couldn't get the other side up. But I got it hot enough and the solder attached to the metal good.
Lol and I forgot to add the heat shrink first.......
And I just figired this will be a good thread for people to post up solder joints here and discuss
Thread Starter
Old Fart
Joined: May 2004
Posts: 26,173
Likes: 18
From: kelowna, bc, canada
I wasn't saying anything bad at all about ur solder method I just kinda skimmed threw it.
But as for the terminal that bastard was crimped good I couldn't get the other side up. But I got it hot enough and the solder attached to the metal good.
Lol and I forgot to add the heat shrink first.......
And I just figired this will be a good thread for people to post up solder joints here and discuss
But as for the terminal that bastard was crimped good I couldn't get the other side up. But I got it hot enough and the solder attached to the metal good.
Lol and I forgot to add the heat shrink first.......
And I just figired this will be a good thread for people to post up solder joints here and discuss
I actually have a few sets of pliers/cutters that I modified to use to "open" those crimped terminals, in most cases we would just replace them, but we would not stock the one in your pix so I would "open" that one and that is the case for a lot of terminals on older cars, [pre 70s] some of those terminals are no longer available
I was also thinking there should be one tread for soldering how to, I am going to take some better pix and more of them, maybe some of other "acceptable" ways to make connections.94


Honda-Tech Member
Joined: Apr 2013
Posts: 16
Likes: 0
i know this is an older thread, but i figured to reply rather than start a new one. i have found myself needing to repair the engine wiring harness, due to a hack n slash job previous owner did in a bad VERY bad wire tuck attempt. I purchased a 3M soldering pencil(?) and some 3M solder. I could not find the percentage of metal content anywhere on packaging except that it just says "rosin core" is this solder suitable for connecting engine wiring plugs, or should i seek out a better solder medium? i assume i can go to a LOWES, Home Depot, Radio-Shack if i need a better solder medium, correct
thanks
thanks

ACTUALLY, you're completely skipping fluxing and tinning and the wire wrap does NOTHING for stability that proper solder won't do. Additionally you're risking a cold joint by pooling the solder on the tip of the iron.
THE PROPER WAY
*Strip 1/4" off each wire.
*APPLY FLUX TO THE WIRE ENDS
*Tin each wire individually by heating the wire with the iron then applying the solder to the
WIRE not the iron to melt it. The flux will clean the wire AND help it immediately flow properly
when it reaches the right temperature.
*Then hold your two wires together and apply heat until they flow.
I micro solder RC helicopter electronics on the side. You won't have a joint fail if you follow this MUCH EASIER AND FASTER procedure.
Thread Starter
Old Fart
Joined: May 2004
Posts: 26,173
Likes: 18
From: kelowna, bc, canada
Rosin Core solder has the "flux" in the core.
Pushing together and wrapping the leads insures better contact between the individual strands of the two lead you are connecting.
MUCH EASIER AND FASTER procedure does not = better. 94
Pushing together and wrapping the leads insures better contact between the individual strands of the two lead you are connecting.
MUCH EASIER AND FASTER procedure does not = better. 94

Thread
Thread Starter
Forum
Replies
Last Post
car, connection, electrical, honda, kits, liquid, pencil, properly, snaponbutane, solder, soldering, tape, wire, wires, wrap