

Progress CsII struts and rear swaybar HOW TO and review


Thread Starter
Honda-Tech Member
Joined: Nov 2011
Posts: 27
Likes: 8
From: MD
I'm sure atleast a few of you have read my suspension woes thread https://honda-tech.com/forums/suspension-brakes-54/bilstein-coilovers-using-non-coilover-springs-3003190/ <----here and for my daily driven eg I've decided to spring for progress technologies cs2 coil over strut package (350/250 weights) and their 22mm rear swaybar- non adjustable. Here is my personal installation guide/review. I'm going to try and write this so anyone can do it...but keep in mind that I may overlook small details that you should be able to figure out.
-ORDERING was quite easy. Just followed the link on their HT classified page to their website and ordered everything on there. Used paypal, it was painless. I had talked via pm's about my needs and they were very helpful and knowledgable. I even got a phone call from them after ordering to confirm my order and make sure they had all the right specs
-SHIPPING took about 5 days and I ordered on a friday. Right off the bat the packaging is awsome. Sturdy boxes stapled together everything is individually wrapped and the finish shows that they care. Sway bar and springs are powdercoated in some lovely neutral shade of grey. Struts appear painted like normal cartirdges, coil over tubes and all hardware is electrically plated for a long rust free life.
-INSTALL I'm sure this would take alot longer for most amateurs working at home but I finished it up at a leisurely pace in about 5 hours including alignment and picture taking.
First is removing the old struts
-Remove strut mount bolts front and rear


Raise the vehicle and remove atleast the front wheels. easier with all 4 off
-Rear: remove the LCA chassis bolt and lower strut bolt. Loosen knuckle bolt for ease of LCA motion


The strut should now easily slide out of the vehicle- REPEAT for pass side
FRONT- Remove upper ball joint cotter pin and lock nut

hit the side of the knuckle with a hammer to release tension and break the joint free


Remove the strut fork clamp bolt

I just loosened the strut fork to LCA bolt and left the fork in the car but you can remove it if you wanna paint it or somthing.

Remove brake hose support bolts

With some wiggling and maybe some love taps the strut should come out of the fork and easily be removed
 repeat for pass side
OK you've got all the factory struts out, now you must remove the strut mounts "hats" to reuse them on the new struts. I chose to disassemble the old and reassemble the new, production line style and do them all at the same time.
Install your favorite coil spring compressor tight enough to relieve tension from the spring

Remove the strut bolt with a 14mm wrench and allen to hold the shaft

One this bolt is removed the stock strut can be removed from the spring and you can get whatcha came for!
 behold the stock strut mounts in all their glory. Make sure to remove the old bushings and noise isolator
 They provide new poly insulators!
Progress has a good breakdown on how to assemble the new struts so I'll save the time. I added and extra step and covered the new poly spring isolators in non petroleum based grease to prevent any squeaks

Install the coilover sleeves on the struts, springs, followed by various bushings and washers

tighten the new nuts down snugly..superhuman torque not needed for this instance.
 viola! They're all assembled! Make sure the crank the struts up atleast 10 clamp rotations to preload the struts. Theyre looking good as well!
For reassembly just follow the dis assembly steps in reverse.
Changes you makes are:
Rear has new hardware since you do away with the nut welded onto the strut

Front has new brake line brackets


Now the bracket set I recieved only holds the rear hose clamp and leaves the front one loose. Which is most likely OK and would be fine...but I went an extra step and threw a hose clamps on to secure the line further

MAKE SURE that you only tighten LCA and rear strut bolts (any bolts that clamp a rubber bushing) snugly until you can put the weight of the car on them (I jounced the suspention a bunch then tightening them up on the ground so not to stress the bushings)
SWAYBAR INSTALLATION
-Skip this if your just installing the struts. I knocked em both out at the same time
 Looks great- fantastic quality
-Remove the lower strut bolt nuts (remove the bolt and flip the shock if your using factory struts) and place the end link mounts. Slide the small hole over the shock bolt and tighten it snugly
 In this picture they're installed upside down (I corrected it later)
Remove the LCA chassis bolt and insert the swaybar bushing mounts

 My car already had threaded holes here for a bar, but if your car is missing them progress provides threaded insert and instructions on how to install them. I just ran a bolt in an out a few times to clean up the thread
Snake the bar into position and let it hang while you get the poly bushings ready

Make sure to apply the supplied lube to the bushings to provide quiet, bind free movement of the swaybar

Center the bar bushings on the mount and tighten the bushings to the mount with supplied hardware

Assemble the endlinks via their diagram and torque them down (or until the bushings start to squish out)


Bam your done!!
FINISHING the struts/adjustment
This part varies from install to install based on the amount of drop you want and vehicle. I just went up and down on the lift moving the coil adjuster in either direction until I got an even ride height I was happy with.


Used a measuring tape from the center of the wheel to the fender to make sure both sides were even. I also found it was possible to easy adjust the fronts by lifting it up, and turning the wheel. The rear was doable with the wheel on, but a PITA! much easier to remove it eash time. I set the rear about 1mm higher then the front, made sure both sides were even and let it go!
At this time I did a final tightening of the coil adjusters, and after the vehicle was on the ground and jounced a few times I tightened all the rubber bushing bolts. (struts, LCAs, ect)
I also sprayed everything down with a rust preventive (corro-ban)
The last and perhaps most important step was the alignment

I was able to aquire about a -1.5* camber all around with all stock parts. The LR I had to shim the camber bar out with some alignment shims. LR toe I got in spec via the factory adjustments, but will require an adjustable toe link for the RR (vehicle might have been hit)
Aligned the front toe and went for a drive!
Also picked up a bennen front strut brace that I installed at this time

My car has the mounting holes for the 3pt on the fire wall, but not holes on the strut towers. I lined it up, drilled holes, and installed bolts/washers to hold it secure.
RESULTS


-Overall in the maybe 20 miles I've put on this thing the difference is amazing. Its a bit stiffer than stock. Certainly not a luxury ride, but definently better than the bilstein coilovers with race weight springs, or tokico blue/eibach sportline kits I've had before. Struts are quiet, absorb the bumps very well and overall the car just feels very solid and capable. The handling is fantastic with very good traction overall in the corning, and good predictability. Understeer has been noticeably reduced and the want to "push" through a corner is almost non existent! I'm going to wait a few weeks while I obtain the toe bars and reset the ride height/alignment after the suspention has had a chance to settle...but thats mostly me being silly about it
HOPE YOU ENJOYED THE REVIEW!! feel free to ask any questions.

-ORDERING was quite easy. Just followed the link on their HT classified page to their website and ordered everything on there. Used paypal, it was painless. I had talked via pm's about my needs and they were very helpful and knowledgable. I even got a phone call from them after ordering to confirm my order and make sure they had all the right specs
-SHIPPING took about 5 days and I ordered on a friday. Right off the bat the packaging is awsome. Sturdy boxes stapled together everything is individually wrapped and the finish shows that they care. Sway bar and springs are powdercoated in some lovely neutral shade of grey. Struts appear painted like normal cartirdges, coil over tubes and all hardware is electrically plated for a long rust free life.
-INSTALL I'm sure this would take alot longer for most amateurs working at home but I finished it up at a leisurely pace in about 5 hours including alignment and picture taking.
First is removing the old struts
-Remove strut mount bolts front and rear
Raise the vehicle and remove atleast the front wheels. easier with all 4 off
-Rear: remove the LCA chassis bolt and lower strut bolt. Loosen knuckle bolt for ease of LCA motion
The strut should now easily slide out of the vehicle- REPEAT for pass side
FRONT- Remove upper ball joint cotter pin and lock nut
hit the side of the knuckle with a hammer to release tension and break the joint free
Remove the strut fork clamp bolt
I just loosened the strut fork to LCA bolt and left the fork in the car but you can remove it if you wanna paint it or somthing.
Remove brake hose support bolts
With some wiggling and maybe some love taps the strut should come out of the fork and easily be removed
repeat for pass sideOK you've got all the factory struts out, now you must remove the strut mounts "hats" to reuse them on the new struts. I chose to disassemble the old and reassemble the new, production line style and do them all at the same time.
Install your favorite coil spring compressor tight enough to relieve tension from the spring
Remove the strut bolt with a 14mm wrench and allen to hold the shaft
One this bolt is removed the stock strut can be removed from the spring and you can get whatcha came for!
behold the stock strut mounts in all their glory. Make sure to remove the old bushings and noise isolator They provide new poly insulators!Progress has a good breakdown on how to assemble the new struts so I'll save the time. I added and extra step and covered the new poly spring isolators in non petroleum based grease to prevent any squeaks
Install the coilover sleeves on the struts, springs, followed by various bushings and washers
tighten the new nuts down snugly..superhuman torque not needed for this instance.
viola! They're all assembled! Make sure the crank the struts up atleast 10 clamp rotations to preload the struts. Theyre looking good as well!For reassembly just follow the dis assembly steps in reverse.
Changes you makes are:
Rear has new hardware since you do away with the nut welded onto the strut
Front has new brake line brackets
Now the bracket set I recieved only holds the rear hose clamp and leaves the front one loose. Which is most likely OK and would be fine...but I went an extra step and threw a hose clamps on to secure the line further
MAKE SURE that you only tighten LCA and rear strut bolts (any bolts that clamp a rubber bushing) snugly until you can put the weight of the car on them (I jounced the suspention a bunch then tightening them up on the ground so not to stress the bushings)
SWAYBAR INSTALLATION
-Skip this if your just installing the struts. I knocked em both out at the same time
Looks great- fantastic quality-Remove the lower strut bolt nuts (remove the bolt and flip the shock if your using factory struts) and place the end link mounts. Slide the small hole over the shock bolt and tighten it snugly
In this picture they're installed upside down (I corrected it later)Remove the LCA chassis bolt and insert the swaybar bushing mounts
My car already had threaded holes here for a bar, but if your car is missing them progress provides threaded insert and instructions on how to install them. I just ran a bolt in an out a few times to clean up the threadSnake the bar into position and let it hang while you get the poly bushings ready
Make sure to apply the supplied lube to the bushings to provide quiet, bind free movement of the swaybar
Center the bar bushings on the mount and tighten the bushings to the mount with supplied hardware
Assemble the endlinks via their diagram and torque them down (or until the bushings start to squish out)
Bam your done!!
FINISHING the struts/adjustment
This part varies from install to install based on the amount of drop you want and vehicle. I just went up and down on the lift moving the coil adjuster in either direction until I got an even ride height I was happy with.
Used a measuring tape from the center of the wheel to the fender to make sure both sides were even. I also found it was possible to easy adjust the fronts by lifting it up, and turning the wheel. The rear was doable with the wheel on, but a PITA! much easier to remove it eash time. I set the rear about 1mm higher then the front, made sure both sides were even and let it go!
At this time I did a final tightening of the coil adjusters, and after the vehicle was on the ground and jounced a few times I tightened all the rubber bushing bolts. (struts, LCAs, ect)
I also sprayed everything down with a rust preventive (corro-ban)
The last and perhaps most important step was the alignment
I was able to aquire about a -1.5* camber all around with all stock parts. The LR I had to shim the camber bar out with some alignment shims. LR toe I got in spec via the factory adjustments, but will require an adjustable toe link for the RR (vehicle might have been hit)
Aligned the front toe and went for a drive!
Also picked up a bennen front strut brace that I installed at this time
My car has the mounting holes for the 3pt on the fire wall, but not holes on the strut towers. I lined it up, drilled holes, and installed bolts/washers to hold it secure.
RESULTS
-Overall in the maybe 20 miles I've put on this thing the difference is amazing. Its a bit stiffer than stock. Certainly not a luxury ride, but definently better than the bilstein coilovers with race weight springs, or tokico blue/eibach sportline kits I've had before. Struts are quiet, absorb the bumps very well and overall the car just feels very solid and capable. The handling is fantastic with very good traction overall in the corning, and good predictability. Understeer has been noticeably reduced and the want to "push" through a corner is almost non existent! I'm going to wait a few weeks while I obtain the toe bars and reset the ride height/alignment after the suspention has had a chance to settle...but thats mostly me being silly about it
HOPE YOU ENJOYED THE REVIEW!! feel free to ask any questions.
Honda-Tech Member
iTrader: (1)
Joined: Feb 2010
Posts: 1,852
Likes: 1
From: latitude 39.6 longitude 78.9
Good write up. One thing I can add is there is no need at all to remove the upper control arm from the ball joint. Just tap the lower fork off the shock body and you can pull it right out.

Nice writeup, thanks I've got some install notes (not nearly as detailed as your writeup) and a review in the last page of my build thread in my sig.
BTW these are shocks and not struts
I've got some install notes (not nearly as detailed as your writeup) and a review in the last page of my build thread in my sig.BTW these are shocks and not struts
Master Detailer
Joined: Nov 2007
Posts: 15,511
Likes: 22
Nice!
However, you should never need to remove the UCA for this.
Un bolt the fork from the LCA, and the shock, wiggle the fork off, and remove the shock.
However, you should never need to remove the UCA for this.
Un bolt the fork from the LCA, and the shock, wiggle the fork off, and remove the shock.
Thread Starter
Honda-Tech Member
Joined: Nov 2011
Posts: 27
Likes: 8
From: MD
ok, I suppose I left the fork on where you guys left the UCA on! and I always refer to anything I have to use a spring compressor on as a strut heh. despite that its not a McPherson strut, unless you can unbolt/remove it without touching a spring its a strut to me! Put some more miles on it tonight. This thing handles fantastic. I can push it harder than ever. Need a brake upgrade now. After hitting many bumps around town you deffinently feel all of them. Not nearly as cushy as stock..once again not nearly as bad as the race springs either. A bearable medium I'd say! I think the shocks are actually smooth and quiet, but now I have to chase down some interior rattles/squeeks/knocks (also possible exhaust knocking into stuff on bumps) The tighter chassis seems to transfer the vibrations further in now. Might need to get some cheap sound deadened to hit the panels/floor/roof with
Put some more miles on it tonight. This thing handles fantastic. I can push it harder than ever. Need a brake upgrade now. After hitting many bumps around town you deffinently feel all of them. Not nearly as cushy as stock..once again not nearly as bad as the race springs either. A bearable medium I'd say! I think the shocks are actually smooth and quiet, but now I have to chase down some interior rattles/squeeks/knocks (also possible exhaust knocking into stuff on bumps) The tighter chassis seems to transfer the vibrations further in now. Might need to get some cheap sound deadened to hit the panels/floor/roof with
Honda-Tech Member
Joined: Jun 2003
Posts: 1,648
Likes: 0
From: Dahlonega, Ga, USA
I put the same coil overs on my 98 coupe and love them. Although i did get the 350/350 set because i feel the 250 is to soft. I really wish they offered a 400 spring set for the front.
The pics should help many people aside from not needing to seperating the UCA from the knuckle.
The pics should help many people aside from not needing to seperating the UCA from the knuckle.

Honda-Tech Member
Joined: Feb 2010
Posts: 21
Likes: 0
Thanks for the great review and photos! I'm going with this same kit just with an ITR rear bar instead. Only suggestion I would make would be to flip the sway bay endlink bolts so they dont stick down quite as far for ground clearance.
Trending Topics

Honda-Tech Member
iTrader: (1)
Joined: Feb 2010
Posts: 1,852
Likes: 1
From: latitude 39.6 longitude 78.9
Master Detailer
Joined: Nov 2007
Posts: 15,511
Likes: 22
Honda-Tech Member
iTrader: (1)
Joined: Feb 2010
Posts: 1,852
Likes: 1
From: latitude 39.6 longitude 78.9
It's probably the most popular spring/coilover setup used these days when paired with Koni shocks for the people who are willing to pay for the quality. Yeah I think 380/280 is the actual OTS rate but I know most go 400/350.
Master Detailer
Joined: Nov 2007
Posts: 15,511
Likes: 22
but, your right. 400/450F 350R is a good setup, depending on how low they want to be.

Honda-Tech Member
Joined: Jun 2012
Posts: 7
Likes: 0
How important is adding the brake line adapter? The previous owner installed eBay coilovers and I didn't see that he move the brake line to somewhere else. It wasn't hooked up to the side of the strut.(unless that is where it is suposed to be on my year car?)
I have a 96 civic hatchback.
Thanks!
I have a 96 civic hatchback.
Thanks!
Honda-Tech Member
Joined: Mar 2008
Posts: 927
Likes: 2
From: North Carolina
^ In MD where rust is an issue there is nothing wrong with undoing the upper balljoint instead of the lower front fork bolts. Because it is possible for the lower bolt through the front forks to be seized. Anyways... Nice write up!
Master Detailer
Joined: Nov 2007
Posts: 15,511
Likes: 22
Honda-Tech Member
Joined: Jun 2004
Posts: 7,539
Likes: 5
From: Sherman Oaks, CA, United States
How important is adding the brake line adapter? The previous owner installed eBay coilovers and I didn't see that he move the brake line to somewhere else. It wasn't hooked up to the side of the strut.(unless that is where it is suposed to be on my year car?)
I have a 96 civic hatchback.
Thanks!
I have a 96 civic hatchback.
Thanks!
Honda-Tech Member
Joined: Jun 2007
Posts: 718
Likes: 0
From: ca, usa
How important is adding the brake line adapter? The previous owner installed eBay coilovers and I didn't see that he move the brake line to somewhere else. It wasn't hooked up to the side of the strut.(unless that is where it is suposed to be on my year car?)
I have a 96 civic hatchback.
Thanks!
I have a 96 civic hatchback.
Thanks!
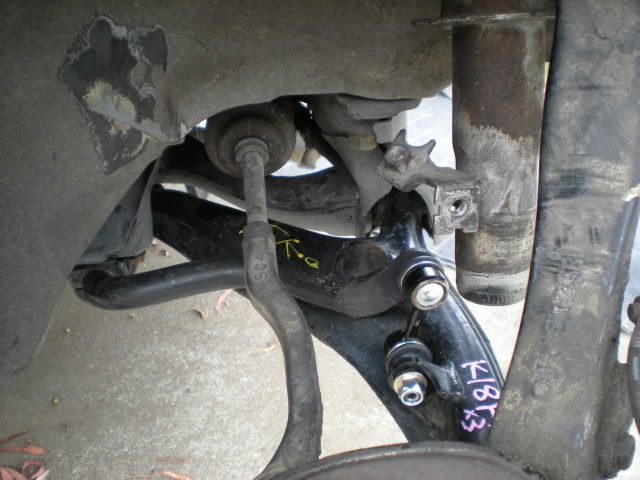
you can barley see the brake line at the lower right, and the bracket on the knuckle.

Honda-Tech Member
Joined: Jul 2011
Posts: 165
Likes: 2
From: South Florida
How are these holding up? I am leaning towards getting the whole setup as you did minus the rear sway bar. I've read great reviews from guys that autoX them but thats normally on flat paved road. I haven't seen too many reviews from people that daily drive them on not so favorable road conditions
Honda-Tech Member
Joined: Jul 2011
Posts: 165
Likes: 2
From: South Florida
Thats great I guess I'll go through your thread and see if I can answer my own questions. I saw Liberteriats thread recently and went through a few other threads, I'm looking for a slight drop from OEM maximum of ~2", which would actually be a significant raise for my current awkward half-slammed front-shot ride height. Not trying to thread jack so I'll see my way out

Honda-Tech Member
Joined: Oct 2012
Posts: 39
Likes: 0
has anyone tried the 350 front and rear setup? how did it ride? im scared that the 250 rear will be too soft and my tires may rub with people sitting in my backseat