

VT Gauge Cluster Installation Review...

Thread Starter
Honda-Tech Member
Joined: Oct 2003
Posts: 244
Likes: 0
From: Orlando, FL, US
VT Gauge Cluster Installation Review
I am a very meticulous person, thus the project took approximately two hours; if it takes you longer, well, it's probably because you broke something. Remember that you aren't wrenching on the suspension - this stuff is kinda delicate - and your project will end well.
Parts and Tools
- USDM 1990-1 Si cluster
- UKDM VT cluster (I have no idea what applicable years)
- #2 "Stubby" Phillips
- #2 standard length Phillips
- 1/4" standard length flathead
Removing the Hood
Slide your driver's seat to its furthest position and get comfy, which isn't all that difficult if you have the original Si seats (I swear these were designed for my scrawny butt). Drop the steering column to the lowest position. Four screws retain the hood - two up top and two below. The two screws up top are close to the windshield under cover plates; it is easiest to roll the window down and work from outside the vehicle to remove these (the "Stubby" is quite useful here). The hood retains three control devices to unplug - the rear defroster, dimmer, and hazard switch. Slide the hood slightly forward and disconnect the three plugs from the rear, then carefully remove the hood.
Removing the Cluster
Four screws retain the cluster to metal mounting brackets; these are easily noted as the screws thread through the black plastic cluster housing. Remove these four screws carefully so as not to drop them. I highly recommend removing the fuse panel access below the steering column at this point as this will allow any screws dropped to fall directly to the floor (yes, I dropped one). Three electrical connectors are on the back of the cluster - simply depress the levers and remove each. Also, the speedometer cable must be removed as well - simply depress the lever and pull the cable housing away from the cluster, then remove the cluster.
Disassembling the Clusters
Two wires run from the top of the cluster to a bulb for the Brights Indicator - twist the bulb and remove the wiring from the tabs of the white cluster case. The black cover plate housing is retained to the gauge cluster by five locking tabs. Depress the two tabs on the bottom and slide them forward until free. Carefully grip the clear face plate and pull down slightly - this should cause the top tabs to drop free of the locking pins. I cannot stress enough do NOT be forceful. It will come apart abruptly, make sure you have a proper grip.
Removing the Gauges on the USDM Cluster
The USDM cluster has a circuit board framed in plastic casing mounted to the back of the cluster - this will need to be removed. Disconnect the two wires secured by screws. Then, use the flathead to depress the locking tab closest to the speedometer, then repeat the procedure on the locking tab closest to the tachometer. Pull the plastic casing directly away from the cluster backing to expose the gauge retaining screws.
Remove the tachometer and speedometer first. The tachometer has two retaining screws and the speedometer has three. Be careful not to drop the gauges. Next remove the six screws retaining the fuel/temperature gauge combo.
Removing the UKDM gauges is the same process, minus the circuit board in plastic casing. However, the two screws used for retaining wires for the circuit board in plastic casing also secure the gauges and will have to be removed as well.
Reassembly
I highly recommend doing a touch of spot cleaning (nothing abrasive). Insert the fuel/temperature combo first, then the speedometer and tachometer. Secure the gauge retaining screws in back, replace the circuit board plastic casing, and reconnect the two associated wires with the circuit board plastic casing. Replace the Brights Indicator bulb and its associated wiring. The rest of the assembly is the reverse of disassembly. I highly recommend testing the cluster before securing the hood.
Best of luck and happy motoring!
PS - H-T member "Jockone" had two of these for sale when I posted this thread...
Last edited by Surfjunkie44; Mar 26, 2011 at 09:13 AM.
Crazy Honda Guy

Joined: Sep 2003
Posts: 8,025
Likes: 19
From: Calgary, AB, Canada
Glad to see you got your cluster now, and got the housing switched over. That is a very detailed review indeed. I managed to removed the gauges out of both clusters and swap them in under 20 mins  Great results though, they are certainly a wonderful looking oem option for those swapping in a high revving vtec swap
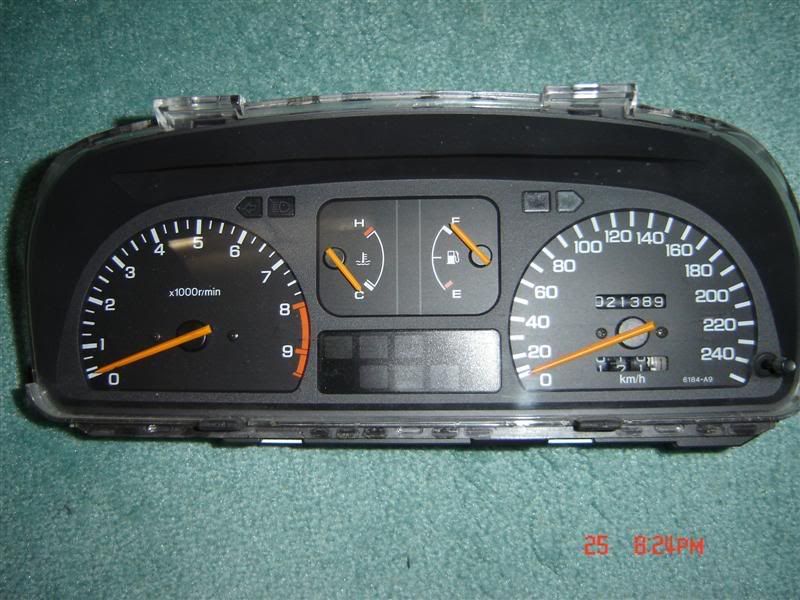
Here is the most current one i'm running in my car before i swapped it in
Great results though, they are certainly a wonderful looking oem option for those swapping in a high revving vtec swapHere is the most current one i'm running in my car before i swapped it in
Thread Starter
Honda-Tech Member
Joined: Oct 2003
Posts: 244
Likes: 0
From: Orlando, FL, US
I used to have a 1988 Si but don't recall if it had a dimmer switch. I have read the dimmer switch does not work with the VT cluster, so should I simply leave it disconnected? I read somewhere that two wires needed to be inserted into one pin to attain full brightness. Heard anything like that, Deetz?
Crazy Honda Guy
Joined: Sep 2003
Posts: 8,025
Likes: 19
From: Calgary, AB, Canada
Being i live in Canada, i wanted the cluster in km's, so it's perfect for me Switching over the gauges from one housing to another was no big deal, don't feel bad about doing that at all. btw, that clear plastic cover you look through to see everything can be purchased separately and give your cluster that look of "new".
As far as the dimmer goes, i am sure it could be wired in. I never bothered with it, as i was satisfied with it's preset performance as Honda meant for it in all European countries
Switching over the gauges from one housing to another was no big deal, don't feel bad about doing that at all. btw, that clear plastic cover you look through to see everything can be purchased separately and give your cluster that look of "new". As far as the dimmer goes, i am sure it could be wired in. I never bothered with it, as i was satisfied with it's preset performance as Honda meant for it in all European countries

Honda-Tech Member
Joined: Feb 2010
Posts: 366
Likes: 1
Does anybody know how to wire up the VT cluster to a 90 civic Si???? I really need help!
I wired up some of it, but two wires are still free. They are Blue/yellow, and Red.
So far my RPM's work, mph/khm work, gas and temperature work.
When i open the driver door the ALB light flashes. What is that??? Anti lock brakes?
I wired up some of it, but two wires are still free. They are Blue/yellow, and Red.
So far my RPM's work, mph/khm work, gas and temperature work.
When i open the driver door the ALB light flashes. What is that??? Anti lock brakes?


Honda-Tech Member
Joined: Sep 2006
Posts: 7,709
Likes: 12
From: NoRthERn Cali
Why didn't you just swap the vt gauges onto the original cluster? I did this on my usdm si cluster with an EDM gauges. Took all of 20 minutes
Trending Topics
Honda-Tech Member
Joined: Feb 2010
Posts: 366
Likes: 1
I would have, but when i got my shell it came with no cluster at all.
I saw a picture of how it should look, but it was for a crx some of the colors are different.
I saw a picture of how it should look, but it was for a crx some of the colors are different.
Crazy Honda Guy
Joined: Sep 2003
Posts: 8,025
Likes: 19
From: Calgary, AB, Canada
So? Go p/u a used cluster from the wrecker for $15 and save yourself a bunch of hassel
Honda-Tech Member
Joined: Feb 2010
Posts: 366
Likes: 1
Im pretty much done switching the pins.
Wasn't hard at all. Just gotta figure out the rest of the pins.
Unless your already have the extra cluster, whats the point of spending more cash.
Theres no cutting involved.
Wasn't hard at all. Just gotta figure out the rest of the pins.
Unless your already have the extra cluster, whats the point of spending more cash.
Theres no cutting involved.
Thread Starter
Honda-Tech Member
Joined: Oct 2003
Posts: 244
Likes: 0
From: Orlando, FL, US
PS - Deetz, in the link below, the author discusses the connection of two wires regarding the dimmer switch to regain full brightness on the climate controls - that was the missing article I couldn't find - but I think it only pertains to USDM models.
http://www.angelfire.com/ca/DrOhm/SiRcluster.html

Thread
Thread Starter
Forum
Replies
Last Post
patrickstar
Honda CRX / EF Civic (1988 - 1991)
10
Mar 3, 2009 04:11 PM
SC2.2CL
Honda Accord (1990 - 2002)
6
Mar 29, 2006 11:03 AM