

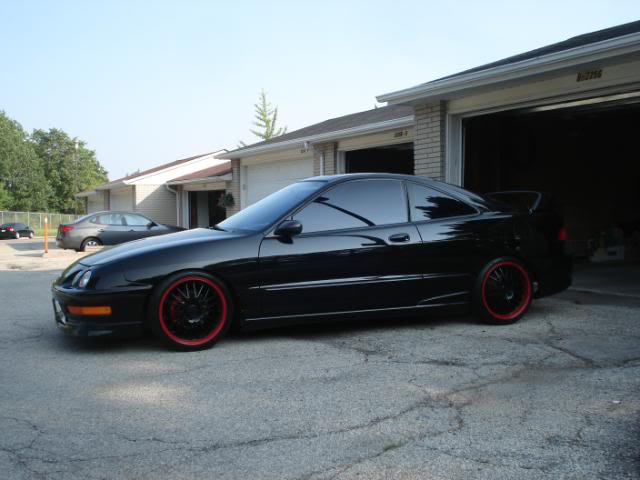
Vinyl wrapped my Integra matte black

Thread Starter
Honda-Tech Member

Joined: Oct 2002
Posts: 140
Likes: 0
From: T.DOT
The background:
i got my hands on 3 rolls of this stuff and i've been wanting to paint my car for awhile now. Having experience with vinyl and wrapping stuff as part of my job i figured why not tackle wrapping my car to save some coin instead of paint.

Tools/Supplies Required:
- 3 rolls of 3M controltac vinyl
- adjustable temp. heat gun
- felt squeegees
- exacto knifes
- lots of patience

Prep:
a good wash and clay bar of the car prior to starting. any bit of dirt, bug debris, or dust will show through. the cars surface has to be flawless prior to install.
after the wash:
Let's get started.
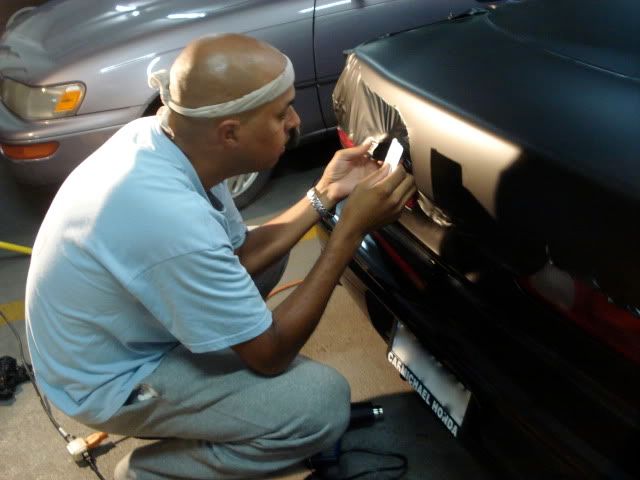
Simply take your roll of vinyl, measure for what you need, cut off a piece and get started. I began with the hood as i figured it was big and flat, however it's pretty freakin' big and i'd wished i started with the fender as it was much easier. anyways, with the help of my little brother i peeled back about 4" of the lead edge of the hood closest to the wipers, tacked my outer edges and began to apply the vinyl with the felt squeegee in short swipes

(sorry no pics of me doing it as i was rushing to beat sundown)
however the vinyl goes on dry with no application fluid believe it or not. back in the day most graphics were applied wet but this 3M stuff has air channels in micro cut into the adhesive side of it. when you see an air bubble just gently press it out with the squeegee

i got my hands on 3 rolls of this stuff and i've been wanting to paint my car for awhile now. Having experience with vinyl and wrapping stuff as part of my job i figured why not tackle wrapping my car to save some coin instead of paint.

Tools/Supplies Required:
- 3 rolls of 3M controltac vinyl
- adjustable temp. heat gun
- felt squeegees
- exacto knifes
- lots of patience

Prep:
a good wash and clay bar of the car prior to starting. any bit of dirt, bug debris, or dust will show through. the cars surface has to be flawless prior to install.
after the wash:

Let's get started.
Simply take your roll of vinyl, measure for what you need, cut off a piece and get started. I began with the hood as i figured it was big and flat, however it's pretty freakin' big and i'd wished i started with the fender as it was much easier. anyways, with the help of my little brother i peeled back about 4" of the lead edge of the hood closest to the wipers, tacked my outer edges and began to apply the vinyl with the felt squeegee in short swipes

(sorry no pics of me doing it as i was rushing to beat sundown)
however the vinyl goes on dry with no application fluid believe it or not. back in the day most graphics were applied wet but this 3M stuff has air channels in micro cut into the adhesive side of it. when you see an air bubble just gently press it out with the squeegee

Last edited by Nuubz; Sep 30, 2013 at 05:51 PM. Reason: pictures fixed
Thread Starter
Honda-Tech Member
Joined: Oct 2002
Posts: 140
Likes: 0
From: T.DOT
after another 6 hours working on the car. I was able to get both rear quarter panels done, trunk and strip of metal between the rear bumper and the lights. All that's left are the front and rear bumpers, spoiler and body kit (all those pieces will be coming off the car to be done)

let me say this about vinyl, ........ it's a pain in the ***!!!! i was asking myself last night, "why am i doing this again?". It is a challenge though, so i guess that's what peaks my interest.
trunk first attempt:

not happy with the results, i removed the vinyl and started again.


notes - i removed the rear spoiler and de-badged the trunk to make things cleaner and easier. The heatgun is a must for this job, you can wrinkle the vinyl, stretch it, pull it and with a little heat gun action it snaps back to shape, (however you have to use it really quick because too much heat and you'll melt the vinyl). Heat also gets you around the weird *** angles on shapes on this car as you can lightly warm up the vinyl and pull it around angles or push it into spaces (like that little grab area to lift up the rear hatch)
Last edited by Nuubz; Sep 30, 2013 at 06:02 PM. Reason: fixed pictures
Thread Starter
Honda-Tech Member
Joined: Oct 2002
Posts: 140
Likes: 0
From: T.DOT
if you're wondering "is this guy doing this in an underground garage???" , yes i am 

my humble work area, with a 100ft extension cord plugged in near my elevators (lol!) who says you can't work in you're underground parking garage eh?
new trunk vinyl cut

leaving enough overlap for wrapping around the edges (one to two inches depending on the angle)


my wife and the heat gun came in handy (i keep it running on the ground - POINTED AWAY from anything flamable - including you) - heat setting low, fan high
when you're getting to corners and round **** it's a must


Last edited by Nuubz; Sep 30, 2013 at 05:58 PM. Reason: fixed pictures
Thread Starter
Honda-Tech Member
Joined: Oct 2002
Posts: 140
Likes: 0
From: T.DOT
trimmed & MMMMMmmmmmmm fresh badgery


spoiler reinstalled

again measure twice and cut once to the size you need leaving overlap

the spoiler was a greater challenge than i anticipated. i originally removed it and started on it on the kitchen table.... after many MANY 4 letter words i decided it would be much easier to do it ON the car as there's resistance to pull the vinyl against

so 'ya, the spoiler = BIG pain in the *** and crazy shape to wrap around. I'm not 100% happy with it underneith, however it will do for now because the top turned out perfect


Last edited by Nuubz; Sep 30, 2013 at 06:03 PM. Reason: fixed pictures
Thread Starter
Honda-Tech Member
Joined: Oct 2002
Posts: 140
Likes: 0
From: T.DOT
after i finished the spoiler i did the side skirts which were fairly simple. Following that I tackled the hardest part of the job, the front and rear bumpers with the help of a friend. I didn't get any pictures (sorry)
however after alot of work the car is done
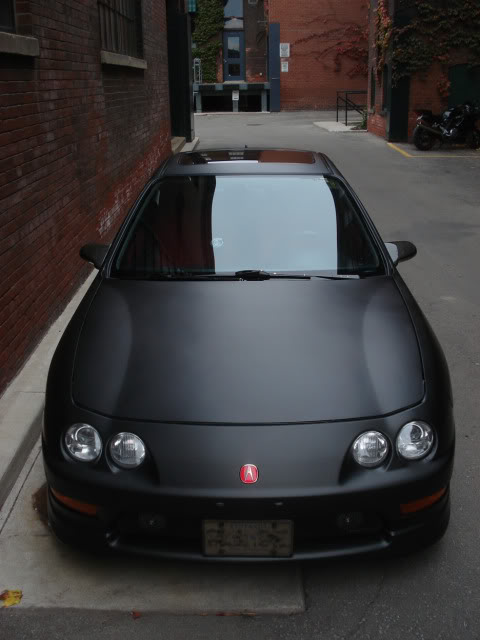


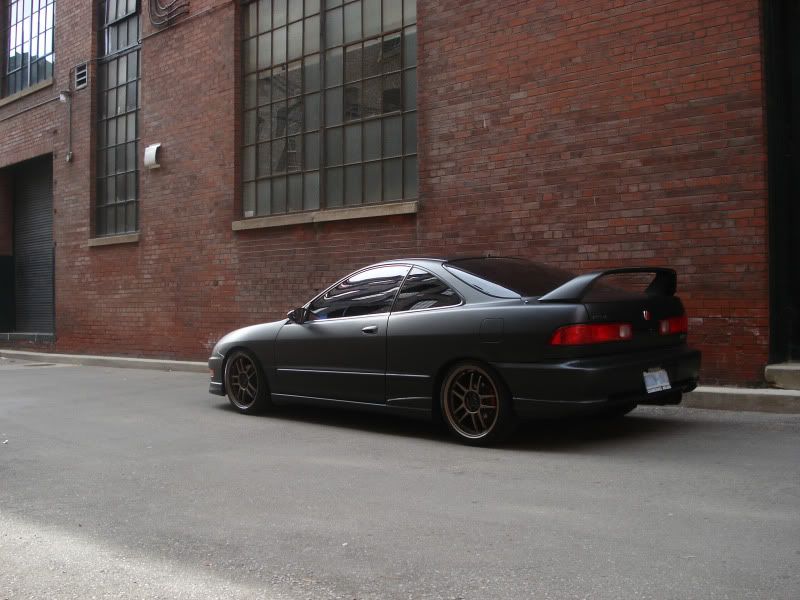
not liking how the wheels now looked against the flat black i went back to some old wheels i had in storage


that's it.
car is wrapped.
C&C or any questions are welcome.
however after alot of work the car is done


not liking how the wheels now looked against the flat black i went back to some old wheels i had in storage


that's it.
car is wrapped.
C&C or any questions are welcome.
Last edited by Nuubz; Sep 30, 2013 at 06:06 PM. Reason: fixed pictures
Trending Topics

Honda-Tech Member
Joined: Feb 2009
Posts: 305
Likes: 0
From: Oregon
When i first read the title, I was imagineing a mess, but great job. Definately took the time to make it look good. sad to see that nice shiney paint go, but a very cool look with the vinyl.

Thread Starter
Honda-Tech Member
Joined: Oct 2002
Posts: 140
Likes: 0
From: T.DOT
/\ thanks, i'll try to (not sure how to move the whole post).
re: the wheels. 'ya, i'm tired of the subzeros too, but no time to shop around right now, hopefully over the winter.
any suggestions for new rims?
re: the wheels. 'ya, i'm tired of the subzeros too, but no time to shop around right now, hopefully over the winter.
any suggestions for new rims?


Joined: Jan 2002
Posts: 30,058
Likes: 59
From: Nowhere and Everywhere
At first I was like wtfuuuuuuu, but then I was like "dayum!"  Clean job, props on actually doing it without tons of seams all over the place.
So now the question is... can you write with chalk on it??
Clean job, props on actually doing it without tons of seams all over the place.So now the question is... can you write with chalk on it??

Honda-Tech Member
Joined: Jul 2004
Posts: 2,772
Likes: 0
From: Idaho
Kind of seems like a waste if it had perfectly good paint already. Although at least it came out good. I wonder how it'll hold up over time. Hopefully it doesn't mess the original paint up.
Honda-Tech Member
Joined: Jun 2005
Posts: 3,281
Likes: 0
From: WORKING for MY stuff in, CA, United States
Yeah, I would also like to know the overall cost. I've seen this a few times with matte/flat black. Anybody seen decent results with other colors?