

I Don't Need No Stinkin' Fog Light Brackets!(JDM Fog Install-Bracket Free)

Thread Starter
Honda-Tech Member
Joined: Jun 2004
Posts: 1,034
Likes: 0
From: Mr. Silk Underwear, TX, USA
I had an extra set of JDM EF9 foglights laying around, but I had no mounting brackets or wiring harness. So I went to the junkyard in search of both and I did find a nice OEM wiring harness out of an 87 Accord, but no luck with brackets..and I sure as hell wasn't gonna pay big money for brackets.
So after about an hour or so messing with bracket ideas I took a hard look at the fogs themselves. I noticed that they came with an adjusting bracket that is held on by two ten millimeter bolts and have a mounting point on them.
I started cutting the holes on the bumper cover and matched them to the fog lights.
I then ran into a problem because of the odd shape of those adjuster brackets. They are made to fit like a shoe onto the fog light housing.
As you may or may not know, the jdm fogs are shaped a certain way to that they shine straight and to the sides at a slight angle...so to make that happen it took a little ghetto engineering.
Tools:
Dremmel for drilling and cutting.(make sure you have a grinder head)
2 Bolts that match the thread pattern in the adjuster brackets(long enough to go through a washer, the bumper urethane and into the adjuster bracket.
2 Large Flat Washers(for added support).
First you take the adjuster brackets off the fogs themselves. Notice next to the bolt hole there is a nub of metal sticking out(to the right in the pick). Grind both down so that they are flat. They need to be flat so that the brackets can sit flat on the inner bumper lip. WEAR SAFETY GOGGLES WHEN GRINDING! DON'T BE A FOOL! SAFETY FIRST!

When you're done it should look more or less like this

Now, take the L(eft) and attach it to the R(ight)foglight but mount it UPSIDE DOWN. Do the same for the R bracket and mount it upside down on the L foglight. They should match up just fine. They should look more or less like this.(be careful not to loose any small parts...the fogs use these tiny pieces of metal so that the tiny ten mm bolts have something to screw into)

Now take the newly tweaked foglight assemblies and press them up against the bottom edge of the bumper and mark where you need to drill through the urethane. Try to get this part right because you only get one shot at this.
Once the hole is drilled you can secure the foglight down to the bumper using the bolt and the large flat washer for added support. If you have a lip it will also add to the support of the foglight. After you fine tune the fogs, tighten everything down. You may or may not have some play in the fogs(moving back n forth)and if that happens use shims in between the foglight adjuster bracket and the bumper support. I used thing foam and those babies won't budge.
This is an upside down view of it when I was tweaking the fit.

Here is how it ended up lookin from the rear.(these pics are right side up)
Driver side

Passenger side

And here is how it turned out!

I will post pics of the whole thing mounted and working soon. Hope this helps those of you with fogs and no mounting brackets!
Cheers
So after about an hour or so messing with bracket ideas I took a hard look at the fogs themselves. I noticed that they came with an adjusting bracket that is held on by two ten millimeter bolts and have a mounting point on them.
I started cutting the holes on the bumper cover and matched them to the fog lights.
I then ran into a problem because of the odd shape of those adjuster brackets. They are made to fit like a shoe onto the fog light housing.
As you may or may not know, the jdm fogs are shaped a certain way to that they shine straight and to the sides at a slight angle...so to make that happen it took a little ghetto engineering.
Tools:
Dremmel for drilling and cutting.(make sure you have a grinder head)
2 Bolts that match the thread pattern in the adjuster brackets(long enough to go through a washer, the bumper urethane and into the adjuster bracket.
2 Large Flat Washers(for added support).
First you take the adjuster brackets off the fogs themselves. Notice next to the bolt hole there is a nub of metal sticking out(to the right in the pick). Grind both down so that they are flat. They need to be flat so that the brackets can sit flat on the inner bumper lip. WEAR SAFETY GOGGLES WHEN GRINDING! DON'T BE A FOOL! SAFETY FIRST!
When you're done it should look more or less like this
Now, take the L(eft) and attach it to the R(ight)foglight but mount it UPSIDE DOWN. Do the same for the R bracket and mount it upside down on the L foglight. They should match up just fine. They should look more or less like this.(be careful not to loose any small parts...the fogs use these tiny pieces of metal so that the tiny ten mm bolts have something to screw into)
Now take the newly tweaked foglight assemblies and press them up against the bottom edge of the bumper and mark where you need to drill through the urethane. Try to get this part right because you only get one shot at this.
Once the hole is drilled you can secure the foglight down to the bumper using the bolt and the large flat washer for added support. If you have a lip it will also add to the support of the foglight. After you fine tune the fogs, tighten everything down. You may or may not have some play in the fogs(moving back n forth)and if that happens use shims in between the foglight adjuster bracket and the bumper support. I used thing foam and those babies won't budge.
This is an upside down view of it when I was tweaking the fit.
Here is how it ended up lookin from the rear.(these pics are right side up)
Driver side
Passenger side
And here is how it turned out!
I will post pics of the whole thing mounted and working soon. Hope this helps those of you with fogs and no mounting brackets!
Cheers

EFB055
Joined: Dec 2005
Posts: 13,249
Likes: 14
From: Brisvegas, QLD, Australia
Not bad, I'd hate to see you coming in the opposite direction with your upside down fog lights though.
Honda-Tech Member
Joined: Jun 2008
Posts: 73
Likes: 0
From: breda, nb, holland

Honda-Tech Member
Joined: Sep 2006
Posts: 7,709
Likes: 12
From: NoRthERn Cali
i did it backwards, i drilled my fogs into my bumper support. its much sturdier because its a solid mounting point. but not a bad idea. if you are interested i have oem usdm fog light brackets just pm me.
Trending Topics
Honda-Tech Member
Joined: Sep 2008
Posts: 1,095
Likes: 0
Thread Starter
Honda-Tech Member
Joined: Jun 2004
Posts: 1,034
Likes: 0
From: Mr. Silk Underwear, TX, USA

Thread Starter
Honda-Tech Member
Joined: Jun 2004
Posts: 1,034
Likes: 0
From: Mr. Silk Underwear, TX, USA
Honda-Tech Member
Joined: Sep 2006
Posts: 7,709
Likes: 12
From: NoRthERn Cali
Well your bumper support does look different so they might not work. I'll find some pics of how I mounted them on my jdm front end
EFB055
Joined: Dec 2005
Posts: 13,249
Likes: 14
From: Brisvegas, QLD, Australia


Thread Starter
Honda-Tech Member
Joined: Jun 2004
Posts: 1,034
Likes: 0
From: Mr. Silk Underwear, TX, USA
I was just ribbin' ya with the facepalm. :p
1989 Honda Civic Wagon. It should work for the ED hatch front end as well.
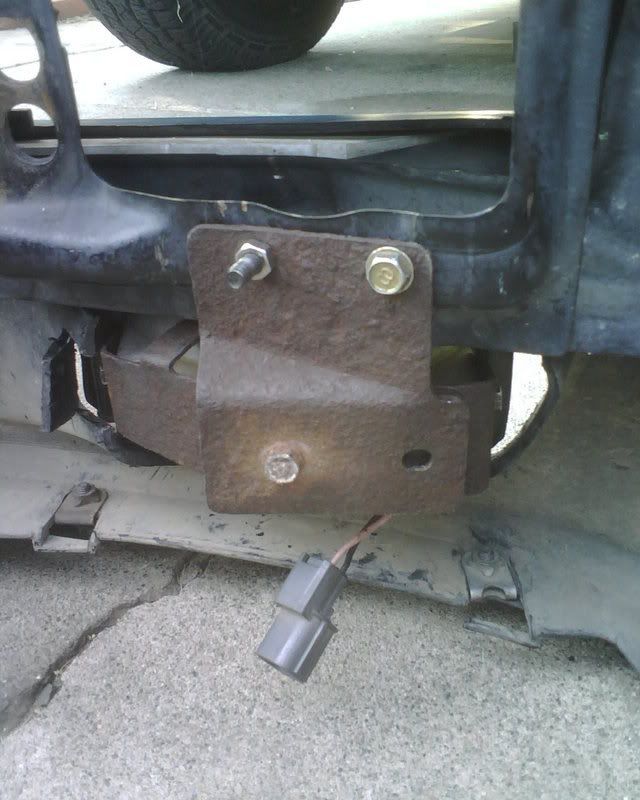
Guess what!? Remember how I said I had two of those mounting plates laying around?
Well, I ended up using them to provide a brace for the back so that it wouldn't wobble at all! These babies are moving ANYWHERE! I say "brace" because the plates don't drill into the fog light housing but hell, it's pretty snug up against the back and that thing won't wobble at all. I used one 10 MM bolt with a locknut and a flat washer....the results were great!
Have a look-see


So forget the foam support. These worked out perectly.
Now I would imagine that you could use any flat piece of metal(or even wood) to brace the fogs from the rear instead of using the oem metal pieces like I did.
I'll take pics of the final look(mounted on the car n all)later.
Originally Posted by apekd
weird...what front bumper is that? good write up atleast
Originally Posted by crx_si-r[/quote
PM Me
Well, I ended up using them to provide a brace for the back so that it wouldn't wobble at all! These babies are moving ANYWHERE! I say "brace" because the plates don't drill into the fog light housing but hell, it's pretty snug up against the back and that thing won't wobble at all. I used one 10 MM bolt with a locknut and a flat washer....the results were great!
Have a look-see
So forget the foam support. These worked out perectly.
Now I would imagine that you could use any flat piece of metal(or even wood) to brace the fogs from the rear instead of using the oem metal pieces like I did.
I'll take pics of the final look(mounted on the car n all)later.
Honda-Tech Member
Joined: Sep 2006
Posts: 7,709
Likes: 12
From: NoRthERn Cali
did you use the door edge trim thingy for the borders of your fog light cut outs? can you post a pic of the front side with those trim things? i had an oem set from a 4DR but i gave my buddy the complete set up.
the rectangular parts are what im talking about....

the rectangular parts are what im talking about....
Thread Starter
Honda-Tech Member
Joined: Jun 2004
Posts: 1,034
Likes: 0
From: Mr. Silk Underwear, TX, USA
Hackjob experiment with door trim.
$2.23 at any wal-mart. What sucks is that the door trim is very stiff.
I wanna do it over..make it look more clean. The corners are a bitch though. I may just use an exacto-knife and make an incision so that the edge trim can "bend"
$2.23 at any wal-mart. What sucks is that the door trim is very stiff.
I wanna do it over..make it look more clean. The corners are a bitch though. I may just use an exacto-knife and make an incision so that the edge trim can "bend"


Honda-Tech Member
Joined: Sep 2006
Posts: 789
Likes: 0
From: KaLifaS, GA, USA
****!!! you guys are making me wanna go get my done right..i bought some lame ones from AUTOZONE but want to get the actual fogs that are for the rex..i need one off of a prelude, 89, but dont want to jack anyone for theirs , unless they give a **** about their car i might be able to buy it off of them..any ideas fellows?
Honda-Tech Member
Joined: Jan 2007
Posts: 1,748
Likes: 1
From: Humboldt, ca, usa
****!!! you guys are making me wanna go get my done right..i bought some lame ones from AUTOZONE but want to get the actual fogs that are for the rex..i need one off of a prelude, 89, but dont want to jack anyone for theirs , unless they give a **** about their car i might be able to buy it off of them..any ideas fellows?
Honda-Tech Member
Joined: May 2008
Posts: 810
Likes: 1
From: CA, USA
I made my brackets from this bracket bought from Home Depot. Go to the wood hanger section, Simpson S/BA brackets:

From this picture, cut off where the red hatching is shown and drill where the blue and green dots are. The green holes will line up to the holes on your bumper support, the blue holes will bolt to the top of your fog bracket.
One Simpson bracket will make one left and one right bracket if you cut it up right down the middle as shown on the red line.
I don't have any dimensions, but once you cut it up and line it up in your car, you'll see where you'll need to drill the holes. These brackets will mount up to Prelude/JDM/USDM fogs. Its shape is similar to the stock JDM bracket.