

The Deffinitive Rear Bushing Thread

Thread Starter
Honda-Tech Member
Joined: Jul 2005
Posts: 1,734
Likes: 2
From: Canada
Hello everyone,
This will be my attempt at giving back to the HT community. This is also my first car related thread, however I've done multiple build threads for guitars I've made.
THE CAR: 2000 Honda Civic. Integra and most Civics will be identical.
OBJECTIVE: New bushings in the rear of the car. Also, an SK2 brake install with drum to disk conversion at NO ADDITIONAL CHARGE.
TOOLS: Sockets - You know the drill (10,12,14,15,17,19)
-Additionally i found 21, 22, and 32 are useful when getting old bushings out
it would be good if these were impact sockets
Wrench - 10 mm for brake lines
Hammers - Whatever you feel is necessary, but at least 1 BFH.
Pliers - Vice grips, adjustable, regular, needle nose (again whatever you feel you need)
Saw - Hacksaw or Sawzall or equivalent
Tin Snips - To cut open chassis (not required in all cases) and to cut bushing rubber
Drivers - Mostly for prying and stabbing
Drill - For removal of old bushings
Lube - WD-40/Liquid Wrench for rusted bolts/bushings
Wirewheel- For paint prep and cleaning rusted bolts
Paint - If you want everything to look like new now would be the time
Press - Hydraulic or Human
Patience - Most important, YOU WILL BRAKE BOLTS. If not then you are made of magic.
Whatever you feel you need here, music, friends, family, bud, beer, kittens, puppies
(looking back I could have used WAY more kittens)
PARTS: depends now what you are doing to your car. my parts include:
Hardrace bushing kit. Came organized in bags like a LEGO set, how cool is that?
Disk converison. So many threads on this i wont go into detail.
S2K rotors. I work in a machine shop so that part of the thread won't be for everyone.
3X5" by 5/8ths thick Steel Plate. for the S2K brake conversion.
REMOVAL:

Start with the Front most mount, the rear toe compensator(14mm). This one is tricky because there is a special nut in a channel inside the chassis. On my car,
this bushing broke into two pieces (inner and outer) which resulted in me wasting a couple hours (per side) getting it out. It also destroyed the inner channel
which required some surgery to fix. I had to cut open the mount because the special nut had fallen out of the channel. I used the predrilled hole and some tin snips
to make a hole big enough for my fingers.

Then I removed the Top most mount(14mm+extension), the one which controls the rear camber.
This one is simple, just 2 bolts which shouldn't cause any problems.

Then Undo the 2 bolts inside the trunk(14mm), under the carpet, that hold the rear shock in place. Then pop the clip off of the brake line bracket.
I find it easiest to just insert a flat head screwdriver between the nut and the raised edge of the clip, and then rotate the screwdriver forcing the clip outwards.
Then disconnect your line (10mm wrench). at this point I attached the new line and put a clamp on it to keep the fluid from draining out.
Go into the car and remove the armrest and console around the E-Brake. Then disconnect your E-Brake lines
and bracket(12mm).

Then I moved on to the Trailing Arm Bushings (17mm+extension). These are also simple and can be pretty stuck but usually come out without
any problems. I suggest stacking boards under the brake drum to support the rear trailing arm at this point.

Now Remove the Inner most mount for the Rear Lower Control Arm(14mm).
This is the last bolt so everything should be ready to drop out after this.

Then just Yank out the whole assembly as 1 big ugly piece. Dont forget to do something about your ABS lines. If you are putting the drums back
on you would have to disconnect them properly. If disks are going on with ABS then cut and just solder in the new ones.
If you are going to non-ABS just cut or yank as you please.

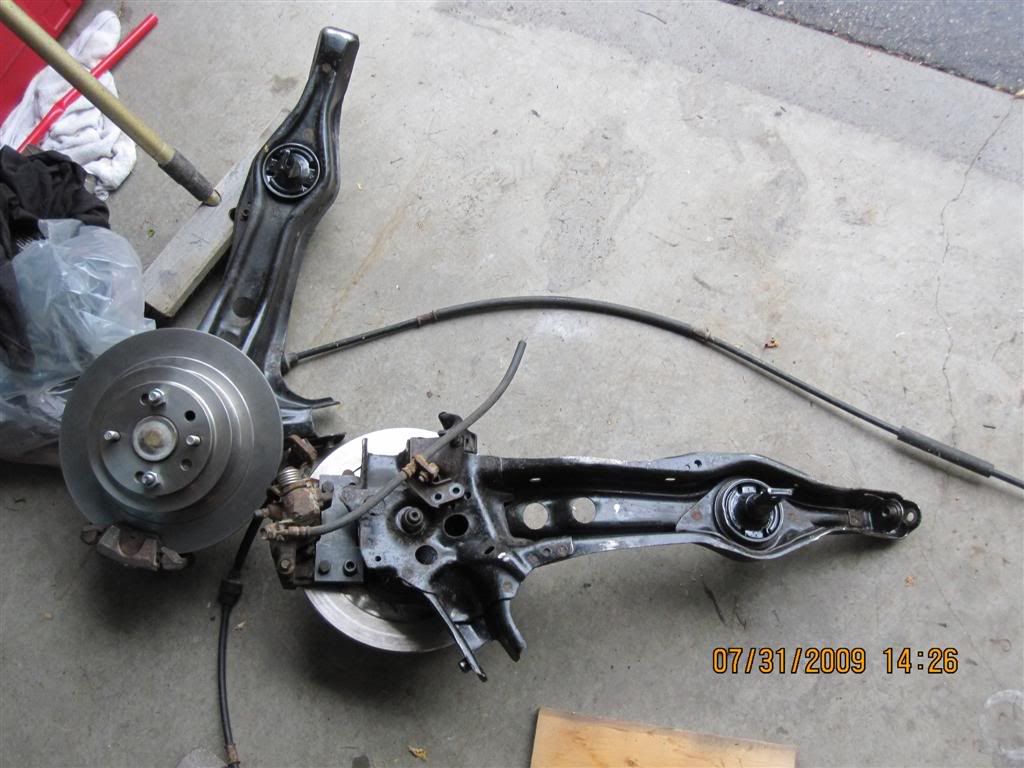
Now it is time to strip all the components off of the rear trailing arm(14mm). After they are stripped it is important to take measurements of how far all of the
bushings are pushed into their respective components.

Here comes the fun part. Removing old bushings. This can either go smoothly, or induce severe depression. The first picture shows some various crap I used.
Different pieces of metal and some leftover pipe from a header build worked perfect. you can either line something up with the bushing and support the
component underneath then hammer or press away.

If something is stuck i suggest this method. Using a drill remove as much rubber from the bushing as possible then cut out the remaining rubber with your
tin snips. Then just hammer or press out the rubber. Then insert your sawzall or hack saw blade and make 2 parallel cuts into the outer ring of the
bushing about 1/4" apart. they do not need to be all the way through. Then take a chisel or flat head and hammer out the section you cut.


Now is a good time to clean up all of your components. I also STRONGLY recommend you wire wheel all your bolts. Then you are ready for Install.

BIG BRAKES
First redrill the rotors to a 4X100 bolt pattern. the existing pattern for the 5-Lug happens to have the exact same distance from the center of the rotor to the
center of the hole for the wheel stud. Using this we can easily set up the rotor on a mill. I started by securing the rotor directly to the table, with the raised hub
section as close to the center as possible, with 1 of the bolt holes parallel with the Y-direction. I then found the exact center by putting a dial indicator
into a chuck in the mill. After that i moved the mill 50mm in the Y direction so that the chuck was directly above the bolt hole we will be lining up with. Then
I put the 13mm drill we will be using to drill the holes into the chuck. I carefully rotated the part so that the existing hole and the drill lined up perfectly without
moving the center of the hub. I then went back to the dial indicator and refound the center and rechecked the drill with the existing hole. After the second
check I was happy with the position. Now it is just a simple matter of moving 100 mm in the Y and drilling, then back to the center and moving 50 in both + and -
in the X direction and drilling. To drill i put a center drill in the chuck and then without moving anything put the 13mm drill in and drilled. The results were a great.

Then you must make a bracket to relocate the caliper approx 1.175" outwards. I will get the exact dimensions later as I left my notes at work. Here you can see
the bracket that was made. It is very simple.
INSTALL

Bushings can be pushed in with a Press, Vise, Or Hammered in. I dont really recommend hammering the bushings in as it is very hard to keep them straight.


After all the bushings are pushed in bolt everything up to the rear trailing arm your ready to use. I left off the Shock and lower control arm.
To make adjustable Toe and Camber pieces is very easy at this point. I just cut pieces of angle iron, drilled a hole in the center, welded in a bolt, then welded that
directly to the bushing. If you want the piece to be adjustable on the car 1 bolt will need to be reverse threaded.

Install is pretty simple, especially considering you wont be dealing with stuck bolts anymore. I start by installing the shock and lower control arm. Remember
that everything can only be finger tight at this point. Then I sit the rear trailing arm on the lower control arm and install the lower most bolt, and then the upper.


Then I install the front most piece, the toe compensator, followed by the rear trailing arm bolts.

Then Hook up all of your lines and cables. Notice that something will have to be done about the E-Brake bracket, however they still work fine like this. Using
front brake lines works fine.

Then jack up the wheel until the body JUST comes off of the jack stand by a hair. Now it is time to tighten all of the bolts to the required torque specs.

Then adjust your Toe/Camber and double check everything. Bleed the brakes and your good to go.

DRIVING IMPRESSIONS:
Brakes:
Just a note, I haven't installed a different Prop Valve. The brake Bias seems to be pretty much fine for the time being but I haven't done too much yet. I did a
test against my friends car. He has a 96 civic hatch with stock brakes. at the time of the test my car was about 400 - 500 pounds heavier than his. I out braked
him by about half a car length however I do have better tyres than him so that obviously played a role in the outcome, but considering the large difference in weight
i considered the braking improvement to be enough to justify this upgrade.
Bushings:
There was a huge change in the rear of the car. The rear end seems to want to rotate itself WAY better around turns now. It almost feels like the rear end pushes
the car around the corner however it feels incredibly solid and there are no signs of oversteer from what I can tell, for how hard I've pushed the car anyways.
The ride hasn't been changed at all in terms of harshness and overall the car just feels much more solid and stable. However the front end feels a little sloppy,
SO GUESS WHATS NEXT ON THE LIST OF THINGS FOR ZANE TO DO!!
Happy Wrenching
This will be my attempt at giving back to the HT community. This is also my first car related thread, however I've done multiple build threads for guitars I've made.
THE CAR: 2000 Honda Civic. Integra and most Civics will be identical.
OBJECTIVE: New bushings in the rear of the car. Also, an SK2 brake install with drum to disk conversion at NO ADDITIONAL CHARGE.
TOOLS: Sockets - You know the drill (10,12,14,15,17,19)
-Additionally i found 21, 22, and 32 are useful when getting old bushings out
it would be good if these were impact sockets
Wrench - 10 mm for brake lines
Hammers - Whatever you feel is necessary, but at least 1 BFH.
Pliers - Vice grips, adjustable, regular, needle nose (again whatever you feel you need)
Saw - Hacksaw or Sawzall or equivalent
Tin Snips - To cut open chassis (not required in all cases) and to cut bushing rubber
Drivers - Mostly for prying and stabbing
Drill - For removal of old bushings
Lube - WD-40/Liquid Wrench for rusted bolts/bushings
Wirewheel- For paint prep and cleaning rusted bolts
Paint - If you want everything to look like new now would be the time
Press - Hydraulic or Human
Patience - Most important, YOU WILL BRAKE BOLTS. If not then you are made of magic.
Whatever you feel you need here, music, friends, family, bud, beer, kittens, puppies
(looking back I could have used WAY more kittens)
PARTS: depends now what you are doing to your car. my parts include:
Hardrace bushing kit. Came organized in bags like a LEGO set, how cool is that?
Disk converison. So many threads on this i wont go into detail.
S2K rotors. I work in a machine shop so that part of the thread won't be for everyone.
3X5" by 5/8ths thick Steel Plate. for the S2K brake conversion.
REMOVAL:
Start with the Front most mount, the rear toe compensator(14mm). This one is tricky because there is a special nut in a channel inside the chassis. On my car,
this bushing broke into two pieces (inner and outer) which resulted in me wasting a couple hours (per side) getting it out. It also destroyed the inner channel
which required some surgery to fix. I had to cut open the mount because the special nut had fallen out of the channel. I used the predrilled hole and some tin snips
to make a hole big enough for my fingers.
Then I removed the Top most mount(14mm+extension), the one which controls the rear camber.
This one is simple, just 2 bolts which shouldn't cause any problems.
Then Undo the 2 bolts inside the trunk(14mm), under the carpet, that hold the rear shock in place. Then pop the clip off of the brake line bracket.
I find it easiest to just insert a flat head screwdriver between the nut and the raised edge of the clip, and then rotate the screwdriver forcing the clip outwards.
Then disconnect your line (10mm wrench). at this point I attached the new line and put a clamp on it to keep the fluid from draining out.
Go into the car and remove the armrest and console around the E-Brake. Then disconnect your E-Brake lines
and bracket(12mm).
Then I moved on to the Trailing Arm Bushings (17mm+extension). These are also simple and can be pretty stuck but usually come out without
any problems. I suggest stacking boards under the brake drum to support the rear trailing arm at this point.
Now Remove the Inner most mount for the Rear Lower Control Arm(14mm).
This is the last bolt so everything should be ready to drop out after this.
Then just Yank out the whole assembly as 1 big ugly piece. Dont forget to do something about your ABS lines. If you are putting the drums back
on you would have to disconnect them properly. If disks are going on with ABS then cut and just solder in the new ones.
If you are going to non-ABS just cut or yank as you please.
Now it is time to strip all the components off of the rear trailing arm(14mm). After they are stripped it is important to take measurements of how far all of the
bushings are pushed into their respective components.
Here comes the fun part. Removing old bushings. This can either go smoothly, or induce severe depression. The first picture shows some various crap I used.
Different pieces of metal and some leftover pipe from a header build worked perfect. you can either line something up with the bushing and support the
component underneath then hammer or press away.
If something is stuck i suggest this method. Using a drill remove as much rubber from the bushing as possible then cut out the remaining rubber with your
tin snips. Then just hammer or press out the rubber. Then insert your sawzall or hack saw blade and make 2 parallel cuts into the outer ring of the
bushing about 1/4" apart. they do not need to be all the way through. Then take a chisel or flat head and hammer out the section you cut.
Now is a good time to clean up all of your components. I also STRONGLY recommend you wire wheel all your bolts. Then you are ready for Install.
BIG BRAKES
First redrill the rotors to a 4X100 bolt pattern. the existing pattern for the 5-Lug happens to have the exact same distance from the center of the rotor to the
center of the hole for the wheel stud. Using this we can easily set up the rotor on a mill. I started by securing the rotor directly to the table, with the raised hub
section as close to the center as possible, with 1 of the bolt holes parallel with the Y-direction. I then found the exact center by putting a dial indicator
into a chuck in the mill. After that i moved the mill 50mm in the Y direction so that the chuck was directly above the bolt hole we will be lining up with. Then
I put the 13mm drill we will be using to drill the holes into the chuck. I carefully rotated the part so that the existing hole and the drill lined up perfectly without
moving the center of the hub. I then went back to the dial indicator and refound the center and rechecked the drill with the existing hole. After the second
check I was happy with the position. Now it is just a simple matter of moving 100 mm in the Y and drilling, then back to the center and moving 50 in both + and -
in the X direction and drilling. To drill i put a center drill in the chuck and then without moving anything put the 13mm drill in and drilled. The results were a great.
Then you must make a bracket to relocate the caliper approx 1.175" outwards. I will get the exact dimensions later as I left my notes at work. Here you can see
the bracket that was made. It is very simple.
INSTALL
Bushings can be pushed in with a Press, Vise, Or Hammered in. I dont really recommend hammering the bushings in as it is very hard to keep them straight.
After all the bushings are pushed in bolt everything up to the rear trailing arm your ready to use. I left off the Shock and lower control arm.
To make adjustable Toe and Camber pieces is very easy at this point. I just cut pieces of angle iron, drilled a hole in the center, welded in a bolt, then welded that
directly to the bushing. If you want the piece to be adjustable on the car 1 bolt will need to be reverse threaded.
Install is pretty simple, especially considering you wont be dealing with stuck bolts anymore. I start by installing the shock and lower control arm. Remember
that everything can only be finger tight at this point. Then I sit the rear trailing arm on the lower control arm and install the lower most bolt, and then the upper.
Then I install the front most piece, the toe compensator, followed by the rear trailing arm bolts.
Then Hook up all of your lines and cables. Notice that something will have to be done about the E-Brake bracket, however they still work fine like this. Using
front brake lines works fine.
Then jack up the wheel until the body JUST comes off of the jack stand by a hair. Now it is time to tighten all of the bolts to the required torque specs.
Then adjust your Toe/Camber and double check everything. Bleed the brakes and your good to go.
DRIVING IMPRESSIONS:
Brakes:
Just a note, I haven't installed a different Prop Valve. The brake Bias seems to be pretty much fine for the time being but I haven't done too much yet. I did a
test against my friends car. He has a 96 civic hatch with stock brakes. at the time of the test my car was about 400 - 500 pounds heavier than his. I out braked
him by about half a car length however I do have better tyres than him so that obviously played a role in the outcome, but considering the large difference in weight
i considered the braking improvement to be enough to justify this upgrade.
Bushings:
There was a huge change in the rear of the car. The rear end seems to want to rotate itself WAY better around turns now. It almost feels like the rear end pushes
the car around the corner however it feels incredibly solid and there are no signs of oversteer from what I can tell, for how hard I've pushed the car anyways.
The ride hasn't been changed at all in terms of harshness and overall the car just feels much more solid and stable. However the front end feels a little sloppy,
SO GUESS WHATS NEXT ON THE LIST OF THINGS FOR ZANE TO DO!!
Happy Wrenching
Last edited by unusual71; Aug 5, 2009 at 10:53 AM.
Thread Starter
Honda-Tech Member
Joined: Jul 2005
Posts: 1,734
Likes: 2
From: Canada
progress is slow due to RAIN for the last week. will hopefully be reassembling the car this afternoon if my friend comes over, in which case there will be a big update tonight as well as first impressions and what not.
Honda-Tech Member


Joined: Aug 2008
Posts: 701
Likes: 5
From: Ghent, Flanders Fields, Belgium
Interesting.
Do list:
- car model and type;
- overview of bushings to replace + pic/drawing where they are located on the vehicle;
- part nrs.
Do list:
- car model and type;
- overview of bushings to replace + pic/drawing where they are located on the vehicle;
- part nrs.
Honda-Tech Member
Joined: Apr 2003
Posts: 2,473
Likes: 2
From: Southeast Pa
i didnt read everything so forgive me if it was already mentioned but with your rear camber kit, i'd recommend using 2 lock nuts on either side of the adjuster. reason being is that after time and vibration, one of the sides will back its way out and push positive camber. that or thread locker.
my .02 from past experience
my .02 from past experience
Trending Topics
Thread Starter
Honda-Tech Member
Joined: Jul 2005
Posts: 1,734
Likes: 2
From: Canada
i didnt read everything so forgive me if it was already mentioned but with your rear camber kit, i'd recommend using 2 lock nuts on either side of the adjuster. reason being is that after time and vibration, one of the sides will back its way out and push positive camber. that or thread locker.
my .02 from past experience
my .02 from past experience
I just never had the right sized nuts

right now i have about 1 degree toe out. how straight does the wheel have to be to prevent accelerated tire wear?
Honda-Tech Member
Joined: Aug 2004
Posts: 4,196
Likes: 0
From: Nah man, Yemen
I'm 1/32" toe out up front and zero'd in the back. I haven't noticed any abnormal wear on my tires and they're only 140 treadwear with about 6 months of daily driving on them...
Honda-Tech Member
Joined: Apr 2003
Posts: 2,473
Likes: 2
From: Southeast Pa
put this on tonight. after about 1500 km one side had come loose. I had thought about it before because with such a course thread the fit isn't incredibly tight,
I just never had the right sized nuts
right now i have about 1 degree toe out. how straight does the wheel have to be to prevent accelerated tire wear?
I just never had the right sized nuts
right now i have about 1 degree toe out. how straight does the wheel have to be to prevent accelerated tire wear?
Thread Starter
Honda-Tech Member
Joined: Jul 2005
Posts: 1,734
Likes: 2
From: Canada
yeah got everything done up just right now, very happy with the outcome. Im not going to have an alignment done at this time because the car drives VERY straight, better than before, and I'll probably do alot of work over the winter, so in spring time I'll get it done.
Can you toss up the dimensions you used for the calipers and the dimensions for the adjustable rear toe piece? (What material, obviously you said the iron corner).
What kind of welding? (TIG/MIG...)
What kind of welding? (TIG/MIG...)
New User
Joined: Jun 2008
Posts: 3
Likes: 0
From: Sao Paulo, SP, Brazil
what set of bushes did you used? There where any loose or oversized bushes? I ran into a problem on loosed new bushes and some that has +1mm on diameter that I'm still thinking on how can I solve it... drill the hole? drill the bushes?
Very Nice write up. Only thing is I didnt see a step where you noted the position of the old bushing such that you could install the new one in the same way.

Thread
Thread Starter
Forum
Replies
Last Post
mynameizstitch
Honda Civic / Del Sol (1992 - 2000)
10
Dec 13, 2009 03:06 PM
optoomistic
Acura Integra
1
Mar 22, 2005 11:43 AM