

Fuel pump removal help


Honda-Tech Member
Joined: Feb 2006
Posts: 700
Likes: 0
From: 717
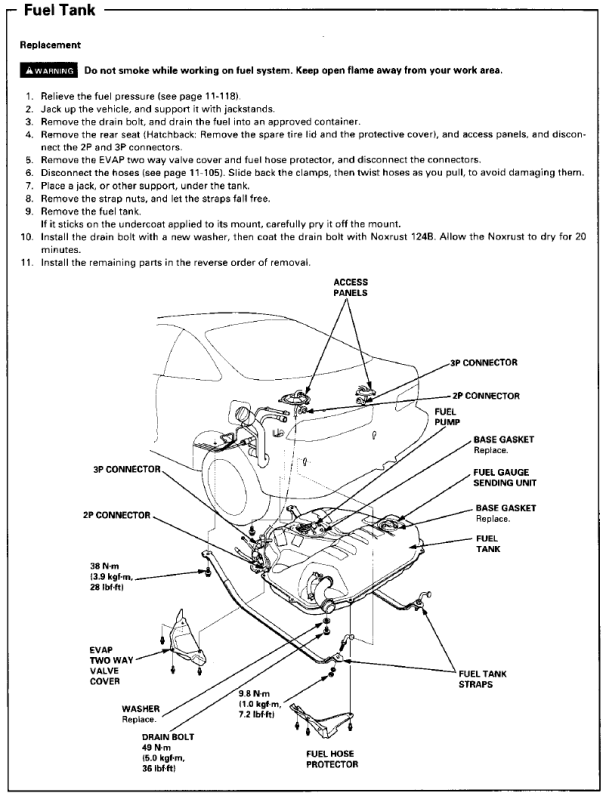
Replacement
Do not smoke while working on fuel system,
Keep open flames away from your work area.
1. Remove the rear seat (see section 20) (20) (Hatchback: Remove the spare tire lid and the protective cover)
2. Remove the access panel.
3. Disconnect the 2P connector from the fuel pump.
Remove the fuel pump mounting nuts.
Remove the fuel pump from the fuel tank.
install parts in the reverse order of removal.
did you remove 3 bolts from access panel and 6 from the fuel pump assembly?
edit: http://www.team-integra.net/sections...?ArticleID=391
Last edited by follie gatts; Jul 22, 2009 at 06:32 PM.
Thread Starter
Honda-Tech Member
Joined: Aug 2008
Posts: 218
Likes: 0
From: centennial, co, united states
Replacement
Do not smoke while working on fuel system,
Keep open flames away from your work area.
1. Remove the rear seat (see section 20) (20) (Hatchback: Remove the spare tire lid and the protective cover)
2. Remove the access panel.
3. Disconnect the 2P connector from the fuel pump.
Remove the fuel pump mounting nuts.
Remove the fuel pump from the fuel tank.
install parts in the reverse order of removal.
did you remove 3 bolts from access panel and 6 from the fuel pump assembly?
edit: http://www.team-integra.net/sections...?ArticleID=391
Do not smoke while working on fuel system,
Keep open flames away from your work area.
1. Remove the rear seat (see section 20) (20) (Hatchback: Remove the spare tire lid and the protective cover)
2. Remove the access panel.
3. Disconnect the 2P connector from the fuel pump.
Remove the fuel pump mounting nuts.
Remove the fuel pump from the fuel tank.
install parts in the reverse order of removal.
did you remove 3 bolts from access panel and 6 from the fuel pump assembly?
edit: http://www.team-integra.net/sections...?ArticleID=391

Junior Member
Joined: Jul 2009
Posts: 25
Likes: 0
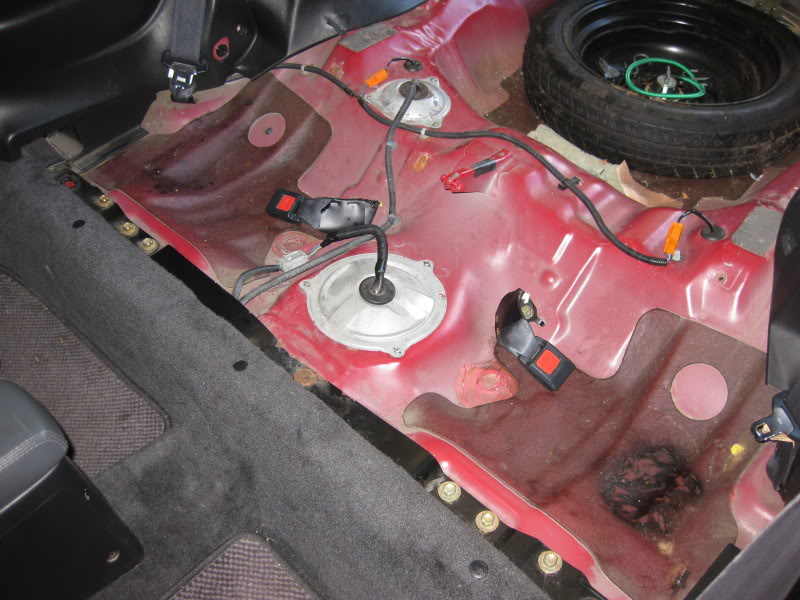
HEY, im having the same problem on my 93. i have the new pump, but it looks nothing like what im seeing under the access panel, the wires connections look the same, but that is about it.

Trending Topics
Thread Starter
Honda-Tech Member
Joined: Aug 2008
Posts: 218
Likes: 0
From: centennial, co, united states
lol bump for us, its strange isnt it? my friends teg looked different and was much easier. im sure someone here knows.....
Junior Member
Joined: Jul 2009
Posts: 25
Likes: 0
yeah, you would think. there are two differient connections on the new pump harness right? one goes to the plug in your pix and the other connects to the main harness. its is almost like what we are seeing under the inspection cover is the sending unit. but why would they be in differeint locations??? This is confusing
Thread Starter
Honda-Tech Member
Joined: Aug 2008
Posts: 218
Likes: 0
From: centennial, co, united states
yeah, you would think. there are two differient connections on the new pump harness right? one goes to the plug in your pix and the other connects to the main harness. its is almost like what we are seeing under the inspection cover is the sending unit. but why would they be in differeint locations??? This is confusing
Junior Member
Joined: Jul 2009
Posts: 25
Likes: 0
IM tempted to take a damn cutoff wheel to the floor...
Honda-Tech Member
Joined: Feb 2006
Posts: 700
Likes: 0
From: 717
here's the fuel tank removal diagram from the acura service manual. from the look of this, it's under the seat, but you can see there are two access panels. maybe you guys aren't pulling enough crap out to find the pump? either way, check out the other access panel, we could be in for a surprise.
Honda-Tech Member
Joined: May 2006
Posts: 258
Likes: 1
G/L
Junior Member
Joined: Jul 2009
Posts: 25
Likes: 0
This picture you have here is your fuel gauge sending unit. The fuel pump in under the rear seat. Remove the rear seat by pulling (2) clips on each side of the backrests, and (1) 10mm bolt. Then the rear seat will pop off and you will see an access cover similar to the one above, but bigger. Remove that and you'll figure it our from there.
G/L
G/L

Honda-Tech Member
Joined: May 2006
Posts: 258
Likes: 1
Honda-Tech Member
Joined: Nov 2002
Posts: 604
Likes: 0
From: orLANdo, FL
He didnt say if it was a DA or a DC...
If it is a DA then you have to pull the tank to get to the pump, it cannot be accessed from under the seat, only the sneding unit is there.
If it is a DA then you have to pull the tank to get to the pump, it cannot be accessed from under the seat, only the sneding unit is there.
Thread Starter
Honda-Tech Member
Joined: Aug 2008
Posts: 218
Likes: 0
From: centennial, co, united states

As for MR 89EFLS i hope you got to it as well its not hard at all once you find the right access panel lol
Junior Member
Joined: Jul 2009
Posts: 25
Likes: 0

New User
Joined: Aug 2009
Posts: 1
Likes: 0
From: Edmonton, Ab, Canada
i have an 87 prelude si 2.0
how can i tell if the fuel pump is under the seat or on top of the fuel tank
i`m assuming its the fuel pump thats needs to be replaced as when i turn the ignition on it continously gargles and hums.
how can i tell if the fuel pump is under the seat or on top of the fuel tank
i`m assuming its the fuel pump thats needs to be replaced as when i turn the ignition on it continously gargles and hums.

Thread
Thread Starter
Forum
Replies
Last Post
birds_sol_94
Honda Civic / Del Sol (1992 - 2000)
14
Aug 10, 2004 01:15 PM