

how do you change the climate control bulb?

Thread Starter
Honda-Tech Member
Joined: Feb 2006
Posts: 406
Likes: 0
From: Long Beach, California, United States
My girl just got a dc5 and her bulb for her climate control is out, how do you take out the face plate of the climate control and get those ***** off? what bulbs are they? and what is the bulb size of the front blinkers on the headlights?? I need to change those too
Honda-Tech Member
Joined: Mar 2007
Posts: 386
Likes: 0
From: My Place, Ohio
http://www.sylvania.com/ConsumerProd...lacementGuide/
For you blinker bulbs and others you may need to replace.
How to remove the cluster:
Heater Control Panel Removal/Installation
NOTE:
When prying with a flat-tip screwdriver, wrap it with protective tape, and apply protective tape around the related pants, to prevent damage.
Take care not to scratch the dashboard and related parts.
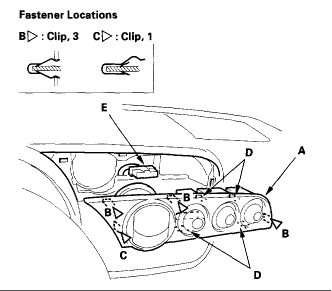
Gently pry up on the heater control panel (A) to detach the clips (B, C) and to release the hooks (D), then pull out the panel.
Disconnect the climate control unit connector (E), then remove the panel
Now how to get to the bulb itself:
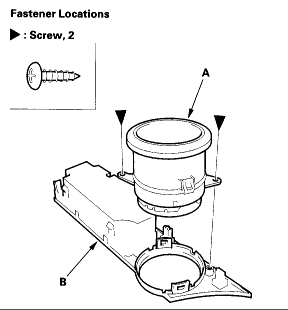
Climate Control Unit Bulb Replacement
Discharge the static electricity (which accumulated on you when you removed the climate control unit) by touching the door striker or other body parts.
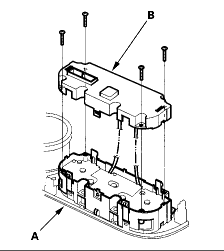
Remove the self-tapping screws, then carefully separate the climate control unit to the display (A) and the control unit (B). Do not kink or pull on the wires between the display and the control unit. Do not touch the electronic components on the printed circuit board in the control unit.
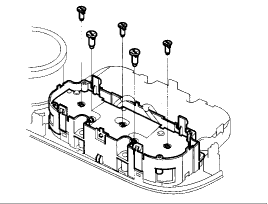
Remove the bulb(s) with a flat-tip screwdriver.
Install the bulb in the reverse order of removal
For you blinker bulbs and others you may need to replace.
How to remove the cluster:
Heater Control Panel Removal/Installation
NOTE:
When prying with a flat-tip screwdriver, wrap it with protective tape, and apply protective tape around the related pants, to prevent damage.
Take care not to scratch the dashboard and related parts.
Gently pry up on the heater control panel (A) to detach the clips (B, C) and to release the hooks (D), then pull out the panel.
Disconnect the climate control unit connector (E), then remove the panel
Now how to get to the bulb itself:
Climate Control Unit Bulb Replacement
Discharge the static electricity (which accumulated on you when you removed the climate control unit) by touching the door striker or other body parts.
Remove the self-tapping screws, then carefully separate the climate control unit to the display (A) and the control unit (B). Do not kink or pull on the wires between the display and the control unit. Do not touch the electronic components on the printed circuit board in the control unit.
Remove the bulb(s) with a flat-tip screwdriver.
Install the bulb in the reverse order of removal

Trending Topics
Honda-Tech Member
Joined: Jun 2003
Posts: 265
Likes: 0
From: OH, USA
Yes, nicely done my man! I've had my new car for about 7 weeks now and have been too lazy to do this...now maybe I'll get off my *** and do it.
Ohio FTW!
Ohio FTW!


Trial User
Joined: Dec 2014
Posts: 1
Likes: 0
I know this is unrelated but does anyone know where I can find just the turning ***** for the climate control as one of them were broken/missing when I bought my 2002 RSX. I looked all over amazon, eBay and other places online with no luck. I was told that you could easily find them but so far, no luck! 

Trial User
Joined: Apr 2019
Posts: 1
Likes: 0
http://www.sylvania.com/ConsumerProd...lacementGuide/
For you blinker bulbs and others you may need to replace.
How to remove the cluster:
Heater Control Panel Removal/Installation
NOTE:
When prying with a flat-tip screwdriver, wrap it with protective tape, and apply protective tape around the related pants, to prevent damage.
Take care not to scratch the dashboard and related parts.

Gently pry up on the heater control panel (A) to detach the clips (B, C) and to release the hooks (D), then pull out the panel.
Disconnect the climate control unit connector (E), then remove the panel

Now how to get to the bulb itself:
Climate Control Unit Bulb Replacement
Discharge the static electricity (which accumulated on you when you removed the climate control unit) by touching the door striker or other body parts.

Remove the self-tapping screws, then carefully separate the climate control unit to the display (A) and the control unit (B). Do not kink or pull on the wires between the display and the control unit. Do not touch the electronic components on the printed circuit board in the control unit.

Remove the bulb(s) with a flat-tip screwdriver.
Install the bulb in the reverse order of removal
For you blinker bulbs and others you may need to replace.
How to remove the cluster:
Heater Control Panel Removal/Installation
NOTE:
When prying with a flat-tip screwdriver, wrap it with protective tape, and apply protective tape around the related pants, to prevent damage.
Take care not to scratch the dashboard and related parts.
Gently pry up on the heater control panel (A) to detach the clips (B, C) and to release the hooks (D), then pull out the panel.
Disconnect the climate control unit connector (E), then remove the panel
Now how to get to the bulb itself:
Climate Control Unit Bulb Replacement
Discharge the static electricity (which accumulated on you when you removed the climate control unit) by touching the door striker or other body parts.
Remove the self-tapping screws, then carefully separate the climate control unit to the display (A) and the control unit (B). Do not kink or pull on the wires between the display and the control unit. Do not touch the electronic components on the printed circuit board in the control unit.
Remove the bulb(s) with a flat-tip screwdriver.
Install the bulb in the reverse order of removal

Honda-Tech Member
Joined: Oct 2015
Posts: 14
Likes: 0
THANKS! One more question - - is this to replace the orange light that goes on when you press the button, or the background light that illuminates the button itself so you can see what the button says?
Honda-Tech Member
Joined: Apr 2002
Posts: 873
Likes: 0
From: Westwood, NJ, USA
Background lighting. Those little slits fro recirc, a/c, and rear defrost are inside those buttons. Swapping them out would be a huge PITA.
Honda-Tech Member

Joined: May 2000
Posts: 392
Likes: 0
From: Lower Hudson Valley, NY


Honda-Tech Member
Joined: Sep 2015
Posts: 4
Likes: 0
Woot Ohio...
There are some nice plastic interior trim tool sets on Amazon if you want to get some things to help you pry that stuff out that will be a lot more gentle with the dash and plastic trim parts. You can still break stuff, but it's not really expensive at all and Mine comes with like 10 tools for 20 different types of pry/working ends.
There are some nice plastic interior trim tool sets on Amazon if you want to get some things to help you pry that stuff out that will be a lot more gentle with the dash and plastic trim parts. You can still break stuff, but it's not really expensive at all and Mine comes with like 10 tools for 20 different types of pry/working ends.

Thread
Thread Starter
Forum
Replies
Last Post
mikej94civex
Honda Civic / Del Sol (1992 - 2000)
2
Jan 26, 2010 01:18 PM
zertoir
Honda Civic / Del Sol (1992 - 2000)
4
May 1, 2004 06:41 PM