

How to rebuild your distributer using a different model Dizzy

Thread Starter
Junior Member
Joined: Oct 2007
Posts: 239
Likes: 2
From: San Clemente, CA, USA
Iv always thought about this becuase there was one time i was in need of a new dizzy for my SOHC ZC (D16), and it was kind of a hard part to find at the moment I needed it. well needless to say one swap later and i was needing a new Dizzy for my B16A, so i decided to rebuild the B16 dizzy using the SOHC Vtec dizzy; this is how its done:
gather up your materials you will need:
your donator dizzy
your broken dizzy that needs a frankenstien transplant
screw drivers
ratchet and sockets
needle nose pliers
misc tools you may need for problems you may incur
plastic garbage bag
paper clip
**********************both Dizzys must be the same wiring models ie OBD0 OBD1 OBD2a***********************
First start off by pulling your dizzy off the motor, go ahead and pull the cap off so you don have to worry about your firing order, after you have removed the dizzy, plug the cam orifice with your plastic bag so you wont leak the oil down your block.

<<<<<<<<<<<<<<<<<<<************************THE FOLLOWING INSTRUCTIONS MUST BE COMPLETED ON BOTH DIZZYS***********************>>>>>>>>>>>>>>>>>>>>> >>
Now remove the two screws that secure the neg and pos wires to the shock tower

The shock tower is ready to be removed, two screw on the side of the dizzy will be all it takes.

now remove the shock tower be very carefull not to slam this part around or lay directly on concrete. Then the three (3) screws on the rotor spindle housing.

Now remove the two screws on the dizzys chip.

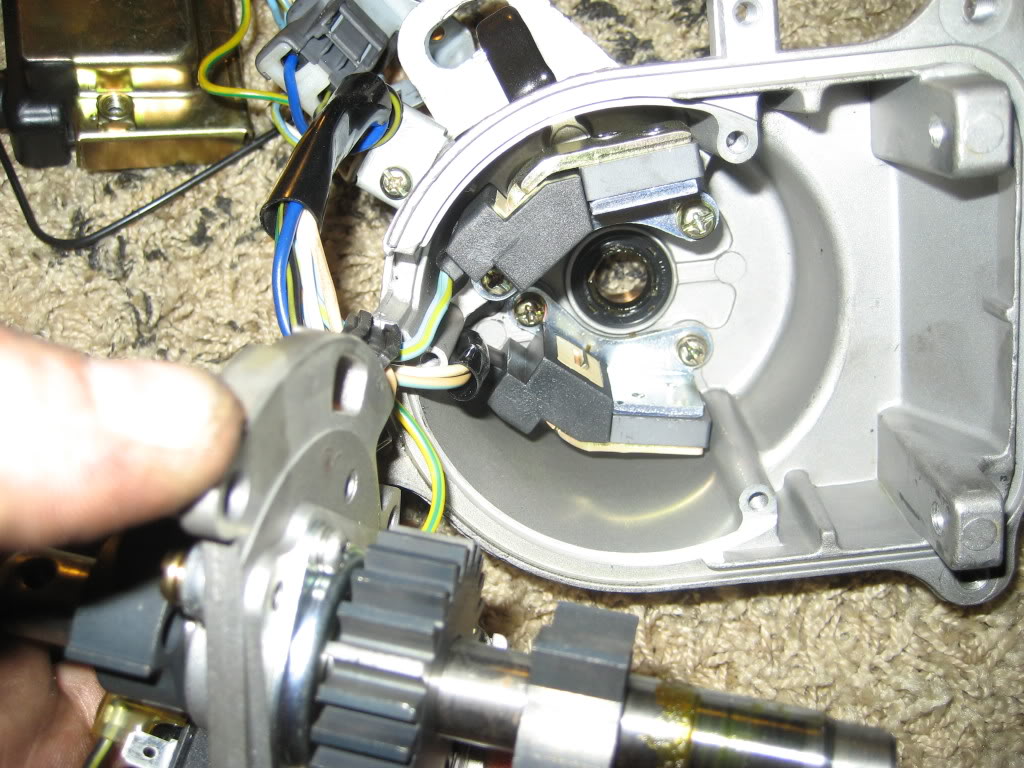
The next two (2) screws you will remove are on the first sensor your top dead center sensor.

Flip the dizzy over and mark the end, I used White Out. BE SURE TO MARK THE CENTER ALSO THIS IS SO YOU PUT THE PIECE BACK ON THE RIGHT WAY this is the only way to make a dizzy 180 degress out of whack.

Next is the ring keeper on the input shaft that turns the dizzy of the intake cam. Its easy if you turn the ring around to the Coter pin hole. Move it up and out of the way so the Coter pin will come out.

Using your handy dandy paper clip push the Coter pin out and remove the end piece.

Now its time to remove the spindle and spindle housing, you may need to push on the other side to get it out.
At this point both distributors should look like this:
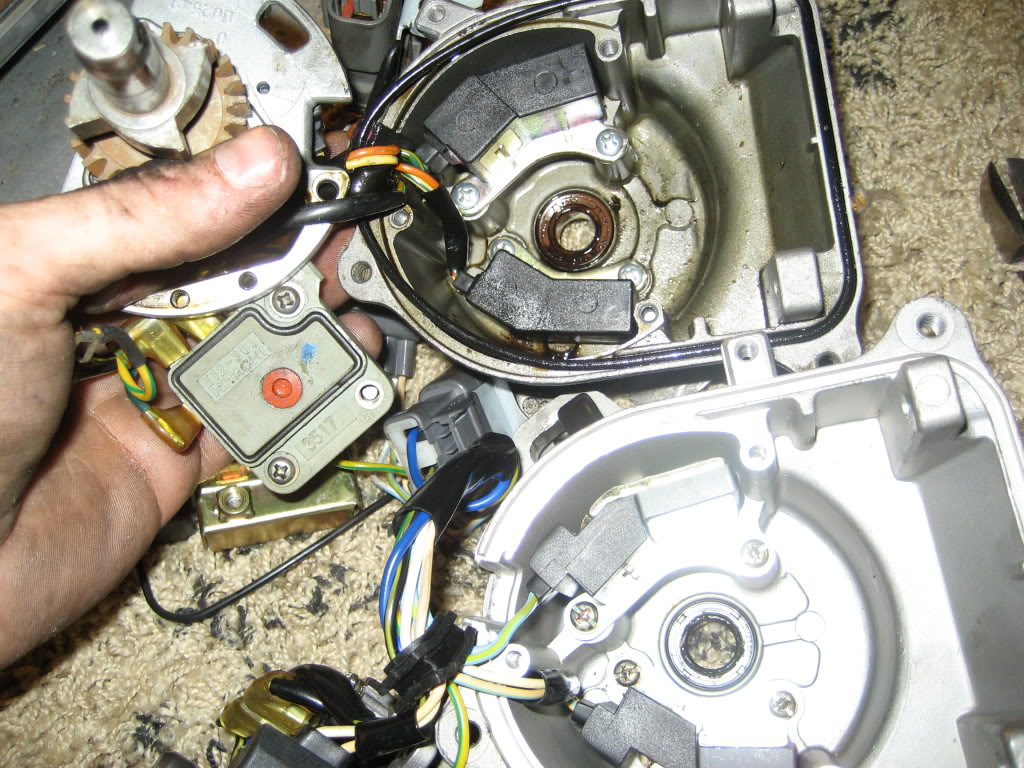
Now remove the last two sensors by removing the marked screws. Its easier if you remove the ones marked in BLUE first.

Now remove the the sensors and you have a bare distributor housing!

now that they are bare the sensors will come off the spindle/spindle housing, go ahead and remove them and install the sensors off the other dizzy, you may if you wish swap the dizzy chips.
!!!!!!!!!!!!!!!!!!!!!!!!!!!!!!!!!!!!!!!!!!!!!!!!!! !!!!!!!!!!!!!!!!!!!!!!!!!!!!!!!!!!!!!!!!!!!!IMPORT ANT!!!!!!!!!!!!!!!!!!!!!!!!!!!!!!!!!!!!!!!!!!!!!!! !!!!!!!!!!!!!!!!!!!!!!!!!!!!!!!!!!!!!!!!!!!!!
when you put the sensors in, finger tighten them down and adjust them closest to the center of the dizzy you will need to spin the spindle to get the sensors to push themsleves outward to where they barely touch. Wiggleing the housing in SMALL circles will help with this, THIS IS VERY TIDEOUS ONLY ADJUST AND TIGHTEN DOWN ONE SENSOR AT A TIME REMOVEING THE HOUSING AND TIGHTENING THE SENSOR AFTER EACH ADJUSTMENT START WITH THE LOWEST SENSOR FIRST!!!!. besure that the housing lines up with its perspective holes to insure the sensors have clearance when the housing is screwed in....NOTE: the sensors can never be too close, but if they are too far away they will throw CEL codes and missfire.
Now you can reassemble the dizzy. Be sure to line up your marks on the input shaft piece on the end of the dizzy.
+++++++++++++++++++++++++++++++++++++++NOTES++++++ ++++++++++++++++++++++
The reason you cannot just swap the housing and sensors from/to two (2) different model distributors is because the pitch of the distributor on the motor and the angle of the sensors mounted permanently to the spindle shaft.
When screwing the wires into the shock tower do not over tighten the screws are weak and you can bust the female end the screw goes into making your shock tower useless.
Feel free to PM for any questions
gather up your materials you will need:
your donator dizzy
your broken dizzy that needs a frankenstien transplant
screw drivers
ratchet and sockets
needle nose pliers
misc tools you may need for problems you may incur
plastic garbage bag
paper clip
**********************both Dizzys must be the same wiring models ie OBD0 OBD1 OBD2a***********************
First start off by pulling your dizzy off the motor, go ahead and pull the cap off so you don have to worry about your firing order, after you have removed the dizzy, plug the cam orifice with your plastic bag so you wont leak the oil down your block.
<<<<<<<<<<<<<<<<<<<************************THE FOLLOWING INSTRUCTIONS MUST BE COMPLETED ON BOTH DIZZYS***********************>>>>>>>>>>>>>>>>>>>>> >>
Now remove the two screws that secure the neg and pos wires to the shock tower
The shock tower is ready to be removed, two screw on the side of the dizzy will be all it takes.
now remove the shock tower be very carefull not to slam this part around or lay directly on concrete. Then the three (3) screws on the rotor spindle housing.
Now remove the two screws on the dizzys chip.
The next two (2) screws you will remove are on the first sensor your top dead center sensor.
Flip the dizzy over and mark the end, I used White Out. BE SURE TO MARK THE CENTER ALSO THIS IS SO YOU PUT THE PIECE BACK ON THE RIGHT WAY this is the only way to make a dizzy 180 degress out of whack.
Next is the ring keeper on the input shaft that turns the dizzy of the intake cam. Its easy if you turn the ring around to the Coter pin hole. Move it up and out of the way so the Coter pin will come out.
Using your handy dandy paper clip push the Coter pin out and remove the end piece.
Now its time to remove the spindle and spindle housing, you may need to push on the other side to get it out.
At this point both distributors should look like this:
Now remove the last two sensors by removing the marked screws. Its easier if you remove the ones marked in BLUE first.
Now remove the the sensors and you have a bare distributor housing!
now that they are bare the sensors will come off the spindle/spindle housing, go ahead and remove them and install the sensors off the other dizzy, you may if you wish swap the dizzy chips.
!!!!!!!!!!!!!!!!!!!!!!!!!!!!!!!!!!!!!!!!!!!!!!!!!! !!!!!!!!!!!!!!!!!!!!!!!!!!!!!!!!!!!!!!!!!!!!IMPORT ANT!!!!!!!!!!!!!!!!!!!!!!!!!!!!!!!!!!!!!!!!!!!!!!! !!!!!!!!!!!!!!!!!!!!!!!!!!!!!!!!!!!!!!!!!!!!!
when you put the sensors in, finger tighten them down and adjust them closest to the center of the dizzy you will need to spin the spindle to get the sensors to push themsleves outward to where they barely touch. Wiggleing the housing in SMALL circles will help with this, THIS IS VERY TIDEOUS ONLY ADJUST AND TIGHTEN DOWN ONE SENSOR AT A TIME REMOVEING THE HOUSING AND TIGHTENING THE SENSOR AFTER EACH ADJUSTMENT START WITH THE LOWEST SENSOR FIRST!!!!. besure that the housing lines up with its perspective holes to insure the sensors have clearance when the housing is screwed in....NOTE: the sensors can never be too close, but if they are too far away they will throw CEL codes and missfire.
Now you can reassemble the dizzy. Be sure to line up your marks on the input shaft piece on the end of the dizzy.
+++++++++++++++++++++++++++++++++++++++NOTES++++++ ++++++++++++++++++++++
The reason you cannot just swap the housing and sensors from/to two (2) different model distributors is because the pitch of the distributor on the motor and the angle of the sensors mounted permanently to the spindle shaft.
When screwing the wires into the shock tower do not over tighten the screws are weak and you can bust the female end the screw goes into making your shock tower useless.
Feel free to PM for any questions

Seagull Management
Joined: Jun 2008
Posts: 15,150
Likes: 26
From: Miramichi, NB, Canada
Overall good write up. I have been intending to do a similar write up for a long time, its actually about 70% done. A few small things i'd like to point out. The CYP/CKP/TDC sensors have a small bump on the bottom that fits into corresponding holes in the distributor case so that the sensors will only fit in one place and can't be adjusted (yours may be different as its an aftermarket distributor). And what you refer to as a shock tower is the coil. Otherwise its a good write up that has been needed for years.
Honda-Tech Member
Joined: Mar 2008
Posts: 2,000
Likes: 0
From: NW
excellent write up, does anyone know the part name/number of the piece that goes into the two spots on the intake cam? Is it the ring keeper? I need to know because one of the two pieces that slide into the intake cam broke off and now i am leaking 
Thread Starter
Junior Member
Joined: Oct 2007
Posts: 239
Likes: 2
From: San Clemente, CA, USA
Overall good write up. I have been intending to do a similar write up for a long time, its actually about 70% done. A few small things i'd like to point out. The CYP/CKP/TDC sensors have a small bump on the bottom that fits into corresponding holes in the distributor case so that the sensors will only fit in one place and can't be adjusted (yours may be different as its an aftermarket distributor). And what you refer to as a shock tower is the coil. Otherwise its a good write up that has been needed for years.
and the piece that keeps the oil in the head off the dizzy i never knew what that was called either,
Last edited by duefuss; Dec 10, 2008 at 09:21 PM.

Honda-Tech Member
Joined: Jun 2019
Posts: 17
Likes: 2
I know I'm digging up an 11 year old thread but I just have to say beautiful write up. My firing order has been 180� out for God knows how long and after seeing that you can remove the cotter pin on the input shaft of the dizzy and flip it 180�, I was able to flip my firing order back to normal after doing so. You saved me a lot of time, trouble, and money, thanks again!
Premium Member


Joined: Mar 2004
Posts: 3,108
Likes: 257
From: Estados Unidos
This thread has some great pictures!
I thought I saw somewhere a link to where one could order bearings for these distributors?
I have a dizzy that was softly squeaking, and had red dust inside - pretty sure that's my sign it is time to replace bearings!
I thought I saw somewhere a link to where one could order bearings for these distributors?
I have a dizzy that was softly squeaking, and had red dust inside - pretty sure that's my sign it is time to replace bearings!
Trending Topics
Premium Member
Joined: Mar 2004
Posts: 3,108
Likes: 257
From: Estados Unidos
Overall good write up. I have been intending to do a similar write up for a long time, its actually about 70% done. A few small things i'd like to point out. The CYP/CKP/TDC sensors have a small bump on the bottom that fits into corresponding holes in the distributor case so that the sensors will only fit in one place and can't be adjusted (yours may be different as its an aftermarket distributor). And what you refer to as a shock tower is the coil. Otherwise its a good write up that has been needed for years.


Honda-Tech Member
Joined: May 2008
Posts: 20
Likes: 2
From: brooklyn, ny, usa
This is a great article. I followed it but forgot to mark the bottom of the dizzy for the 180 degree, is there any way to know for sure how to set this right? Or do I have to bolt it up and find out?
Honda-Tech Member
Joined: Apr 2018
Posts: 3,716
Likes: 349
Compare this position of the camshaft end to the position of the distributor end when the distributor rotor is aligned with plug wire 1 in the distributor cap.
It will be obvious whether or not your distributor has been assembled 180-degrees out of phase by making this visual comparison. You have a 50:50 chance for success!


Last edited by muellersfan; Jun 22, 2020 at 08:26 PM.
Fish Twig
Joined: Nov 2005
Posts: 15,554
Likes: 309
From: Still hunting that foo up there
Another way I've found to know if I put in the distributor correctly is that it only goes in 'smoothly' in one way. But what muellerfan posted is more technical.
Honda-Tech Member
Joined: Apr 2018
Posts: 3,716
Likes: 349
FYI Tony -- A disassembled distributor mistakenly reassembled 180-degrees out of phase would still install "smoothly".
Premium Member
Joined: Mar 2004
Posts: 3,108
Likes: 257
From: Estados Unidos
Honda-Tech Member
Joined: May 2008
Posts: 20
Likes: 2
From: brooklyn, ny, usa
@mullersfan - dude you are awesome!! in the old days that how we used to set the distributor (and thats going back to a 1975 Honda Civic CVCC i owned). But yes, now that you mentioned that, with the #1 cylinder on top of the compression stroke, the rotor should be pointing near the #1 on the cap (i think the firing is set for 12 degrees BTDC).
Makes perfect sense. My distributor cap does not have the C (#4 cyl) mark, but it does have to A, so straight across is the #1. Already took some whiteout and marked that.
Thanks again.
Makes perfect sense. My distributor cap does not have the C (#4 cyl) mark, but it does have to A, so straight across is the #1. Already took some whiteout and marked that.
Thanks again.

Trial User
Joined: Jan 2011
Posts: 1
Likes: 0
Last edited by Poodlehead; Oct 19, 2022 at 10:35 PM. Reason: Add more to it

Trial User
Joined: Sep 2023
Posts: 1
Likes: 0
have all came to the same conclusion. It�s got power but it�s not getting past the distributor to the rest of the car.
I�ve bought 2 distributors 1st was for a civic si 90?something model. It fit perfectly on the engine but would not fire.
2nd: I ordered an actual Japanese obd0 distributor for a b16 but the plugs are both female.
PLZ IF YOU HAVE ANY IDEA OF WHAT I NEED TO DO PLZ HELP ME! I wrecked this car 3.5 weeks after I bought it back in 2015-16.
bought all the parts I needed to replace a few months afterwards. But alas my poor civic has just set there until I paid a man to fix the body &was supposed to get it running
but no such luck
Premium Member
Joined: Mar 2004
Posts: 3,108
Likes: 257
From: Estados Unidos
Hey man I�ve got a 1997 Honda civic with a 91 b16 that�s apparently obd0 the car is OBD2. Everybody that has checked it out
have all came to the same conclusion. It�s got power but it�s not getting past the distributor to the rest of the car.
I�ve bought 2 distributors 1st was for a civic si 90?something model. It fit perfectly on the engine but would not fire.
2nd: I ordered an actual Japanese obd0 distributor for a b16 but the plugs are both female.
PLZ IF YOU HAVE ANY IDEA OF WHAT I NEED TO DO PLZ HELP ME! I wrecked this car 3.5 weeks after I bought it back in 2015-16.
bought all the parts I needed to replace a few months afterwards. But alas my poor civic has just set there until I paid a man to fix the body &was supposed to get it running
but no such luck
Is the engine harness all OBD2?

Thread
Thread Starter
Forum
Replies
Last Post
mikezcdx
Honda CRX / EF Civic (1988 - 1991)
4
Mar 13, 2006 02:39 PM