


 Apr 6, 2015, 10:07 AM
Last edit by: IB Advertising
See related guides and technical advice from our community experts:
Browse all: Engine and Powertrain
- Honda Accord: How to replace head gasket
Step by step instructions for do-it-yourself repairs.
Browse all: Engine and Powertrain

How to: Replace Headgasket F22B2
Thread Starter
Honda-Tech Member
Joined: May 2002
Posts: 471
Likes: 0
From: Florida
Ok, so I have been on this board forever (it feels like) and I see countless threads of questions regarding headgasket repair. I had to do mine so I took some pics most of the way. This is not something that I reccomend for a beginner mechanic so im gonna skip some stupid steps and outline the specifics .
There are many ways to remove the head of this car, and also everyones setup is a little different. My car is turbo, so i had a few extra steps not seen in the pics below. It wouldve been 10x easier if it was stock IMO.
If something isnt worded right or correctly just IM me and i can edit the OP.
.................................................. .................................................. ..................
Tools needed
Floor Jack
Jack stands
Screwdrivers/needlenose pliers
1/4" sockets set 10mm-19mm
1/4" drive extentions
3/8" socket set 10mm-19mm
3/8"drive extentions
3/8" Swivel joint
opened and closed end wrenches 10,12,14,17mm
Timing light
Torque wrench capable of 8.7 ft/lbs - 72ft/lbs
.................................................. .................................................. ..................
Step one disconnect neg battery term. and drain ALL fluids ! Oil and Coolant !!!!
Remove header/Exhaust Manifold.
Remove cylinder num1 spark plug wire/plug.
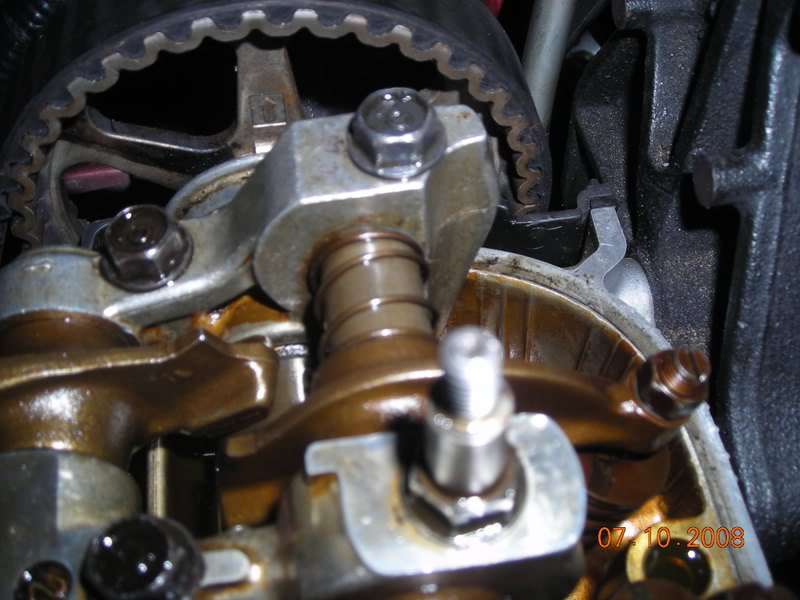
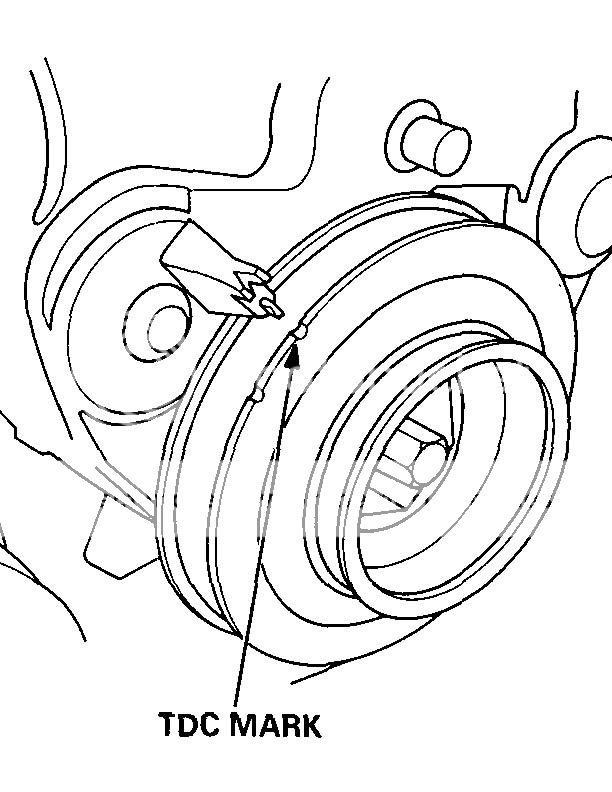
Align to TDC.
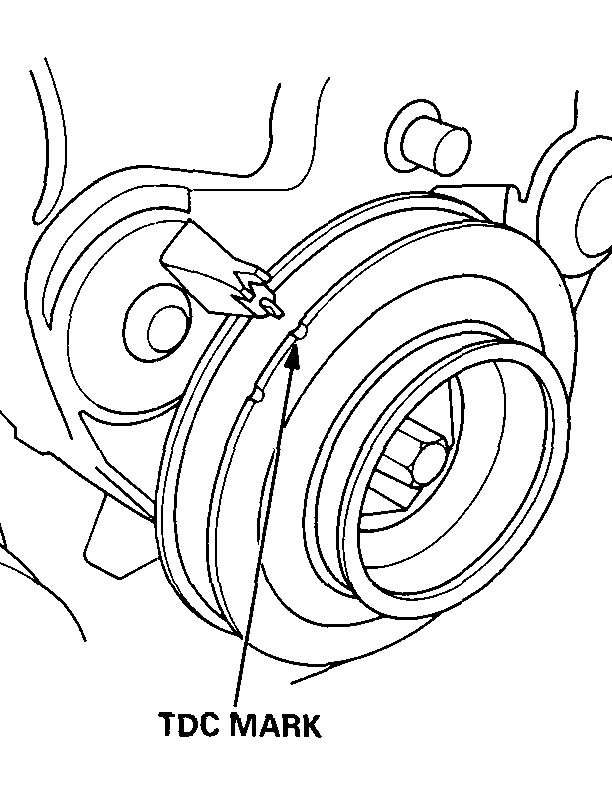
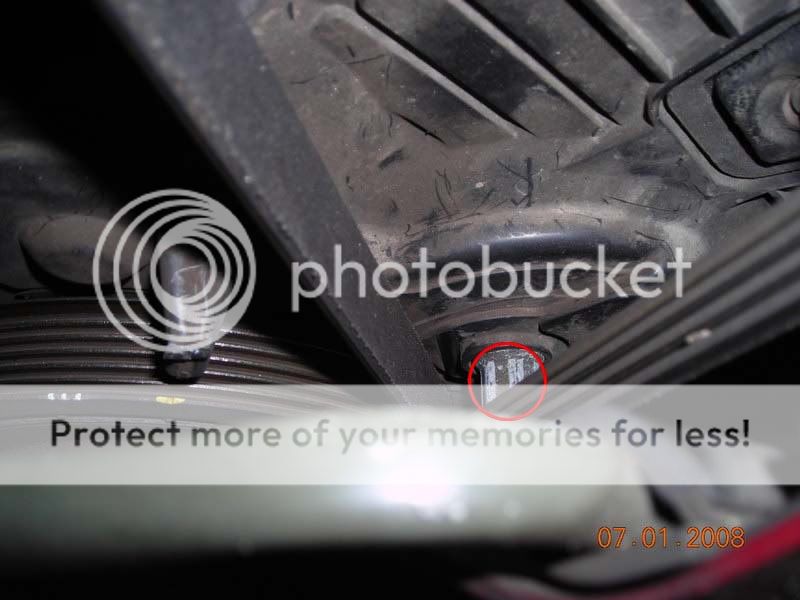
Rotate bottom crank pulley from wheel well with 19mm socket counter clockwise until youve hit the single timing mark shown here.
Or you can place an extension in the spark plug tube and feel the piston hit the climax.

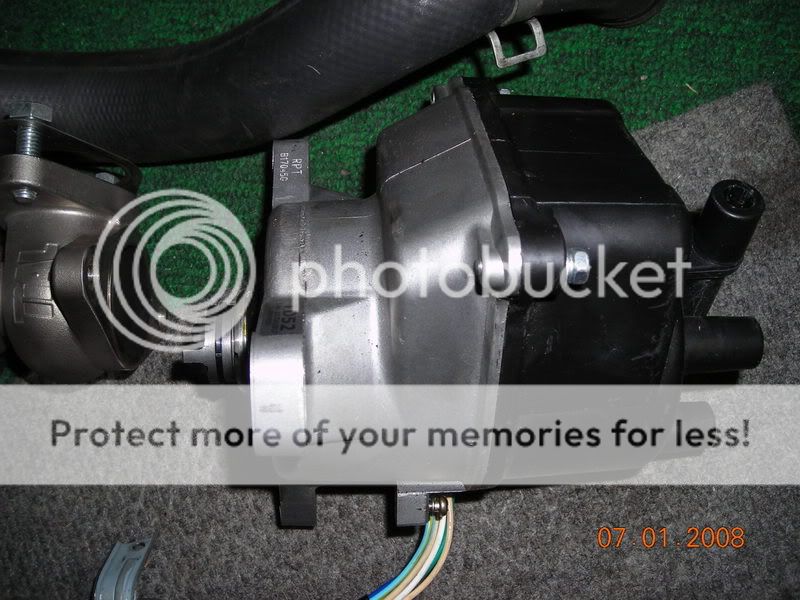
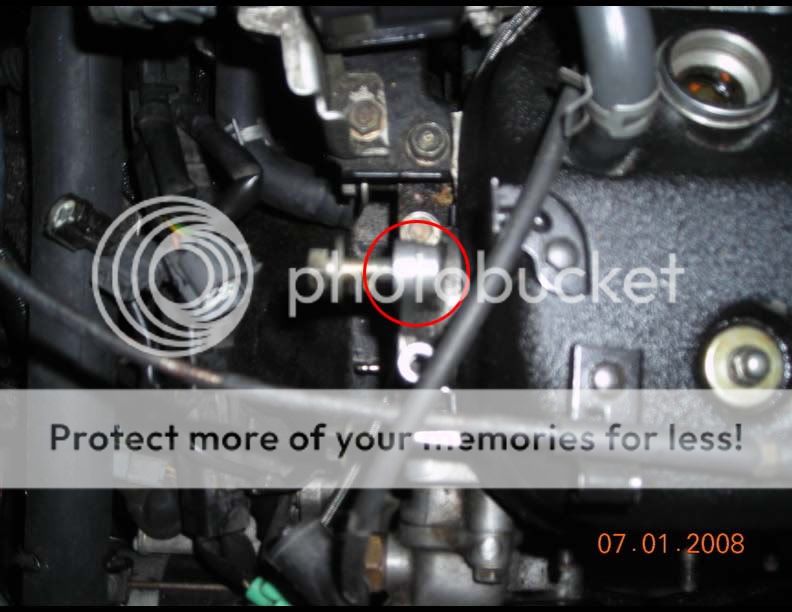
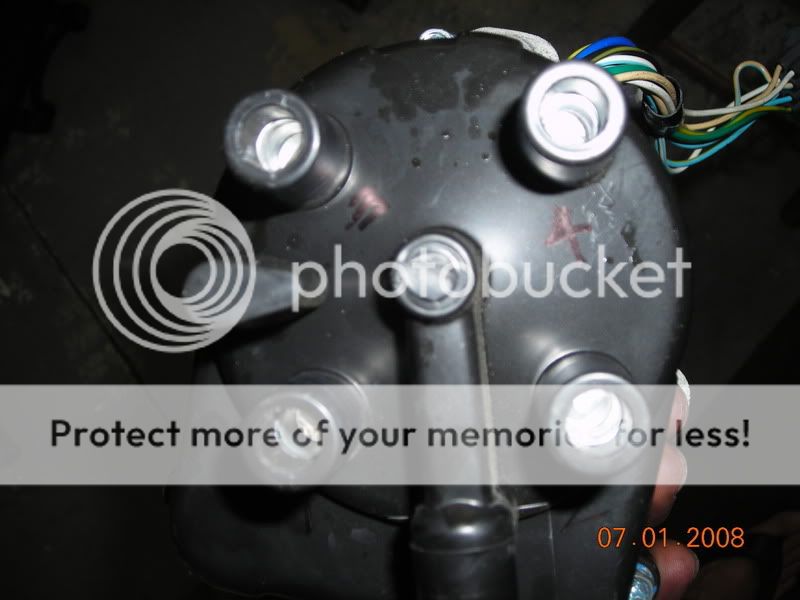
Before removing the distributor, Id suggest marking the dizzy/housing with a sharpie marker to give you a ball park on where to set your timing for when its time to reinstall. this step is not required but reccomended. (sorry for the crappy pic, you cant see well it but its marked)
on the dizzy
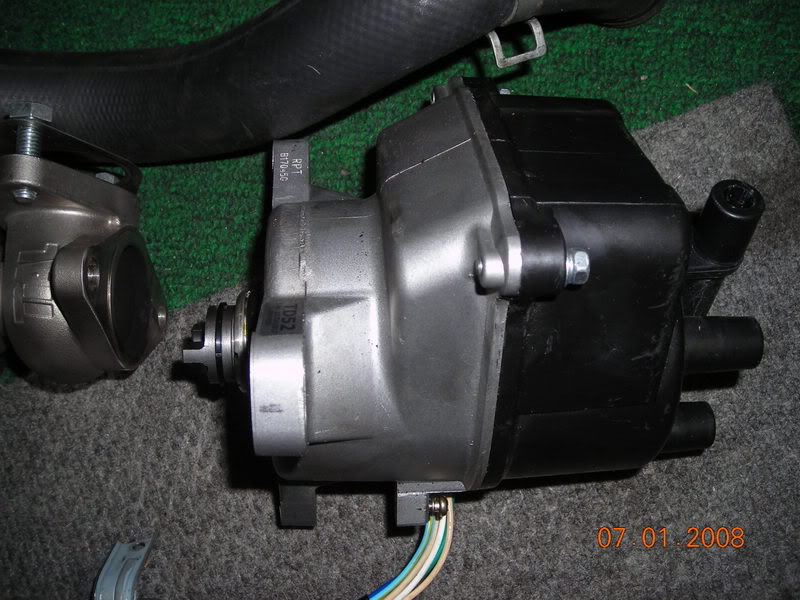
where the dizzy bolts up

and also which plugs went to which cylinder. on the motor its 4-3-2-1. On the dizzy its
3 - 4
1 | 2
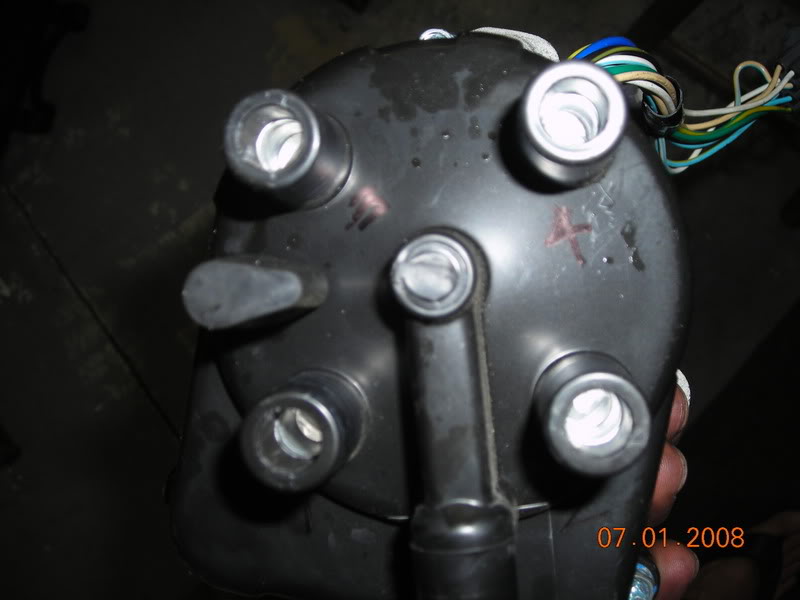
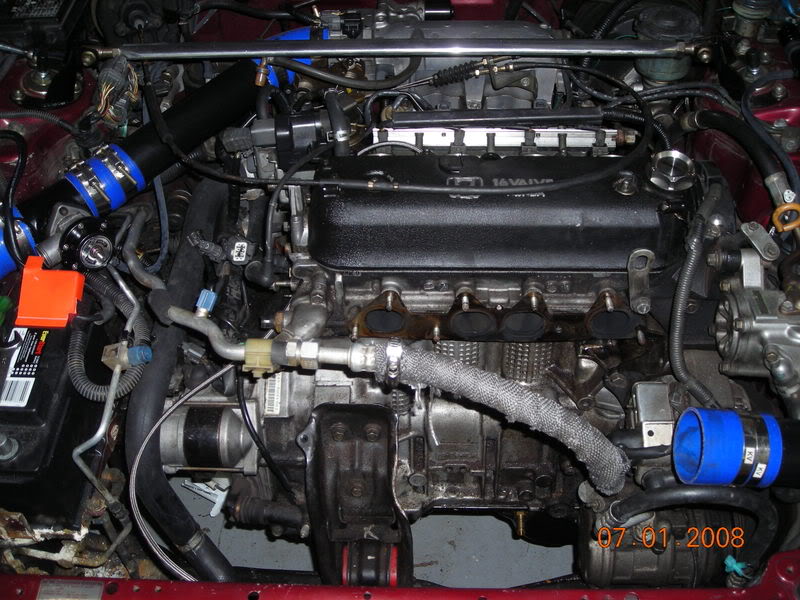
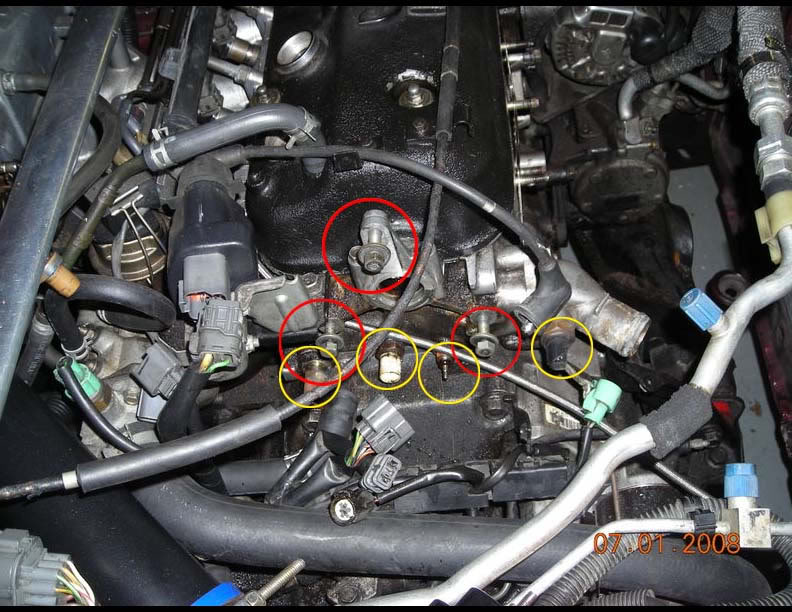
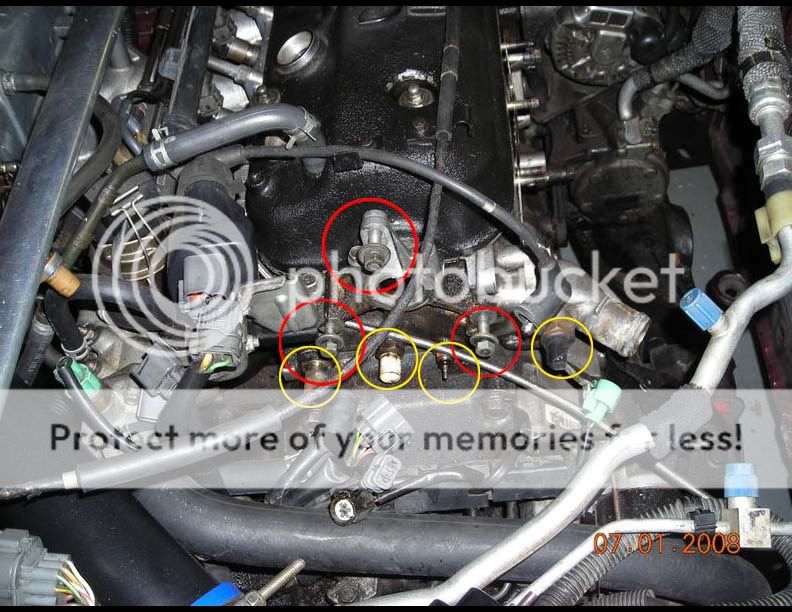
After marking, unclip the dizzy from coil and remove 3 bolts in red and set aside. Also unclip heater hose and sensors shown in yellow.
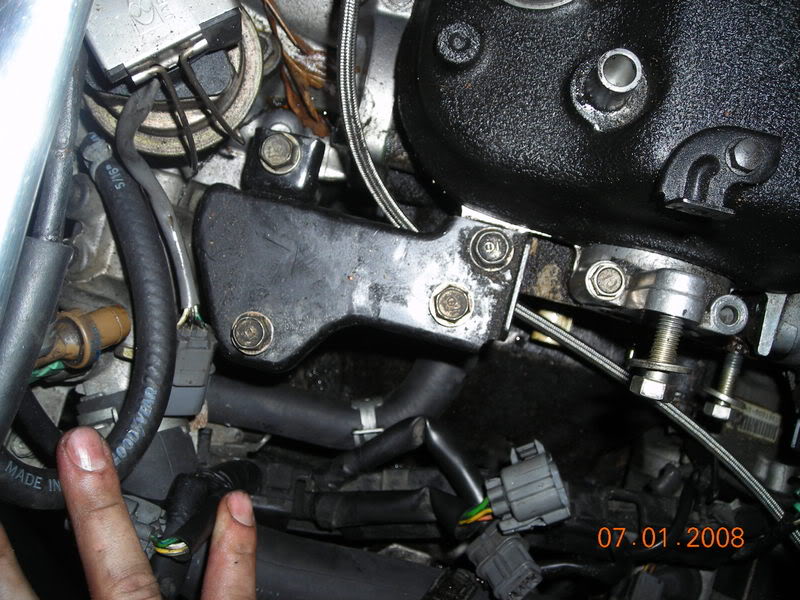
Remove the clips from coil to the wiring harness and unbolt these 4 bolts. The coil and mounting bracket will come right off. After that remove this black mounting plate.
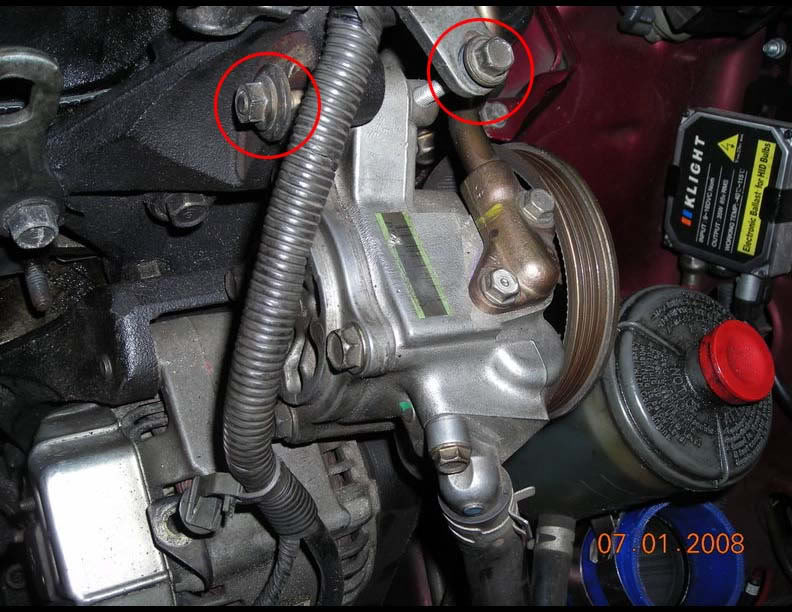
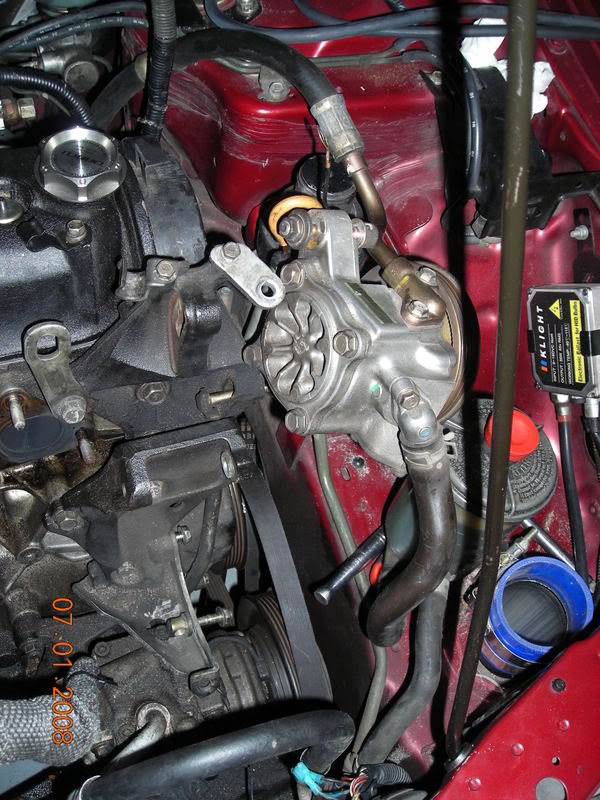
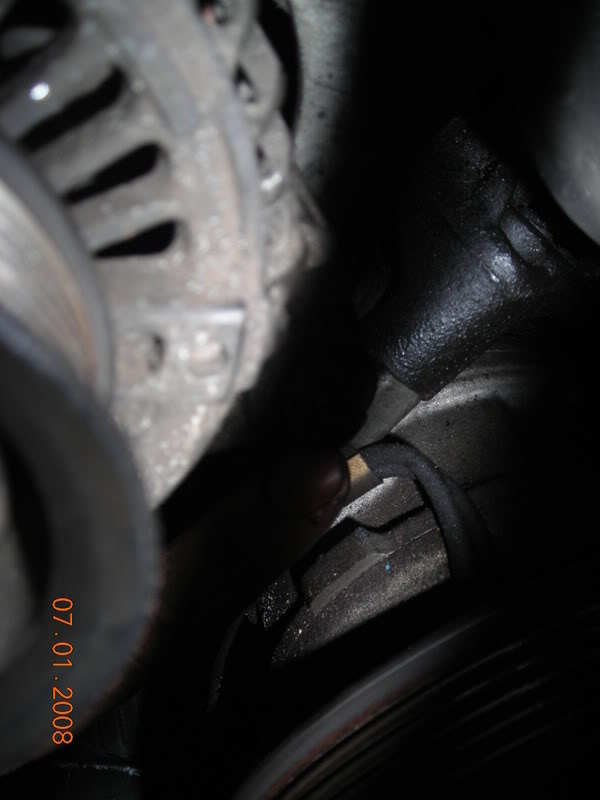
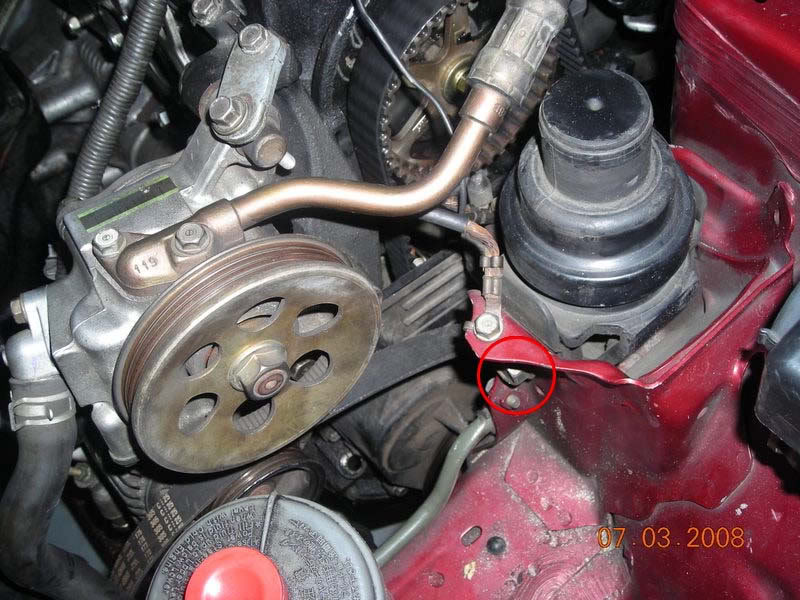
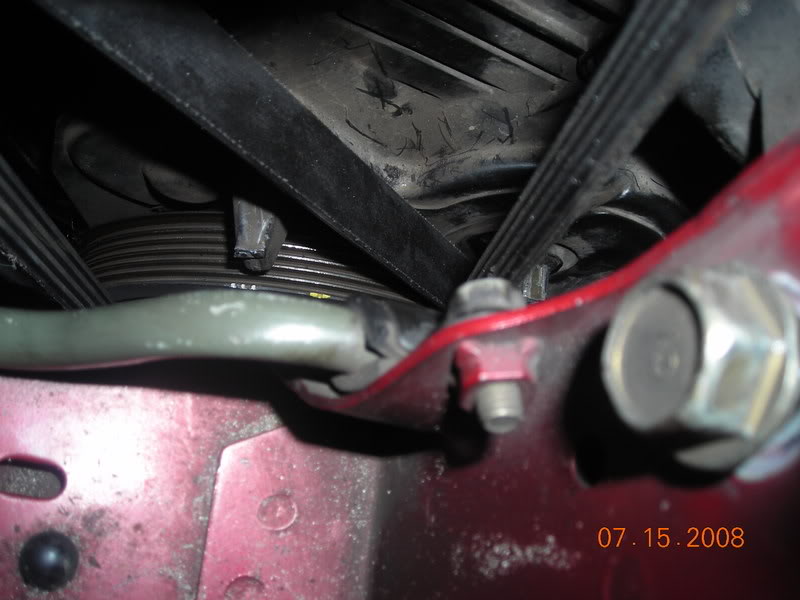
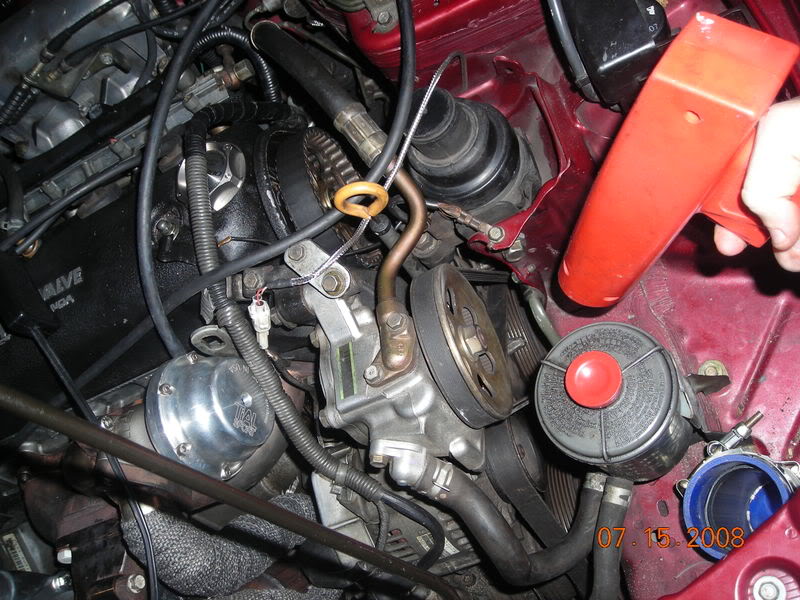
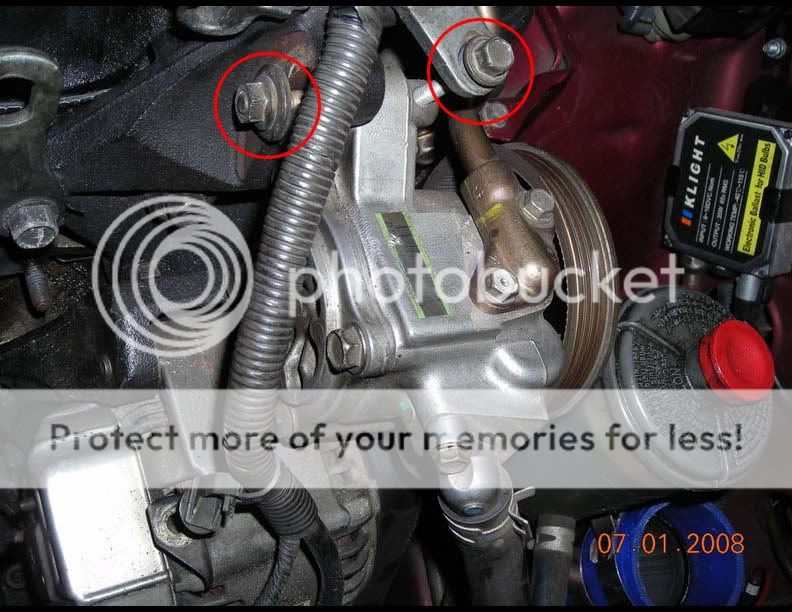
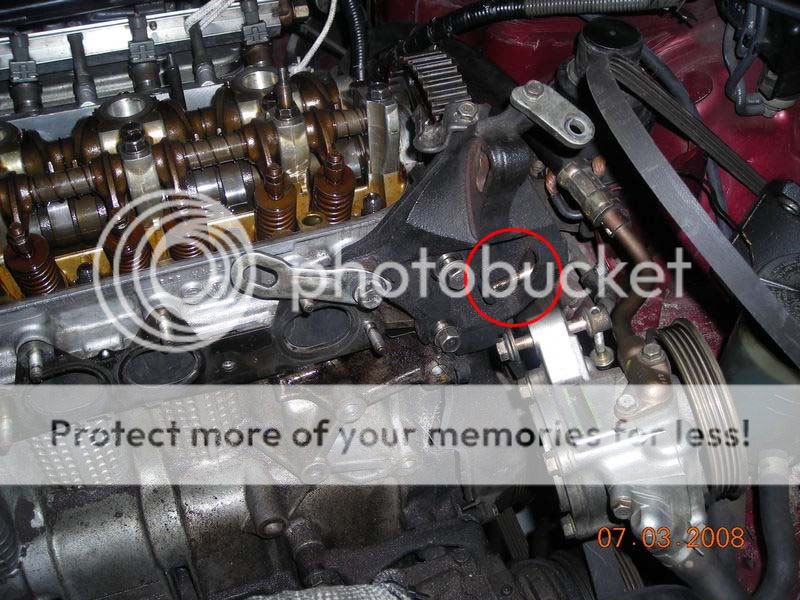
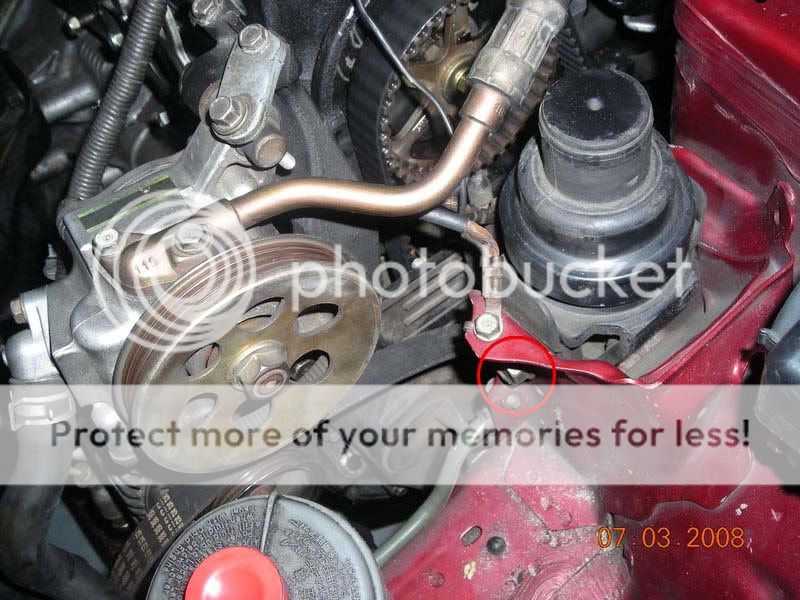
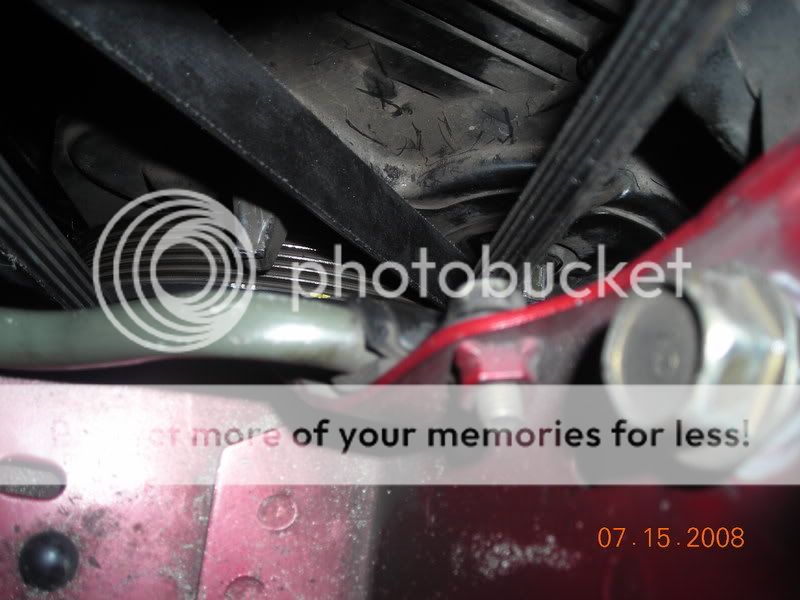
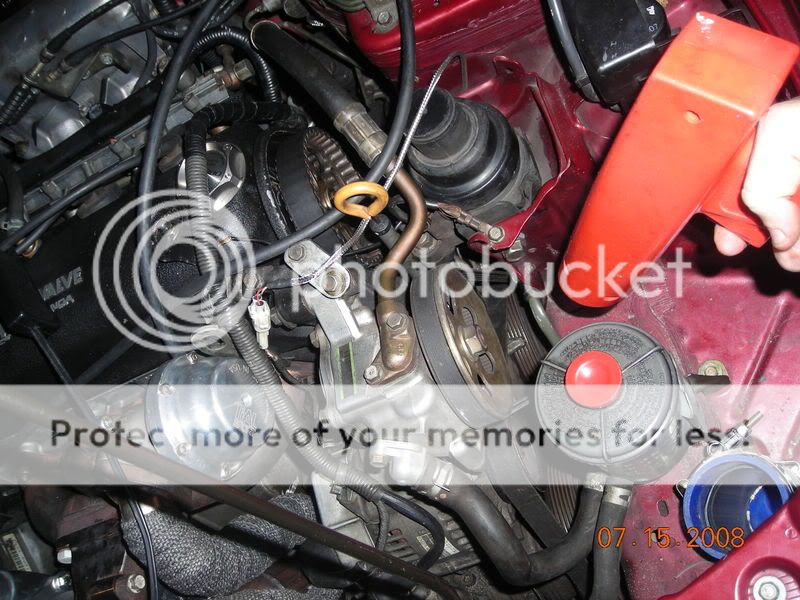
Now time to move to the driver side of the motor. Loosen the Power steering pump tensioner (circled on right), then loosen other nut circled. To remove the pump from bracket there is one more bolt with a U joint on the end under the whole assembly.
Belt should be loose and is time to be removed.
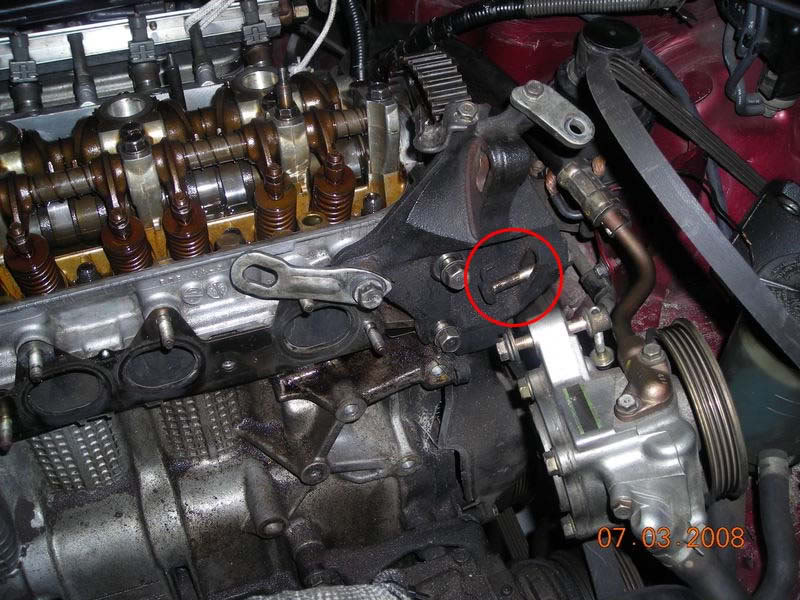
I just rest it on the reservoir.
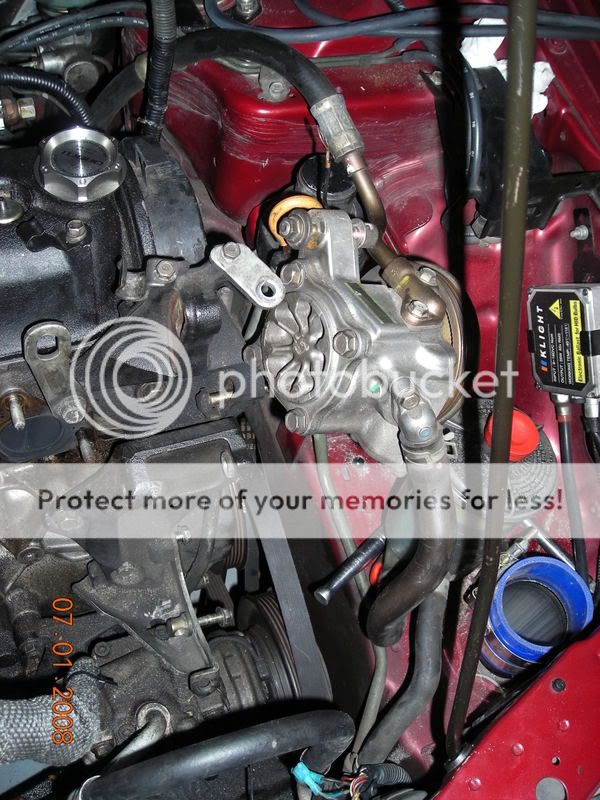
Next is the alternator. Unlike the D series the alt is in the front and is PITA to get out of its mounting bracket. It just takes some persuation. The tensioner is UNDER the alt, then just like the power steering unbolt on side. (best pics i could take)
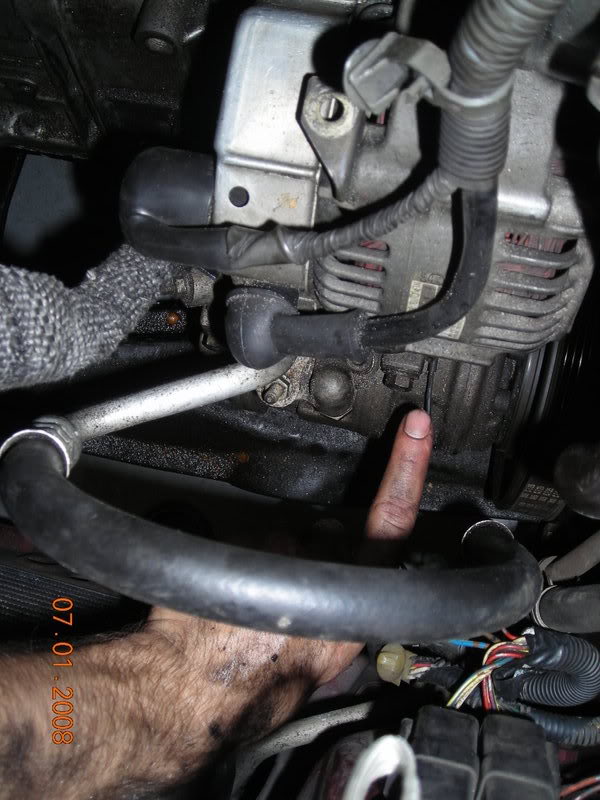
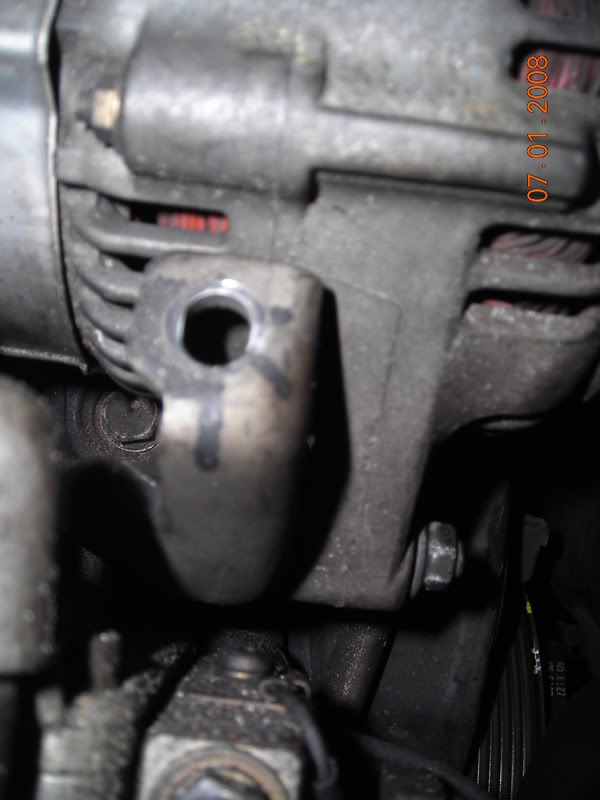
Again to make it easy, I leave it all connected and just kinda rotate it and set it on the strut tower to the side.
Remove mounting brackets that were holding alt, powersteering pump.
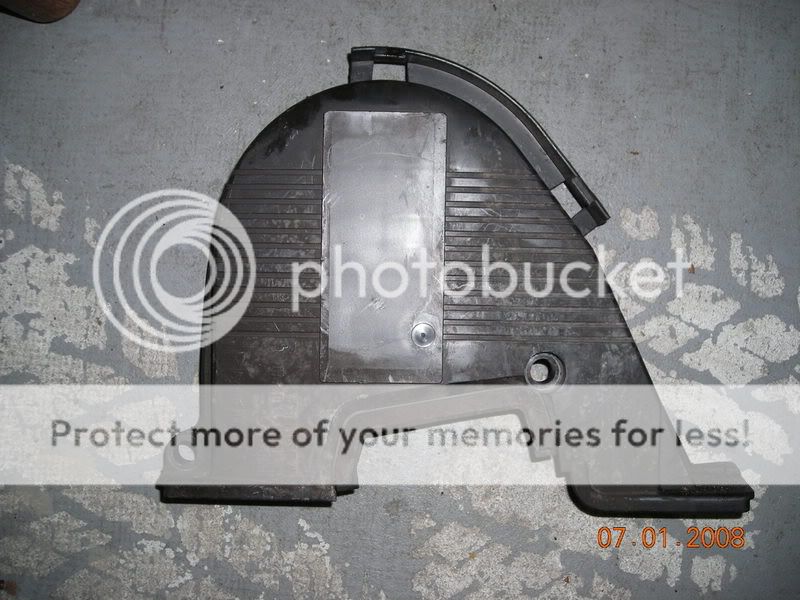
and top timing cover(2 bolts).
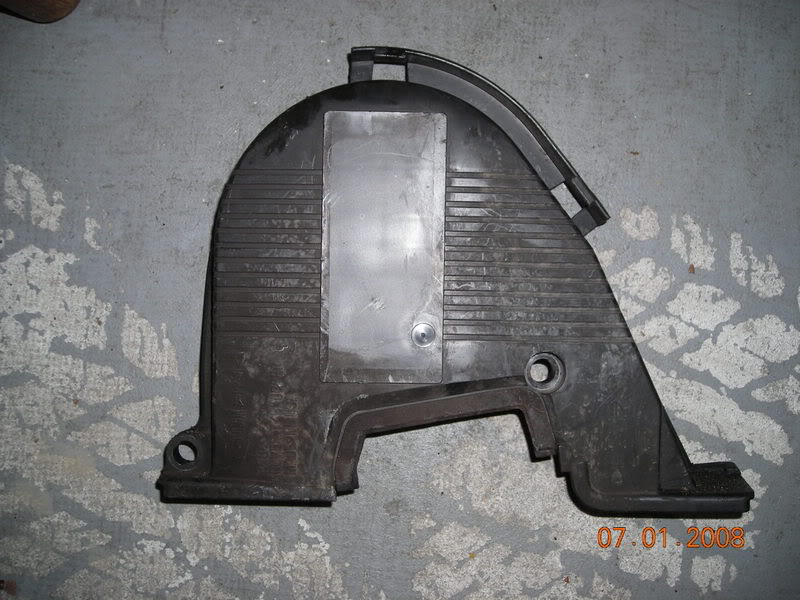
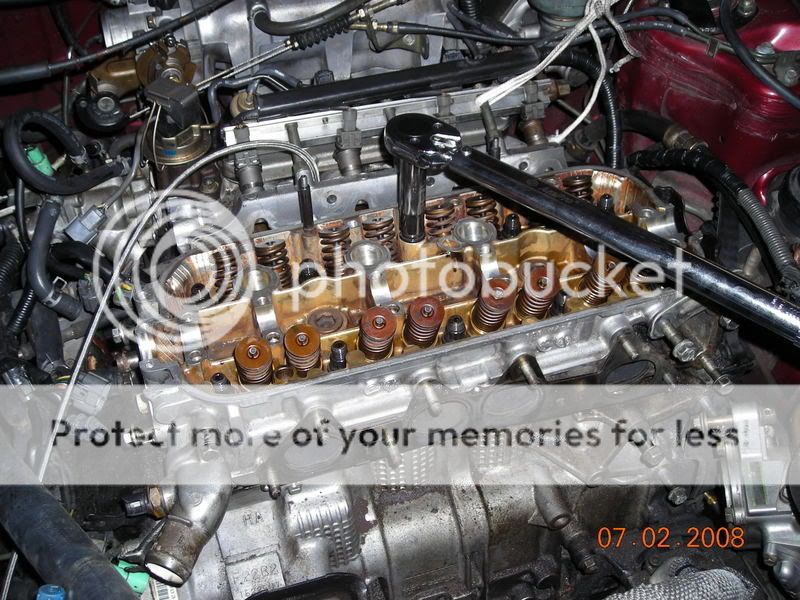
Next step you need to take off the valve cover so you can get the intake manifold bolts easier.
!!!! VERY IMPORTANT !!!!
****Try not to contaminate the motor while its open.
you need to unbolt the intake manifold from the head. The flange has 4 bolts on top and five on the bottom.
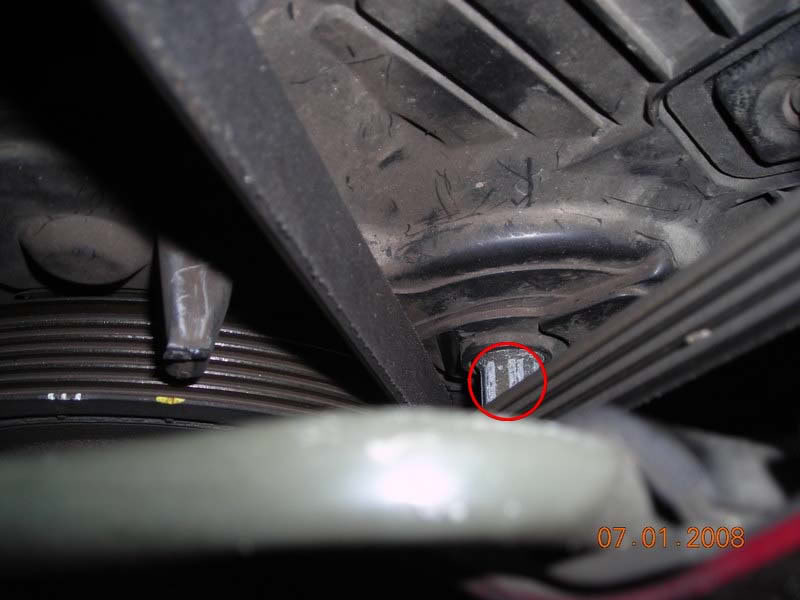
While your under the car loosening the 5 IM nuts you will need to remove this bolt from the mounting bracket. The IM should now be only resting on the studs.
Back on top of the car now, push back the intake manifold and your almost ready to pull the head !
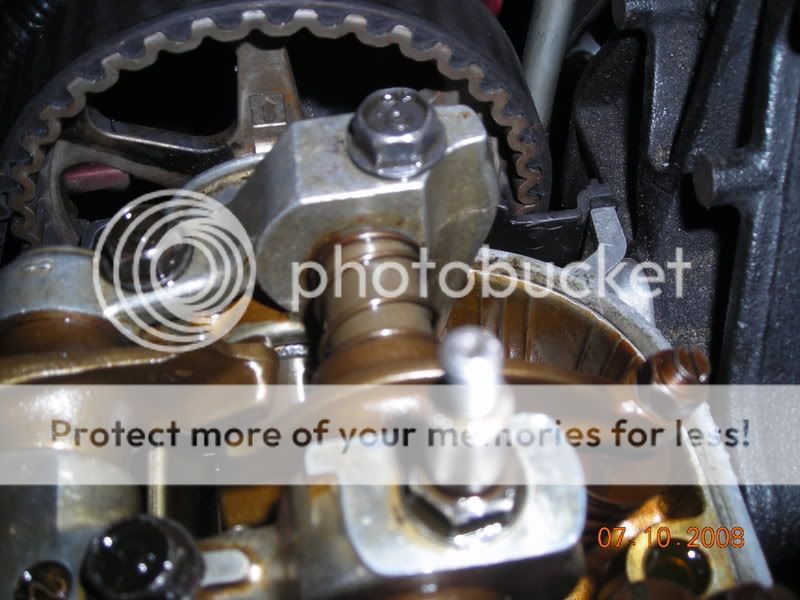
Now we need to loosen the timing belt so we can slide it off of the cam gear.
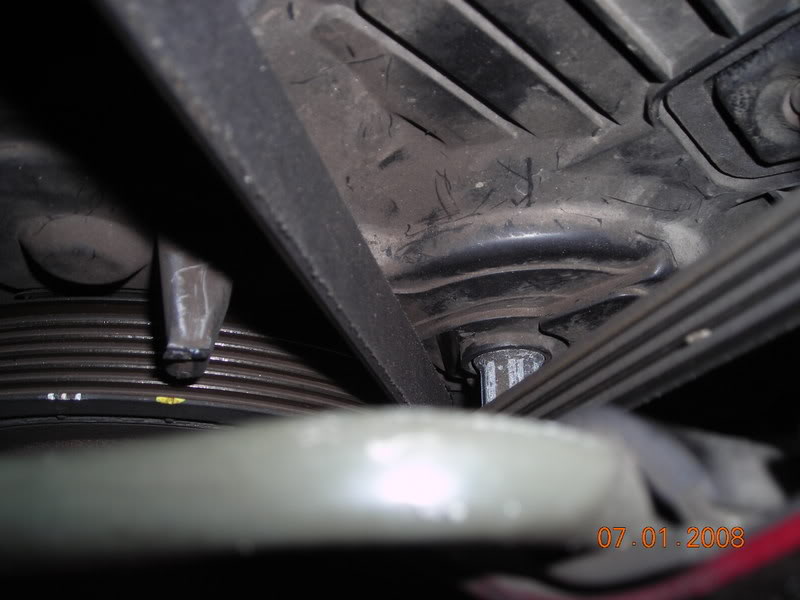
Not Required but makes it easier *** Place a floor jack under the oil pan with a piece of wood where it will hit the pan(so you dont damage the oil pan).
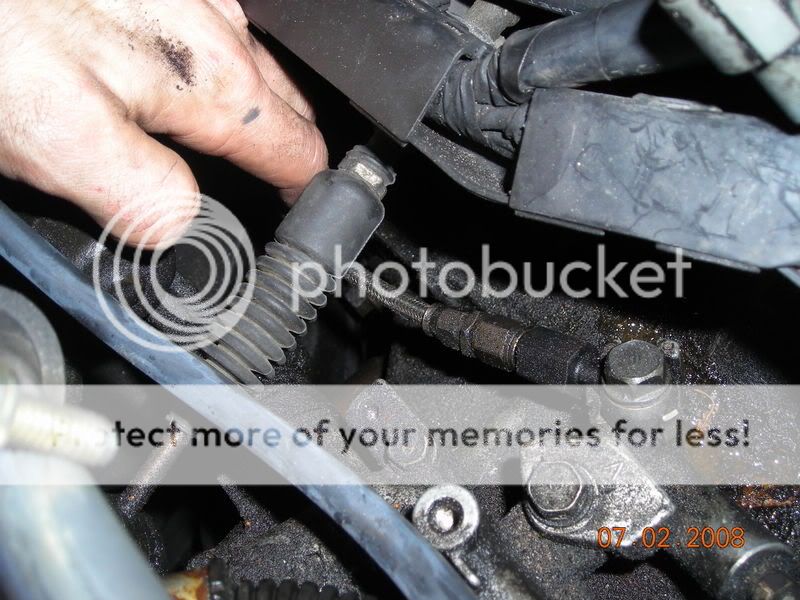
Lightly jack up the jack until it makes contact with the bottom of the pan. Loosen and remove the bolt going through the motor mount
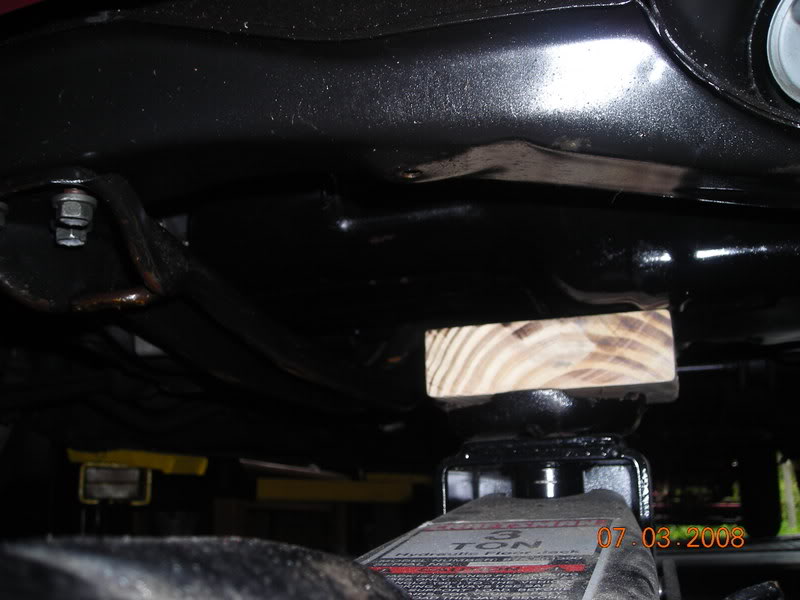
and jack up the motor slightly while loosening the motor mount and it will easily come out.
once you pull the bolt out from the mount, jack the motor up or down, whichever gives you more clearance to loosen the timing belt tensioner. I perfer jaking it up.
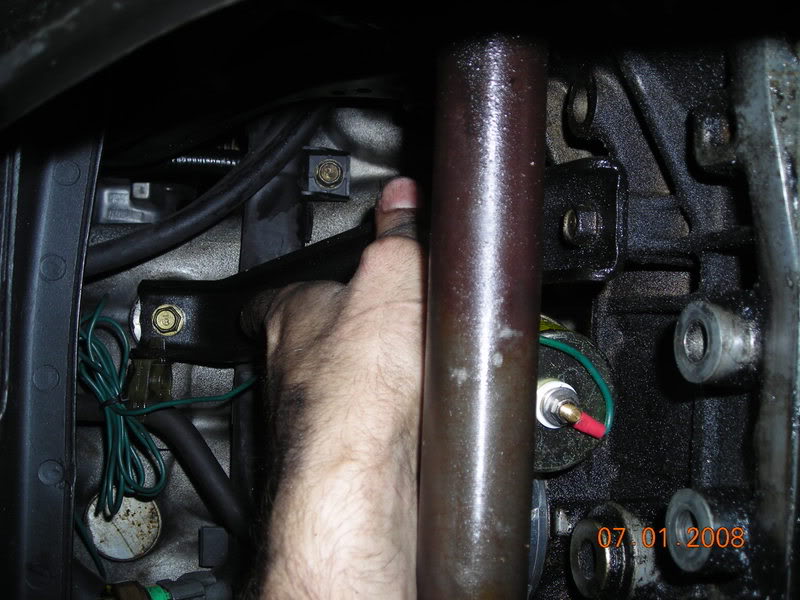
You need to get to this tensioner
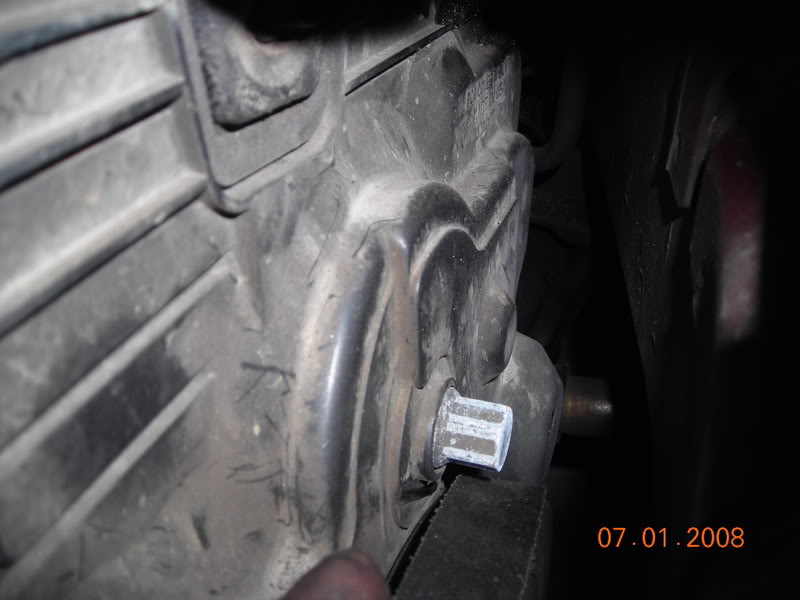
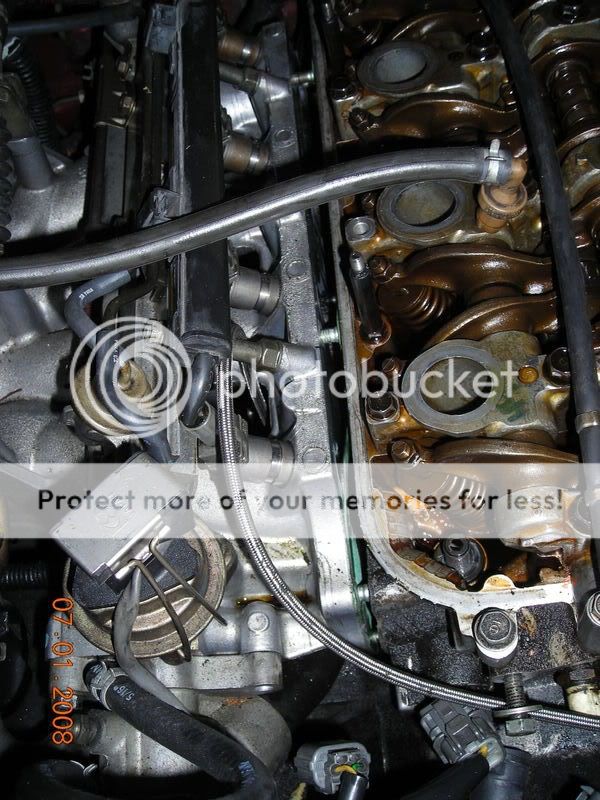
Once the timing chain is loose, slide it back off the cam.

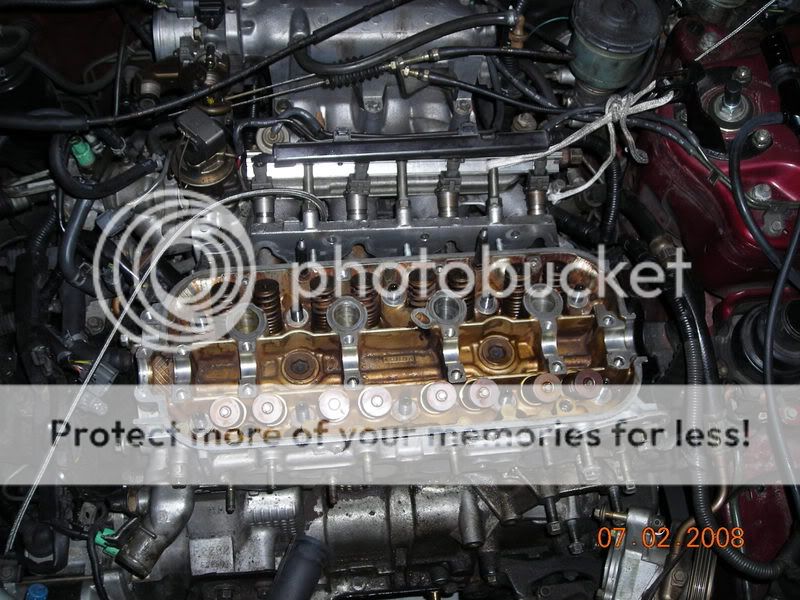
!!!!!!!! READ THIS !!!!!!!!
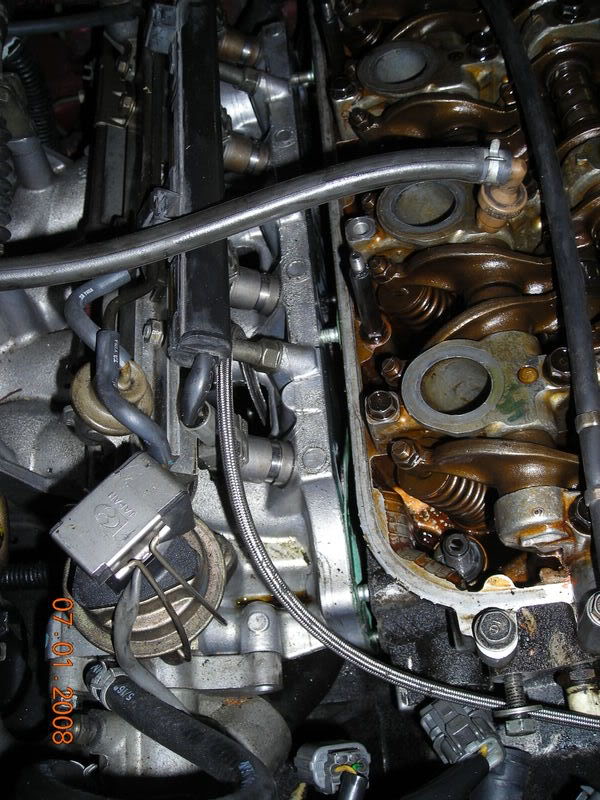
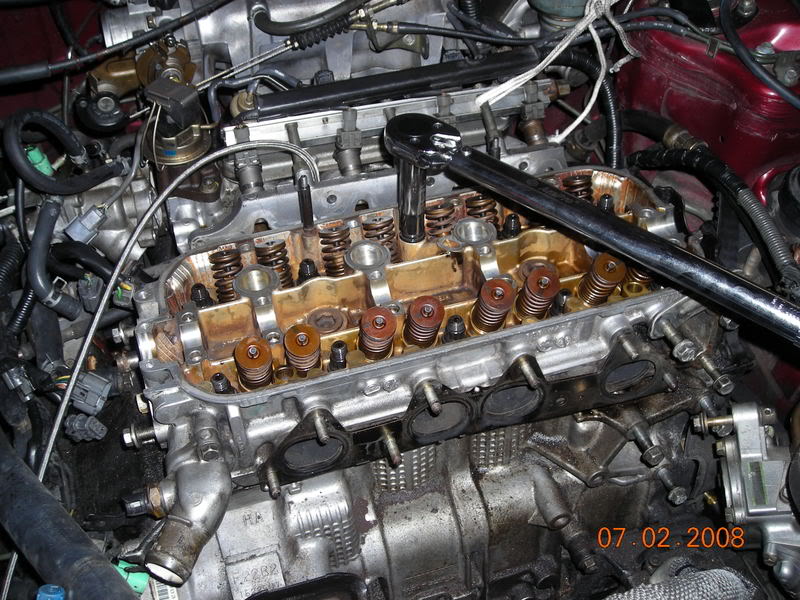
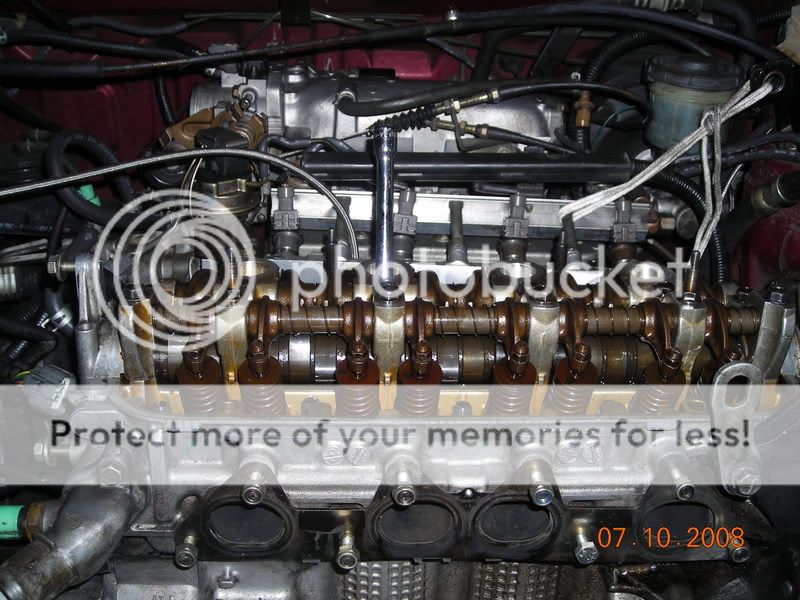
NOT REQUIRED *** I took off my rocker arm assembly to clean the head the best i could. below is an easy how to from the FAQ's. you will want to remove the rocker arm assembly now bc the head is still anchored.
http://www.cb7tuner.com/vbb/sh...seals
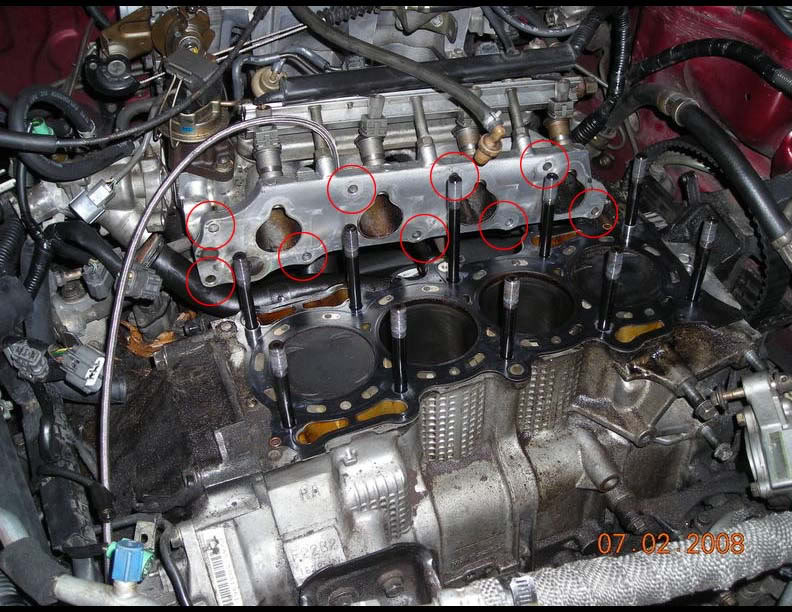
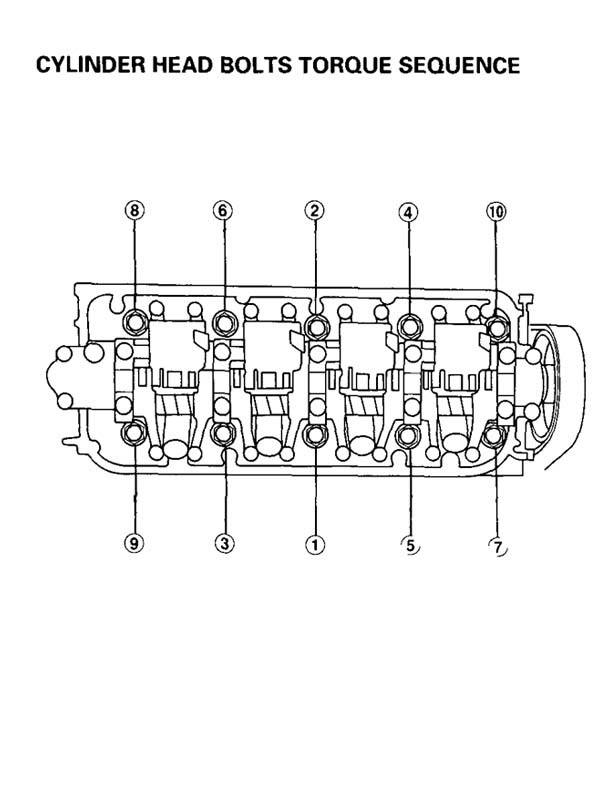
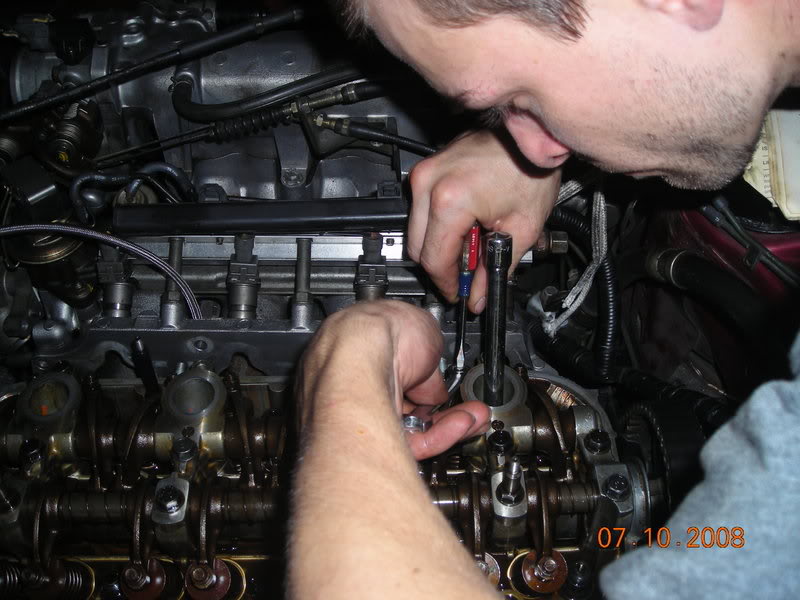
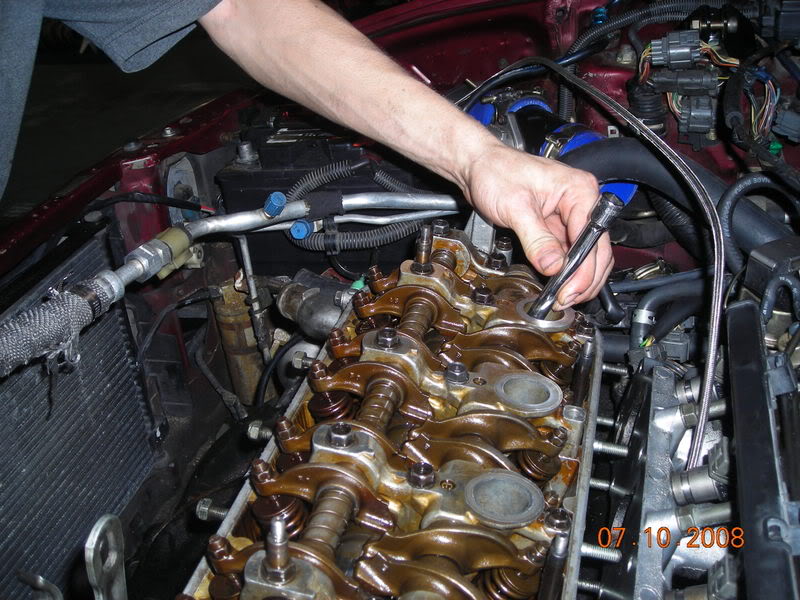
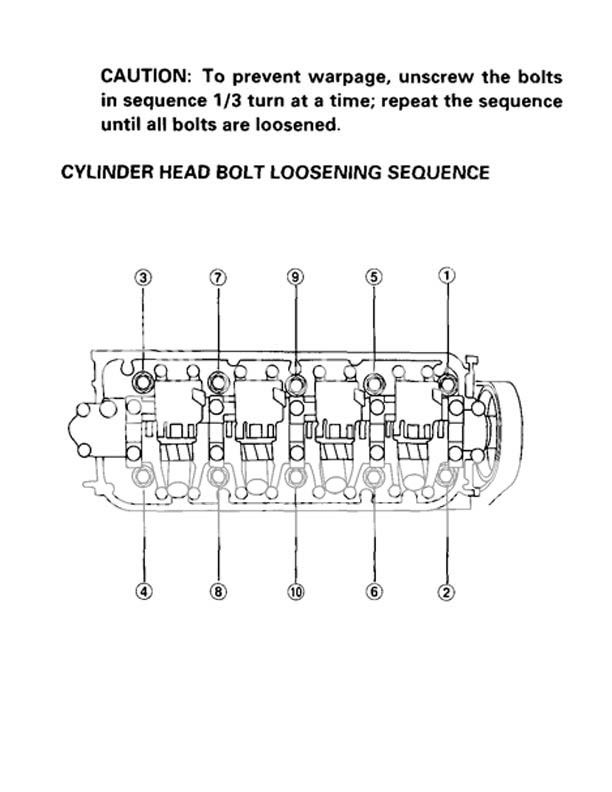
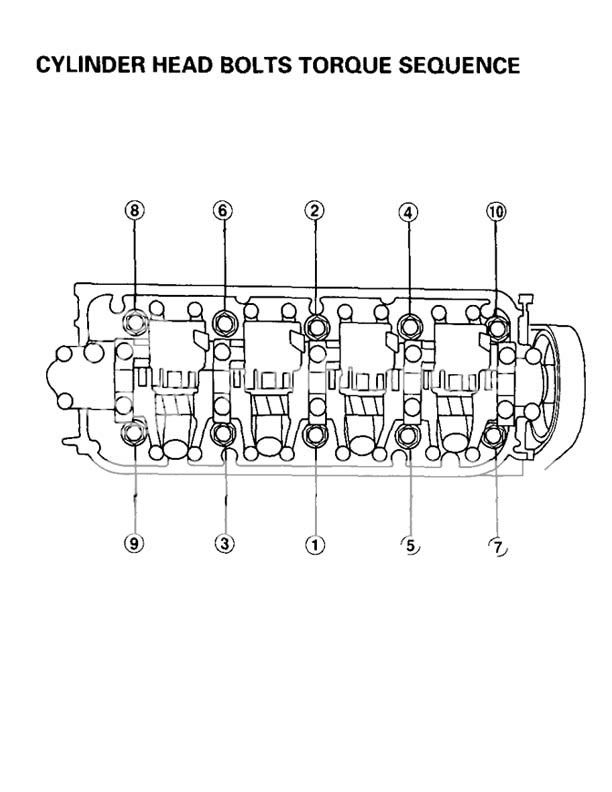
Next step is VERY IMPORTANT not to rush through ! You need to loosen the head studs SLOWLY so you dont warp the head. Slower the better.
You will need some muscle on this so use a pipe, jack handle, or anything you can get around a nice ratchet will do.
Now loosen the headstuds in this order so you dont warp the head.
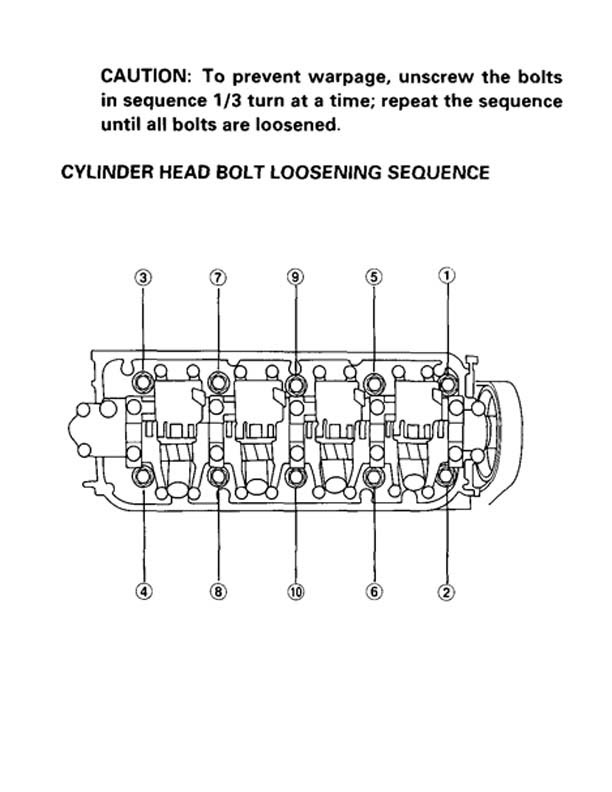
!!!!!!!! BREAKTIME !!!!!!!!
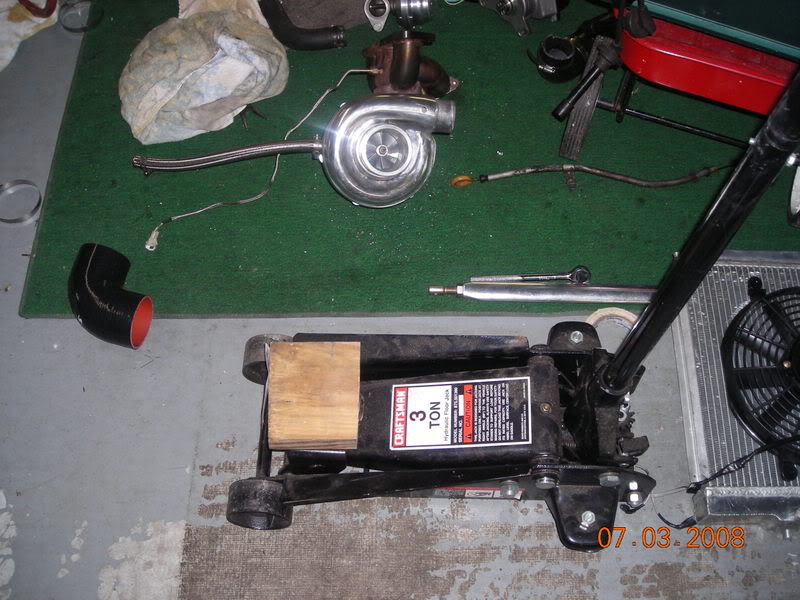
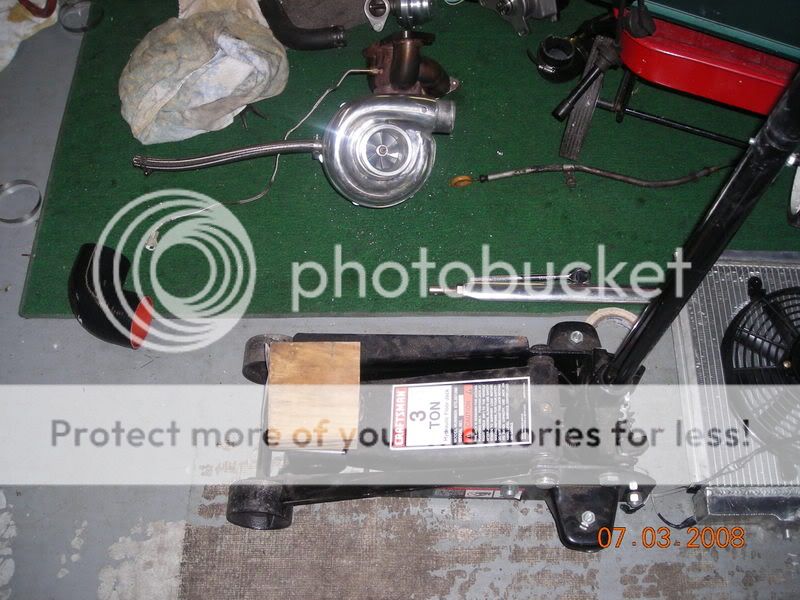
Take a min and set up a nice CLEAN area to put the head on when you pull it.
NOT LIKE THIS !!! HA HA
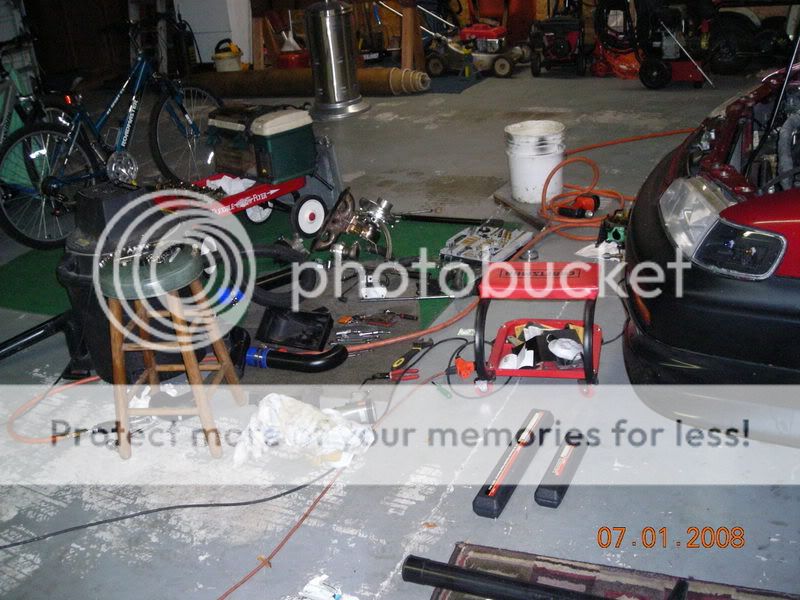
I use to bag all my nuts and bolts and i reccomend doing it that way if this is your first time. Id use labels like IM, valvecover, distrib, etc... but ive done it enough times now that i just keep a neat little pile.
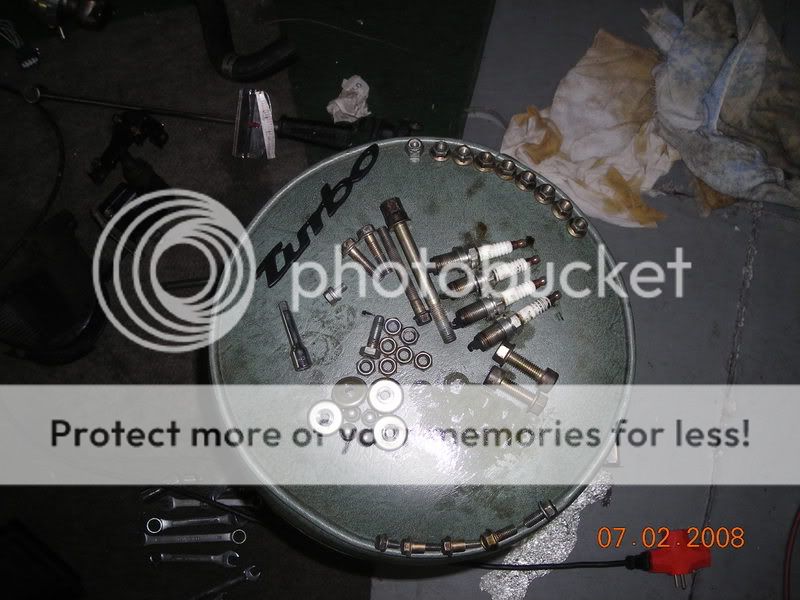
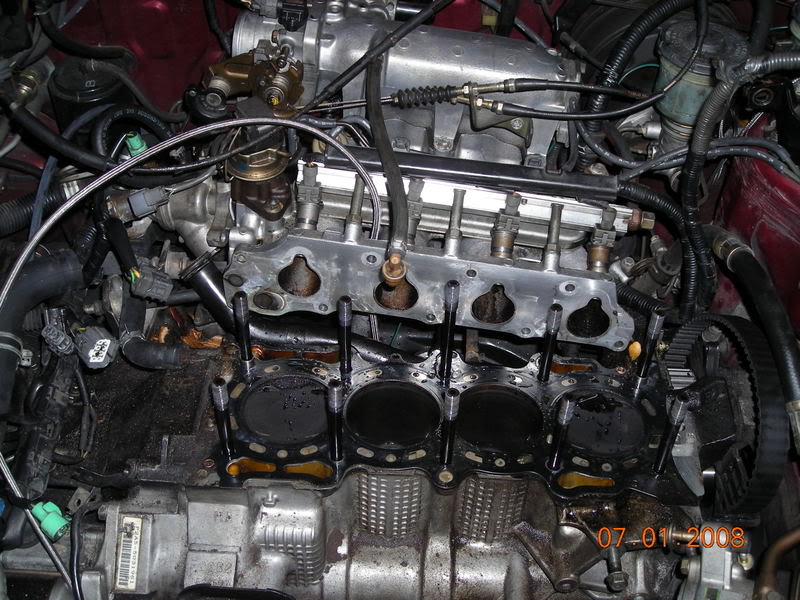
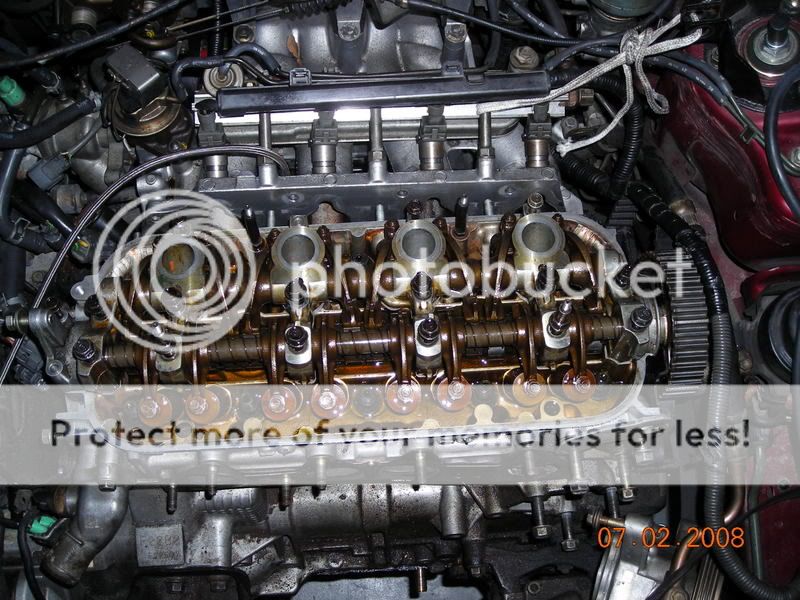
Now go ahead and pat yourself on the back and pull the head off the block and put it on the nice clean area you just made for it !!!!!
Since the engine bay is all opened up and if you want to do the extra maint. look around and inspect everything real good and see if anything needs replacing. Id highly suggest converting this portion of the hydraulics in the clutch from rubber to ss.
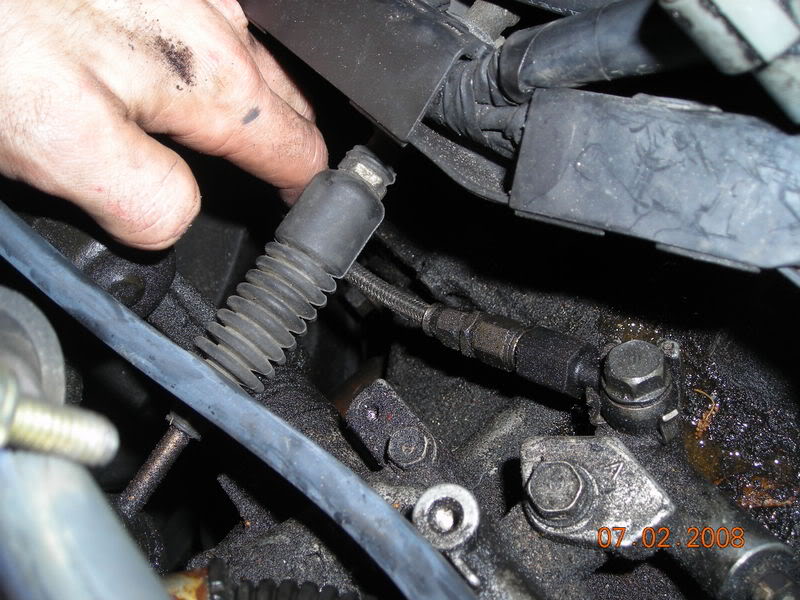
Also any weathered misc hoses back there you see, now is a good time to replace !
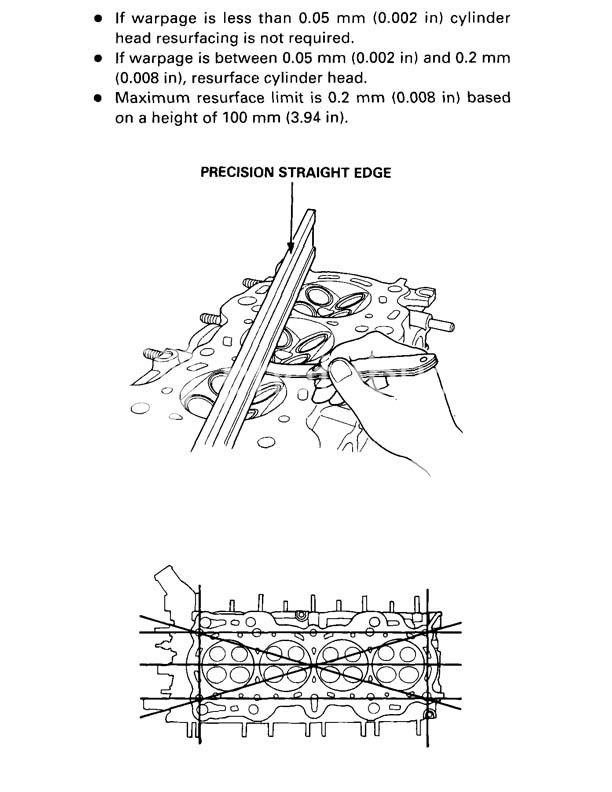
Ok so turn the head over and place a straight edge over each corner and check with a valve lash adjustment .05mm. If you can fit the .05mm valve lash between the straight edge and the head, time to go to the machine shop.
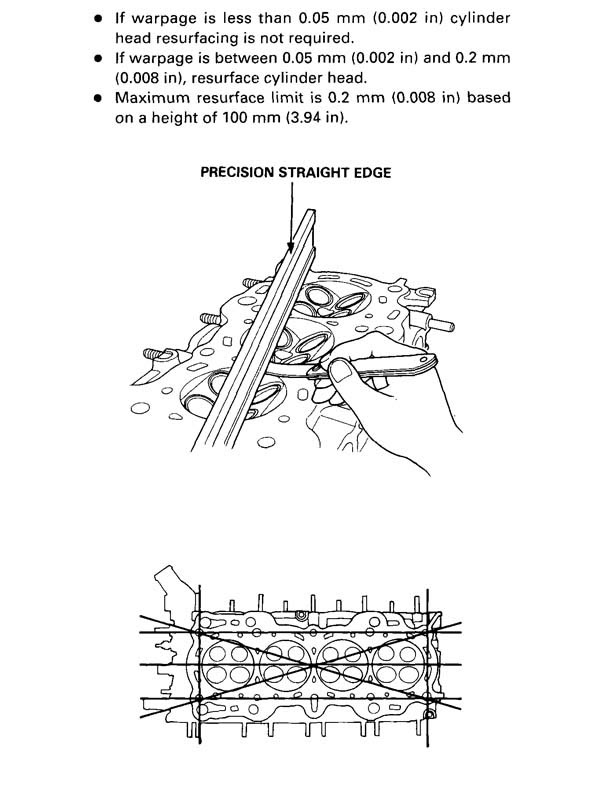
Mine was fine... so back to hard labor...
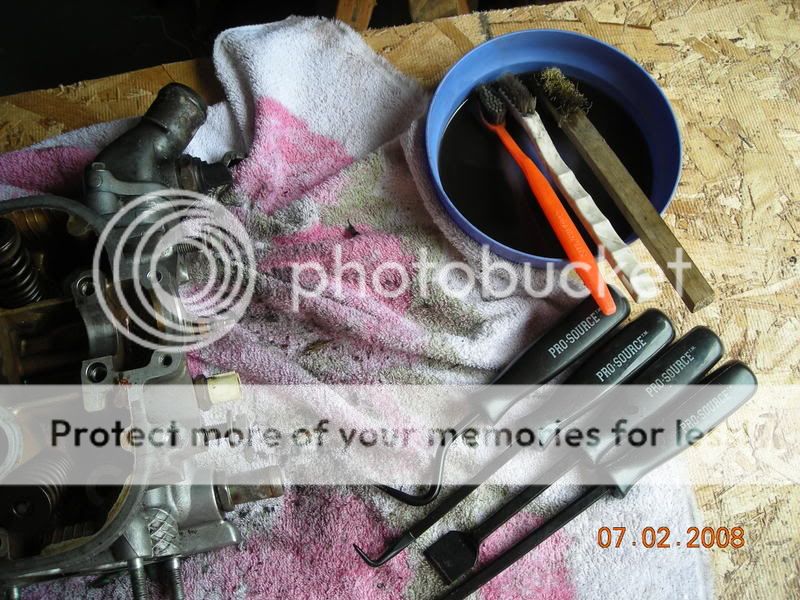
Time to scrape off those 14yr old gaskets ! Your gonna need some chemicals to knock this out. I reccomend using mineral spirits, gasket scraper set, and a brass brush, (not stainless steel).
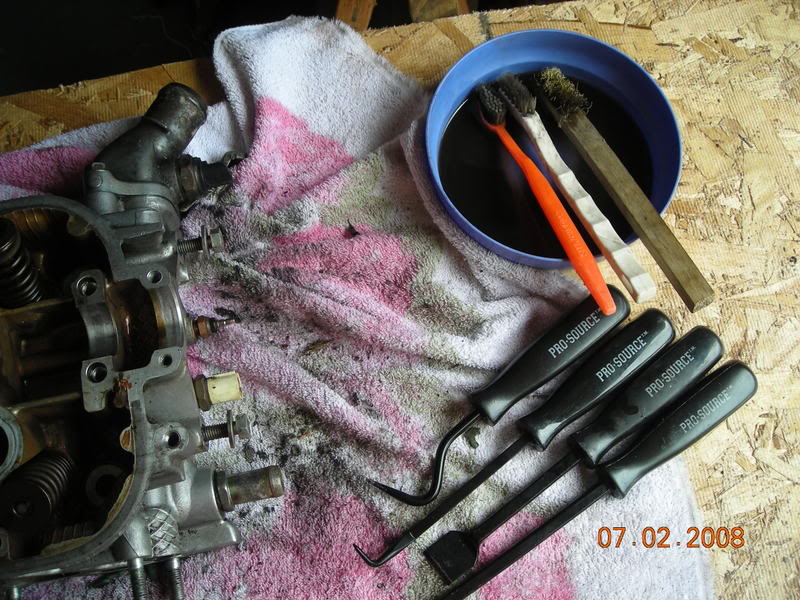

Just go at it and scrape away !
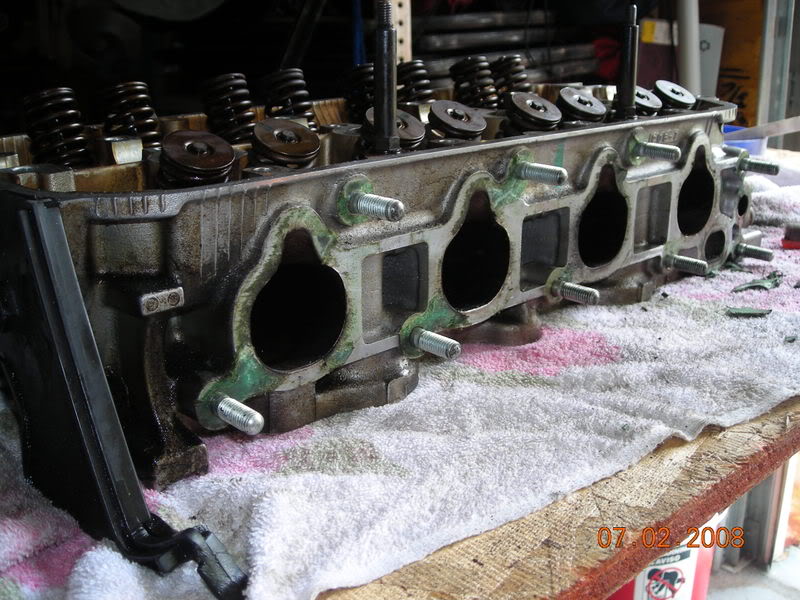
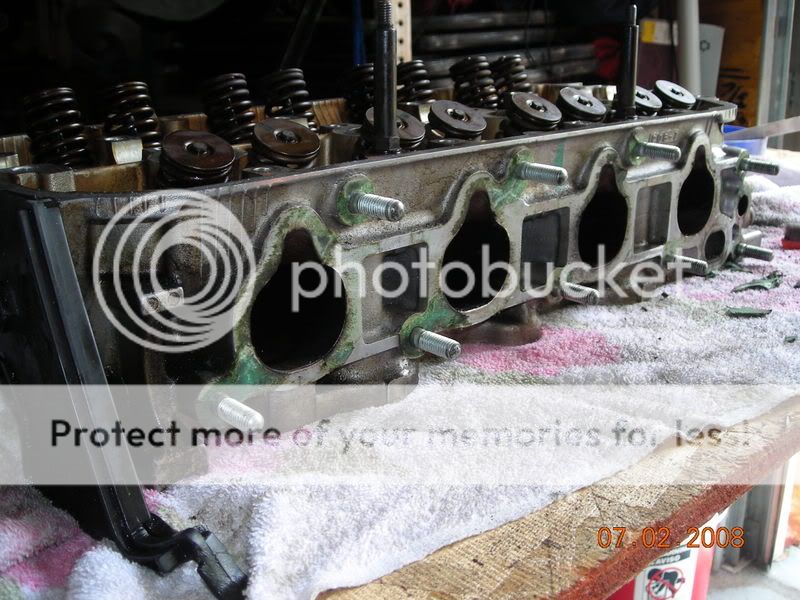
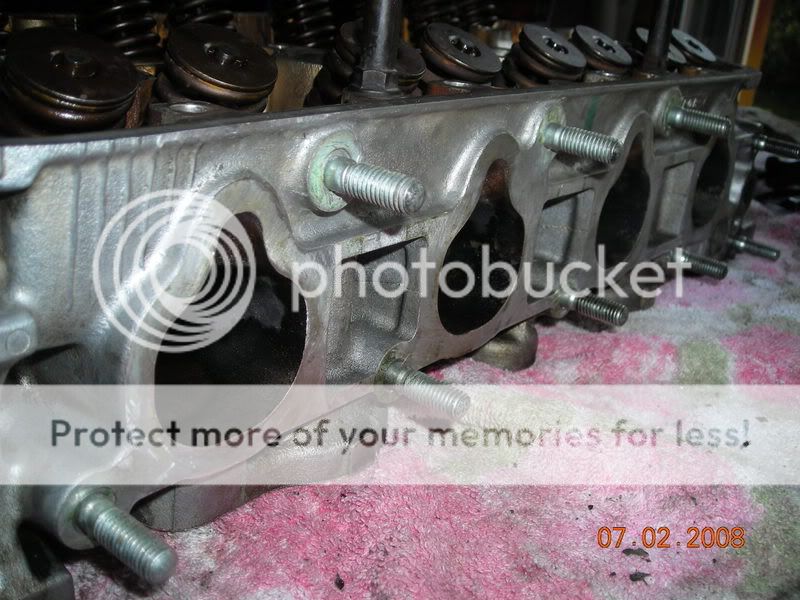
.......................if you accidently nick it a little bit use some light sandpaper to smooth it out best you can. The goal is to make a completely flat smooth surface for the gasket to bond to.....................but eventually you want it to look like this
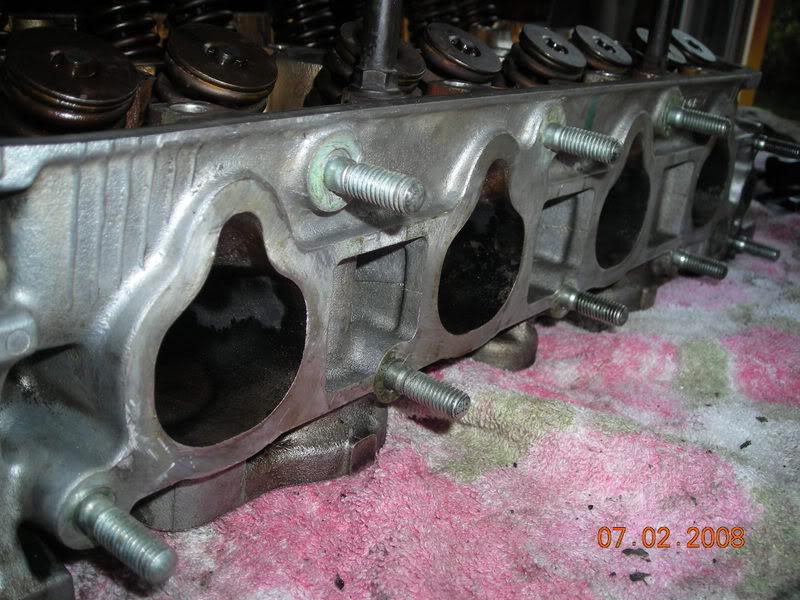
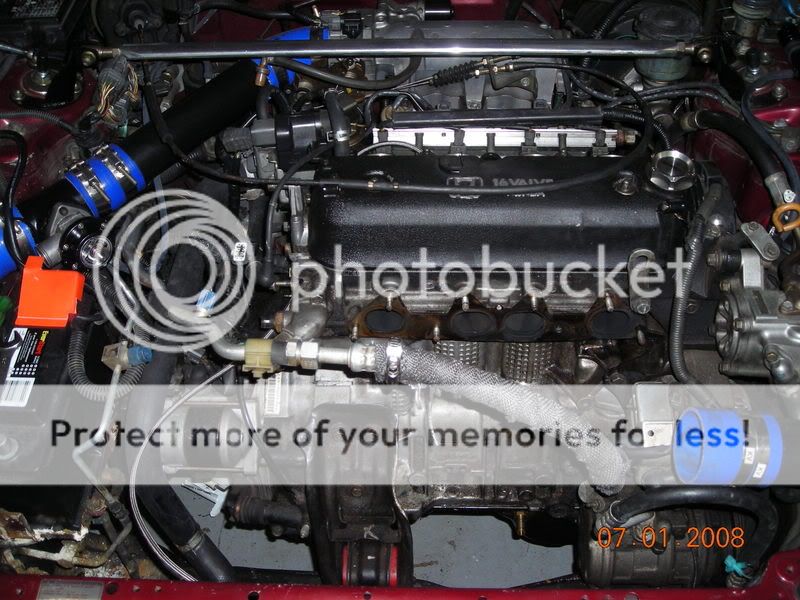
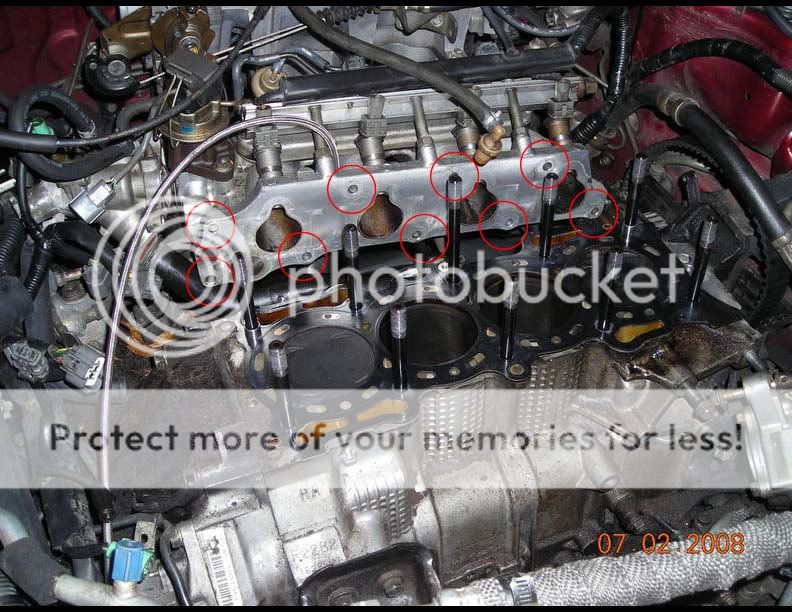
Time to put on your new headgasket. Make sure you put it on correctly ! There is a oil pressure sensor right in the middle in the back.
I was working by myself this time, (brother wimped out on me ) I needed about a 1/2" of clearance so i tied a rope to the IM to the strut tower to hold it back out of the way good enough while i was lowering the head down on the head studs.
Time to start torque'n ! 3 step process
29ftlbs
51ft/lbs
72.3 ft/lbs
Time for some oil ! Not just any oil ! I perfer Mobil1 Synthetic. others may disagree but thats another thread... If this was a new dual spring 9k revving Bisi valvetrain or something crazy id suggest some assembly lube.
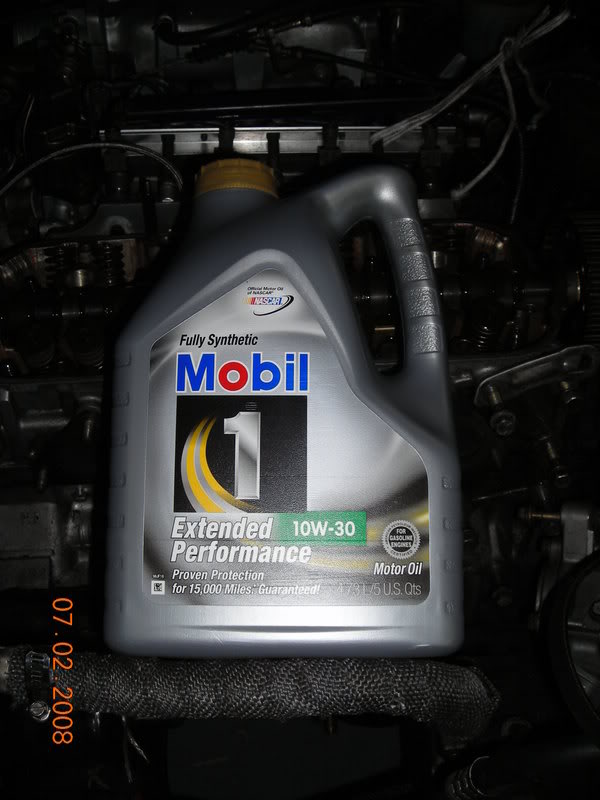
...... but UNFORTUNITLY this is my 120,000 beat to hell motor. I have always used a small funnel and funnel Mobil 1 lightly cam journals/reservoirs, valvesprings and all moving parts. Ive never had and issues with this method.
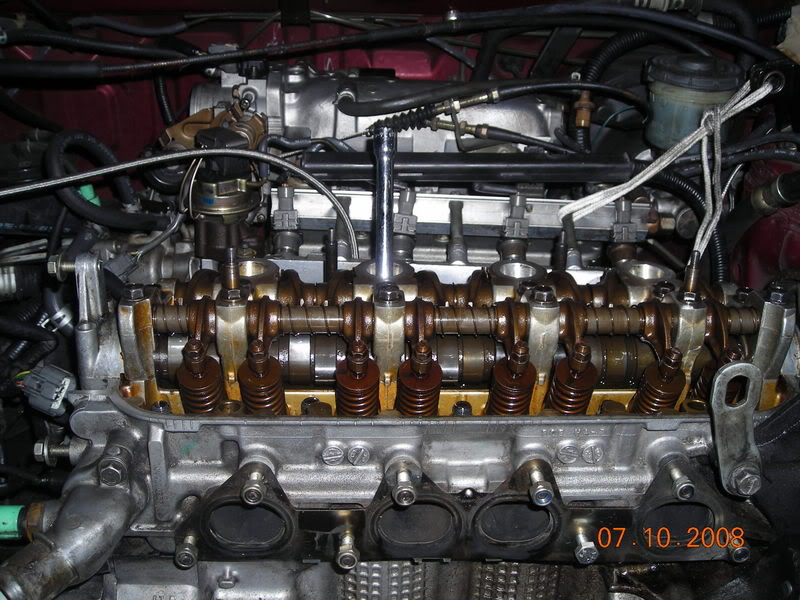
Retighten rocker arm assembly in correct order now that the head is anchored. Loosen all 16 valves. Link was posted above.
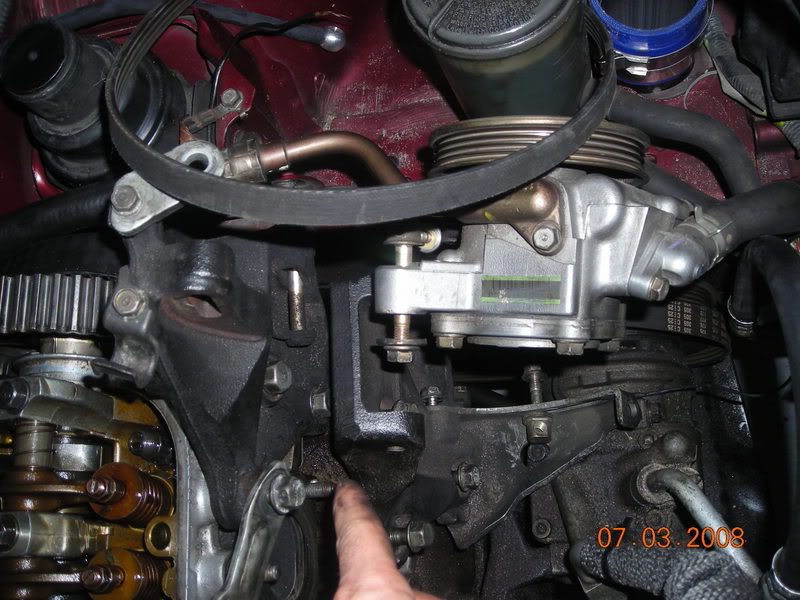
Ok now time to remount the powerstearing bracket first then the alt bracket make sure this bolt it torqued down good because the alt bracket covers it.

Mount alternator and powersteering pump on brackets but do not put belts on pullies yet. Were now ready to time the motor.
To time the motor isnt as hard as it sounds. The only thing you have to do is compensate for the slack of the belt. I found that if you line up your bottom end approx to this position.
this is basically what happens, you turn the crank it starts the rotation first, then the belt begins to tighten, then once it tightens it turns the cam.
After you get the belt on crank the motor over manually min 3x to verify that the crank TDC mark and the cam gear mark are lined up at the same time. I find it a hell of alot easier to see the cam gear marks by looking from valvetrain side instead of trying to see through the belts and engine bay. (everyone does it different) You can see the mark just to the right on the gear.
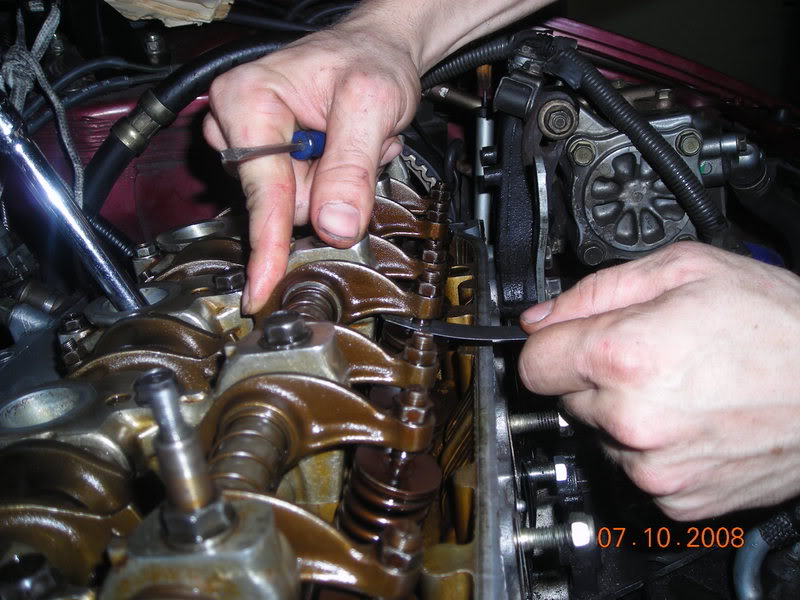
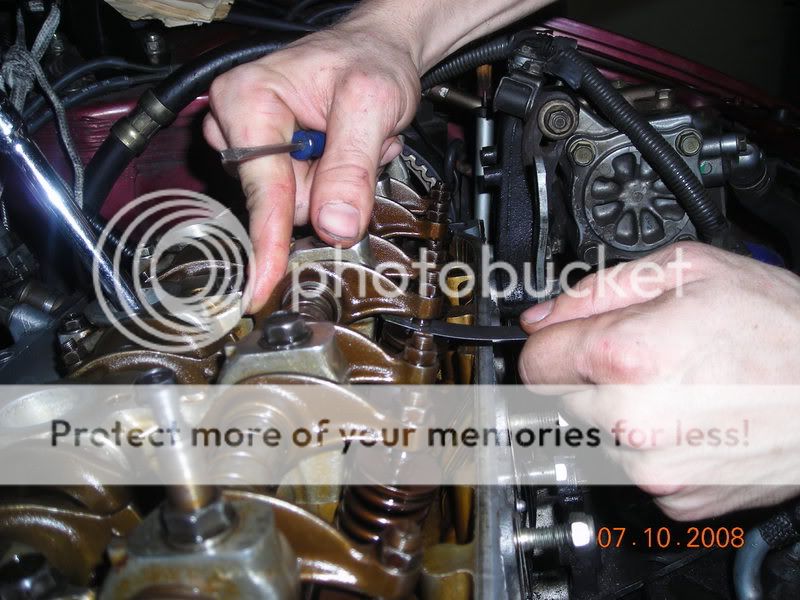
OK, after thats all done and you have turned the motor over manually and verified the motor is in time, then its on to adjust the valvetrain. Again everyone has their own method on how to adjust valves and this is mine.
I get all my valve lashes set up and ready to go, from left to right .009 - .013
your adjustment specs are:
intake .010 (closest to firewall)
exhaust .012 (exhaust manifold side)
This is how i was taught. Intake valve : Adjust valve to .010, if the .009 will fit but the .011 wont. then your good and its on to the exhaust. tighten adjusting nut to 14ft/lbs
Start by putting motor back to TDC and adjust num one cylinder intake and exhaust valves.
Now rotate crank 180 deg and make sure the "up" arrow on the cam gear is in the 9 o'clock position. Adjust cylinder num 3.
I use my deep extension to feel each piston hit the climax. (but its not required)
Use caution when doing this.
Rotate crank 180 deg and "up" arrow should be pointing in 6 o'clock position. Adjust cylinder num 4. Again, you can use the extension to feel the piston get in the upper most position so that you cann adjust valves.
Finally rotate crank 180 deg. "up" arrow on cam gear should now be in 3 o' clock position and now time to adjust cylinder num 2.
After this is complete your motor should be ready to fire ! Time to put everything back together and get ready to make sure ignition timing is set properly. You will need a timing light for this. Have a friend watch under the car/in the bay for any oil/coolant leaks. Once you have verified there are no leaks get the timing light out and check to make sure the timing is on. Point timing light at bottom crank pulley, rotate distributor to align the middle line with the pointer on the lower timing cover.
After verifying motor is timed its time to start cleaning up !
Here is the link from the FAQs to help on timing. If you should run into a prob.
https://honda-tech.com/zerothread/1908944
I will edit this post later with better pics and more elaborate explanations.
Modified by NeKe1point0 at 4:37 PM 10/26/2008
There are many ways to remove the head of this car, and also everyones setup is a little different. My car is turbo, so i had a few extra steps not seen in the pics below. It wouldve been 10x easier if it was stock IMO.
If something isnt worded right or correctly just IM me and i can edit the OP.
.................................................. .................................................. ..................
Tools needed
Floor Jack
Jack stands
Screwdrivers/needlenose pliers
1/4" sockets set 10mm-19mm
1/4" drive extentions
3/8" socket set 10mm-19mm
3/8"drive extentions
3/8" Swivel joint
opened and closed end wrenches 10,12,14,17mm
Timing light
Torque wrench capable of 8.7 ft/lbs - 72ft/lbs
.................................................. .................................................. ..................
Step one disconnect neg battery term. and drain ALL fluids ! Oil and Coolant !!!!
Remove header/Exhaust Manifold.
Remove cylinder num1 spark plug wire/plug.
Align to TDC.
Rotate bottom crank pulley from wheel well with 19mm socket counter clockwise until youve hit the single timing mark shown here.
Or you can place an extension in the spark plug tube and feel the piston hit the climax.
Before removing the distributor, Id suggest marking the dizzy/housing with a sharpie marker to give you a ball park on where to set your timing for when its time to reinstall. this step is not required but reccomended. (sorry for the crappy pic, you cant see well it but its marked)
on the dizzy
where the dizzy bolts up
and also which plugs went to which cylinder. on the motor its 4-3-2-1. On the dizzy its
3 - 4
1 | 2
After marking, unclip the dizzy from coil and remove 3 bolts in red and set aside. Also unclip heater hose and sensors shown in yellow.
Remove the clips from coil to the wiring harness and unbolt these 4 bolts. The coil and mounting bracket will come right off. After that remove this black mounting plate.
Now time to move to the driver side of the motor. Loosen the Power steering pump tensioner (circled on right), then loosen other nut circled. To remove the pump from bracket there is one more bolt with a U joint on the end under the whole assembly.
Belt should be loose and is time to be removed.
I just rest it on the reservoir.
Next is the alternator. Unlike the D series the alt is in the front and is PITA to get out of its mounting bracket. It just takes some persuation. The tensioner is UNDER the alt, then just like the power steering unbolt on side. (best pics i could take)
Again to make it easy, I leave it all connected and just kinda rotate it and set it on the strut tower to the side.
Remove mounting brackets that were holding alt, powersteering pump.
and top timing cover(2 bolts).
Next step you need to take off the valve cover so you can get the intake manifold bolts easier.
!!!! VERY IMPORTANT !!!!
****Try not to contaminate the motor while its open.
you need to unbolt the intake manifold from the head. The flange has 4 bolts on top and five on the bottom.
While your under the car loosening the 5 IM nuts you will need to remove this bolt from the mounting bracket. The IM should now be only resting on the studs.
Back on top of the car now, push back the intake manifold and your almost ready to pull the head !
Now we need to loosen the timing belt so we can slide it off of the cam gear.
Not Required but makes it easier *** Place a floor jack under the oil pan with a piece of wood where it will hit the pan(so you dont damage the oil pan).
Lightly jack up the jack until it makes contact with the bottom of the pan. Loosen and remove the bolt going through the motor mount
and jack up the motor slightly while loosening the motor mount and it will easily come out.
once you pull the bolt out from the mount, jack the motor up or down, whichever gives you more clearance to loosen the timing belt tensioner. I perfer jaking it up.
You need to get to this tensioner
Once the timing chain is loose, slide it back off the cam.
!!!!!!!! READ THIS !!!!!!!!
NOT REQUIRED *** I took off my rocker arm assembly to clean the head the best i could. below is an easy how to from the FAQ's. you will want to remove the rocker arm assembly now bc the head is still anchored.
http://www.cb7tuner.com/vbb/sh...seals
Next step is VERY IMPORTANT not to rush through ! You need to loosen the head studs SLOWLY so you dont warp the head. Slower the better.
You will need some muscle on this so use a pipe, jack handle, or anything you can get around a nice ratchet will do.
Now loosen the headstuds in this order so you dont warp the head.
!!!!!!!! BREAKTIME !!!!!!!!
Take a min and set up a nice CLEAN area to put the head on when you pull it.
NOT LIKE THIS !!! HA HA
I use to bag all my nuts and bolts and i reccomend doing it that way if this is your first time. Id use labels like IM, valvecover, distrib, etc... but ive done it enough times now that i just keep a neat little pile.
Now go ahead and pat yourself on the back and pull the head off the block and put it on the nice clean area you just made for it !!!!!
Since the engine bay is all opened up and if you want to do the extra maint. look around and inspect everything real good and see if anything needs replacing. Id highly suggest converting this portion of the hydraulics in the clutch from rubber to ss.
Also any weathered misc hoses back there you see, now is a good time to replace !
Ok so turn the head over and place a straight edge over each corner and check with a valve lash adjustment .05mm. If you can fit the .05mm valve lash between the straight edge and the head, time to go to the machine shop.
Mine was fine... so back to hard labor...
Time to scrape off those 14yr old gaskets ! Your gonna need some chemicals to knock this out. I reccomend using mineral spirits, gasket scraper set, and a brass brush, (not stainless steel).
Just go at it and scrape away !
.......................if you accidently nick it a little bit use some light sandpaper to smooth it out best you can. The goal is to make a completely flat smooth surface for the gasket to bond to.....................but eventually you want it to look like this
Time to put on your new headgasket. Make sure you put it on correctly ! There is a oil pressure sensor right in the middle in the back.
I was working by myself this time, (brother wimped out on me
) I needed about a 1/2" of clearance so i tied a rope to the IM to the strut tower to hold it back out of the way good enough while i was lowering the head down on the head studs. Time to start torque'n ! 3 step process
29ftlbs
51ft/lbs
72.3 ft/lbs
Time for some oil ! Not just any oil ! I perfer Mobil1 Synthetic. others may disagree but thats another thread... If this was a new dual spring 9k revving Bisi valvetrain or something crazy id suggest some assembly lube.
...... but UNFORTUNITLY this is my 120,000 beat to hell motor.
I have always used a small funnel and funnel Mobil 1 lightly cam journals/reservoirs, valvesprings and all moving parts. Ive never had and issues with this method. Retighten rocker arm assembly in correct order now that the head is anchored. Loosen all 16 valves. Link was posted above.
Ok now time to remount the powerstearing bracket first then the alt bracket make sure this bolt it torqued down good because the alt bracket covers it.
Mount alternator and powersteering pump on brackets but do not put belts on pullies yet. Were now ready to time the motor.
To time the motor isnt as hard as it sounds. The only thing you have to do is compensate for the slack of the belt. I found that if you line up your bottom end approx to this position.
this is basically what happens, you turn the crank it starts the rotation first, then the belt begins to tighten, then once it tightens it turns the cam.
After you get the belt on crank the motor over manually min 3x to verify that the crank TDC mark and the cam gear mark are lined up at the same time. I find it a hell of alot easier to see the cam gear marks by looking from valvetrain side instead of trying to see through the belts and engine bay. (everyone does it different) You can see the mark just to the right on the gear.
OK, after thats all done and you have turned the motor over manually and verified the motor is in time, then its on to adjust the valvetrain. Again everyone has their own method on how to adjust valves and this is mine.
I get all my valve lashes set up and ready to go, from left to right .009 - .013
your adjustment specs are:
intake .010 (closest to firewall)
exhaust .012 (exhaust manifold side)
This is how i was taught. Intake valve : Adjust valve to .010, if the .009 will fit but the .011 wont. then your good and its on to the exhaust. tighten adjusting nut to 14ft/lbs
Start by putting motor back to TDC and adjust num one cylinder intake and exhaust valves.
Now rotate crank 180 deg and make sure the "up" arrow on the cam gear is in the 9 o'clock position. Adjust cylinder num 3.
I use my deep extension to feel each piston hit the climax. (but its not required)
Use caution when doing this.
Rotate crank 180 deg and "up" arrow should be pointing in 6 o'clock position. Adjust cylinder num 4. Again, you can use the extension to feel the piston get in the upper most position so that you cann adjust valves.
Finally rotate crank 180 deg. "up" arrow on cam gear should now be in 3 o' clock position and now time to adjust cylinder num 2.
After this is complete your motor should be ready to fire ! Time to put everything back together and get ready to make sure ignition timing is set properly. You will need a timing light for this. Have a friend watch under the car/in the bay for any oil/coolant leaks. Once you have verified there are no leaks get the timing light out and check to make sure the timing is on. Point timing light at bottom crank pulley, rotate distributor to align the middle line with the pointer on the lower timing cover.
After verifying motor is timed its time to start cleaning up !
Here is the link from the FAQs to help on timing. If you should run into a prob.
https://honda-tech.com/zerothread/1908944
I will edit this post later with better pics and more elaborate explanations.
Modified by NeKe1point0 at 4:37 PM 10/26/2008
H-T Order of Merit
Joined: Aug 2002
Posts: 9,172
Likes: 7
From: somewhere in MI
Nice write-up
just a few things...
- Do not use a torque wrench to loosen bolts. It can mess up the calibration of the torque wrench. Use a breaker bar or a ratchet with a pipe on it.
- As an option to putting oil in the cam areas and that, I use Torco Engine Assembly Lube. General used for assembly of new parts so oil is fine in this situation for an engine and cam that isn't brand new, but I just like to be 100% sure no damage will happen in that first start-up.
- I didn't see you mention it though I'm sure you did it, so probably more of a note to others... Be sure to reset your timing and belt tension after put the head and cam/rocker assembly back in. If need be, see my timing belt write-up on how to do this.
And I have added this to the FAQ
Honda-Tech Member
Joined: Aug 2002
Posts: 399
Likes: 0
Good write-up! Did you run into any issues disconnecting the water pipe from the thermostat housing? Do you really have to worry about nicking the head while you are scraping the old gasket off? Are you still gonna have to remove the lower timing cover so you can re-tension the timing and balancer belts? Where do you get the ss clutch line?
Modified by Bird333 at 1:37 PM 7/3/2008
Modified by Bird333 at 1:37 PM 7/3/2008
Thread Starter
Honda-Tech Member
Joined: May 2002
Posts: 471
Likes: 0
From: Florida
<TABLE WIDTH="90%" CELLSPACING=0 CELLPADDING=0 ALIGN=CENTER><TR><TD>Quote, originally posted by TouringAccord »</TD></TR><TR><TD CLASS="quote">Nice write-up
just a few things...
- Do not use a torque wrench to loosen bolts. It can mess up the calibration of the torque wrench. Use a breaker bar or a ratchet with a pipe on it.
- As an option to putting oil in the cam areas and that, I use Torco Engine Assembly Lube. General used for assembly of new parts so oil is fine in this situation for an engine and cam that isn't brand new, but I just like to be 100% sure no damage will happen in that first start-up.
- I didn't see you mention it though I'm sure you did it, so probably more of a note to others... Be sure to reset your timing and belt tension after put the head and cam/rocker assembly back in. If need be, see my timing belt write-up on how to do this.
And I have added this to the FAQ</TD></TR></TABLE>
-Good to know about the torque wrench, I will edit that now.
-I only use assembly lube when new too. On my 120,000k motor mobil 1 has yet to let me down. I have never had any issues.
-This was kinda my way of getting out of typing up the timing portion last night. I will post more regarding assembly and the timing portion this evening.
<TABLE WIDTH="90%" CELLSPACING=0 CELLPADDING=0 ALIGN=CENTER><TR><TD>Quote, originally posted by NeKe1point0 »</TD></TR><TR><TD CLASS="quote">My local stealership is working on getting me a new IM gasket, throttle/cruise cable and some other random parts. Here is the link from the FAQs to help on timing. If you should run into a prob.
https://honda-tech.com/zerothread/1908944
I will edit this later(tomarrow) with better pics and better explanations. 250am GF is complaining :in background: " babe! get off of honda-tech"
</TD></TR></TABLE>
Sorry but it was late ... I will edit this much more this evening to explain the timing process.
<TABLE WIDTH="90%" CELLSPACING=0 CELLPADDING=0 ALIGN=CENTER><TR><TD>Quote, originally posted by Bird333 »</TD></TR><TR><TD CLASS="quote">Good write-up! Did you run into any issues disconnecting the water pipe from the thermostat housing? Do you really have to worry about nicking the head while you are scraping the old gasket off? Are you still gonna have to remove the lower timing cover so you can re-tension the timing and balancer belts? Where do you get the ss clutch line?
</TD></TR></TABLE>
-Never have I had any issues disconnecting waterpipe.
-Yes you have to be very meticulous when scraping ANY gasket not to nick the surface. Otherwise you wont get a good seal.
- No removing the lower timing cover is not required. I will elaborate on that portion later this evening. However, if you havent done the necessary maint in the timing area, now is the time to do any and everything ! you can refer to the link above (for now) regarding timing.
- SS clutch line, any local hydraulic shop can make it for you.
Modified by NeKe1point0 at 3:36 PM 7/3/2008
Thread Starter
Honda-Tech Member
Joined: May 2002
Posts: 471
Likes: 0
From: Florida
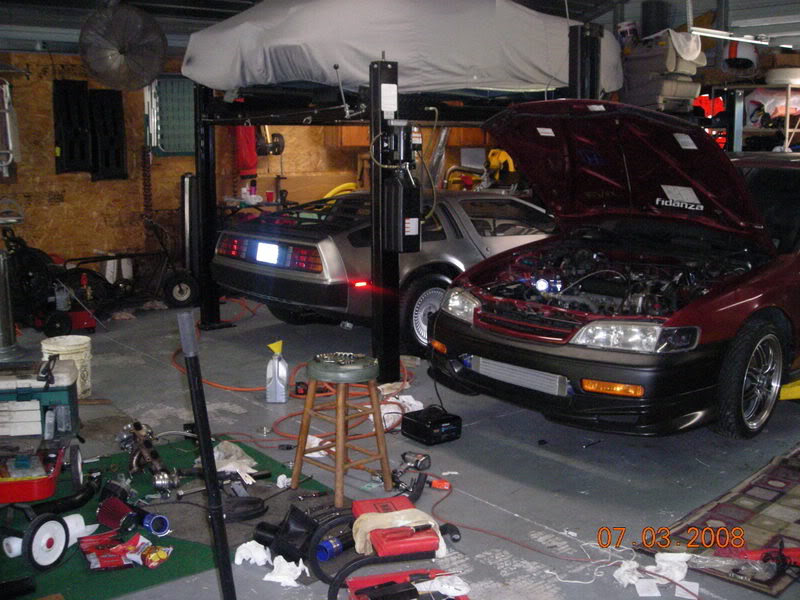
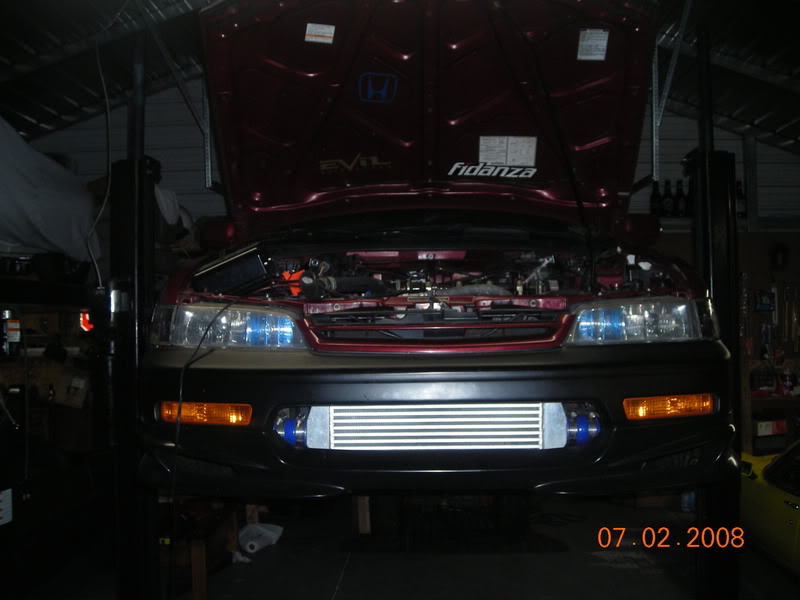
<TABLE WIDTH="90%" CELLSPACING=0 CELLPADDING=0 ALIGN=CENTER><TR><TD>Quote, originally posted by rhdins »</TD></TR><TR><TD CLASS="quote">DUDE! You have a freaking DeLorean! AWESOME!!!!</TD></TR></TABLE>
YEP ! 19,000 original miles !! ... its for sale !
In process now of taking pics for timing, powersteering, and drive belts.
YEP ! 19,000 original miles !! ... its for sale !
In process now of taking pics for timing, powersteering, and drive belts.
Honda-Tech Member
Joined: Jun 2007
Posts: 280
Likes: 0
From: Tx, USA
man what an awesome write up, I think you just wanted to show off your turbo and DELOREAN! SO NICE. I DON'T KNOW IF YOU EVER LISTEN TO KANYE BUT
'GOOD MORNIAN/
LOOK AT THE VALEDICTORIAN/
SCARED OF THE FUTURE/
WHILE I HOP IN A DELOREAN'
PEACE
and DELOREAN! SO NICE. I DON'T KNOW IF YOU EVER LISTEN TO KANYE BUT'GOOD MORNIAN/
LOOK AT THE VALEDICTORIAN/
SCARED OF THE FUTURE/
WHILE I HOP IN A DELOREAN'
PEACE
Trending Topics


Honda-Tech Member
Joined: Jan 2008
Posts: 632
Likes: 0
From: Fullerton, CA, USA
So I guess to adjust the valves, it's easier to use the long socket extension as you turn the crank to its highest position then adjust the valves for each cylinder. How do you torque the adjusting nut to 14ft/lbs if you are using the wrench instead of a socket?
Thanks.
Thanks.

Honda-Tech Member

Joined: Jul 2004
Posts: 2,344
Likes: 0
Is this pretty much the same on a F22B1? I've never done anything near this advanced before, and just trying to decide if I want to attempt it. Every time I take something to a shop they mess it and overcharge me too. I've yet to find anyone I trust to work on it, so I'm really considering attempting this myself, but it has me worried.


Honda-Tech Member
Joined: Jan 2009
Posts: 419
Likes: 0
From: VA
Thanks so much for this helpful write up and sticky.
It's really helpful and informative
I am doing the EXACT same thing on F22B1 and need help and advice.
Questions:
1-How should I pull the head-bolts off? They seem to be a PITA, I tried using impact didn't work, breaker bar--no luck. Then finally used a big cheater pipe and was able to break the lower bolts while upper ones, still they don't budge, any special trick for it and are they the same size as lower ones(14)?
2-Do I have to remove the Alternator and engine mounts to remove the Head?
3-What's the name of the sensor/switch and how will it come out on the left side of block and back side of upper radiator hose entrance?
4-How will I be able to slide/remove the Timing belt off of camshaft without removing crank pulley bolt?
Please help and advice would really appreciate all the input.

B*a*n*n*e*d
Joined: Aug 2009
Posts: 579
Likes: 2
From: St. Louis
Ok, so I have been on this board forever (it feels like) and I see countless threads of questions regarding headgasket repair. I had to do mine so I took some pics most of the way. This is not something that I reccomend for a beginner mechanic so im gonna skip some stupid steps and outline the specifics .
There are many ways to remove the head of this car, and also everyones setup is a little different. My car is turbo, so i had a few extra steps not seen in the pics below. It wouldve been 10x easier if it was stock IMO.
If something isnt worded right or correctly just IM me and i can edit the OP.
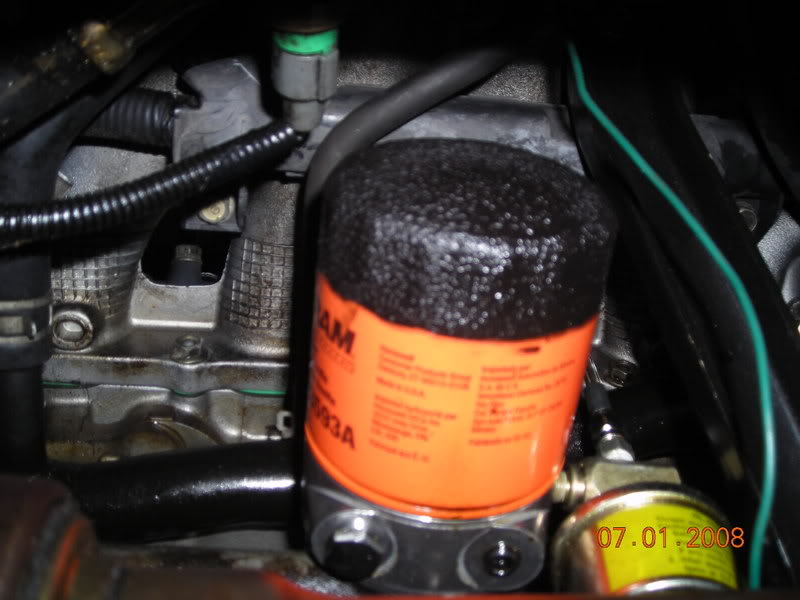
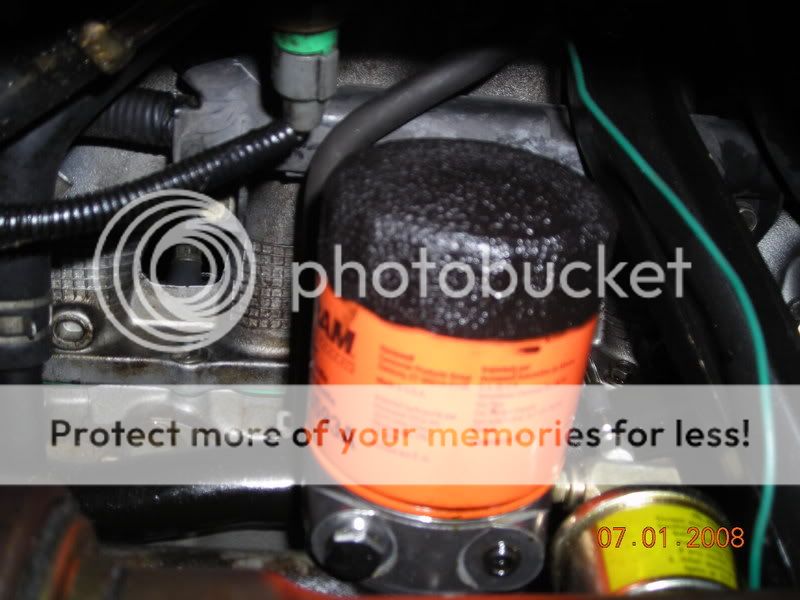
Fram orange can oil filters are the worst filter you can have (look at oil filter tests). Goodluck.....Cheers!
.................................................. .................................................. ..................
Tools needed
Floor Jack
Jack stands
Screwdrivers/needlenose pliers
1/4" sockets set 10mm-19mm
1/4" drive extentions
3/8" socket set 10mm-19mm
3/8"drive extentions
3/8" Swivel joint
opened and closed end wrenches 10,12,14,17mm
Timing light
Torque wrench capable of 8.7 ft/lbs - 72ft/lbs
.................................................. .................................................. ..................
Step one disconnect neg battery term. and drain ALL fluids ! Oil and Coolant !!!!
Remove header/Exhaust Manifold.
Remove cylinder num1 spark plug wire/plug.
Align to TDC.
Rotate bottom crank pulley from wheel well with 19mm socket counter clockwise until youve hit the single timing mark shown here.

Or you can place an extension in the spark plug tube and feel the piston hit the climax.
Before removing the distributor, Id suggest marking the dizzy/housing with a sharpie marker to give you a ball park on where to set your timing for when its time to reinstall. this step is not required but reccomended. (sorry for the crappy pic, you cant see well it but its marked)
on the dizzy
where the dizzy bolts up
and also which plugs went to which cylinder. on the motor its 4-3-2-1. On the dizzy its
3 - 4
1 | 2
After marking, unclip the dizzy from coil and remove 3 bolts in red and set aside. Also unclip heater hose and sensors shown in yellow.
Remove the clips from coil to the wiring harness and unbolt these 4 bolts. The coil and mounting bracket will come right off. After that remove this black mounting plate.

Now time to move to the driver side of the motor. Loosen the Power steering pump tensioner (circled on right), then loosen other nut circled. To remove the pump from bracket there is one more bolt with a U joint on the end under the whole assembly.
Belt should be loose and is time to be removed.
I just rest it on the reservoir.
Next is the alternator. Unlike the D series the alt is in the front and is PITA to get out of its mounting bracket. It just takes some persuation. The tensioner is UNDER the alt, then just like the power steering unbolt on side. (best pics i could take)


Again to make it easy, I leave it all connected and just kinda rotate it and set it on the strut tower to the side.
Remove mounting brackets that were holding alt, powersteering pump.

and top timing cover(2 bolts).
Next step you need to take off the valve cover so you can get the intake manifold bolts easier.
!!!! VERY IMPORTANT !!!!
****Try not to contaminate the motor while its open.
you need to unbolt the intake manifold from the head. The flange has 4 bolts on top and five on the bottom.
While your under the car loosening the 5 IM nuts you will need to remove this bolt from the mounting bracket. The IM should now be only resting on the studs.

Back on top of the car now, push back the intake manifold and your almost ready to pull the head !
Now we need to loosen the timing belt so we can slide it off of the cam gear.
Not Required but makes it easier *** Place a floor jack under the oil pan with a piece of wood where it will hit the pan(so you dont damage the oil pan).
Lightly jack up the jack until it makes contact with the bottom of the pan. Loosen and remove the bolt going through the motor mount

and jack up the motor slightly while loosening the motor mount and it will easily come out.
once you pull the bolt out from the mount, jack the motor up or down, whichever gives you more clearance to loosen the timing belt tensioner. I perfer jaking it up.
You need to get to this tensioner

Once the timing chain is loose, slide it back off the cam.

!!!!!!!! READ THIS !!!!!!!!
NOT REQUIRED *** I took off my rocker arm assembly to clean the head the best i could. below is an easy how to from the FAQ's. you will want to remove the rocker arm assembly now bc the head is still anchored.
http://www.cb7tuner.com/vbb/sh...seals
Next step is VERY IMPORTANT not to rush through ! You need to loosen the head studs SLOWLY so you dont warp the head. Slower the better.
You will need some muscle on this so use a pipe, jack handle, or anything you can get around a nice ratchet will do.
Now loosen the headstuds in this order so you dont warp the head.
!!!!!!!! BREAKTIME !!!!!!!!
Take a min and set up a nice CLEAN area to put the head on when you pull it.
NOT LIKE THIS !!! HA HA

I use to bag all my nuts and bolts and i reccomend doing it that way if this is your first time. Id use labels like IM, valvecover, distrib, etc... but ive done it enough times now that i just keep a neat little pile.
Now go ahead and pat yourself on the back and pull the head off the block and put it on the nice clean area you just made for it !!!!!
Since the engine bay is all opened up and if you want to do the extra maint. look around and inspect everything real good and see if anything needs replacing. Id highly suggest converting this portion of the hydraulics in the clutch from rubber to ss.
Also any weathered misc hoses back there you see, now is a good time to replace !
Ok so turn the head over and place a straight edge over each corner and check with a valve lash adjustment .05mm. If you can fit the .05mm valve lash between the straight edge and the head, time to go to the machine shop.
Mine was fine... so back to hard labor...
Time to scrape off those 14yr old gaskets ! Your gonna need some chemicals to knock this out. I reccomend using mineral spirits, gasket scraper set, and a brass brush, (not stainless steel).

Just go at it and scrape away !
.......................if you accidently nick it a little bit use some light sandpaper to smooth it out best you can. The goal is to make a completely flat smooth surface for the gasket to bond to.....................but eventually you want it to look like this
Time to put on your new headgasket. Make sure you put it on correctly ! There is a oil pressure sensor right in the middle in the back.

I was working by myself this time, (brother wimped out on me ) I needed about a 1/2" of clearance so i tied a rope to the IM to the strut tower to hold it back out of the way good enough while i was lowering the head down on the head studs.
Time to start torque'n ! 3 step process
29ftlbs
51ft/lbs
72.3 ft/lbs
Time for some oil ! Not just any oil ! I perfer Mobil1 Synthetic. others may disagree but thats another thread... If this was a new dual spring 9k revving Bisi valvetrain or something crazy id suggest some assembly lube.

...... but UNFORTUNITLY this is my 120,000 beat to hell motor. I have always used a small funnel and funnel Mobil 1 lightly cam journals/reservoirs, valvesprings and all moving parts. Ive never had and issues with this method.
Retighten rocker arm assembly in correct order now that the head is anchored. Loosen all 16 valves. Link was posted above.
Ok now time to remount the powerstearing bracket first then the alt bracket make sure this bolt it torqued down good because the alt bracket covers it.

Mount alternator and powersteering pump on brackets but do not put belts on pullies yet. Were now ready to time the motor.
To time the motor isnt as hard as it sounds. The only thing you have to do is compensate for the slack of the belt. I found that if you line up your bottom end approx to this position.
this is basically what happens, you turn the crank it starts the rotation first, then the belt begins to tighten, then once it tightens it turns the cam.
After you get the belt on crank the motor over manually min 3x to verify that the crank TDC mark and the cam gear mark are lined up at the same time. I find it a hell of alot easier to see the cam gear marks by looking from valvetrain side instead of trying to see through the belts and engine bay. (everyone does it different) You can see the mark just to the right on the gear.
OK, after thats all done and you have turned the motor over manually and verified the motor is in time, then its on to adjust the valvetrain. Again everyone has their own method on how to adjust valves and this is mine.
I get all my valve lashes set up and ready to go, from left to right .009 - .013

your adjustment specs are:
intake .010 (closest to firewall)
exhaust .012 (exhaust manifold side)
This is how i was taught. Intake valve : Adjust valve to .010, if the .009 will fit but the .011 wont. then your good and its on to the exhaust. tighten adjusting nut to 14ft/lbs
Start by putting motor back to TDC and adjust num one cylinder intake and exhaust valves.

Now rotate crank 180 deg and make sure the "up" arrow on the cam gear is in the 9 o'clock position. Adjust cylinder num 3.
I use my deep extension to feel each piston hit the climax. (but its not required)
Use caution when doing this.
Rotate crank 180 deg and "up" arrow should be pointing in 6 o'clock position. Adjust cylinder num 4. Again, you can use the extension to feel the piston get in the upper most position so that you cann adjust valves.

Finally rotate crank 180 deg. "up" arrow on cam gear should now be in 3 o' clock position and now time to adjust cylinder num 2.
After this is complete your motor should be ready to fire ! Time to put everything back together and get ready to make sure ignition timing is set properly. You will need a timing light for this. Have a friend watch under the car/in the bay for any oil/coolant leaks. Once you have verified there are no leaks get the timing light out and check to make sure the timing is on. Point timing light at bottom crank pulley, rotate distributor to align the middle line with the pointer on the lower timing cover.
After verifying motor is timed its time to start cleaning up !


Here is the link from the FAQs to help on timing. If you should run into a prob.
https://honda-tech.com/zerothread/1908944
I will edit this post later with better pics and more elaborate explanations.
Modified by NeKe1point0 at 4:37 PM 10/26/2008
There are many ways to remove the head of this car, and also everyones setup is a little different. My car is turbo, so i had a few extra steps not seen in the pics below. It wouldve been 10x easier if it was stock IMO.
If something isnt worded right or correctly just IM me and i can edit the OP.
Fram orange can oil filters are the worst filter you can have (look at oil filter tests). Goodluck.....Cheers!
.................................................. .................................................. ..................
Tools needed
Floor Jack
Jack stands
Screwdrivers/needlenose pliers
1/4" sockets set 10mm-19mm
1/4" drive extentions
3/8" socket set 10mm-19mm
3/8"drive extentions
3/8" Swivel joint
opened and closed end wrenches 10,12,14,17mm
Timing light
Torque wrench capable of 8.7 ft/lbs - 72ft/lbs
.................................................. .................................................. ..................
Step one disconnect neg battery term. and drain ALL fluids ! Oil and Coolant !!!!
Remove header/Exhaust Manifold.
Remove cylinder num1 spark plug wire/plug.
Align to TDC.
Rotate bottom crank pulley from wheel well with 19mm socket counter clockwise until youve hit the single timing mark shown here.
Or you can place an extension in the spark plug tube and feel the piston hit the climax.
Before removing the distributor, Id suggest marking the dizzy/housing with a sharpie marker to give you a ball park on where to set your timing for when its time to reinstall. this step is not required but reccomended. (sorry for the crappy pic, you cant see well it but its marked)
on the dizzy
where the dizzy bolts up
and also which plugs went to which cylinder. on the motor its 4-3-2-1. On the dizzy its
3 - 4
1 | 2
After marking, unclip the dizzy from coil and remove 3 bolts in red and set aside. Also unclip heater hose and sensors shown in yellow.
Remove the clips from coil to the wiring harness and unbolt these 4 bolts. The coil and mounting bracket will come right off. After that remove this black mounting plate.
Now time to move to the driver side of the motor. Loosen the Power steering pump tensioner (circled on right), then loosen other nut circled. To remove the pump from bracket there is one more bolt with a U joint on the end under the whole assembly.
Belt should be loose and is time to be removed.
I just rest it on the reservoir.
Next is the alternator. Unlike the D series the alt is in the front and is PITA to get out of its mounting bracket. It just takes some persuation. The tensioner is UNDER the alt, then just like the power steering unbolt on side. (best pics i could take)
Again to make it easy, I leave it all connected and just kinda rotate it and set it on the strut tower to the side.
Remove mounting brackets that were holding alt, powersteering pump.
and top timing cover(2 bolts).
Next step you need to take off the valve cover so you can get the intake manifold bolts easier.
!!!! VERY IMPORTANT !!!!
****Try not to contaminate the motor while its open.
you need to unbolt the intake manifold from the head. The flange has 4 bolts on top and five on the bottom.
While your under the car loosening the 5 IM nuts you will need to remove this bolt from the mounting bracket. The IM should now be only resting on the studs.
Back on top of the car now, push back the intake manifold and your almost ready to pull the head !
Now we need to loosen the timing belt so we can slide it off of the cam gear.
Not Required but makes it easier *** Place a floor jack under the oil pan with a piece of wood where it will hit the pan(so you dont damage the oil pan).
Lightly jack up the jack until it makes contact with the bottom of the pan. Loosen and remove the bolt going through the motor mount
and jack up the motor slightly while loosening the motor mount and it will easily come out.
once you pull the bolt out from the mount, jack the motor up or down, whichever gives you more clearance to loosen the timing belt tensioner. I perfer jaking it up.
You need to get to this tensioner
Once the timing chain is loose, slide it back off the cam.
!!!!!!!! READ THIS !!!!!!!!
NOT REQUIRED *** I took off my rocker arm assembly to clean the head the best i could. below is an easy how to from the FAQ's. you will want to remove the rocker arm assembly now bc the head is still anchored.
http://www.cb7tuner.com/vbb/sh...seals
Next step is VERY IMPORTANT not to rush through ! You need to loosen the head studs SLOWLY so you dont warp the head. Slower the better.
You will need some muscle on this so use a pipe, jack handle, or anything you can get around a nice ratchet will do.
Now loosen the headstuds in this order so you dont warp the head.
!!!!!!!! BREAKTIME !!!!!!!!
Take a min and set up a nice CLEAN area to put the head on when you pull it.
NOT LIKE THIS !!! HA HA
I use to bag all my nuts and bolts and i reccomend doing it that way if this is your first time. Id use labels like IM, valvecover, distrib, etc... but ive done it enough times now that i just keep a neat little pile.
Now go ahead and pat yourself on the back and pull the head off the block and put it on the nice clean area you just made for it !!!!!
Since the engine bay is all opened up and if you want to do the extra maint. look around and inspect everything real good and see if anything needs replacing. Id highly suggest converting this portion of the hydraulics in the clutch from rubber to ss.
Also any weathered misc hoses back there you see, now is a good time to replace !
Ok so turn the head over and place a straight edge over each corner and check with a valve lash adjustment .05mm. If you can fit the .05mm valve lash between the straight edge and the head, time to go to the machine shop.
Mine was fine... so back to hard labor...
Time to scrape off those 14yr old gaskets ! Your gonna need some chemicals to knock this out. I reccomend using mineral spirits, gasket scraper set, and a brass brush, (not stainless steel).
Just go at it and scrape away !
.......................if you accidently nick it a little bit use some light sandpaper to smooth it out best you can. The goal is to make a completely flat smooth surface for the gasket to bond to.....................but eventually you want it to look like this
Time to put on your new headgasket. Make sure you put it on correctly ! There is a oil pressure sensor right in the middle in the back.
I was working by myself this time, (brother wimped out on me
) I needed about a 1/2" of clearance so i tied a rope to the IM to the strut tower to hold it back out of the way good enough while i was lowering the head down on the head studs. Time to start torque'n ! 3 step process
29ftlbs
51ft/lbs
72.3 ft/lbs
Time for some oil ! Not just any oil ! I perfer Mobil1 Synthetic. others may disagree but thats another thread... If this was a new dual spring 9k revving Bisi valvetrain or something crazy id suggest some assembly lube.
...... but UNFORTUNITLY this is my 120,000 beat to hell motor.
I have always used a small funnel and funnel Mobil 1 lightly cam journals/reservoirs, valvesprings and all moving parts. Ive never had and issues with this method. Retighten rocker arm assembly in correct order now that the head is anchored. Loosen all 16 valves. Link was posted above.
Ok now time to remount the powerstearing bracket first then the alt bracket make sure this bolt it torqued down good because the alt bracket covers it.
Mount alternator and powersteering pump on brackets but do not put belts on pullies yet. Were now ready to time the motor.
To time the motor isnt as hard as it sounds. The only thing you have to do is compensate for the slack of the belt. I found that if you line up your bottom end approx to this position.
this is basically what happens, you turn the crank it starts the rotation first, then the belt begins to tighten, then once it tightens it turns the cam.
After you get the belt on crank the motor over manually min 3x to verify that the crank TDC mark and the cam gear mark are lined up at the same time. I find it a hell of alot easier to see the cam gear marks by looking from valvetrain side instead of trying to see through the belts and engine bay. (everyone does it different) You can see the mark just to the right on the gear.
OK, after thats all done and you have turned the motor over manually and verified the motor is in time, then its on to adjust the valvetrain. Again everyone has their own method on how to adjust valves and this is mine.
I get all my valve lashes set up and ready to go, from left to right .009 - .013
your adjustment specs are:
intake .010 (closest to firewall)
exhaust .012 (exhaust manifold side)
This is how i was taught. Intake valve : Adjust valve to .010, if the .009 will fit but the .011 wont. then your good and its on to the exhaust. tighten adjusting nut to 14ft/lbs
Start by putting motor back to TDC and adjust num one cylinder intake and exhaust valves.
Now rotate crank 180 deg and make sure the "up" arrow on the cam gear is in the 9 o'clock position. Adjust cylinder num 3.
I use my deep extension to feel each piston hit the climax. (but its not required)
Use caution when doing this.
Rotate crank 180 deg and "up" arrow should be pointing in 6 o'clock position. Adjust cylinder num 4. Again, you can use the extension to feel the piston get in the upper most position so that you cann adjust valves.
Finally rotate crank 180 deg. "up" arrow on cam gear should now be in 3 o' clock position and now time to adjust cylinder num 2.
After this is complete your motor should be ready to fire ! Time to put everything back together and get ready to make sure ignition timing is set properly. You will need a timing light for this. Have a friend watch under the car/in the bay for any oil/coolant leaks. Once you have verified there are no leaks get the timing light out and check to make sure the timing is on. Point timing light at bottom crank pulley, rotate distributor to align the middle line with the pointer on the lower timing cover.
After verifying motor is timed its time to start cleaning up !
Here is the link from the FAQs to help on timing. If you should run into a prob.
https://honda-tech.com/zerothread/1908944
I will edit this post later with better pics and more elaborate explanations.
Modified by NeKe1point0 at 4:37 PM 10/26/2008
Honda-Tech Member
Joined: Oct 2012
Posts: 2,000
Likes: 3
From: Minnesota
Thanks so much for this helpful write up and sticky.
It's really helpful and informative
I am doing the EXACT same thing on F22B1 and need help and advice.
Questions:
1-How should I pull the head-bolts off? They seem to be a PITA, I tried using impact didn't work, breaker bar--no luck. Then finally used a big cheater pipe and was able to break the lower bolts while upper ones, still they don't budge, any special trick for it and are they the same size as lower ones(14)?
2-Do I have to remove the Alternator and engine mounts to remove the Head?
3-What's the name of the sensor/switch and how will it come out on the left side of block and back side of upper radiator hose entrance?
4-How will I be able to slide/remove the Timing belt off of camshaft without removing crank pulley bolt?
Please help and advice would really appreciate all the input.
It's really helpful and informative
I am doing the EXACT same thing on F22B1 and need help and advice.
Questions:
1-How should I pull the head-bolts off? They seem to be a PITA, I tried using impact didn't work, breaker bar--no luck. Then finally used a big cheater pipe and was able to break the lower bolts while upper ones, still they don't budge, any special trick for it and are they the same size as lower ones(14)?
2-Do I have to remove the Alternator and engine mounts to remove the Head?
3-What's the name of the sensor/switch and how will it come out on the left side of block and back side of upper radiator hose entrance?
4-How will I be able to slide/remove the Timing belt off of camshaft without removing crank pulley bolt?
Please help and advice would really appreciate all the input.
2-No you will not need to remove them, just remove the belt.
3-There is a coolant inlet, temperature sensor, and temperature/fan switch all on the side of the head.
4-You don't remove the belt, you just loosen the tensioner which is accessible via the cover.
Honda-Tech Member
Joined: Jan 2009
Posts: 419
Likes: 0
From: VA
Thanks so much for the reply and response, appreciate it.
X2!
1-The head bolts are probably just stuck on good, depending on the amount of miles your car has on it. DO NOT USE A 12pt SOCKET, make it certain you are using a 6pt or you will for sure strip the bolt.
I have nearly ~233k, I have used 12 pt 
Anyway I can remove one of the bolt whose head is lil bit stripped?
That's what my biggest fear was when I was thinking about it today, since I worked on the car yesterday.
3-There is a coolant inlet, temperature sensor, and temperature/fan switch all on the side of the head.
I think I am talking about the temperature sensor. 12 mm wrench is able to loosen it. How should I take it out from the block? It's screwed to head and if I try to open, there is an electric wire hooked to it and it might break?
So you mean, I can just remove the tensioner while upper T/B cover is removed?
Thanks again for helping out brother
1-The head bolts are probably just stuck on good, depending on the amount of miles your car has on it. DO NOT USE A 12pt SOCKET, make it certain you are using a 6pt or you will for sure strip the bolt.
Anyway I can remove one of the bolt whose head is lil bit stripped?
That's what my biggest fear was when I was thinking about it today, since I worked on the car yesterday.
3-There is a coolant inlet, temperature sensor, and temperature/fan switch all on the side of the head.
4-You don't remove the belt, you just loosen the tensioner which is accessible via the cover.
Thanks again for helping out brother
Honda-Tech Member
Joined: Oct 2012
Posts: 2,000
Likes: 3
From: Minnesota
Thanks so much for the reply and response, appreciate it.
X2!
I have nearly ~233k, I have used 12 pt
Anyway I can remove one of the bolt whose head is lil bit stripped?
That's what my biggest fear was when I was thinking about it today, since I worked on the car yesterday.
I think I am talking about the temperature sensor. 12 mm wrench is able to loosen it. How should I take it out from the block? It's screwed to head and if I try to open, there is an electric wire hooked to it and it might break?
So you mean, I can just remove the tensioner while upper T/B cover is removed?
Thanks again for helping out brother
You might be able to get it with a 6pt as long as you have a lot of downforce on the bolt when trying to remove it. Otherwise you will need a stripped bolt remover, OR potentially have to cut it off/grind it off and pull it out after the fact. Sadly..
As far as the temp sending unit goes just pull out the wire, its a connector! lol

Honda-Tech Member
Joined: Jan 2009
Posts: 419
Likes: 0
From: VA
Appreciate the picture, that's really helpful
About the sensor, I was thinking maybe it's a bolt too, lol!

Before I try anything else on the headbolts, one last question, can I try using an Air Impact with a deep 6pt 14mm socket?
Or hand-tool would be best for pulling the stuck/stripped bolt?
How about Timing belt, can I just remove the tensioner while upper T/B cover is removed?
Looking for a response and help
Thank you again


Honda-Tech Member
Joined: Jan 2009
Posts: 419
Likes: 0
From: VA

I am able to crack 8/10, while '2' are still stuck and proving to be a PITA for me

Please have a look on the attached pictures both are from the right side of the head(Upper and lower)
Please advise, how should I crack them?