

pics of innovative mounts h22 installed?

Honda-Tech Member
Joined: Mar 2007
Posts: 3,074
Likes: 0
From: SOCAL, ca, 91702
<TABLE WIDTH="90%" CELLSPACING=0 CELLPADDING=0 ALIGN=CENTER><TR><TD>Quote, originally posted by ketchup »</TD></TR><TR><TD CLASS="quote">I can't seem to find any install pics of a h22 / crx using innovative mounts. Anyone come across any?</TD></TR></TABLE>
check my sig. and the car is for sale!!
pics in there!
check my sig. and the car is for sale!!
pics in there!
Thread Starter
Honda-Tech Member
iTrader: (3)
Joined: May 2004
Posts: 1,050
Likes: 1
From: San Diego, CA
I'm actually looking for pictures of each mount as they are placed on the motor, more like someone's photo album during their h22 install using innovative mounts.
Nice car tho, GL with the sale
Nice car tho, GL with the sale
Honda-Tech Member
Joined: Mar 2007
Posts: 3,074
Likes: 0
From: SOCAL, ca, 91702
<TABLE WIDTH="90%" CELLSPACING=0 CELLPADDING=0 ALIGN=CENTER><TR><TD>Quote, originally posted by ketchup »</TD></TR><TR><TD CLASS="quote">I'm actually looking for pictures of each mount as they are placed on the motor, more like someone's photo album during their h22 install using innovative mounts.
Nice car tho, GL with the sale </TD></TR></TABLE>
what exactly are you looking for?? the mounts bolted to the motor look like any other drop in mount kit.
the drivers side needs no mods to the mount. the pass side you need to cut off the stock mount. then bolt on the innovative plate. Its recommended you weld it on because it will only be held on by 2 12mm bolts. i put a nice bead around the plate. then the mount bolts to the trans and onto the bracket that was welded to the chassis. rear mount is basic. doesnt need any modification. the frame rails and certain parts need to be (massaged) a little bit in order to clear the trans and the crank pulley. its quite a bit of work, especially if you plan to convert to full hydro..
are you planning on putting this in your car?
Nice car tho, GL with the sale
</TD></TR></TABLE>what exactly are you looking for?? the mounts bolted to the motor look like any other drop in mount kit.
the drivers side needs no mods to the mount. the pass side you need to cut off the stock mount. then bolt on the innovative plate. Its recommended you weld it on because it will only be held on by 2 12mm bolts. i put a nice bead around the plate. then the mount bolts to the trans and onto the bracket that was welded to the chassis. rear mount is basic. doesnt need any modification. the frame rails and certain parts need to be (massaged) a little bit in order to clear the trans and the crank pulley. its quite a bit of work, especially if you plan to convert to full hydro..
are you planning on putting this in your car?
Thread Starter
Honda-Tech Member
iTrader: (3)
Joined: May 2004
Posts: 1,050
Likes: 1
From: San Diego, CA
<TABLE WIDTH="90%" CELLSPACING=0 CELLPADDING=0 ALIGN=CENTER><TR><TD>Quote, originally posted by h22crxpwr »</TD></TR><TR><TD CLASS="quote">
what exactly are you looking for?? the mounts bolted to the motor look like any other drop in mount kit.
the drivers side needs no mods to the mount. the pass side you need to cut off the stock mount. then bolt on the innovative plate. Its recommended you weld it on because it will only be held on by 2 12mm bolts. i put a nice bead around the plate. then the mount bolts to the trans and onto the bracket that was welded to the chassis. rear mount is basic. doesnt need any modification. the frame rails and certain parts need to be (massaged) a little bit in order to clear the trans and the crank pulley. its quite a bit of work, especially if you plan to convert to full hydro..
are you planning on putting this in your car?</TD></TR></TABLE>
Yes, I already have the motor and performed some R&R on it. Waiting for the mounts in the mail. I'm getting a UR single belt crank pulley, so I hope that helps with some of the clearance issue on that side. I just wanted as much visuals for reference, so I can get this swap done asap.
Honda-Tech Member
Joined: Mar 2007
Posts: 3,074
Likes: 0
From: SOCAL, ca, 91702
<TABLE WIDTH="90%" CELLSPACING=0 CELLPADDING=0 ALIGN=CENTER><TR><TD>Quote, originally posted by ketchup »</TD></TR><TR><TD CLASS="quote">
Yes, I already have the motor and performed some R&R on it. Waiting for the mounts in the mail. I'm getting a UR single belt crank pulley, so I hope that helps with some of the clearance issue on that side. I just wanted as much visuals for reference, so I can get this swap done asap.</TD></TR></TABLE>
you will also need custom axles. and the clearance on the pulley side is tight. i turned down the stock pulley to a single row. i recommend taking a large hammer to the lower framerail where the crank pulley sits to give you some clearance to change the Alt belt. also the alt will hit the headlight unless you run an explicit speed or similar bracket. or you can cut out part of the headlight metal cage to make it fit with the stock alt mount.
also you need a aftermarket front crossmember. pref one that doesnt have the radius rod too close to the crank pulley. i have the place racing one and its great but good luck finding one now!
also you need to trim some of the trans side framerail. the thin part on the bottom of the framerail will need to be either hammered flat or cut off. and the rear crossmember needs some massaging with the hammer too.
and you need to relocate the battery as the mount now goes where your battery tray used to be.
Did you buy a Cable to hydro actuator?? i'd recommend doing the full hydro swap.. its a lot of work but worth it as you cant shift for **** with the garbage actuator. and it feels like you have a super heavy race clutch even with a stock clutch as the cable now has to pull a lot harder. you may tend to break cables or pedal assmblys because the cable is under a lot more stress. If you have a race clutch (6 puck) heavy duty or dual Diaghram pressure plate then you are going to grow some monster calves because its HARD as hell to push the cluctch in when running the actuator.
wiring i just used a obd0 to obd1 jumper (p28 ecu) and did the wiring myself.
the hood should clear pretty well. it will be close but will still close..
people don't realize how much work it is to do this motor. thats why the price i'm selling mine for is WAYY under how much it took to get this car ready.
Anway.. Good luck!! i can get some parts for your swap if you are interested. actually i have a mount kit brand new if you can return your other one i'll sell you this one cheap..
Trending Topics
Honda-Tech Member
Joined: Mar 2007
Posts: 3,074
Likes: 0
From: SOCAL, ca, 91702
<TABLE WIDTH="90%" CELLSPACING=0 CELLPADDING=0 ALIGN=CENTER><TR><TD>Quote, originally posted by ESP.net »</TD></TR><TR><TD CLASS="quote">Inno's kit work with factory booster? Also curious on the driver side valve cover hit shock tower?</TD></TR></TABLE>
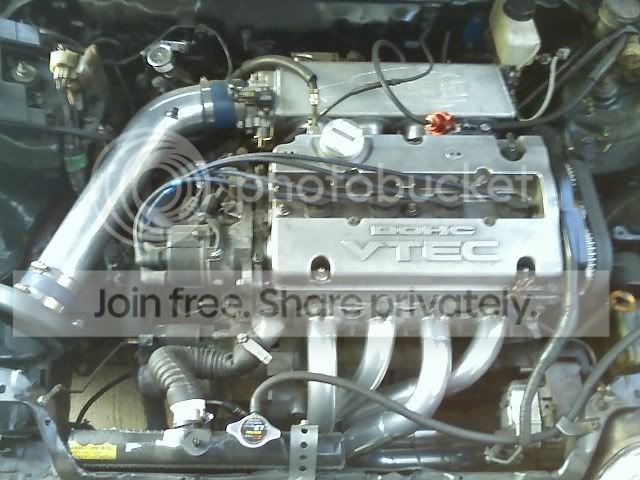
the kit clears the booster with a good amount of room. and no hitting the shock tower. hood can even close with no trimming or anything. it actually has great clearance. i have some engine pics in my for sale thread in my SIG.. the master cylinder i have (kens kustom) i used because i switched to the GE manifold. no way that would fit. but the stock Mani fit with no probs...
the kit clears the booster with a good amount of room. and no hitting the shock tower. hood can even close with no trimming or anything. it actually has great clearance. i have some engine pics in my for sale thread in my SIG.. the master cylinder i have (kens kustom) i used because i switched to the GE manifold. no way that would fit. but the stock Mani fit with no probs...

Thread
Thread Starter
Forum
Replies
Last Post
K24CRXTX
Honda CRX / EF Civic (1988 - 1991)
3
Aug 17, 2010 11:18 AM
Newman
Hybrid / Engine Swaps
12
Sep 30, 2003 08:46 PM