

93 Prelude Rear Quarter Panel Replacement - MANY PICS

Thread Starter
Honda-Tech Member
Joined: Jan 2008
Posts: 18
Likes: 1
From: USA
I'm currently in the process of replacing the rear quarter panels on my 1993 Prelude. I did alot of searching on this topic but couldn't quite find much information or any pics. So, i decided to start a thread to show the entire process of my restore.
This is what i'm starting with:


Entire interior stripped:


The RUST:


Glass Removed:


Some other damage to fix:


The car has been in an accident. You can see the metal where the door hinges bolt up, its all bent to hell. That metal will also be removed and replaced with a new piece from a donor car.
The front end also needs some work, plan to replace the front radiator support as well.
I will continue to update with new pics as more progress is made. Tonight i will start to drill out the spot welds to seperate the panels from the rest of the car.
This is what i'm starting with:
Entire interior stripped:
The RUST:
Glass Removed:
Some other damage to fix:
The car has been in an accident. You can see the metal where the door hinges bolt up, its all bent to hell. That metal will also be removed and replaced with a new piece from a donor car.
The front end also needs some work, plan to replace the front radiator support as well.
I will continue to update with new pics as more progress is made. Tonight i will start to drill out the spot welds to seperate the panels from the rest of the car.


Thread Starter
Honda-Tech Member
Joined: Jan 2008
Posts: 18
Likes: 1
From: USA
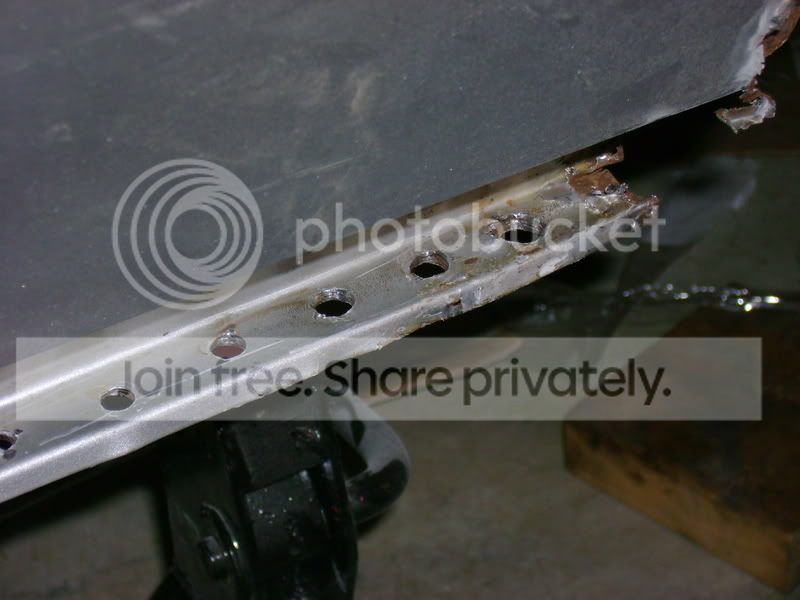
I started to drill out some of the spot welds around the driver side rear quarter panel. I'm using a 5/16 drill bit.


Here you can see how the roof and quarter connect to each other. The roof piece lays on top of the quarter panel piece. You'll need a wire wheel to remove some of the filler to see the spot welds, this is where i stopped for the evening.

I plan to have the entire panel removed by this weekend, then i can start on the passenger side.
Here you can see how the roof and quarter connect to each other. The roof piece lays on top of the quarter panel piece. You'll need a wire wheel to remove some of the filler to see the spot welds, this is where i stopped for the evening.
I plan to have the entire panel removed by this weekend, then i can start on the passenger side.

Honda-Tech Member
Joined: Jul 2007
Posts: 249
Likes: 0
From: Central, NJ, Middlesex
Too late to tell you not to drill all the way through now I guess. A piece of advice would also be to section it before the roof at the sail panel. That way you don't have to compromise any welds or corrosion protection at the roof.
But your doing a good job so far. Keep it up man.
But your doing a good job so far. Keep it up man.
Trending Topics
Honda-Tech Member
Joined: Jul 2007
Posts: 249
Likes: 0
From: Central, NJ, Middlesex
Also another reason not to drill the roof welds would be that you would then have to take your new quarter panel and punch out your weld holes in the same exact spot to have your weld go from roof to quarter to inner structure. Big pain in the *** that way. This is based all off the premise that the quarter is under the roof skin like on most cars.
Honda-Tech Member
Joined: Mar 2006
Posts: 303
Likes: 0
From: MA
yea you shouldnt have drilled all the way through...now you are going to have fun filling up all those holes. And llike disease said, section it at the sail panel. There is really no point going any higher than that.


Thread Starter
Honda-Tech Member
Joined: Jan 2008
Posts: 18
Likes: 1
From: USA
Thanks for the advice, but where were you guys before i started to drill out the holes?? LOL
98-DC4 - What is the name for that type of drill bit? I'll probably use those when i do the passenger side, looks like they would help alot.
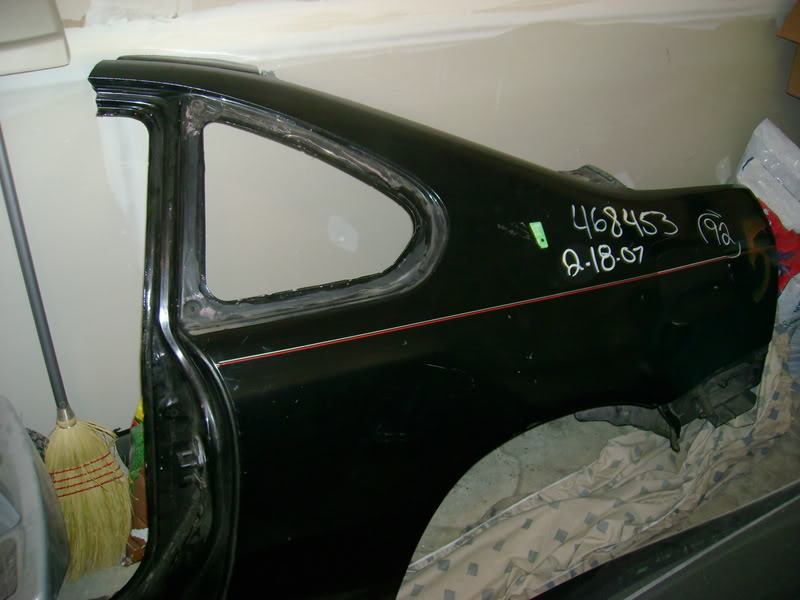
I got the panel removed:


The Replacement panel:
98-DC4 - What is the name for that type of drill bit? I'll probably use those when i do the passenger side, looks like they would help alot.
I got the panel removed:
The Replacement panel:
Honda-Tech Member
Joined: Jul 2007
Posts: 249
Likes: 0
From: Central, NJ, Middlesex
Around the windshiled just weld it in from the inside since you drilled through and do the same on anything else you can weld in from the opposite side. The ones you can't get to from the back, offset the plug holes. You should do that anyways so that the weld has more metal to bite into.
The bit is called a spot weld cutter made by blair.
http://www.blairequipment.com/
I'm sure that there are other makers out there but that is what I use. Tip use them at low rpm's. They last longer and cut faster that way.
The bit is called a spot weld cutter made by blair.
http://www.blairequipment.com/
I'm sure that there are other makers out there but that is what I use. Tip use them at low rpm's. They last longer and cut faster that way.
Honda-Tech Member
Joined: Mar 2006
Posts: 303
Likes: 0
From: MA
<TABLE WIDTH="90%" CELLSPACING=0 CELLPADDING=0 ALIGN=CENTER><TR><TD>Quote, originally posted by Disease »</TD></TR><TR><TD CLASS="quote">
The bit is called a spot weld cutter made by blair.
http://www.blairequipment.com/
I'm sure that there are other makers out there but that is what I use. Tip use them at low rpm's. They last longer and cut faster that way.</TD></TR></TABLE>
Yep thats the brand we use at the body shop i work at. It has a reversible bit so you when one side gets dull you just in screw it and turn it around.
Junior Member
Joined: Mar 2006
Posts: 128
Likes: 0
From: Around, NY, Usa
nice....quick question....is it easy removing it? I have to do the exact same thing to mines....already got the replacement quarter from Honda. Im leaving the welding to the professioal but im trying to minimize cost. If i cant remove the quarter panel myself great. All ill need is that spot weld cutter and a wire wheel ro remove the seam right?
Modified by Chekz at 3:57 PM 2/1/2008
Modified by Chekz at 3:57 PM 2/1/2008
Junior Member
Joined: Mar 2006
Posts: 128
Likes: 0
From: Around, NY, Usa
nice....quick qyestion....is it easy removing it? I have to do the exact same thing to mines....already got the replacement quarter from Honda. Im leaving the welding to the professioal but im trying to minimize cost. If i cant remove the quarter panel myself great. All ill need is that spot weld cutter and a wire wheel ro remove the seam right?
Thread Starter
Honda-Tech Member
Joined: Jan 2008
Posts: 18
Likes: 1
From: USA
Update: I got the spot weld remover bits. I still need to drill out the welds from the replacement panel. Then i can transfer the panel to the car and align it before welding. This should be completed this week.
MidShipCivic - I used an air cut-off tool to cut the panel at the door frame.
Chekz - After you remove the glass and drill out the welds, the panel comes apart easily. It's tricky around the gas cap.
MidShipCivic - I used an air cut-off tool to cut the panel at the door frame.
Chekz - After you remove the glass and drill out the welds, the panel comes apart easily. It's tricky around the gas cap.
Junior Member
Joined: Mar 2006
Posts: 128
Likes: 0
From: Around, NY, Usa
well my damage is on the passenger side so i dont have to worry about the gas cap area. I just need to remove mines and then have the welder come weld it. I was thinking of gluing mines but im very picky and i want mines to look like factory.
Honda-Tech Member
Joined: Aug 2004
Posts: 4,638
Likes: 0
From: Altamonte Springs/Orlando, Florida, USA
<TABLE WIDTH="90%" CELLSPACING=0 CELLPADDING=0 ALIGN=CENTER><TR><TD>Quote, originally posted by mrbleegs »</TD></TR><TR><TD CLASS="quote">
MidShipCivic - I used an air cut-off tool to cut the panel at the door frame.
</TD></TR></TABLE>
Did you use a certain thickness of disc?
MidShipCivic - I used an air cut-off tool to cut the panel at the door frame.
</TD></TR></TABLE>
Did you use a certain thickness of disc?
Thread Starter
Honda-Tech Member
Joined: Jan 2008
Posts: 18
Likes: 1
From: USA
No updates at the moment. My civic spun a rod bearing so ive had to deal with that over the last week, replacing the bottem end with a used one from the wrecker that i scored for $100! I hope to get back to work by next week.
<TABLE WIDTH="90%" CELLSPACING=0 CELLPADDING=0 ALIGN=CENTER><TR><TD>Quote, originally posted by JDM_JNKY »</TD></TR><TR><TD CLASS="quote">not too shabby.. what made you decide to re-vamp the lude?</TD></TR></TABLE>
I got the car for FREE from my neighbor after his kids all had their turn wrecking it. Plus i already own 2 other hondas so i figure why not a 3rd. I'm really only looking to get this car on the road and driveable at first, maybe something more as time goes on and depending on how all of this turns out
<TABLE WIDTH="90%" CELLSPACING=0 CELLPADDING=0 ALIGN=CENTER><TR><TD>Quote, originally posted by MidShipCivic »</TD></TR><TR><TD CLASS="quote">Did you use a certain thickness of disc?</TD></TR></TABLE>
The blade was quite thick, however im not sure exactly sure how thick. Im assuming there is a standart thickness, this blade was about 3 inches in diameter.