

valve cover how too..

Thread Starter
Honda-Tech Member
Joined: Feb 2007
Posts: 1,155
Likes: 0
From: spokane
alright, so i misplaced the early ongoing picture's with paint stripping and prep.
sorry i'll haft to explain. i didn't use aircraft remover ( but there is nothing wrong with using it ) i used a spray on brand that i got from a kc paint supply store. i had to apply it about three times and it goes as follows
-spray the face of the valve cover for your first coat
-make sure you have water in a bucket near by in case it gets on your skin, paint stripper neutralizes with water and DO NOT GET IT IN YOUR EYES OR NEAR YOUR EYES !
-the first coat will start to bubble after a minute of so, after ten min. you might as well neutralize with water and clean with some old paint brushes you don't care about or a thick and fine bristled brush that won't scare the metal.
-repeat this process try to get all nooks and cranny's stripped of old paint. i also used compressed air after the paint stripper was neut. to get in some area's.
finally after i repeated this three times the paint was off. i then prepped with my mini pistol grip DA ( dual action sander ) but in you don't have one, sanding with 120, 150, will do fine. a wet scotch bright and compressed air followed.
and now prime ( i used ppg k36 primer surfacer ) 2 coats.
the mixture is 4:1:1 , k36, i can't remember the catalyst a ppg store should be able to tell you, and dt solvent 885 ( depending on room temp, it was around 70 degrees when i shot the paint. )
and boom it's boring grey !


at my shop we had a brand new element come in for a front end hit, the color was kiwi pearl. it looked sweet so i went with that color. i wet sanded with 320, then 400 in all area's i could reach and again i used a wet scotch bright.


the paint came out good, i was loving the color ! now for the letters
-get some tape, and a piece of a paint stick with some sticky 120 grit paper and sand.
note : i went sideways because i wanted to leave the sandscratches on the metal to leave a machined look.


now for the H, on the jdm cover.

it's important to be careful and patient, you could scratch your new paint job.


and there it is !
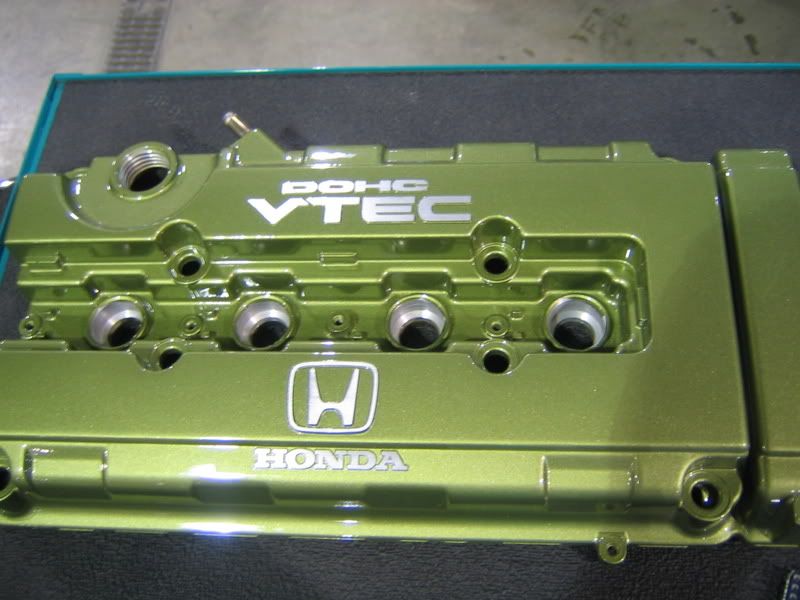
and it's ready. this isn't a high heat paint but it's more of show purpose. however i have two other covers i did the same way and they are holding up just fine.
Last edited by jasoncrashtech; Jul 2, 2013 at 07:27 PM. Reason: crappy spelling (blah)
Thread Starter
Honda-Tech Member
Joined: Feb 2007
Posts: 1,155
Likes: 0
From: spokane
what up acid ! howz the h22 going !
and to answer your question, just call up a local bodyshot around where you live and ask where they get there supplies. get an address and phone number. if you buy from them ask for " p pages" this will tell you all the info about the product you need. you will need catalyst, reducer ( or solvent ), and primer surfacer.
pm me if you have anymore questions !
Thread Starter
Honda-Tech Member
Joined: Feb 2007
Posts: 1,155
Likes: 0
From: spokane
<TABLE WIDTH="90%" CELLSPACING=0 CELLPADDING=0 ALIGN=CENTER><TR><TD>Quote, originally posted by kelviiv »</TD></TR><TR><TD CLASS="quote">Good Write up</TD></TR></TABLE>
thanks
thanks
Honda-Tech Member
Joined: Aug 2007
Posts: 3,895
Likes: 0
Whaha. Thanks Jason that sparkle paint is great looking.
As for my H22. Its running so much better, than originally. I just got my Vtak cracking and its great. Whoa who.
Now all thats left is a Tuning system, and a tranny swap, then its off to body work and what not.
As for my H22. Its running so much better, than originally. I just got my Vtak cracking and its great. Whoa who.
Now all thats left is a Tuning system, and a tranny swap, then its off to body work and what not.


Trending Topics
Thread Starter
Honda-Tech Member
Joined: Feb 2007
Posts: 1,155
Likes: 0
From: spokane
thanks guys.
i've rattle canned valve covers like this and it still came out clean. good prep makes a big differencebut the gloss doesn't last
i've rattle canned valve covers like this and it still came out clean. good prep makes a big difference
but the gloss doesn't last
Last edited by jasoncrashtech; Jul 2, 2013 at 06:40 PM.

Honda-Tech Member
Joined: May 2006
Posts: 409
Likes: 0
From: Dublin or MN
I thought it looked clear for sure, but my friend was told not to use clear when doing his engine bay cuz of heat, so i thought definately not on valve cover. I would love to see how it holds up cuz i want to do mine like that but i don't know if it will last.
Thread Starter
Honda-Tech Member
Joined: Feb 2007
Posts: 1,155
Likes: 0
From: spokane
<TABLE WIDTH="90%" CELLSPACING=0 CELLPADDING=0 ALIGN=CENTER><TR><TD>Quote, originally posted by inspector01 »</TD></TR><TR><TD CLASS="quote">I thought it looked clear for sure, but my friend was told not to use clear when doing his engine bay cuz of heat, so i thought definately not on valve cover. I would love to see how it holds up cuz i want to do mine like that but i don't know if it will last.</TD></TR></TABLE>
for the most part, engine bays are always in single stage. the heat will be hard on the clear, and my motor is boosted. i will keep posting on how it is holding up
for the most part, engine bays are always in single stage. the heat will be hard on the clear, and my motor is boosted. i will keep posting on how it is holding up

Honda-Tech Member
Joined: Oct 2005
Posts: 1,936
Likes: 0
From: Paint'n $hit from FL 2 GA
<TABLE WIDTH="90%" CELLSPACING=0 CELLPADDING=0 ALIGN=CENTER><TR><TD>Quote, originally posted by jasoncrashtech »</TD></TR><TR><TD CLASS="quote">yes, base coat , clear.
ppg
Modified by jasoncrashtech at 9:57 PM 1/14/2008</TD></TR></TABLE>
I can spot PPG from a mile away. Nothing can beat the shine of PPG.
ppg
Modified by jasoncrashtech at 9:57 PM 1/14/2008</TD></TR></TABLE>
I can spot PPG from a mile away. Nothing can beat the shine of PPG.