

Just another B16 swap for viewing pleasure (PICS!)

Thread Starter
Honda-Tech Member
Joined: May 2007
Posts: 1,331
Likes: 0
From: Milwaukee, WI
Ok, i wanted to gather some write up and pics before i posted anything. I'll start out with how it sits now.

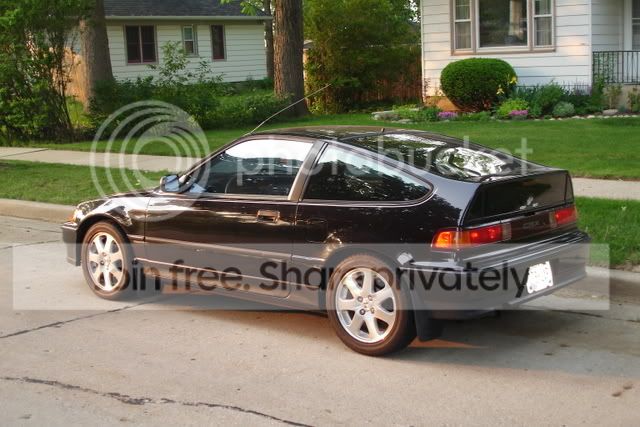
Si wheels, LS seats, Momo steering wheel, smoked amber corners, tint, some new molding, and yes, the stupid fog lights will come off.
I came across a good deal on another CRX that had a B16 swap in it already. It also included some nice mods.
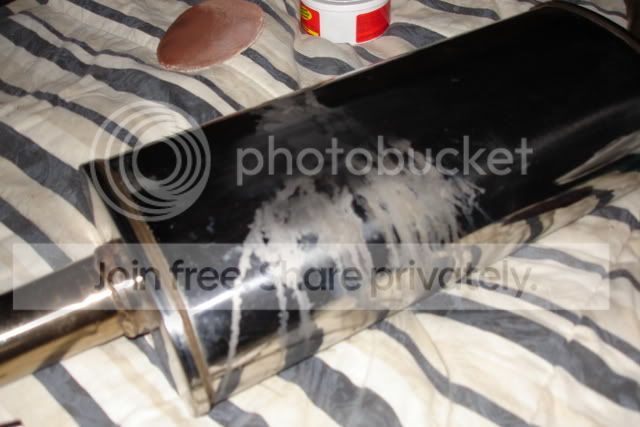
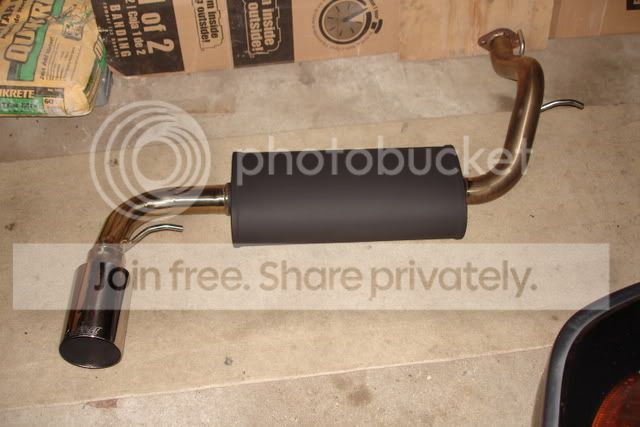
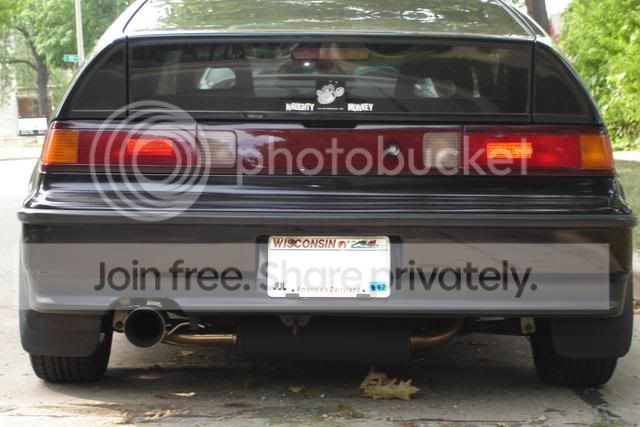
Thermal exhaust with a big splooge stain on it. Before and after:
Also came with Tokico 5-ways and GC coilovers. The car was pretty much pieced together and the finish of everything was terrible. I spent alot of time cleaning and such.
I have access to a sandblaster at work. Made good use of it.
Front forks before and after
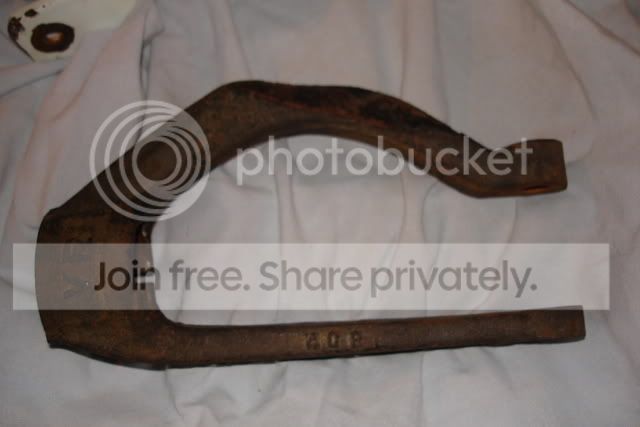
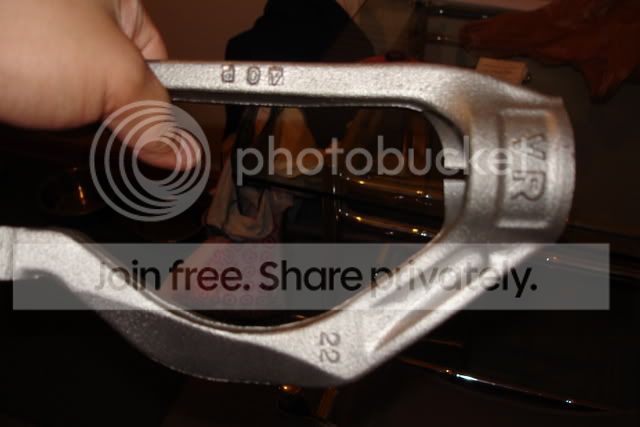
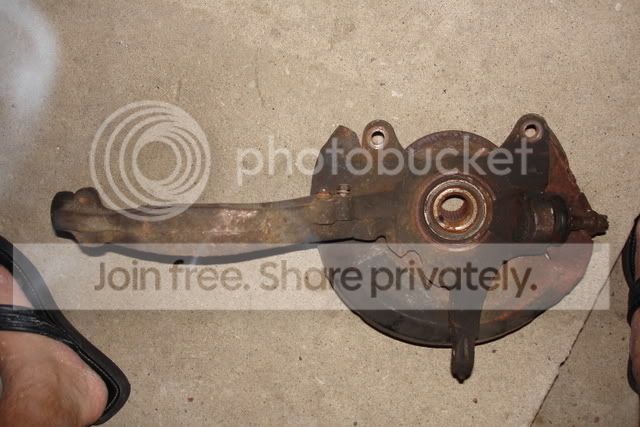
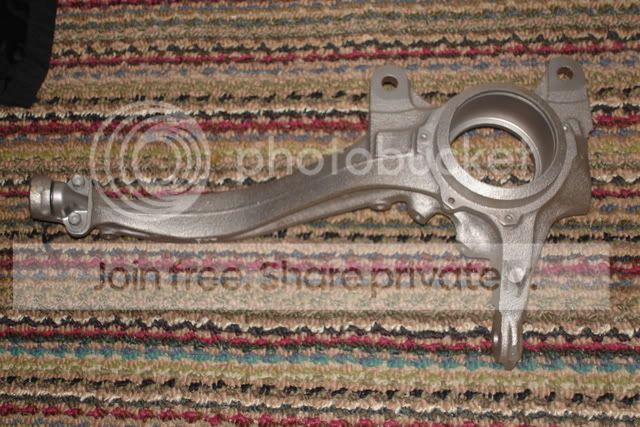
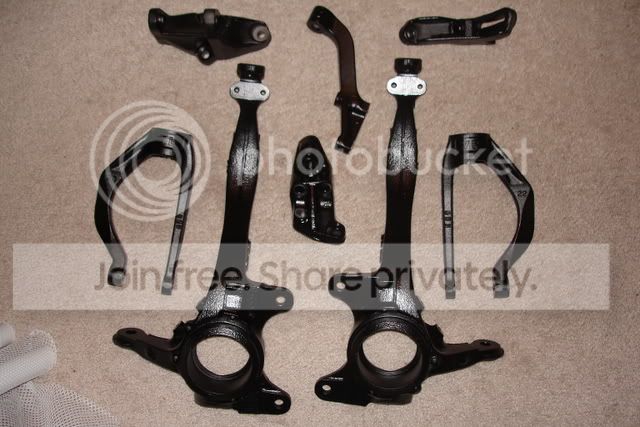
Front knuckles before and after:
After after powdercoating (includes some various engine brackets and such)
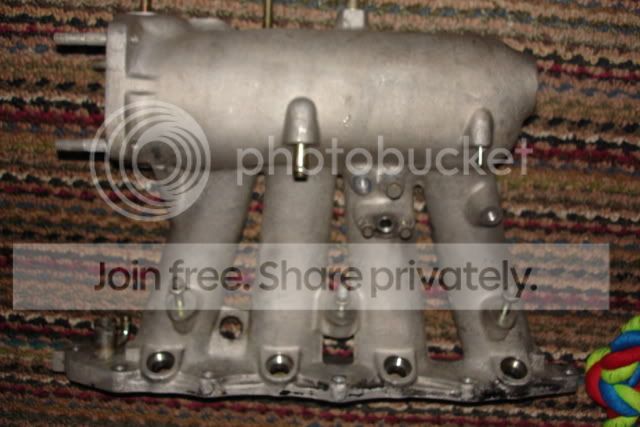
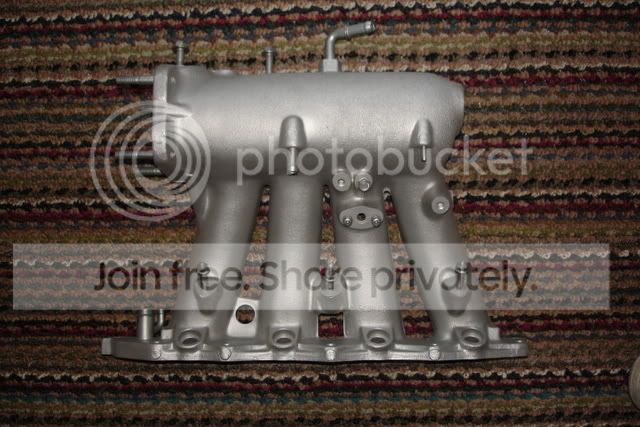
Blox intake mani before and after:
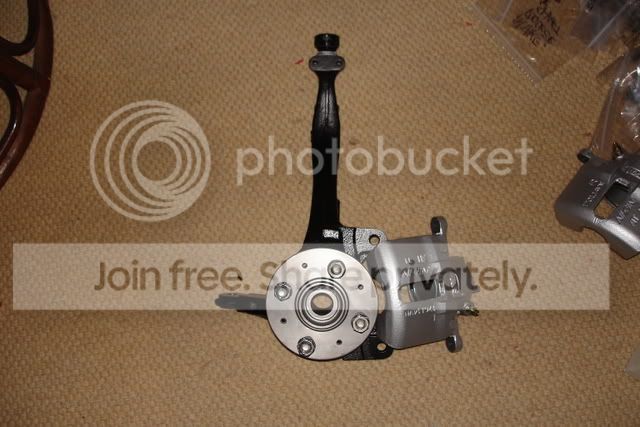
Little teaser pics for myself with silver painted calipers and clean hub:
Lots of other little things along the way along with some others that i will post later. (the "donor" car is getting the famous "roll on" paint job along with my stock DX motor)
Thanks for looking!
Si wheels, LS seats, Momo steering wheel, smoked amber corners, tint, some new molding, and yes, the stupid fog lights will come off.
I came across a good deal on another CRX that had a B16 swap in it already. It also included some nice mods.
Thermal exhaust with a big splooge stain on it. Before and after:
Also came with Tokico 5-ways and GC coilovers. The car was pretty much pieced together and the finish of everything was terrible. I spent alot of time cleaning and such.
I have access to a sandblaster at work. Made good use of it.
Front forks before and after
Front knuckles before and after:
After after powdercoating (includes some various engine brackets and such)
Blox intake mani before and after:
Little teaser pics for myself with silver painted calipers and clean hub:
Lots of other little things along the way along with some others that i will post later. (the "donor" car is getting the famous "roll on" paint job along with my stock DX motor)
Thanks for looking!

Thread Starter
Honda-Tech Member
Joined: May 2007
Posts: 1,331
Likes: 0
From: Milwaukee, WI
<TABLE WIDTH="90%" CELLSPACING=0 CELLPADDING=0 ALIGN=CENTER><TR><TD>Quote, originally posted by low91rex »</TD></TR><TR><TD CLASS="quote">Did you paint that blox mani with silver paint?</TD></TR></TABLE>
Nope, just sandblasted.
<TABLE WIDTH="90%" CELLSPACING=0 CELLPADDING=0 ALIGN=CENTER><TR><TD>Quote, originally posted by Old Renegade »</TD></TR><TR><TD CLASS="quote">looks good but should have tried to keep the thermal stainless\polished. good exhaust too. </TD></TR></TABLE>
My favorite exhaust. I tried everything I had in the house to get that stain out. Rubbing compound, clay bar, cleaner wax, acetone, mineral spirits. Then i tried a scotch pad, steel wool, sand paper. NOTHING worked. Oh well, I like it black.
Nope, just sandblasted.
<TABLE WIDTH="90%" CELLSPACING=0 CELLPADDING=0 ALIGN=CENTER><TR><TD>Quote, originally posted by Old Renegade »</TD></TR><TR><TD CLASS="quote">looks good but should have tried to keep the thermal stainless\polished. good exhaust too.
</TD></TR></TABLE> My favorite exhaust. I tried everything I had in the house to get that stain out. Rubbing compound, clay bar, cleaner wax, acetone, mineral spirits. Then i tried a scotch pad, steel wool, sand paper. NOTHING worked. Oh well, I like it black.
Trending Topics
Honda-Tech Member
Joined: Oct 2004
Posts: 4,915
Likes: 1
From: jimmysville VT,, NY, USA
<TABLE WIDTH="90%" CELLSPACING=0 CELLPADDING=0 ALIGN=CENTER><TR><TD>Quote, originally posted by crxrider »</TD></TR><TR><TD CLASS="quote">nice and i like the fogs, but then again i am old school</TD></TR></TABLE>
I kinda like em too
I kinda like em too
Honda-Tech Member
Joined: Jan 2007
Posts: 1,140
Likes: 0
From: What Location? United States of Africa
Good job on the sandblasting man. Nice looking CRX as well. I kind of like the foglights though, what kind and where did you get them? you should also blackhouse your headlights to set off the front end more, I did it on mine and it looks very very nice. ill post pics once i get a camera for you.
ill post pics once i get a camera for you.
Honda-Tech Member
Joined: May 2004
Posts: 3,024
Likes: 0
From: A racetrack near you, CA, USA
love the rex...very clean...and i love the thermal w/ the flat paint...maybe i will do it to mine...since it attracts so much attention being all shiny and **** 


<TABLE WIDTH="90%" CELLSPACING=0 CELLPADDING=0 ALIGN=CENTER><TR><TD>Quote, originally posted by turkishEF »</TD></TR><TR><TD CLASS="quote">They wouldn't be bad if the previous owner hadn't cut into the cross pieces in the bumper opening.</TD></TR></TABLE>
Have to agree on that...they don't fit with the rest of the car. I didn't even like them when they were cool back in the day. But, man I love the sandblasting work!! Looks great....very clean car!!
Have to agree on that...they don't fit with the rest of the car. I didn't even like them when they were cool back in the day. But, man I love the sandblasting work!! Looks great....very clean car!!
footwork mastery
Joined: Sep 2004
Posts: 5,982
Likes: 8
From: Bigger, Faster, Smarter, Stronger
<TABLE WIDTH="90%" CELLSPACING=0 CELLPADDING=0 ALIGN=CENTER><TR><TD>Quote, originally posted by ian1006 »</TD></TR><TR><TD CLASS="quote">nice touches all around. i really like the exhaust set up too. </TD></TR></TABLE>
Thread Starter
Honda-Tech Member
Joined: May 2007
Posts: 1,331
Likes: 0
From: Milwaukee, WI
Thanks for all the comments everyone.
<TABLE WIDTH="90%" CELLSPACING=0 CELLPADDING=0 ALIGN=CENTER><TR><TD>Quote, originally posted by IP RACING »</TD></TR><TR><TD CLASS="quote">nice man. I love when people take there time and clean everything up.</TD></TR></TABLE>
"Cleanliness is next to godliness"
Plus, for some reason, it feels like my car runs better when its clean. I'm sure its in my head, but oh, well.
Thread Starter
Honda-Tech Member
Joined: May 2007
Posts: 1,331
Likes: 0
From: Milwaukee, WI
<TABLE WIDTH="90%" CELLSPACING=0 CELLPADDING=0 ALIGN=CENTER><TR><TD>Quote, originally posted by Autoworks »</TD></TR><TR><TD CLASS="quote">attention to detail gets </TD></TR></TABLE>
Well, here's what i'm looking at as far as timeline. The block is at the machine shop now and i should be getting it back by the end of this week.
The head will be dropped off Saturday morning for just some freshening up.
The JDM B16 tranny it came with has the shift linkage shaft broken off as well as a broken bellhousing bolt fastener(don't know what else to call it). I picked up a '91 LS tranny for $50. Currently sandblsting the case(i'll have some pics of that tonight). I hope to do the 5th gear swap while i'm at it. (i need some motivation to try that one out. if you've done it or know someone who has, talk me into it please)
The knuckles are at the honda dealership where my friend works. Getting the new ball joints, wheel bearings and dust sheilds put on.
Basically, after i get the motor back, it's just a matter of assembly and drop it in.
Stay tuned!!!!!
</TD></TR></TABLE> Well, here's what i'm looking at as far as timeline. The block is at the machine shop now and i should be getting it back by the end of this week.
The head will be dropped off Saturday morning for just some freshening up.
The JDM B16 tranny it came with has the shift linkage shaft broken off as well as a broken bellhousing bolt fastener(don't know what else to call it). I picked up a '91 LS tranny for $50. Currently sandblsting the case(i'll have some pics of that tonight). I hope to do the 5th gear swap while i'm at it. (i need some motivation to try that one out. if you've done it or know someone who has, talk me into it please)
The knuckles are at the honda dealership where my friend works. Getting the new ball joints, wheel bearings and dust sheilds put on.
Basically, after i get the motor back, it's just a matter of assembly and drop it in.
Stay tuned!!!!!
Thread Starter
Honda-Tech Member
Joined: May 2007
Posts: 1,331
Likes: 0
From: Milwaukee, WI
I wasn't going to add this till later, but this guy on here jsut posted some questions about something like this so here goes
Know when you wax your car, there are a few places that you just can't seem to get the wax out of? Well with this mod, you will have one less place for it to hide.
I'm talking about the raised words/numbers/letters on your taillights. (this also involved removing the CRX logo from the center garnish, but only because it was faded and will be replaced)
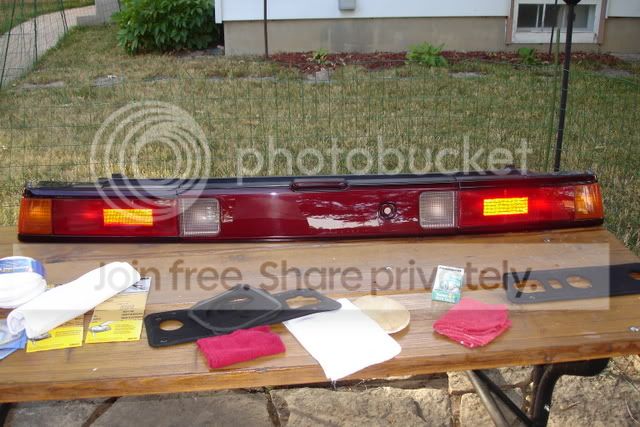
First off, much easier to do this work if the lights are removed from the car. Please follow procedure to remove.
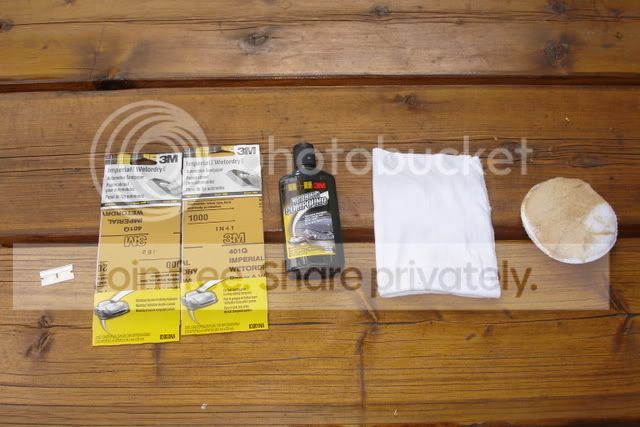
Grab yourself the following:
a bowl for water or a spray bottle
1000 and 2000 grit wet-sandpaper (also labeled as "waterproof")
3M or comparable rubbing compound
applicator pads
buffing towels
buffer
polishing compund
Begin by soaking a piece of 1000 grit in the water. Begin sanding in the areas of the raised words/letters/numbers. Make sure you keep the area wet and be sure to rinse occasionally and wipe dry to see progress. This will take about 20-30 minutes of straight movement to complete.
You will begin to see them disappear. Once you can no longer see or feel anything, rinse/wipe and switch to 2000 grit. At this point, be sure to use a circular motion in order to blend any grooves made during the previous steps as well as any scratches there previously.
You can continue this step to you liking. Again, rinse and wipe clean.
At this point you can see a stock taillight next to one after the wetsanding process.


The CRX sticker was easy to remove. Use a razor blade. Just make an effort not to gouge (sp?) the plastic. If you move slowly and with minimal pressure, you should do fine.
Follow same steps for center garnish.
After pieces have dried, follow directions on back of rubbing compound bottle. Small dab on applicator, rub in circular motion to a haze, buff off with a buffing rag. This step may (should) take 2-4 applications and buffings on the same area. More simply put, do the whole thing at least thrice!
Now this last step i have not done nor know how to do. Polishing with a buffer. I don't have one and i've never used one. If you know, then you know. If you don't know, let someone who knows do it. You don't want to burn the plastic.
Here are some after pics.
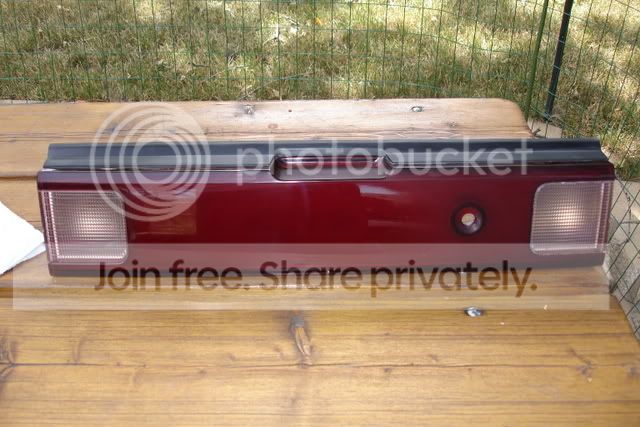
I am very pleased with the results! The overall shine is far better than it was before and i have yet to have them polished. No need to worry about wax in the cracks either
Before

After
Thanks for reading. (in case anyone brings it up, the monkey is advertisement for a band my bro-in-law is in, The Love Monkeys, here in Milwaukee)
let me know if these pics didnt come out. i had to copy the whole post from another website and i cant see photbucket at work so all red x's for me anyway
Modified by turkishEF at 12:04 PM 8/22/2007
Know when you wax your car, there are a few places that you just can't seem to get the wax out of? Well with this mod, you will have one less place for it to hide.
I'm talking about the raised words/numbers/letters on your taillights. (this also involved removing the CRX logo from the center garnish, but only because it was faded and will be replaced)
First off, much easier to do this work if the lights are removed from the car. Please follow procedure to remove.
Grab yourself the following:
a bowl for water or a spray bottle
1000 and 2000 grit wet-sandpaper (also labeled as "waterproof")
3M or comparable rubbing compound
applicator pads
buffing towels
buffer
polishing compund
Begin by soaking a piece of 1000 grit in the water. Begin sanding in the areas of the raised words/letters/numbers. Make sure you keep the area wet and be sure to rinse occasionally and wipe dry to see progress. This will take about 20-30 minutes of straight movement to complete.
You will begin to see them disappear. Once you can no longer see or feel anything, rinse/wipe and switch to 2000 grit. At this point, be sure to use a circular motion in order to blend any grooves made during the previous steps as well as any scratches there previously.
You can continue this step to you liking. Again, rinse and wipe clean.
At this point you can see a stock taillight next to one after the wetsanding process.
The CRX sticker was easy to remove. Use a razor blade. Just make an effort not to gouge (sp?) the plastic. If you move slowly and with minimal pressure, you should do fine.
Follow same steps for center garnish.
After pieces have dried, follow directions on back of rubbing compound bottle. Small dab on applicator, rub in circular motion to a haze, buff off with a buffing rag. This step may (should) take 2-4 applications and buffings on the same area. More simply put, do the whole thing at least thrice!
Now this last step i have not done nor know how to do. Polishing with a buffer. I don't have one and i've never used one. If you know, then you know. If you don't know, let someone who knows do it. You don't want to burn the plastic.
Here are some after pics.
I am very pleased with the results! The overall shine is far better than it was before and i have yet to have them polished. No need to worry about wax in the cracks either
Before
After
Thanks for reading. (in case anyone brings it up, the monkey is advertisement for a band my bro-in-law is in, The Love Monkeys, here in Milwaukee)
let me know if these pics didnt come out. i had to copy the whole post from another website and i cant see photbucket at work so all red x's for me anyway
Modified by turkishEF at 12:04 PM 8/22/2007
Honda-Tech Member
Joined: Oct 2004
Posts: 1,261
Likes: 0
From: Oregon
<TABLE WIDTH="90%" CELLSPACING=0 CELLPADDING=0 ALIGN=CENTER><TR><TD>Quote, originally posted by turkishEF »</TD></TR><TR><TD CLASS="quote">
Blox intake mani before and after:
</TD></TR></TABLE>
if you sandblasted this why is everything painted silver that previously was not. all your bolts are the same silver as the manifold. kinda fishy. dude if you painted it who cares.. no biggie. looks good either way.
Blox intake mani before and after:
</TD></TR></TABLE>
if you sandblasted this why is everything painted silver that previously was not. all your bolts are the same silver as the manifold. kinda fishy. dude if you painted it who cares.. no biggie. looks good either way.
Thread Starter
Honda-Tech Member
Joined: May 2007
Posts: 1,331
Likes: 0
From: Milwaukee, WI
<TABLE WIDTH="90%" CELLSPACING=0 CELLPADDING=0 ALIGN=CENTER><TR><TD>Quote, originally posted by the.ERIC.show »</TD></TR><TR><TD CLASS="quote">
if you sandblasted this why is everything painted silver that previously was not. all your bolts are the same silver as the manifold. kinda fishy. dude if you painted it who cares.. no biggie. looks good either way. </TD></TR></TABLE>
Actually, thanks for bringing that up cause i can now ask the question.
First off, nothing was painted silver. This is all the raw finish after sandblasting. The mistake i made was not covering up all the bolts and fittings with tape or something because the sandblasting took off the "colored" coating on it that apparently is an anti-corrosive coating.
So i guess my question is, what can i put on them to have the same effect as the coating so they dont corrode????
Thanks, but nothing fishy. I do like fish, though.
EDIT: the only things painted silver were the calipers that were painted with uhhh.........silver caliper paint.