

A Little $15 Rear Panel Upgrade for my Accord - DIY!!

Thread Starter
Honda-Tech Member
Joined: Nov 2005
Posts: 2,359
Likes: 0
From: nine zero nine, CA
Well, I thought I'd make one of these since I never have before and I had some
spare time today. I decided to upgrade my rear panel to match my seats
Supplies:
Fabric
Spray Adhesive
Scissors
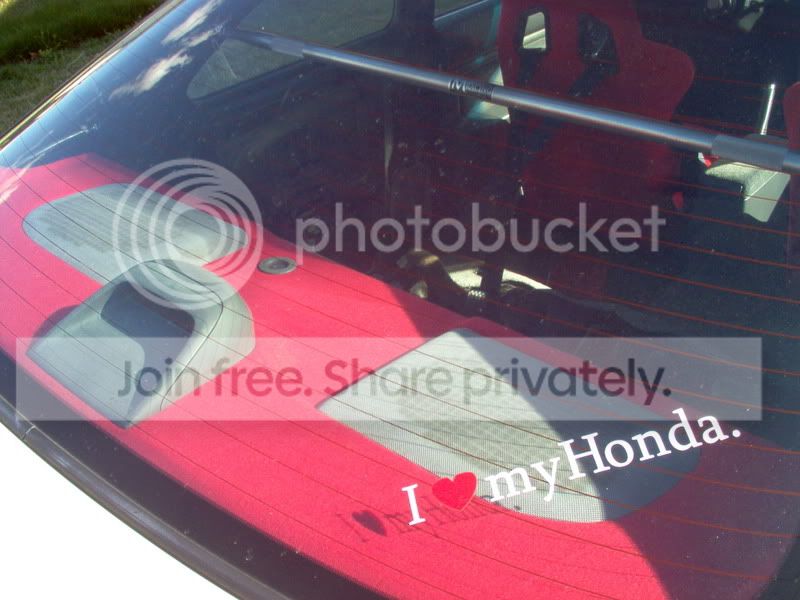
Here's what it looks like before:

First I removed the panel so I could start working on it. I took out the 3rd brake
light 1st, then I un-did the clips on the bottom of the panel from inside the trunk.
Once I had the panel out and the speaker covers off of it, I could start to remove
the stock fabric by simply pulling it off. It came off in one piece pretty easily:

Once I got the whole piece off I set it on top of the new fabric and used a sharpee
to trace it where I was gonna cut it. I traced the piece upside down so the marks
wouldn't show up on the finished product:

From there I checked the piece to make sure it was accurate so I could start the
gluing process. I started by laying the piece on top of the panel where it would go:

Then I started to glue it by spraying the adhesive on the panel starting from the
middle. I just pulled back a little section of the fabric and started to spray sections
at a time so I could have time to fix a problem if it were to come up. I made sure
I would smooth out each section as I adhered it to the panel once I sprayed it:

Once it dried I just checked the edges to make sure they were secure and were
not gonna pull apart. I put the speaker covers back on it and looked like this:

Then I put it back in the car, it was too dark to take a picture, maybe tomorrow?
The whole process didn't take me too long and it looks way better. If you read
this, let me know what you think, thanks. Peace!
Cali-Luv
Modified by jdmcd7_cali-luv at 7:08 PM 2/28/2007
spare time today. I decided to upgrade my rear panel to match my seats
Supplies:
Fabric
Spray Adhesive
Scissors
Here's what it looks like before:
First I removed the panel so I could start working on it. I took out the 3rd brake
light 1st, then I un-did the clips on the bottom of the panel from inside the trunk.
Once I had the panel out and the speaker covers off of it, I could start to remove
the stock fabric by simply pulling it off. It came off in one piece pretty easily:
Once I got the whole piece off I set it on top of the new fabric and used a sharpee
to trace it where I was gonna cut it. I traced the piece upside down so the marks
wouldn't show up on the finished product:
From there I checked the piece to make sure it was accurate so I could start the
gluing process. I started by laying the piece on top of the panel where it would go:
Then I started to glue it by spraying the adhesive on the panel starting from the
middle. I just pulled back a little section of the fabric and started to spray sections
at a time so I could have time to fix a problem if it were to come up. I made sure
I would smooth out each section as I adhered it to the panel once I sprayed it:
Once it dried I just checked the edges to make sure they were secure and were
not gonna pull apart. I put the speaker covers back on it and looked like this:
Then I put it back in the car, it was too dark to take a picture, maybe tomorrow?
The whole process didn't take me too long and it looks way better. If you read
this, let me know what you think, thanks. Peace!
Cali-Luv
Modified by jdmcd7_cali-luv at 7:08 PM 2/28/2007
Honda-Tech Member
Joined: Dec 2004
Posts: 4,214
Likes: 0
From: New Orleans, LA.
<TABLE WIDTH="90%" CELLSPACING=0 CELLPADDING=0 ALIGN=CENTER><TR><TD>Quote, originally posted by WAGOM4N »</TD></TR><TR><TD CLASS="quote">dope </TD></TR></TABLE>
Thread Starter
Honda-Tech Member
Joined: Nov 2005
Posts: 2,359
Likes: 0
From: nine zero nine, CA
<TABLE WIDTH="90%" CELLSPACING=0 CELLPADDING=0 ALIGN=CENTER><TR><TD>Quote, originally posted by matt_shaban »</TD></TR><TR><TD CLASS="quote">thanks for the write-up I wouldn't have enough patience to not get any creases or wrinkles</TD></TR></TABLE>
To my surprise it was quite easy to make it smooth, wrinkles weren't a problem
I wouldn't have enough patience to not get any creases or wrinkles</TD></TR></TABLE>To my surprise it was quite easy to make it smooth, wrinkles weren't a problem
Trending Topics
Thread Starter
Honda-Tech Member
Joined: Nov 2005
Posts: 2,359
Likes: 0
From: nine zero nine, CA
<TABLE WIDTH="90%" CELLSPACING=0 CELLPADDING=0 ALIGN=CENTER><TR><TD>Quote, originally posted by Hondizzle! »</TD></TR><TR><TD CLASS="quote">Nice I think the speaker panels would look better black... just a thought</TD></TR></TABLE>
True...but i'm over it now
I think the speaker panels would look better black... just a thought</TD></TR></TABLE>True...but i'm over it now

Honda-Tech Member

Joined: Mar 2002
Posts: 10,666
Likes: 0
From: ATL WHAT, GA
<TABLE WIDTH="90%" CELLSPACING=0 CELLPADDING=0 ALIGN=CENTER><TR><TD>Quote, originally posted by jdmcd7_cali-luv »</TD></TR><TR><TD CLASS="quote">
True...but i'm over it now</TD></TR></TABLE>
haha I can understand that. Wasnt trying to hate or anything, just saying. Good diy though
True...but i'm over it now</TD></TR></TABLE>
haha I can understand that.
Wasnt trying to hate or anything, just saying. Good diy though


Junior Member
Joined: Oct 2003
Posts: 710
Likes: 0
From: socal, US
should've use better material, those mom's and ghey partner cloth doesn't have much uv protection like automotive grade trim.
in other word, it might faded to pink if you park under the sun for a while
in other word, it might faded to pink if you park under the sun for a while
<TABLE WIDTH="90%" CELLSPACING=0 CELLPADDING=0 ALIGN=CENTER><TR><TD>Quote, originally posted by art vandelay »</TD></TR><TR><TD CLASS="quote">in for final product!</TD></TR></TABLE>


Honda-Tech Member
Joined: Apr 2006
Posts: 2,261
Likes: 0
From: Manteca, CA
<TABLE WIDTH="90%" CELLSPACING=0 CELLPADDING=0 ALIGN=CENTER><TR><TD>Quote, originally posted by jdmcd7_cali-luv »</TD></TR><TR><TD CLASS="quote">Here's the finished product: what do you think?
</TD></TR></TABLE>
I like it! I dunno if I would try painting the speaker cover...jus cuz it looks like some kinda meshy fabric going on...but maybe the third brakelight cover? could be rice, but I say color match anything you decide to paint! Black would look good as well, but colormatching gets my vote