

First TIG welds... definitely need some help from you pros.

Thread Starter
Junior Member
Joined: May 2006
Posts: 364
Likes: 1
From: East Falmouth, MA, USA
Well, I got bored today and started my TIG up for the first time.
Its the infamous harbor freight $200 Rescue Toaster, rigged to a pedal from a console game
1/16" Blue tungsten (2% lanthanated)
No filler
Base metal is 304L, SCH10, with the factory bevel. I cleaned it with a SS brush and denatured alcohol. Running Argon, unluckily, I can't read my flowmeter when I'm working, so I'm guessing at the flowrate. Its pretty high, I burned through 500psi in my 80CF tank in about 20 minutes.
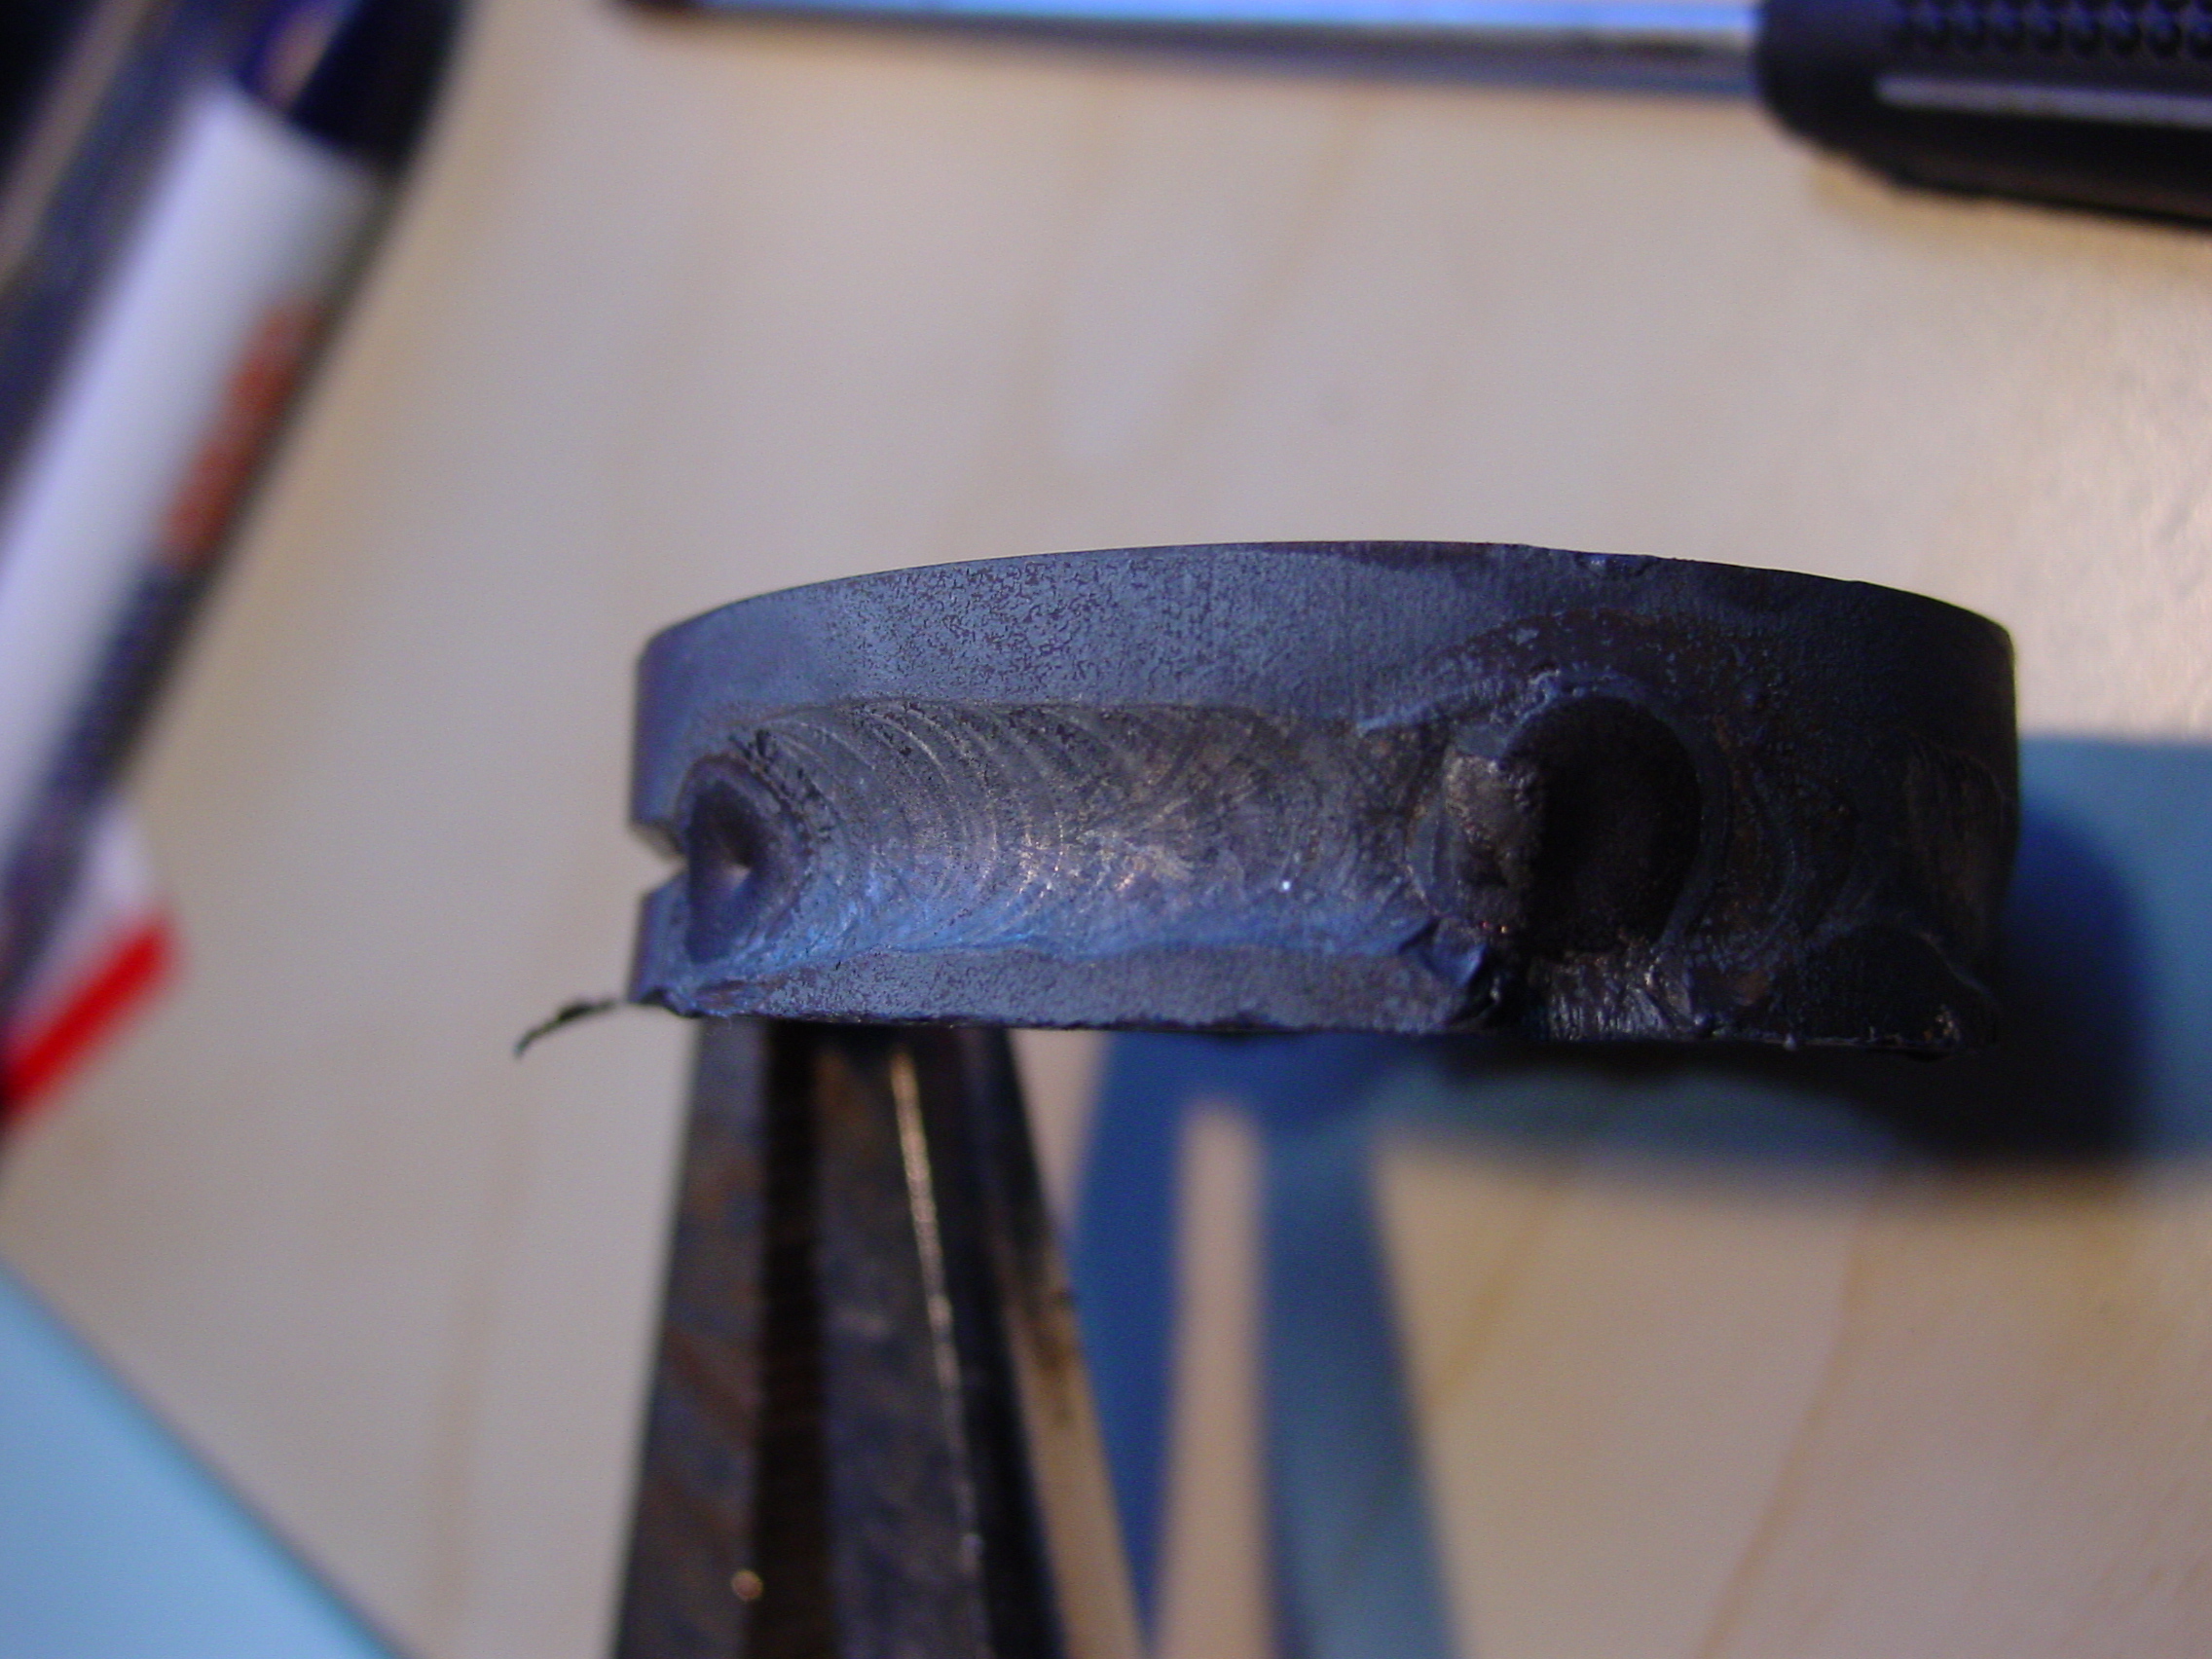
Click for big.


Showing what it originally looked like. Ignore the melted blob on the back, I went WAY high on amps, and melted it all.


I'm no expert, but that looks like crap. I'm assuming its too much heat, not enough gas, and moving too fast, as there's no fusion on the back side, and there's sugaring from a lack of backpurging.
Any suggestions would be helpful. I've always known that TIG is difficult, this proves it. 
Its the infamous harbor freight $200 Rescue Toaster, rigged to a pedal from a console game
1/16" Blue tungsten (2% lanthanated)
No filler
Base metal is 304L, SCH10, with the factory bevel. I cleaned it with a SS brush and denatured alcohol. Running Argon, unluckily, I can't read my flowmeter when I'm working, so I'm guessing at the flowrate. Its pretty high, I burned through 500psi in my 80CF tank in about 20 minutes.
Click for big.

Showing what it originally looked like. Ignore the melted blob on the back, I went WAY high on amps, and melted it all.


I'm no expert, but that looks like crap. I'm assuming its too much heat, not enough gas, and moving too fast, as there's no fusion on the back side, and there's sugaring from a lack of backpurging.
Any suggestions would be helpful. I've always known that TIG is difficult, this proves it.
OG Fabricator
Joined: Dec 2006
Posts: 1,342
Likes: 0
From: Calgary, Alberta, Canada
Not using filler is going to complicate things.
You are right though, too hot, and no back purging.
Filler also serves to cool the puddle, so that will affect the heat.
The lack of fusion is because of the lack of filler for the most part.
Get some stainless filler rod, and go at it again.
You are right though, too hot, and no back purging.
Filler also serves to cool the puddle, so that will affect the heat.
The lack of fusion is because of the lack of filler for the most part.
Get some stainless filler rod, and go at it again.
Thread Starter
Junior Member
Joined: May 2006
Posts: 364
Likes: 1
From: East Falmouth, MA, USA
I have a bunch of filler, I was just concentration on getting the hang of it. I've NEVER welded before, and I've read here that practicing with fusion welding is the best way of learning heat control...
Any thoughts on how much flow of Ar I should be using?
\/\/ Thanks. I have some SS 16G pipe around. I'll practice on that.
I'll also see if I can move my flowmeter so I can see it. I knew my 80 would only last about 4-5 hours. I guess it goes with the territory.
Any thoughts on how much flow of Ar I should be using?
\/\/ Thanks. I have some SS 16G pipe around. I'll practice on that.
I'll also see if I can move my flowmeter so I can see it. I knew my 80 would only last about 4-5 hours. I guess it goes with the territory.
OG Fabricator
Joined: Dec 2006
Posts: 1,342
Likes: 0
From: Calgary, Alberta, Canada
I agree mostly, but not with heavy-wall bevelled pipe.
Learning heat control can also be done by welding on thin materials
with your amperage set very high so you get used to adjusting with the pedal.
I usually go with about 25-30 cfh with stainless, and 20-25 with mild steel.
Learning heat control can also be done by welding on thin materials
with your amperage set very high so you get used to adjusting with the pedal.
I usually go with about 25-30 cfh with stainless, and 20-25 with mild steel.
Honda-Tech Member
Joined: Oct 2005
Posts: 540
Likes: 0
From: TX, USA
yikes; you sure the gas is turned on?
at least crank it up; if you're not using a flowmeter then you need to up the pressure. I noticed when using that tig w/ my lincoln gauge (no flowmeter) it would not flow nearly the same amount of gas at XX psi as it would on my mig. It's like the tig has more restrictive gas channels; i had to tripple the pressure to get the same flow.
at least crank it up; if you're not using a flowmeter then you need to up the pressure. I noticed when using that tig w/ my lincoln gauge (no flowmeter) it would not flow nearly the same amount of gas at XX psi as it would on my mig. It's like the tig has more restrictive gas channels; i had to tripple the pressure to get the same flow.
Thread Starter
Junior Member
Joined: May 2006
Posts: 364
Likes: 1
From: East Falmouth, MA, USA
Gas is definitely on. I can hear it exiting the torch. I'm running 25CFH. I'm waiting for a piece of pipe to cool, then I'll have more pictures. I'm still getting a greyish scale on the welds, no matter how low on the amperage or how fast I move., but when I brush the welds with my SS brush, it comes off, and the welds are silver in color.

Honda-Tech Member
Joined: Nov 2002
Posts: 17,227
Likes: 2
From: Illinois
You gas is on, no doubt about that. You would not be able to weld with the gas off, well you can but you get the picture.
Is there coating on these pieces, if so clean them off. Clean, Clean, then clean some more. And use filler, get the hang of moving the torch which is not that bad then use filler. Also on the one pic with the blob and a hole, make sure when you are starting the puddle, if you can't get the puddle ( both sides to come together ) swirl the tip.
Hold the torch at a 10 degree angle towards the direction you are going. You should really be practicing on flat pieces, not round. Also the back of the one weld, is surge, you really can't tell how much pentration you have gotten unless you cut it in half. Even then, its hard to tell because either the bandsaw blade or what ever you are using to cut the piece will tend to blend the metal together.
Also weld on larger materials, you are trying to weld on very small portions and this will not give you a good idea of the HAZ ( heat affected area )
Trending Topics
Thread Starter
Junior Member
Joined: May 2006
Posts: 364
Likes: 1
From: East Falmouth, MA, USA
Ok. Pics are up.
I've been having trouble adding filler thanks to my gloves. How do you add filler without A) getting burned, or b) removing the filler from the gas flow? I can't control the filler very well unless I only have about 6" sticking out from my hand. The problem is, I get a bead going, I'm dabbing filler once per puddle, and all of a sudden, I'm getting low on filler, and I can't figure out a way to get more through my fingers. If I try to keep going, my gloves get hot, then start smoking, and I break the arc. If I remove the filler, I can drop it onto the table and get some more, but when I try to add it, I see contaminants (floating debris in the puddle).
Anyhow... onto the pictures. (at least I know how to use Macro mode)
1. The top weld was adding filler. The bottom weld was fusion. This is all on 16G SS pipe.


2. A weld before I cleaned it with the SS brush. Looks flaky and dull.

3. After cleaning.

I've been having trouble adding filler thanks to my gloves. How do you add filler without A) getting burned, or b) removing the filler from the gas flow? I can't control the filler very well unless I only have about 6" sticking out from my hand. The problem is, I get a bead going, I'm dabbing filler once per puddle, and all of a sudden, I'm getting low on filler, and I can't figure out a way to get more through my fingers. If I try to keep going, my gloves get hot, then start smoking, and I break the arc
. If I remove the filler, I can drop it onto the table and get some more, but when I try to add it, I see contaminants (floating debris in the puddle).Anyhow... onto the pictures. (at least I know how to use Macro mode)
1. The top weld was adding filler. The bottom weld was fusion. This is all on 16G SS pipe.


2. A weld before I cleaned it with the SS brush. Looks flaky and dull.

3. After cleaning.

Honda-Tech Member
Joined: Nov 2002
Posts: 17,227
Likes: 2
From: Illinois
Are you using filler ?
A weld puddle with out filler, is going to look like a single solid bead. There are ways to get the dime look, don't get me wrong but a noob starting off won't be able to accomplish that.
So basically what I'm saying is, if you not using filler in those pics, there not really telling us a whole lot, besides that it looks like either your getting to hot in color or your gas coverage is bad.
Is it mild or stainless though ?
Honda-Tech Member
Joined: Nov 2002
Posts: 17,227
Likes: 2
From: Illinois
Try to practice on a real joint, not just on a flat round piece like that. Cut up some pieces then butt weld them together, I find when you weld like you are trying to, the weld will come out flat a lot of the times, specially when you are first learning.
Thread Starter
Junior Member
Joined: May 2006
Posts: 364
Likes: 1
From: East Falmouth, MA, USA
I post everything on both places. Vortex has a few people I trust and who I have a relationship with. This forum moves a LOT faster, and has a lot more knowledgable people.
Anyhow, I cut a piece of pipe, and tried to weld them together. I had a lot of trouble getting the puddle to combine, and once it did, I had to move really fast to keep it from falling through. I added filler, didn't seem to make a difference. No point in pics, I'm going to try again tomorrow when I'm rested and not frustrated.
:edit: Decided to check my pedal setting. Turns out that it had skipped a tooth or two, and was only supplying 7.7Kohm of resistance with the pedal all the way up. It should be supplying 10K, I moved the pot a little, and its now right at 9.2K. No wonder everything was so hot, its been running at around 3 out of 10.
Modified by sharkytm at 6:43 PM 2/10/2007
Thread Starter
Junior Member
Joined: May 2006
Posts: 364
Likes: 1
From: East Falmouth, MA, USA
Yeah, I'm going to spend some time working on it this week. I've got work to do now. Thanks for the help.
I tried a little this morning, and found that the pedal'd screwed up pot setting was part of the problem. Now, I can barely strike an arc, and when I do, I have to stay much closer to the workpiece to keep it. I dunno. I'll go bug someone nearby who's an amazing welder, and see if he'll let me screw around with his syncrowave.
I tried a little this morning, and found that the pedal'd screwed up pot setting was part of the problem. Now, I can barely strike an arc, and when I do, I have to stay much closer to the workpiece to keep it. I dunno. I'll go bug someone nearby who's an amazing welder, and see if he'll let me screw around with his syncrowave.
New User
Joined: Aug 2001
Posts: 364
Likes: 0
From: Gastonia, NC, US
I am a part time welding instructor and all I have to say is keep up with the practice and don't get too discouraged. It is very rare to have someone catch on right away. There are some great videos online that are very informative with technique.
I always tell students to use some thicker materials like at least 1/8th inch to start with and no filler. This is only to develope technique with push angle, torch movement, and arc length. Once this is acheived then try to get the weld to look anything but a dull grey. Then move onto thinner materials for greater heat control.
For heat control I suggest to strike the arc with a minimum amount of heat adn increase it as you see the metal melt, when you reach that point then continue push the puddle accross the joint.
There are many different ways of teaching, but I have great quick success rates by teaching this way. Hopefully it helps a little and check out some videos or enroll in a community college for some beginer tips.
Thread Starter
Junior Member
Joined: May 2006
Posts: 364
Likes: 1
From: East Falmouth, MA, USA
The problem is that the local CC only teaches Arc and MIG, no TIG. The instructors don't even know what TIG is if you can believe it. I asked and got blank stares.
I'll see if I can scrounge up some plate steel, and try again later this week.
Any suggestions on videos? I haven't found much except 2 on putfile, and 1 on youtube, none of which were much help.
:edit: New pics.


Still 16G stainless pipe, 308L filler.
Modified by sharkytm at 1:04 PM 2/11/2007
I'll see if I can scrounge up some plate steel, and try again later this week.
Any suggestions on videos? I haven't found much except 2 on putfile, and 1 on youtube, none of which were much help.
:edit: New pics.


Still 16G stainless pipe, 308L filler.
Modified by sharkytm at 1:04 PM 2/11/2007
Honda-Tech Member
Joined: Nov 2002
Posts: 17,227
Likes: 2
From: Illinois
Need to get the control better, and run longer beads. By the time you get going, you stop so its not helping you get the hand of the torch. Also from the looks of the rusted area around the puddle, looks like either your not cleaning the metal good or your gas coverage is lacking.
Thread Starter
Junior Member
Joined: May 2006
Posts: 364
Likes: 1
From: East Falmouth, MA, USA
<TABLE WIDTH="90%" CELLSPACING=0 CELLPADDING=0 ALIGN=CENTER><TR><TD>Quote, originally posted by RCautoworks »</TD></TR><TR><TD CLASS="quote">Need to get the control better, and run longer beads. By the time you get going, you stop so its not helping you get the hand of the torch. Also from the looks of the rusted area around the puddle, looks like either your not cleaning the metal good or your gas coverage is lacking.</TD></TR></TABLE>
Thats not rust, its a discoloration thats been appearing on the welds. I definitely cleaned the area before welding it. Maybe more gas? I've turned it down to 20CFH. That bead stopped because I couldn't keep the arc going, where it turns black, it started sputtering, and just died. No clue what caused it, but the tungsten was probably contaminated by then.
Thats not rust, its a discoloration thats been appearing on the welds. I definitely cleaned the area before welding it. Maybe more gas? I've turned it down to 20CFH. That bead stopped because I couldn't keep the arc going, where it turns black, it started sputtering, and just died. No clue what caused it, but the tungsten was probably contaminated by then.
Honda-Tech Member
Joined: Nov 2002
Posts: 17,227
Likes: 2
From: Illinois
<TABLE WIDTH="90%" CELLSPACING=0 CELLPADDING=0 ALIGN=CENTER><TR><TD>Quote, originally posted by sharkytm »</TD></TR><TR><TD CLASS="quote">
Thats not rust, its a discoloration thats been appearing on the welds. I definitely cleaned the area before welding it. Maybe more gas? I've turned it down to 20CFH. That bead stopped because I couldn't keep the arc going, where it turns black, it started sputtering, and just died. No clue what caused it, but the tungsten was probably contaminated by then. </TD></TR></TABLE>
Could be more gas, but is that at the start of the end of the weld ? The post/pre flow could be causing that, or the movement of your hand.
If you are touching the metal, practicing basic tig control.
Take a pencil and get a washer and a white piece of paper. Hold the pencil like the torch and move the washer around on the paper, but make sure you don't touch the paper.
New User
Joined: Aug 2001
Posts: 364
Likes: 0
From: Gastonia, NC, US
Those pics look pretty good. Looks like some filler was added. The color was decent, see how it the color is a little on the darker side, this means that you are borderline too hot. The next shade will be that bad dull grey. I agree with RCautoworksn about the control, this will come with time and practice.
With GTAW (tig) comtamination is a huge problem. One step to make sure that a good clean weld is acheived is to have a sharp clean tungsten. I suggest that when you sharpen it the angle isn't that critical as a beginner but to lightly flatten the end without a point. Make sure that the scratches are all going parallel with the tungsten, not perpendicular. The grind markes are to go with the direction that the arc is going (this helps with arc from wondering). Quick tip is to sharpen both ends of the tungsten so you don't make more trips to sharpen. I can't stress enough that when you contaminate the tungsten (touch either filler metal or base metal) you must re-sharpen it!
As far as getting control try doing what RCautoworks suggested or just take the tourch and make a few practice welds without striking an arc. Don't waste Argon! Something to help with control is to use you tourch hand along with the part or a table, something to steady your hand. When you practice make sure you don't put very much pressure on your hand to whatever is steadying you, this will cause you to move irradically and a smooth bead is harder to acheive. Round parts are the most difficult to learn on because the compund torch angles are constantly changing.
Another suggestion, too make sure that you can see the weld. Get infront of it and make sure you can see what is going on: arc length, torch angle, push angle.
I will try to find some videos but look at Miller's and Lincoln's site. Not sure why the welder started to studder and why it stopped, it could be many issues.
Once you get it you will be soooooo excited that you can be as good as the rest of them and you will think that wasn't so hard. I see this everyday that a student gets this great achievment and excitement and I get excited and everybody is excited.
Again keep up the good work.
Honda-Tech Member
Joined: Jun 2002
Posts: 645
Likes: 0
From: Brooklyn, NY
Thread Starter
Junior Member
Joined: May 2006
Posts: 364
Likes: 1
From: East Falmouth, MA, USA
I've read that article. Its very good.
Here's what I've been doing, feel free to critique my technique.
Torch Setup: #9 torch, long endcap, #6 cup.
Tungsten: ground on an abrasive wheel against the point (direction of rotation points from tip to end of tungsten). I grind a sharp point and try to get the grind marks to go parallel to the tungsten, but they tend to curve a little from me rotating the tungsten as I grind it. 1/2" of tungsten stickout.
Striking the arc: I strike the arc with about 2/10 amperage, and once its established, I go to 1/10. Any higher, and the weld turns black/grey.