

blacked out my headlights (6th gen)

Thread Starter
Joined: Sep 2006
Posts: 198
Likes: 0
From: MN
just finished blacking out my headlights per these instructions:
http://www.filtsai.com/accord/housings/index.php
i started at about 4PM and only about an hour was waiting for paint to dry.
one of my headlights had a TON of dust in it, so i was originally just going to take apart that one and clean it.
i unfortunately decided to use a scotch brite pad, and it started taking off the reflective material
the reflective material was already in pretty bad shape, so i decided to take them both apart and black them out. i used gloss black krylon fusion.
i didn't mask off the reflective area around the turn signal:
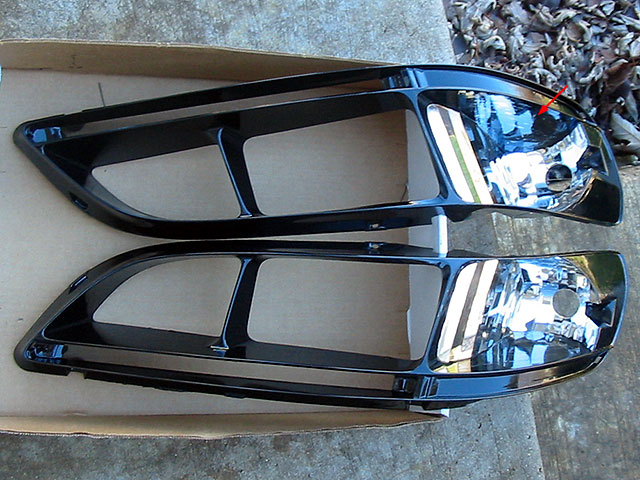
(on my headlights the area denoted by the arrow is painted black)
now that i have them on it's as i'd hoped, not that big of a deal. it's just the amber lights, so doesn't affect visibility much, and turn signal is still easily noticeable for other drivers.
when trying to pry the headlights apart, i found that 300 degrees for a shorter period of time, seemed to work better, but both headlights took a few rounds in the oven to get apart.
the main problem that i ran into, is that by the time i was ready to put everything back together, it was dark, and it had snowed 2-3 inches (and was still snowing)!
obviously this made re-assembly a real pain, and took much longer than it should have.
i'll try and get pics at a later date, but neither of the headlights were in that great of shape to begin with
http://www.filtsai.com/accord/housings/index.php
i started at about 4PM and only about an hour was waiting for paint to dry.
one of my headlights had a TON of dust in it, so i was originally just going to take apart that one and clean it.
i unfortunately decided to use a scotch brite pad, and it started taking off the reflective material
the reflective material was already in pretty bad shape, so i decided to take them both apart and black them out. i used gloss black krylon fusion.
i didn't mask off the reflective area around the turn signal:
(on my headlights the area denoted by the arrow is painted black)
now that i have them on it's as i'd hoped, not that big of a deal. it's just the amber lights, so doesn't affect visibility much, and turn signal is still easily noticeable for other drivers.
when trying to pry the headlights apart, i found that 300 degrees for a shorter period of time, seemed to work better, but both headlights took a few rounds in the oven to get apart.
the main problem that i ran into, is that by the time i was ready to put everything back together, it was dark, and it had snowed 2-3 inches (and was still snowing)!
obviously this made re-assembly a real pain, and took much longer than it should have.
i'll try and get pics at a later date, but neither of the headlights were in that great of shape to begin with
Thread Starter
Joined: Sep 2006
Posts: 198
Likes: 0
From: MN
<TABLE WIDTH="90%" CELLSPACING=0 CELLPADDING=0 ALIGN=CENTER><TR><TD>Quote, originally posted by AJ06 »</TD></TR><TR><TD CLASS="quote">HEY there Ca.com fellow member... 
I did that today too... its sweet. </TD></TR></TABLE>
cool, any pics of yours?
i'm sure it was a lot more fun doing it in TX than MN
it's about 10 degrees and 2-5" snow
btw, what year accord and what system?
<TABLE WIDTH="90%" CELLSPACING=0 CELLPADDING=0 ALIGN=CENTER><TR><TD>Quote, originally posted by gianinline »</TD></TR><TR><TD CLASS="quote">By painting the part in black, you will notice a slightly weaker light output, since black absorbs the light instead of reflecting it.</TD></TR></TABLE>
yeah, i realized that, but was too lazy to mask it off
i did take a look at it, and the amber light is noticeably dimmer than before, but plenty visible to other drivers (at least at night, haven't checked during daylight).
I did that today too... its sweet.
</TD></TR></TABLE>cool, any pics of yours?
i'm sure it was a lot more fun doing it in TX than MN
it's about 10 degrees and 2-5" snow
btw, what year accord and what system?
<TABLE WIDTH="90%" CELLSPACING=0 CELLPADDING=0 ALIGN=CENTER><TR><TD>Quote, originally posted by gianinline »</TD></TR><TR><TD CLASS="quote">By painting the part in black, you will notice a slightly weaker light output, since black absorbs the light instead of reflecting it.</TD></TR></TABLE>
yeah, i realized that, but was too lazy to mask it off
i did take a look at it, and the amber light is noticeably dimmer than before, but plenty visible to other drivers (at least at night, haven't checked during daylight).

Trending Topics
Thread Starter
Joined: Sep 2006
Posts: 198
Likes: 0
From: MN
<TABLE WIDTH="90%" CELLSPACING=0 CELLPADDING=0 ALIGN=CENTER><TR><TD>Quote, originally posted by AJ06 »</TD></TR><TR><TD CLASS="quote">MASKING alone took 2 hrs...
</TD></TR></TABLE>
i figured as much, i'm glad i just sprayed mine.
</TD></TR></TABLE>
i figured as much, i'm glad i just sprayed mine.
Honda-Tech Member
Joined: Aug 2005
Posts: 10
Likes: 0
From: riverside, ca, usa
Cool look bro, You gotta love the look of the lights blacked out. I just wanted to let you know that if you boil the lights in a big pot of water on the stove on high the lenses will come off easily, you will steam clean them in the process, and if you paint the housing the same day you can put them back together without using any extra glue. The oem glue/sealer will still be soft enough to reseal it. Hope this helps you and anyone else out. Jdmpartshunter
In a Junkyard near you.
Joined: Mar 2004
Posts: 5,084
Likes: 2
From: Richmond, Va
i didn't read that much. did you mention better bulbs? If you sre still using standard halogen I would switch to Sylvania Silverstar to compensate for the loss from the black paint


Thread Starter
Joined: Sep 2006
Posts: 198
Likes: 0
From: MN
<TABLE WIDTH="90%" CELLSPACING=0 CELLPADDING=0 ALIGN=CENTER><TR><TD>Quote, originally posted by -Bionic- »</TD></TR><TR><TD CLASS="quote">Good job.
Hope you used new headlight sealant, as the 6th gen are relatively to fog once opened.
 </TD></TR></TABLE>
nope, just re-heated and smushed them back together
i'll have to monitor for fog.
Hope you used new headlight sealant, as the 6th gen are relatively to fog once opened.
</TD></TR></TABLE>nope, just re-heated and smushed them back together
i'll have to monitor for fog.

Former Sponsor
Joined: Jun 2003
Posts: 1,862
Likes: 0
From: Glen Cove/Richmond, NY/VA
Well if fogging occur, you can always add silicone; preferably the OEM Nissan headlight/tailight sealant to the outer edge/border; instead of taking it apart again.
And to get the moister out; simply open the hood and remove the lowbeam and highbeam on a dry day, and let it vent. Resealt the headlights and close up. Should be good to go.
And to get the moister out; simply open the hood and remove the lowbeam and highbeam on a dry day, and let it vent. Resealt the headlights and close up. Should be good to go.
Honda-Tech Member
Joined: Aug 2005
Posts: 3,495
Likes: 5
From: Pompano Beach, FL, USA
I like it the final result.
How did you put the lens back on the headlight?! Did you use the same glue that was on them?! Or you cleaned and then put a new glue?
I ask because, I've done that to my friends a couple of times and... at the "closing" of the headlights, I would say if wasn't fitting 100% with the old glue..... thought I should have completelly removed the old glue.
Thread Starter
Joined: Sep 2006
Posts: 198
Likes: 0
From: MN
<TABLE WIDTH="90%" CELLSPACING=0 CELLPADDING=0 ALIGN=CENTER><TR><TD>Quote, originally posted by gianinline »</TD></TR><TR><TD CLASS="quote">I like it the final result.
How did you put the lens back on the headlight?! Did you use the same glue that was on them?! Or you cleaned and then put a new glue?
I ask because, I've done that to my friends a couple of times and... at the "closing" of the headlights, I would say if wasn't fitting 100% with the old glue..... thought I should have completelly removed the old glue.</TD></TR></TABLE>
thanks all.
i just set them back together, put them in the oven for about the same amount of time as to get them off, and then pushed real hard
i got all the tabs on, so i was satisfied.
haven't noticed any condensation problems yet (although it's been single digits (temp F) since i did them).
Junior Member
Joined: Sep 2006
Posts: 548
Likes: 0
From: DFW, TX
Pour some water across them, and a little on the place where the lens/housing are joined, then see if any gets in...
Wait if its freezing weather this would BE BAD... Try in about 50-60'f weather
Wait if its freezing weather this would BE BAD...
Try in about 50-60'f weather
Member
Joined: Nov 2002
Posts: 8,435
Likes: 0
From: NJ
When it was ~60 degrees last week, I loaded the outside of my headlights up with sealant, in addition to the upgraded sealant that Custom Lightz gave me. There's no way water is getting in now.
I was even tempted to seal the turn signal, and high beam bulbs in, but that's a little too extreme. Once they fog up a handful of times, it sort of gets to you.
<TABLE WIDTH="90%" CELLSPACING=0 CELLPADDING=0 ALIGN=CENTER><TR><TD>Quote, originally posted by -Bionic- »</TD></TR><TR><TD CLASS="quote">And to get the moister out; simply open the hood and remove the lowbeam and highbeam on a dry day, and let it vent. Resealt the headlights and close up. Should be good to go.</TD></TR></TABLE>
Or say hello to some fog.
A hairdryer also works very well, but some areas may be to hard to reach. I usually plug up two of the openings for the bulbs, then go to town.
Thread Starter
Joined: Sep 2006
Posts: 198
Likes: 0
From: MN
<TABLE WIDTH="90%" CELLSPACING=0 CELLPADDING=0 ALIGN=CENTER><TR><TD>Quote, originally posted by Crono139 »</TD></TR><TR><TD CLASS="quote">I was even tempted to seal the turn signal, and high beam bulbs in, but that's a little too extreme. Once they fog up a handful of times, it sort of gets to you.</TD></TR></TABLE>
yeah, if you don't seal the bulbs in what's stopping moisture from entering there?
it's no where near an airtight seal.
and if water can get in there it doesn't really matter how much sealant you have around the edges.
i guess i'll address the issue if i have fogging problems
yeah, if you don't seal the bulbs in what's stopping moisture from entering there?
it's no where near an airtight seal.
and if water can get in there it doesn't really matter how much sealant you have around the edges.
i guess i'll address the issue if i have fogging problems
Thread Starter
Joined: Sep 2006
Posts: 198
Likes: 0
From: MN
<TABLE WIDTH="90%" CELLSPACING=0 CELLPADDING=0 ALIGN=CENTER><TR><TD>Quote, originally posted by 96Civic_Coupe »</TD></TR><TR><TD CLASS="quote">do u have any shots of the whole front end</TD></TR></TABLE>
eh, the other headlight is not so sharp looking (it had a lot of dust in it before, and some of the silver reflective area is somewhat worn, also the clear cover piece is a bit less clear) and i repaired a few rust spots in the hood, so the paint has a few bumpy spots.
if i have time i'll try to get a pic that looks decent. also the weather is crappy so the car is always dirty
Member
Joined: Oct 2003
Posts: 1,149
Likes: 1
From: Akron, OH, U.S.A.
<TABLE WIDTH="90%" CELLSPACING=0 CELLPADDING=0 ALIGN=CENTER><TR><TD>Quote, originally posted by -Bionic- »</TD></TR><TR><TD CLASS="quote">Good job.
Hope you used new headlight sealant, as the 6th gen are relatively to fog once opened.
</TD></TR></TABLE>
They only fog if you dont know what you're doing. Ive done mine with no resealing to mass amounts and it never fogged. Ive seen plenty with massive amounts of sealant and it fogs.
My current retro is duct taped and sealed all over and it fogs like no other. Needless to say it wasnt done by me.
Masking that chrome part is kinda difficult ive found. The tape just takes the reflective paint off in most cases. Ive used only low-tac architech's tape and it still took it off. Its a pain to mask off.
Hope you used new headlight sealant, as the 6th gen are relatively to fog once opened.
</TD></TR></TABLE>They only fog if you dont know what you're doing. Ive done mine with no resealing to mass amounts and it never fogged. Ive seen plenty with massive amounts of sealant and it fogs.
My current retro is duct taped and sealed all over and it fogs like no other. Needless to say it wasnt done by me.
Masking that chrome part is kinda difficult ive found. The tape just takes the reflective paint off in most cases. Ive used only low-tac architech's tape and it still took it off. Its a pain to mask off.