

Ned help w/my Ksport coilovers (theory)

Thread Starter
Honda-Tech Member
Joined: May 2005
Posts: 928
Likes: 0
From: GA
Ok, in the past year or so Ive been astounded at how much Ive learned about cars (honda's in particular thanks to this site and buddies), however I havent spent enough time learning suspension and the other day it showed. I was trying to raise up the front of my car for slicks and it ended up taking me almost 2 hrs to do it. The problem I was having was with the adjustment of the actual coilover itself. I went to raise it up using only the lower locknut (on ksports it doesnt affect spring tension or ride quality at all) and at first I could only raise it about 1". I didnt have enough threads at the bottom of the assembly to keep screwing the bottom piece down. Ok,... so next I tried screwing the whole strut "body" (by body I mean the threaded part of the coilover) down which actually lengthened the overall length of the coilover(the top locknuts and spingg stayed still). That worked fine but it seems like it made the ride different. (heres a link to a thread with pics of the coilovers Im talkin about) https://honda-tech.com/zero...age=1
My question: What charictaristics (sp?) am I affecting by lengthening the coilover like that? I noticed as I turned the body of the coilover itself the top locknut kept getting looser. That didnt make logical sense to me because of the direction that I was turning the body. If you are looking DOWN, I was turning the body clockwise. It seems to me that it would make the spring tension greater by doing this. I was lengthening the travel too I guess, giving the strut its fullest length of travel. Is that what I should be doing? I really just need someone to help me, and show me how to adjust these coilovers for my driving needs. I dont autocross(although Id love to) but I do like to go down a few CURVY backroads and feel the cars handling capabilities. Matter of fact, Id rather do that than eat!! Its a rush,.........but I dont think that Ive got these coilovers adjusted to their fullest potential. ANY (knowledgeable) input is GREATLY appreciated. Oh and no, I dont have a rear sway bar YET...... I wanna get one but I dont know what size to get.
PLEASE HELP
Honda-Tech Member
Joined: Mar 2004
Posts: 2,972
Likes: 0
From: IL, USA
Raising the car will allow your car to roll a tad more, if thats what you mean by riding differently.
The easiest way to adjust height with these types of coilovers is this (though you can probably skip to step 4):
Step 1 Begin by setting the two front coilovers and rear two coilovers to the same heights. Also make sure that the dust boot is slipped snugly over the thicker bottom portion of the piston shaft. This ensures that the dust boot will not become seized in the upper mount assembly.
Step 2 With coilover in place on the car, tighten the two 14mm nuts.
Step 3 Attach the lower mount to the lower control arm/fork.
Step 4 With the coilover now at full droop, measure the distance between the wheel hub center and the topmost part of the fenderwell arch. Do this at all four corners, and adjust until the two front heights are equal, and the two rear heights are equal.
Step 5 Raise the spring perch lock and spring perch upwards until there is no up-down play in the spring and the upper mount, then tighten further until you are able to turn the spring by hand with a good amount of drag. Then tighten the spring perch against the spring perch lock as tightly as possible, so that turning one turns the other as well.
Step 6 To adjust height, use the spanner wrench to turn the spring perch/spring perch lock combination. To lower the ride height you turn clockwise. To raise the ride height you turn counter-clockwise.
Step 7 Mount the wheels, and lower the car onto the ground (start with one end, then do the other). Front corners and rear corners should be relatively equal, +/- ~2mm. If you are unsatisfied with the wheel clearance, repeat steps 4 through 6 until desired heights have been achieved.
Step 8 When you have reached your desired ride height at all four corners, raise one end, remove the wheels, and proceed to tighten the lower mount lock, and spring perch lock. Then lower the car onto the ground.
Step 9 Double-check all nuts and parts that might've been loosened for the adjustment process.
Step 10 Some amount of settling is normal in springs, so allow between 4mm - 5mm of settling to occur during the course of driving. Depending on driving habits, settling can take from a few days up to a month or more.
You are not adjusting shock travel in any way by doing this. You are only turning the shock body inside the lower mount. If done correctly, there should be no change in the spring at all. The entire spring/spring perch/spring perch lock assembly is essentially fixed. The only thing that will change is height, where clockwise turning will lower the car, and counter-clockwise turning will raise it.
Thread Starter
Honda-Tech Member
Joined: May 2005
Posts: 928
Likes: 0
From: GA
<TABLE WIDTH="90%" CELLSPACING=0 CELLPADDING=0 ALIGN=CENTER><TR><TD>Quote, originally posted by Noob4life »</TD></TR><TR><TD CLASS="quote">You are not adjusting shock travel in any way by doing this. You are only turning the shock body inside the lower mount. If done correctly, there should be no change in the spring at all. The entire spring/spring perch/spring perch lock assembly is essentially fixed. The only thing that will change is height, where clockwise turning will lower the car, and counter-clockwise turning will raise it.
</TD></TR></TABLE>
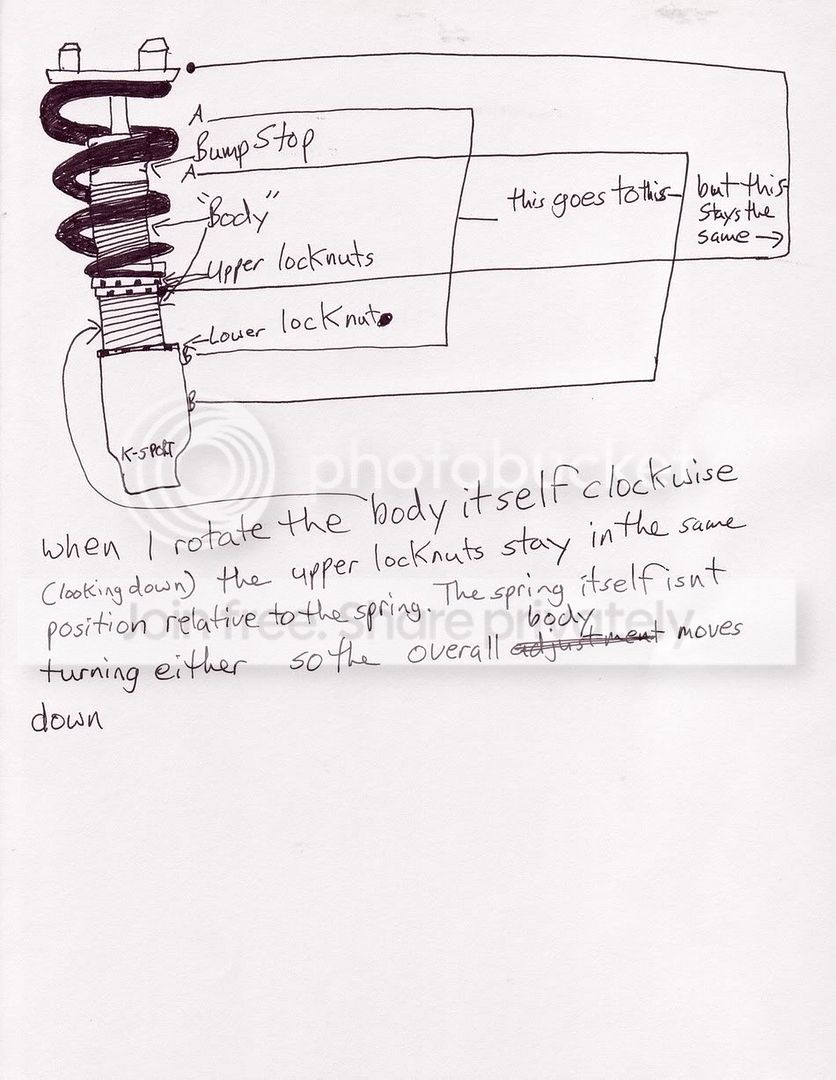
IM ASSUMING THAT PART YOU TYPED FOR ME BUT i THINK YOU ARE MISUNDERSTANDING MY INPUT. wHEN i SAID THAT iM TURNING THE.........freagin caps button......... body(threaded portion), the to 2 locknuts are staying stationary along with the spring and rest of the upper portion (2 14mm bolts). In essense you could acheive the same effect of what Im doing by turning the top lock nut counterclockwise up the threads. Hopefully my artistic capabilities are enough to better express what Im trying to say.
</TD></TR></TABLE>IM ASSUMING THAT PART YOU TYPED FOR ME BUT i THINK YOU ARE MISUNDERSTANDING MY INPUT. wHEN i SAID THAT iM TURNING THE.........freagin caps button......... body(threaded portion), the to 2 locknuts are staying stationary along with the spring and rest of the upper portion (2 14mm bolts). In essense you could acheive the same effect of what Im doing by turning the top lock nut counterclockwise up the threads. Hopefully my artistic capabilities are enough to better express what Im trying to say.
Honda-Tech Member
Joined: Jul 2005
Posts: 216
Likes: 0
Allan I don't have any personal experience with these but let me try to help you, I've been looking and thinking about these shocks precisely because I was trying to figure out how to set these up properly given the two adjustments. Sometimes simpler is better right?
By adjusting the shock body how you just described, you are in essence changing the position of the piston relative to the cylinder. With the two different adjustments on these shocks, you can change the relative static position of the pistons without changing the ride height. So the question is where do we want it? There are several factors here that we should consider.
We shouldn't set it so that the shock bottoms out under the car's weight (one extreme). If the spring perch is too low on the shock body, the shock could compress all the way - don't want that. The springs would also unseat whenever the shock extended - bad. Ok then how about the other extreme, fully extend the shock and raise the spring perch until the spring seats at full extension. This is probably where we want the perch to be so the spring never unseats itself. This is also how almost all name brand lowering springs are designed - just long enough to remain seated at full shock extension (ever wondered why you don't need to compress it to install it?) Then they adjust the spring rate to get the desired ride height (softer = lower). So why are the Race springs lower and stiffer than the Sport springs? Because of many helper coils that collapse under the car's weight leaving the rest of the spring to do it's job. I digress...
So if you set the spring perch until the spring seats at full shock extension, the amount of compression when you put the car back on the ground is a function of the weight on that corner and the spring rate. Hopefully there is still some bump travel left - if not you can raise the spring perch even more (and as a side effect, give the spring more preload at full travel - not important - think of the oem setup very soft spring rate, with a bunch of preload to get the ride height correct). The opposite could happen too - like if these springs are so stiff like 2000 lbs/in, you end up with inadequate static compression (not likely to happen so no need to worry).
Ok so now you've set it so the car has adequate bump travel left when the car's on the ground. Cool, now you can raise and lower the control arm mount to your heart's content to change the ride height (ie 4x4 status or muffler scrapin' slammed) all without changing the static position of the pistons. More importantly you can corner-weight the car so it behaves the same on left and right turns (do a search).
So cliff notes: to answer your question what does moving the shock body up/down do? Think in terms of moving the spring perch at least high enough so that the spring doesn't fall out under full extension, and even higher if you need more static bump travel. Then adjust ride-height, corner-weighting, with the lower control arm mount.
Honda-Tech Member
Joined: Mar 2004
Posts: 2,972
Likes: 0
From: IL, USA
<TABLE WIDTH="90%" CELLSPACING=0 CELLPADDING=0 ALIGN=CENTER><TR><TD>Quote »</TD></TR><TR><TD CLASS="quote">By adjusting the shock body how you just described, you are in essence changing the position of the piston relative to the cylinder.</TD></TR></TABLE>
This is incorrect. Turning the shock body does not raise or lower the piston inside the shock body. It only raises or lowers the ride height, hence why the lower mount is seperate from the shock body; this allows you to adjust height without affecting shock travel with this design.
Allan, you want the spring perch and lock to turn WITH the shock body. If you turn the shock body, and the collars remain stationary, you are altering the spring position, which is undesirable. You want the shock body and the collars to rotate as one piece. Here: Imagine that the spring perch, spring perch lock, and shock body were all one fixed unit, so that no piece would rotate indepedently of the other, as if the collars were welded in place. That is how you want adjustments to happen. So that counterclockwise rotations of any piece (whether it be the collar, the lock, or the shock body) will have the same effect, that of raising the shock body out of the lower mount, increasing overall coilover length, and raising ride height. Likewise, clockwise rotations of any piece (collar, lock, or shock body) will lower the shock body into the lower mount, decreasing overall coilover length, and lowering ride height.
I did not note this in my installation instructions, because in my experiences, tightening the spring perch against the spring perch lock has always resulted in the shock body turning along with the spring perch/lock combo. But it should be noted that this is the desired result, and if this doesn't happen, then tighten the two collars further until it does.
The method you are using now is the method I used to use, until I realized that you could very easily end up with very different settings at all 4 corners. It is a less accurate method, and more time consuming.
Thread Starter
Honda-Tech Member
Joined: May 2005
Posts: 928
Likes: 0
From: GA
<TABLE WIDTH="90%" CELLSPACING=0 CELLPADDING=0 ALIGN=CENTER><TR><TD>Quote, originally posted by Noob4life »</TD></TR><TR><TD CLASS="quote">
This is incorrect. Turning the shock body does not raise or lower the piston inside the shock body. It only raises or lowers the ride height, hence why the lower mount is seperate from the shock body; this allows you to adjust height without affecting shock travel with this design.
Allan, you want the spring perch and lock to turn WITH the shock body. If you turn the shock body, and the collars remain stationary, you are altering the spring position, which is undesirable. You want the shock body and the collars to rotate as one piece. Here: Imagine that the spring perch, spring perch lock, and shock body were all one fixed unit, so that no piece would rotate indepedently of the other, as if the collars were welded in place. That is how you want adjustments to happen. So that counterclockwise rotations of any piece (whether it be the collar, the lock, or the shock body) will have the same effect, that of raising the shock body out of the lower mount, increasing overall coilover length, and raising ride height. Likewise, clockwise rotations of any piece (collar, lock, or shock body) will lower the shock body into the lower mount, decreasing overall coilover length, and lowering ride height.
I did not note this in my installation instructions, because in my experiences, tightening the spring perch against the spring perch lock has always resulted in the shock body turning along with the spring perch/lock combo. But it should be noted that this is the desired result, and if this doesn't happen, then tighten the two collars further until it does.
The method you are using now is the method I used to use, until I realized that you could very easily end up with very different settings at all 4 corners. It is a less accurate method, and more time consuming.</TD></TR></TABLE>
No, that is correct, think about it and re-read the post. He's 100% right. As far as this "method",.... I wouldnt really call it my method,... just my trial and error
Trending Topics
Thread Starter
Honda-Tech Member
Joined: May 2005
Posts: 928
Likes: 0
From: GA
<TABLE WIDTH="90%" CELLSPACING=0 CELLPADDING=0 ALIGN=CENTER><TR><TD>Quote, originally posted by superpilun »</TD></TR><TR><TD CLASS="quote">Allan I don't have any personal experience with these but let me try to help you, I've been looking and thinking about these shocks precisely because I was trying to figure out how to set these up properly given the two adjustments. Sometimes simpler is better right?
By adjusting the shock body how you just described, you are in essence changing the position of the piston relative to the cylinder. With the two different adjustments on these shocks, you can change the relative static position of the pistons without changing the ride height. So the question is where do we want it? There are several factors here that we should consider.
We shouldn't set it so that the shock bottoms out under the car's weight (one extreme). If the spring perch is too low on the shock body, the shock could compress all the way - don't want that. The springs would also unseat whenever the shock extended - bad. Ok then how about the other extreme, fully extend the shock and raise the spring perch until the spring seats at full extension. This is probably where we want the perch to be so the spring never unseats itself. This is also how almost all name brand lowering springs are designed - just long enough to remain seated at full shock extension (ever wondered why you don't need to compress it to install it?) Then they adjust the spring rate to get the desired ride height (softer = lower). So why are the Race springs lower and stiffer than the Sport springs? Because of many helper coils that collapse under the car's weight leaving the rest of the spring to do it's job. I digress...
So if you set the spring perch until the spring seats at full shock extension, the amount of compression when you put the car back on the ground is a function of the weight on that corner and the spring rate. Hopefully there is still some bump travel left - if not you can raise the spring perch even more (and as a side effect, give the spring more preload at full travel - not important - think of the oem setup very soft spring rate, with a bunch of preload to get the ride height correct). The opposite could happen too - like if these springs are so stiff like 2000 lbs/in, you end up with inadequate static compression (not likely to happen so no need to worry).
Ok so now you've set it so the car has adequate bump travel left when the car's on the ground. Cool, now you can raise and lower the control arm mount to your heart's content to change the ride height (ie 4x4 status or muffler scrapin' slammed) all without changing the static position of the pistons. More importantly you can corner-weight the car so it behaves the same on left and right turns (do a search).
So cliff notes: to answer your question what does moving the shock body up/down do? Think in terms of moving the spring perch at least high enough so that the spring doesn't fall out under full extension, and even higher if you need more static bump travel. Then adjust ride-height, corner-weighting, with the lower control arm mount.</TD></TR></TABLE>
Oh yeah,........ WWWOOOWWW!!! Thats what Im talkin about. That whole post is awesome info,..and it makes sense to me. Im still not sure how to corner weight and set the coilovers to their best setting but I think I understand a little more the theory behind adjusting them,....Thanks!!!
Honda-Tech Member
Joined: Jul 2005
Posts: 216
Likes: 0
No problem, glad I could help. I would start with the spring perches high enough to seat the springs at full extension. Then if you find yourself hitting the bumpstops you can raise the spring perch. After you get that sorted, then you play with the lower mount. First get it to the ride height you want (or where you want the static suspension geometry to be for racing). Then you fine tune to corner-weight. Corner-weighting is pretty easy to understand but hard to do. Imagine a table with four legs. If two of the diagonal legs are a little bit longer than the other legs, they will carry all the weight of the table. Same thing with a car. If the Right-Front and Left-Rear carry more than 50% of the weight, the car will tend to understeer on left turns, and oversteer on right turns. With the two diagonals each carrying 50% of the weight, the understeer-oversteer characteristics of the car will be more or less the same on left and right turns. If you want to fool around with this, just make some examples on paper and move the weight around keeping the diagonals at 50% each and see what happens.
Honda-Tech Member
Joined: Mar 2004
Posts: 2,972
Likes: 0
From: IL, USA
Ah yes, the rest of your post is spot on. I was caught up in the very beginning though, where I read you saying:
<TABLE WIDTH="90%" CELLSPACING=0 CELLPADDING=0 ALIGN=CENTER><TR><TD>Quote »</TD></TR><TR><TD CLASS="quote">By adjusting the shock body how you just described, you are in essence changing the position of the piston relative to the cylinder.</TD></TR></TABLE>
as:
"By rotating the shock body, you increase/decrease shock travel by raising or lowering the internal piston assembly inside the shock body."
Which, I still believe, is incorrect. I do see what you are saying though, everything else is indeed the correct way to set ride height, and is essentially the same as our directions, only you went into more detail about setting the initial spring position.
The method he described using is the same as what I had done in the past, and while its a viable method, its more complicated than it has to be.
Honda-Tech Member
Joined: Jan 2000
Posts: 4,468
Likes: 0
From: Carbon Fiber Land, USA
I love the illustration.
Just give me a call bro, and I will explain how to adjust them. You are my customer and were here to help you. I hope you got your turbo stuff figured out. Hit me up.
Just give me a call bro, and I will explain how to adjust them. You are my customer and were here to help you. I hope you got your turbo stuff figured out. Hit me up.
Honda-Tech Member
Joined: Jul 2005
Posts: 216
Likes: 0
Sorry I wasn't clear in what I was referring to. I was specifically talking about Allan's hand sketch. In his sketch, the spring perch AND the lower mount stay exactly where they are - the only thing moving is the shock body itself. The piston rod stays where it is because it's connected to the top. So based on this "hypothetical" situation the only thing changing is the relative position of the piston inside the shock body. This situation is confusing to deal with, so instead I explained to instead think first about where to put the spring perch, then second where to put the lower mount. Are we in agreement now?
Thread Starter
Honda-Tech Member
Joined: May 2005
Posts: 928
Likes: 0
From: GA
<TABLE WIDTH="90%" CELLSPACING=0 CELLPADDING=0 ALIGN=CENTER><TR><TD>Quote, originally posted by superpilun »</TD></TR><TR><TD CLASS="quote">Sorry I wasn't clear in what I was referring to. I was specifically talking about Allan's hand sketch. In his sketch, the spring perch AND the lower mount stay exactly where they are - the only thing moving is the shock body itself. The piston rod stays where it is because it's connected to the top. So based on this "hypothetical" situation the only thing changing is the relative position of the piston inside the shock body. This situation is confusing to deal with, so instead I explained to instead think first about where to put the spring perch, then second where to put the lower mount. Are we in agreement now?</TD></TR></TABLE>
Oh..... oooops,..... Thats my fault I guess. I should've elaborated more. The lower mount turns with the shock "body" in the "method" I was talkin about.
Oh..... oooops,..... Thats my fault I guess. I should've elaborated more. The lower mount turns with the shock "body" in the "method" I was talkin about.
Thread Starter
Honda-Tech Member
Joined: May 2005
Posts: 928
Likes: 0
From: GA
<TABLE WIDTH="90%" CELLSPACING=0 CELLPADDING=0 ALIGN=CENTER><TR><TD>Quote, originally posted by BodyKits NW »</TD></TR><TR><TD CLASS="quote">I love the illustration.
Just give me a call bro, and I will explain how to adjust them. You are my customer and were here to help you. I hope you got your turbo stuff figured out. Hit me up. </TD></TR></TABLE>
I know,.... Im an arteest huh
Ive been tryin to call you but cant get u on the phone. I need some more locknut wrenches or whatever you call those things. gimme a holla
Pm'd u
Just give me a call bro, and I will explain how to adjust them. You are my customer and were here to help you. I hope you got your turbo stuff figured out. Hit me up.
</TD></TR></TABLE>I know,.... Im an arteest huh
Ive been tryin to call you but cant get u on the phone. I need some more locknut wrenches or whatever you call those things. gimme a holla
Pm'd u

Thread
Thread Starter
Forum
Replies
Last Post
arsim
Suspension & Brakes
2
Sep 4, 2007 07:34 AM