When you click on links to various merchants on this site and make a purchase, this can result in this site earning a commission. Affiliate programs and affiliations include, but are not limited to, the eBay Partner Network.
Aside from the evap system, the only other thing that bugged me after the swap was the shifter.
The shifter position was forward of the stock location after the swap, and it had the tendency to rattle in 5th gear when I was going down the road.
I also noticed that the boot/dust cover that covers the shift rod was deteriorated. I thought it was a good idea to keep that shift rod covered where it enters the transmission. The problem is that this requires the removal of the "spring pin" (AKA bitch pin). Here is where my OCD kicks in...
I thought I would also replace all the wear items at the rear joint bushing where the shift rod meets the change lever. It was only after I ordered everything that I would realize my B&M short shifter does not use the thrust washers and the joint bushings shown in the parts catalog. It uses different size o-rings instead. Oh well...
First things first, I put the tranny in N and disconnected the shift rod to see how much would need to be removed so the change lever could sit in its neutral position while the tranny was in N - 7/16". A quick stop at my friend's steel fab shop took care of that. Then I threw a fresh coat of paint on there and got ready to install.
I saw a write up about removing the spring pin with a C-clamp instead of beating it out with a hammer. I liked that idea, but my C-clamp would not clear the tranny. But I decided to try using the tool I rented for removing the outer tie rod ends. It ended up working okay, but was not a perfect tool for the job. I got the pin pressed out, and replaced the boot and then drove the new pin with the TRE puller. I also installed the new pin retainer I ordered out of fear that the pin might fall out w/o the retainer (kidding). Holy cow, that bitch pin is a complete pain in the ***.
If you want to see all the pieces you can replace on your shift rod in the hopes of getting rid of the rattle - here they are.
As I said above, my B&M short shifter does not use the thrust washers or joint bushings called for. I doubt it will be worth shipping them back to return. I will figure out what o-rings I am supposed to use with the short shifter and get some new ones of those.
I did not get to do much work on the mighty Civic over the weekend - did some family stuff instead.
One thing I am trying to track down is the male plug for my VTEC solenoid. The plug is have looks like it was partially melted at one point. How/why did that happen?
As best as I can tell, this is a Sumitomo HW 090 series connector. It looks like if you want to buy hundreds of these at a time, you can find them on Alibaba.
Why not just get a weatherproof one-pin connector and splice that into the VTEC solenoid?
That is an entirely reasonable question...
I get a little unreasonable about trying to keep things looking factory or original vs. a mish-mash of things cobbled together. It seems like when the factory product has an H (or A) on it, the initial build quality is pretty high. So I am trying to find one just to keep it looking factory. I kind of see this as the Civic Honda could have built...
Try Ali Express if you just want to buy 5 or 10 of something. I know they have some of the Honda connectors. Or get one off an AC compressor, they use the same connector.
Try Ali Express if you just want to buy 5 or 10 of something. I know they have some of the Honda connectors. Or get one off an AC compressor, they use the same connector.
Thank you, those are both great tips. Hoping I can find some of these.
Hey man just dropping by to say I am still following along. Haven't had much to add as it seems you are plugging along pretty good. Absolutely love your mindset- about building the car the way you envisioned it would have come from the factory from Honda. The attention to detail is great and I love what you're doing. Keep up the good work! I will be starting a build thread soon I think. I've had my car since 2004 so trying to dig up some old pictures before I start...
Hey man just dropping by to say I am still following along. Haven't had much to add as it seems you are plugging along pretty good. Absolutely love your mindset- about building the car the way you envisioned it would have come from the factory from Honda. The attention to detail is great and I love what you're doing. Keep up the good work! I will be starting a build thread soon I think. I've had my car since 2004 so trying to dig up some old pictures before I start...
Thank you, I appreciate the compliments. I know some of this info is overkill to the seasoned folks on here, but honestly I have not done more than buy gas and oil for this machine for the last several years, so it is nice to take a deeper dive. I like to take a lot of pictures, I love seeing new parts go in. I can't wait to see how she feels!!!
Let me know if I can do anything to help with your build!
Now it gets worse! The 400 grit ball hone I saw on Amazon back on Weds is now unavailable! At this point, unless I can find one this week, my build will get slowed down.
I can replace all the heater hoses and vac lines under the intake manifold, and clean up electrical connections/splices this weekend, and change the front main seal and timing belt while I am waiting, but the next "big thing" to do is de-glaze the cylinder walls and then put those pistons w/ new rings in!
I probably have enough little things to do, but I am getting anxious about finding a ball hone now that I am committed to buying one.
I just searched for 3 Jaw Cylinder Hone tool. You'd need to find one with the grit you want.
My understanding is that the ball hone is the correct tool for a simple de-glaze of the cylinder walls. Since everything measures w/in spec, I am simply after a fresh surface that the new ring set can wear in to.
Originally Posted by TomCat39
The flex hone ball hone is the superior hone, however, I don't recall if 400 grit is the recommended grit.
I'm assuming this is a B series motor based on the 83mm hone.
I remember reading up (I think on flex hone's site) the various honing material best practice materials and grits.
Have you already researched which honing material will be best for your particular application?
The service manual for the '96 Integra does specify 400 grit, or finer.
You assume correct, engine is B18C1, so 81mm bore, closest (bigger) size is the 83mm, or 3-1/4".
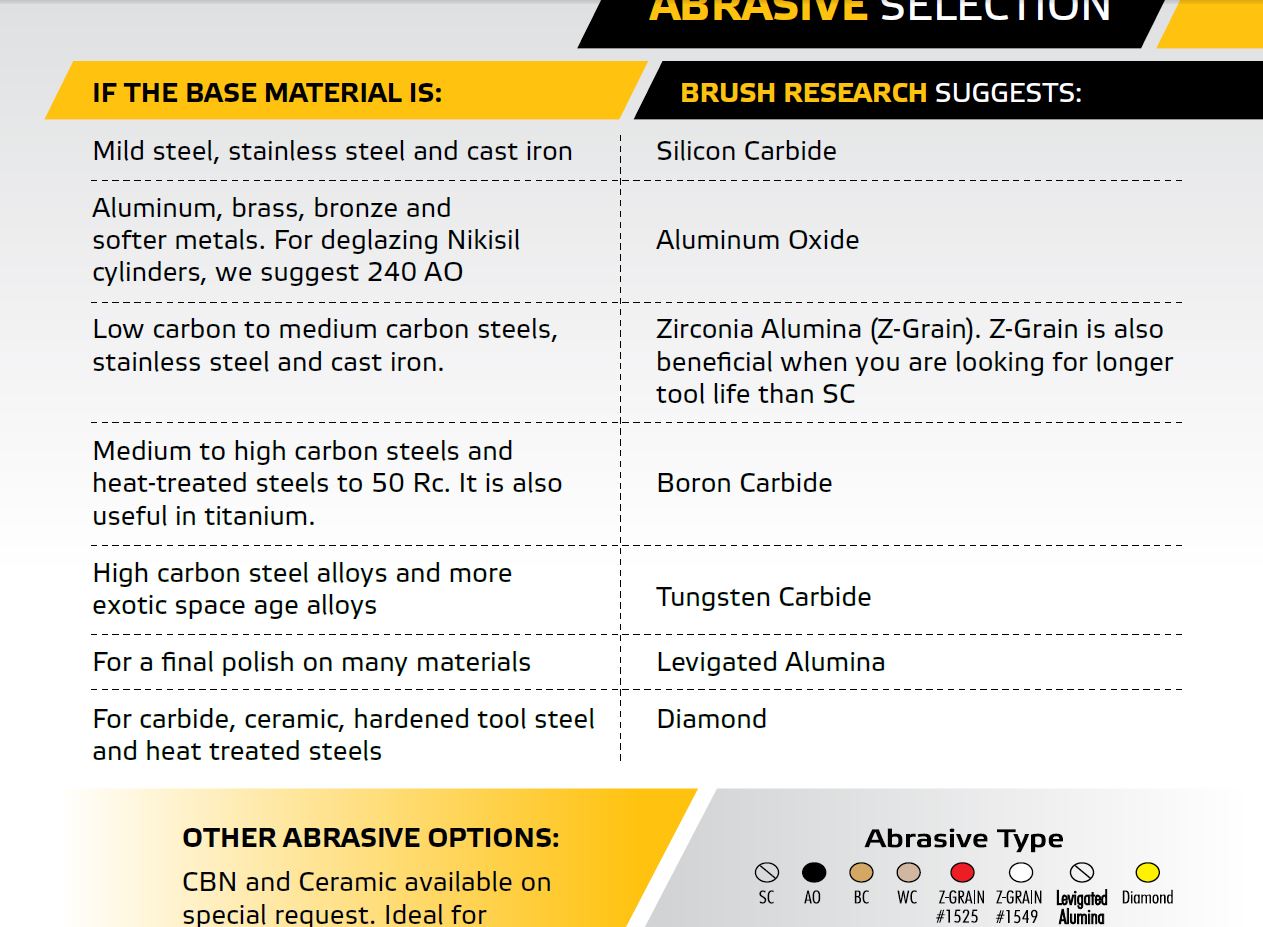
Since the cylinder sleeves are cast iron, the silicon carbide is the appropriate media for the job.
I called Brush Research and they didn't say why they were out of these, but thought they would be back in stock next week. I hope so! If other items arrive this week, I probably have enough to do to keep me busy. The days are getting shorter, and colder, so work days are becoming less productive...
I get a little unreasonable about trying to keep things looking factory or original vs. a mish-mash of things cobbled together. It seems like when the factory product has an H (or A) on it, the initial build quality is pretty high. So I am trying to find one just to keep it looking factory. I kind of see this as the Civic Honda could have built...
Score! Thrilled to say I found the pieces for both female and male end. Simple pleasures for simple minds...
This will help me as I plan on cleaning up some poorly-done splices over the weekend...
When I read more about the IAB connector, it sounds like it was PNK/BLU & YEL/BLK in OBD1 and RED/BLU & BLK in OBD2. So no idea where the swap shop got my connector for IAB - GRN & RED:
When I read more about the IAB connector, it sounds like it was PNK/BLU & YEL/BLK in OBD1 and RED/BLU & BLK in OBD2. So no idea where the swap shop got my connector for IAB - GRN & RED:
This gets more interesting, as the IAB solenoid relies on switched ground to function for OBD1. For OBD2, it looks like a different story.
The two scans below are from '94 and then '96 FSMs.
My swap was hooked up with the (-) terminal of IAB connector going to the t-stat housing. What did the shop connect the (+) terminal to at my ECM? Can't wait to find out...
I have one terminal of IAB hooked up to A17, which should be switched ground (-).
The other terminal is grounded at the thermostat housing.
If I am correct, then my IAB never worked for 14 years.
This may explain why it felt like I never had any low-end torque off idle...
The connector your shop used is an OBD0 temp sensor (I can't remember if those wire colors are IAT or coolant temp anymore, but it's one or the other) That part doesn't really matter, Honda used that same style connector for lots of things. Generally if you're in the business of doing Honda engine swaps you keep all the cut JDM harnesses you get with the engines to use for connectors when doing swaps. I'm not very impressed with the crimp terminals though.
When wiring an OBD1 GSR swap in an OBD1 Civic the easiest thing to do (if you don't have emissions testing) is to simply move A20 to A17 and plug the evap purge solenoid connector into the IAB solenoid. The car will run fine without the evap purge solenoid and an OBD1 ECU wont throw a code for it. If you need to pass emissions testing or simply want the evap purge to function you'll need to take power from one of the yellow/black wires at the dead end plug on the driver's side of the engine bay near the firewall and run the other wire to A17.
Thank you for weighing in here. It makes sense to scavenge factory connectors and use them wherever they fit. I agree with you about the crimp terminals. I had a friend who is a professional wrench comment about those years ago, so I was going to re-do the connections this weekend, and that is how I discovered this wiring issue.
If I have a OBD2 GSR swap (engine is from a '96) going into my OBD1 body ('94 EH3), what is the guidance?
I do want to keep the evap purge function, the car smells awful when purge is not purging.
So if I want to keep using A17, switched (-), where is this dead end plug YEL/BLK? It provides (+) from the PGM-FI main relay, yes?