
Need help identifying something on this crimper please *PICS*
 10-05-2008, 12:50 AM
#1
Honda-Tech Member
Thread Starter
I just bought this crimper which has me confused on one part. I have tried stripping wire with it with no problem, but now when I go to crimp a insulated butt connector, I don't know which of these ridges to use.
It's almost 5am here so I'm sorry if I seem stupid for asking such a question, but I just don't know which of these ridges or "round teeth" are the one for the 16 guage crimp. Here are 2 pics. One is a scan of the actual crimper and the second one is a scan of insert of the packaging. I scanned the packaging beacause there you can actually read the numbers since my scanner couldn't fully read the actual crimper. This crimper is a step up from the "el cheapo" black crimper that they had (or the one that every kit seems to come with) This silver spring-loaded one was double price (this one)
I need help with the red circle.
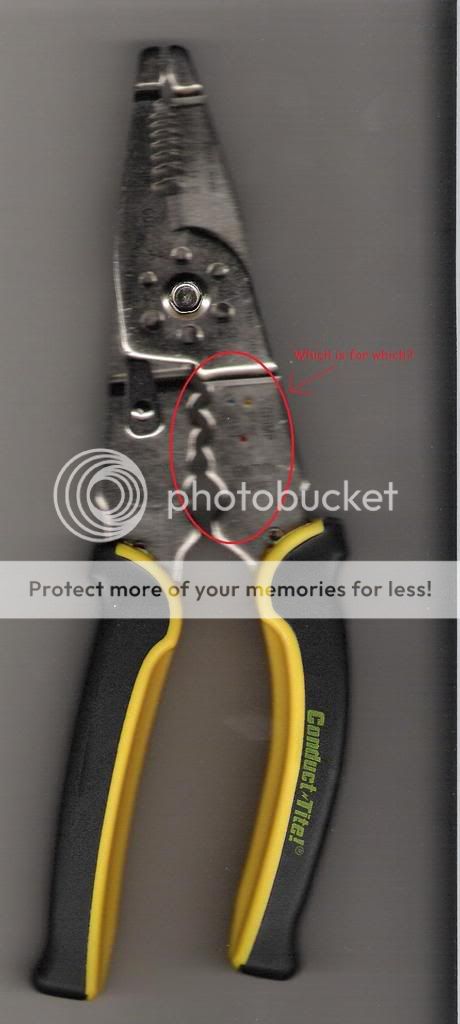
^^^Actual scan^^^
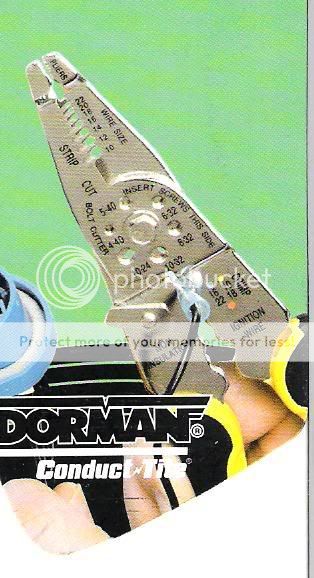
^^^Scanned Packaging insert with clear numbers/color^^^
Can some one draw arrows for which guage number to what groove it goes to? Please?????? Me love you long time!
It's almost 5am here so I'm sorry if I seem stupid for asking such a question, but I just don't know which of these ridges or "round teeth" are the one for the 16 guage crimp. Here are 2 pics. One is a scan of the actual crimper and the second one is a scan of insert of the packaging. I scanned the packaging beacause there you can actually read the numbers since my scanner couldn't fully read the actual crimper. This crimper is a step up from the "el cheapo" black crimper that they had (or the one that every kit seems to come with) This silver spring-loaded one was double price (this one)
I need help with the red circle.
^^^Actual scan^^^
^^^Scanned Packaging insert with clear numbers/color^^^
Can some one draw arrows for which guage number to what groove it goes to? Please?????? Me love you long time!
 10-05-2008, 12:54 AM
#2
Junior Member
Join Date: Aug 2007
Location: Mesquite, Texas
Posts: 868
Likes: 0
Received 0 Likes
on
0 Posts
Sup again. You can very likely use the top one, closest to the actual stripping teeth. I usually go trial and error on this, but if that's unacceptable I'll try harder to post. 
(Usually the individual spikes will cover a ridiculous range of gauges anyway.)
E: Actually, look at second picture. He's crimping a blue connector, reserved for 16 gauge, using the top spoke.
Also, if you get into crimping regularly, I've found great pleasure in something called '909' by Channel Lock, at Home Depot. Cost $20 though, but good if you'll be crimping tons in the future.
10-05-2008, 07:01 AM
#4
Honda-Tech Member
You could use the bottom part. Honestly it doesnt matter if its insulated or not itll crimp the same. Insulated will make it a little harder of a squeeze but its not that big of a deal. As long as you have the point into the little cup on the pilers it will do exactly what you want. 
10-05-2008, 11:30 AM
#5
Junior Member
Join Date: Sep 2007
Location: Hettinger, North Dakota, US
Posts: 891
Likes: 0
Received 0 Likes
on
0 Posts
just use the slot with the round end that matches the connector your using. the old wire crimper i use doesnt have thecolor codes any more, i just match the size up and crimp it down, then fallow it with a flat crimp so that its nice and tight.
10-05-2008, 02:18 PM
#6
Junior Member
Join Date: Aug 2008
Location: Orlando, FL, USA
Posts: 99
Likes: 0
Received 0 Likes
on
0 Posts
Yeah - that should work. Technically, if you're going to be crimping insulated terminals (and who isn't, anymore) you shouldn't use anything with a post/spike, since it may cut through the insulation.
Ideally, you should use a crimper with a die that equally applies pressure around the crimp, and is designed to apply a certain amount of pressure and not release it until that pressure is reached.
But one of those costs a bunch more than the one you have (like ...$80 to $150?), so.... unless you're planning to do a bunch of electrical work, it's probably not a good investment.
If when you're done with the crimping, you have doubts about the insulation, just wrap it with electrical tape or heat shrink.
10-05-2008, 04:25 PM
#7
Honda-Tech Member
Thread Starter
<TABLE WIDTH="90%" CELLSPACING=0 CELLPADDING=0 ALIGN=CENTER><TR><TD>Quote, originally posted by PerryRT »</TD></TR><TR><TD CLASS="quote">Yeah - that should work. Technically, if you're going to be crimping insulated terminals (and who isn't, anymore) you shouldn't use anything with a post/spike, since it may cut through the insulation.
Ideally, you should use a crimper with a die that equally applies pressure around the crimp, and is designed to apply a certain amount of pressure and not release it until that pressure is reached.
But one of those costs a bunch more than the one you have (like ...$80 to $150?), so.... unless you're planning to do a bunch of electrical work, it's probably not a good investment.
If when you're done with the crimping, you have doubts about the insulation, just wrap it with electrical tape or heat shrink.</TD></TR></TABLE>
This morning my neighbor just gave me his. He had a few of them. This is the same one I went out and bought for my old job. The cost was 84 bucks last year ago. It is a ratchet design that won't let go until you have pressed hard enough.
Trending Topics
10-06-2008, 03:01 PM
#8
Junior Member
Join Date: Aug 2008
Location: Orlando, FL, USA
Posts: 99
Likes: 0
Received 0 Likes
on
0 Posts
<TABLE WIDTH="90%" CELLSPACING=0 CELLPADDING=0 ALIGN=CENTER><TR><TD>Quote, originally posted by sageuvagony »</TD></TR><TR><TD CLASS="quote">It is a ratchet design that won't let go until you have pressed hard enough. </TD></TR></TABLE>
 ....and that's actually the most important part. The ratchet keeps you from undercrimping - letting you press down just enough to make contact. It looks OK, it makes electrical contact ... for the next six weeks. Unfortunately, in week seven, you and your girlfriend/wife will be caught dead on the side of the road 50-miles from nowhere because now the connection's vibrated loose. And she's not happy.
And trust me - I've been married for 16 years - you NEED to keep her happy!
As I said, worth the money if you're going to do a lot of these terminals. If not, use the kind you got, but be really aggro about squeezing hard enough.
Good test to see if your crimps are ok - get a connector and a spare piece of wire. Crimp it like you normally do. Put the spade/ring end of the connector in a vise. Yank the other end of the wire hard with vicegrips or whatever until it separates. If the wire came OUT of the connector? No good - Crimp harder next time. If the wire stayed in the connector but broke just next to it or the connector ring broke..... you're in good shape.
(This is how we used to get tested when I was in A&P school.)
....and that's actually the most important part. The ratchet keeps you from undercrimping - letting you press down just enough to make contact. It looks OK, it makes electrical contact ... for the next six weeks. Unfortunately, in week seven, you and your girlfriend/wife will be caught dead on the side of the road 50-miles from nowhere because now the connection's vibrated loose. And she's not happy.And trust me - I've been married for 16 years - you NEED to keep her happy!
As I said, worth the money if you're going to do a lot of these terminals. If not, use the kind you got, but be really aggro about squeezing hard enough.
Good test to see if your crimps are ok - get a connector and a spare piece of wire. Crimp it like you normally do. Put the spade/ring end of the connector in a vise. Yank the other end of the wire hard with vicegrips or whatever until it separates. If the wire came OUT of the connector? No good - Crimp harder next time. If the wire stayed in the connector but broke just next to it or the connector ring broke..... you're in good shape.
(This is how we used to get tested when I was in A&P school.)

Thread
Thread Starter
Forum
Replies
Last Post