

B20Vtec "In Memory" Build

Thread Starter
Honda-Tech Member
Joined: Nov 2009
Posts: 1,809
Likes: 1
From: New York
to answer your questions, the black thing is a charcoal canister, it can be deleted, gas from the tank gets vented to the charcoal canister then the ecu tells the canister to vent the fumes later i think, either way its not needed, i deleted it on my hatch and ran a line from the tank vent down the fire wall and under the car.
I think it's a better idea to just keep it though


I ran a stock disc/drum prop valve and had mushy brakes, wastn fond of that. Found and swapped a 4040 out of a 90 integra and it solved my issues.
I suggest running the correct brake parts, cuz they're brake parts and they're designed from the factory that way. i think honda engineers know more than most of us... just sayin.
I suggest running the correct brake parts, cuz they're brake parts and they're designed from the factory that way. i think honda engineers know more than most of us... just sayin.

Thread Starter
Honda-Tech Member
Joined: Nov 2009
Posts: 1,809
Likes: 1
From: New York
Thanks man, stay tuned 
I appreciate it, lots of things going on in life right now so it's hard to find motivation, but thanks again.
Picked up a spoiler today for $20, can't go wrong. Also got my 40/40 prop valve from a junkyard for free (yoink). I think I may put this build on hold for about a month in order to fix my hatch up so I've got something to go on a well needed roadtrip over spring break. I'll get some pictures up as soon as my phone is charged.. I want a few opinions on the spoiler, it's a lot bigger than it looked


apologies for the shitty pictures
Picked up a spoiler today for $20, can't go wrong. Also got my 40/40 prop valve from a junkyard for free (yoink
). I think I may put this build on hold for about a month in order to fix my hatch up so I've got something to go on a well needed roadtrip over spring break. I'll get some pictures up as soon as my phone is charged.. I want a few opinions on the spoiler, it's a lot bigger than it lookedapologies for the shitty pictures
Last edited by Dontoh; Mar 5, 2011 at 01:00 PM.
Thread Starter
Honda-Tech Member
Joined: Nov 2009
Posts: 1,809
Likes: 1
From: New York
yeah. i was excited for it too. i was hoping it looked like this
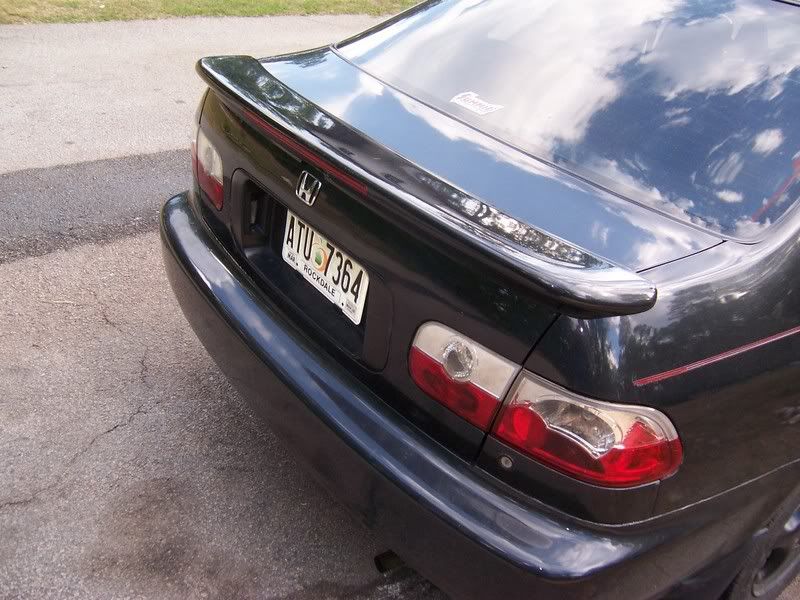
yeah, I'm aware the tails gotta go lol. I'm keeping my eyes open for some 50/50s..
yeah, I'm aware the tails gotta go lol. I'm keeping my eyes open for some 50/50s..
Thread Starter
Honda-Tech Member
Joined: Nov 2009
Posts: 1,809
Likes: 1
From: New York
nothing big, but its progress i guess.
picked these seats up, and this cluster that was already wired and modded to sit SUPER flush in an eg dash


picked these seats up, and this cluster that was already wired and modded to sit SUPER flush in an eg dash
Thread Starter
Honda-Tech Member
Joined: Nov 2009
Posts: 1,809
Likes: 1
From: New York
alrighty.. not much of an update, but thats what happens when you're poor lol
i got the drags sold, sold all 4 to a buddy of mine.. he put them on his metro lmao


got the bay stripped some more. getting ready to cover it in degreaser and wash it before i start the body work


gunna repaint this ugly *** valve cover =]


next update should be monday, and lets hope its a big one
i got the drags sold, sold all 4 to a buddy of mine.. he put them on his metro lmao
got the bay stripped some more. getting ready to cover it in degreaser and wash it before i start the body work
gunna repaint this ugly *** valve cover =]
next update should be monday, and lets hope its a big one
Thread Starter
Honda-Tech Member
Joined: Nov 2009
Posts: 1,809
Likes: 1
From: New York
Started on the VC today. Was outside doing it, but it started snowing, and I wasnt about to start spraying **** in the house. here's the progress so far
vc marinating in paint stripper. yum. and yes, the **** DOES burn, wear latex gloves


central new york weather. mid march. terrible lol

updates tomorrow
vc marinating in paint stripper. yum. and yes, the **** DOES burn, wear latex gloves
central new york weather. mid march. terrible lol
updates tomorrow
Thread Starter
Honda-Tech Member
Joined: Nov 2009
Posts: 1,809
Likes: 1
From: New York
like promised, finished the vc..
now- i dont want to hear anything on what i should have done as far as the letters go. i thought very hard about it, asked a lot of people, and decided that i'll leave it the way it is..
anyway, these finally came in from autozone.. my new valve cover gasket kit (vc gasket and spark plug seals) and my camshaft seals.. i'm hoping this was the problem as to why i was getting oil in my #3 and #4 sparkplugs and why i had oil leaking out from near my camshafts.. i really do hope lol

first coat of primer

after i sprayed this it look ORANGE. and when i say orange, i mean ORANGE.. the pictures make it look more red, but it was really orange lol.. orange.. i was so disappointed

tape pealed- it started to look a little more red

in the over for 20 min @ 200 degrees. idc what any says, i recommend this. i also recommend using primer and clear.. if they weren't needed, they wouldn't exist. i've also read that you could paint this, then put it on your car and drive around for a little bit.. but i wouldnt mess with it until its cured, so i threw it in the over.. mmmm vtec for dinner.. it also turned a bit more red surprisingly.. usually the color will fade very slightly after being baked

out of the oven, and i started experimenting with 400 grit, then 600

finished product, leaving it like this.. for now.. it also looks a lot more red now that the paint has cured


now- i dont want to hear anything on what i should have done as far as the letters go. i thought very hard about it, asked a lot of people, and decided that i'll leave it the way it is..
anyway, these finally came in from autozone.. my new valve cover gasket kit (vc gasket and spark plug seals) and my camshaft seals.. i'm hoping this was the problem as to why i was getting oil in my #3 and #4 sparkplugs and why i had oil leaking out from near my camshafts.. i really do hope lol
first coat of primer
after i sprayed this it look ORANGE. and when i say orange, i mean ORANGE.. the pictures make it look more red, but it was really orange lol.. orange.. i was so disappointed
tape pealed- it started to look a little more red
in the over for 20 min @ 200 degrees. idc what any says, i recommend this. i also recommend using primer and clear.. if they weren't needed, they wouldn't exist. i've also read that you could paint this, then put it on your car and drive around for a little bit.. but i wouldnt mess with it until its cured, so i threw it in the over.. mmmm vtec for dinner.. it also turned a bit more red surprisingly.. usually the color will fade very slightly after being baked
out of the oven, and i started experimenting with 400 grit, then 600
finished product, leaving it like this.. for now.. it also looks a lot more red now that the paint has cured
Last edited by Dontoh; Mar 30, 2011 at 02:32 PM.
Thread Starter
Honda-Tech Member
Joined: Nov 2009
Posts: 1,809
Likes: 1
From: New York
Alright, so I wired up my DC cluster.. all the wiring is done, so its ready to go in.. But here's the good part, and I'm really impressed by how it turned out
I got my dash painted, and the cluster fit real nice..
check it out
right after I washed it with some purple power!


notice the second piece near the bottom of the pic. I was originally going to leave this the color it is, because they don't come black from factory, but then I found a really nice picture of an eg interior where the guy had painted it black, so I figured I might as well since it's off

steps i took in a nutshell
-removed everything from dash
-washed with hot water/soap
-scrubbed with royal purple wax & grease remover
-rinsed
-sprayed it with duplicolor adhesive promoter (2 light coats, 1 medium)
-painted with duplicolor flat black (i thought it was semi at first, but still looks amazing- 2 light coats, 2 medium coats and 1 heavy coat)
voila


looks amazing


all assemble with the dc cluster (sorry the pic looks sketchy, it was 2 pictures that i put together in ps, but you can see how it looks)

I got my dash painted, and the cluster fit real nice..
check it out
right after I washed it with some purple power!
notice the second piece near the bottom of the pic. I was originally going to leave this the color it is, because they don't come black from factory, but then I found a really nice picture of an eg interior where the guy had painted it black, so I figured I might as well since it's off
steps i took in a nutshell
-removed everything from dash
-washed with hot water/soap
-scrubbed with royal purple wax & grease remover
-rinsed
-sprayed it with duplicolor adhesive promoter (2 light coats, 1 medium)
-painted with duplicolor flat black (i thought it was semi at first, but still looks amazing- 2 light coats, 2 medium coats and 1 heavy coat)
voila
looks amazing
all assemble with the dc cluster (sorry the pic looks sketchy, it was 2 pictures that i put together in ps, but you can see how it looks)
Last edited by Dontoh; Mar 30, 2011 at 02:20 PM.
Honda-Tech Member
Joined: Dec 2005
Posts: 699
Likes: 0
From: cincy,oh
keep it up dude, consistancy is your friend right now. THIS is the kind of build that is much appreciated and worth following. just keep the exterior all oem but maybe the tails and your set
Thread Starter
Honda-Tech Member
Joined: Nov 2009
Posts: 1,809
Likes: 1
From: New York
let me see if i can find the wiring diagram but basically
i like to look at it as having 3 parts to the cluster (sorry for the size)

the plastic glass at the front, the black/grey plastic bezel in between, and then the actual cluster at the back.. what i had to do was take the dc cluster from the back (which is the same size as an eg, ek or any of them really) and put the plastic and glass on it so that it would fit in the dash/bezel. its not that actual cluster that bolts in, its the glass/plastic part. so by swapping these, i could put the dc cluster, with the eg front in without much modding. the only mods i had to do was the take a dremel and trim down the cluster so it would fit snug against the glass..
then the wiring from eg to dc is pretty straight forward. you basically match all the colors up, but you have to switch plugs since they're different. i used this
from this thread
https://honda-tech.com/forums/showth...ntegra+cluster
i like to look at it as having 3 parts to the cluster (sorry for the size)
the plastic glass at the front, the black/grey plastic bezel in between, and then the actual cluster at the back.. what i had to do was take the dc cluster from the back (which is the same size as an eg, ek or any of them really) and put the plastic and glass on it so that it would fit in the dash/bezel. its not that actual cluster that bolts in, its the glass/plastic part. so by swapping these, i could put the dc cluster, with the eg front in without much modding. the only mods i had to do was the take a dremel and trim down the cluster so it would fit snug against the glass..
then the wiring from eg to dc is pretty straight forward. you basically match all the colors up, but you have to switch plugs since they're different. i used this
from this thread
https://honda-tech.com/forums/showth...ntegra+cluster
Thread Starter
Honda-Tech Member
Joined: Nov 2009
Posts: 1,809
Likes: 1
From: New York
Thanks 
Thanks man, these are the comments that keep moving on worth it :p
That's what I'm thinking with the exterior, a couple friends want me to keep the tails, but I think they needa go. Been trying to sell them..
That's what I'm thinking with the exterior, a couple friends want me to keep the tails, but I think they needa go. Been trying to sell them..
Thread Starter
Honda-Tech Member
Joined: Nov 2009
Posts: 1,809
Likes: 1
From: New York
got a few things done today, the girl helped me out a lot with it all
ordered some faux black suede from jo-ann fabric, got 42"x50" of it for $10.50, can't go wrong
also did some more polishing to the valve cover letters. went with 320>400>600>1000>1500.. when I get a hold of some trizac I'll cut/buff the paint... you'll see how nice it turned out in the pictures
cleaned the bay up too.. soaked it in engine degreaser, then scrubbed and rinsed it off. going to borrow a pressure washer real soon to do it right though.. I was also able to pick up some duraglass and some body supplies to get started after its clean.. on with the picta's
apologies for the small pictures
before


after, still not done though


armrest wrapped, thanks to the lady.. soaked it in purple power, then sprayed a 3M adhesive. stuck the back on with hot glue

door panels look great, i put the handle and grabber thing on for the picture.. those will be painted black within the next few days

will be ordering some dress up bolts for the engine bay pretty soon.. then on with the body work and hopefully the motor can go back in =]
ordered some faux black suede from jo-ann fabric, got 42"x50" of it for $10.50, can't go wrong
also did some more polishing to the valve cover letters. went with 320>400>600>1000>1500.. when I get a hold of some trizac I'll cut/buff the paint... you'll see how nice it turned out in the pictures
cleaned the bay up too.. soaked it in engine degreaser, then scrubbed and rinsed it off. going to borrow a pressure washer real soon to do it right though.. I was also able to pick up some duraglass and some body supplies to get started after its clean.. on with the picta's
apologies for the small pictures
before
after, still not done though
armrest wrapped, thanks to the lady.. soaked it in purple power, then sprayed a 3M adhesive. stuck the back on with hot glue
door panels look great, i put the handle and grabber thing on for the picture.. those will be painted black within the next few days
will be ordering some dress up bolts for the engine bay pretty soon.. then on with the body work and hopefully the motor can go back in =]
Thread Starter
Honda-Tech Member
Joined: Nov 2009
Posts: 1,809
Likes: 1
From: New York
late night update-
caved on the VC, ended up polishing 'VTEC' as well..
i went with 400>600>800>1000>1500. looks good imo

got one of the door panels done, and it looks beautiful :')
this is a before pic (i'll post another one at the end for comparison)
back door

front door

I didn't take many pictures of the process but basically it went like this
-removed everything from door panel
-washed with purple power/rinsed
-2 coats of adhesive promoter
-3 coats of flat black acrylic enamel
-plastic pieces wrapped in black suede (spray adhesive/hot glue)
-reassemble
also, I painted all the smaller plastics with the same process. this included the door handle, the winder roller-upper and the door-shutter handle
this is where I had to get creative. as I was putting the center of the door panel back in, I needed a way to set it up so it would have pressure on it while drying. this is what I came up with lol
hanging from a log, by a dog leash.. the piece the leash is tied around is being weighed down by the rest of the door, hence being pushed together and drying like that

130lb 1 year old really wanted to go out after he saw the leash, was trying to play sad

got him distracted with the laser though

little bit of added support while he glue dries

how i got it to hold together.. there were little plastic pegs that went through holes into the door. but because i cut the top of them off to get the middle of the panel out, it would no longer stick. so i filled the hole with hot glue, stuck the pegs in, and then glued a penny to the back, hoping it would give it the extra support it needs. i know it won't fall out or anything, but its nice to know it was done right

anyway, this is how they turned out


i'm happy, dog is happy, woohoo")

before:
after:
caved on the VC, ended up polishing 'VTEC' as well..
i went with 400>600>800>1000>1500. looks good imo
got one of the door panels done, and it looks beautiful :')
this is a before pic (i'll post another one at the end for comparison)
back door
front door
I didn't take many pictures of the process but basically it went like this
-removed everything from door panel
-washed with purple power/rinsed
-2 coats of adhesive promoter
-3 coats of flat black acrylic enamel
-plastic pieces wrapped in black suede (spray adhesive/hot glue)
-reassemble
also, I painted all the smaller plastics with the same process. this included the door handle, the winder roller-upper and the door-shutter handle
this is where I had to get creative. as I was putting the center of the door panel back in, I needed a way to set it up so it would have pressure on it while drying. this is what I came up with lol
hanging from a log, by a dog leash.. the piece the leash is tied around is being weighed down by the rest of the door, hence being pushed together and drying like that
130lb 1 year old really wanted to go out after he saw the leash, was trying to play sad
got him distracted with the laser though
little bit of added support while he glue dries
how i got it to hold together.. there were little plastic pegs that went through holes into the door. but because i cut the top of them off to get the middle of the panel out, it would no longer stick. so i filled the hole with hot glue, stuck the pegs in, and then glued a penny to the back, hoping it would give it the extra support it needs. i know it won't fall out or anything, but its nice to know it was done right
anyway, this is how they turned out
i'm happy, dog is happy, woohoo
before:
after:
Thread Starter
Honda-Tech Member
Joined: Nov 2009
Posts: 1,809
Likes: 1
From: New York
Was replacing my cam seals, and it seems as though my cam shafts, cam caps and head are pretty beat up. IDK what happened when this motor was put together, but someone must have done something wrong, there's metal bits everywhere, and I can't afford to have this dealt with, as I've put every penny I have into this car hoping it would turn out so I could get to and from work..


this is what the head is supposed to look like

this is what mine looks like

also noticed that the head was missing a dowel pin (crucial for vtec to engage properly) and its accompanying o ring.. along with 4 missing cam cap bolts..
this is what the head is supposed to look like
this is what mine looks like
also noticed that the head was missing a dowel pin (crucial for vtec to engage properly) and its accompanying o ring.. along with 4 missing cam cap bolts..
Last edited by Dontoh; May 3, 2011 at 08:19 PM.