
Update on page 2, 3
I've been around this forum for quite long time but never really started or posted a lot of pictures of my Ef. I had some people to request me to make a build thread. So, here I am. Special thanks to my dad who been supporting me and helping me along the way.
I'm in no rush to build this car and taking, learning as I go. There is no specific time for it to be complete. I'm doing what ever it takes to finish it. I will not hide any of my mistakes unlike a lot of people on here don't show. I'm showing all of the stuff that I've learned along the way.
I know I will redo this whole car again some day. I actually want to repaint it back to oem color teal instead of cherry red.
To start off, I bought this hatch in Maryland from a guy. It's was mint, no rust, clean for its year. 1991 Honda Civic Si to be precise.
It had a few mods done to it.

After about 2 weeks of owning it, a terrible thing happen with it. Believe it or not, I manage to t-bone a alive cow. The cow was just standing in the middle of the road when I was coming home really late and it was also really foggy. I was very cautious and was going at least 15 mph below the speed limit. My driver side pillar smashed into his/her neck and his/her head smashed into my roof. It caused a lot of damages to the roof, sunroof, driver side fender, driver side mirror. After all of that, I managed to keep the car on the road instead of running into a ditch or what not. I thought the front end was done but it turn out not too bad.


Hair and meat for dinner, anybody?


I was upset for a couple weeks because it's hard to find a ef with no rust and teal in color, also an si. I'm a huge ef fan, so that explains. I didn't know what to do so I let it sit with a cover for a while.
Note: not my crx, belongs to a old friend.

until one day, my dad was like why don't we take the time and restore the hatch? I had the time and the money and just never thought of that. Next day we started on the hatch and took the time to take all the damaged parts off. Also, cleaned the interior.


I didn't take much picture of the interior as I was stripping it. But give you an idea.

I figured to go ahead and start some body work here and there while I'm at it.


Me and my dad was trying to see if we could get the roof back straight. This was the best we could. It was hella hard!


It was not perfectly straight but I put it on hold for now until I focus on other stuff.


I had a change to rent out a storage unit where I can work on it any time of the day when I can. It was a nice 20x20 with 2 door garage and it came with electric. My dad and I was there almost every night.

This is when I totally strip down the car to there was nothing on it left.


To be continued, all of this progress was last year summer.
I've been around this forum for quite long time but never really started or posted a lot of pictures of my Ef. I had some people to request me to make a build thread. So, here I am. Special thanks to my dad who been supporting me and helping me along the way.
I'm in no rush to build this car and taking, learning as I go. There is no specific time for it to be complete. I'm doing what ever it takes to finish it. I will not hide any of my mistakes unlike a lot of people on here don't show. I'm showing all of the stuff that I've learned along the way.
I know I will redo this whole car again some day. I actually want to repaint it back to oem color teal instead of cherry red.
To start off, I bought this hatch in Maryland from a guy. It's was mint, no rust, clean for its year. 1991 Honda Civic Si to be precise.
It had a few mods done to it.
After about 2 weeks of owning it, a terrible thing happen with it. Believe it or not, I manage to t-bone a alive cow. The cow was just standing in the middle of the road when I was coming home really late and it was also really foggy. I was very cautious and was going at least 15 mph below the speed limit. My driver side pillar smashed into his/her neck and his/her head smashed into my roof. It caused a lot of damages to the roof, sunroof, driver side fender, driver side mirror. After all of that, I managed to keep the car on the road instead of running into a ditch or what not. I thought the front end was done but it turn out not too bad.
Hair and meat for dinner, anybody?
I was upset for a couple weeks because it's hard to find a ef with no rust and teal in color, also an si. I'm a huge ef fan, so that explains. I didn't know what to do so I let it sit with a cover for a while.
Note: not my crx, belongs to a old friend.
until one day, my dad was like why don't we take the time and restore the hatch? I had the time and the money and just never thought of that. Next day we started on the hatch and took the time to take all the damaged parts off. Also, cleaned the interior.
I didn't take much picture of the interior as I was stripping it. But give you an idea.
I figured to go ahead and start some body work here and there while I'm at it.
Me and my dad was trying to see if we could get the roof back straight. This was the best we could. It was hella hard!
It was not perfectly straight but I put it on hold for now until I focus on other stuff.
I had a change to rent out a storage unit where I can work on it any time of the day when I can. It was a nice 20x20 with 2 door garage and it came with electric. My dad and I was there almost every night.
This is when I totally strip down the car to there was nothing on it left.
To be continued, all of this progress was last year summer.
Last year of March 7th 2008, I got laid off from my job. Forcing me to sell everything I had from the Ef, I mean everything and only thing was left was the shell. No body wanted to buy the shell, so I brought it back home from the storage place and let it sit with a cover on it. It been siting over an year untouched, not even a check up because I lost hope into the project. My dad and I was upset big time. After a while I found me another job, wasn't making good money but it gets me around anyhow. I was saving money for no reason what so ever, my dad was visiting a friend of his and he came across this junked up hatch which happen to be a teal si hatch with everything intact and looked abused up badly. Next week, I went down and took a look at it and bought it for 150 bucks. Even had a original a6 engine that runs but looked very abused due to the heavily smoking tail pipe. Also has mint si seats. The guy just didn't know what he had period.
I have no pictures of the day I bought it but I do have it when it was all stripped down. My dad and I said lets try to swap the donor hatch roof over to my project hatch that been sitting. I was scared I might screw something up because I never done a roof swap before. Everything from the donor car was used on my project car.
Me and my dad wanted to do the car right at the 1st time, so we decided to do a roof swap.
The beginning,
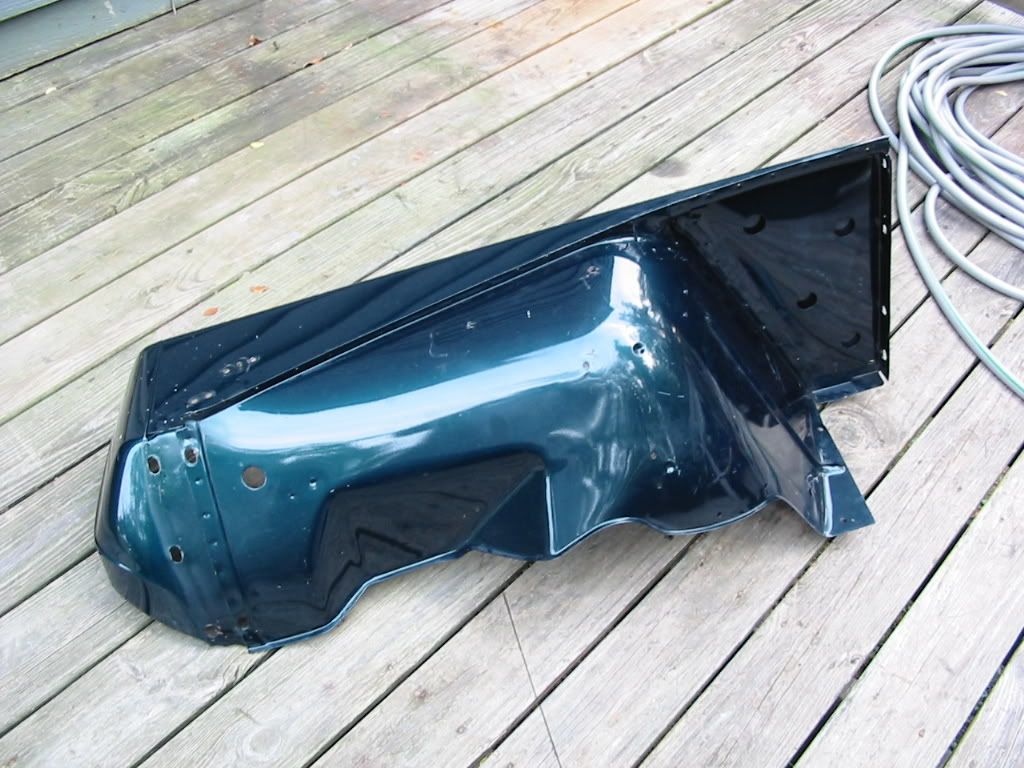
what it looked like when it was sitting for a year. Looks like a pile of **** that came from the junkyard, don't it? There was nothing, I mean nothing on the car expect, wheels, steering wheel, gas tank and a few other things. It was a good start off, again.

Engine bay looked like **** from sitting too long. Rust spots and what not.
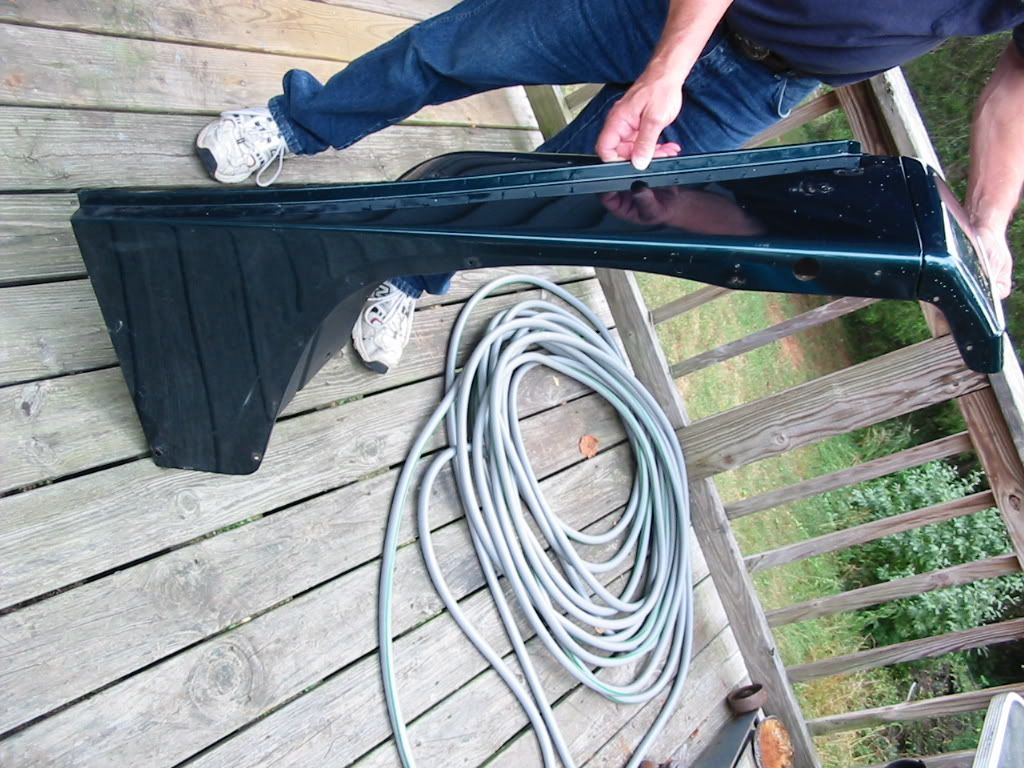
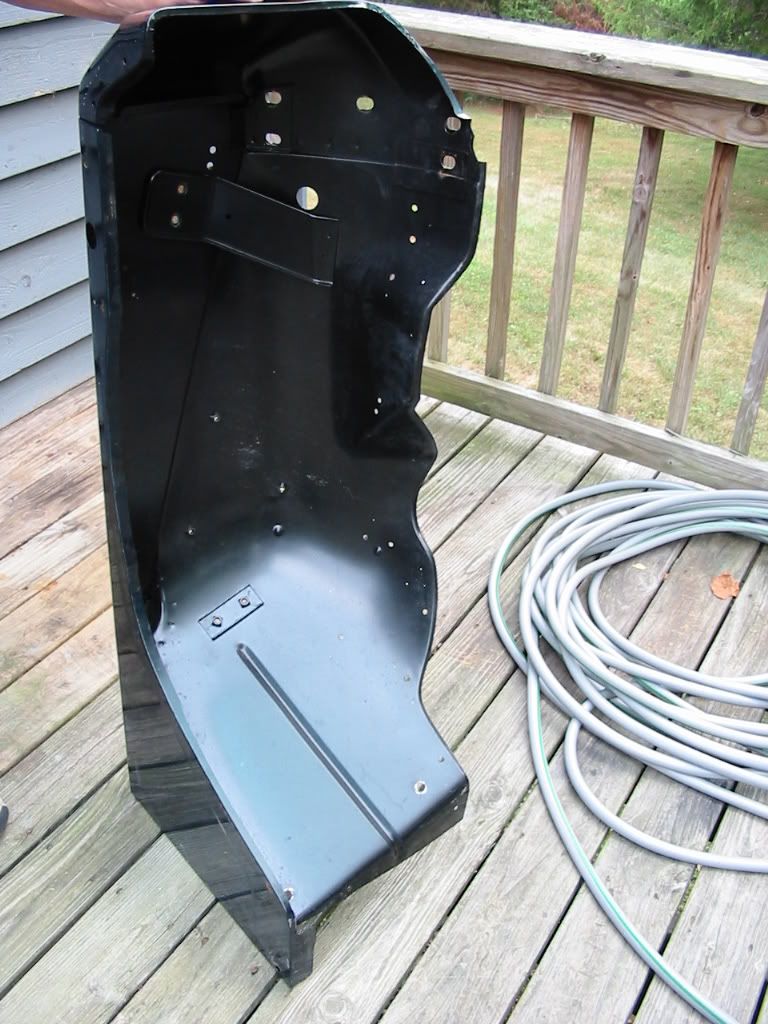
Here, we started working on the roof and try our best to swap it over. !st we chop off the roof from the donor car and then lay the roof on the table and drill out all the spot weld to get the roof skin off just perfect without bending it. I kinda felt bad for chopping off the si shell.


After a long 2 days with fighting the pillars, the roof skin with cross beams came out perfect like I've pictured!


We set it on the project car to see what it would look like. Ahh, much better than the filler up crap. Less work to work about and new window would line up better.


To be continued.....
I have no pictures of the day I bought it but I do have it when it was all stripped down. My dad and I said lets try to swap the donor hatch roof over to my project hatch that been sitting. I was scared I might screw something up because I never done a roof swap before. Everything from the donor car was used on my project car.
Me and my dad wanted to do the car right at the 1st time, so we decided to do a roof swap.
The beginning,
what it looked like when it was sitting for a year. Looks like a pile of **** that came from the junkyard, don't it? There was nothing, I mean nothing on the car expect, wheels, steering wheel, gas tank and a few other things. It was a good start off, again.
Engine bay looked like **** from sitting too long. Rust spots and what not.
Here, we started working on the roof and try our best to swap it over. !st we chop off the roof from the donor car and then lay the roof on the table and drill out all the spot weld to get the roof skin off just perfect without bending it. I kinda felt bad for chopping off the si shell.
After a long 2 days with fighting the pillars, the roof skin with cross beams came out perfect like I've pictured!
We set it on the project car to see what it would look like. Ahh, much better than the filler up crap. Less work to work about and new window would line up better.
To be continued.....
Honda-Tech Member
Looks like you and your dad know your stuff. Keep up the good work man, I love a good looking EF. I miss mine now, jerk. 
Honda-Tech Member
looks good so far..im planning to do a roof swap to my friends teg due to rust..is it real hard to get everything to line up again?
Doing body work every where I can to speed things up but also taking the time while I'm at it.


This is where I made a mistake and which is why I stated earlier that I believe I will redo this sometimes again soon. I used spray paint in the can for color paint and clear coat. I wish I never done it and wish I took the time to get it professionally painted at the paint booth. But anyway this will get taken cared of and will be painted back to teal. So, in another words, no worries I got it all planned out.
Enough blah and here is the mistake I made, it may look good but it faded over time.


Then I took the time to mock up my tucked brake line before I go buy new lines and have them fitted.
Keep in mind all of this is just a mock up for a 1st timer like myself.


I used the stock oem rubber boots to make it look more oemish.

To be continued and it getting late and I'm off to bed. I'll update it more sometimes tomorrow....
This is where I made a mistake and which is why I stated earlier that I believe I will redo this sometimes again soon. I used spray paint in the can for color paint and clear coat. I wish I never done it and wish I took the time to get it professionally painted at the paint booth. But anyway this will get taken cared of and will be painted back to teal. So, in another words, no worries I got it all planned out.
Enough blah and here is the mistake I made, it may look good but it faded over time.
Then I took the time to mock up my tucked brake line before I go buy new lines and have them fitted.
Keep in mind all of this is just a mock up for a 1st timer like myself.
I used the stock oem rubber boots to make it look more oemish.
To be continued and it getting late and I'm off to bed. I'll update it more sometimes tomorrow....
Quote:
Thanks, doing the roof swap was not too bad, there was some hidden spot welds that I had to take care of. I used panel glue to get it back together.Originally Posted by H.I CTR
looks good so far..im planning to do a roof swap to my friends teg due to rust..is it real hard to get everything to line up again?
Quote:
Haha, get your self a ef now!Originally Posted by theEFsarecoming!
Looks like you and your dad know your stuff. Keep up the good work man, I love a good looking EF. I miss mine now, jerk.
Honda-Tech Member
looking good, can't wait to see more.
Alright, keep in mind all of those picture you have seen happen an year ago and I am just updating as I go.
I've bought a few things as I go along with the build. I bought some engine parts and misc items.
Jvt racing slim 12 inch fan

[IMG] [/IMG]
Refinished the header

Cleaned up the y8 intake manifold.

I went out and took the time to paint every piece I could find.

I made a block off plate for the throttle body where the fitv used to sit. I didn't need that part at all. My car idle just fine with out it and cold start, starts up just fine too. I maintained the oem o rings and just bolt down the plate I've made. No vaccum leaks what so ever.


Misc item I've bought for the car to get it running.


This is a every nice piece made by CBEengieering on here. One bracket holds the fuel filter and relocate it behind the engine and the other bracket is for the coolant over flow bottle.

I've bought a few things as I go along with the build. I bought some engine parts and misc items.
Jvt racing slim 12 inch fan
[IMG]
[/IMG]Refinished the header
Cleaned up the y8 intake manifold.
I went out and took the time to paint every piece I could find.
I made a block off plate for the throttle body where the fitv used to sit. I didn't need that part at all. My car idle just fine with out it and cold start, starts up just fine too. I maintained the oem o rings and just bolt down the plate I've made. No vaccum leaks what so ever.
Misc item I've bought for the car to get it running.
This is a every nice piece made by CBEengieering on here. One bracket holds the fuel filter and relocate it behind the engine and the other bracket is for the coolant over flow bottle.
Motor is in. I'm doing a d16a6 for now. My plan was a k20a dc5 engine swap but that can come later on.


As I was assemble the interior, I bought some few things.


CBEengieering made me this shifter similar with the FLP shifter.


Interior


Then this how it looked for a while when I was waiting for a new window to be installed.


Window man!


As I was assemble the interior, I bought some few things.
CBEengieering made me this shifter similar with the FLP shifter.
Interior
Then this how it looked for a while when I was waiting for a new window to be installed.
Window man!
The car was ready for a 1st start. It started but kept blowing smoke non stop. So, I believe it was bad rings due to the previous owner beat the crap out of this great little engine. I installed new rings, rebuilded the head with all new parts. It runs great and stopped smoking. Pulls hard as hell for what it is as well.
On to the pictures.
While the 1st start up before tearing it down again for a rebuild. Note: look where the over flow bottle is sitting, that one of the bracket I had CBEengieering to make me.

The tear down to see wtf was wrong with it.


All of my piston walls looked like this with oil on it, so this means rings are toasted. The crosshatch is still there tho and I didn't bother to hone it.


I used Nippon rings and surprisingly, none of them needed to be gapped. I was worried at 1st but after the start up and a few hundred miles, it pulls strong and no smoking.


Fresh head.

Here how it looked after the rebuild. Nothing big.

On to the pictures.
While the 1st start up before tearing it down again for a rebuild. Note: look where the over flow bottle is sitting, that one of the bracket I had CBEengieering to make me.
The tear down to see wtf was wrong with it.
All of my piston walls looked like this with oil on it, so this means rings are toasted. The crosshatch is still there tho and I didn't bother to hone it.
I used Nippon rings and surprisingly, none of them needed to be gapped. I was worried at 1st but after the start up and a few hundred miles, it pulls strong and no smoking.
Fresh head.
Here how it looked after the rebuild. Nothing big.
I'm going to jump into what the car looks like right now. Right now I am focusing on some body work and trying to get it repainted back to teal. Also going for the ZC front end look.


I couldn't stand the feel of a stock steering wheel, so I had to do something about that. I bought a momo hub and what it seems like to be is a old school nrg deep dish wheel. I need a horn ring retainer though, anybody has one?


So, that where I am right now. Still looking for a front bumper before paint. Keep in mind, all of those pictures you see is what I started 2 years ago to now. It took me a good 2 years to get it to look like this.
I'm still working on a few things and changing some of the things in the engine bay such as wiring sleeves just like what chase/rywire uses, hide the hardness a little better and some other things. I'm also waiting for new exhaust to arrive from CBEengieering. It's a nice piece. I'm focusing on getting it painted 1st before wheels.
What do you guys think? Any suggestions? I'm open to any ideas.
I couldn't stand the feel of a stock steering wheel, so I had to do something about that. I bought a momo hub and what it seems like to be is a old school nrg deep dish wheel. I need a horn ring retainer though, anybody has one?
So, that where I am right now. Still looking for a front bumper before paint. Keep in mind, all of those pictures you see is what I started 2 years ago to now. It took me a good 2 years to get it to look like this.
I'm still working on a few things and changing some of the things in the engine bay such as wiring sleeves just like what chase/rywire uses, hide the hardness a little better and some other things. I'm also waiting for new exhaust to arrive from CBEengieering. It's a nice piece. I'm focusing on getting it painted 1st before wheels.
What do you guys think? Any suggestions? I'm open to any ideas.

Quote:
Thanks Originally Posted by apekd
Nice progress man

Honda-Tech Member
whats the name of the panel glue that you used?
Honda-Tech Member
I believe I have 2-3 spare horn button retainer pieces somewhere around here, came with a NRG hub kit.. Ill check and let you know, you can have it if i find em. Nice *** progress btw.
Quote:
If I remember right, it was speedy glue or something. It holds 22,000 psi and the spot welds failed before the panel glue did. Originally Posted by H.I CTR
whats the name of the panel glue that you used?
Quote:
Oh def! I couldn't find anybody who had a spare set. Let me know! How much for it btw?Originally Posted by itslogz
I believe I have 2-3 spare horn button retainer pieces somewhere around here, came with a NRG hub kit.. Ill check and let you know, you can have it if i find em. Nice *** progress btw.
Honda-Tech Member
Good to see that you didn't give up on your project man.
Subscribe for the final product.
Subscribe for the final product.
Honda-Tech Member
3m panel bond adhesive works great for roof skins, doorskins, 1/4 skins etc
BTW awesome project! i am a honda fanatic and look foward to doing up a old ef or eg here rear soon. looks great. i am digging the 2 tone idea with the jambs red and exterior being teal. those 2 colors will be thee hottness. great work
BTW awesome project! i am a honda fanatic and look foward to doing up a old ef or eg here rear soon. looks great. i am digging the 2 tone idea with the jambs red and exterior being teal. those 2 colors will be thee hottness. great work
Quote:
Subscribe for the final product.
Me too. I realize how hard is it to find a rust free si hatch nowadays. Originally Posted by VN712
Good to see that you didn't give up on your project man.Subscribe for the final product.
Quote:
BTW awesome project! i am a honda fanatic and look foward to doing up a old ef or eg here rear soon. looks great. i am digging the 2 tone idea with the jambs red and exterior being teal. those 2 colors will be thee hottness. great work
3m makes the same thing. Oh no, I'm painting the door jambs while I paint the exterior back to teal. The engine bay, I'm not going to worry about because I will paint the engine bay when it's time for a swap sometimes soon.Originally Posted by notmightydx
3m panel bond adhesive works great for roof skins, doorskins, 1/4 skins etcBTW awesome project! i am a honda fanatic and look foward to doing up a old ef or eg here rear soon. looks great. i am digging the 2 tone idea with the jambs red and exterior being teal. those 2 colors will be thee hottness. great work
Quote:

Originally Posted by brandonEM1
nice work man

Quote:
Hell yeah!Originally Posted by Dredakid05
Subscribed, bro
Honda-Tech Member
wow nice!