

FAQ: Axle Replacement Tutorial With PICS!

HT White Ops

Joined: Oct 2001
Posts: 2,813
Likes: 2
From: Arizona Uplands
Replacement axles may (or may not) have them, depending on the vendor.

EDIT
I should have kept reading...
Honda-Tech Member
Joined: Nov 2007
Posts: 155
Likes: 0
From: Mystic, CT, USA
Great writeup.
Do I truly need to drain the tranny fluid?
Mine is A '97 5-spd, needs the passenger side axle replaced.
I'm ready to change axle but don't have the fluid and the dealer is closed. Big box parts stores are open but I probably should use Honda MTF?? I don't want to put in generic stuff and have to drain and fill it again after I get the Honda stuff.
I saw my friend change my axle once and he didn't drain tranny fluid - why do it? He only jacked up the side of car where axle was being replaced - does the tilt keep the fluid from dipping out when you pull the axle??

Honda-Tech Member
Joined: Feb 2008
Posts: 45,214
Likes: 59
Great writeup.
Do I truly need to drain the tranny fluid?
Mine is A '97 5-spd, needs the passenger side axle replaced.
I'm ready to change axle but don't have the fluid and the dealer is closed. Big box parts stores are open but I probably should use Honda MTF?? I don't want to put in generic stuff and have to drain and fill it again after I get the Honda stuff.
I saw my friend change my axle once and he didn't drain tranny fluid - why do it? He only jacked up the side of car where axle was being replaced - does the tilt keep the fluid from dipping out when you pull the axle??
Do I truly need to drain the tranny fluid?
Mine is A '97 5-spd, needs the passenger side axle replaced.
I'm ready to change axle but don't have the fluid and the dealer is closed. Big box parts stores are open but I probably should use Honda MTF?? I don't want to put in generic stuff and have to drain and fill it again after I get the Honda stuff.
I saw my friend change my axle once and he didn't drain tranny fluid - why do it? He only jacked up the side of car where axle was being replaced - does the tilt keep the fluid from dipping out when you pull the axle??
Honda-Tech Member
Joined: Mar 2009
Posts: 14
Likes: 0
From: FL
I'm having a problem others have mentioned (I skimmed over the replies & searched within the topic)... I can't seem to get my axles fully seated into the differential. It's really pissing me off  I'm not a very strong guy, but I had a friend of mine, who's much stronger than I am, pounding the hell out of the axles trying to get them all the way in. We still end up with this 1/8" gap. I fear for my CV joints now with all this pounding... but these ****ers aren't fully seated, and the tranny fluid leaks out when it reaches the level of the axles.

My del Sol shop manual says to replace those set rings... is that really necessary? (Like you're supposed to replace the axle nuts every time they're removed, but if they're still OK you just reuse them.) Should they look like this:
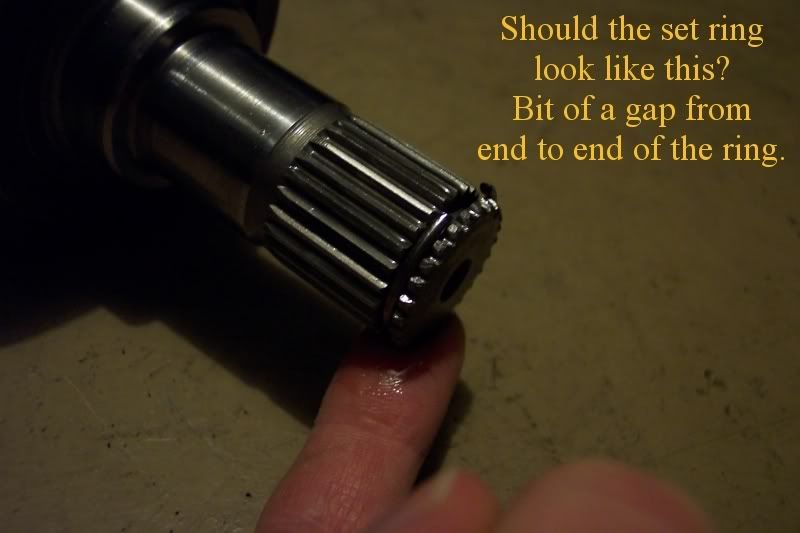

My friend and I removed the passenger side axle set ring to see how far in the axle would go without it, and there was still a gap! We inspected the inside of the differential, but saw no foreign materials (i.e. output shaft seal pieces). Speaking of, I just replaced both of those seals tonight.
At wit's end here...
I'm not a very strong guy, but I had a friend of mine, who's much stronger than I am, pounding the hell out of the axles trying to get them all the way in. We still end up with this 1/8" gap. I fear for my CV joints now with all this pounding... but these ****ers aren't fully seated, and the tranny fluid leaks out when it reaches the level of the axles.My del Sol shop manual says to replace those set rings... is that really necessary? (Like you're supposed to replace the axle nuts every time they're removed, but if they're still OK you just reuse them.) Should they look like this:
My friend and I removed the passenger side axle set ring to see how far in the axle would go without it, and there was still a gap! We inspected the inside of the differential, but saw no foreign materials (i.e. output shaft seal pieces). Speaking of, I just replaced both of those seals tonight.
At wit's end here...
Honda-Tech Member
Joined: Feb 2008
Posts: 45,214
Likes: 59
The four-step method below invariably works for me to get axles fully seated into the differential on the first try:
1) Insert the outer axle splines into the hub and then install the axle nut hand tight.
2) Grease the inner axle splines and adjacent smooth area of the shaft that comes in contact with the oil seal and the corresponding inner surface of the oil seal.
3) Note at the outset that nothing in this third step requires any large force or hammering. Gently, slowly, carefully insert the inner axle splines straight into the differential to avoid damaging the oil seal. In some instances, the axle may not slide into and engage with the differential without a little back and forth axle rotation to align the axle splines with the differential gears. At this point, the axle splines will slide almost fully into the differential. However, the axle will not yet be fully seated because the set ring at the end of the axle splines is not locked into the differential.
4) The last step, locking the axle set ring into differential, is where you are having the problem. This is actually most easily accomplished not from under the car but at the hub. Position yourself directly in front of the hub, which swings freely because the lower ball joint has been separated and the damper fork has been removed. You can take advantage of this large range of motion and the weight of the hub to force the set ring to lock in the differential. To do this, slowly swivel the hub outward toward you (while carefully ensuring that the inner spline does back out of the differential) and then swing the hub back inward directly toward the differential in one quick hammer-like strike. If done, correctly the set ring will lock fully into the differential and there will only be a small gap between the inner CV joint and the differential housing.
Honda-Tech Member
Joined: Mar 2009
Posts: 14
Likes: 0
From: FL
Thanks Ron for the advice... I'm heading out to the garage soon, and I'll do just that. And that set ring, I'll try to compress it a little before reattaching the axles.
Only thing is, on the passenger side I couldn't get the very end of the PS rack free from... whatever it connects to. Forgive my lack of knowledge It's held in place with a castle nut & cotter pin, both of which I removed, then put the castle nut back on a few turns and pounded on it, but it wouldn't pop out. I did this for the driver side and it came out no problem (hardly pounded on it, just tapped hard). I'm not talking about the ball joint under the hub, I've gotten both of those free...
Anyways I will try this for the driver side since that hub is completely free and not still tied to the PS rack.
Only thing is, on the passenger side I couldn't get the very end of the PS rack free from... whatever it connects to. Forgive my lack of knowledge
It's held in place with a castle nut & cotter pin, both of which I removed, then put the castle nut back on a few turns and pounded on it, but it wouldn't pop out. I did this for the driver side and it came out no problem (hardly pounded on it, just tapped hard). I'm not talking about the ball joint under the hub, I've gotten both of those free...Anyways I will try this for the driver side since that hub is completely free and not still tied to the PS rack.
Honda-Tech Member
Joined: Mar 2009
Posts: 14
Likes: 0
From: FL
Tried that method a couple hours ago... no luck. I might spring for new set rings from Honda, though I don't see why the old ones would prevent the axles from seating into the diff.
What I might do next is pull out one of the axles, remove the set ring, and see if they will seat all the way in. I mean nothing should stop the axle from sliding in, when the set ring is removed... right?
Failing this, I'm going to pay someone to come over and pop these back in for me. I'm done.
What I might do next is pull out one of the axles, remove the set ring, and see if they will seat all the way in. I mean nothing should stop the axle from sliding in, when the set ring is removed... right?
Failing this, I'm going to pay someone to come over and pop these back in for me. I'm done.
Honda-Tech Member
Joined: Feb 2008
Posts: 45,214
Likes: 59


Honda-Tech Member
Joined: Mar 2009
Posts: 35
Likes: 0
Another great write up . I plan on just replacing both since I wanna swap out the lower ball joints as well. For the splines going into the tranny, should I just use a little MTF to lube the splines up? As for the splines where the axel nut will sit, should I just use anti seize, or an all purpose grease?
. I plan on just replacing both since I wanna swap out the lower ball joints as well. For the splines going into the tranny, should I just use a little MTF to lube the splines up? As for the splines where the axel nut will sit, should I just use anti seize, or an all purpose grease?
Trial User
Joined: Nov 2007
Posts: 2
Likes: 0
From: Out There, NY, USA
Good write-up. I especially like the tip on filling through the sensor hole. I only have a few suggestions:
1) It might be a good idea to torque all the suspension bolts to the specified settings, and the axle nut to 130 lb-ft.
2) The factory manual recommends putting grease or anti-seize compound on the shaft splines. This will be helpful when you have to remove the axle in the future.
3) I use the splitter tool to separate the ball joint; it's hard to use a hammer there when you don't have a lift. The splitter tool is about $10 at AutoZone, and has two fingers and a bolt in the middle that you turn to break the joint. To use it, take off the castle nut, but then put it back on backwards, in order to protect the threads. (This is very important.) Then put the tool on and tighten it to break the joint.
4) I don't know about Civics, but on Integras the axles are equal-length and there's an intermediate shaft on the driver's side. So if you're replacing the driver's side axle, you don't need to bother draining the transmission oil.
5) If you hear a popping noise from your axle when you turn, the way to determine which axle is bad is to see which direction of turn causes the worse popping noise. The axle on the opposite side is bad. So if you hear the popping only when turning left, your right (passenger side) axle is bad. The reason for this is, when turning, more force is placed on the wheels on the outside of the turn, so that's when the bad joint will reveal itself.
Don't pay someone to change an axle; as you can see here, it's really not that hard to do yourself. Replacement (reman) axles only cost about $60-70 at Autozone, and have lifetime warrantees, so you can get a free replacement when they go bad again.
Honda-Tech Member
Joined: Mar 2009
Posts: 35
Likes: 0
I'd like to add that I have an EM1. I got 2 half shafts, so I guess it's safe to say the b-Series all have the int. shaft. I'm sure most of you knew that though . I'm doing this this weekend, got a few of the tools you guys suggested and I'll let you guys know how it turns out!
. I'm doing this this weekend, got a few of the tools you guys suggested and I'll let you guys know how it turns out!
Honda-Tech Member
Joined: Aug 2005
Posts: 165
Likes: 0
From: San Diego
The four-step method below invariably works for me to get axles fully seated into the differential on the first try:
1) Insert the outer axle splines into the hub and then install the axle nut hand tight.
2) Grease the inner axle splines and adjacent smooth area of the shaft that comes in contact with the oil seal and the corresponding inner surface of the oil seal.
3) Note at the outset that nothing in this third step requires any large force or hammering. Gently, slowly, carefully insert the inner axle splines straight into the differential to avoid damaging the oil seal. In some instances, the axle may not slide into and engage with the differential without a little back and forth axle rotation to align the axle splines with the differential gears. At this point, the axle splines will slide almost fully into the differential. However, the axle will not yet be fully seated because the set ring at the end of the axle splines is not locked into the differential.
4) The last step, locking the axle set ring into differential, is where you are having the problem. This is actually most easily accomplished not from under the car but at the hub. Position yourself directly in front of the hub, which swings freely because the lower ball joint has been separated and the damper fork has been removed. You can take advantage of this large range of motion and the weight of the hub to force the set ring to lock in the differential. To do this, slowly swivel the hub outward toward you (while carefully ensuring that the inner spline does back out of the differential) and then swing the hub back inward directly toward the differential in one quick hammer-like strike. If done, correctly the set ring will lock fully into the differential and there will only be a small gap between the inner CV joint and the differential housing.
1) Insert the outer axle splines into the hub and then install the axle nut hand tight.
2) Grease the inner axle splines and adjacent smooth area of the shaft that comes in contact with the oil seal and the corresponding inner surface of the oil seal.
3) Note at the outset that nothing in this third step requires any large force or hammering. Gently, slowly, carefully insert the inner axle splines straight into the differential to avoid damaging the oil seal. In some instances, the axle may not slide into and engage with the differential without a little back and forth axle rotation to align the axle splines with the differential gears. At this point, the axle splines will slide almost fully into the differential. However, the axle will not yet be fully seated because the set ring at the end of the axle splines is not locked into the differential.
4) The last step, locking the axle set ring into differential, is where you are having the problem. This is actually most easily accomplished not from under the car but at the hub. Position yourself directly in front of the hub, which swings freely because the lower ball joint has been separated and the damper fork has been removed. You can take advantage of this large range of motion and the weight of the hub to force the set ring to lock in the differential. To do this, slowly swivel the hub outward toward you (while carefully ensuring that the inner spline does back out of the differential) and then swing the hub back inward directly toward the differential in one quick hammer-like strike. If done, correctly the set ring will lock fully into the differential and there will only be a small gap between the inner CV joint and the differential housing.
Neither of my axles are going in smoothly and after much hammering and pushing, I still have about 1/8" gap on the driver's side and maybe 1/16" gap on the passenger's side. I tried the hub trick on the passenger side (but w/out threading the axle nut)... guess I'll give it a shot on the driver's side.

Honda-Tech Member
Joined: Oct 2010
Posts: 151
Likes: 0
From: jax, fla
i have a quick question idk if it was asked and answered yet but yeah.
i have a b18 in my civic, i know you have to use b series axles. but mine are worn and i cant find any integra axles, what non oem axles are good brands to buy??
i have a b18 in my civic, i know you have to use b series axles. but mine are worn and i cant find any integra axles, what non oem axles are good brands to buy??
Honda-Tech Member
Joined: Mar 2009
Posts: 137
Likes: 1
From: AZ
i bought my axles at checkers and just told them i needed 1997 acura integra axles. about 60 brand new and it works great. even came with a new 32mm brass nut.

Honda-Tech Member
Joined: Jan 2011
Posts: 40
Likes: 0
Hi. My first post.
I had read and reread this thread and kept it in favorites throughout more than a few weeks. I'd been staring at it for a long time.
So last week I happen to be in the parts store to pick up some washer fluid and as if by chance I decide to pick up an axle. Price? Cost me all of 48 bucks plus 75 core charge. This week I finally decided to do the axle replacement -- and after an cold and EPIC day, it's done and I've come full circle.
For a guy who's never done an axle job before, it was extremely difficult because of the complications. But that's why I'm writing now. I'll relate what I know now so that others can learn from my experience.
First my car is an Accord 1993. It takes a 36 mm socket for the axle nut. Second, it was neccesary to take off the outer tie rod joint. Contrary to what some people at the parts store say, it's indeed neccesary to remove the lower control arm from the strut fork.
First Difficulty:
Axle nut wouldn't come off and on top of that it was not easy to unstake. 2 breaker bars replaced (I returned both of them - Thanks Napa and Autozone for your terrific service! Sorry for breaking your tools! ).
Solution: I happened to have an angle grinder so I used that to cut off the nut. I cut it down far enough. Then I put the tire back on and lowered the car, and was able to wrench off the nut! This in itself was epic for me and it was one of the LAST things in the disassembly phase that I did. I decided it was wiser to see if there'd be any problem unbolting the lower control arm and the castle nuts on the joints, etc, first.
Second Difficulty:
The tie rod and lower ball joint were not coming off! I tried hammering at the knuckles to no avail -- perhaps my hammer wasn't big enough. Out of frustration, I even tried hammering directly at the joints, which could have been a big mistake. I nearly destroyed the thread. I thought hammering directly over the top or bottom of them would be safe, but it's not. I recommend not hammering at anything. Also, DO NOT USE PICKLEFORKS or joint seperators. I really don't understand why any person would want to use them except as a very last resort. They are bound to destroy boots and it doesn't seem like they would have worked on my car anyway.
I tried doing that rachet trick mentioned in this thread (see Youtube and search for "Painless ball joint seperation"), but unfortunately I didn't have a 1/2" Craftman's ratchet and my other tools were either too big or too small. Also, for my car it probably wouldn't have worked anyway as the gap between the LCA and hub assembly doesn't seem to change much at all when the hub is lowered or raised. So for me, this was another red herring and major waste of time.
I could have saved myself a lot of trouble if I had just used a tie-rod puller arm first. It's a simple but very effective tool. Autozone has this tool and many other tools available for free rental, including larger 1/2" sockets and torque wrenches. They also have a pitman puller arm. I'd recommend using whichever of the two puller arms fits one's joints. The tie-rod puller is smaller and was a perfect fit my car. I got both the tie rod and lower ball joints out in a matter of minutes.
Should I mention again that I nearly killed the threads on the lower ball joint and tie rod? Well, maybe it's because I was hammering away at them but I wasn't able to get the castle nuts on the spokes without the joint spinning with the castle nut! For the tie rod, solving this was easy -- I got my jack lift and raised against the tie rod. That secured the joint enough to allow me to tighten pass the bad threads and tighten all the way. BTW, for a job like this, when you're messing with the tie rods, BE MINDFUL of how you're handling them, twisting or turning them, as the alignment can be thrown off by a hair.
Getting the castlenut on the lowerball joint was another issue. My heart sunk when I thought that I had passed a point of no return and that I was going to have to take my car to a mechanic. But I persevered.
Here's what I did: I got the jack lift, raised it against the lower control arm so that the shocks were compressed enough and that the car was lifted slightly too. The aim here is to get as much weight as possible DOWN on the hub assembly against the lower control arm. This way the ball joint is pressed enough so as to disable it from turning. Even with such steps, the joint was still turning, so what I did was put a tire lugnut on- securely- back on the spoke on the hub and got my lugnut wrench and used that as a lever with which to pressthe hub assembly down . So the lift is pressing UP on the arm and I leaning DOWN on the tire wrench and hub while also reaching down to the lower ball joint and wrenching clockwise on the castle nut. I didn't know if this trick was going to work, but I was desperate and it did work! I got the joint threaded back in and the castle nut firmly in place! This was actually the last thing that I did for the job.
Third Difficulty:
Removing axle/outer joint from hub. Merely hammering away at the spoke isn't going to do you any good and I do not recommend poking and prodding with prybars as this risks damaging brake lines or ABS (?) fixtures.
To remove the hub, I simply had to grab and HOLD the hub toward me in one direction and then hammer at the axle in the other direction. Apparently, if you're not using a big hammer, when you hit against parts, you're merely reverberating shock throughout an assembly without causing displacement. As a total novice, it took me quite a while to figure this one out. But I'm glad I persevered. Again, I had never done so much automotive work before and my car is really old. Everything was rusted and seized, and I felt like I was flying blind through a learning curve. I made certain this time to get my lugnuts on the spokes and be very careful using the hammer.
I had no real difficulty getting the inner joint seperated - I used a small pry bar/fork to remove it. Getting the new axle/joint on was a bit difficult - not only was it not seating completely, it wasn't even going in past a few inches. What I had to do was get the outer joint in the hub and everything else settled completely to make sure everything was positioned normally before the inner joint would go in deep enough. To completely seat it, I followed the RonJ's direction: Back it out a little, straighten everything out, and then in one swift, hammer-like movement, push the axle in as far as possible. I did this on a prayer and then when I crawled beneath the car to check the joint out I was surprised to see no gap there! Thanks, RonJ for this tip!
Anyway, folks, that's my write up. It's long and tedious and rambling but I hope it turns out to be useful.
Some other stuff: I replaced the driver-side axle on the automatic, and when removing the axle, transmission fluid didn't drain out. So no need to worry about it. Not sure about the other side.
My thanks to RonJ and everyone who contributed to this 8 yo thread and for maintaining it. I really do recommend making use of Autozone's Load-A-Tool service and I recommend patience. Don't compound your problems; it's very easy to do just that when you're fixing cars.
Also, this axle job -- I didn't even need to do it. My axle joints were clicking bad while turning, but from what I've heard those things can last a long time before they become dire and start making noise even while driving straight where they really need to be replaced. I did this job because the noise was bugging the crap out of me and I wanted to do it.
Thanks again.
I had read and reread this thread and kept it in favorites throughout more than a few weeks. I'd been staring at it for a long time.
So last week I happen to be in the parts store to pick up some washer fluid and as if by chance I decide to pick up an axle. Price? Cost me all of 48 bucks plus 75 core charge. This week I finally decided to do the axle replacement -- and after an cold and EPIC day, it's done and I've come full circle.
For a guy who's never done an axle job before, it was extremely difficult because of the complications. But that's why I'm writing now. I'll relate what I know now so that others can learn from my experience.
First my car is an Accord 1993. It takes a 36 mm socket for the axle nut. Second, it was neccesary to take off the outer tie rod joint. Contrary to what some people at the parts store say, it's indeed neccesary to remove the lower control arm from the strut fork.
First Difficulty:
Axle nut wouldn't come off and on top of that it was not easy to unstake. 2 breaker bars replaced (I returned both of them - Thanks Napa and Autozone for your terrific service! Sorry for breaking your tools!
). Solution: I happened to have an angle grinder so I used that to cut off the nut. I cut it down far enough. Then I put the tire back on and lowered the car, and was able to wrench off the nut! This in itself was epic for me and it was one of the LAST things in the disassembly phase that I did. I decided it was wiser to see if there'd be any problem unbolting the lower control arm and the castle nuts on the joints, etc, first.
Second Difficulty:
The tie rod and lower ball joint were not coming off! I tried hammering at the knuckles to no avail -- perhaps my hammer wasn't big enough. Out of frustration, I even tried hammering directly at the joints, which could have been a big mistake. I nearly destroyed the thread. I thought hammering directly over the top or bottom of them would be safe, but it's not. I recommend not hammering at anything. Also, DO NOT USE PICKLEFORKS or joint seperators. I really don't understand why any person would want to use them except as a very last resort. They are bound to destroy boots and it doesn't seem like they would have worked on my car anyway.
I tried doing that rachet trick mentioned in this thread (see Youtube and search for "Painless ball joint seperation"), but unfortunately I didn't have a 1/2" Craftman's ratchet and my other tools were either too big or too small. Also, for my car it probably wouldn't have worked anyway as the gap between the LCA and hub assembly doesn't seem to change much at all when the hub is lowered or raised. So for me, this was another red herring and major waste of time.
I could have saved myself a lot of trouble if I had just used a tie-rod puller arm first. It's a simple but very effective tool. Autozone has this tool and many other tools available for free rental, including larger 1/2" sockets and torque wrenches. They also have a pitman puller arm. I'd recommend using whichever of the two puller arms fits one's joints. The tie-rod puller is smaller and was a perfect fit my car. I got both the tie rod and lower ball joints out in a matter of minutes.
Should I mention again that I nearly killed the threads on the lower ball joint and tie rod? Well, maybe it's because I was hammering away at them but I wasn't able to get the castle nuts on the spokes without the joint spinning with the castle nut! For the tie rod, solving this was easy -- I got my jack lift and raised against the tie rod. That secured the joint enough to allow me to tighten pass the bad threads and tighten all the way. BTW, for a job like this, when you're messing with the tie rods, BE MINDFUL of how you're handling them, twisting or turning them, as the alignment can be thrown off by a hair.
Getting the castlenut on the lowerball joint was another issue. My heart sunk when I thought that I had passed a point of no return and that I was going to have to take my car to a mechanic. But I persevered.
Here's what I did: I got the jack lift, raised it against the lower control arm so that the shocks were compressed enough and that the car was lifted slightly too. The aim here is to get as much weight as possible DOWN on the hub assembly against the lower control arm. This way the ball joint is pressed enough so as to disable it from turning. Even with such steps, the joint was still turning, so what I did was put a tire lugnut on- securely- back on the spoke on the hub and got my lugnut wrench and used that as a lever with which to pressthe hub assembly down . So the lift is pressing UP on the arm and I leaning DOWN on the tire wrench and hub while also reaching down to the lower ball joint and wrenching clockwise on the castle nut. I didn't know if this trick was going to work, but I was desperate and it did work! I got the joint threaded back in and the castle nut firmly in place! This was actually the last thing that I did for the job.
Third Difficulty:
Removing axle/outer joint from hub. Merely hammering away at the spoke isn't going to do you any good and I do not recommend poking and prodding with prybars as this risks damaging brake lines or ABS (?) fixtures.
To remove the hub, I simply had to grab and HOLD the hub toward me in one direction and then hammer at the axle in the other direction. Apparently, if you're not using a big hammer, when you hit against parts, you're merely reverberating shock throughout an assembly without causing displacement. As a total novice, it took me quite a while to figure this one out. But I'm glad I persevered. Again, I had never done so much automotive work before and my car is really old. Everything was rusted and seized, and I felt like I was flying blind through a learning curve. I made certain this time to get my lugnuts on the spokes and be very careful using the hammer.
I had no real difficulty getting the inner joint seperated - I used a small pry bar/fork to remove it. Getting the new axle/joint on was a bit difficult - not only was it not seating completely, it wasn't even going in past a few inches. What I had to do was get the outer joint in the hub and everything else settled completely to make sure everything was positioned normally before the inner joint would go in deep enough. To completely seat it, I followed the RonJ's direction: Back it out a little, straighten everything out, and then in one swift, hammer-like movement, push the axle in as far as possible. I did this on a prayer and then when I crawled beneath the car to check the joint out I was surprised to see no gap there! Thanks, RonJ for this tip!
Anyway, folks, that's my write up. It's long and tedious and rambling but I hope it turns out to be useful.
Some other stuff: I replaced the driver-side axle on the automatic, and when removing the axle, transmission fluid didn't drain out. So no need to worry about it. Not sure about the other side.
My thanks to RonJ and everyone who contributed to this 8 yo thread and for maintaining it. I really do recommend making use of Autozone's Load-A-Tool service and I recommend patience. Don't compound your problems; it's very easy to do just that when you're fixing cars.
Also, this axle job -- I didn't even need to do it. My axle joints were clicking bad while turning, but from what I've heard those things can last a long time before they become dire and start making noise even while driving straight where they really need to be replaced. I did this job because the noise was bugging the crap out of me and I wanted to do it.
Thanks again.

Honda-Tech Member
Joined: Sep 2005
Posts: 4,265
Likes: 0
From: Sick2Sick Los Angeles, Soul CAL
I have the same problem, I just replaced my axle cuz it broke the other night. I put in a "new" axle and I get a **** ton of vibration only when accelerating. None what so ever when I am coasting, or even giving it a little bit of gas. Like less than 10%.
could some one please help me!!!!
Honda-Tech Member
Joined: Feb 2008
Posts: 45,214
Likes: 59
I have the same problem, I just replaced my axle cuz it broke the other night. I put in a "new" axle and I get a **** ton of vibration only when accelerating. None what so ever when I am coasting, or even giving it a little bit of gas. Like less than 10%.
could some one please help me!!!!
could some one please help me!!!!