
Support to themuffinman's cluster removal FAQ
 07-20-2007, 05:47 AM
#1
Honda-Tech Member
Thread Starter
Join Date: Apr 2006
Location: NJ -> Outside Denver
Posts: 1,267
Likes: 0
Received 0 Likes
on
0 Posts
*Before I start this thread let it be known that this is not my original work and figuring out! Credit belongs to themuffinman. I have talked to him and touringaccord, both giving me the OK to add pictures to themuffinman's thread!
*Again, this is only my pictures to support another member's thread!*
Before driving to test speedo, make sure all harnesses are plugged back in. If you don't plug hazards you have no blinker, and if you do not put in the dimmer harness and cruise control harness, you have no speedo.
Modified by awdgsx96 at 8:36 AM 7/27/2007
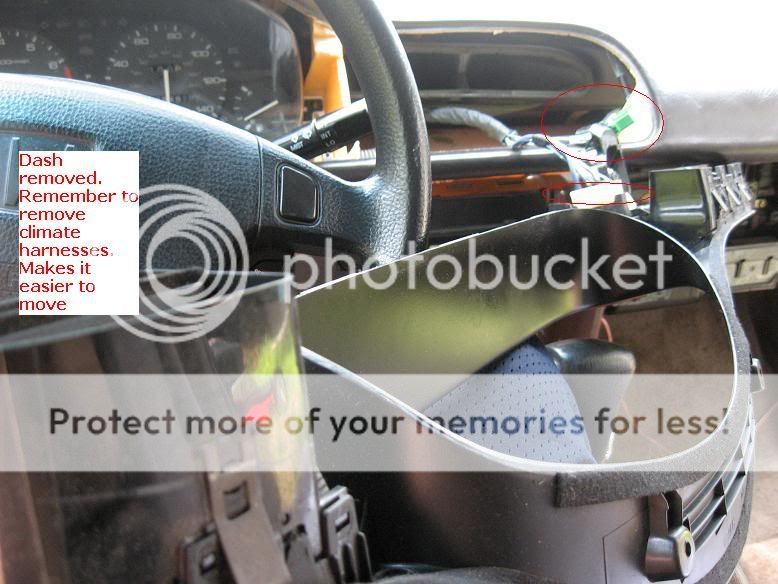
Originally Posted by TheMuffinMan
It's a bitch to get to the cluster.
I'll make a list of what needs to be removed:
1) Inside arm rest, open the small panel at the bottom and remove those two screws
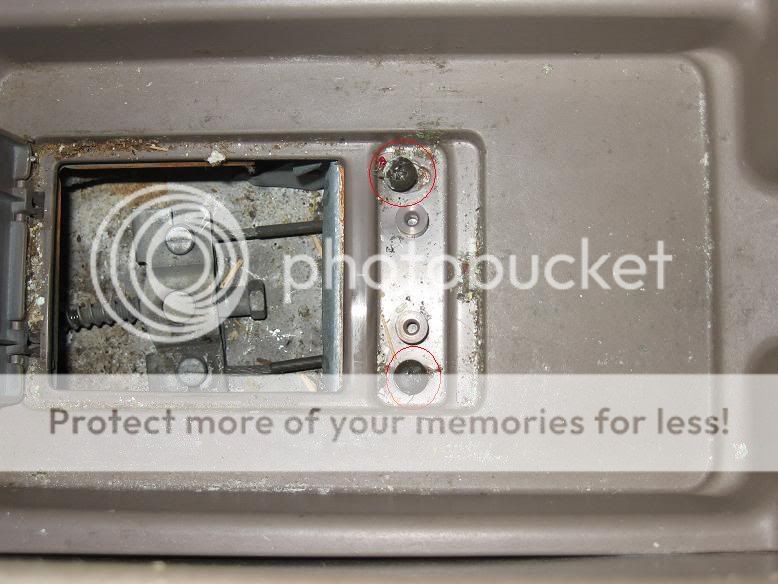
2) Pull up on cup holder (should pop out) there is one screw at an ANGLE at the front of the opening, ignore the two ones in the middle, remove that one angled screw
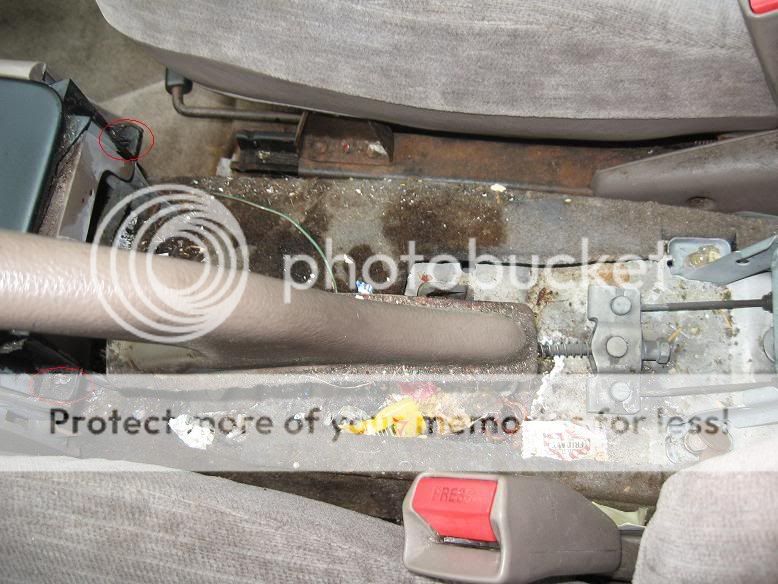
3) Pull up the ebrake if it's not already up and the entire armrest/cupholder piece should slide back and up (move it around the ebrake)
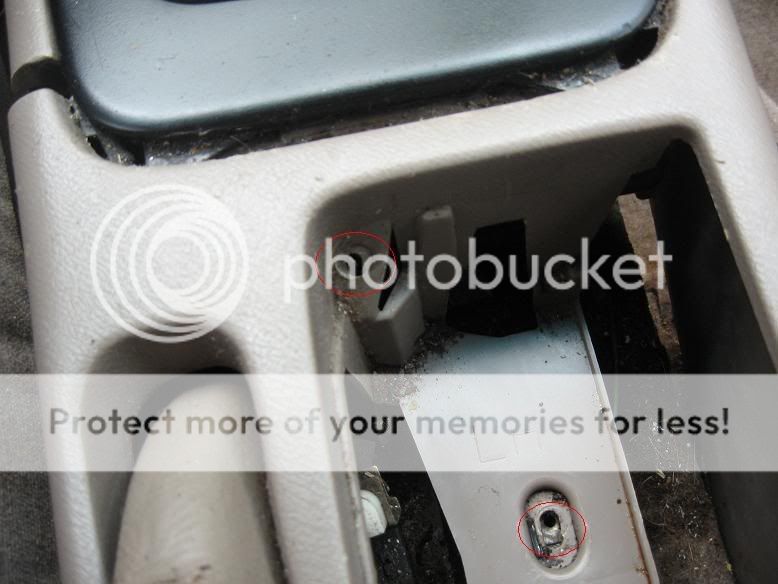
4) Two screws are in front of you now near the ebrake and behind the shifter on the black piece, remove those
5) Pull out the ash tray (straight out) and remove the screw above the OBD II connector
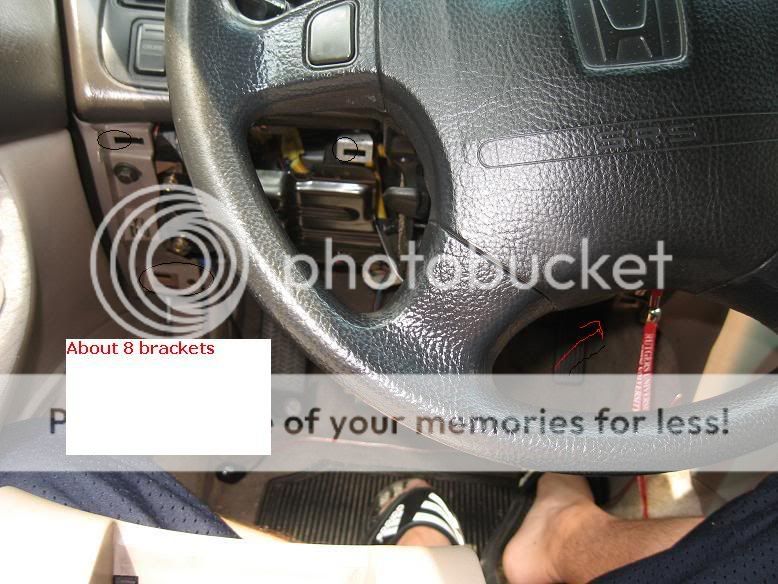
6) Pull out the Coin Holder, remove the screw behind that and pull off the steering column cover (about 8 clips)
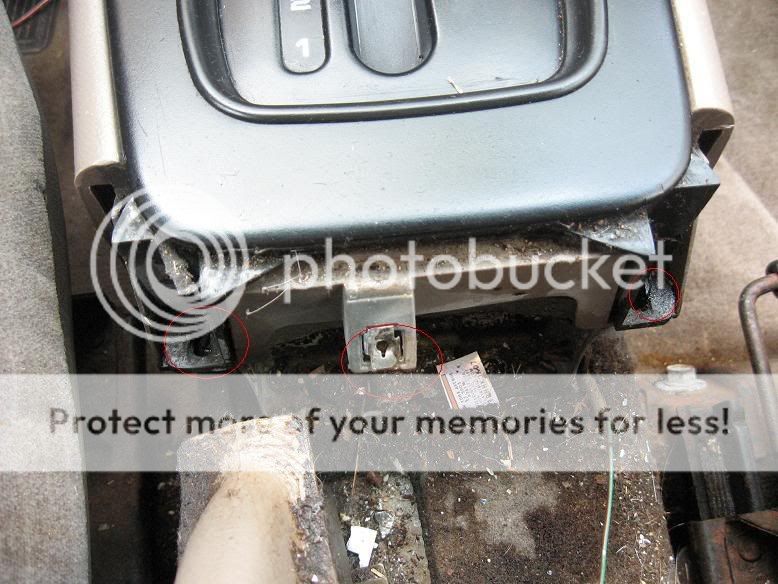
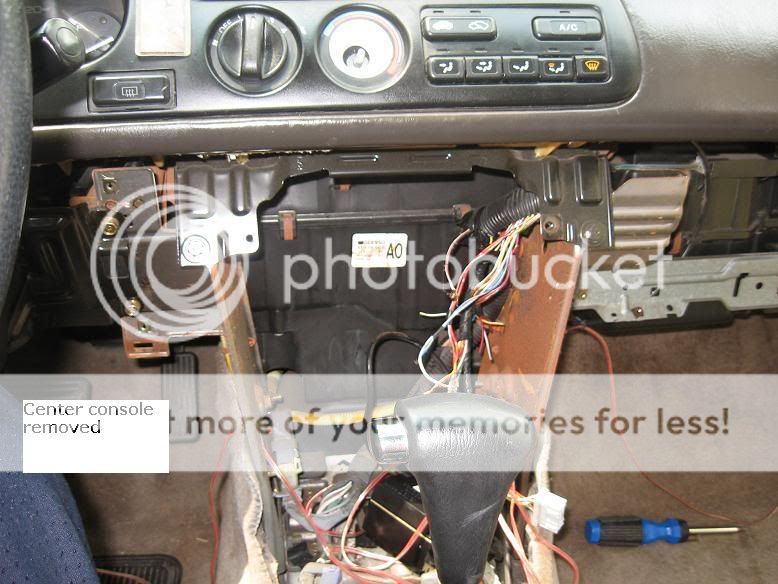
7) The black center console should be loose now, kinda lift it up and out - there's two clips holding it near the radio
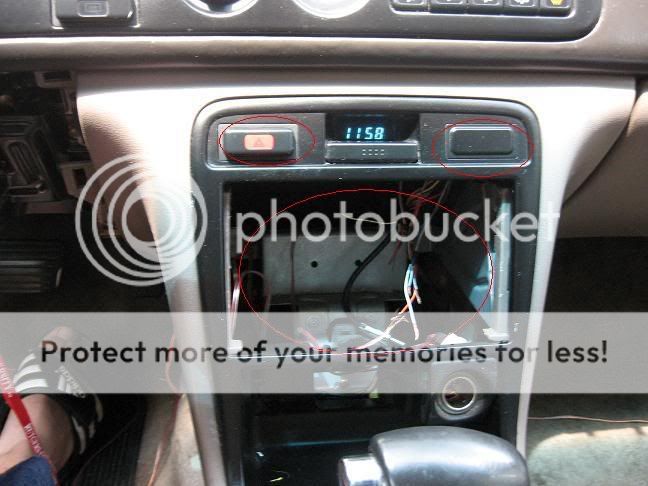
8) Unclip the lighter , clock, hazards, and fog connectors at the top and put the piece aside
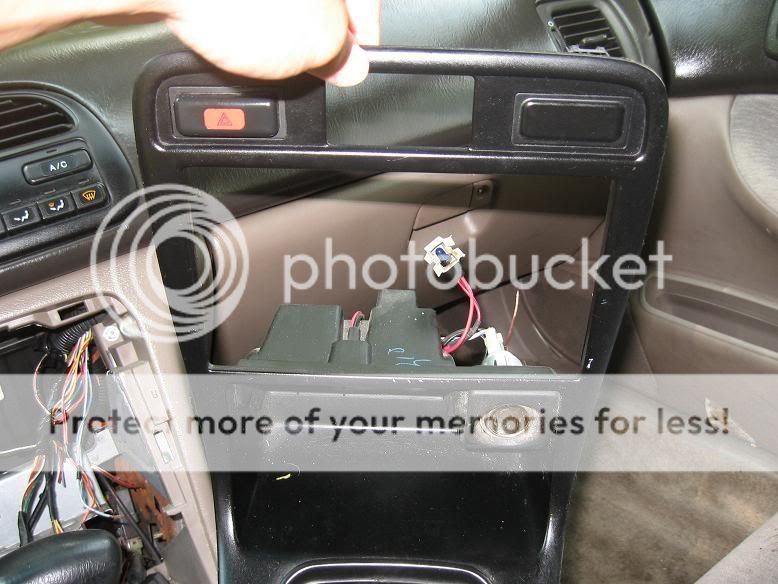
9) Remove the two screws at the base of the radio (near the OBDII connector) and pull the radio out - unplug the main harness and the antenna
10) It should look pretty empty at this point, remove the two screws on the left side of the tan part of the center console (one up by AC controls, one below near bottom of steering column)
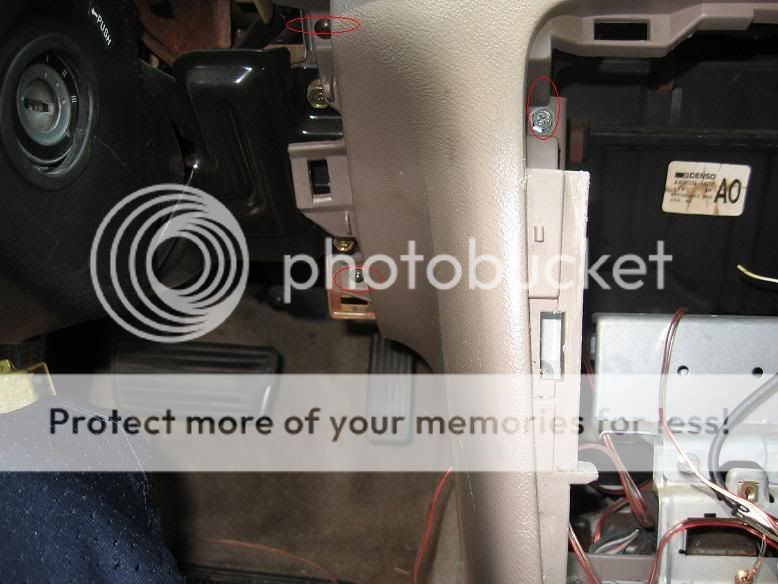
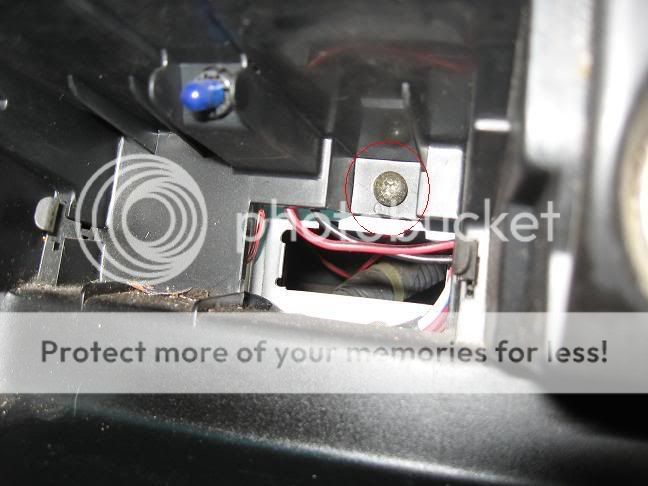
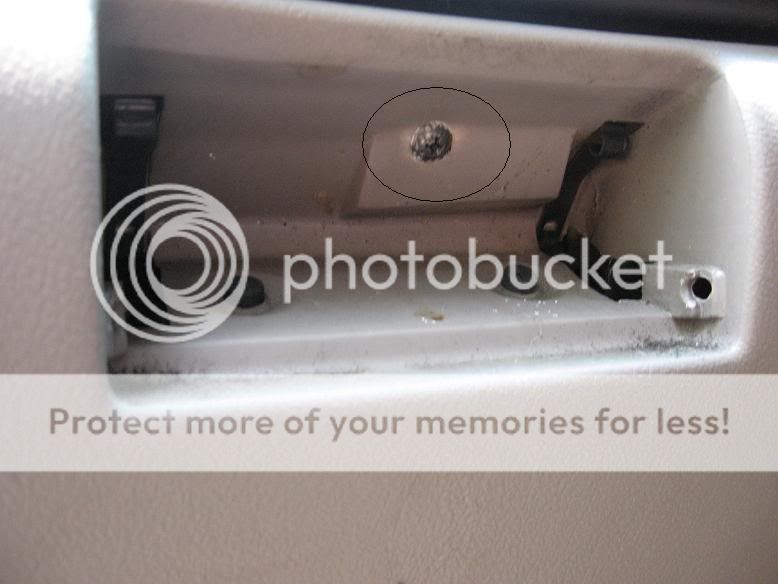
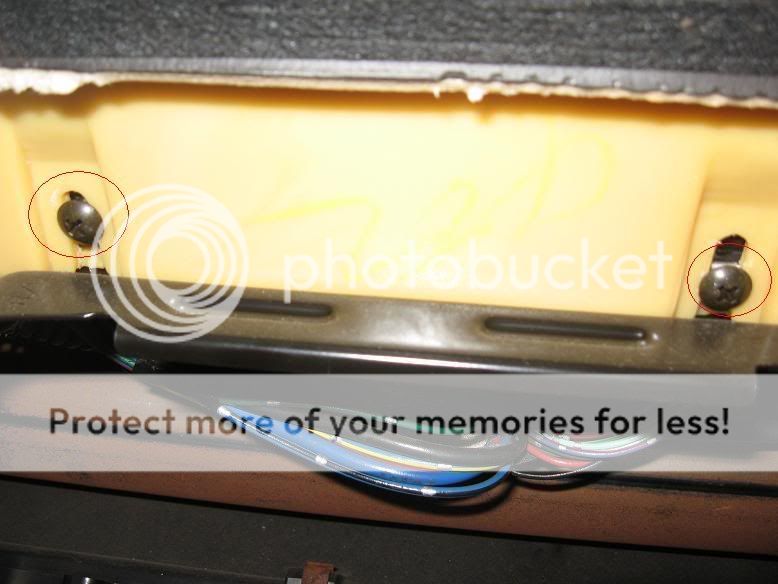
11) Kinda weird part, Open the glove box, there's two screws on the center console in similar areas, I was able to fanangle my way in there to remove them, take out both of these.
I wasn't able to get to them with the glove box in, so I just removed it. Just two gold screws on the bottom
12) Remove the two upper screws on the center console (silver and hex head)
13) The center console should now be free to be pulled out (you MAY need to remove your glove box - two screws on bottom + clipped on arm on the right side)
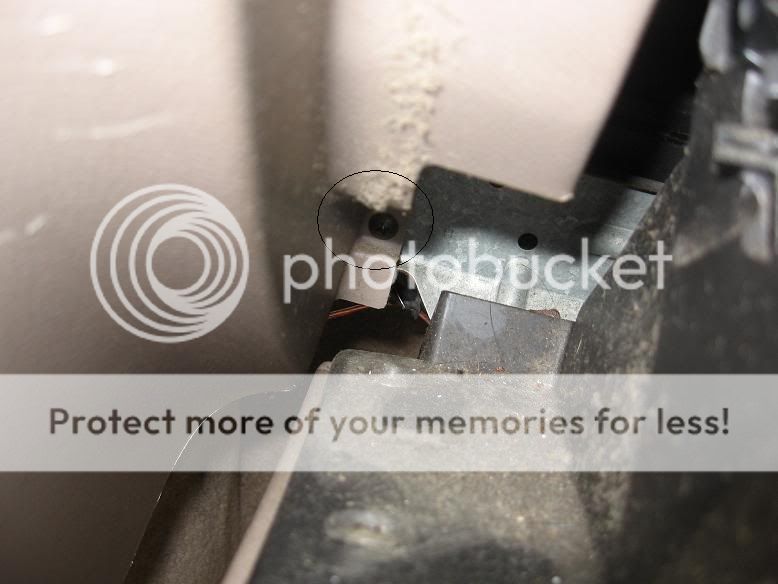
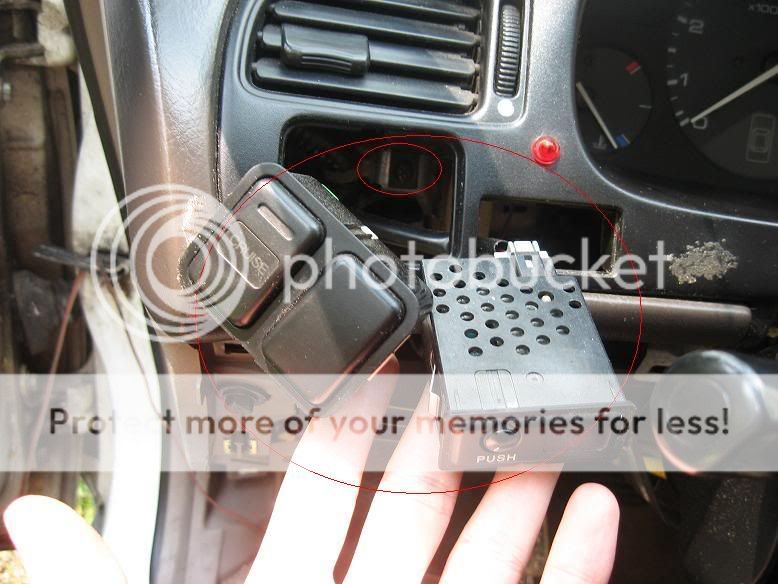
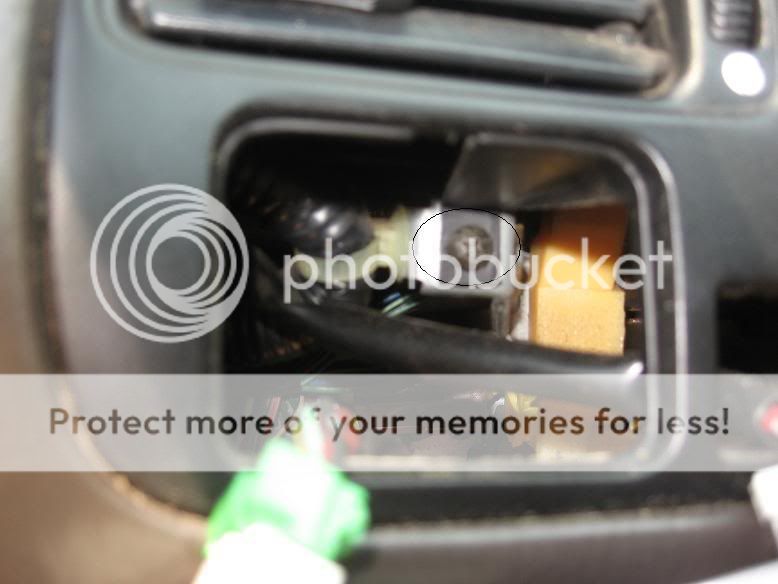
14) Put your hand on the back of the dash and pop out the Dimmer, Cruise/Sunroof, and defrost switches - behind the Cruise/Sunroof is a screw - remove that, behind the defrost is a screw - remove that as well
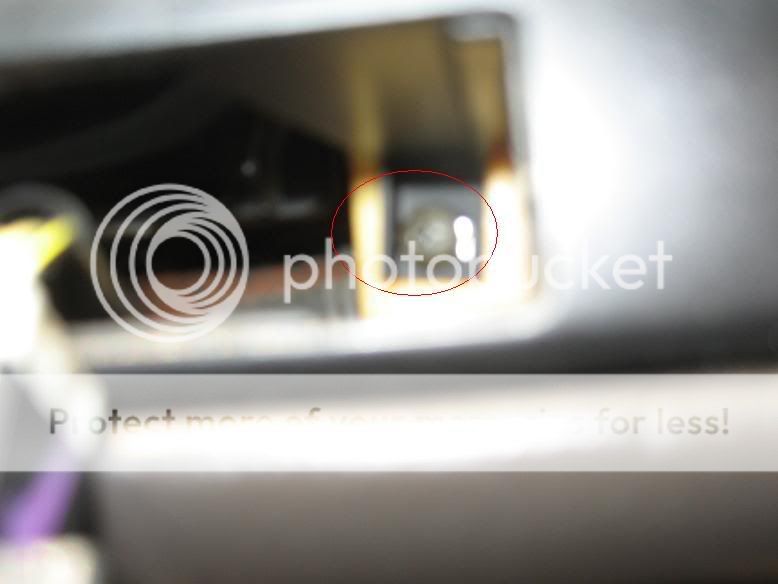
15) Look up under the Heating / AC controls where the clock/hazards used to be, you should see two small screws - remove those
16) Lower the steering wheel all the way and remove the two screws recessed where the cluster is

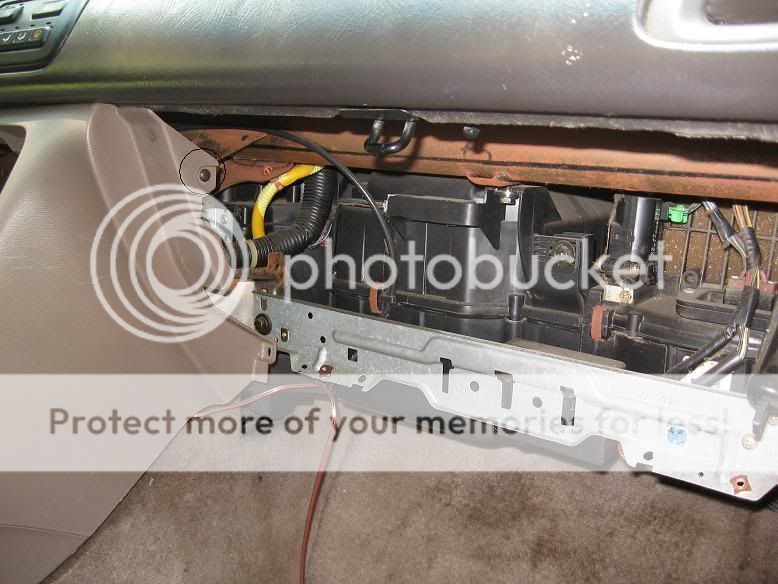
17) Congrats (haha) you can now pop out the black trim that holds everything in there, if you want you can just swing it carefully into your passenger footwell (what I do) or unclip/screw the heating/ac cable and pull it out
18) Now, you should see your naked dash, 4 gold screws hold in the cluster (2 on each side), remove these
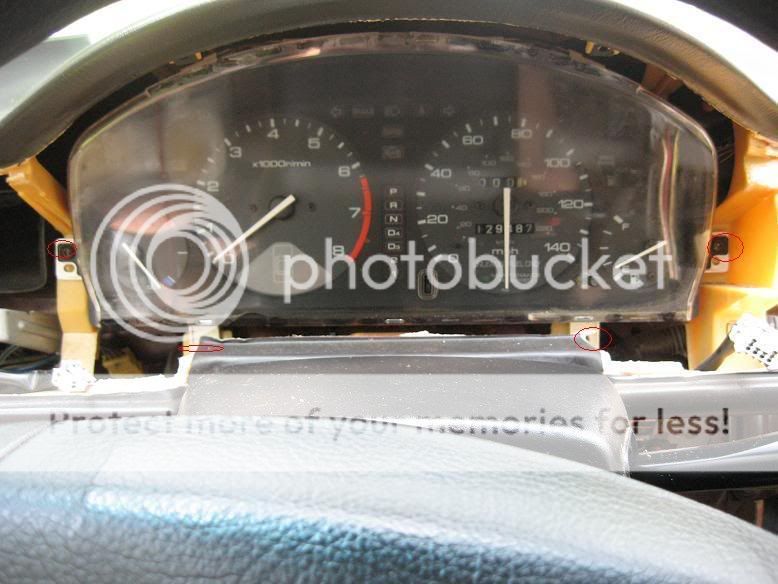
19) CAREFULLY pull the cluster foward, there's three harnesses that attach to it, no way to describe what I did, but manuever it around to unclip those and pull it out, be careful as the cluster plastic can break easily
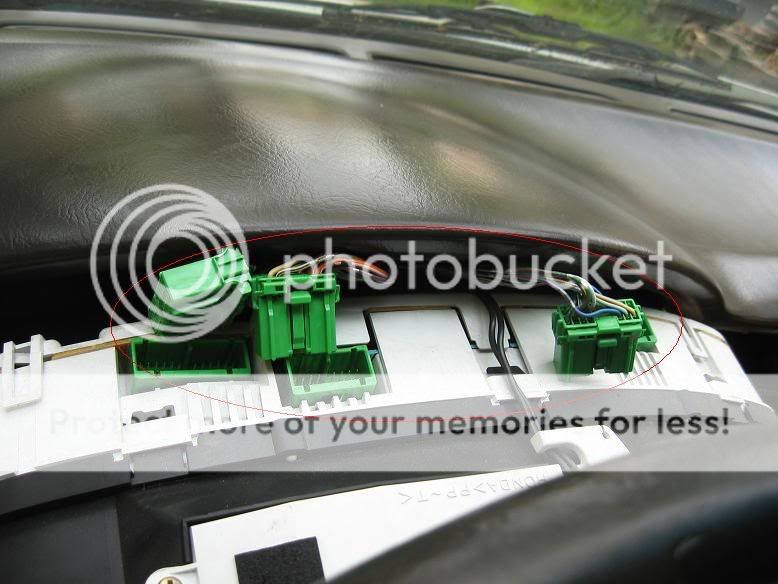
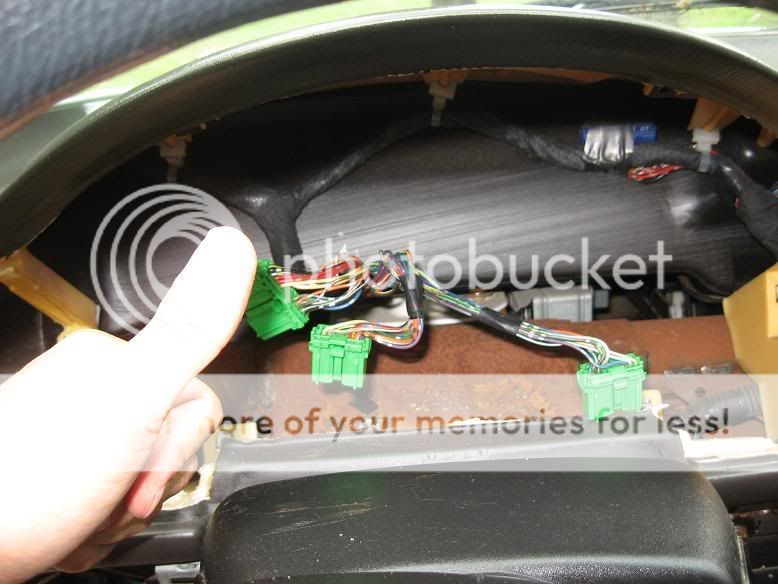
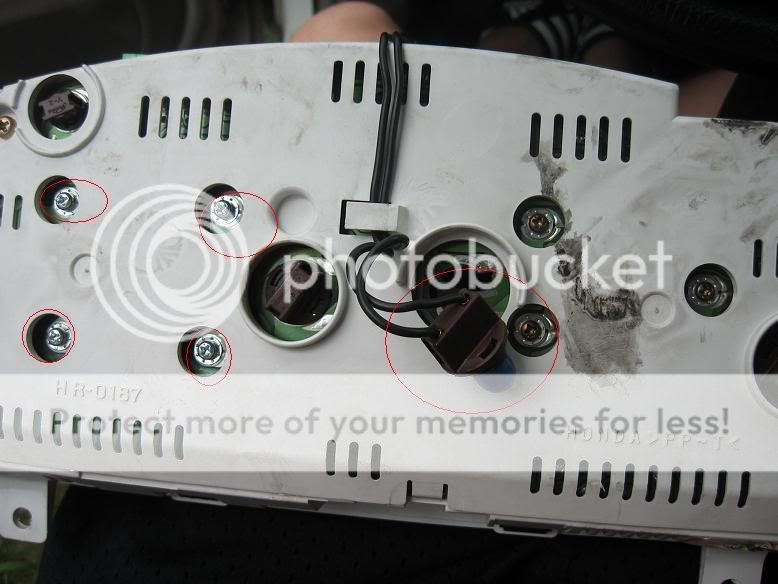
20) To take apart the cluster, remove the light bulb that connects to the top of it (there's two wires so just follow them) now there's two clips on the bottom and three on the top, carefully press all those in and the clear covering should slide off.
21) Removal of gauges and what not - Pull up on the flat covering that has the labels on it (it probably is already loose) this should expose everything else.
- Turn the cluster around this is what everything is:
1) Three screws hold in the Temp Gauge and Fuel Gauge
2) Four screws hold in the Speedo and the Tach
There are NO wires going to these pieces, I believe the power is transferred through the screws, so don't lose any and don't damage anything.
I may try to post pics up later since that's a pretty detailed explaination. Accord FAQ worthy haha
I'll make a list of what needs to be removed:
1) Inside arm rest, open the small panel at the bottom and remove those two screws
2) Pull up on cup holder (should pop out) there is one screw at an ANGLE at the front of the opening, ignore the two ones in the middle, remove that one angled screw
3) Pull up the ebrake if it's not already up and the entire armrest/cupholder piece should slide back and up (move it around the ebrake)
4) Two screws are in front of you now near the ebrake and behind the shifter on the black piece, remove those
5) Pull out the ash tray (straight out) and remove the screw above the OBD II connector
6) Pull out the Coin Holder, remove the screw behind that and pull off the steering column cover (about 8 clips)
7) The black center console should be loose now, kinda lift it up and out - there's two clips holding it near the radio
8) Unclip the lighter , clock, hazards, and fog connectors at the top and put the piece aside
9) Remove the two screws at the base of the radio (near the OBDII connector) and pull the radio out - unplug the main harness and the antenna
10) It should look pretty empty at this point, remove the two screws on the left side of the tan part of the center console (one up by AC controls, one below near bottom of steering column)
11) Kinda weird part, Open the glove box, there's two screws on the center console in similar areas, I was able to fanangle my way in there to remove them, take out both of these.
I wasn't able to get to them with the glove box in, so I just removed it. Just two gold screws on the bottom
12) Remove the two upper screws on the center console (silver and hex head)
13) The center console should now be free to be pulled out (you MAY need to remove your glove box - two screws on bottom + clipped on arm on the right side)
14) Put your hand on the back of the dash and pop out the Dimmer, Cruise/Sunroof, and defrost switches - behind the Cruise/Sunroof is a screw - remove that, behind the defrost is a screw - remove that as well
15) Look up under the Heating / AC controls where the clock/hazards used to be, you should see two small screws - remove those
16) Lower the steering wheel all the way and remove the two screws recessed where the cluster is
17) Congrats (haha) you can now pop out the black trim that holds everything in there, if you want you can just swing it carefully into your passenger footwell (what I do) or unclip/screw the heating/ac cable and pull it out
18) Now, you should see your naked dash, 4 gold screws hold in the cluster (2 on each side), remove these
19) CAREFULLY pull the cluster foward, there's three harnesses that attach to it, no way to describe what I did, but manuever it around to unclip those and pull it out, be careful as the cluster plastic can break easily
20) To take apart the cluster, remove the light bulb that connects to the top of it (there's two wires so just follow them) now there's two clips on the bottom and three on the top, carefully press all those in and the clear covering should slide off.
21) Removal of gauges and what not - Pull up on the flat covering that has the labels on it (it probably is already loose) this should expose everything else.
- Turn the cluster around this is what everything is:
1) Three screws hold in the Temp Gauge and Fuel Gauge
2) Four screws hold in the Speedo and the Tach
There are NO wires going to these pieces, I believe the power is transferred through the screws, so don't lose any and don't damage anything.
I may try to post pics up later since that's a pretty detailed explaination. Accord FAQ worthy haha
Before driving to test speedo, make sure all harnesses are plugged back in. If you don't plug hazards you have no blinker, and if you do not put in the dimmer harness and cruise control harness, you have no speedo.
Modified by awdgsx96 at 8:36 AM 7/27/2007
 07-20-2007, 05:53 AM
#2
Excellent job 
Glad I could help you get everything working again.
I may do some other tutorials too, how to remove interior parts is a possibility since I've stripped down my interior about 90%.
But awesome post, if anyone has any questions feel free to post up and either awdgsx96 can help you out or I can.
Glad I could help you get everything working again.
I may do some other tutorials too, how to remove interior parts is a possibility since I've stripped down my interior about 90%.
But awesome post, if anyone has any questions feel free to post up and either awdgsx96 can help you out or I can.
07-20-2007, 06:08 AM
#3
H-T Order of Merit
Nice job to the both of you 
TheMuffinMan, if you do make some more tutorials, let me know and I'll add them to the FAQ
TheMuffinMan, if you do make some more tutorials, let me know and I'll add them to the FAQ
07-20-2007, 07:03 AM
#6
Honda-Tech Member
Thread Starter
Join Date: Apr 2006
Location: NJ -> Outside Denver
Posts: 1,267
Likes: 0
Received 0 Likes
on
0 Posts
What about window regulators?
I'm gonna try tackling that one next week.
And the trunk lock assembly. When I bought my car it didn't have one. I'm gonna buy one from tasauto soon and do that all mammajamma
I'm gonna try tackling that one next week.
And the trunk lock assembly. When I bought my car it didn't have one. I'm gonna buy one from tasauto soon and do that all mammajamma
07-20-2007, 07:21 AM
#7
H-T Order of Merit
<TABLE WIDTH="90%" CELLSPACING=0 CELLPADDING=0 ALIGN=CENTER><TR><TD>Quote, originally posted by awdgsx96 »</TD></TR><TR><TD CLASS="quote">And the trunk lock assembly. When I bought my car it didn't have one. I'm gonna buy one from tasauto soon and do that all mammajamma</TD></TR></TABLE>
the part thats attached to the car or to the trunk lid?
When I sold the trunk lid from my 95 EX my girls brother and I swapped the keyed lock assembly on the lid for the guy pretty quick. It was straight forward and simple from what I remember, which isn't much that was probably 3 years ago.
the part thats attached to the car or to the trunk lid?
When I sold the trunk lid from my 95 EX my girls brother and I swapped the keyed lock assembly on the lid for the guy pretty quick. It was straight forward and simple from what I remember, which isn't much
that was probably 3 years ago.
Trending Topics
07-20-2007, 07:41 AM
#9
H-T Order of Merit
<TABLE WIDTH="90%" CELLSPACING=0 CELLPADDING=0 ALIGN=CENTER><TR><TD>Quote, originally posted by awdgsx96 »</TD></TR><TR><TD CLASS="quote">Is it basically just mounting it on there and calling it a day?</TD></TR></TABLE>
pretty much. I can't think of anything special we had to do. We unbolted the old one, maybe removed a couple clips of some sorta and installed in reverse order. I don't remember the exact steps because it was a while ago, but I know it's not hard. Just go to a junk yard and as you remove the part pay attention to the parts and whats holding it in, you shouldn't have a problem.
pretty much. I can't think of anything special we had to do. We unbolted the old one, maybe removed a couple clips of some sorta and installed in reverse order. I don't remember the exact steps because it was a while ago, but I know it's not hard. Just go to a junk yard and as you remove the part pay attention to the parts and whats holding it in, you shouldn't have a problem.
07-20-2007, 07:34 PM
#15

I like to respectfully thank TheMuffinMan for his time and effort on creating this DIY for everyone.
The Helms manual doesn't list as procedures in taking out the lower dash cover, center console (upper part), or the glovebox to remove the gauge cluster. Essentially, the steps # 6, 10, 11, and 12 in the pictures above are not listed. I have replaced an instrument cluster, without removing these.
Here are the 2 essential screw areas and philips screws that need to be removed once the black bezel with the hazard switch, clock, etc. is removed from the center console. These pictures are from LEDautomotive.com. (The links originally posted by The-Kid on this forum.)


LEDautomotive.com links:
http://ledautomotive.com/HowTo...o.asp
http://ledautomotive.com/HowTo...o.asp
The Helms manual doesn't list as procedures in taking out the lower dash cover, center console (upper part), or the glovebox to remove the gauge cluster. Essentially, the steps # 6, 10, 11, and 12 in the pictures above are not listed. I have replaced an instrument cluster, without removing these.
Here are the 2 essential screw areas and philips screws that need to be removed once the black bezel with the hazard switch, clock, etc. is removed from the center console. These pictures are from LEDautomotive.com. (The links originally posted by The-Kid on this forum.)
LEDautomotive.com links:
http://ledautomotive.com/HowTo...o.asp
http://ledautomotive.com/HowTo...o.asp
07-20-2007, 09:45 PM
#17
Join Date: Feb 2007
Location: 757, VA, U.S.
Posts: 511
Likes: 0
Received 0 Likes
on
0 Posts
why was the center console removed? ive taken my cluster out without taking out my radio and the cover underneath the steering wheel.. i took my cluster out in a good 10 minutes.. why was all that necessary?
07-21-2007, 08:34 AM
#19
<TABLE WIDTH="90%" CELLSPACING=0 CELLPADDING=0 ALIGN=CENTER><TR><TD>Quote, originally posted by JDM_Acccord »</TD></TR><TR><TD CLASS="quote">why was the center console removed? ive taken my cluster out without taking out my radio and the cover underneath the steering wheel.. i took my cluster out in a good 10 minutes.. why was all that necessary?</TD></TR></TABLE>
You HAVE TO take out at least the radio, you're missing quite a few screws otherwise
You HAVE TO take out at least the radio, you're missing quite a few screws otherwise
07-22-2007, 05:38 PM
#20
Honda-Tech Member
Thread Starter
Join Date: Apr 2006
Location: NJ -> Outside Denver
Posts: 1,267
Likes: 0
Received 0 Likes
on
0 Posts
<TABLE WIDTH="90%" CELLSPACING=0 CELLPADDING=0 ALIGN=CENTER><TR><TD>Quote, originally posted by TouringAccord »</TD></TR><TR><TD CLASS="quote">Nice job to the both of you
TheMuffinMan, if you do make some more tutorials, let me know and I'll add them to the FAQ </TD></TR></TABLE>
I might have something for you. I got a slide hammer + the weldy gun thing that welds sticks to the panel to remove dents. I also picked up some hammers and dollies. A friend of mine works at an auto shop and let me borrow them. I'm gonna do pictures of progress, and the before and after.
TheMuffinMan, if you do make some more tutorials, let me know and I'll add them to the FAQ
</TD></TR></TABLE>I might have something for you. I got a slide hammer + the weldy gun thing that welds sticks to the panel to remove dents. I also picked up some hammers and dollies. A friend of mine works at an auto shop and let me borrow them.
I'm gonna do pictures of progress, and the before and after.
07-24-2007, 10:11 AM
#23
I might have to do this since my speedometer just started acting weird like not starting until about 15-20mph and ticking left and right a little bit when going. Any ideas for my 95 ex
07-24-2007, 10:42 AM
#24
Should apply to yours as mine and awd's
Try replacing just the back circuitry from a working speedometer. You will probably be fine after that.
As long as your cruise control works, it's most likely not your VSS (which should also trigger a CEL)
Try replacing just the back circuitry from a working speedometer. You will probably be fine after that.
As long as your cruise control works, it's most likely not your VSS (which should also trigger a CEL)