
F22B2 ITB setup
 03-30-2007, 06:52 AM
#1
Honda-Tech Member
Thread Starter

by GhostAccord, on Flickr
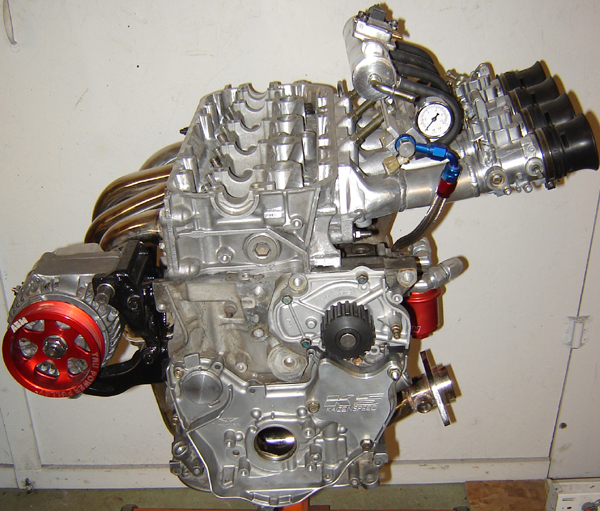
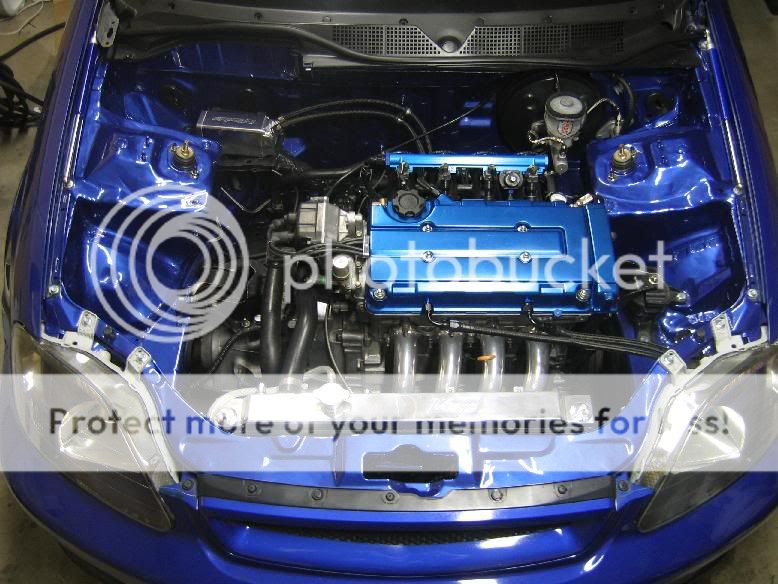
Wanted to share my F22B2 Individual throttle body setup. I have not installed the individual throttles yet. I am currently completely restoring and customizing the chassis.
This is the latest 05/09 up to date image.
ECU Chipped
I started this whole project off with learning how to chip my own ECU and it was a bit tougher than I thought but I got it done eventually.
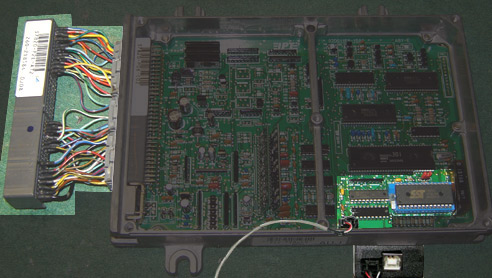
My P75 non VTEC Ecu converted to a P72 VTEC w/IAB enabled, lowprof Zif Chipped, Jumpered, to allow for an easy return to the stock P75 mode. Base Mapped, set up for Hulog datalogging and OBD2 (Veh) to OBD1 (ecu) wired.
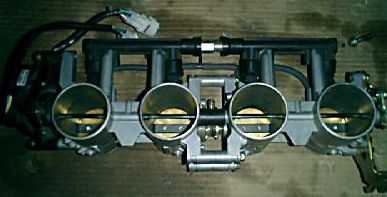
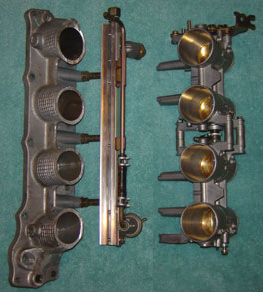
GSXR Throttle Body prep for F22 ITB conversion
These are a set of 2003 GSXR 1000 Throttle bodies. Measuring 51mm at the trumpet and 46mm @ the throttle plate. Now some may say that these are the measurements for a Hyabusa, so be it, I got these TB for the price of 1000�s�.cheap $80 delivered.
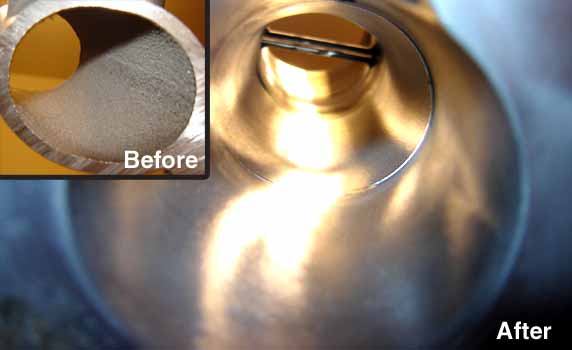
First sep was obviously to clean them up and get rid of all the bits that I will not be using.
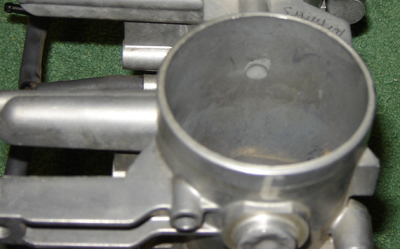
They came with the secondary throttle bar still attached but not the the valves. I removed the bar and was faced with the fact that a hole in the side of the ventury would not be a benefit so I filled the holes with JB weld.
Before JB weld
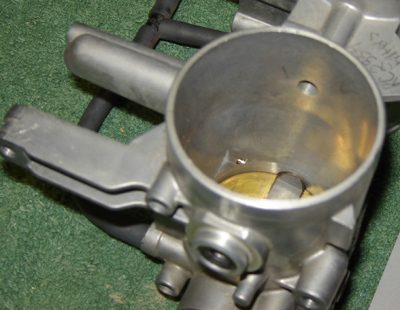
& holes filled
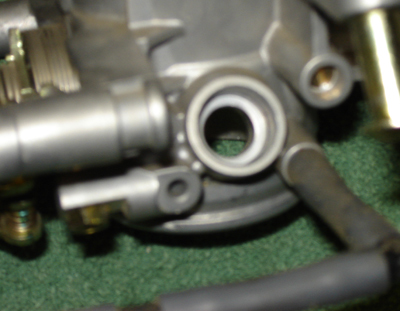
Then I had to go about deciding what to do with the stock GSXR fuel injector locations. They could be of some use in the future so for now I decided to just leave them be. Possible secondary injector setup

by GhostAccord, on Flickr
I did not make the injector bungs any bigger or modify the seal in any way so that I may be able to add an extra set of injectors in the future. May even try adding the GSXR injectors.
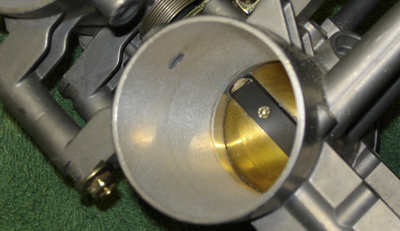
Well after doing this I saw that there was a bit of room to clean up the JB weld and maybe enlarge the ventury.
So I honed them out about 1mm making them 52mm at the trumpet and 47mm at the throat
by GhostAccord, on Flickr
Then polished them.
by GhostAccord, on Flickr
on to
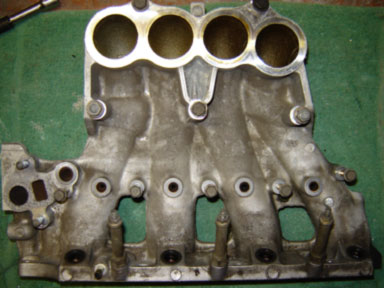
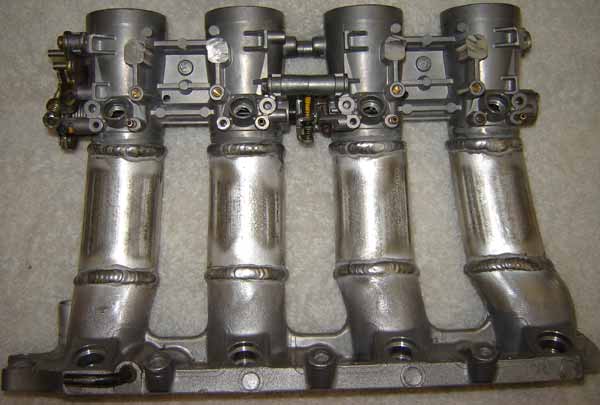
The runners and stock F22 manifold.
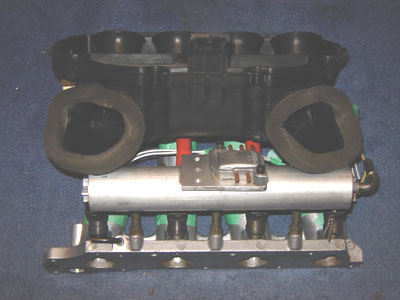
This is where I started with a stock Upper & Lower IM.

by GhostAccord, on Flickr
After I disassembled them here is what I had to work with, gotta love So Cal car parts not a spot of rust or aluminum pitting.
by GhostAccord, on Flickr
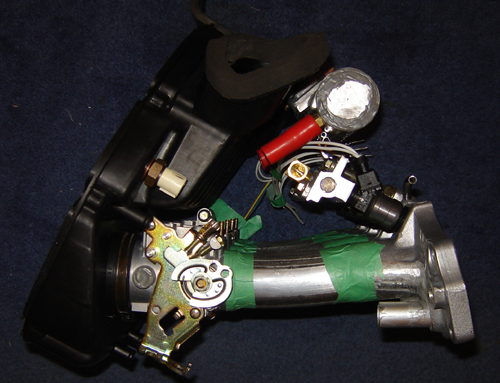
After a few hours of cutting, grinding and fine tuning. I get my lower manifold ready for runners.
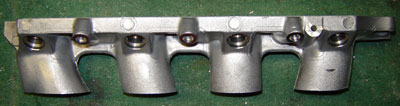
by GhostAccord, on Flickr
by GhostAccord, on Flickr
At this point is where I stood stagnant.....waiting........and......
........waiting. It was a long wait for my custom bent aluminum runners. You wouldn't believe how hard it was to find 1"7/8" aluminum tubing in this city....not a common tube size for refineries or paper mills... :lol: Not one shop in the city carried this tube size. Oh well I found some and have made my request for custom 40's. I don't want my ITB's pointing at my firewall, I want them as close to my hood as possible.
Here is where it all begins, the hours of fabrication. These are all the parts that went into making my ITB's, Runners, Fuel Rail and Vacuum Manifold.

by GhostAccord, on Flickr
And.......
here they are with those unbelievable hours of fabricating and grinding to get the angles right as well as the curve. I had to make it so that there would be as little bend in the inside track of the runner as possible. Some may have noticed that the runners I started with were a lot longer...well that's how long I needed them to achieve the curve without being to badly crushed in the bender. The amount that they did flatten matched the oval shape manifold ports 100%. I now have enough pipe to do 1 or 2 more sets depending on the runner length. I only used one and a half of the four.
Fitted with the bottom half of my ram air GSXR air box. All measurements were double and triple checked to ensure this thing will fit snug in the available space.
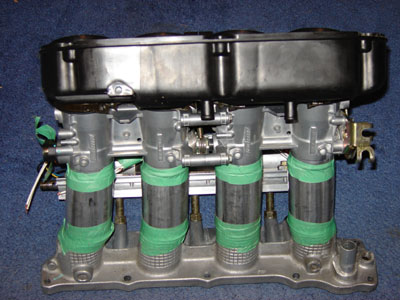
by GhostAccord, on Flickr
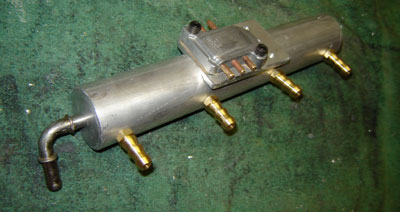
Vacuum Manifoild
Now some people are saying that what do you need a vacuum manifold for ITB's are un-tunable using vacuum. Well not to step on any toes but I need vacuum for more than just my MAP sensor. I need vacuum for my FPR and my break boost. Plus I had some spare tubing laying around and some aluminum end plugs so I did it anyway.
My vacuum manifold is complete will all the factory vacuum line ports as you can see in the pic it is actually the factory vacuum housing from my parts manifold.
by GhostAccord, on Flickr
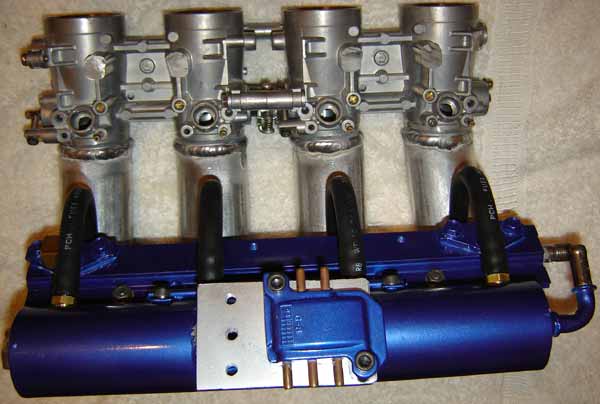
And this is how it sits now waiting to have my engine rebuilt and my engine bay cleaned up.
I welded my runners directly to my throttle bodies
by GhostAccord, on Flickr
Complete with vacuum can and all stock vacuum line ports.
by GhostAccord, on Flickr
Last edited by GhostAccord; 03-11-2018 at 07:01 AM. Reason: Added welcoming image...& update!
 03-30-2007, 09:32 AM
#3
Honda-Tech Member
Join Date: Mar 2006
Location: Pittsburgh, PA, USA
Posts: 727
Likes: 0
Received 0 Likes
on
0 Posts
that looks real clean dude!
are you using the stock injector ports?
how's the tuning coming with that thing, anyhow? i'm lost when it comes to tuning and don't even know where to start. i'm thinking maybe a chipped p28? i dunno.
awesome build so far, tho.
are you using the stock injector ports?
how's the tuning coming with that thing, anyhow? i'm lost when it comes to tuning and don't even know where to start. i'm thinking maybe a chipped p28? i dunno.
awesome build so far, tho.
03-30-2007, 09:40 AM
#4
H-T Order of Merit
just wondering, how did you decide on the length of the runners? Did you calculate (somehow) what would work best or did you just pick a length that would best fit the car it's going into?
03-30-2007, 10:00 AM
#5
Honda-Tech Member
Thread Starter
Haven't started tuning yet. I chipped a P75 added VTEC & IAB and I'm using Crome Pro with a P30 ROM running ITB tools with VTEC disbled. I have a base map running on the car right now with the stock motor.
here is a vid of how the car runs right now with the chipped ECU
I'm pulling the motor at the end of April. I have No time to work on it before then, Busy time at work. I have 2 Innovate LC-1's w/widband 02 sensors that I am going to use to tune it. I too was going to run with stock internals but I saved up some pennies with all the OT I've been work'n and I bought a custom camshaft from F22parts, and the Ultimate Valve train pacage from KMS Engine. I was going to go VTEC but figured with a cam purpose built for higher RPM no need for all the complex VTEC components, I can handle a rough Idle.
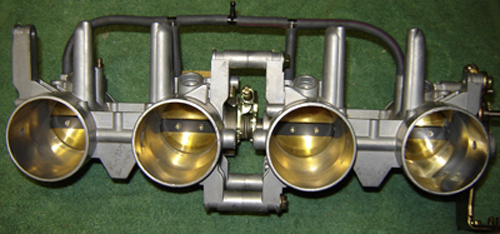
Last thing I did to the ITB's was gasket matching and polishing .....just trying to fill any spare time I do have with prepping my parts for assembly.
by GhostAccord, on Flickr
Oh forgot to mention that this is going into my daily driver...That is why I can't just yank it off the road with out time off work
here is a vid of how the car runs right now with the chipped ECU
I'm pulling the motor at the end of April. I have No time to work on it before then, Busy time at work. I have 2 Innovate LC-1's w/widband 02 sensors that I am going to use to tune it. I too was going to run with stock internals but I saved up some pennies with all the OT I've been work'n and I bought a custom camshaft from F22parts, and the Ultimate Valve train pacage from KMS Engine. I was going to go VTEC but figured with a cam purpose built for higher RPM no need for all the complex VTEC components, I can handle a rough Idle.
Last thing I did to the ITB's was gasket matching and polishing .....just trying to fill any spare time I do have with prepping my parts for assembly.
by GhostAccord, on Flickr
Oh forgot to mention that this is going into my daily driver...That is why I can't just yank it off the road with out time off work
Last edited by GhostAccord; 03-11-2018 at 07:31 AM.
03-30-2007, 10:15 AM
#6
Honda-Tech Member
Thread Starter
<TABLE WIDTH="90%" CELLSPACING=0 CELLPADDING=0 ALIGN=CENTER><TR><TD>Quote, originally posted by "TouringAccord" »</TD></TR><TR><TD CLASS="quote">just wondering, how did you decide on the length of the runners? Did you calculate (somehow) what would work best or did you just pick a length that would best fit the car it's going into? </TD></TR></TABLE>
I used a formula where the distance of the butterfly valves from the intake valve is in relation to the RPM range I was looking to run @ approx 6500-8000. That is why they seem longer than most. The short ones seem to be built for engines running in the higher RPM range 8000 - 10000. As well keeping the injectors in the stock location is in keeping with the lower RPM's. I have left the stock injector bungs in the GSXR location and honed them out to accept bosch style injectors if my plans don't work and I need to move the injectors up for better fuel atomization. or I'll add water injection somewhere down the line
I used a formula where the distance of the butterfly valves from the intake valve is in relation to the RPM range I was looking to run @ approx 6500-8000. That is why they seem longer than most. The short ones seem to be built for engines running in the higher RPM range 8000 - 10000. As well keeping the injectors in the stock location is in keeping with the lower RPM's. I have left the stock injector bungs in the GSXR location and honed them out to accept bosch style injectors if my plans don't work and I need to move the injectors up for better fuel atomization. or I'll add water injection somewhere down the line
Last edited by GhostAccord; 04-29-2009 at 10:40 AM. Reason: New tuned length intake information added
03-30-2007, 10:37 AM
#7
H-T Order of Merit
ah, ok. I thought there was a difference between the runner length and where the power is made I just couldn't remember exactly. Thats why I asked. Thanks for explaining it
Trending Topics
03-30-2007, 11:08 AM
#8
Honda-Tech Member
Join Date: Aug 2004
Location: Grosse Pointe Woods/Ann Arbor, MI, USA
Posts: 1,353
Likes: 0
Received 1 Like
on
1 Post
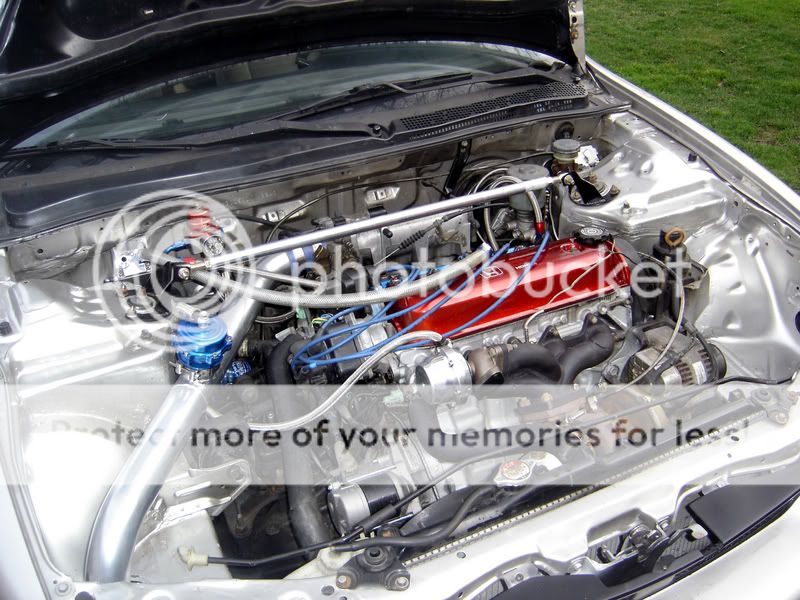
WOW... absolutely beautiful. You did a really nice job fabbing it up. The setup is really clean, too. Just make sure to do a wire tuck when you take the motor out... it'll look so much cleaner w/ just the itbs and nothing else... somewhat like this...
03-30-2007, 11:18 AM
#9
H-T Order of Merit
there is a lot of work that went into that... filled unused holes, deleted radiator mounts, relocated battery, relocated fuse box, full SS brake lines, ect. I think to tuck an Accord to look like that would take even more work, but thats a different discussion.  back on topic
back on topic
03-30-2007, 01:03 PM
#10
Honda-Tech Member
Join Date: Apr 2006
Location: Portland, OR, USA
Posts: 486
Likes: 0
Received 0 Likes
on
0 Posts
wow, cant wait to hear what this things will sound like with ITBs. how much HP are you aiming for?
i think this is the only serious F22 n/a build i have ever seen.
o yea, and post some pics of your car!
i think this is the only serious F22 n/a build i have ever seen.
o yea, and post some pics of your car!
03-30-2007, 02:24 PM
#12
H-T Order of Merit
<TABLE WIDTH="90%" CELLSPACING=0 CELLPADDING=0 ALIGN=CENTER><TR><TD>Quote, originally posted by pos_cd5 »</TD></TR><TR><TD CLASS="quote">o yea, and post some pics of your car!</TD></TR></TABLE>
he posted a couple in the Accord Picture Thread
he posted a couple in the Accord Picture Thread
03-30-2007, 02:27 PM
#13
Honda-Tech Member
Join Date: Apr 2006
Location: Portland, OR, USA
Posts: 486
Likes: 0
Received 0 Likes
on
0 Posts
<TABLE WIDTH="90%" CELLSPACING=0 CELLPADDING=0 ALIGN=CENTER><TR><TD>Quote, originally posted by TouringAccord »</TD></TR><TR><TD CLASS="quote">
he posted a couple in the Accord Picture Thread</TD></TR></TABLE>
Good detective work, Johnson.
he posted a couple in the Accord Picture Thread</TD></TR></TABLE>
Good detective work, Johnson.
03-30-2007, 03:48 PM
#14
Honda-Tech Member
<TABLE WIDTH="90%" CELLSPACING=0 CELLPADDING=0 ALIGN=CENTER><TR><TD>Quote, originally posted by TouringAccord »</TD></TR><TR><TD CLASS="quote">there is a lot of work that went into that... filled unused holes, deleted radiator mounts, relocated battery, relocated fuse box, full SS brake lines, ect. I think to tuck an Accord to look like that would take even more work, but thats a different discussion. back on topic </TD></TR></TABLE>
rhdune has actually done the wire tuck on his accord...
back on topic </TD></TR></TABLE>rhdune has actually done the wire tuck on his accord...
03-31-2007, 08:52 AM
#16
Honda-Tech Member
Thread Starter
Well, I am only allowed 5 posts in a 24Hr period so I'll try and merge all into one for now.
Yes I am going to try the stock injector ports first, using a set of DSM 450cc Black Top Injectors. As I mentioned I still have the GSXR ports plugged right now but I can remove the plugs and move them down, If the need arises.
Man that looks sweet, very clean.....may have to try that next winter when I actualy store this thing in my garage and get ready for body and paint. After I throw the ITB's in her this spring, she'll never see the snow again as well this spring I will be getting rid of alot of the crap I won't need anymore, A/C components, EGR, Cruise Control. I think that will clean it up alot for now.
I do have one question about the wire tuck. Is the battery relocated to the trunk? If so what gauge wire will I need and will I need a higher output Alt. I have the AEM TRU Power Pulleys on it right now and it seems strained already????
Yeah me either, think it's going to sound pretty nasty 
As for HP I'm not sure, HP gains are not the reason I'm doing this. It's the throttle response and getting off the line quick and accelerating out of the corners fast that I'm looking for, of course HP gains should be there and will be a welcome bennefit . High HP is great for 1/4 or strait runns but if you have HP and no torque ur F_ _ked in a street race with lots of curves. The back roads that I cruise on have tones of curves.
But to answer your Hp question more directly, I'll have to wait to see what comp ratio I end up with after getting my engine work done. I'm re-using my stock pistons and getting mill work done to the deack & head. With the calculations that I have done on paper .01 off both deck and head using a 2 layer head gasket should get me to around 9.8:1 CR close enought to 10 for me. If I need something higher I'll buy pistons next year.
Nice work rhdune, how long did that take you....and what is the easyest way to get your engine and tranny to look like that? and don't tell me to buy new......
by the way nice Turbo setup
N/A for the best, Boost for the rest...lol jst-kd'n Cheers!
Thanks for all your positive coments, helps beat down all those nea sayers around here that are hopping that I fail misearably at this project....You Know who you are don't deny it......
Modified by GhostAccord at 2:41 PM 4/17/2007
Originally Posted by AccordSleeperZzZ
are you using the stock injector ports?
Originally Posted by rhdune16
Just make sure to do a wire tuck when you take the motor out... it'll look so much cleaner w/ just the itbs and nothing else... somewhat like this...
as well this spring I will be getting rid of alot of the crap I won't need anymore, A/C components, EGR, Cruise Control. I think that will clean it up alot for now.I do have one question about the wire tuck. Is the battery relocated to the trunk? If so what gauge wire will I need and will I need a higher output Alt. I have the AEM TRU Power Pulleys on it right now and it seems strained already????
Originally Posted by pos_cd5
wow, cant wait to hear what this things will sound like with ITBs. how much HP are you aiming for?
i think this is the only serious F22 n/a build i have ever seen. o yea, and post some pics of your car!
i think this is the only serious F22 n/a build i have ever seen. o yea, and post some pics of your car!
As for HP I'm not sure, HP gains are not the reason I'm doing this. It's the throttle response and getting off the line quick and accelerating out of the corners fast that I'm looking for, of course HP gains should be there and will be a welcome bennefit
. High HP is great for 1/4 or strait runns but if you have HP and no torque ur F_ _ked in a street race with lots of curves. The back roads that I cruise on have tones of curves. But to answer your Hp question more directly, I'll have to wait to see what comp ratio I end up with after getting my engine work done. I'm re-using my stock pistons and getting mill work done to the deack & head. With the calculations that I have done on paper .01 off both deck and head using a 2 layer head gasket should get me to around 9.8:1 CR close enought to 10 for me. If I need something higher I'll buy pistons next year.
Originally Posted by raceACCORDingly
rhdune has actually done the wire tuck on his accord...
by the way nice Turbo setup
N/A for the best, Boost for the rest...lol jst-kd'n Cheers!
Thanks for all your positive coments, helps beat down all those nea sayers around here that are hopping that I fail misearably at this project....You Know who you are don't deny it......
Modified by GhostAccord at 2:41 PM 4/17/2007
03-31-2007, 09:57 PM
#17
H-T Order of Merit
<TABLE WIDTH="90%" CELLSPACING=0 CELLPADDING=0 ALIGN=CENTER><TR><TD>Quote, originally posted by GhostAccord »</TD></TR><TR><TD CLASS="quote">Well, I am only allowed 5 posts in a 24Hr period so I'll try and merge all into one for now.</TD></TR></TABLE>
yeah, once you are a full memeber (no trial user under your screen name) you wont have any post restrictions.
<TABLE WIDTH="90%" CELLSPACING=0 CELLPADDING=0 ALIGN=CENTER><TR><TD>Quote, originally posted by GhostAccord »</TD></TR><TR><TD CLASS="quote">I do have one question about the wire tuck. Is the battery relocated to the trunk? If so what gauge wire will I need and will I need a higher output Alt. </TD></TR></TABLE>
yes, most people locate the battery in the truck. Some people with Civic/CRX/Integra have also used small batteries and made a custom bracket to fit it behind the bumper and out of the way. I don't think I've ever seen an Accord like that but I'm sure the same can be done.
As for the wire, 0-4 gauge.
I believe there is a link in the FAQ showing the way one person did their battery relocation.
side note:
I got to see rhdune16's car at a meet we went to today wait, I mean yesterday, ah... I need to go to bed. It's been a long day
yeah, once you are a full memeber (no trial user under your screen name) you wont have any post restrictions.
<TABLE WIDTH="90%" CELLSPACING=0 CELLPADDING=0 ALIGN=CENTER><TR><TD>Quote, originally posted by GhostAccord »</TD></TR><TR><TD CLASS="quote">I do have one question about the wire tuck. Is the battery relocated to the trunk? If so what gauge wire will I need and will I need a higher output Alt. </TD></TR></TABLE>
yes, most people locate the battery in the truck. Some people with Civic/CRX/Integra have also used small batteries and made a custom bracket to fit it behind the bumper and out of the way. I don't think I've ever seen an Accord like that but I'm sure the same can be done.
As for the wire, 0-4 gauge.
I believe there is a link in the FAQ showing the way one person did their battery relocation.
side note:
I got to see rhdune16's car at a meet we went to today
wait, I mean yesterday, ah... I need to go to bed. It's been a long day
04-01-2007, 03:20 AM
#19
Honda-Tech Member
Thread Starter
<TABLE WIDTH="90%" CELLSPACING=0 CELLPADDING=0 ALIGN=CENTER><TR><TD>Quote, originally posted by "i_kick_turtles" »</TD></TR><TR><TD CLASS="quote">Very nice! What are you going to use for filters?</TD></TR></TABLE>
Thanks, I am going to fab a sort of ram air / old school shaker style hood and intake system for it. I'm using the stock GSXR air box & K&N Filter and the Erebuni F3V fiberglass hood scoop that I bought.
These are pics that I took back in the mock-up stage pre-weld. Haven't taken another pic since. It shows the position that the air intakes will be when the ITB's are on the car.
by GhostAccord, on Flickr
by GhostAccord, on Flickr
It is probably going to restrict the air to throttles a little bit but oh well, when I need them open it will only be 4 little screws to take of the air box. The air box will also keep down some of the throttle body/engine noise for the every day drive.
If this plan fails I am going to use a set of universal fit K&N cone filters.
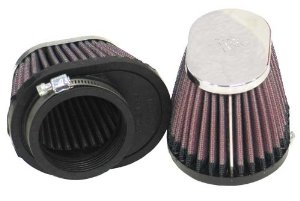
by GhostAccord, on Flickr
Thanks, I am going to fab a sort of ram air / old school shaker style hood and intake system for it. I'm using the stock GSXR air box & K&N Filter and the Erebuni F3V fiberglass hood scoop that I bought.
These are pics that I took back in the mock-up stage pre-weld. Haven't taken another pic since. It shows the position that the air intakes will be when the ITB's are on the car.
by GhostAccord, on Flickr
by GhostAccord, on Flickr
It is probably going to restrict the air to throttles a little bit but oh well, when I need them open it will only be 4 little screws to take of the air box. The air box will also keep down some of the throttle body/engine noise for the every day drive.
If this plan fails
I am going to use a set of universal fit K&N cone filters.by GhostAccord, on Flickr
Last edited by GhostAccord; 03-11-2018 at 07:52 AM.
04-01-2007, 06:16 AM
#20
Honda-Tech Member
Join Date: Jan 2006
Location: Southern MD
Posts: 986
Likes: 0
Received 0 Likes
on
0 Posts
that hood idea is exactly what my brother wants to do with his.... looking good already and should be mean when you finish.
04-01-2007, 09:18 AM
#21
H-T Order of Merit
<TABLE WIDTH="90%" CELLSPACING=0 CELLPADDING=0 ALIGN=CENTER><TR><TD>Quote, originally posted by GhostAccord »</TD></TR><TR><TD CLASS="quote">Of course the FAQs, There is always alot of reading to do whenever ya join one of these forums and that is the place to start. Thanks TA I'll have to check them out when I have some time to spare.....before I ask another already answered question </TD></TR></TABLE>
yep, no problem
</TD></TR></TABLE>yep, no problem
04-06-2007, 05:48 AM
#24
Honda-Tech Member
Thread Starter
<TABLE WIDTH="90%" CELLSPACING=0 CELLPADDING=0 ALIGN=CENTER><TR><TD>Quote, originally posted by "Turbowa" »</TD></TR><TR><TD CLASS="quote">Where did you get all the head gear if you don't mind me asking and how much$ did it set you back? </TD></TR></TABLE>
I don't mind at all. I got them from KMS Engine Development for $750 US shipped to Canada.
I don't mind at all. I got them from KMS Engine Development for $750 US shipped to Canada.
04-06-2007, 12:10 PM
#25
Honda-Tech Member
Join Date: May 2006
Location: Texas, United States
Posts: 53
Likes: 0
Received 0 Likes
on
0 Posts
Note: I intermixed the terms fluting, and tapper, they mean the same thing.
I am glad to see someone showing some interest in the f22, nice work on that side, but there are some things you really really need to be aware of.
First thing is that at low RPM ITB's kill torque, but the improved throttle response mostly makes up for it. The benefit of ITB's is taking off out of turns ... I am impressed that you said that by the way, that is the funnest and most important part of driving fast for a number of reasons, and no one ever mentions or thinks about it. Taking off from the line though is not going to be your engines strong suit.
The next thing is sort of unfortunate. Keep in mind that designing ITB's is just about one of the hardest things to design for an engine, I am not telling you this stuff to knock you, but to help you now, and in the future. With that said, those ITB's are not going to make power, you may actually even notice a drop in power. There are some key things wrong with them, the runner shape is the main one though. Have you ever seen a set of TWM ITB's? If you have, did you notice the fluting of the runners? That is the most important part of ITB design, the next one is the length of course. The way it works is this. When the valves open, they open a fraction of the way, and continue to open at a certain rate depending on cam grind. This is hard explain in words how it works, but I will try my best.
when the valve opens it can flow n amount of air where n is some number. the initial volume of the runner is n. So n is the flow rate essentially. the cam continues to turn and the the valve opens more and more, making n a larger and larger number, so you have n as a function of degrees in cam rotation. f(n), well, the tapper of the runner is in direct relation of that function. if you need n amount of air at that cam degree, then there should be that n amount of air available at that time to allow the engine to pump air at the most efficient rate. The length of the runner is determined by how large n is at 50-70% of the valve being open (in most cases). This again has to do with cam grind, buy you want the throat of the ITB's to have the a similar volume as what ever flow rate the head has at the most common valve position.
reasoning for 50-70%, and why it is only similar to most common valve position: When the air starts rushing into the cylinder at this expanding rate you cause a vacuum in the runner. What ever air that just exited the runner into the cylinder left a void that has to be filled. Air further up the runner is going to rush to fill that space, the further it has to travel the more velocity it is going to have. when it reaches the bottom of the tapper, the area with the least circumference that air is going to jam together (increase in density) because there is more of it in a smaller space. This once again is a function. The further the air travels down the runner due to the tapper, the denser it will be upon entering the chamber. The volume of the throat of the ITB dictates what this density is going to be, the length as a function of diameter. You want to loose as little density of the charge air at the closing of the valve as possible, unfortunately when the valve starts to close the flow rate starts to diminish. So you have to make a compromise. The more aggressive the cam grind the less compromise you have to make, because there is not as much time for the velocity of the charge air to change. Here is how you figure it out. The amount of time it takes for the came to close from its highest common valve position vs the time it takes the charge air to reach the valve.
So what we have shown is that the length of the runner is actually not predetermined it is actually just a by product, but an important one. You are more concerned with the function of the tapper, and the volume at the throat, these two things will show you how long the runner needs to be.
If you understand this, then it should also be apparent that a shorter runner with a more aggressive tapper will have better throttle response because the denser air is quicker to reach the cylinder. In order to do this you have to have very aggressive cams though.
On your ITBs you have a single diameter pipe (no tapper) meaning it is going to have very little density upon entering the combustion chamber. The only density you are going to gain is from back pressure, which is some, but not enough to make up for what was lost by the back pressure of an intake pipe. The restrictive air box you are going to use will probably help you gain some back pressure though, and I would not be surprised if you find that you have better numbers with it attached. Another thing to be aware of though is that since the density of the air entering the cylinders with the air box is going to be most likely higher, your tunning is going to be different for running with it and without it, you are going to have to adjust fuel amounts to achieve proper AFR in both scenarios.
The only other thing that I can see that you may consider doing differently in the future is using mandrel bends on those two out side pipes instead of the sharp bends you got from welding those angled pieces together.
As I said in the beginning, designing ITB's is really difficult, it takes a lot of time on a flow bench, and with micro meters measuring cams and valve position and the flow at that position... and on and on and on till you get it just right. In the end, it is best to design the cams around the desired ITB's, but that can cost a whole lot of money.
For all general purposes though, those ITB's will be fun, you will still have the quicker response, and that is always fun, even at the expense of loosing power. Like I said at the beginning as well, I am not knocking your project, but I feel like you and the rest of the people that read this should be aware of that stuff.
Edit: Damn, I forgot about the injection points. ITB's work best with multi point injection. The position you have yours at now is good for about the first 3k RPM, a mid runner injection is good till about 3-6.5k RPM, and higher than that you actually want the injector facing into the throat of the ITB's. Chrome does not accommodate multi injectors, so the place you put them at is the best for what you have. If you try moving the injectors up, the fuel will puddle at idle and low RPM because there is not enough velocity at those RPM ranges to keep the fuel suspended, and this causes a lot of other problems.
Good luck to you.
Modified by Seeds at 1:23 PM 4/6/2007
Modified by Seeds at 1:24 PM 4/6/2007