
Vacuum infusion molding (VIP) Carbon Fiber - How to with pics and videos
 04-28-2006, 10:18 PM
#1
Thread Starter

Join Date: Oct 2002
Location: Eagle Mountain, UT, USA
Posts: 1,708
Likes: 0
Received 0 Likes
on
0 Posts
Ok I got sick of waiting for the other infusion post to come back to life. I am hosting all of this so pics and videos should be available all the time. This post will show you the basics of infusing carbon fiber plate. I thought this might be interesting to a few members here. We are using glass as our mold surface. If you want to learn infusion I suggest you start with simple plates and then move on to more complex parts. Don't feel bad if your first few parts suck and don't give up.
In the first video I basically have a clean sheet of 1/4" glass and has already been waxed several times so it has been seasoned and only needs one waxing. For fresh molds you want at least 3 coats of wax to ensure you don't have any spots that are wax free. I show waxing the glass but not removal of the wax. Waxing glass is pretty boring and tedious. After your mold is seasoned with #8 wax you don't have to let the wax fully setup before removal. We wait until it's almost dry which makes removing the glass easy and fast. We have had no release problems doing it this way. Anyway watch 30 seconds of the video to see how its done. One more thing, I drew a box on the glass with a sharpie pen to make sure I waxed the right area. This will come off with acetone if we want to change the plate size. Make sure at this point that there is no resin left from the last cure so the surface of your new parts comes out nice.
http://www.carbonfibertubeshop.com/waxing.mov 3.29MB
GEL COAT
Now it's time to lay down our polyester gel coat. At this point we have been brushing it on to keep things clean in the shop since our spray area is not really contained. For complex shapes you may need to spray but lets leave that out of the project for now since a brush is cheap and easy to start. We are using S249A poly surfboard laminating resin for it's uv properties and ease of use.
http://www.fiberglasssupply.co...9.pdf
In the video you can see I have taped off the box with masking tape to give me a clean resin line. This makes it easy to apply tacky tape to the glass to seal the vacuum bag later on but you can try it without if you want. We start by dumping a thin pool of resin down one side of our panel. I have noticed that the styrene in the resin can cause a ghost line at the site of the first resin drop. The line can only be seen in certain light and it is a direct impression of the pour spot. The ghost line does not exist on the rest of the part because we keep the resin moving across. When we are done this first pour will be cut away so we don't care about any ghost line there. I have seen this happen with epoxies as well, it may be a reaction between the resin and the wax but I'm not sure. Watch the vid and then continue on:
http://www.carbonfibertubeshop.com/gelcoat.mov 13.9 MB
A couple of points on brushing... You say whats to learn? Well plenty actually. You want to make sure you get the resin across the face of the part first and foremost. Then you can start evening things out. For our application it is important that the thickness of the plate comes out right so we have to be consistent on our gel coat application. Another reason you want uniform application of the gel or surface coat is that if you get a thin spot and try to release the part it will sometimes crack and/or leave a chunk of resin on the glass. I can assure you if this happens and you have released properly your gel is too thin. In fact even if this first coat is uniform and you try to build a plate about 75% of the time you will have problems. We try to shoot for about 10 mills for each gel coat layer and we apply two layers per part. If you were using an epoxy surface coat you could get away with one gel coat because epoxy is stiffer and stronger than most polyester resins. Anyway back to brushing. You want to brush all the way across the surface, do not start in the middle and brush out. With this resin you have about 12-13 mins before it gels at 74f. You want to avoid brushing so that you create air bubbles. When brushing the resin across initially you want to "push the pool" and don't over run your pool front ever. You want to push the pool until you have complete coverage. When brushing everything out smooth use just the weight of the brush and hold it at a pretty good angle. I am using a 3" horsehair brush which works well and is heavy enough to impart enough pressure.
A word about air bubbles for brushers. With this resin if you have any large air bubbles the will show up on the final part. About 5-10 minutes after the resin gels these bubbles will expand do to the exotherm of the resin which causes a small mound to stick up out of the gel coat. This has nothing to do with use temp or dirt in the resin. This is not a huge deal but what happens is when you lay carbon fabric on top of this bump and let it cure you will pull your panel off and there will be a distortion of the fabric. The front of the panel will be smooth to the touch but on the other side of the gel coat where that mound popped up there is now a dent which is visible on the first ply of fabric next to the gel coat. To avoid this mix your resin slowly and turn your mixing stick so there isn't a huge wake while pushing it through the resin. Hold it at just enough angle to be able to mix the resin no more. Mix 30 revs one way and 30 revs the other way and do not touch the bottom or sides of the cup. The resin turns from blue to greenish if mixed right. I say don't touch the sides and bottom because that tends to create bubbles. Once stage one mixing is done you can now hold your mixing stick against the side of the cup and turn the cup and then hit the bottom slowly. You must pull everything in from the sides and bottom of the cup. Wipe you stick off on the cup edge and mix 3o revs and your done. This is my way of keeping as few bubbles as possible from haunting me later. If your resin is cold it will take longer to mix. I have found this to be true with most resins.
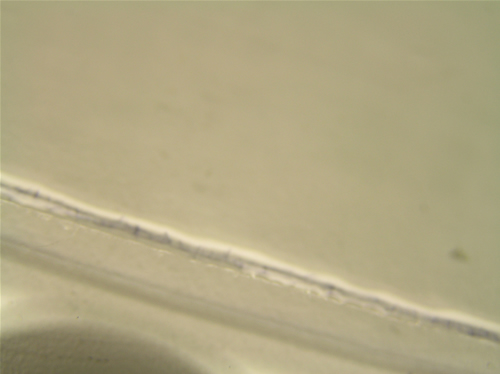
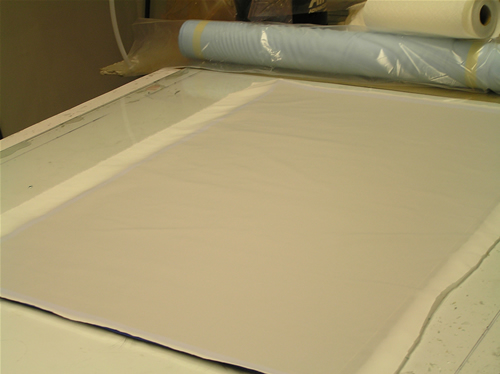
Here is a close-up shot of the gel.
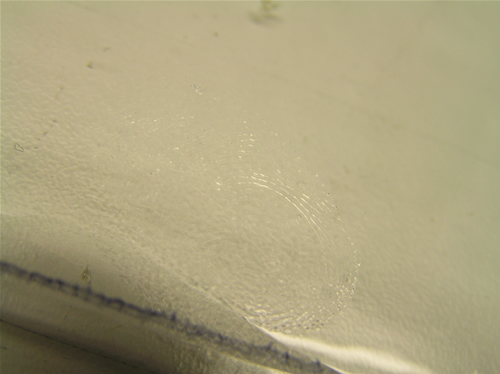
I wait about 50 mins to an hour to let this resin "B" stage. You will know your resin is at the "B" stage when you can touch a corner of it and no resin come off on your finger as shown in the pic below.
Now lay down another coat of gel as before. If you have a few bumps in your first gel layer now you can correct them and save the part. This next coat will mostly cover them up if done correctly. Now wait another hour and your ready to drop fabric down.
LAYUP
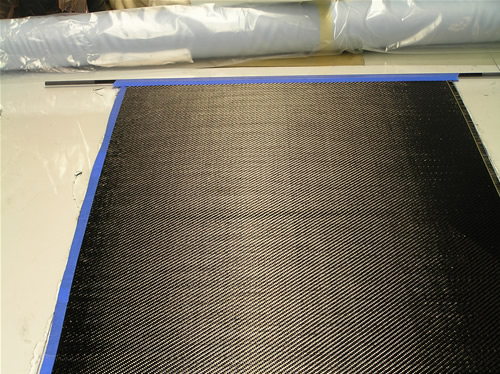
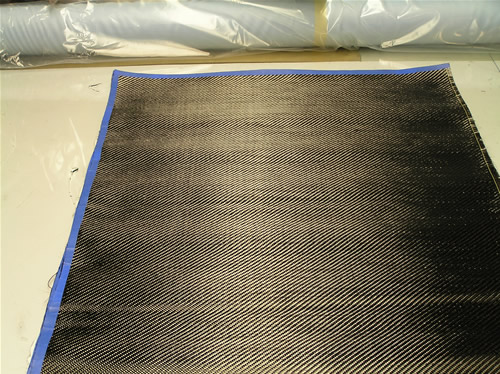
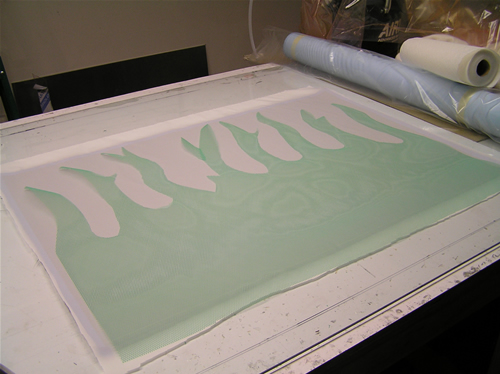
In this first pic you can see I laid down my first ply of 5.7 oz. twill. You don't have to tape the edge of the fabric but when this was taken we were. Without tape things tend to fray but we are careful now and we don't take time to tape. Also notice I taped 2 carbon fiber tubes to both side of the fiber scroll style. You have one shot to drop your material on straight and this does a great job. I never have any mis-aligned fiber tows. If your fabric is a loose weave this really gets tough and even holding it under its won weight distorts it. I have my favorite grade of material but with shortages I take what I can get. Another way to handle fiber placement issues would be to use a wax additive which will allow you to pick the fabric up after you drop it down and reposition but if you let it go to long before dropping your fabric you won't get the gel coat to stick to the laminating resin. I don't mess with it on flat panel.
I just cut the masking tape away from the tubes and then rub my material down to the gel coat. We are now ready for more plies of carbon and then or bagging stuff.
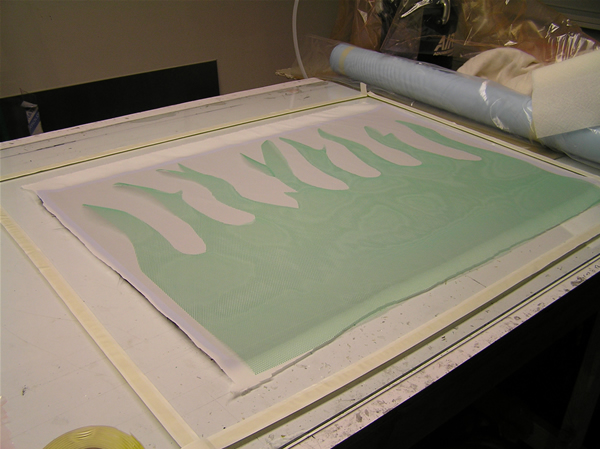
Next I cut a sheet of peel ply and lay it over the 6 plies of carbon fabric. Notice I have some extra near the top. I'll explain this shortly. This will keep all of our flow media and spiral wrap from sticking to the back of the carbon panel. It is coated with release from the factory. This also gives a uniform bond ready finish to the back of our part.
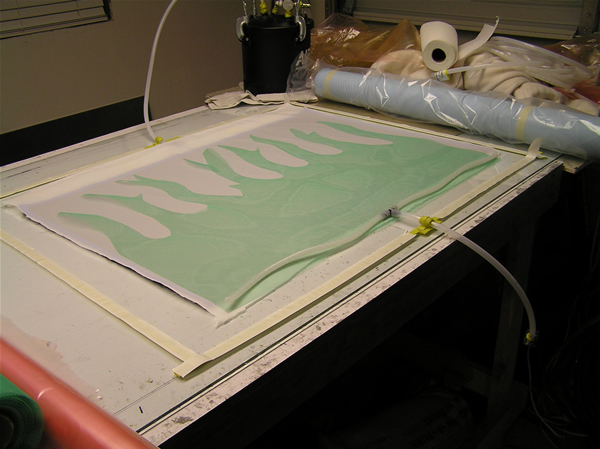
Now I add my flow media, green stuff over the peel ply. This is just gauged screen media that allows the resin to travel across the part and gravity then causes the resin to soak down through the laminate to the gel coat and bring everything together. I don't cover the entire back to keep the resin from flowing too fast through the part. Also I made the flame pattern just to add a cool impression to the back of the part. I can cover the entire part now but didn't used to do this. This created a perfect, uniform backside. If we didn't have the peel ply this flow media would be stuck to the carbon fiber after infusion and cure. Notice the flow media starts about an inch prior to the material. I do this so my spiral wrap doesn't dent the back of my part. The flow media and peel ply allow a pathway for resin to travel from my resin injection point through the rest of the panel. If I didn't care about leaving a small impression on the back of my part I could place a resin line in the center of the part and let the resin flow to the outside of the part but I would have to rearrange the vacuum lines to make this happen. On some parts it does not matter what the back looks like.
Now I've added my tacky tape to seal the vacuum bag which comes next. This stuff is like chewing gum in tape form and seals the bag completely. Make sure you wipe down the area where the tape goes. If you even have a stray carbon filament this can cause a pathway for air to get in the bag. With vacuum infusion it is critical that you have a perfect seal. With a regular vacuum bag some leak might not ruin a part but with infusion it will.
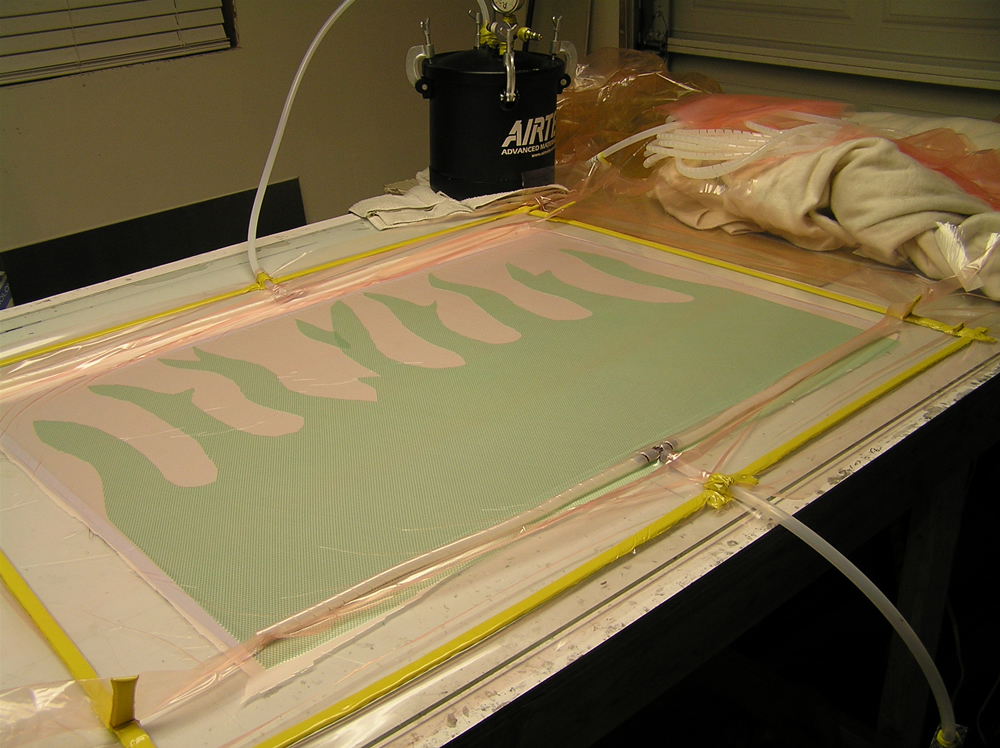
Here you can see I have all of my lines run. I have a resin line on the lower right hand side of this picture. The end of this line will be placed in a cup of resin and clamped off with a welders clamp until its time to infuse the part. I am use Polyethylene tubing with a nylon "T" and then electricians spiral wrap coming off both ends. The resin will fill to the end of these tubes and then spread across the panel. Notice on the left hand top side of the pic I have my corresponding vacuum lines set up the same way so that resin is drawn evenly across the part. Once the vacuum bag itself is placed on the part and vacuum is drawn this spiral wrap becomes tunnels for air or resin to travel through.
Now I place my bag over the part and seal it down. Notice I have rabbit ears in the bag so the bag is fairly loose to accommodate the bumps of the lines when vacuum is pulled. There is a lot I could write about bagging but the one thing I will say here is it took me a long time to figure out how to make a perfect bag. It will involve many hours and a few mistakes to get it right. The vacuum bag I use is slightly elastic so that helps make a good seal and is more forgiving. You must check to make sure the bagging film you are using is compatible with your resin system whether its PER,VER, EPOXY or other. Now we are ready to pull the air out of this bag. BTW - I made these last two pics extra large so you could see detail.
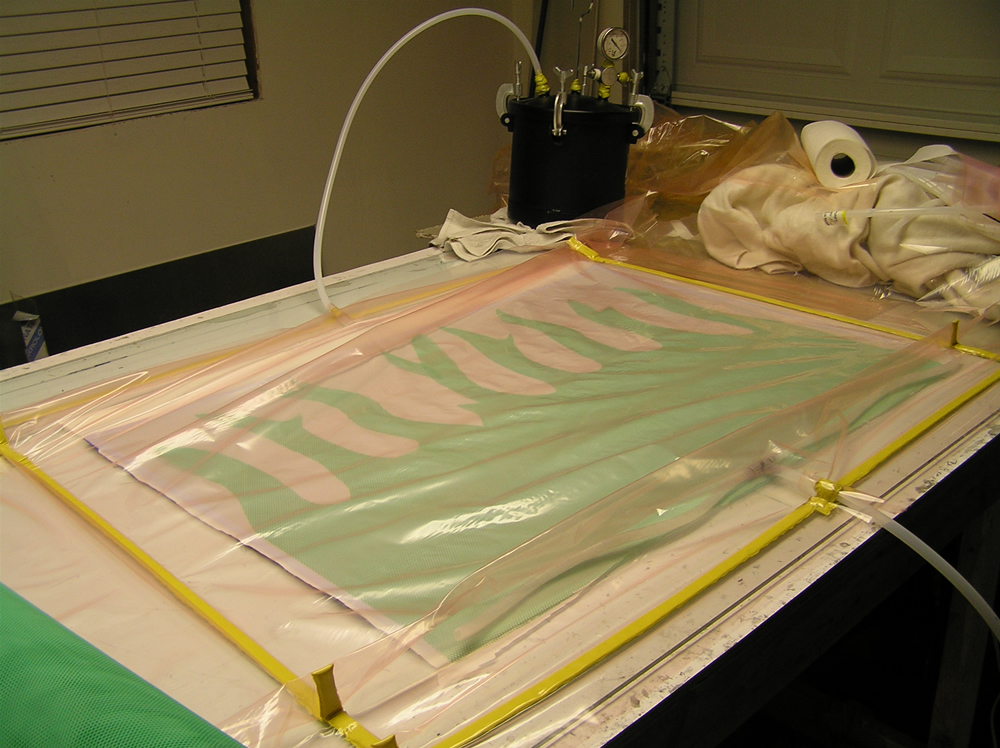
Here is the final shot prior to infusion. You can see full vacuum has been applied to this layup. I have gone around the perimeter making sure every spot is sealed. I always let the part sit under vacuum for 30 mins prior to infusing the part to ensure there are no leaks. If I loose any pressure at all in that 30 mins then I go over the bag again. I can usually get it on the first try but it wasn't always this way. Max vacuum that can be pulled at sea level is a little over 30" of mercury. This assumes you have a quality vacuum pump and no leaks. For every 1000 ft above sea level you loose about 1" of mercury vacuum since you have less atmosphere above you at higher elevation the pressure is less. I'm pretty sure that's how it works. I can pull nearly 27" of mercury on my gauge and I am almost exactly at 5000 ft above sea level. There can be some gauge error as well I'm sure. Let's get into the how to as seen in the video below. AS I mentioned before we have extra peel ply between the vacuum side of the plate and the vacuum T. When the resin has infused through the part it will have a tendency to continue moving even after the pump has been shut off and the resin line clamped. So the extra peel ply at the top (vacuum) side of the part is called a resin break. The resin will move very slowly through this and then gel before the resin hits the vacuum spiral wrap and or exit. By the time the resin gels it won't have enough time to get to the vacuum line and start sucking up the line this drying out the back of your part. A resin break is required on all infusion parts. If your sucking resin into the line you're doing it wrong. In any case in the video below you can't really see the welders clamp on the resin line but before we do anything we throw a clamp on there. Then when the resin line goes into our cup of premixed VER resin we can slowly unclamp it allowing resin to be drawn through the part. The resin is not injected although it might appear so. If the resin was injected into the part under positive pressure that would be called true RTM (resin transfer molding). Infusion is also called VARTM (vacuum assisted resin transfer molding) or VIP (vacuum infusion process). True VIP only uses vacuum to move the resin. Anyway as you will see in the video this plate infused in about 20 minutes. It's very cool to watch a part get built quickly like this even though you do put a lot of work in on the front end. With this process you don't have as much of a problem with VOC's (volatile organic compounds). A lot of large boats are now built with this method. Infusion patents have been around a long time so this is nothing new really. With typical wet layup methods you get about 50/50 fiber to resin ratio and with infusion 40/60 is not uncommon. I have even seen some aerospace stuff that was in the low 30's resin content. Since fiber is where the real strength is too much resin makes parts heavy and weak.
http://www.carbonfibertubeshop.com/infusion1.mov 28.2 MB
Hope you enjoyed the vid. I chopped it up so it wasn't as long. I forgot to mention what that black pressure pot was doing behind the layup. Some people might not know, it is a pressure pot and this is what keeps my vacuum pump from sucking in mixed resin. If resin goes up that line it drops into the pot instead of going directly to my pump and ruining it. Like I mentioned this doesn't happen much anymore but it sure helped when I was starting out. The pressure pot has a vac gauge and a quick connect line going back to my pump. Here is the pump I use:

Robinair 15600 6CFM
You can find specs on it here: http://www.racingcomposites.net/unt?id=473
Well that's about it. I left out a ton of stuff dealing with emergencies during infusion and how to deal with different materials. Infusion is so much like cooking where you find a recipe and you stick to it or pay the price. Infusion is just one way to build parts and I'm not going to say what is the best way to build parts but for many parts this makes sense and has a lot of advantages. I am going to write a short book on the subject that includes everything I have learned, sort of a getting started book because I have made lot's of mistakes that cost me lots of cash. If I had someone to show me it would have made things easier and cheaper. Hope you enjoyed the how to, feel free to ask any questions. I also have more info is available on my forum.
In the first video I basically have a clean sheet of 1/4" glass and has already been waxed several times so it has been seasoned and only needs one waxing. For fresh molds you want at least 3 coats of wax to ensure you don't have any spots that are wax free. I show waxing the glass but not removal of the wax. Waxing glass is pretty boring and tedious. After your mold is seasoned with #8 wax you don't have to let the wax fully setup before removal. We wait until it's almost dry which makes removing the glass easy and fast. We have had no release problems doing it this way. Anyway watch 30 seconds of the video to see how its done. One more thing, I drew a box on the glass with a sharpie pen to make sure I waxed the right area. This will come off with acetone if we want to change the plate size. Make sure at this point that there is no resin left from the last cure so the surface of your new parts comes out nice.
http://www.carbonfibertubeshop.com/waxing.mov 3.29MB
GEL COAT
Now it's time to lay down our polyester gel coat. At this point we have been brushing it on to keep things clean in the shop since our spray area is not really contained. For complex shapes you may need to spray but lets leave that out of the project for now since a brush is cheap and easy to start. We are using S249A poly surfboard laminating resin for it's uv properties and ease of use.
http://www.fiberglasssupply.co...9.pdf
In the video you can see I have taped off the box with masking tape to give me a clean resin line. This makes it easy to apply tacky tape to the glass to seal the vacuum bag later on but you can try it without if you want. We start by dumping a thin pool of resin down one side of our panel. I have noticed that the styrene in the resin can cause a ghost line at the site of the first resin drop. The line can only be seen in certain light and it is a direct impression of the pour spot. The ghost line does not exist on the rest of the part because we keep the resin moving across. When we are done this first pour will be cut away so we don't care about any ghost line there. I have seen this happen with epoxies as well, it may be a reaction between the resin and the wax but I'm not sure. Watch the vid and then continue on:
http://www.carbonfibertubeshop.com/gelcoat.mov 13.9 MB
A couple of points on brushing... You say whats to learn? Well plenty actually. You want to make sure you get the resin across the face of the part first and foremost. Then you can start evening things out. For our application it is important that the thickness of the plate comes out right so we have to be consistent on our gel coat application. Another reason you want uniform application of the gel or surface coat is that if you get a thin spot and try to release the part it will sometimes crack and/or leave a chunk of resin on the glass. I can assure you if this happens and you have released properly your gel is too thin. In fact even if this first coat is uniform and you try to build a plate about 75% of the time you will have problems. We try to shoot for about 10 mills for each gel coat layer and we apply two layers per part. If you were using an epoxy surface coat you could get away with one gel coat because epoxy is stiffer and stronger than most polyester resins. Anyway back to brushing. You want to brush all the way across the surface, do not start in the middle and brush out. With this resin you have about 12-13 mins before it gels at 74f. You want to avoid brushing so that you create air bubbles. When brushing the resin across initially you want to "push the pool" and don't over run your pool front ever. You want to push the pool until you have complete coverage. When brushing everything out smooth use just the weight of the brush and hold it at a pretty good angle. I am using a 3" horsehair brush which works well and is heavy enough to impart enough pressure.
A word about air bubbles for brushers. With this resin if you have any large air bubbles the will show up on the final part. About 5-10 minutes after the resin gels these bubbles will expand do to the exotherm of the resin which causes a small mound to stick up out of the gel coat. This has nothing to do with use temp or dirt in the resin. This is not a huge deal but what happens is when you lay carbon fabric on top of this bump and let it cure you will pull your panel off and there will be a distortion of the fabric. The front of the panel will be smooth to the touch but on the other side of the gel coat where that mound popped up there is now a dent which is visible on the first ply of fabric next to the gel coat. To avoid this mix your resin slowly and turn your mixing stick so there isn't a huge wake while pushing it through the resin. Hold it at just enough angle to be able to mix the resin no more. Mix 30 revs one way and 30 revs the other way and do not touch the bottom or sides of the cup. The resin turns from blue to greenish if mixed right. I say don't touch the sides and bottom because that tends to create bubbles. Once stage one mixing is done you can now hold your mixing stick against the side of the cup and turn the cup and then hit the bottom slowly. You must pull everything in from the sides and bottom of the cup. Wipe you stick off on the cup edge and mix 3o revs and your done. This is my way of keeping as few bubbles as possible from haunting me later. If your resin is cold it will take longer to mix. I have found this to be true with most resins.
Here is a close-up shot of the gel.
I wait about 50 mins to an hour to let this resin "B" stage. You will know your resin is at the "B" stage when you can touch a corner of it and no resin come off on your finger as shown in the pic below.
Now lay down another coat of gel as before. If you have a few bumps in your first gel layer now you can correct them and save the part. This next coat will mostly cover them up if done correctly. Now wait another hour and your ready to drop fabric down.
LAYUP
In this first pic you can see I laid down my first ply of 5.7 oz. twill. You don't have to tape the edge of the fabric but when this was taken we were. Without tape things tend to fray but we are careful now and we don't take time to tape. Also notice I taped 2 carbon fiber tubes to both side of the fiber scroll style. You have one shot to drop your material on straight and this does a great job. I never have any mis-aligned fiber tows. If your fabric is a loose weave this really gets tough and even holding it under its won weight distorts it. I have my favorite grade of material but with shortages I take what I can get. Another way to handle fiber placement issues would be to use a wax additive which will allow you to pick the fabric up after you drop it down and reposition but if you let it go to long before dropping your fabric you won't get the gel coat to stick to the laminating resin. I don't mess with it on flat panel.
I just cut the masking tape away from the tubes and then rub my material down to the gel coat. We are now ready for more plies of carbon and then or bagging stuff.
Next I cut a sheet of peel ply and lay it over the 6 plies of carbon fabric. Notice I have some extra near the top. I'll explain this shortly. This will keep all of our flow media and spiral wrap from sticking to the back of the carbon panel. It is coated with release from the factory. This also gives a uniform bond ready finish to the back of our part.
Now I add my flow media, green stuff over the peel ply. This is just gauged screen media that allows the resin to travel across the part and gravity then causes the resin to soak down through the laminate to the gel coat and bring everything together. I don't cover the entire back to keep the resin from flowing too fast through the part. Also I made the flame pattern just to add a cool impression to the back of the part. I can cover the entire part now but didn't used to do this. This created a perfect, uniform backside. If we didn't have the peel ply this flow media would be stuck to the carbon fiber after infusion and cure. Notice the flow media starts about an inch prior to the material. I do this so my spiral wrap doesn't dent the back of my part. The flow media and peel ply allow a pathway for resin to travel from my resin injection point through the rest of the panel. If I didn't care about leaving a small impression on the back of my part I could place a resin line in the center of the part and let the resin flow to the outside of the part but I would have to rearrange the vacuum lines to make this happen. On some parts it does not matter what the back looks like.
Now I've added my tacky tape to seal the vacuum bag which comes next. This stuff is like chewing gum in tape form and seals the bag completely. Make sure you wipe down the area where the tape goes. If you even have a stray carbon filament this can cause a pathway for air to get in the bag. With vacuum infusion it is critical that you have a perfect seal. With a regular vacuum bag some leak might not ruin a part but with infusion it will.
Here you can see I have all of my lines run. I have a resin line on the lower right hand side of this picture. The end of this line will be placed in a cup of resin and clamped off with a welders clamp until its time to infuse the part. I am use Polyethylene tubing with a nylon "T" and then electricians spiral wrap coming off both ends. The resin will fill to the end of these tubes and then spread across the panel. Notice on the left hand top side of the pic I have my corresponding vacuum lines set up the same way so that resin is drawn evenly across the part. Once the vacuum bag itself is placed on the part and vacuum is drawn this spiral wrap becomes tunnels for air or resin to travel through.
Now I place my bag over the part and seal it down. Notice I have rabbit ears in the bag so the bag is fairly loose to accommodate the bumps of the lines when vacuum is pulled. There is a lot I could write about bagging but the one thing I will say here is it took me a long time to figure out how to make a perfect bag. It will involve many hours and a few mistakes to get it right. The vacuum bag I use is slightly elastic so that helps make a good seal and is more forgiving. You must check to make sure the bagging film you are using is compatible with your resin system whether its PER,VER, EPOXY or other. Now we are ready to pull the air out of this bag. BTW - I made these last two pics extra large so you could see detail.
Here is the final shot prior to infusion. You can see full vacuum has been applied to this layup. I have gone around the perimeter making sure every spot is sealed. I always let the part sit under vacuum for 30 mins prior to infusing the part to ensure there are no leaks. If I loose any pressure at all in that 30 mins then I go over the bag again. I can usually get it on the first try but it wasn't always this way. Max vacuum that can be pulled at sea level is a little over 30" of mercury. This assumes you have a quality vacuum pump and no leaks. For every 1000 ft above sea level you loose about 1" of mercury vacuum since you have less atmosphere above you at higher elevation the pressure is less. I'm pretty sure that's how it works. I can pull nearly 27" of mercury on my gauge and I am almost exactly at 5000 ft above sea level. There can be some gauge error as well I'm sure. Let's get into the how to as seen in the video below. AS I mentioned before we have extra peel ply between the vacuum side of the plate and the vacuum T. When the resin has infused through the part it will have a tendency to continue moving even after the pump has been shut off and the resin line clamped. So the extra peel ply at the top (vacuum) side of the part is called a resin break. The resin will move very slowly through this and then gel before the resin hits the vacuum spiral wrap and or exit. By the time the resin gels it won't have enough time to get to the vacuum line and start sucking up the line this drying out the back of your part. A resin break is required on all infusion parts. If your sucking resin into the line you're doing it wrong. In any case in the video below you can't really see the welders clamp on the resin line but before we do anything we throw a clamp on there. Then when the resin line goes into our cup of premixed VER resin we can slowly unclamp it allowing resin to be drawn through the part. The resin is not injected although it might appear so. If the resin was injected into the part under positive pressure that would be called true RTM (resin transfer molding). Infusion is also called VARTM (vacuum assisted resin transfer molding) or VIP (vacuum infusion process). True VIP only uses vacuum to move the resin. Anyway as you will see in the video this plate infused in about 20 minutes. It's very cool to watch a part get built quickly like this even though you do put a lot of work in on the front end. With this process you don't have as much of a problem with VOC's (volatile organic compounds). A lot of large boats are now built with this method. Infusion patents have been around a long time so this is nothing new really. With typical wet layup methods you get about 50/50 fiber to resin ratio and with infusion 40/60 is not uncommon. I have even seen some aerospace stuff that was in the low 30's resin content. Since fiber is where the real strength is too much resin makes parts heavy and weak.
http://www.carbonfibertubeshop.com/infusion1.mov 28.2 MB
Hope you enjoyed the vid. I chopped it up so it wasn't as long. I forgot to mention what that black pressure pot was doing behind the layup. Some people might not know, it is a pressure pot and this is what keeps my vacuum pump from sucking in mixed resin. If resin goes up that line it drops into the pot instead of going directly to my pump and ruining it. Like I mentioned this doesn't happen much anymore but it sure helped when I was starting out. The pressure pot has a vac gauge and a quick connect line going back to my pump. Here is the pump I use:
Robinair 15600 6CFM
You can find specs on it here: http://www.racingcomposites.net/unt?id=473
Well that's about it. I left out a ton of stuff dealing with emergencies during infusion and how to deal with different materials. Infusion is so much like cooking where you find a recipe and you stick to it or pay the price. Infusion is just one way to build parts and I'm not going to say what is the best way to build parts but for many parts this makes sense and has a lot of advantages. I am going to write a short book on the subject that includes everything I have learned, sort of a getting started book because I have made lot's of mistakes that cost me lots of cash. If I had someone to show me it would have made things easier and cheaper. Hope you enjoyed the how to, feel free to ask any questions. I also have more info is available on my forum.


Thread
Thread Starter
Forum
Replies
Last Post
streetlights
Acura Integra
26
12-13-2003 09:19 AM
N24RE
Road Racing / Autocross & Time Attack
15
09-30-2002 08:43 PM