
Now for something different. 1986 Prelude 2.0 Si Retromod
 02-15-2013, 05:24 PM
#51
Honda-Tech Member
Thread Starter
Join Date: Mar 2003
Location: NY
Posts: 203
Likes: 0
Received 0 Likes
on
0 Posts
Sooo jealous it really is the part I want most without a doubt, although i would settling for the exhaust or front bumper :lol:
 02-15-2013, 05:39 PM
#53
Honda-Tech Member
Thread Starter
Join Date: Mar 2003
Location: NY
Posts: 203
Likes: 0
Received 0 Likes
on
0 Posts
I've been debating having a replica of the header made to the same spec since it really is just pieces of metal bent and welded. Only thing is getting a good enough picture to work out the little details (badging and markings...etc.).
Might do it if I ever get a good enough example to work from as the only brochure I have is the one with small pictures. There is another version of the prelude mugen brochure going around but I don't know what that one looks like as i'v only seen the cover.
Might do it if I ever get a good enough example to work from as the only brochure I have is the one with small pictures. There is another version of the prelude mugen brochure going around but I don't know what that one looks like as i'v only seen the cover.
02-15-2013, 05:44 PM
#54
Honda-Tech Member

and not to forget the race cylinder head!
yeah that may be quite difficult. not a bad idea though.
yeah that may be quite difficult. not a bad idea though.
02-16-2013, 02:54 PM
#55
Honda-Tech Member
Thread Starter
Join Date: Mar 2003
Location: NY
Posts: 203
Likes: 0
Received 0 Likes
on
0 Posts
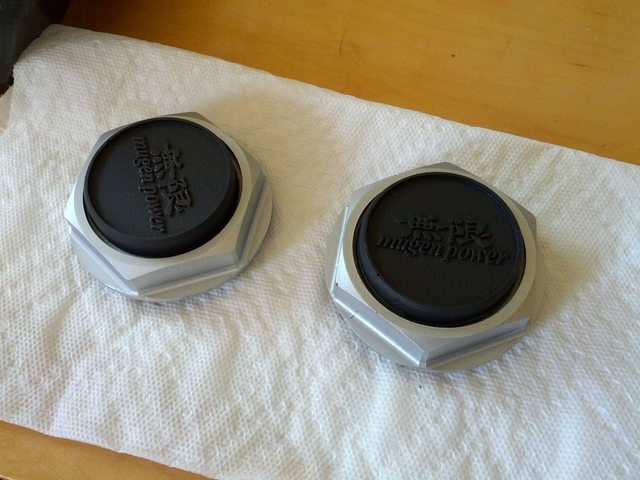
Ok, so the brand new set of covers was of course sold :lol: luckily the dude had another set of near mint condition. So considering these are still in MUCH better shape than the ones I already currently own i decided to go with them.
will be shipping out on monday so I should have them in a week or so. Still debating whether or not the sell the set I have now or just hold onto them.
will be shipping out on monday so I should have them in a week or so. Still debating whether or not the sell the set I have now or just hold onto them.
Last edited by XGRaViSmOrSX; 04-02-2013 at 12:59 PM.
02-28-2013, 06:28 PM
#56
Honda-Tech Member
Thread Starter
Join Date: Mar 2003
Location: NY
Posts: 203
Likes: 0
Received 0 Likes
on
0 Posts
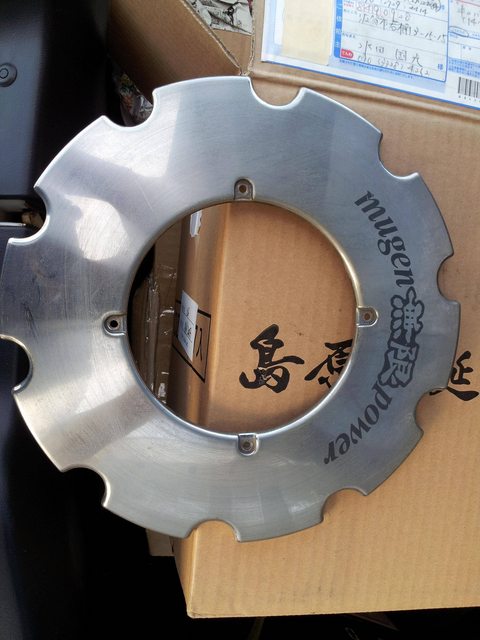
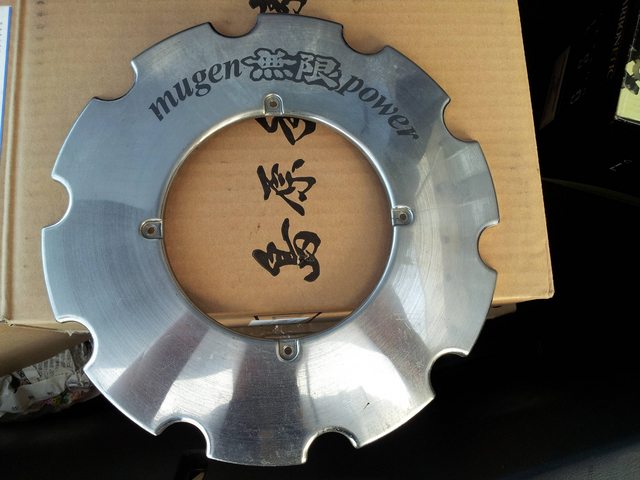
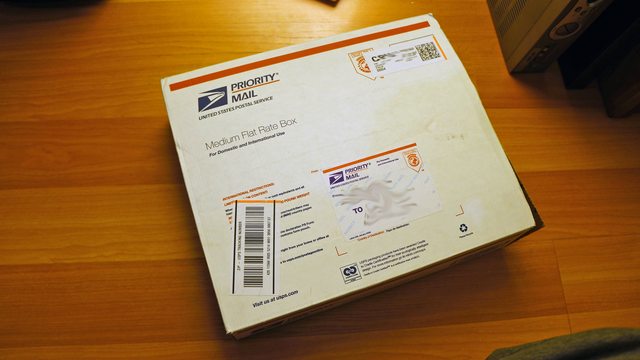
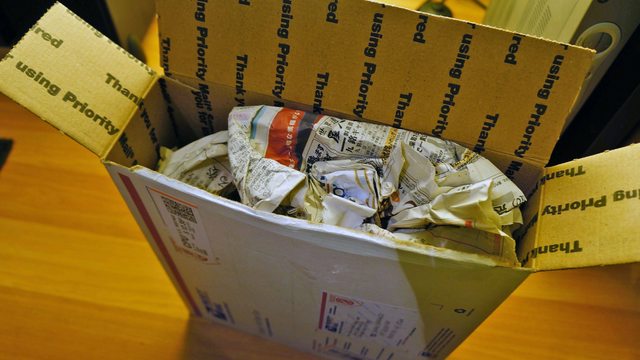
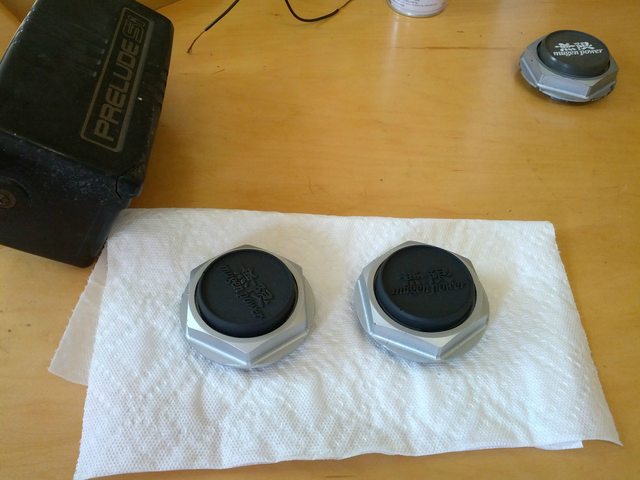
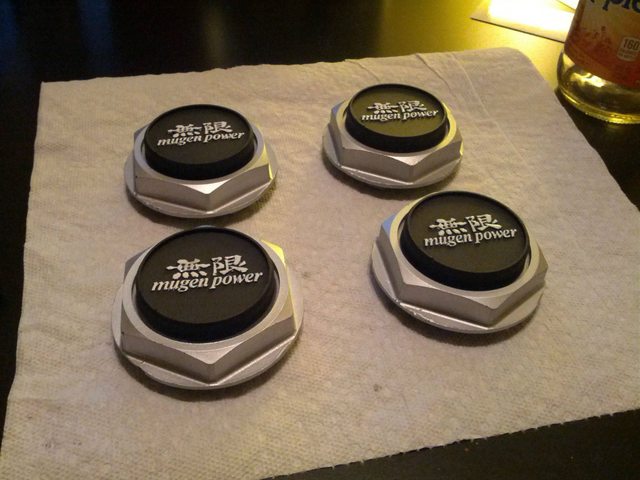
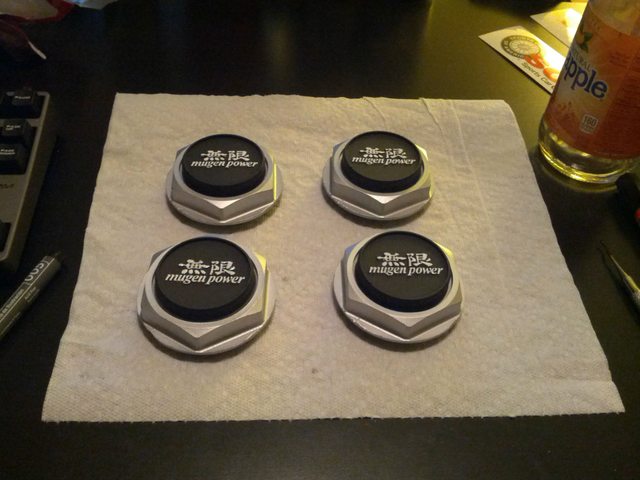
Finally! a package came in the mail:
what could it be?
oh, yea. lets get em unwrapped!
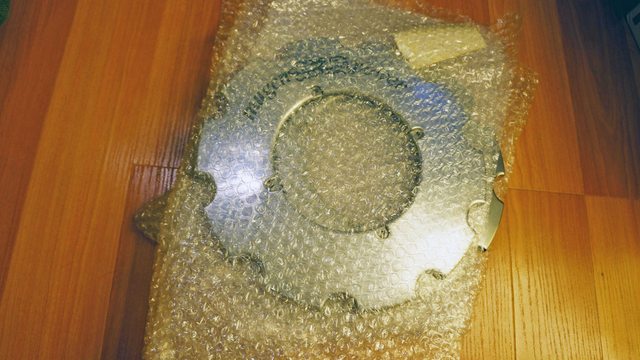
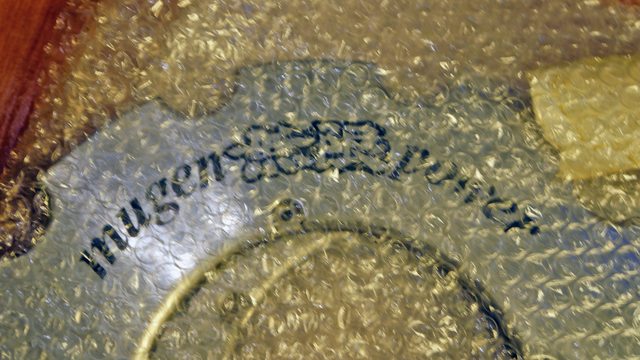
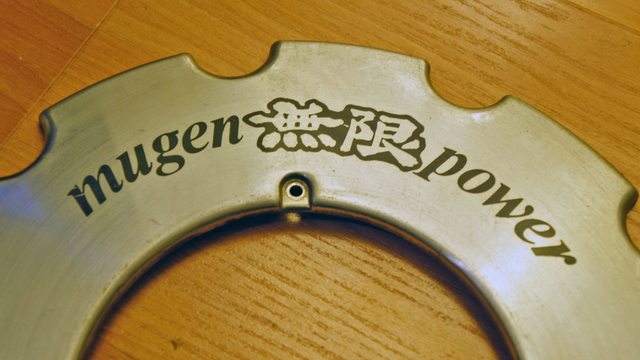
close up:
unwrapped and breathing
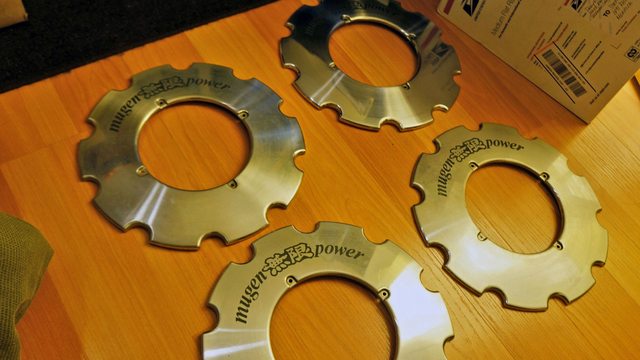
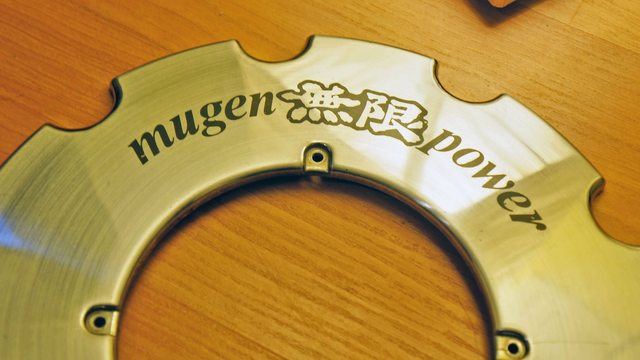
after unwrapping i noticed they needed to be polished up a bit. so i spent an hour or so just giving them a quick hand polish.
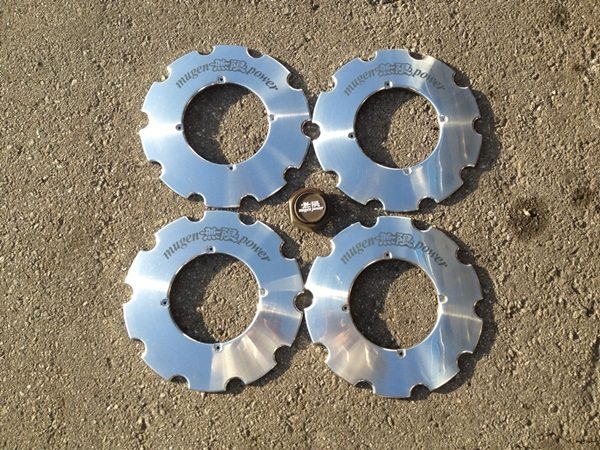
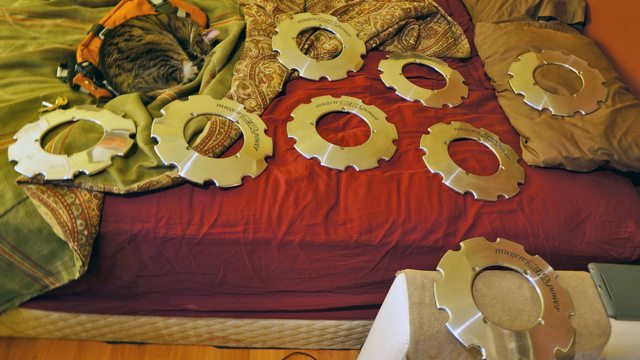
and a quick shot i took after laying both sets out trying to figure out which are the top 4.
what could it be?
oh, yea. lets get em unwrapped!
close up:
unwrapped and breathing
after unwrapping i noticed they needed to be polished up a bit. so i spent an hour or so just giving them a quick hand polish.
and a quick shot i took after laying both sets out trying to figure out which are the top 4.
Last edited by XGRaViSmOrSX; 04-02-2013 at 01:01 PM.
03-13-2013, 07:25 PM
#58
Honda-Tech Member

Join Date: Feb 2013
Posts: 50
Likes: 0
Received 0 Likes
on
0 Posts
wow! what a great car! very tasteful mods too! I'm 28 years old, seeing this takes me back to my earliest car memories. My dad had an 85 model with a sweet chrome trunk rack.
03-14-2013, 06:31 AM
#59
Honda-Tech Member
Thread Starter
Join Date: Mar 2003
Location: NY
Posts: 203
Likes: 0
Received 0 Likes
on
0 Posts
Just turned 29 recently myself and that was one of the reasons I couldn't turn this car up. Remember this car when I was younger as being like a super sports car in my eyes. From the crazy spoiler off the back and low front end it just looked so cool. Also remember it as the first can I went 100mph in. Dad opened the sunroof so I could stick my fingers out to see what 100mph wind felt like :lol: Too bad the car met it's demise at the hands of a drunk driver.
04-02-2013, 01:13 PM
#60
Honda-Tech Member
Thread Starter
Join Date: Mar 2003
Location: NY
Posts: 203
Likes: 0
Received 0 Likes
on
0 Posts
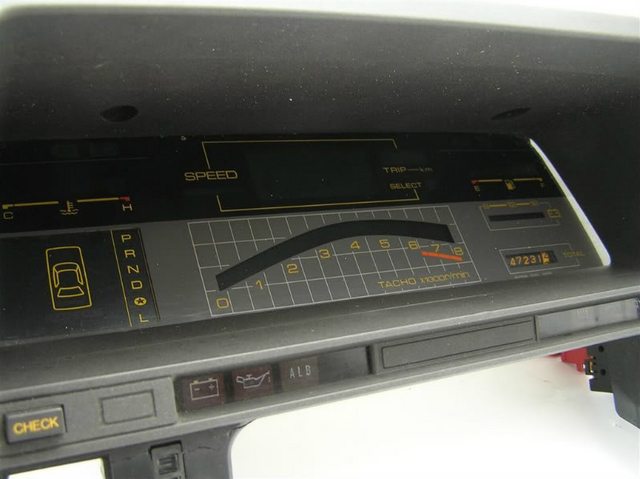
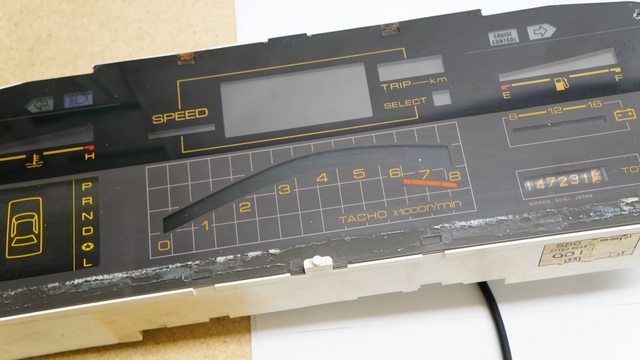
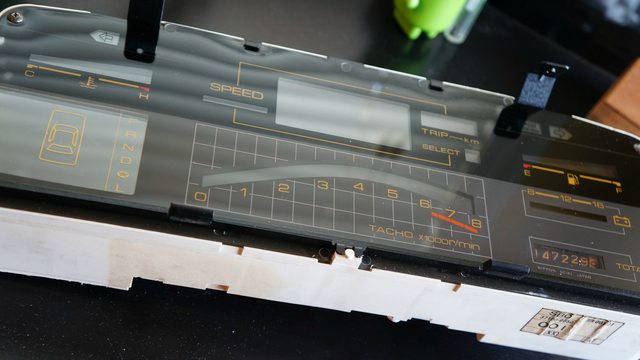
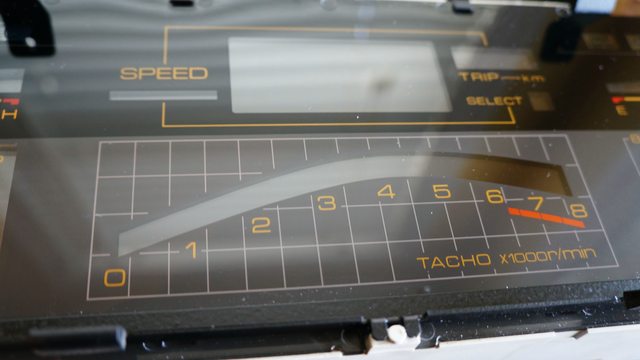
I'm finally getting ready to try and put this digidash in. The thing needed a bit of work in terms of cleaning up, but aside from that it was in fairly good shape and not missing anything.
The shroud was cracked so i'm currently looking into finding one off a junked 2g.
The instrument panel itself was easy to take apart, just requiring 4 screws
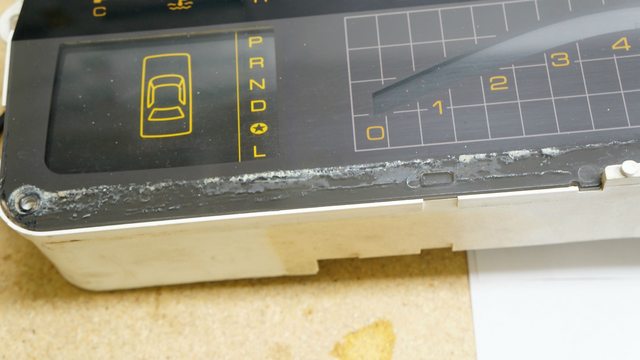
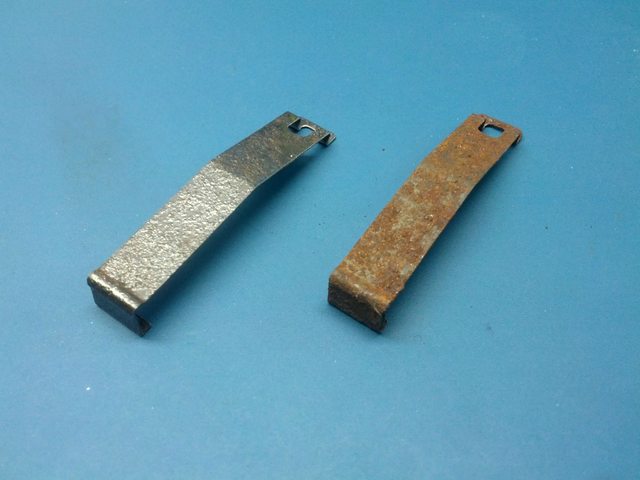
as you can see there was a bit of corrosive residue left behind from the bracket that has oxidized. I was going to use a finishing compound to basically buff out all the scratches and corrosion on the face.
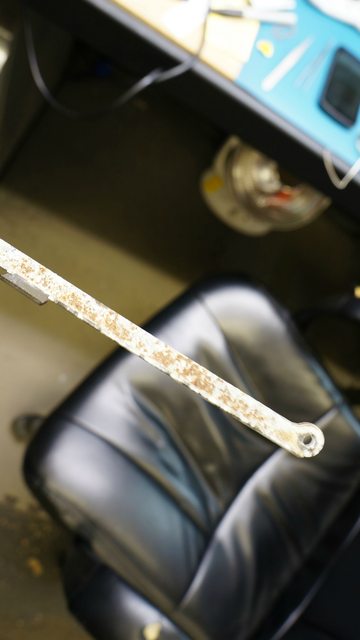
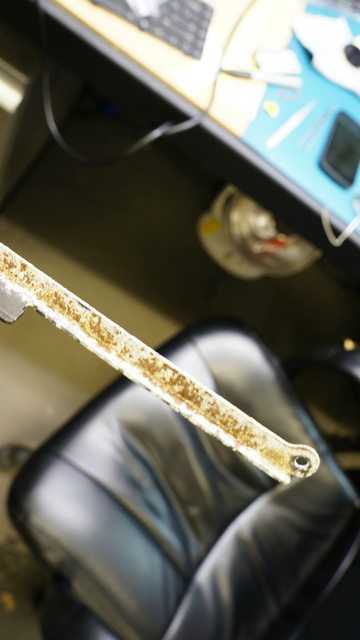
lower bracket was oxidized as well as the retaining clips and upper mounting bracket. all has to be sanded down. I just sued a dremel with a wire brush attachment to get rid of most of the corrosion.
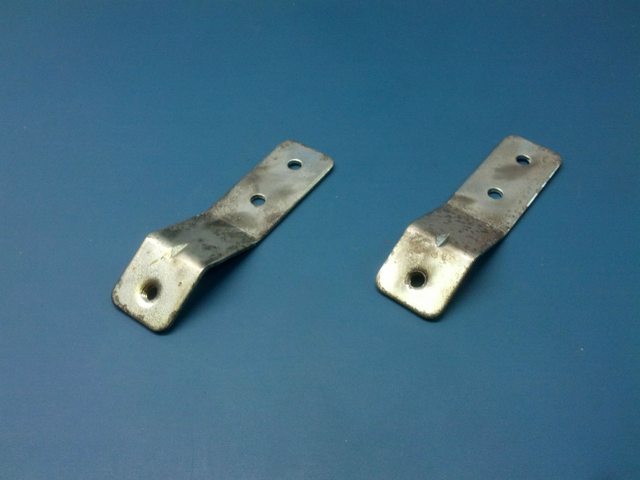
Then each piece after being cleaning was sprayed with some self etching primer and flat black paint to just give it some protection so it hopefully holds up for another 20+ years.
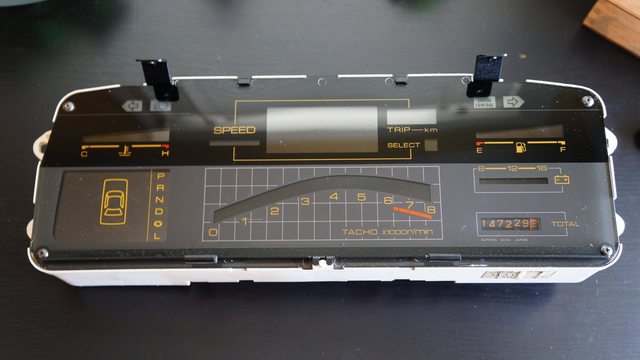
full shot, dust everywhere.
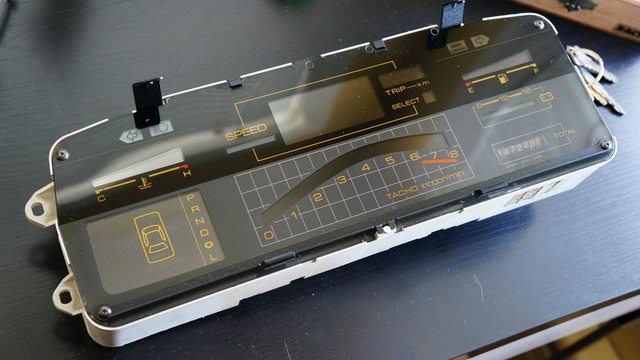
Still need to do a few things here and there but for the most part it is ready to go. Only thing now is to find the pin outs from the 83-85 dx cluster and the 86-87 si cluster so I can make a conversion harness so this thing is plug and play.
The shroud was cracked so i'm currently looking into finding one off a junked 2g.
The instrument panel itself was easy to take apart, just requiring 4 screws
as you can see there was a bit of corrosive residue left behind from the bracket that has oxidized. I was going to use a finishing compound to basically buff out all the scratches and corrosion on the face.
lower bracket was oxidized as well as the retaining clips and upper mounting bracket. all has to be sanded down. I just sued a dremel with a wire brush attachment to get rid of most of the corrosion.
Then each piece after being cleaning was sprayed with some self etching primer and flat black paint to just give it some protection so it hopefully holds up for another 20+ years.
full shot, dust everywhere.
Still need to do a few things here and there but for the most part it is ready to go. Only thing now is to find the pin outs from the 83-85 dx cluster and the 86-87 si cluster so I can make a conversion harness so this thing is plug and play.
04-02-2013, 09:35 PM
#61
Honda-Tech Member
Join Date: Mar 2013
Location: The Evergreen State
Posts: 53
Likes: 0
Received 0 Likes
on
0 Posts
I gotta say I don't think I have been more upset with a thread when I came to the realization that this was only three pages long!! LOL! I wanted so much more, well this is definitely one I will be following! Great build man I am loving every aspect of it so far! this is up there with a guy I know that did a frame off resto of an 86 Civic Si that was second to none... keep it up!
04-14-2013, 07:11 PM
#63
Honda-Tech Member
Thread Starter
Join Date: Mar 2003
Location: NY
Posts: 203
Likes: 0
Received 0 Likes
on
0 Posts
Just picked up a set of replica center caps and replica aero disk decals. Figure this will allow me to keep the center caps on the car all the time without fear of losing one of the originals.

and here is a pic of the replica decals i'm going to use to clean up my "bad" set of aero disks.

should have them within the week and probably spend the weekend working on the wheels.
Going to my friends shop this week also, to try and nail down how were going to go about getting this digidash in. Getting super excited now that it's finally getting close. Also the Mugen rear aero spoiler is going to be refinished with a new boot lid as the current one it's mounted to is trash and the spoiler had a rough winter last year :lol:
and here is a pic of the replica decals i'm going to use to clean up my "bad" set of aero disks.
should have them within the week and probably spend the weekend working on the wheels.
Going to my friends shop this week also, to try and nail down how were going to go about getting this digidash in. Getting super excited now that it's finally getting close. Also the Mugen rear aero spoiler is going to be refinished with a new boot lid as the current one it's mounted to is trash and the spoiler had a rough winter last year :lol:
05-01-2013, 08:12 AM
#64
Honda-Tech Member
Thread Starter
Join Date: Mar 2003
Location: NY
Posts: 203
Likes: 0
Received 0 Likes
on
0 Posts
time for another update:
Finally got my replica center caps for the cf-48's in the mail. They needed a bit of work to be put on the car.
Here is how the caps started out after a quick spray of "rubber black" the lettering was originally already touched up in white:
Here is a shot of one of my less than spectacular original caps:

After the first step of getting some paint on the center portion of the caps I made a mask for the center so I could paint the sides:
Pretty simple but effective.
The lettering still needed to be done after the initial paint work was done. Came out better then I expected. You can also see some of the white lettering showing through the centers paint but it won't matter after the lettering it repainted in white.
The lettering was the hardest part and took the longest. The paint pen I used was good but I still had overflow issues and the the spaces in between some of the kanji and letters got paint in them. So I had to then go back and use a touch up pen to go over the overflow in black. Not a perfect job but for a pair of replica's they are passable.
These things are LOCKED into the wheel :lol: the extra reinforcement done on them by the maker was super tough to get them in. Just let them sit in hot water for a few mins and they clicked in with a nice hardy pop!
I'll get some more pics in the daylight but they look super good and it's nice to finally have some caps I can run everyday without fear of losing an original cap and still have the look of a finished wheel.
Finally got my replica center caps for the cf-48's in the mail. They needed a bit of work to be put on the car.
Here is how the caps started out after a quick spray of "rubber black" the lettering was originally already touched up in white:
Here is a shot of one of my less than spectacular original caps:
After the first step of getting some paint on the center portion of the caps I made a mask for the center so I could paint the sides:
Pretty simple but effective.
The lettering still needed to be done after the initial paint work was done. Came out better then I expected. You can also see some of the white lettering showing through the centers paint but it won't matter after the lettering it repainted in white.
The lettering was the hardest part and took the longest. The paint pen I used was good but I still had overflow issues and the the spaces in between some of the kanji and letters got paint in them. So I had to then go back and use a touch up pen to go over the overflow in black. Not a perfect job but for a pair of replica's they are passable.
These things are LOCKED into the wheel :lol: the extra reinforcement done on them by the maker was super tough to get them in. Just let them sit in hot water for a few mins and they clicked in with a nice hardy pop!
I'll get some more pics in the daylight but they look super good and it's nice to finally have some caps I can run everyday without fear of losing an original cap and still have the look of a finished wheel.
05-01-2013, 05:08 PM
#65
Honda-Tech Member
This. Man, that would be AWESOME!
This is my new favorite build. You, clearly, have an eye for detail. Meticulous. Very impressive. Keep it up, and show these guys how to get it done "OG style" :D
 I picked up a set of the caps and badges too. Keep up the good work. I'm subscribed
  05-20-2013, 04:56 PM
#67
Honda-Tech Member
Thread Starter
Join Date: Mar 2003
Location: NY
Posts: 203
Likes: 0
Received 0 Likes
on
0 Posts
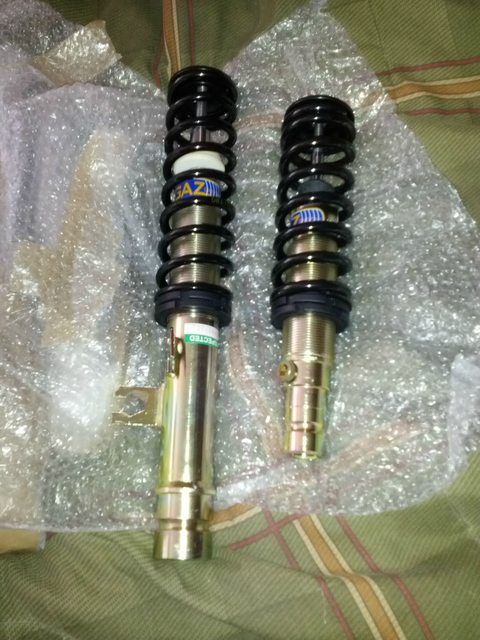
Just placed an order with Gaz shocks on full coil over suspension. Gonna take about 3-4 weeks to be made and shipped. Was gonna buy a set from another 2G dude in the UK but he flaked and was asking a bit much anyways, so I bought new.
Here are some pics of that other guys set up to give an idea of what they look like/build quality.


Hopefully will have this old man sittin ready to pounce in about a month. updates as I go.
Here are some pics of that other guys set up to give an idea of what they look like/build quality.
Hopefully will have this old man sittin ready to pounce in about a month. updates as I go.
06-11-2013, 10:57 AM
#68
Honda-Tech Member
Thread Starter
Join Date: Mar 2003
Location: NY
Posts: 203
Likes: 0
Received 0 Likes
on
0 Posts
Arrived sooner than expected! actually I missed it the first day since I had to sign for it and slept through the fed ex man arriving.


GAZ Suspension fully wrapped and ready to be opened
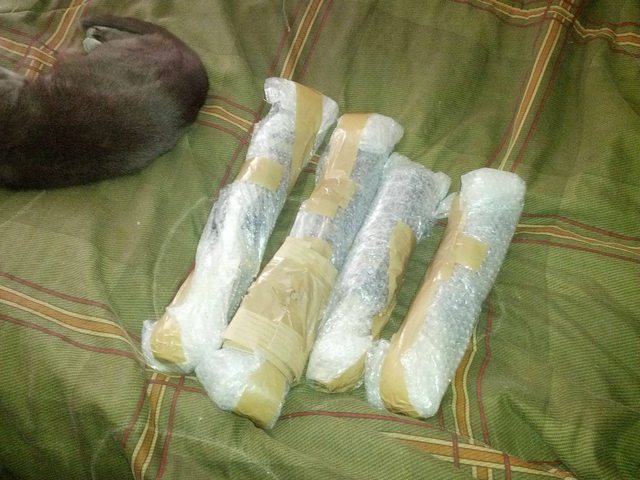
spoke to a local shop about doing the install since honestly i'm not looking forward to the almost 30 year old components that are on there and the potential pain in the *** moments that are going to arise. Should be slammed and aligned by the end of the week.
more pics incoming soon!
GAZ Suspension fully wrapped and ready to be opened
spoke to a local shop about doing the install since honestly i'm not looking forward to the almost 30 year old components that are on there and the potential pain in the *** moments that are going to arise. Should be slammed and aligned by the end of the week.
more pics incoming soon!
06-18-2013, 07:30 PM
#71
Honda-Tech Member
Thread Starter
Join Date: Mar 2003
Location: NY
Posts: 203
Likes: 0
Received 0 Likes
on
0 Posts
finally got these bitches on today. took about 5 hours but all in all went surprisingly well.
I'm probably going to be going about 1-2 inches lower than it sits now but i just wanted to lower it a bit and see how it handles before i go too low :lol:
some before shots:
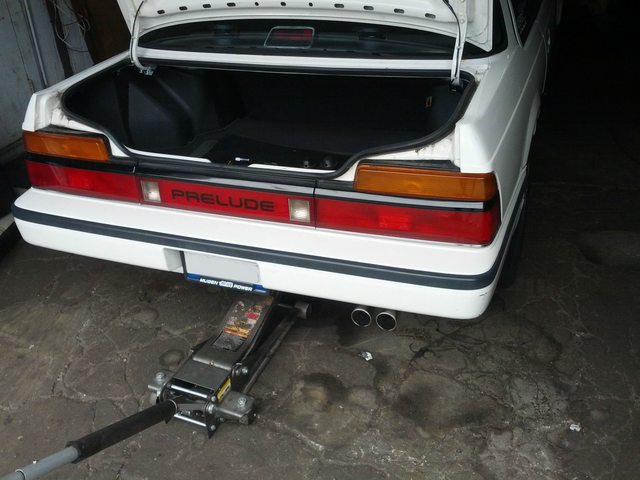
lifting the car off the ground (still love that center jack point lol)
figured i would pile stuff in the trunk

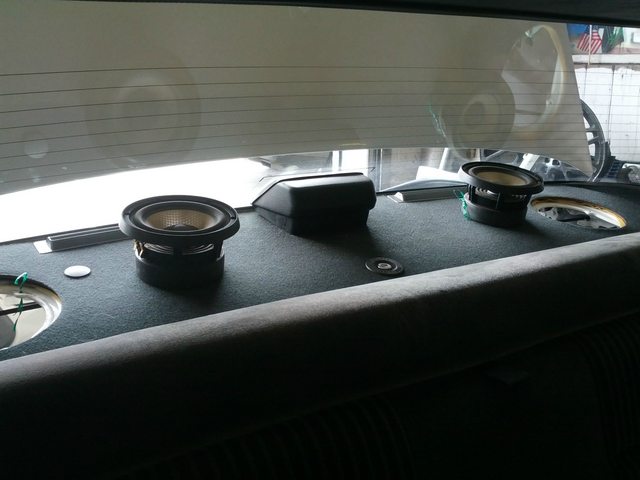
rear deck speakers removed to access top of strut towers
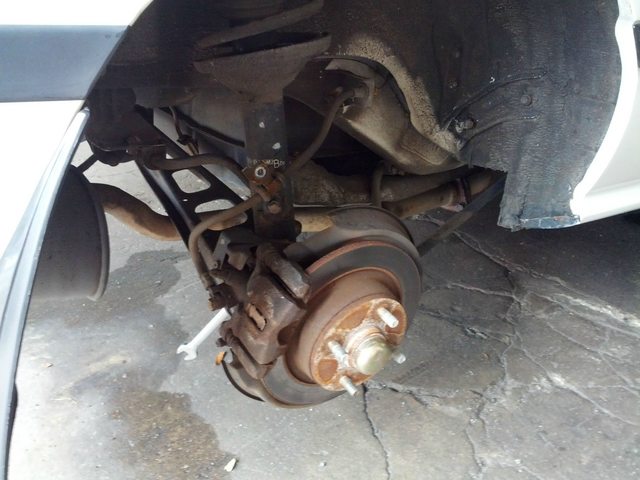
pretty clean for an almost 30 years old car
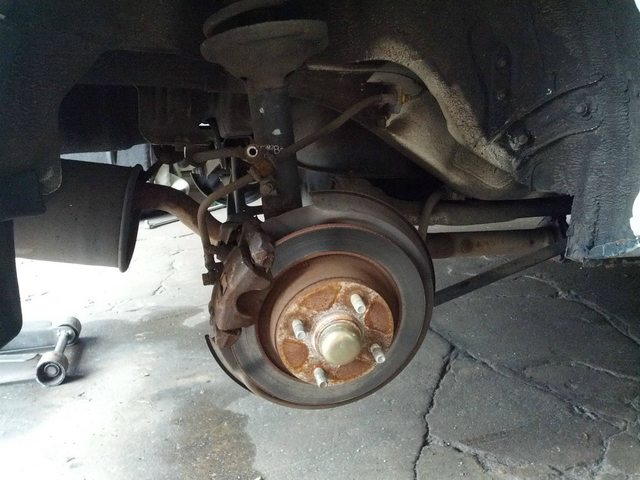
the first one was a pain in the ***. dropped the exhaust down a bit but then figured out it was just easier to remove the sway bar bracket to free up some clearance.
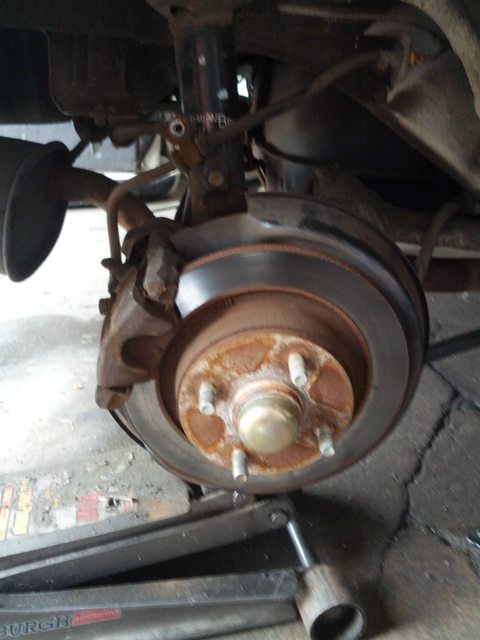
figuring out which side was which (one of those brackets has no use? so we winged it)

here it is all bolted in a pretty
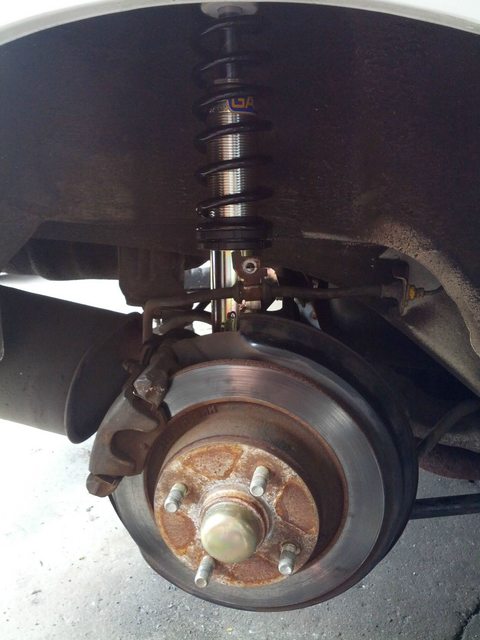
i have a couple of more pics of the front end but i stopped taking pics halfway through and focused on working on the car instead. had a bit of an issue of trial and error with the whole set up after it was all bolted in. Found out the rears were missing one of the rubber bushings for the top hat so it would bang any time going over a bump but that was solved fairly easily.
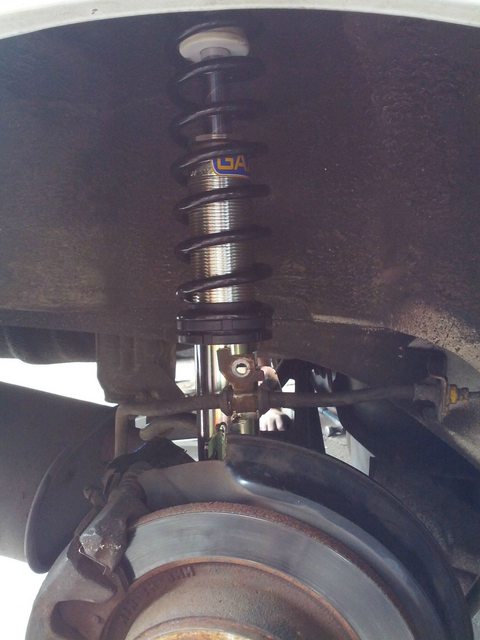
here is a crappy cell phone pic i took just before (started raining out near the end of the install so i couldn't get any good shots

i'll get a few more pics of the front end tomorrow and some better shots of the car in day light.
I'm probably going to be going about 1-2 inches lower than it sits now but i just wanted to lower it a bit and see how it handles before i go too low :lol:
some before shots:
lifting the car off the ground (still love that center jack point lol)
figured i would pile stuff in the trunk
rear deck speakers removed to access top of strut towers
pretty clean for an almost 30 years old car
the first one was a pain in the ***. dropped the exhaust down a bit but then figured out it was just easier to remove the sway bar bracket to free up some clearance.
figuring out which side was which (one of those brackets has no use? so we winged it)
here it is all bolted in a pretty
i have a couple of more pics of the front end but i stopped taking pics halfway through and focused on working on the car instead. had a bit of an issue of trial and error with the whole set up after it was all bolted in. Found out the rears were missing one of the rubber bushings for the top hat so it would bang any time going over a bump but that was solved fairly easily.
here is a crappy cell phone pic i took just before (started raining out near the end of the install so i couldn't get any good shots
i'll get a few more pics of the front end tomorrow and some better shots of the car in day light.
