
L.E.D Lights for Cluster..

 01-14-2011, 02:53 PM
#3
Honda-Tech Member
Join Date: Sep 2008
Posts: 1,095
Likes: 0
Received 0 Likes
on
0 Posts
01-15-2011, 08:38 PM
#4
Honda-Tech Member

Join Date: Jan 2011
Posts: 23
Likes: 0
Received 0 Likes
on
0 Posts
01-16-2011, 01:04 AM
#5
Honda-Tech Member
Join Date: Oct 2007
Location: Bracknell
Posts: 40
Likes: 0
Received 0 Likes
on
0 Posts
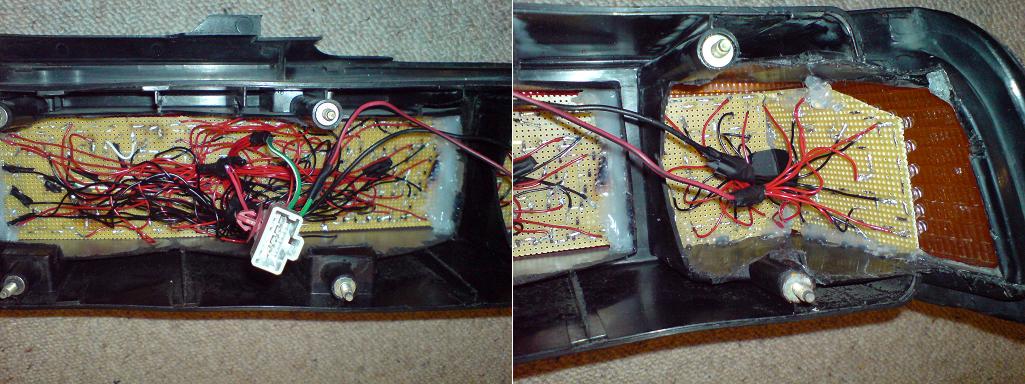
Am in the process of making a new set, but these where my old ones:
Right then Chaps, this is really very easy. All you have to do is get a great big Hammer, then….
1. Prepare the cluster by cutting away the plastic
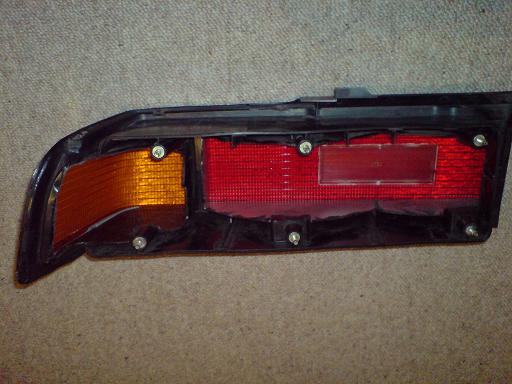
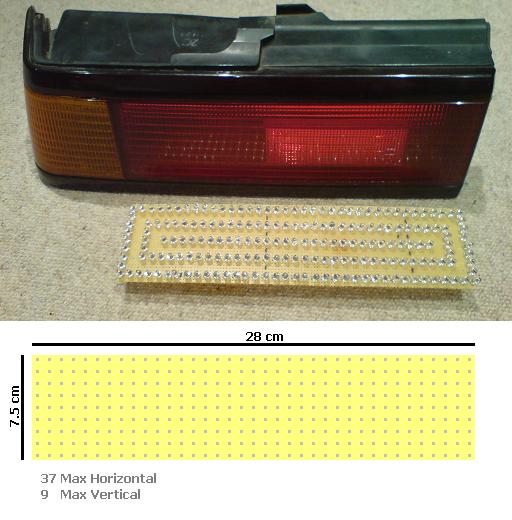
2. Choose a design for your lights
Make yourself a design from a 9 x 37 grid.
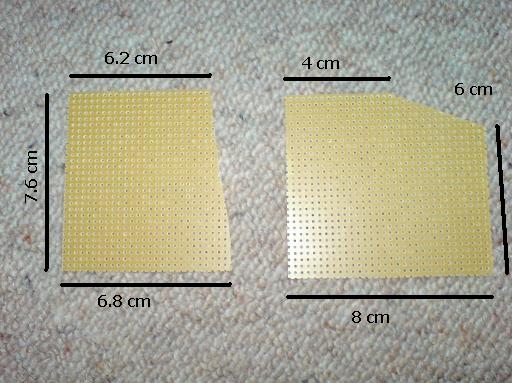
3. Measure the hole you made and cut a Circuit board to fit.
These images are of the shapes I used for the indicators.
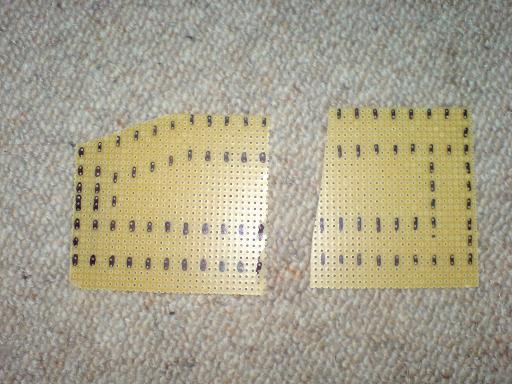
4. Draw your design onto your circuit board.
Drawing the design on makes it easier to put the LEDs in later, because you don't have to recount the holes. It also allows you to double check exactly how many LEDs you need.
5. Once you know how many LEDs you need use this website http://led.linear1.org/led.wiz to determine your design.
It's a great website that clearly shows you how many LEDs you have to solder in serial and how many resistors you need. It also tells you what strength resistors you need.
The picture below is an example I used for the Break Light.
6. Now mount your LEDs onto the circuit board.
- LEDs are directional. Look at the Head of the LED. Inside the LED, the shorter part is the positive side.
- I cut the pins short, put the LEDs through the circuit board holes and then bend the pins down to keep them in place. This makes it easily to solder them together.
- At the end of a row of LEDs you need to solder in the resistor to the negate end. I chose to thread the resistor through the Circuit board.
The resistors get EXTREMELY hot when you solder them on.

7. Connect all your lots of serial LEDs in parallel.
- Solder Red cables to the positive ends of the LED strings and Black to the negative end and then solder all same colored ends together.
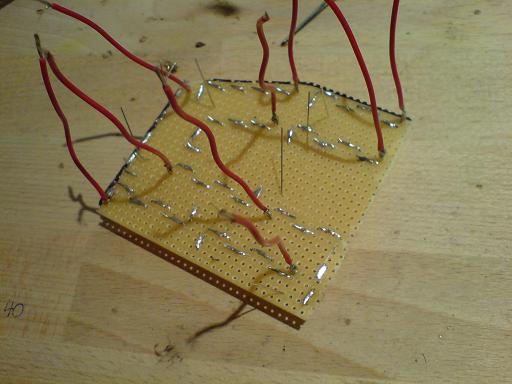
8. Connect the Voltage Regulators
This is the circuit diagram I made
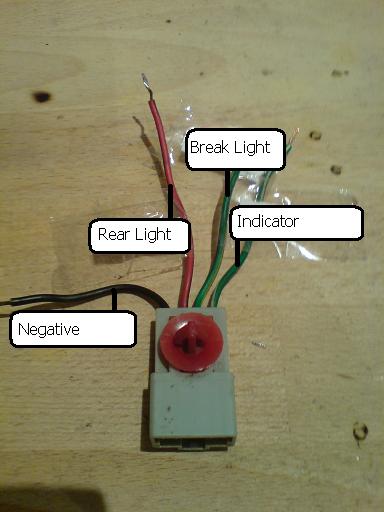
9. Cut the connector from the bulb sockets and connect it to the Voltage regulators.
Another picture to follow
10. Solder the Ground wire from the Voltage Regulator to a ground point.
I have chosen to solder it to the screw mount which firmly sits on the car.
Picture to follow soon.

11. Glue the circuit board into place
- I used a hot glue gun, so I can remove the circuit board again if I have to.
Now that you have spent hours slaving on your kitchen desk, stand back and look at your results.
Here are some pictures of the cluster on my car in comparison to the standard light
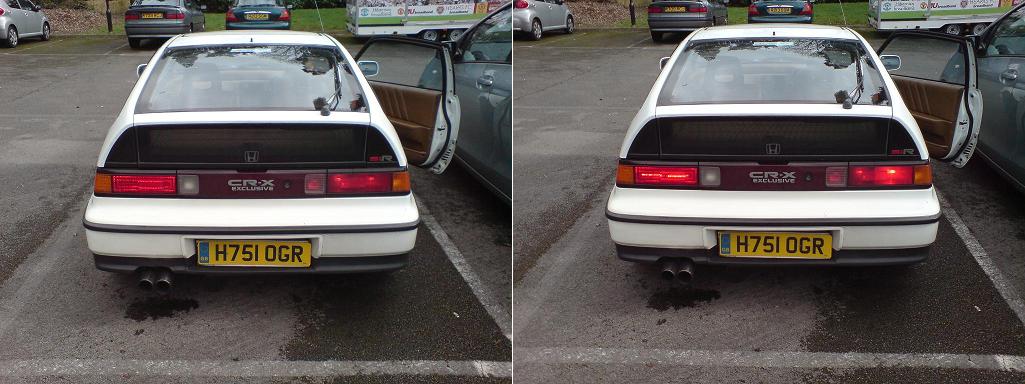
Tips I picked up along the way / Questions
- Should I convert the indicators aswell?
In my opinion: No.
If you have decided to convert the Indicators aswell, then you need to change the flasher relay under your steering wheel.
- What strength LEDs should I buy?
I choose 5000mcd for the rear light, 8000mcd for the break light. For the Indicators I used 4500mcd LEDs, which I would now say are not strong enough.
- Do I need to use Voltage regulators?
No, but if you don’t then your car could blow LEDs when the voltage is higher when your battery is being charged.
- Can I use any rear cluster?
Yes, but by Law you have to have a red rear deflector, you can buy these as stick on strips.
- What is the minimum number of LEDs I need to use for each circuit?
Personally I would say 30 is minimum.
Right then Chaps, this is really very easy. All you have to do is get a great big Hammer, then….
1. Prepare the cluster by cutting away the plastic
2. Choose a design for your lights
Make yourself a design from a 9 x 37 grid.
3. Measure the hole you made and cut a Circuit board to fit.
These images are of the shapes I used for the indicators.
4. Draw your design onto your circuit board.
Drawing the design on makes it easier to put the LEDs in later, because you don't have to recount the holes. It also allows you to double check exactly how many LEDs you need.
5. Once you know how many LEDs you need use this website http://led.linear1.org/led.wiz to determine your design.
It's a great website that clearly shows you how many LEDs you have to solder in serial and how many resistors you need. It also tells you what strength resistors you need.
The picture below is an example I used for the Break Light.
6. Now mount your LEDs onto the circuit board.
- LEDs are directional. Look at the Head of the LED. Inside the LED, the shorter part is the positive side.
- I cut the pins short, put the LEDs through the circuit board holes and then bend the pins down to keep them in place. This makes it easily to solder them together.
- At the end of a row of LEDs you need to solder in the resistor to the negate end. I chose to thread the resistor through the Circuit board.
The resistors get EXTREMELY hot when you solder them on.
7. Connect all your lots of serial LEDs in parallel.
- Solder Red cables to the positive ends of the LED strings and Black to the negative end and then solder all same colored ends together.
8. Connect the Voltage Regulators
This is the circuit diagram I made
9. Cut the connector from the bulb sockets and connect it to the Voltage regulators.
Another picture to follow
10. Solder the Ground wire from the Voltage Regulator to a ground point.
I have chosen to solder it to the screw mount which firmly sits on the car.
Picture to follow soon.
11. Glue the circuit board into place
- I used a hot glue gun, so I can remove the circuit board again if I have to.
Now that you have spent hours slaving on your kitchen desk, stand back and look at your results.
Here are some pictures of the cluster on my car in comparison to the standard light
Tips I picked up along the way / Questions
- Should I convert the indicators aswell?
In my opinion: No.
If you have decided to convert the Indicators aswell, then you need to change the flasher relay under your steering wheel.
- What strength LEDs should I buy?
I choose 5000mcd for the rear light, 8000mcd for the break light. For the Indicators I used 4500mcd LEDs, which I would now say are not strong enough.
- Do I need to use Voltage regulators?
No, but if you don’t then your car could blow LEDs when the voltage is higher when your battery is being charged.
- Can I use any rear cluster?
Yes, but by Law you have to have a red rear deflector, you can buy these as stick on strips.
- What is the minimum number of LEDs I need to use for each circuit?
Personally I would say 30 is minimum.
01-16-2011, 01:06 AM
#6
Honda-Tech Member
Join Date: Nov 2003
Location: Tustin, CA, USA
Posts: 1,103
Likes: 0
Received 0 Likes
on
0 Posts
01-16-2011, 01:10 AM
#7
Honda-Tech Member
Join Date: Oct 2007
Location: Bracknell
Posts: 40
Likes: 0
Received 0 Likes
on
0 Posts
You can follow me on my home-forum here
http://board.hondacrx.co.uk/phpbb2/v...ic.php?t=55024
http://board.hondacrx.co.uk/phpbb2/v...ic.php?t=55024
Trending Topics
01-16-2011, 09:07 AM
#8
Honda-Tech Member
That is a write up for the tail lights.... NOT gauge cluster.
I'm pretty sure superbrightled's is going to have the info on their website or if you email them anyway.
I'm pretty sure superbrightled's is going to have the info on their website or if you email them anyway.
01-16-2011, 11:37 AM
#9
Honda-Tech Member
01-16-2011, 01:54 PM
#11
Honda-Tech Member
Join Date: Oct 2007
Location: Bracknell
Posts: 40
Likes: 0
Received 0 Likes
on
0 Posts

Thread
Thread Starter
Forum
Replies
Last Post
snuggles
Honda Civic / Del Sol (1992 - 2000)
1
06-10-2004 08:47 PM
LillDragun
Acura Integra
1
07-13-2002 08:15 PM