
2006 Accord Clutch Master Cylinder Replacement DIY
 11-01-2010, 09:29 AM
#1
Honda-Tech Member
Thread Starter

Join Date: Jan 2008
Location: Milwaukee, WI, USA
Posts: 9
Likes: 0
Received 0 Likes
on
0 Posts
Haven't seen a DIY specific to this model Accord, but did find tons of complaints/folk remedies for this problem on the Accord, RSX, and TSX that all use the same master cylinder part. Silicone lubricant worked for the groan, but not the clicking noise. They both just kept getting worse and worse, the groan coming and going and the clicking constant. The only way to continue enjoying the car was to replace it the whole thing, which was about 50 bucks for the part and 2 hours of labor. It required a mityvac but no other special tools.
Step 1. Removed cap from reservoir, opened bleeder on clutch slave, attached tubing to bleeder and tin can, pumped clutch pedal to drain.

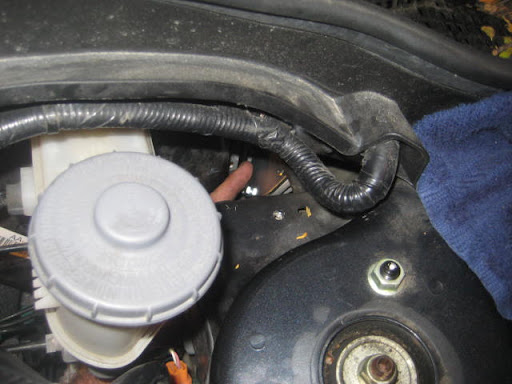
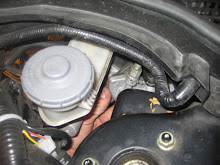
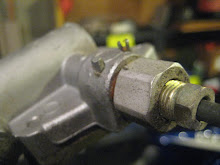
Step 2. remove reservoir from bracket (pull up), push aside, remove bracket. Now you can see the Master Cylinder (not my arm snaked below the brake booster just to touch it):
Step 3. Follow metal line from Master to slave until roughly below the fuse box. Here it attaches to firewall and changes to rubber. First break the compression fitting from the metal to rubber line. Then, had to loosen the two bolts attaching the bracket to the firewall (to allow flexibility to reattach lines later). Go up the metal line, there are two ziptie like attachments of the metal line to the chassis which I cut with diagonal cutters and have not yet replaced..
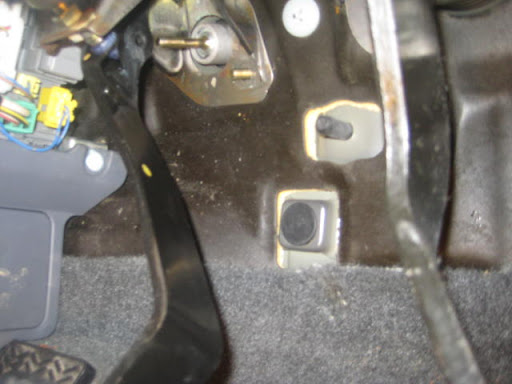
Step 4. Go under the dash, remove the panel above the pedals. Remove the two nuts holding the clutch cylinder to the firewall. It's only one more bolt and two wires to remove the whole pedal assembly to lubricate it. The 10 O'clock nut is a beast. Just be glad you're not replacing the body ecu you keep bumping into (not that I would know about that). Also, remove the cotter pin (twist 90 degrees and pull) and the pin holding the MC to the pedal.
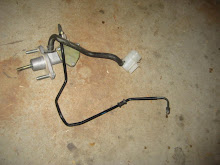
Step 5. Give the cylinder a good push from the inside, then go under the hood and snake the whole assembly out. This is quite tricky but do-able with the reservoir and the whole metal line attached. You will NOT be able to detatch the metal line first as you will see in a minute:
And the assembly will look like this:
And here is why you needed to remove it as a whole:
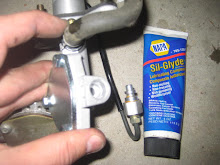
One of the ends of the quick release pin is split to prevent this from happening, unfortunately it's on the body side and impossible to access while the MC is mounted on the firewall. I pinched it, it came out with a flathead screwdriver. Everything from the old is transferred to the new. Don't forget this donut, and lubricate it with silicone grease:
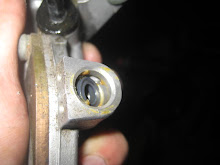
To get the pin that holds the quick release metal line to the cylinder required a c clamp to press it in:

And, of course, installation is opposite of removal. I was not able to bleed the system via the clutch pedal, I had to use a mityvac. Otherwise I only needed 10mm sockets and IIRC an 8mm wrench for the bleeder screw.
Step 1. Removed cap from reservoir, opened bleeder on clutch slave, attached tubing to bleeder and tin can, pumped clutch pedal to drain.
Step 2. remove reservoir from bracket (pull up), push aside, remove bracket. Now you can see the Master Cylinder (not my arm snaked below the brake booster just to touch it):
Step 3. Follow metal line from Master to slave until roughly below the fuse box. Here it attaches to firewall and changes to rubber. First break the compression fitting from the metal to rubber line. Then, had to loosen the two bolts attaching the bracket to the firewall (to allow flexibility to reattach lines later). Go up the metal line, there are two ziptie like attachments of the metal line to the chassis which I cut with diagonal cutters and have not yet replaced..
Step 4. Go under the dash, remove the panel above the pedals. Remove the two nuts holding the clutch cylinder to the firewall. It's only one more bolt and two wires to remove the whole pedal assembly to lubricate it. The 10 O'clock nut is a beast. Just be glad you're not replacing the body ecu you keep bumping into (not that I would know about that). Also, remove the cotter pin (twist 90 degrees and pull) and the pin holding the MC to the pedal.
Step 5. Give the cylinder a good push from the inside, then go under the hood and snake the whole assembly out. This is quite tricky but do-able with the reservoir and the whole metal line attached. You will NOT be able to detatch the metal line first as you will see in a minute:
And the assembly will look like this:
And here is why you needed to remove it as a whole:
One of the ends of the quick release pin is split to prevent this from happening, unfortunately it's on the body side and impossible to access while the MC is mounted on the firewall. I pinched it, it came out with a flathead screwdriver. Everything from the old is transferred to the new. Don't forget this donut, and lubricate it with silicone grease:
To get the pin that holds the quick release metal line to the cylinder required a c clamp to press it in:
And, of course, installation is opposite of removal. I was not able to bleed the system via the clutch pedal, I had to use a mityvac. Otherwise I only needed 10mm sockets and IIRC an 8mm wrench for the bleeder screw.

 07-31-2012, 05:36 AM
#4
Honda-Tech Member
Thread Starter
Join Date: Jan 2008
Location: Milwaukee, WI, USA
Posts: 9
Likes: 0
Received 0 Likes
on
0 Posts
It was a pain just because of it's location. If it were easy to get to it'd be under an hour. Half the time was trying to figure out how to contort myself to get to things. But I was very happy when it was done.
07-31-2012, 03:37 PM
#5
Honda-Tech Member

Join Date: Jul 2006
Location: KS
Posts: 144
Likes: 0
Received 0 Likes
on
0 Posts
Awesome DIY!!!
Quite a few members, including me, on v6performance and acurazine have been experiencing the creaking and popping from the CMC. White lithium grease has eliminated the symptoms for me at the moment, but I don't know how long it will last. I'll probably end up replacing the CMC whenever I get my clutch replaced.
The Acura TL & TSX both have TSBs for this, which lists a new P/N 46920-S7A-A04 for an updated part (the failed part P/N 46920-S7A-A03). Did you get the updated part w/ the new P/N?
I'm going to link this thread to the other sites.
07-31-2012, 05:45 PM
#6
Honda-Tech Member
Join Date: Aug 2003
Location: NYC
Posts: 479
Likes: 0
Received 0 Likes
on
0 Posts
The creaking sound you're reffering to is when you step on or pump the clutch pedal correct? My gf's clutch pedal did that for a while, now the noise stopped and her clutch pedal is kissing the floor with no pressure going to the slave piston. Safe to say the master is done? I'm going to check the part numbers you posted.
Trending Topics
05-07-2013, 05:46 AM
#9
Honda-Tech Member
Join Date: Sep 2003
Location: MI, USA
Posts: 44
Likes: 0
Received 0 Likes
on
0 Posts
The part number for the updated clutch master cylinder is 46920-S7A-A04 (my TSX with 122K miles just started creaking/clicking last night) and though I didn't see any sign of cracking of the pedal assembly near the mounting flange, just to be on the safe side, I ordered an OEM clutch pedal assembly and the updated clutch master cyclinder (the TL unit)...Perhaps this also will fix the issue I have with slight grinding on high RPM shifts (7K RPM)...


Thread
Thread Starter
Forum
Replies
Last Post
ZMan3000
Honda Accord (1990 - 2002)
1
05-21-2008 11:53 AM