
Back from the Dead Build
 10-18-2009, 08:11 PM
#1
Well guys, i figure i'll throw up my build at this point. I didn't really want to until the car was painted so there would be non-stop updates but i'm bored and have time to do it now.
Background info: Some may recall i had a de-rice build last year around this time. I had stripped the car down, shaved the bay, finished painting the bay along with alot of other stuff. The car had some rust on the runners and rear quarters and when i was given a free rust free shell, under 70,000 original miles, and no accidents i scrapped the old shell. At that point i let the original thread die because i basically had to repeat everything i had already done and no one really wants to see it all a second time.
The motor i purchased for that chasis turned out to be a dud as well which only set me back further. One of the cylinder walls had scarring all down the side and the bearings were toast. It just wasn't feasible to rebuild it for my goal. It was cheaper picking up a different stock motor and using it instead. I was also originally going to be boosting that prelude. Those plans changed and i sold the entire kit that i had pieced together off for a Jackson Racing supercharger.
I recently purchased a new JDM H22a motor. It is in great shape and will be used for this build I tore it apart today (oct/18/2009) to inspect the internals, have everything washed due to carelessness on my behalf. I forgot to properly cover the shortblock while it was open during some IM port work. While it was apart i noticed the bearings could use replacements. They aren't in bad shape but one looks a bit to worn for my liking. The rings also appear to be in decent shape, but i am going to replace those as well just to be safe since the motor is in pieces.
I also had a set back with a H22 head i purchased on these boards. I was told it had a valve job, port work, new seals, new guides, cleaned etc done to it. I took it to a local trusted machine shop to have them look at it and just do a test to ensure the seals were sealing and check the deck work, It failed. They took it apart and it had 8 guides destroyed, most of the seals were bad, there was a small pile about the size of a quarter and about a quarter of an inch high of metal shavings. The rocker shaft was damaged but salvagable since none of the oil gallies were affected. To top it off a broken cam cover bolt was broken in the head and needed a heli coil to remove it (i did know about this problem though). In the end it cost me $615 to fix all the problems. Luckily the deck work was done correctly. I am glad i now know i can put the motor together without the bearings being fried upon start up. Lesson learned, don't buy other peoples work.
I am hoping to have the build completed by the end of fall 2010. My last build was suppose to be finished this summer but with the constant set backs i've been without a lude for over a year
This is a list of some of the stuff being done to the car
Engine
-OEM head rebuilt (supertech valve seals, new guides, polished valves, jet washed, decked, port and polished intake and exhaust ports, 3 angle valve job)
-OEM block rebuilt (ACL standard size bearings, Nippon Rings, jet washed, 10:6:1 compression, crank mircro polished to standard size)
-97-01 Aluminum oil pan
-Kaz. Speed B/S eliminator kit
-New OEM pumps/belts/gaskets/seals
-Rosko Racing cam cap
-Rosko Racing EGR plug
-Hytech Replica header
-Skunk2 Intake Manifold
-Custom 3" intake (vibrant couplers)
Induction
-Cold Fusion Nitrous Wet Kit
-35-75 shot
-Bottle heater
-Bottle opener
-Purge valve
Transmission
-H23 transmission
-Stock gear set
-H22 Exedy clutch
-Fidanza light weight flywheel
-Forbidden motor sports short shifter
Cooling
-OEM rad (koyo in the future)
-Mishimoto slim fan
-Mugen thermostat
-Mugen fan switch
-Rosko Racing IM Heat shield gasket
-Rosko Racing 68mm TB heat shield gasket
-Forbidden motor sports cooling plate
Fuel
-AEM fuel rail
-AEM fuel pressure regulator
-DSM 450cc injectors
-Walbro 255 fuel pump
Suspension and Brakes
-Brembo Blanks Front/Rear
-Kyb Gr-2's shocks
-Neuspeed sport springs
-OE Brand upper front/rear balljoints
-OE Brand lower front/rear balljoints
-OE Brand front/rear sway bar endlinks
-Energy Suspension front/rear sway bar bushings
-Megan Toe arms
-Megan rear subframe brace
Management
-Hondata s300
-AEM Wideband
-Prosport Oil pressure, Oil temp, Fuel pressure
-Autometer Nitrous gauge
Most of the parts are purchased already. I am just saving right now for the paint job. The motor will hopefully be put together sometime in the next few weeks and the car painted in the next 2 months. I'll be sure to keep you guys updated. Hopefully i have no further set backs, i really just want to drive a lude again. This is a full lude restoration so there is definately more to it than just the parts/work listed above
Pictures will be added in the post below!
Background info: Some may recall i had a de-rice build last year around this time. I had stripped the car down, shaved the bay, finished painting the bay along with alot of other stuff. The car had some rust on the runners and rear quarters and when i was given a free rust free shell, under 70,000 original miles, and no accidents i scrapped the old shell. At that point i let the original thread die because i basically had to repeat everything i had already done and no one really wants to see it all a second time.
The motor i purchased for that chasis turned out to be a dud as well which only set me back further. One of the cylinder walls had scarring all down the side and the bearings were toast. It just wasn't feasible to rebuild it for my goal. It was cheaper picking up a different stock motor and using it instead. I was also originally going to be boosting that prelude. Those plans changed and i sold the entire kit that i had pieced together off for a Jackson Racing supercharger.
I recently purchased a new JDM H22a motor. It is in great shape and will be used for this build
I tore it apart today (oct/18/2009) to inspect the internals, have everything washed due to carelessness on my behalf. I forgot to properly cover the shortblock while it was open during some IM port work. While it was apart i noticed the bearings could use replacements. They aren't in bad shape but one looks a bit to worn for my liking. The rings also appear to be in decent shape, but i am going to replace those as well just to be safe since the motor is in pieces.I also had a set back with a H22 head i purchased on these boards. I was told it had a valve job, port work, new seals, new guides, cleaned etc done to it. I took it to a local trusted machine shop to have them look at it and just do a test to ensure the seals were sealing and check the deck work, It failed. They took it apart and it had 8 guides destroyed, most of the seals were bad, there was a small pile about the size of a quarter and about a quarter of an inch high of metal shavings. The rocker shaft was damaged but salvagable since none of the oil gallies were affected. To top it off a broken cam cover bolt was broken in the head and needed a heli coil to remove it (i did know about this problem though). In the end it cost me $615 to fix all the problems. Luckily the deck work was done correctly. I am glad i now know i can put the motor together without the bearings being fried upon start up. Lesson learned, don't buy other peoples work.
I am hoping to have the build completed by the end of fall 2010. My last build was suppose to be finished this summer but with the constant set backs i've been without a lude for over a year
This is a list of some of the stuff being done to the car
Engine
-OEM head rebuilt (supertech valve seals, new guides, polished valves, jet washed, decked, port and polished intake and exhaust ports, 3 angle valve job)
-OEM block rebuilt (ACL standard size bearings, Nippon Rings, jet washed, 10:6:1 compression, crank mircro polished to standard size)
-97-01 Aluminum oil pan
-Kaz. Speed B/S eliminator kit
-New OEM pumps/belts/gaskets/seals
-Rosko Racing cam cap
-Rosko Racing EGR plug
-Hytech Replica header
-Skunk2 Intake Manifold
-Custom 3" intake (vibrant couplers)
Induction
-Cold Fusion Nitrous Wet Kit
-35-75 shot
-Bottle heater
-Bottle opener
-Purge valve
Transmission
-H23 transmission
-Stock gear set
-H22 Exedy clutch
-Fidanza light weight flywheel
-Forbidden motor sports short shifter
Cooling
-OEM rad (koyo in the future)
-Mishimoto slim fan
-Mugen thermostat
-Mugen fan switch
-Rosko Racing IM Heat shield gasket
-Rosko Racing 68mm TB heat shield gasket
-Forbidden motor sports cooling plate
Fuel
-AEM fuel rail
-AEM fuel pressure regulator
-DSM 450cc injectors
-Walbro 255 fuel pump
Suspension and Brakes
-Brembo Blanks Front/Rear
-Kyb Gr-2's shocks
-Neuspeed sport springs
-OE Brand upper front/rear balljoints
-OE Brand lower front/rear balljoints
-OE Brand front/rear sway bar endlinks
-Energy Suspension front/rear sway bar bushings
-Megan Toe arms
-Megan rear subframe brace
Management
-Hondata s300
-AEM Wideband
-Prosport Oil pressure, Oil temp, Fuel pressure
-Autometer Nitrous gauge
Most of the parts are purchased already. I am just saving right now for the paint job. The motor will hopefully be put together sometime in the next few weeks and the car painted in the next 2 months. I'll be sure to keep you guys updated. Hopefully i have no further set backs, i really just want to drive a lude again. This is a full lude restoration so there is definately more to it than just the parts/work listed above
Pictures will be added in the post below!
Last edited by Prudz_lude; 10-24-2010 at 09:10 PM.
 10-18-2009, 08:37 PM
#2
The Car Intially


After i had my way with it

As some of you know my last shell had some serious wiring issues. Well, this one was no different, infact this one was worse. I had to remove the most hack job satelite radio install, aftermarket deck and sub wiring mess, along with a bad alarm install. It was much easier this time around since i now knew what was what. This is what it looked like about half way through before i finished it up.

Sand blasting suspension pieces

Tires

Prep supplies

JDM H22A


The head after all the work


And the bill....


The block


The bad bearing (the rod bearing doesn't look to hot either)

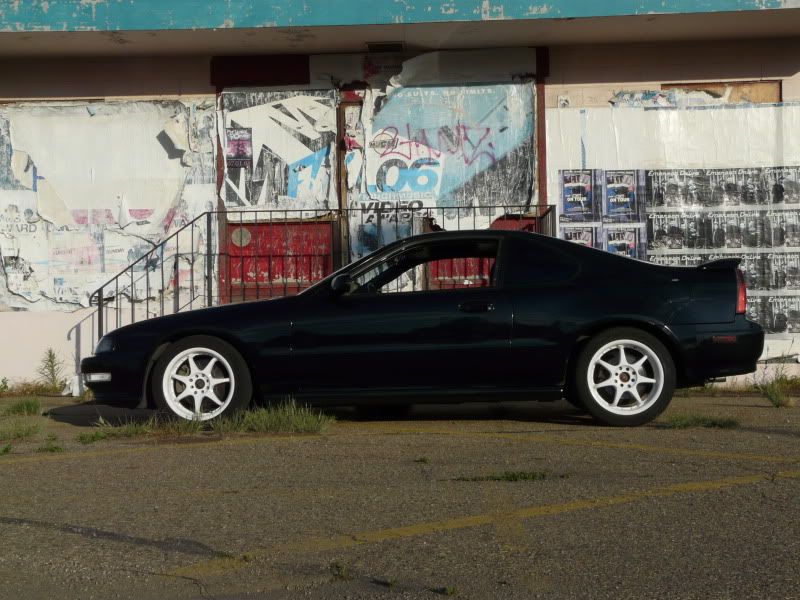
A final picture of my Daily driven lude
Watch for updates guys
After i had my way with it
As some of you know my last shell had some serious wiring issues. Well, this one was no different, infact this one was worse. I had to remove the most hack job satelite radio install, aftermarket deck and sub wiring mess, along with a bad alarm install. It was much easier this time around since i now knew what was what. This is what it looked like about half way through before i finished it up.
Sand blasting suspension pieces
Tires
Prep supplies
JDM H22A
The head after all the work
And the bill....
The block
The bad bearing (the rod bearing doesn't look to hot either)
A final picture of my Daily driven lude
Watch for updates guys
Last edited by Prudz_lude; 08-11-2010 at 09:09 AM.
10-18-2009, 09:49 PM
#3
Honda-Tech Member
Join Date: Jul 2008
Location: Clatskanie, OR, USA
Posts: 711
Likes: 0
Received 0 Likes
on
0 Posts
Nice build. What are you doing to make the JRSC fit in the 4th gen engine bay? I've read that it hits the fire wall and you have to make a custom braket to clear the shock tower.
10-19-2009, 04:14 AM
#4
Honda-Tech Member
Join Date: Aug 2007
Posts: 3,895
Likes: 0
Received 0 Likes
on
0 Posts
Hey man, when you hear about that Mfactory 4.7 FD and if it works on the H23 tranny, let me know, Im going to have to rebuild my tanny so, and burn outs with one wheel suck!
10-19-2009, 05:19 AM
#5
Honda-Tech Member

Join Date: Aug 2005
Location: Macon, GA, USA
Posts: 1,324
Likes: 0
Received 0 Likes
on
0 Posts
10-19-2009, 06:10 AM
#6
I'll let you know what they tell me if someone else doesn't before me.
Trending Topics
10-19-2009, 03:20 PM
#9
Hmmm well guys i need some suggestions. I called around to the different local honda dealers getting quotes on a set of rings and bearings, since regardless of the colour they are all priced the same, and i got news i didn't like. Honda wants me to fork over $450 for the rings, $460 for the bearing set. Since i have no intention of spending that much could someone recommend a online site that i can purchase both from? I'll talk to my local machine shop later this week and see if they have someone who they can order from but just incase if someone could post a link online that would be much appreciated.
10-19-2009, 04:27 PM
#10
I got bored today and decided to polish my cam gears. They were sandblasted by me a few months back and i left them to sit. I was unsure what i wanted to do with them and today i decided to polish the lips and paint the insides. I may tape them back up and spray them a bit better. I only did one side because it started to rain :p
Comparison of unpolished vs. polished

Lips finished

All finished up with gold paint


Comparison of unpolished vs. polished
Lips finished
All finished up with gold paint
Last edited by Prudz_lude; 10-19-2009 at 04:58 PM.
10-19-2009, 07:02 PM
#11
Honda-Tech Member
Join Date: Sep 2009
Location: Saskatoon, SK, Canada
Posts: 147
Likes: 0
Received 0 Likes
on
0 Posts
wow you gave me a great DIY lol. Painting cam gears..... i think ima pull mine off and do the same... mine look like ****, all rusted and crap. You should write up a DIY on how to do that lol. Looks good .
10-19-2009, 07:30 PM
#12
Haha thanks, it doesn't need a write up. I'll just explain how to do it right now. I used 80 grit, 180, 220, 400, and 1000 grit sand paper. Pickup a little container of mother's mag aluminum polish, some painters tape and a paint of your choice.
All you do is start at 80 grit and start wet sanding the lip on the cam gear. I did this in my kitchen sink in about 30 minutes. Work your way through all the grits. It won't look very shiney at first or even after the 1000 grit, but it will be very smooth to the touch. After the first steps dry it off and take your mothers mag polish and rub it all over the area you sanded.
Finally take a cloth and rub the polish back and fourth with some muscle until the polish turns black. Once it turns black take a rag and whipe it clean. It will now appear with that nice mirror finish. Tape the lip off (and the teeth if you don't want it to chip from your timing belt) and then paint the exposed inside. Should come out looking like the above, but remember i sand blasted mine first so that they had zero flaws in them. No corrosion left, no indents, nothing but bare metal.
10-19-2009, 09:46 PM
#15
Honda-Tech Member
Join Date: Jul 2008
Location: Clatskanie, OR, USA
Posts: 711
Likes: 0
Received 0 Likes
on
0 Posts
Thanks for clearing that up for me. Now if I could get someone to make a bracket, then I'd for sure run one; don't want to hammer in the shock tower.
10-19-2009, 10:02 PM
#16
No problem, i definately would not be bashing in the shock tower if i wasn't going to repaint the engine bay. Here is a link for those who want to see one running and installed in a 4th gen. I know honda-tech is one of the few places where this topic has not been covered extensively. I always seem to find the users on this site bring up the firewall debate. Hopefully this will clear it up and give some reference so that myth can die once and for all.
..... nice..... honda-tech must really hate prelude power.com they won't even allow the link to show up. If you want to see it, remove the space between prelude power and you can see the thread
http://www.prelude power.com/forums/showthread.php?t=304487
Page 2 has a video of driving the car, page 5 has a dyno video.
Last edited by Prudz_lude; 10-19-2009 at 10:09 PM.
10-20-2009, 06:38 AM
#18
I guess i forgot to mention that. The harnesses (headlights, engine) will be tucked. I have already done most of the body work for the engine bay shave. I only did a minor shave. The shave only applies to the shock towers no where else. I want to keep A/C, cruise, and P/S. The only one however that will be re-installed during assembly is the P/S. I plan to make custom A/C lines so that everything is indeed tucked. Once that is finished (planning to do this next winter) i'll toss cruise back in as well.
10-20-2009, 07:32 AM
#19
Junior Member

Join Date: Oct 2009
Location: TX
Posts: 521
Likes: 0
Received 0 Likes
on
0 Posts
I wonder if our a/c line relocation kits will fit the prelude? Works great on s2000!
http://www.s2carbonworks.com/00s2cuaircol.html
http://www.s2carbonworks.com/00s2cuaircol.html
Last edited by S2Carbonworks; 10-20-2009 at 09:26 AM.
 jp.
11-01-2009, 01:40 PM
jp.
11-01-2009, 01:40 PM
#22
Small update, i should be able to go get my block work done in the next couple days. Bearing numbers (well colours) will be recommended and noted then ordered, crank will be serviced, and all parts on the bottom end will be cleaned at the machine shop. Other than the piston and rods, i will be hand washing those myself since i don't want to seperate the wrist pins. Rings should be ordered at the same time, and i am going to have the machine shop inspect the surface of the block to make sure it is true. I don't want to have a leaky headgasket after all this.
For now i decided to just snap a shot of what parts are still here after all of the delays, selling of parts etc. There are quiet a few additions to this little parts pile. Hopefully something more eventful will be posted in the next couple weeks, this is more or less to keep the thread active.


More to come, hopefully soon.
For now i decided to just snap a shot of what parts are still here after all of the delays, selling of parts etc. There are quiet a few additions to this little parts pile. Hopefully something more eventful will be posted in the next couple weeks, this is more or less to keep the thread active.
More to come, hopefully soon.
11-01-2009, 04:48 PM
#25
Honda-Tech Member
Join Date: Mar 2006
Location: Gloversville, NY, USA
Posts: 125
Likes: 0
Received 0 Likes
on
0 Posts
its going to be nice seeing another s/c lude on the forums(i'm jeff25). i'm thinking about freshening up my h22 this winter but i might hold off. let me know where you get your rings and bearing tho. good luck with everything.