
How To: Brake Line Tuck Guidelines..
 09-20-2007, 08:27 AM
#1
Honda-Tech Member
Thread Starter
Join Date: Apr 2006
Location: Newport, NC, 28570
Posts: 1,684
Likes: 0
Received 0 Likes
on
0 Posts
So theres a lot of questions floating around over and over about brake line tucks, i figured to keep the confusion out of the shaved/tuck thread i'd do a small write up and add to it as information is available.
i would recommend to start with find the new location of your prop valve.

after finding the location mount the prop valve securely in place.
next you will have to decide what kind of line your going to be using. stainless hard line or stainless braided are the most common types ive seen used here on HT.
<U>the size of the line used in honda's for brakes is 3/16ths and the male fittings are 10x1.0 metric fittings.</U>
after you have your prop valve mounted and know which type of line your going to use its time to figure out how you'd like to mount your lines.
for hardlines you can go to your local automotive store and buy lines in different lengths pre flared with fittings. or you can choose to buy straight 3/16ths tube and flare it your self these are the steps to flaring the line: (taken from: http://www.pharmacy.arizona.ed....html)
 1. Cut the tubing to desired length. Make sure the cut is square to the length of the tubing. I used a mini tubing cutter. You will notice that the tubing openings are collapsed a little after the cut is made.
 2. Take a 7/32 inch drill bit and put the point into the tubing opening and turn by hand to deburr. You can compare the size of the opening before (on left) and after (on right) this deburring process. A 7/64 inch drill bit will slide into the tubing on the right and a 1/8 in drill bit will not. The 7/64 inch drill bit will not fit into the undeburred tubing end on the left.
 3. Now take a file (Craftsman 931265, 6 inch mill file) and chamfer the edge of the tubing about 1/16th inch.
4. Put the Tubing Nut ON! PUT THE TUBING NUT ON NOW!! Very Important to remember to put the tubing nut on now or you'll have to cut off the beautiful flare you are about to make.
 5. Insert the tubing into the flaring tool (Performance Tool Double Flare Tool W80670 made by Wilmar Corp and purchased at Sears) and adjust until the tubing sticks out the proper length per your tools instructions. For my tool the die is used as the guage so the tube just fits under the edge of the inverted die. Tighten the tool to hold the tubing. Make sure, as you continue the steps, that the tubing does not slip in the tool. I had a tool from another manufacturer that would not hold the tubing tight enough. After struggling with it I found the Performance Tool and threw away the other brand. I put a little grease on the tip of the tubing and on the flaring tool anvil. Now invert the die and put the pin into the tubing end and attach the anvil. Compress the tubing until the die makes contact with the tool clamp.
 6. After removing the anvil and the die from the tubing this picture shows what the tubing looks like after the above step. Essentially it is a bubble flare.
 7. Complete the double flare by placing the tool anvil in the center of the tubing and turn the press until tight. After removing the anvil this is what the completed double flare looks like in the tool clamp.
8. With practice the flare you make should look just as good as one on the end of brake tubing purchased at your local parts store.


****i would recommend using these guidlines to re-flare your rear brake lines that way you can simply add a nice stainless section to the visible part of the rear lines in the bay, and not have to re-do the entire rear section.
back to the brake lines,
once your prop valve mounted and have decided on your lines, i would start in the bay and run the lines from your master cylinder to the desired location on the firewall and use a bulk head fitting to go through the firewall.
on the back side of the firewall use a piece of line to go from the bulkhead fitting to the appropriate place on the prop valve.
next i would work on the lines from your prop valve to the front brakes.
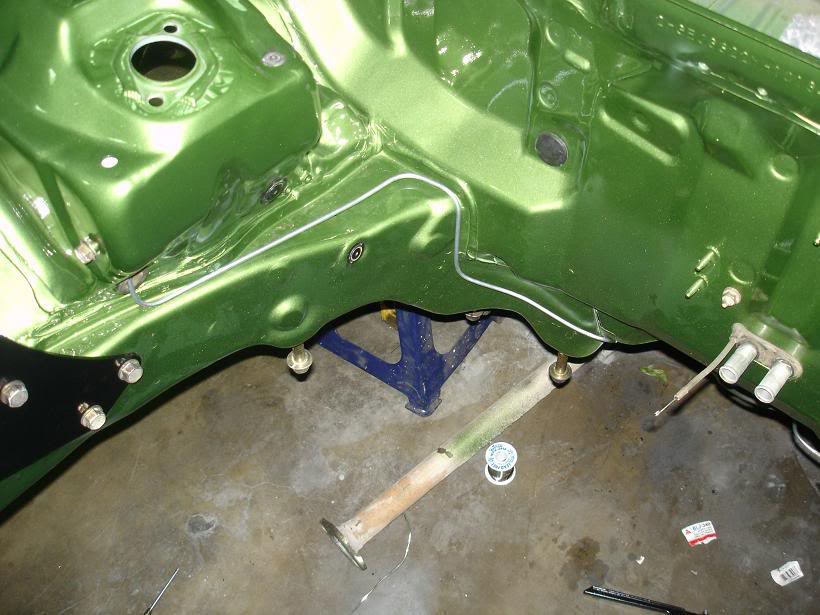
this is a picture for reference of a general spot used to go from the cabin into the fender well. use the flat spot found here.

bend the lines as needed but avoid kinking the lines in anyway possible.
and lastly you will need to run from the prop valve to the rear lines, i would flare the rear lines and use hardline from the prop valve to a fitting on the rear line.
this is just a basic guideline to use on doing your own brake line setups.. be creative and use your own ideas, make it unique and be sure to post pics or any helpful information to add to it. i'll update the post with any info i can.
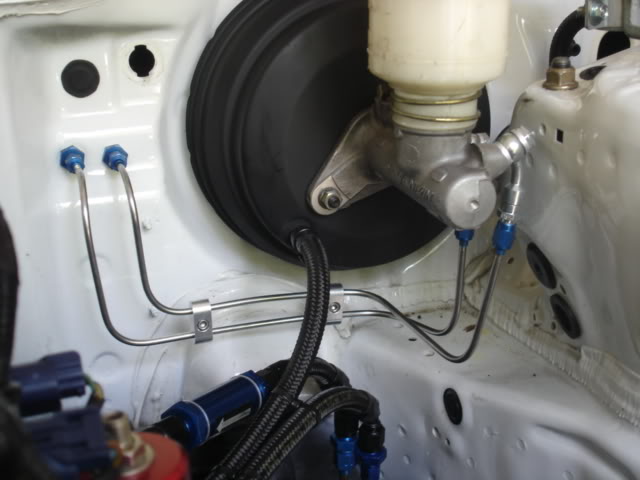
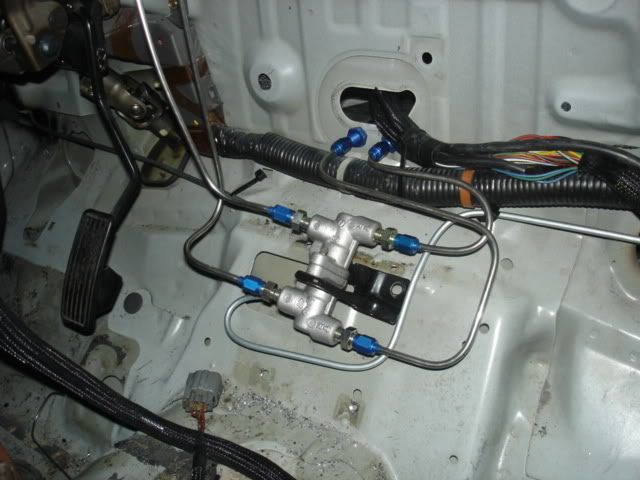
here are a few examples of both types of setups.. if its your car or work and you would like the pics taken down let me know..
hardline setups can look like some of these:


stainless braided setups can look like some of these:


People think this is more confusing than it really is!!
The fittings in the Master Cylinder, Prop Valve, OEM Brake caliper hose are all OEM metric fittings.
They are all 10 x 1.00mm fittings.
NPT and BSP are pipe thread fittings, they are not used on our brake systems....
All the fittings on our brake systems are 10x1.00mm and if you wanna use the aftermarket earls (or other brand) fittings then they are all -3an fittings as this is the correct size fitting to fit over the size brake line we use which is 3/16"
So use 10x1.00mm fittings and adapt them to the -3AN aftermarket fittings.
It really is not that complicated.
You cant really use a shopping list as alot of peope do it different.
With mine, i removed all of my OEM brake hardlines (apart from the OEM caliper flex hose). From there i used 10mmx1.00 male to -3an male brake adaptors on all 4 OEM brake hose from the caliper, the 2 MC fittings and the 6 prop valve fittings. From there i used -3AN tube nuts and sleeves on all the lines on everything they connected too. I used 2 90 deg bulkheads for the rear lines, 2 straight bulkheads for the lines from the MC to the prop valve, a stright bulkhead fitting on the drivers side in the wheel arch and a 90 deg bulkhead on the passenger side wheel arch. I used bulkhead nuts on all these bulkheads.
Thats it...
My advice,
Get a piece of paper, grab a pen. Now, draw a square and write MC in it, after that draw the lines and all the fittings you need. Write how many of each item you need.
Then, log onto http://www.anplumbing.com http://www.summitracing.com or http://www.jegs.com or even goto a local auto parts store if this is an option you have. Now order the parts you need.
If you cant work out what metric fittings you need, then are you going to have the tools or ability to bend and flare the lines correctly?
It's just frustrating how every second post people ask what brake adaptors they need, or what size fittings they need... The answer is in the inital post and every second post from there on!!
To make it more clear:
1. Brake adaptors: 10mm x 1.00. Both ends are MALE
2. -3AN tube nuts, tube sleeves, bulkeads, bulkhead nuts.
3. 3/16" brake line
That is it, those 3 are ALL you need. Now do some reading and work out exactly how many of each you need. Also, work out whether to get steel, stainless or aluminium.
This setup utilises the 37 degree single flare, not a double flare. Make sure you have a single flaring tool. Also, take note that this is prob not legal to use on your brake system.
Basically read this thread from post number 1 right upto this post... You should have all the info you need.
Modified by Weak!EG at 11:18 AM 5/10/2008
i would recommend to start with find the new location of your prop valve.
after finding the location mount the prop valve securely in place.
next you will have to decide what kind of line your going to be using. stainless hard line or stainless braided are the most common types ive seen used here on HT.
<U>the size of the line used in honda's for brakes is 3/16ths and the male fittings are 10x1.0 metric fittings.</U>
after you have your prop valve mounted and know which type of line your going to use its time to figure out how you'd like to mount your lines.
for hardlines you can go to your local automotive store and buy lines in different lengths pre flared with fittings. or you can choose to buy straight 3/16ths tube and flare it your self these are the steps to flaring the line: (taken from: http://www.pharmacy.arizona.ed....html)
1. Cut the tubing to desired length. Make sure the cut is square to the length of the tubing. I used a mini tubing cutter. You will notice that the tubing openings are collapsed a little after the cut is made. 2. Take a 7/32 inch drill bit and put the point into the tubing opening and turn by hand to deburr. You can compare the size of the opening before (on left) and after (on right) this deburring process. A 7/64 inch drill bit will slide into the tubing on the right and a 1/8 in drill bit will not. The 7/64 inch drill bit will not fit into the undeburred tubing end on the left. 3. Now take a file (Craftsman 931265, 6 inch mill file) and chamfer the edge of the tubing about 1/16th inch. 4. Put the Tubing Nut ON! PUT THE TUBING NUT ON NOW!! Very Important to remember to put the tubing nut on now or you'll have to cut off the beautiful flare you are about to make.
5. Insert the tubing into the flaring tool (Performance Tool Double Flare Tool W80670 made by Wilmar Corp and purchased at Sears) and adjust until the tubing sticks out the proper length per your tools instructions. For my tool the die is used as the guage so the tube just fits under the edge of the inverted die. Tighten the tool to hold the tubing. Make sure, as you continue the steps, that the tubing does not slip in the tool. I had a tool from another manufacturer that would not hold the tubing tight enough. After struggling with it I found the Performance Tool and threw away the other brand. I put a little grease on the tip of the tubing and on the flaring tool anvil. Now invert the die and put the pin into the tubing end and attach the anvil. Compress the tubing until the die makes contact with the tool clamp. 6. After removing the anvil and the die from the tubing this picture shows what the tubing looks like after the above step. Essentially it is a bubble flare. 7. Complete the double flare by placing the tool anvil in the center of the tubing and turn the press until tight. After removing the anvil this is what the completed double flare looks like in the tool clamp. 8. With practice the flare you make should look just as good as one on the end of brake tubing purchased at your local parts store.
****i would recommend using these guidlines to re-flare your rear brake lines that way you can simply add a nice stainless section to the visible part of the rear lines in the bay, and not have to re-do the entire rear section.
back to the brake lines,
once your prop valve mounted and have decided on your lines, i would start in the bay and run the lines from your master cylinder to the desired location on the firewall and use a bulk head fitting to go through the firewall.
on the back side of the firewall use a piece of line to go from the bulkhead fitting to the appropriate place on the prop valve.
next i would work on the lines from your prop valve to the front brakes.
this is a picture for reference of a general spot used to go from the cabin into the fender well. use the flat spot found here.
bend the lines as needed but avoid kinking the lines in anyway possible.
and lastly you will need to run from the prop valve to the rear lines, i would flare the rear lines and use hardline from the prop valve to a fitting on the rear line.
this is just a basic guideline to use on doing your own brake line setups.. be creative and use your own ideas, make it unique and be sure to post pics or any helpful information to add to it. i'll update the post with any info i can.
here are a few examples of both types of setups.. if its your car or work and you would like the pics taken down let me know..
hardline setups can look like some of these:
stainless braided setups can look like some of these:
People think this is more confusing than it really is!!
The fittings in the Master Cylinder, Prop Valve, OEM Brake caliper hose are all OEM metric fittings.
They are all 10 x 1.00mm fittings.
NPT and BSP are pipe thread fittings, they are not used on our brake systems....
All the fittings on our brake systems are 10x1.00mm and if you wanna use the aftermarket earls (or other brand) fittings then they are all -3an fittings as this is the correct size fitting to fit over the size brake line we use which is 3/16"
So use 10x1.00mm fittings and adapt them to the -3AN aftermarket fittings.
It really is not that complicated.
You cant really use a shopping list as alot of peope do it different.
With mine, i removed all of my OEM brake hardlines (apart from the OEM caliper flex hose). From there i used 10mmx1.00 male to -3an male brake adaptors on all 4 OEM brake hose from the caliper, the 2 MC fittings and the 6 prop valve fittings. From there i used -3AN tube nuts and sleeves on all the lines on everything they connected too. I used 2 90 deg bulkheads for the rear lines, 2 straight bulkheads for the lines from the MC to the prop valve, a stright bulkhead fitting on the drivers side in the wheel arch and a 90 deg bulkhead on the passenger side wheel arch. I used bulkhead nuts on all these bulkheads.
Thats it...
My advice,
Get a piece of paper, grab a pen. Now, draw a square and write MC in it, after that draw the lines and all the fittings you need. Write how many of each item you need.
Then, log onto http://www.anplumbing.com http://www.summitracing.com or http://www.jegs.com or even goto a local auto parts store if this is an option you have. Now order the parts you need.
If you cant work out what metric fittings you need, then are you going to have the tools or ability to bend and flare the lines correctly?
It's just frustrating how every second post people ask what brake adaptors they need, or what size fittings they need... The answer is in the inital post and every second post from there on!!
To make it more clear:
1. Brake adaptors: 10mm x 1.00. Both ends are MALE
2. -3AN tube nuts, tube sleeves, bulkeads, bulkhead nuts.
3. 3/16" brake line
That is it, those 3 are ALL you need. Now do some reading and work out exactly how many of each you need. Also, work out whether to get steel, stainless or aluminium.
This setup utilises the 37 degree single flare, not a double flare. Make sure you have a single flaring tool. Also, take note that this is prob not legal to use on your brake system.
Basically read this thread from post number 1 right upto this post... You should have all the info you need.
Modified by Weak!EG at 11:18 AM 5/10/2008
 09-20-2007, 09:01 AM
#2
Honda-Tech Member
Join Date: Dec 2004
Location: Seattle, WA, US
Posts: 549
Likes: 0
Received 0 Likes
on
0 Posts
Good thread. 
However, not all fittings on all Hondas are 10x1.0 male fittings. When I installed my ABS Integra 1" master cylinder, one of the fittings is a larger fitting. I don't know the exact size, but it's definitely larger.
However, not all fittings on all Hondas are 10x1.0 male fittings. When I installed my ABS Integra 1" master cylinder, one of the fittings is a larger fitting. I don't know the exact size, but it's definitely larger.
09-20-2007, 09:12 AM
#3
Honda-Tech Member
Thread Starter
Join Date: Apr 2006
Location: Newport, NC, 28570
Posts: 1,684
Likes: 0
Received 0 Likes
on
0 Posts
<TABLE WIDTH="90%" CELLSPACING=0 CELLPADDING=0 ALIGN=CENTER><TR><TD>Quote, originally posted by Coomer »</TD></TR><TR><TD CLASS="quote">Good thread.
However, not all fittings on all Hondas are 10x1.0 male fittings. When I installed my ABS Integra 1" master cylinder, one of the fittings is a larger fitting. I don't know the exact size, but it's definitely larger.</TD></TR></TABLE>
thanks for the input.. as i said its a general guideline..
i used my 92 hatch for it.


 09-20-2007, 09:41 AM
#6
Honda-Tech Member
Thread Starter
Join Date: Apr 2006
Location: Newport, NC, 28570
Posts: 1,684
Likes: 0
Received 0 Likes
on
0 Posts
<TABLE WIDTH="90%" CELLSPACING=0 CELLPADDING=0 ALIGN=CENTER><TR><TD>Quote, originally posted by EF8kid »</TD></TR><TR><TD CLASS="quote">I'll contribute some of my ChaseBays workssss</TD></TR></TABLE>
thanks for the contribution chase..
almost forgot to add that.. if all this info seems to be too much for you and you can't handle doing the work on your own

thanks for the contribution chase..
almost forgot to add that.. if all this info seems to be too much for you and you can't handle doing the work on your own
Trending Topics
09-20-2007, 10:57 AM
#8
<TABLE WIDTH="90%" CELLSPACING=0 CELLPADDING=0 ALIGN=CENTER><TR><TD>Quote, originally posted by Weak!EG »</TD></TR><TR><TD CLASS="quote">
thanks for the contribution chase..
almost forgot to add that.. if all this info seems to be too much for you and you can't handle doing the work on your own
</TD></TR></TABLE>
<TABLE WIDTH="90%" CELLSPACING=0 CELLPADDING=0 ALIGN=CENTER><TR><TD>Quote, originally posted by ARC Magic »</TD></TR><TR><TD CLASS="quote">good thread! </TD></TR></TABLE>
thanks for the contribution chase..
almost forgot to add that.. if all this info seems to be too much for you and you can't handle doing the work on your own
</TD></TR></TABLE>
<TABLE WIDTH="90%" CELLSPACING=0 CELLPADDING=0 ALIGN=CENTER><TR><TD>Quote, originally posted by ARC Magic »</TD></TR><TR><TD CLASS="quote">good thread!
</TD></TR></TABLE>
 09-20-2007, 12:56 PM
#10
Senior Member
Join Date: Dec 2004
Location: EMAIL ME at Chase@ChaseBaysOnline.com
Posts: 10,137
Likes: 0
Received 0 Likes
on
0 Posts
<TABLE WIDTH="90%" CELLSPACING=0 CELLPADDING=0 ALIGN=CENTER><TR><TD>Quote, originally posted by hayce »</TD></TR><TR><TD CLASS="quote">
fixed
</TD></TR></TABLE>
watd u do i dont get it haha
fixed
</TD></TR></TABLE>
watd u do i dont get it haha
09-21-2007, 09:06 AM
#13
Honda-Tech Member
Thread Starter
Join Date: Apr 2006
Location: Newport, NC, 28570
Posts: 1,684
Likes: 0
Received 0 Likes
on
0 Posts
thanks for all the positive feedback.. tried to spend a little bit of time on it if anyone has pics of their own brake line work feel free to post them.. the more pics the better.. makes peoples brains start thinking when doing their own.

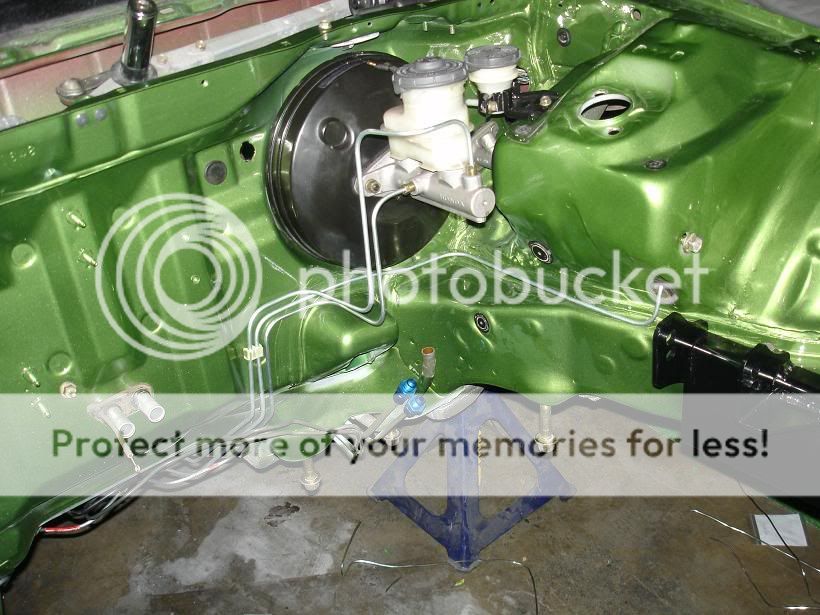
this is my own work.
the dimple below the shaved cruise control hole about 1/2 way up on the left in the pic that you can only see 1/2 of is where the other stainless line runs now..
if anyone has pics of their own brake line work feel free to post them.. the more pics the better.. makes peoples brains start thinking when doing their own.this is my own work.
the dimple below the shaved cruise control hole about 1/2 way up on the left in the pic that you can only see 1/2 of is where the other stainless line runs now..
09-21-2007, 03:13 PM
#15
Honda-Tech Member
Thread Starter
Join Date: Apr 2006
Location: Newport, NC, 28570
Posts: 1,684
Likes: 0
Received 0 Likes
on
0 Posts
<TABLE WIDTH="90%" CELLSPACING=0 CELLPADDING=0 ALIGN=CENTER><TR><TD>Quote, originally posted by JST1CAM »</TD></TR><TR><TD CLASS="quote">This makes me wanna start tuckin my hatch
Does anyone know if you can keep the heater ducts and still put the prop valve in the car??</TD></TR></TABLE>
yes you can, chase has done some work similar to this i believe.. its all about how far you want to go with your car.
if he doesnt chime back in on the thread then pm him (EF8Kid) and ask him about it.. he may have some pictures.
09-21-2007, 04:29 PM
#18
Honda-Tech Member
Join Date: May 2001
Location: Lynchvegas, Va, USA
Posts: 3,572
Likes: 0
Received 0 Likes
on
0 Posts
I'm working toward redoing all my lines for a prop valve setup. This thread is informative even for the "I don't care what it looks like as long as it works" crowd.
 nothing but time and headaches
  09-21-2007, 10:59 PM
#20
Honda-Tech Member

Join Date: Oct 2005
Location: Indy
Posts: 161
Likes: 0
Received 0 Likes
on
0 Posts
<TABLE WIDTH="90%" CELLSPACING=0 CELLPADDING=0 ALIGN=CENTER><TR><TD>Quote, originally posted by EF8kid »</TD></TR><TR><TD CLASS="quote">yes u can keep heat just put the prop valve low inside the car.</TD></TR></TABLE>
Thank you for your input
I'm gonna take a closer look at the car tomorrow for it
Thank you for your input
I'm gonna take a closer look at the car tomorrow for it