
Guide To remove side panel for speakers?
 03-06-2007, 01:09 PM
#1
* B A N N E D *
Thread Starter

Join Date: May 2006
Location: Skokie
Posts: 581
Likes: 0
Received 0 Likes
on
0 Posts
im gonna swap speakers soon need a guide on how to remove the side door panel so i dont break ****.
google failes me
please help
google failes me
please help
 03-06-2007, 01:37 PM
#2
always try searching on civicforums.com - they have a lot of DIY's. if you're not a member, i doubt you will be able to see these pics, but here you go. this is for a sedan, i'd think its the same for a coupe, if not, i'm sure you can figure it out.
I know this has been DIY'ed several times, but even the sticky didn't cover everything I encountered, so I thought I'd write up what I did. Also, I'm making the pictures as attachments so they won't get lost and turn into little red x's in a year or so like most of the DIY's on here that have pics hosted on another site.
Speakers
Infinity Reference 6012i
Tools Needed
Standard flathead screwdriver
#2 Philips screwdriver
Long skinny flathead screwdriver
Drill (preferably cordless)
3/16" drill bit
3/8" drill bit
8-32 Tap and matching #29 drill bit (can usually be bought as a set for a couple $$$)
Wire strippers
Terminal crimpers
Jigsaw
Parts Needed
(8) - 8-32 x 1.25" Machine Screws
(8) - #8 Lock Washers
1ft Speaker wire 16 or 18 ga
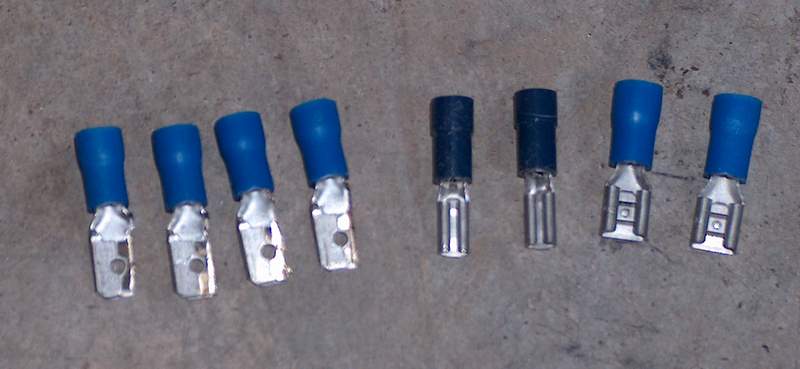
(4) - Male spade connectors
(2) - Small female spade connectors
(2) - Medium female spade connectors
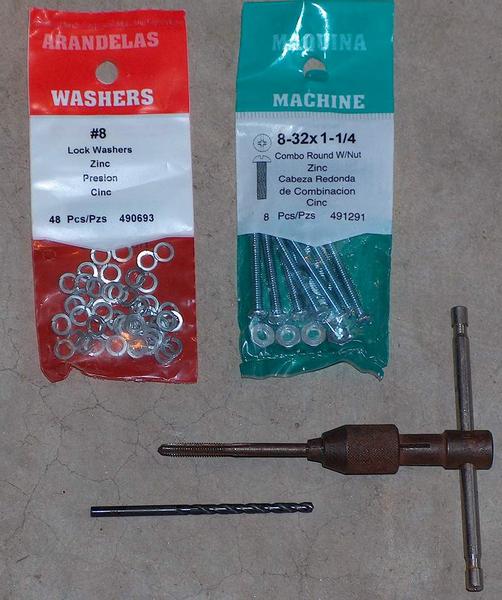
Here's the tap, drill bit, screws and washers you can pick up at Lowe's.
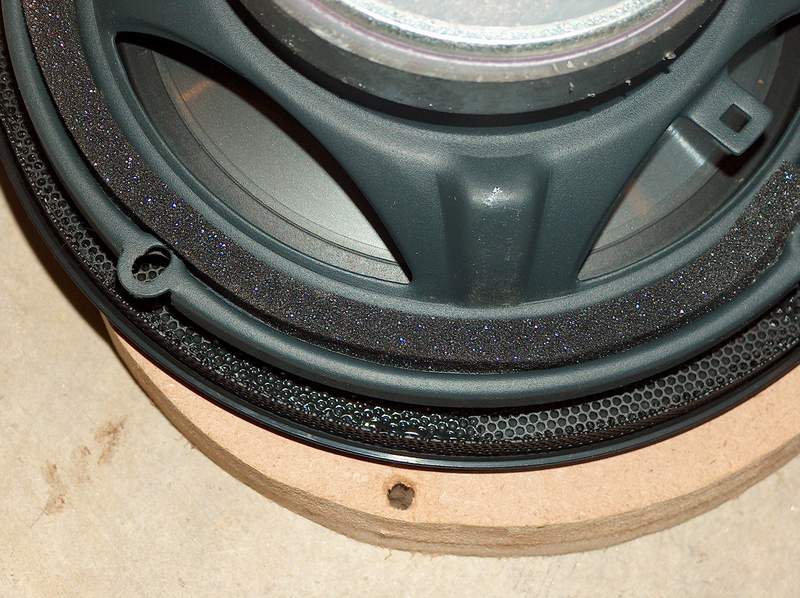
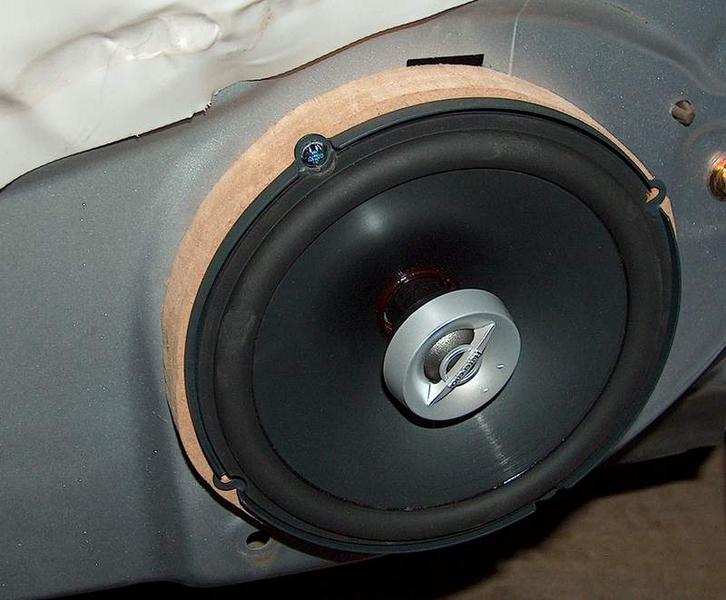
As you can see here, you've only got about 1.75" of clearance between the top of the door panel and the window. also, the width of the opening is ~4.125" so keep that in mind when picking out speakers. especially if you want components. they tend to have very large magnets.
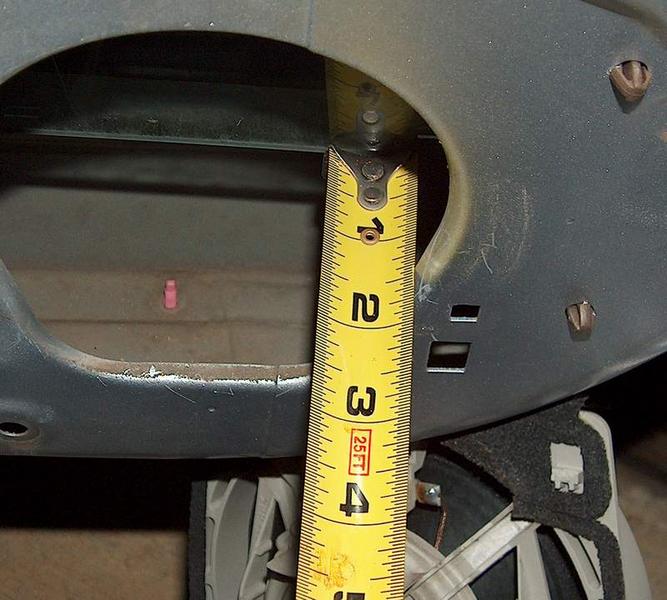
If your speakers are less than that, then you're good. Go head and mount them. My speakers were right at 2", so I needed a spacer.
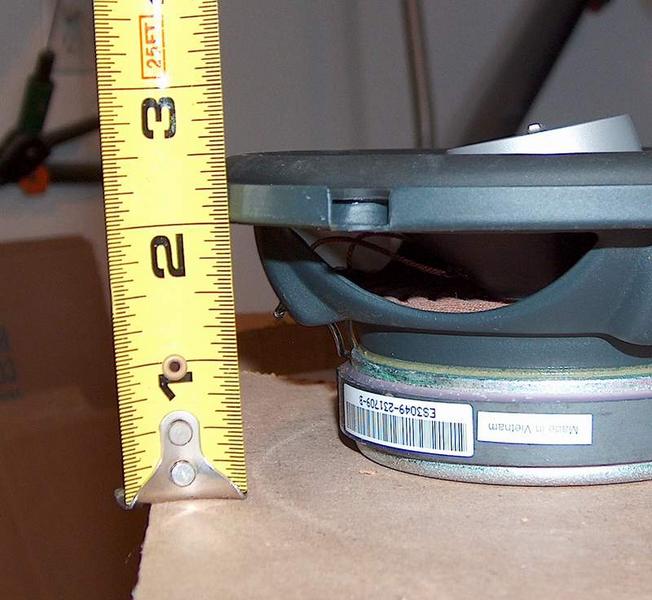
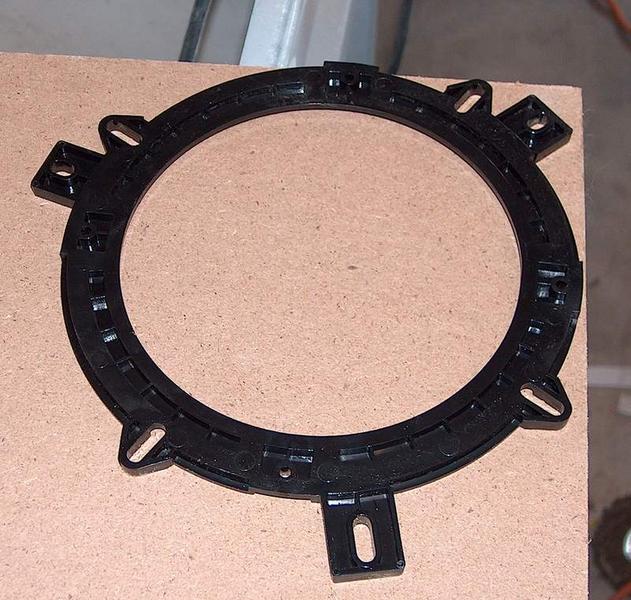
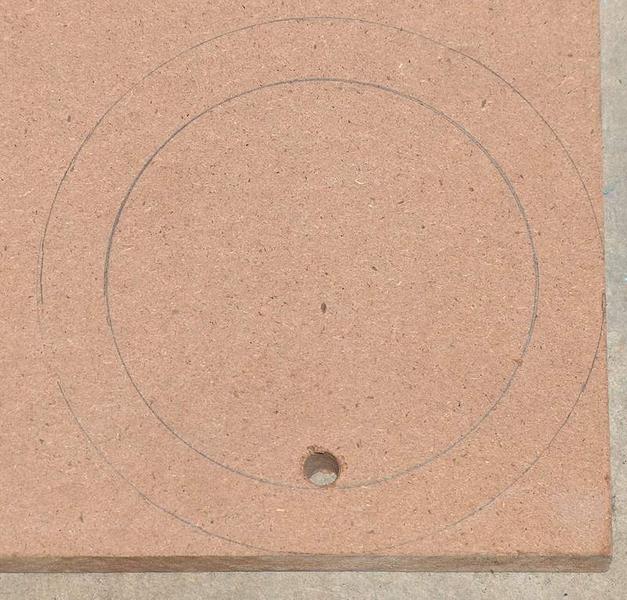
A 0.5" spacer would have done the trick, but I had some .75" MDF laying around so I used that for mine. You can use whatever you want to make your spacer. Start by tracing the adapter ring (or the speaker if you don't have one) as a template.
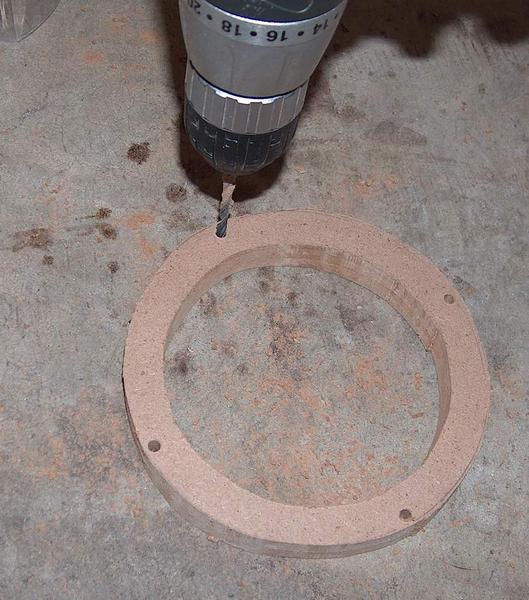
Drill a 3/8" hole in the middle ring so you can get the jigsaw blade in there.
Cut out the spacer and repeat for a second one.

Test fit the spacer on the speaker and ensure it fits. Mark the locations of the 4 mounting holes of the speaker.
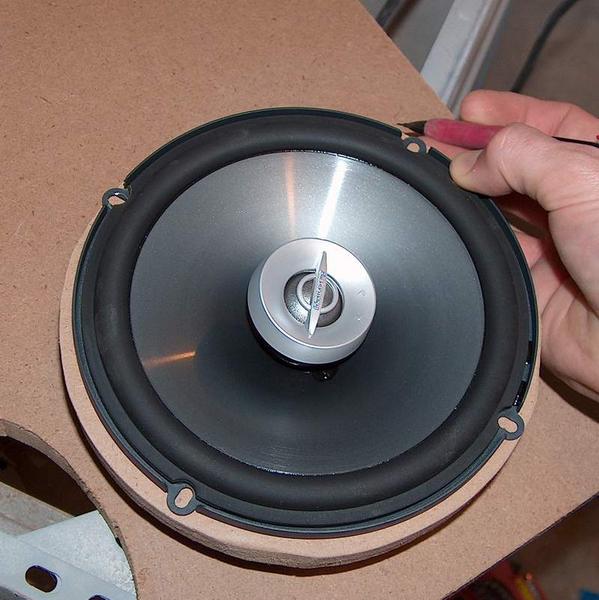
Drill the mount holes with a 3/16" drill. This hole is big enough to let the 8-32 screws pass through freely, which is what we want. Again, repeat for the other spacer.
My speakers came with foam, so I installed it on the back of the speakers. I doubt it will help at all, but I put it on anyway.
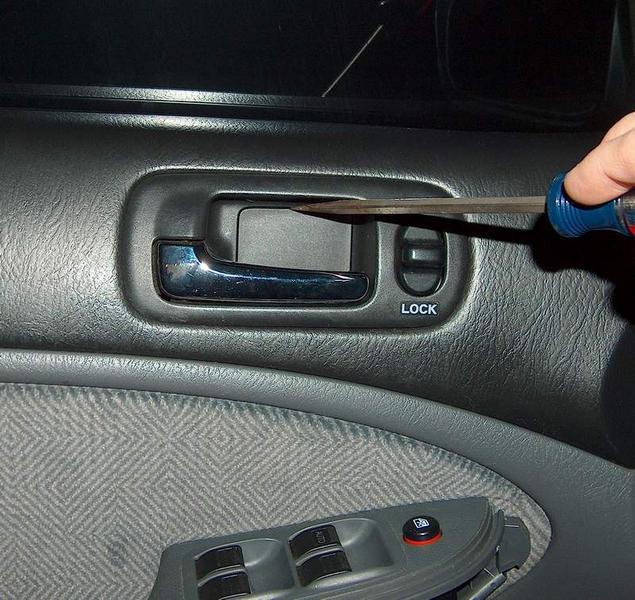
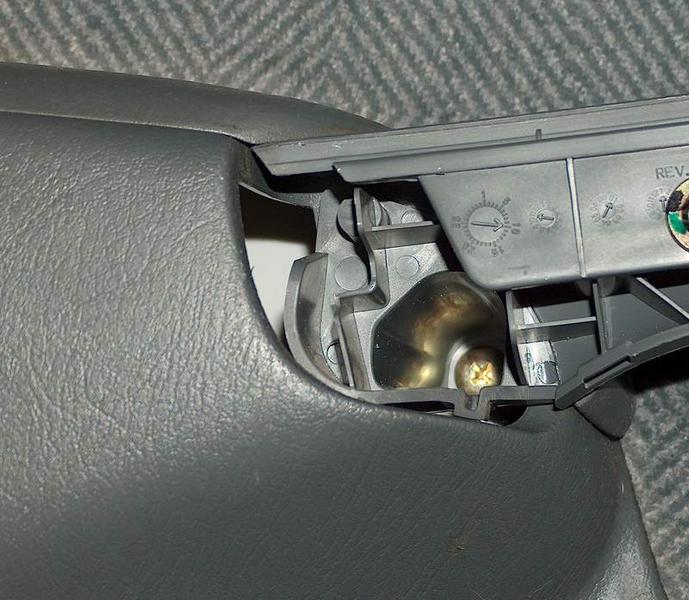
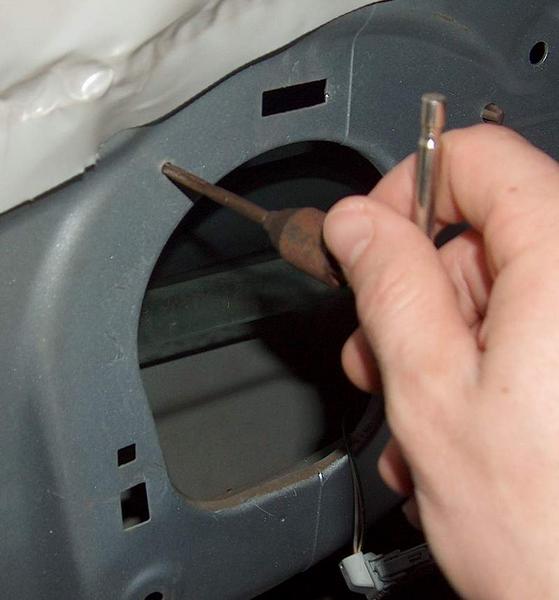
Insert screwdriver as shown and pop off cover.
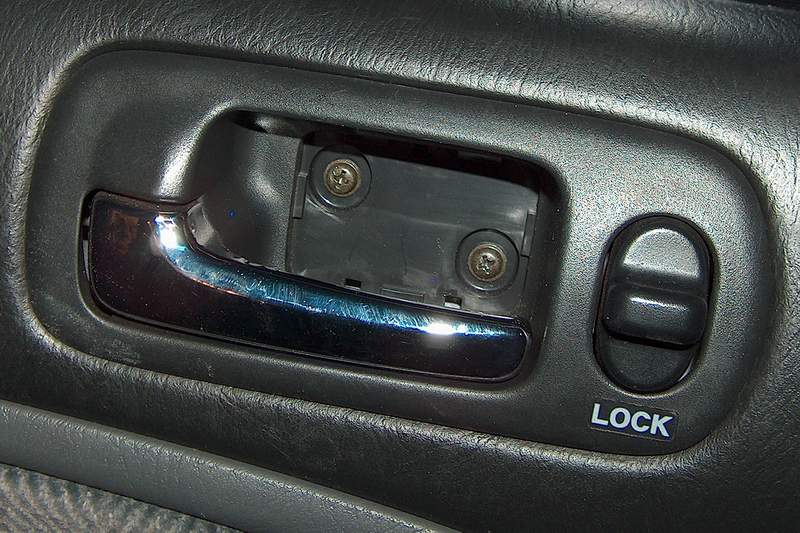
Remove 2 philips screws here.
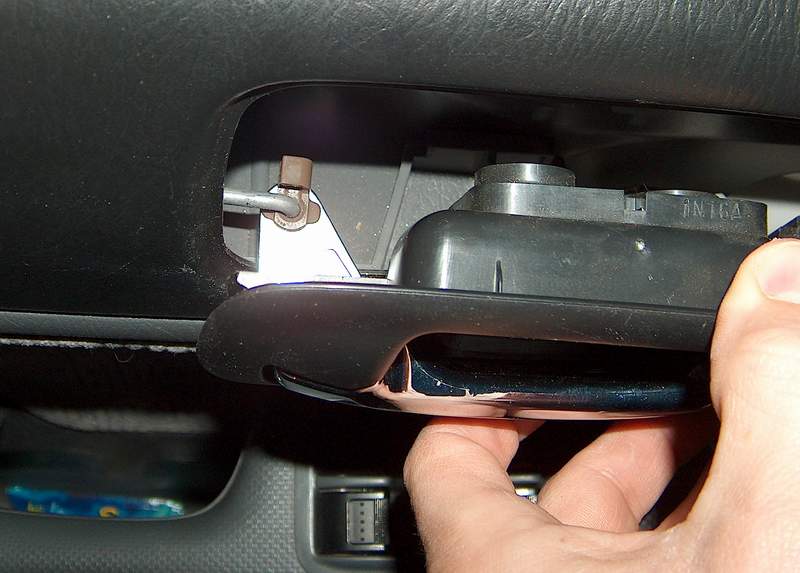
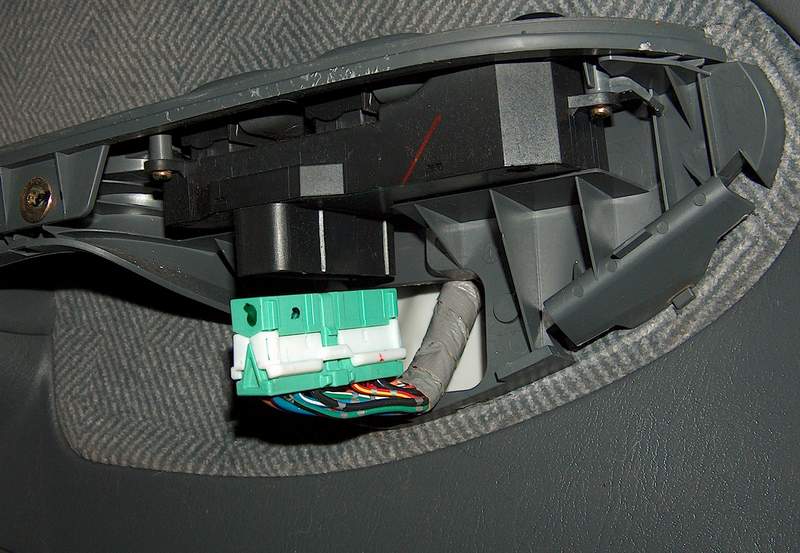
Pull out assembly as shown and remove electrical connector.
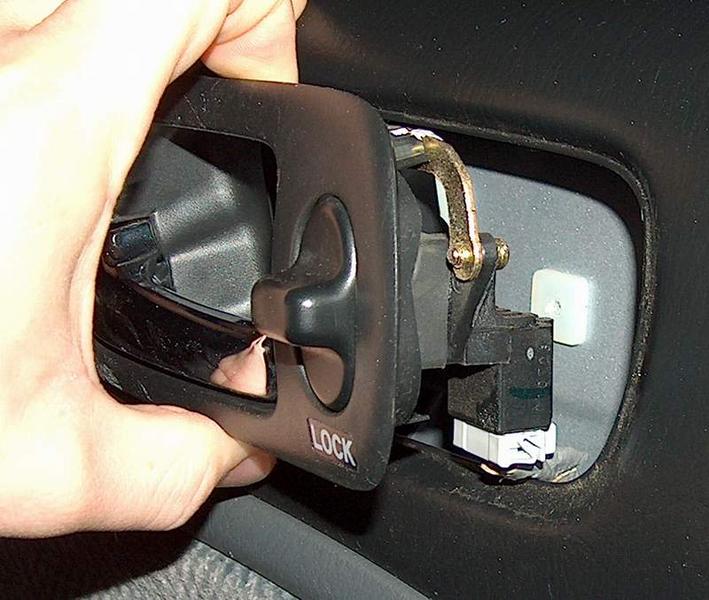
In order to remove the assembly, you'll have to remove the door opener rod. Rotate the plastic connector 90 degrees and lift the rod straight up. Compare the pics to see the connector.
Locked
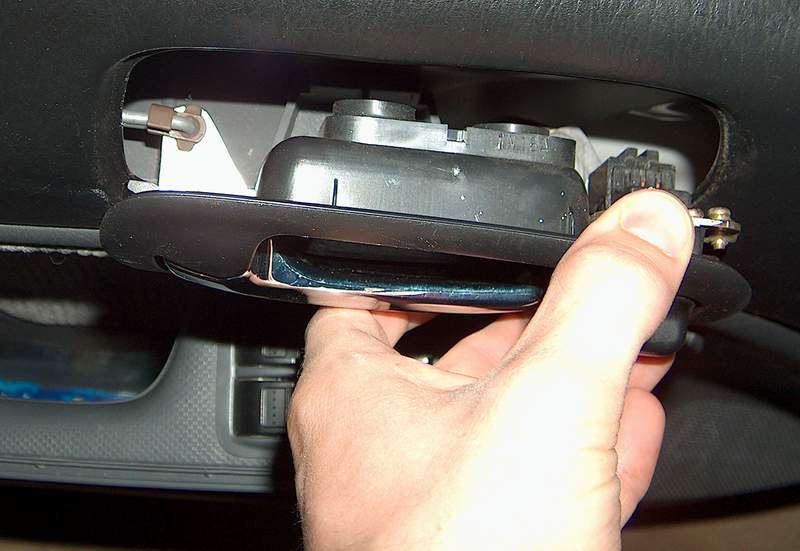
Unlocked
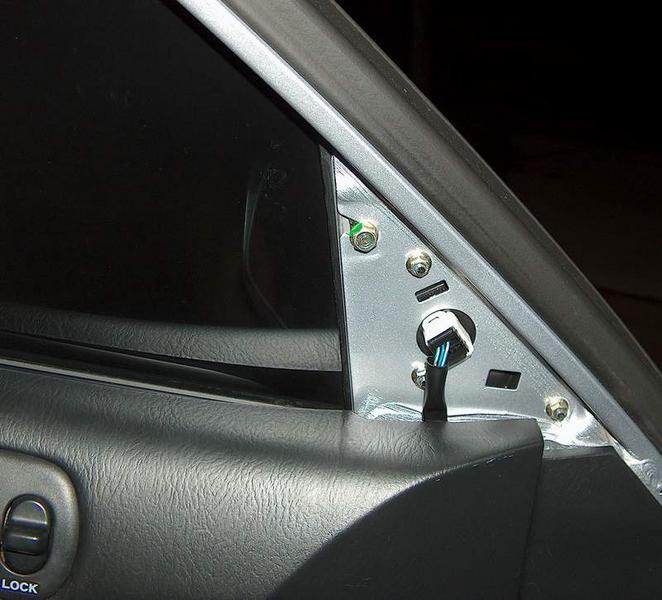
Remove Sail Panel.
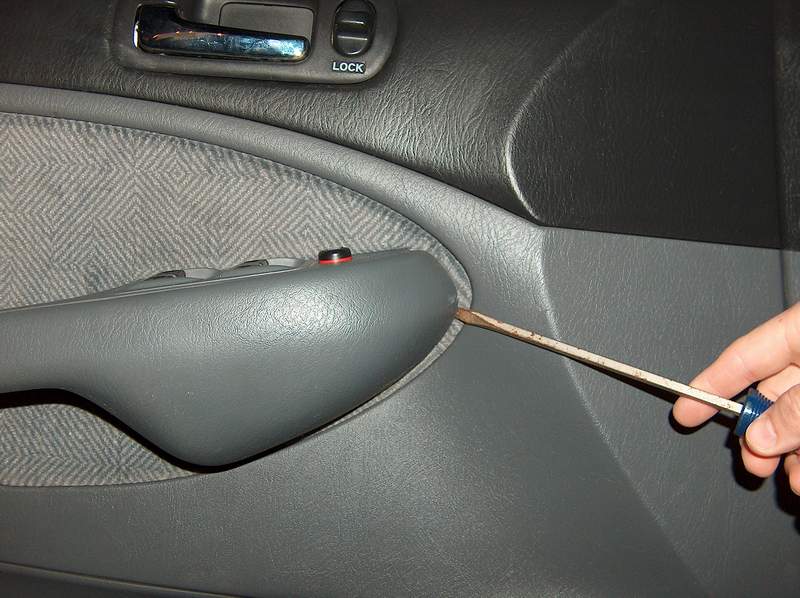
Insert screwdriver as shown and gently pry off the cover for the door handle.
Remove screw from door handle here
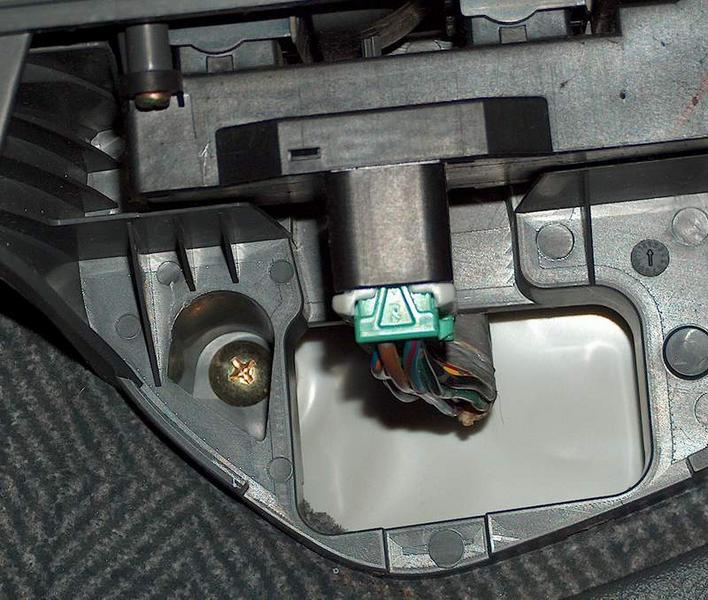
and here
Remove power window connector if applicable
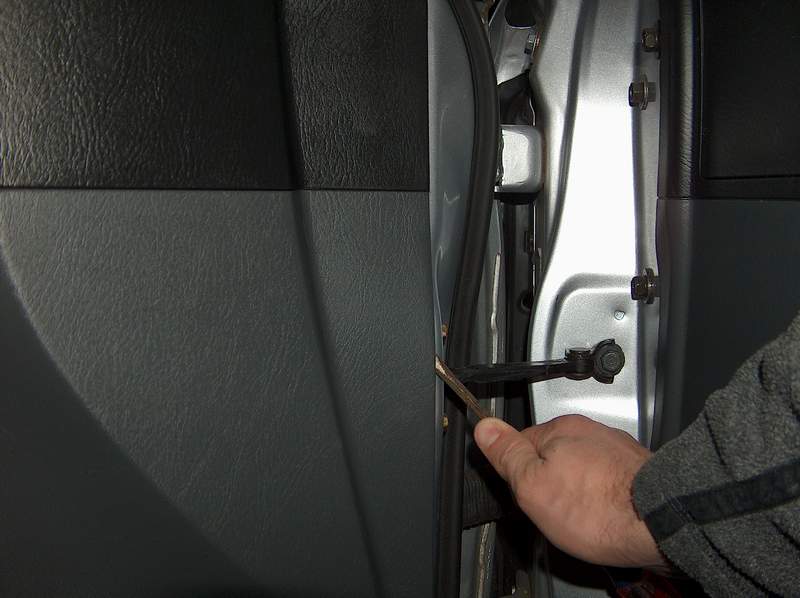
Insert screwdriver as shown here or anywhere around the door panel edge and pry up just enough to get your fingers behind the panel. There should be around 5-6 fasteners that will pop off. The panel the slides straight up out of the window channel.
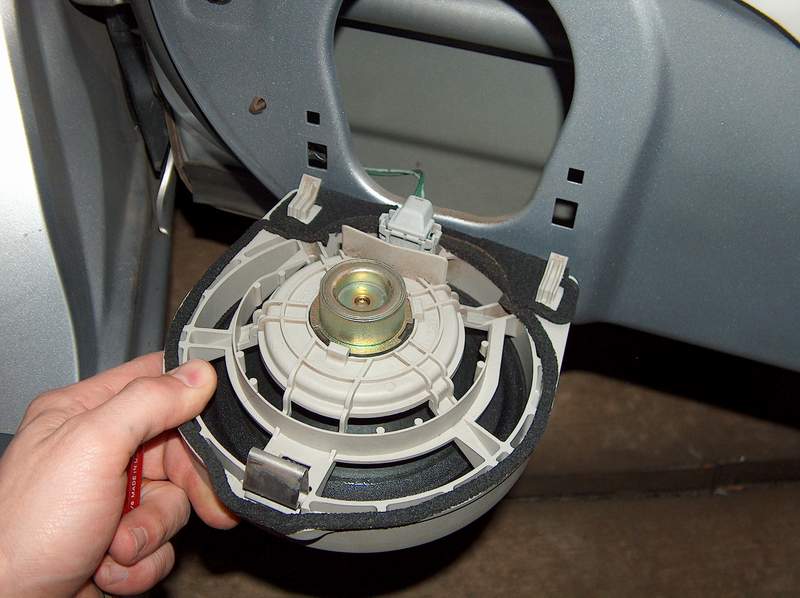
To remove the stock speakers without damaging them, insert the long skinny screwdriver into the top and press down to release the clip.
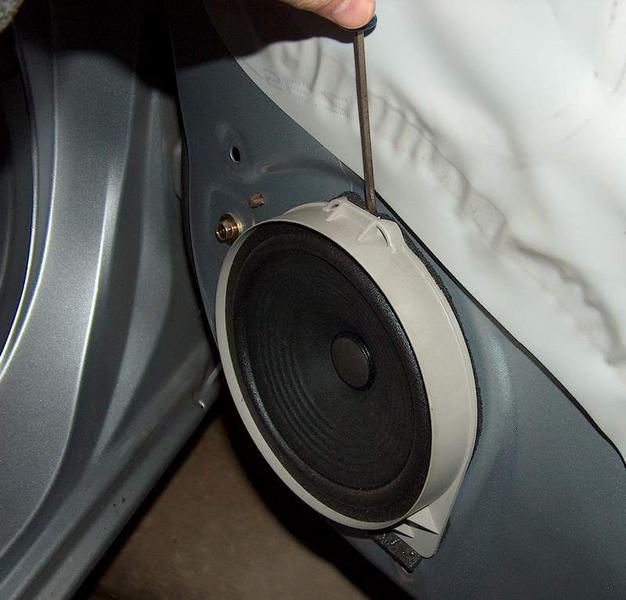
Wiggle the speaker back and forth while pulling up to release the bottom clips. then admire your massive paper driver! :giggle: Remove the factory connector
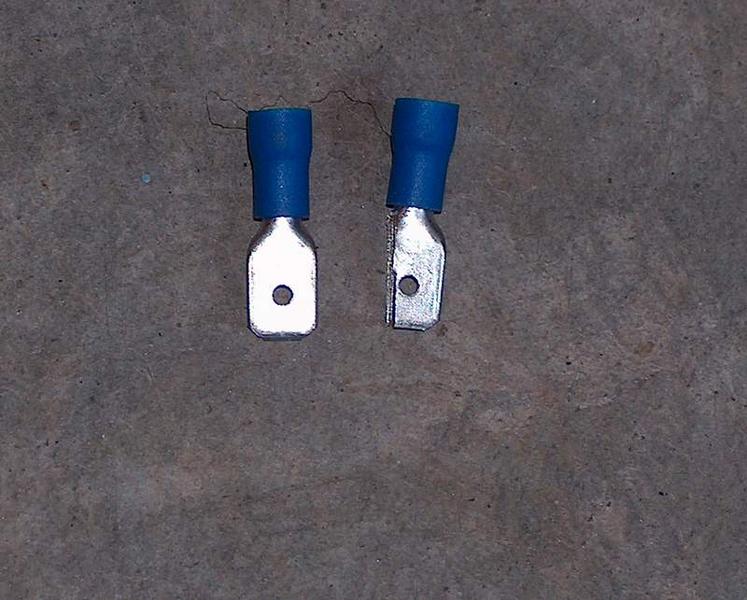
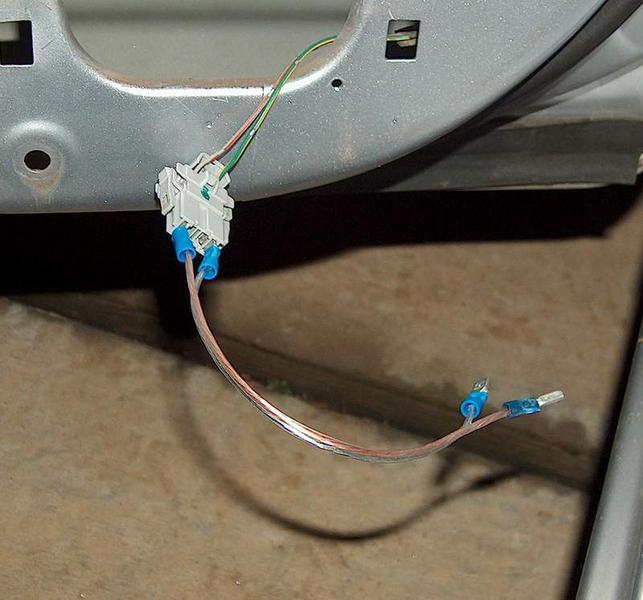
So I didn't have to cut off the factory connector and could reinstall the OEM speakers later if desired, I opted to make my own adapter harness. I only had the larger spade connectors on hand, so I cut them to make them fit. See pic for comparison. If you can get the medium size male's, then you'll be good.
Here's all the connectors you'll need.
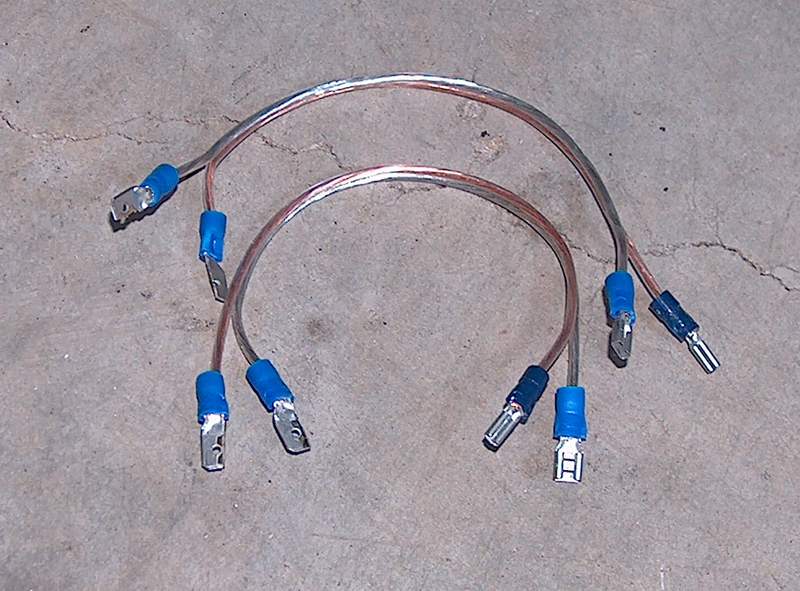
Cut the 1ft wire in half, strip the ends and crimp the terminals on to make the 2 harnesses.
Position the speaker and spacer on the door. Ensure that the speaker terminals will not touch the metal of the door panel. Mark the location of one hole. Drill with the #29 bit and tap it to make threads.
Mount the speaker with one screw and tighten down. Mark the location of the other 3 mount holes. I inserted the 3/16 drill bit into the spacers holes to mark the metal. I made a mark on the spacer so I knew where the speaker terminals were. This made it easier when I was reinstalling because unless you drill everything perfectly spaced, the spacer will only really fit one way when you put it back together.
Drill and tap the remaining 3 mount holes. Install the wire harness you made.
Put a lock washer on each of the 4 mount screws. Insert and mount the speaker with 4 screws and 4 lockwashers.

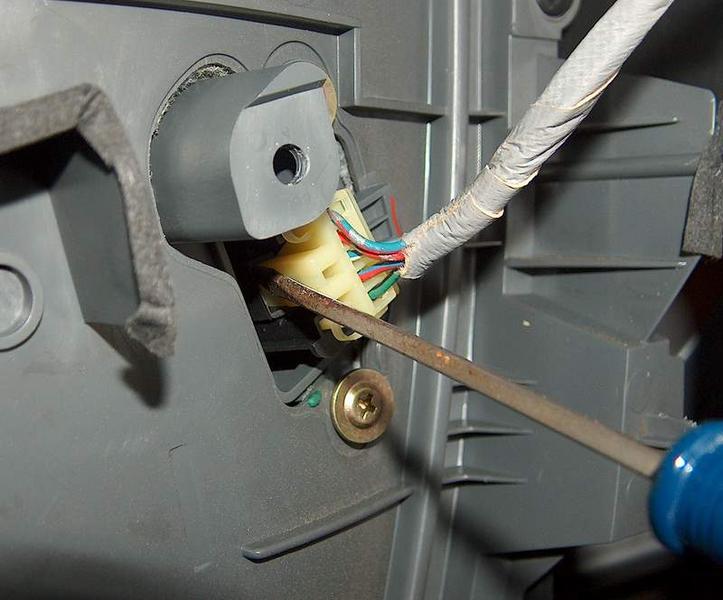
At this point, I turned my car on to make sure that the speaker was working. Once you're satisfied, reinstall the door panel the opposite of how you removed it. The passenger side is essentiall the same with one exception. Removing the electrical connector for the power window has to be done from the back of the panel. Insert the skinny screwdriver as shown to release the locking clip.
Other than that, the install is the same as the driver's side. Enjoy your new speakers.
TIP:When installing the door panels, it's easier to do it if the windows are rolled down. Obvisously, the window control switch needs to be connected for this to happen, so i rolled my windows down before I started. Also, if you're using a different spacer, with the window already rolled down, you'll know right away if the speaker is going to hit the window or not.
Speakers
Infinity Reference 6012i
Tools Needed
Standard flathead screwdriver
#2 Philips screwdriver
Long skinny flathead screwdriver
Drill (preferably cordless)
3/16" drill bit
3/8" drill bit
8-32 Tap and matching #29 drill bit (can usually be bought as a set for a couple $$$)
Wire strippers
Terminal crimpers
Jigsaw
Parts Needed
(8) - 8-32 x 1.25" Machine Screws
(8) - #8 Lock Washers
1ft Speaker wire 16 or 18 ga
(4) - Male spade connectors
(2) - Small female spade connectors
(2) - Medium female spade connectors
Here's the tap, drill bit, screws and washers you can pick up at Lowe's.
As you can see here, you've only got about 1.75" of clearance between the top of the door panel and the window. also, the width of the opening is ~4.125" so keep that in mind when picking out speakers. especially if you want components. they tend to have very large magnets.
If your speakers are less than that, then you're good. Go head and mount them. My speakers were right at 2", so I needed a spacer.
A 0.5" spacer would have done the trick, but I had some .75" MDF laying around so I used that for mine. You can use whatever you want to make your spacer. Start by tracing the adapter ring (or the speaker if you don't have one) as a template.
Drill a 3/8" hole in the middle ring so you can get the jigsaw blade in there.
Cut out the spacer and repeat for a second one.
Test fit the spacer on the speaker and ensure it fits. Mark the locations of the 4 mounting holes of the speaker.
Drill the mount holes with a 3/16" drill. This hole is big enough to let the 8-32 screws pass through freely, which is what we want. Again, repeat for the other spacer.
My speakers came with foam, so I installed it on the back of the speakers. I doubt it will help at all, but I put it on anyway.
Insert screwdriver as shown and pop off cover.
Remove 2 philips screws here.
Pull out assembly as shown and remove electrical connector.
In order to remove the assembly, you'll have to remove the door opener rod. Rotate the plastic connector 90 degrees and lift the rod straight up. Compare the pics to see the connector.
Locked
Unlocked
Remove Sail Panel.
Insert screwdriver as shown and gently pry off the cover for the door handle.
Remove screw from door handle here
and here
Remove power window connector if applicable
Insert screwdriver as shown here or anywhere around the door panel edge and pry up just enough to get your fingers behind the panel. There should be around 5-6 fasteners that will pop off. The panel the slides straight up out of the window channel.
To remove the stock speakers without damaging them, insert the long skinny screwdriver into the top and press down to release the clip.
Wiggle the speaker back and forth while pulling up to release the bottom clips. then admire your massive paper driver! :giggle: Remove the factory connector
So I didn't have to cut off the factory connector and could reinstall the OEM speakers later if desired, I opted to make my own adapter harness. I only had the larger spade connectors on hand, so I cut them to make them fit. See pic for comparison. If you can get the medium size male's, then you'll be good.
Here's all the connectors you'll need.
Cut the 1ft wire in half, strip the ends and crimp the terminals on to make the 2 harnesses.
Position the speaker and spacer on the door. Ensure that the speaker terminals will not touch the metal of the door panel. Mark the location of one hole. Drill with the #29 bit and tap it to make threads.
Mount the speaker with one screw and tighten down. Mark the location of the other 3 mount holes. I inserted the 3/16 drill bit into the spacers holes to mark the metal. I made a mark on the spacer so I knew where the speaker terminals were. This made it easier when I was reinstalling because unless you drill everything perfectly spaced, the spacer will only really fit one way when you put it back together.
Drill and tap the remaining 3 mount holes. Install the wire harness you made.
Put a lock washer on each of the 4 mount screws. Insert and mount the speaker with 4 screws and 4 lockwashers.
At this point, I turned my car on to make sure that the speaker was working. Once you're satisfied, reinstall the door panel the opposite of how you removed it. The passenger side is essentiall the same with one exception. Removing the electrical connector for the power window has to be done from the back of the panel. Insert the skinny screwdriver as shown to release the locking clip.
Other than that, the install is the same as the driver's side. Enjoy your new speakers.
TIP:When installing the door panels, it's easier to do it if the windows are rolled down. Obvisously, the window control switch needs to be connected for this to happen, so i rolled my windows down before I started. Also, if you're using a different spacer, with the window already rolled down, you'll know right away if the speaker is going to hit the window or not.
 03-09-2007, 05:56 AM
#6
* B A N N E D *
Thread Starter
Join Date: May 2006
Location: Skokie
Posts: 581
Likes: 0
Received 0 Likes
on
0 Posts
while on topic, is there also a guide on how to remove the back speakers? Im not feeling too comfy taking off the rear cover. is it just the few snap ins from inside the trunk or something more
03-09-2007, 06:02 AM
#7
PICS ARE DEAD BUT READ

Here is a list of the junk needed for this job:
1. A ratchet
2. Socket 10mm
3. Clip pry screwdriver (optional, but keeps you from messin' stuff up)
4. Dynamat (optional, but recommended, especially if you have subs)

1. If it's colder than a bitch (-20oC) you better dress warm and wear gloves...

2. Swapping Infinity Reference Series 6002i 6 1/2 in. 2 way speakers for the
factory "paper series"

3. Take off the 10mm bolt from under the driver side cushion.

4. Open the trunk. On the same piece that you just took the bolt out of there is
a big plastic clip (arrow) push up on it reasonably hard to loosen it. Go back
in the car and lift the cushion. It will just come out.

5. Take off the passenger cushion the same way. Now is a good time to flip down
the seats so you can see into the trunk.

6. Loosen the trim. You don't have to take it right off. About this much is
perfect.

7. Peel back the rubber door trim about half way accross the door.

8. Unplug the defrost wires on both sides.

9. Take off the trim piece vertical to the window. Be careful, but don't be
afraid to show it who's the boss. Pull it towards the middle of the car.

10. Here's where all the clips are - only 9 of them! Take the trim off both
sides.

11. Take the passenger and driver side seat belts out of the rear deck. Don't
worry about the middle belt.

12. Make sure you unplug the brake light from inside the trunk.

13. Here is the rear deck and it's ready to come out. The trick to this is:
loosen the three front clips (arrows). Then start to pull up. After you stop
hearing clicks, you need to pull it almost straight towards you. It isn't as
hard as it sounds.

14. The rear deck.

15. Attack the speakers with your 10mm socket.

16. I went 'Office Space' on my speakers (optional)

17. Dynamat the deck (optional but highly reccomended epsecially if you have
subs) and mout the speakers into their new home. If you have Infinity 6002i's,
you have to adjust the tweeter direction now. Note about Dynamat: This crap is
expensive but it works good. You DON'T HAVE TO USE A LOT. For 2 speakers and the
scraps in the middle I used 1 12"x12" square and it works just as well as using
twice that much.

18. Looks/sounds a lot better than the stock crap. Now do the opposite of the
directions to rebuild your car. Don''t forget to plug in your brake light or
the cops will pull you over.

19. Dream about your next project. An Alpine TME-M710 7" Widescreen LCD display
in your passenger visor and a hardwired PS2 slim in your glove box maybe?

20. Or you could slap Infinity 6000cs 6 1/2" 2 way components in the
front...It's all up to you.

21. For now just have a beer. You deserve it.
Here is a list of the junk needed for this job:
1. A ratchet
2. Socket 10mm
3. Clip pry screwdriver (optional, but keeps you from messin' stuff up)
4. Dynamat (optional, but recommended, especially if you have subs)
1. If it's colder than a bitch (-20oC) you better dress warm and wear gloves...
2. Swapping Infinity Reference Series 6002i 6 1/2 in. 2 way speakers for the
factory "paper series"
3. Take off the 10mm bolt from under the driver side cushion.
4. Open the trunk. On the same piece that you just took the bolt out of there is
a big plastic clip (arrow) push up on it reasonably hard to loosen it. Go back
in the car and lift the cushion. It will just come out.
5. Take off the passenger cushion the same way. Now is a good time to flip down
the seats so you can see into the trunk.
6. Loosen the trim. You don't have to take it right off. About this much is
perfect.
7. Peel back the rubber door trim about half way accross the door.
8. Unplug the defrost wires on both sides.
9. Take off the trim piece vertical to the window. Be careful, but don't be
afraid to show it who's the boss. Pull it towards the middle of the car.
10. Here's where all the clips are - only 9 of them! Take the trim off both
sides.
11. Take the passenger and driver side seat belts out of the rear deck. Don't
worry about the middle belt.
12. Make sure you unplug the brake light from inside the trunk.
13. Here is the rear deck and it's ready to come out. The trick to this is:
loosen the three front clips (arrows). Then start to pull up. After you stop
hearing clicks, you need to pull it almost straight towards you. It isn't as
hard as it sounds.
14. The rear deck.
15. Attack the speakers with your 10mm socket.
16. I went 'Office Space' on my speakers (optional)
17. Dynamat the deck (optional but highly reccomended epsecially if you have
subs) and mout the speakers into their new home. If you have Infinity 6002i's,
you have to adjust the tweeter direction now. Note about Dynamat: This crap is
expensive but it works good. You DON'T HAVE TO USE A LOT. For 2 speakers and the
scraps in the middle I used 1 12"x12" square and it works just as well as using
twice that much.
18. Looks/sounds a lot better than the stock crap. Now do the opposite of the
directions to rebuild your car. Don''t forget to plug in your brake light or
the cops will pull you over.
19. Dream about your next project. An Alpine TME-M710 7" Widescreen LCD display
in your passenger visor and a hardwired PS2 slim in your glove box maybe?
20. Or you could slap Infinity 6000cs 6 1/2" 2 way components in the
front...It's all up to you.
21. For now just have a beer. You deserve it.
Trending Topics
03-09-2007, 08:32 AM
#10
Grace Under Pressure
Join Date: May 2006
Location: The Fugitive Motel
Posts: 2,519
Likes: 0
Received 0 Likes
on
0 Posts
<TABLE WIDTH="90%" CELLSPACING=0 CELLPADDING=0 ALIGN=CENTER><TR><TD>Quote, originally posted by fventura03 »</TD></TR><TR><TD CLASS="quote">yes.</TD></TR></TABLE>
LMFAO dude...
LMFAO dude...
03-09-2007, 08:42 AM
#11
* B A N N E D *
Thread Starter
Join Date: May 2006
Location: Skokie
Posts: 581
Likes: 0
Received 0 Likes
on
0 Posts
Damn it, host site is down or something..
there a guide outthere with teh pics? im at work right now and dont have time to search and would like to add these speakers in today
there a guide outthere with teh pics? im at work right now and dont have time to search and would like to add these speakers in today
03-09-2007, 12:59 PM
#17
<TABLE WIDTH="90%" CELLSPACING=0 CELLPADDING=0 ALIGN=CENTER><TR><TD>Quote, originally posted by Killtodie »</TD></TR><TR><TD CLASS="quote">teh guide is useless without pics  </TD></TR></TABLE>
And you're useless without common knowledge, and the innate ability to NOT search.
</TD></TR></TABLE>And you're useless without common knowledge, and the innate ability to NOT search.
03-09-2007, 10:50 PM
#20
* B A N N E D *
Thread Starter
Join Date: May 2006
Location: Skokie
Posts: 581
Likes: 0
Received 0 Likes
on
0 Posts
while we are on topic, I was looking for a guide to remove the deck, anyway, says to pull the bottom thing out, the 12v plug and the button, that thing wont budge though. should i remove the center thing around the shifter and go from there?
03-09-2007, 10:50 PM
#21
* B A N N E D *
Thread Starter
Join Date: May 2006
Location: Skokie
Posts: 581
Likes: 0
Received 0 Likes
on
0 Posts
<TABLE WIDTH="90%" CELLSPACING=0 CELLPADDING=0 ALIGN=CENTER><TR><TD>Quote, originally posted by fventura03 »</TD></TR><TR><TD CLASS="quote">not bad, i guess.</TD></TR></TABLE>
like hell if I was gonna spend 3 hours taking out the rear seat and inside quaterpanels. $40 for someone else to do it aint bad
like hell if I was gonna spend 3 hours taking out the rear seat and inside quaterpanels. $40 for someone else to do it aint bad
03-10-2007, 02:13 PM
#23
* B A N N E D *
Thread Starter
Join Date: May 2006
Location: Skokie
Posts: 581
Likes: 0
Received 0 Likes
on
0 Posts
Yes thats true. but I dont a cordless drill and would have needed to buy a 50ft power extention cable for $35 so whatever. plus, its ****** snowing here all day
11-06-2007, 05:01 PM
#24
Join Date: Nov 2007
Location: Trois Rivieres, Quebec, Canada
Posts: 1
Likes: 0
Received 0 Likes
on
0 Posts
Originally Posted by fventura03
PICS ARE DEAD BUT READ
Here is a list of the junk needed for this job:
1. A ratchet
2. Socket 10mm
3. Clip pry screwdriver (optional, but keeps you from messin' stuff up)
4. Dynamat (optional, but recommended, especially if you have subs)
1. If it's colder than a bitch (-20oC) you better dress warm and wear gloves...
2. Swapping Infinity Reference Series 6002i 6 1/2 in. 2 way speakers for the
factory "paper series"
3. Take off the 10mm bolt from under the driver side cushion.
4. Open the trunk. On the same piece that you just took the bolt out of there is
a big plastic clip (arrow) push up on it reasonably hard to loosen it. Go back
in the car and lift the cushion. It will just come out.
5. Take off the passenger cushion the same way. Now is a good time to flip down
the seats so you can see into the trunk.
6. Loosen the trim. You don't have to take it right off. About this much is
perfect.
7. Peel back the rubber door trim about half way accross the door.
8. Unplug the defrost wires on both sides.
9. Take off the trim piece vertical to the window. Be careful, but don't be
afraid to show it who's the boss. Pull it towards the middle of the car.
10. Here's where all the clips are - only 9 of them! Take the trim off both
sides.
11. Take the passenger and driver side seat belts out of the rear deck. Don't
worry about the middle belt.
12. Make sure you unplug the brake light from inside the trunk.
13. Here is the rear deck and it's ready to come out. The trick to this is:
loosen the three front clips (arrows). Then start to pull up. After you stop
hearing clicks, you need to pull it almost straight towards you. It isn't as
hard as it sounds.
14. The rear deck.
15. Attack the speakers with your 10mm socket.
16. I went 'Office Space' on my speakers (optional)
17. Dynamat the deck (optional but highly reccomended epsecially if you have
subs) and mout the speakers into their new home. If you have Infinity 6002i's,
you have to adjust the tweeter direction now. Note about Dynamat: This crap is
expensive but it works good. You DON'T HAVE TO USE A LOT. For 2 speakers and the
scraps in the middle I used 1 12"x12" square and it works just as well as using
twice that much.
18. Looks/sounds a lot better than the stock crap. Now do the opposite of the
directions to rebuild your car. Don''t forget to plug in your brake light or
the cops will pull you over.
19. Dream about your next project. An Alpine TME-M710 7" Widescreen LCD display
in your passenger visor and a hardwired PS2 slim in your glove box maybe?
20. Or you could slap Infinity 6000cs 6 1/2" 2 way components in the
front...It's all up to you.
21. For now just have a beer. You deserve it.
11-07-2007, 08:22 AM
#25
Junior Member
Join Date: Oct 2007
Location: New York, USA
Posts: 240
Likes: 0
Received 0 Likes
on
0 Posts
I wonder...if you manufacture your own spacers / mounting pieces like that...If its going to clear the factory speaker grille / cover on the door panel... 
guess it depends on how thick the MDF you use is and how deep the back of the speaker extends into the door itself...
any dimensions to look for?
guess it depends on how thick the MDF you use is and how deep the back of the speaker extends into the door itself...
any dimensions to look for?