
Complete write up - DA to CIVIC 4dr Rear Disc Brake Swap
 08-09-2005, 01:43 PM
#1
Senior Member
Thread Starter
iTrader: (4)
Join Date: Dec 2004
Location: Diamond Bar, Ca.
Posts: 2,536
Likes: 0
Received 0 Likes
on
0 Posts
So you got a set of Disc Brakes that you want to throw on to your ride. Easy task right? NOT! Well at least not for us first timers. I’m going try and take out all of the guess work with this write up. This project is for a 1991 Civic 4dr EX. So you may or may not have the same stock set up as I do. The EX’s I believe have the bigger front brake set up than the DX and LX’s. Plus I don’t know if after 1991 if the brake sizes have changed. This should help you to figure out what you basically need to get started and to get it bolted onto your car. And for you guys out there who don’t like to read, I’ve got lots o pictures for you to look at.
Stock 1991 CIVIC RTA’s (Rear Trailing Arm) will be replaced with 1990 DA RTA’s. There’s another option if you want, and that is to remove only the disc brake unit and e-brake from the DA RTA and bolt them onto the CIVIC RTA, let me know if your able to get the older Torx screws (T45) off either of the RTA’s without stripping them (mine aren’t but after trying to give them a few tries it felt as though the metal was about to give, so I stopped and just went with this option) If you have the power tools or hookups to get to a shop then take all your stuff there and get it done and in half the time, too. Otherwise, for us who cannot afford power tools, here’s what you’ll need.
Oh yeah before I forget…Bushings. I’ve heard many stories with the Energy Suspension (ES) bushings that they pop out well, I will be a test guinea pig and will figure this out for myself. I have read many posts to say that they’ve never had a problem with their ES bushings, this after having them in for at least a year or more…so that’s good so far. Another thing I’d recommend you do before the installation, I didn’t do it but will later is to install a Zerk fitting. Polyurethane is a great material, but when it rains they begin to squeak and it’ll sound like your driving an old beat up truck. Whereas rubber fittings are maintenance free. You decide.
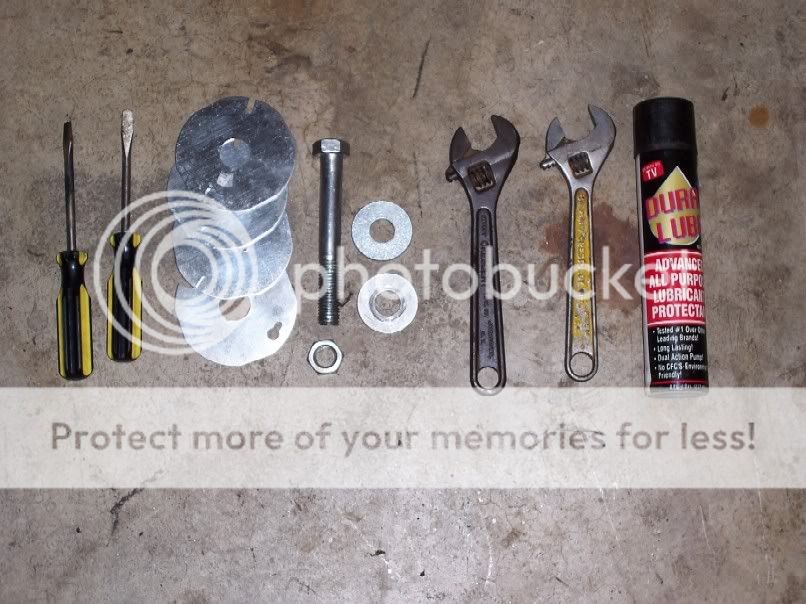
Lets begin. You’ll need the following items to start the installation of your project. ES says to get 3 ˝” washers from your favorite hardware store...I went to Home Depot, Loewe’s and ACE hardware, could not find that size. So I improvised, don’t ask how I came up with this idea but it worked very well. Go to the electrical aisle and pick out 4, 3 ˝” round electrical housing plates, it will have a partially punched center. While at Ace I picked up 5” X5/8ths” bolt and nut, along with 2 fender washers as they are called for extra support. Using these will come in after you remove the older bushings. Please note that you can use any lubricant available. You’ll need plenty of it. Also 2 open ended adjustable crescent wrenches and 2 std. “-“ screwdrivers. Costs for supplies if you have tools = <$5.00
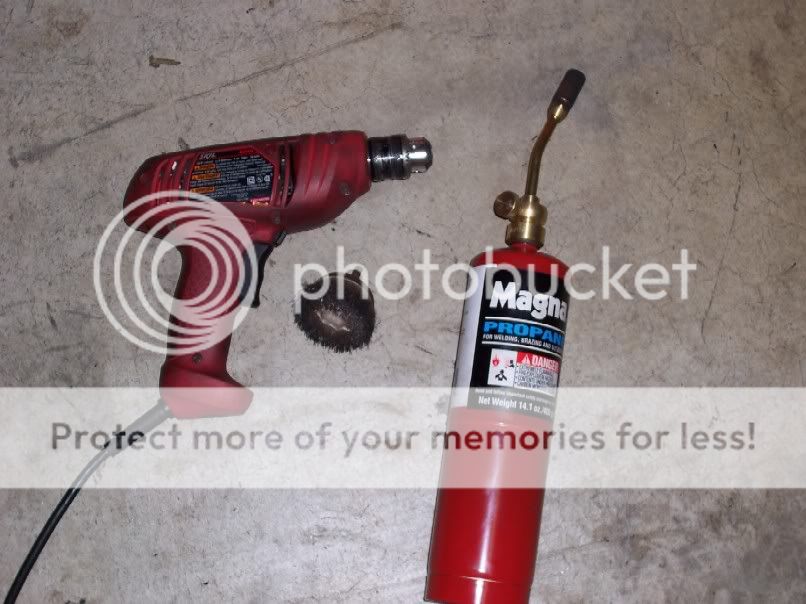
To remove the old bushings you will need the following items. A really good drill, a minimum of 3” cup steel bristle brush bit, and a propane torch…FIRE!! FIRE!!
Costs = <5.00 for the bit. Home Depot torch = $10-12.00. Drill = your choice.
STEP 1.
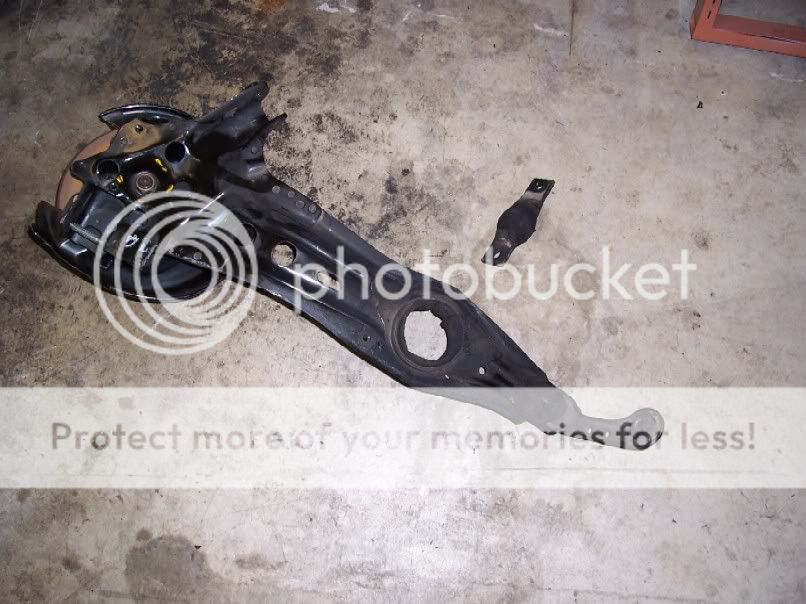
This is what the RTA will look like when you’ve burned the hell out of the bushings. Be careful of the rust proof coating on the arm, because of the heat this stuff will get very soft and will wipe away, don’t remove any of it. <u>This whole process takes about 1 hr on each side.</u> Costs for DA RTA, got mine for $120.00.
STEP 2
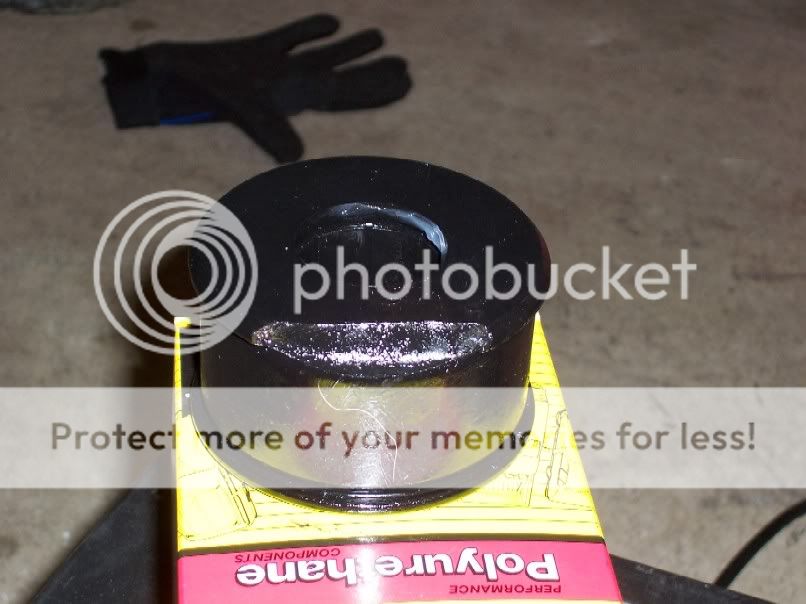
Once you’ve smoothed out all of the rubber from the pin and bushing cylinder you’ll end up with a smooth as a babies butt surface. So now let’s get those bushings on. OK so now you’ll need to grab the bolt, nut and all the tools as I indicated on the first pic. To load the bushing you’ll need to prep the RTA first with ES lube, use the whole tube. Next place the bushing on the outside of the RTA (rotor side), place 2 of the “aftermarket” washers on top then the fender washer and finally the screw. Slide the other 4 items from the bottom and start cranking until you see the bushing begin to slide itself in. It will go in at an angle. Now slow down the cranking once you get about ľ of it into the cylinder. Here’s the critical part and I’ll explain more on this on the next photo. Pretend you are installing a tire onto your bicycle rim; only things are opposite each other. The rim is the bushing and tire is the Cylinder. Take the 2 screwdrivers and with the flat-side place them in between the cylinder and bushing, space them equally apart. Next flip the screwdrivers up at the same time, also while hold the bushing (otherwise get a friend to help) you’ll notice that the remainder of the bushing will begin to tuck into the cylinder. Once you get everything in simply apply some pressure with your hand on top of the bushing, remove the screw drivers and it should slide all the way through the other end. That’s it. This is was made easy for you as it cost me a bushing by trial and error…being a noob at this the first try didn’t go so well, while I was tourqing on the bushing I figured that all of the lube that was used would allow it to go in easily, well with all of the pressure that’s put on, the cylinder with its thin wall acted like a cutter and split off the piece of bushing that wouldn’t go in, see pic of bushing below. Cost for bushings = $40.00 (80.00 for me) – eBay. Estimated time for this step is approx 10 min. each side.
Step 3-Optional
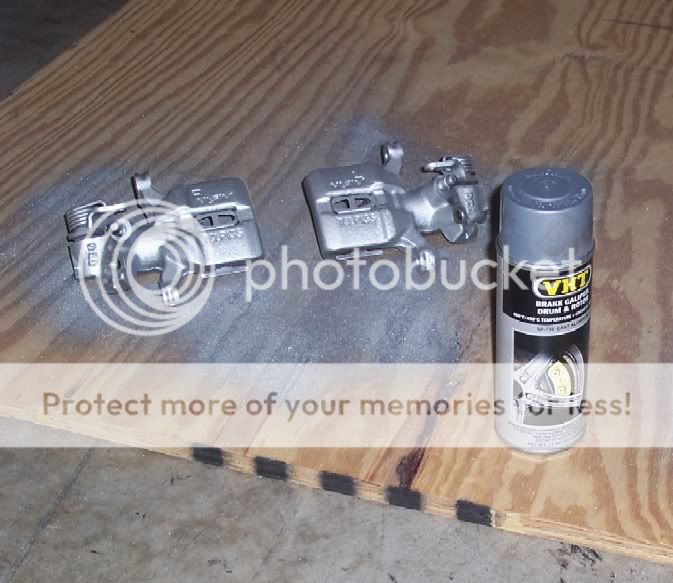
OK, the bushings are in. Now let’s look at the brake assy, if you have the money and unless the brake rotors aren’t warped and pads aren’t worn too thin, take the advantage of buying these items before you install the brake assy. I don’t have the cash so I’ll just put some estimated cost on here from eBay. (Hawk rear brake pads w/free shipping - $35.00) (rear rotors – after market blanks = w/shipping $49.00 or cross drilled Brembo’s w/shipping $90.00). I may buy the pads because the ones I have are getting there (found some from ebay made by Verto – They are either European or S.A. but anyway they worked out very well. Semi Metallic and only spent $11.00 complete.
Step 4 – Optional
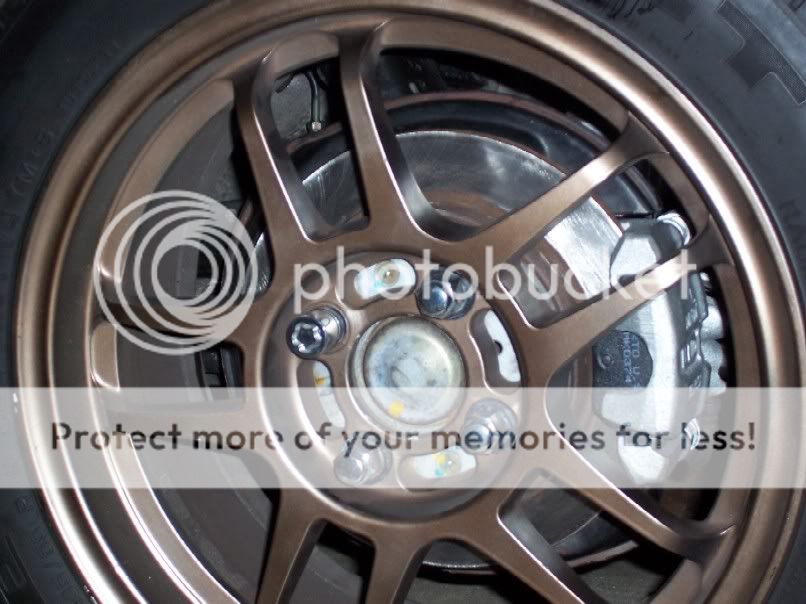
Painting your Brake assy. I bought 1 can of Hi temp. brake paint. I’m going with Cast Aluminum for that stock look. I took that same cup brush and drill and cleaned off all of the brake dust and grime from the assy. I’m also going to apply the paint to the outside of the rotors to prevent rust, will also do the same for the front rotors, too. This is all very easy and since I removed the brake assy. from the RTA’s first this will look first class.
Cost for paint = $7.99 per can. Total time about 2 hrs. for all 4 rotors.
Step 5 – Optional but recommended – Replacing the Brake Lines.
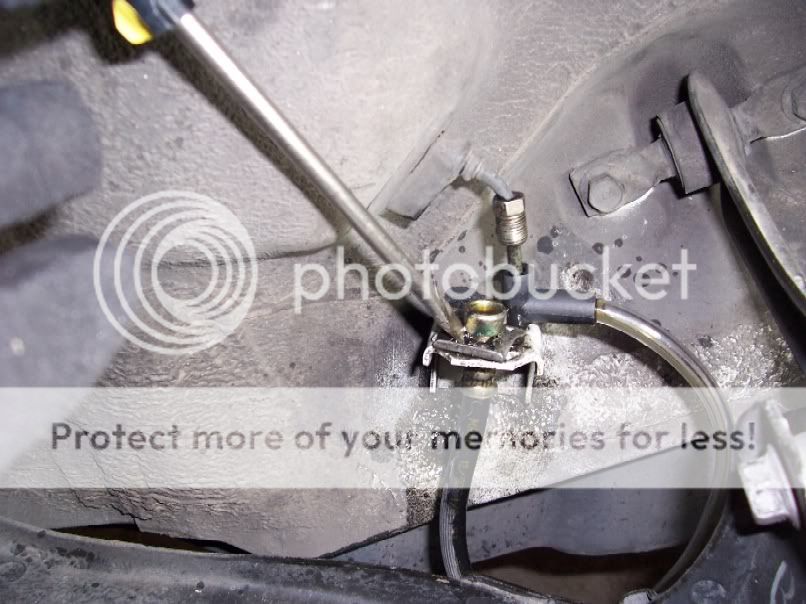
<FONT COLOR="red">This part is important please read.</FONT>
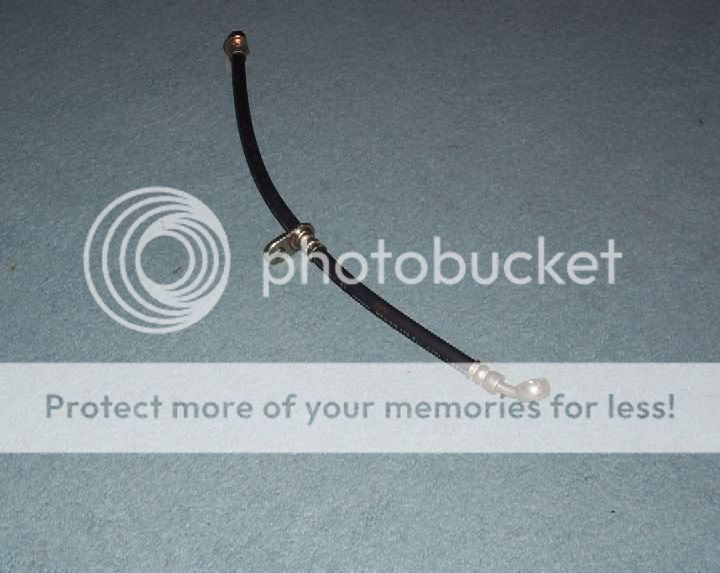
Now of course I know you will be doing this and most of you will buy the steel braided lines. However, since I don’t do a lot of road racing or Auto-X, stock will do just fine. A friend of mine whom I bought these lines from (see pic below) told me that CIVIC SI brake lines would be a direct bolt on, and even the junk yard I went to said that the Brake line that I have is the right length. However, after looking at the brake lines on the DA and comparing them with the CIVIC SI, these are two totally different designs. The DA brake line has 2 mounting points, where as the CIVIC SI has only 1.
So at this point I can only say that the 4dr’s will require the DA brake line. The Hatch backs I don’t know, you will have to check that out for yourself.
Step 6 – Installation of the Rear Trailing Arms
Take the time to make sure you have the following items before you begin. I thought a lot about safety and so should you…ya I know blah blah blah.
You will need these tools and equipment to get the job done quickly and easily.
equipment
1. 2+ ton floor jack
2. 4 very durable jack stands
3. Safety glasses….I’m telling you, get them, even though they may look stupid.
4. Portable shop light.
5. If you have a creeper or stool those will help.
6. Hand held brake bleeding vacuum pump. (Sears has them for $40.00) it’s a great investment and you can do it with one person, actually they lie because you need someone to watch the reservoir from emptying. You should replace the fluid once every few years I believe anyway. BUY IT!!
7. Brake fluid catch can. ($4.00, I got mine from Sears).
8. Work gloves, you know the ones NASCAR teams use.
Tools
For the tools I used ˝ “ drive, 6 point sockets (if you use the 12 point your mostly going to strip bolts that have never been removed) and ratchet wrench.
1. 10mm open end socket wrench. This is a must to undo the brake line.
2. 10,12,14,17 and 18mm sockets.
3. Breaker bar very handy when removing bolts and just for leverage.
4. Needle nose pliers
5. 1 standard “-“and 1 Phillips “+” screwdriver.
6. Wire snips.
E-BRAKE REMOVAL – In Car
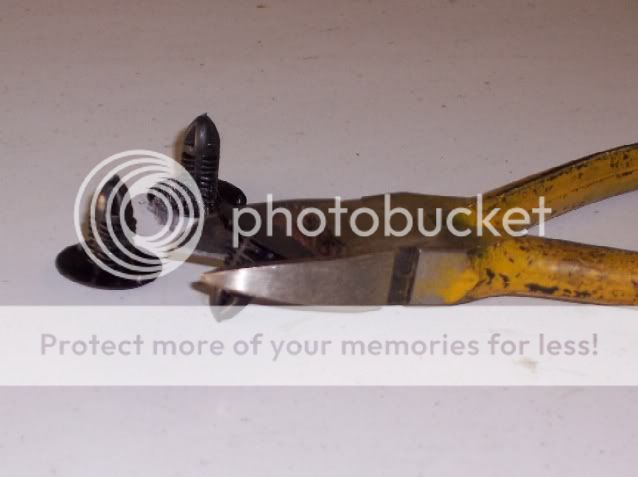
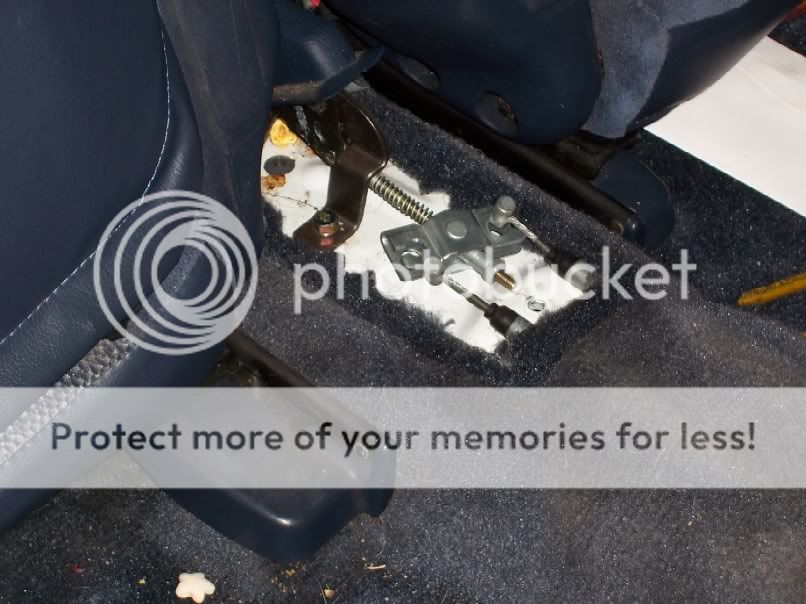
OK, now before you lift the car, go into your back seat area and remove the e-brake and shifter housing. Release the parking brake and unbolt the two bolts that are holding the e-brake lines. Then remove the two lines from the e-brake cradle. Now here is something that you may have to do, I didn’t as I think I got lucky. There are 3 plastic plugs that are at either end and at the center edge of the bench seat. Take your wire snips and without cutting the head off but simply use them for leverage to lift them out from the floor. Doing this will allow you to fold over the carpet enough to get your hands through to route the cables.
E-BRAKE REMOVAL – out of car
This is probably the hardest part of the whole changeover, because you have to get underneath the car. Start by removing the 3 bolts hold the cable in place. There is one on the RTA and two on the underbody. Next you will need to remove the Heat Shield, there are 4 bolts to this, Yank out the heat shield and put all of your bolts onto the shield for safe keeping. Next there are 3 bolts holding the rubber boot and metal housing to hold the two cables in place once you’ve unbolted the metal housing give a good yank at the cable and out they come. You can now remove the cable from one side and then the other from the rubber housing.
[b]
Begin with unbolting the hard brake line and lift it out from the flex line, immediately plug in your brake fluid catch can to the hard line. Remove the clip that is holding the flex brake line to the mounting bracket, and then pull it down and out.
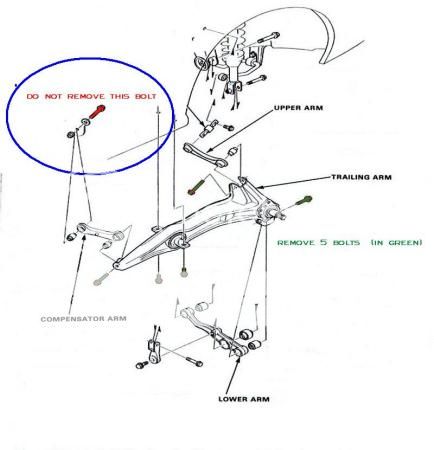
REMOVAL OF THE RTA
Begin by removing only the following bolts on the diagram below. If you remove the Compensator bolt that is attached to the frame of the car you’re in for a lot of trouble. For some reason I believe there may be floating items that allow for Toe adjustment and if it’s removed, serious work will have to be done to correct it. So this means if you haven’t taken the compensator arm off from your donor parts then do so. <u>Also, don't use the DA compensator arm as it is about a ˝” longer from the Civic C-arm</u>. If you use the DA C-arm you will create huge Toe out at the wheels.

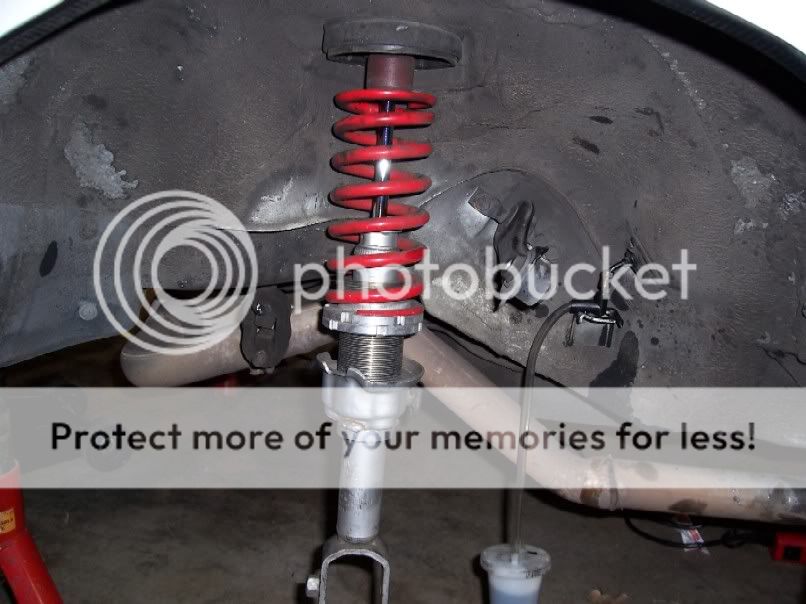
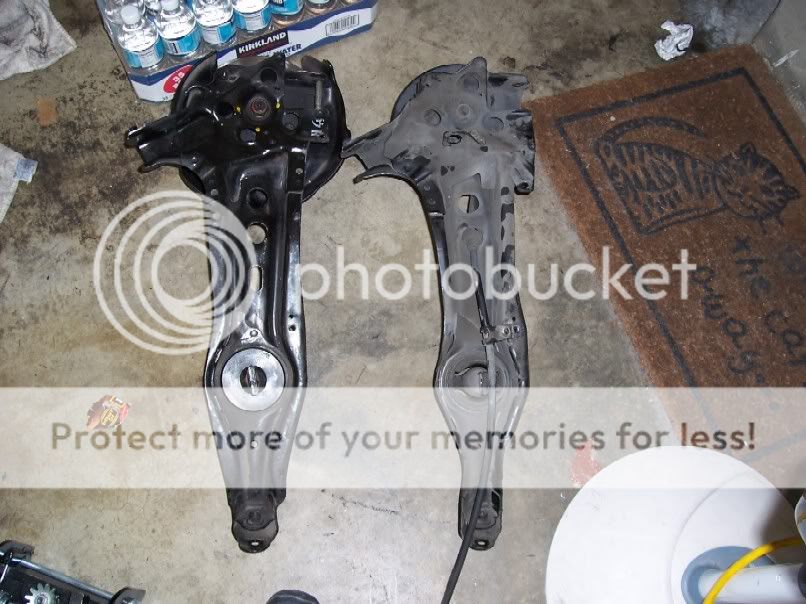
COMPARISON OF CIVIC & DA LCA (Lower Control Arm)
Use the Civic LCA, not the DA. Using the DA will cause way too much camber and put undo stress on the suspension. The Civic LCA is on the left.
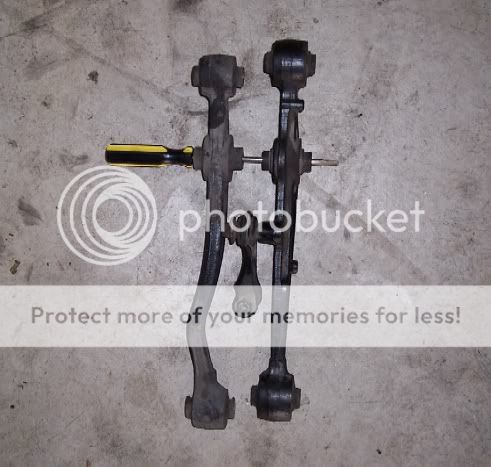
COMPARISON OF THE CIVIC & DA RTA.
As you can see both arms are similar but not exactly the same.
Step 7 Bolting the RTA’s back onto the car.
You can choose how you want to rebolt everything back. I did it in this pattern as it seemed to be easier. Begin with the Compensator bolt, secondly the UCA, Next the LCA, then the 2 RTA bolts then finally the strut.
Step 8 – Replacing the E-brake cables – See Removal of E-Brake lines and perform everything in reverse order.
Step 9 - Replace the Caliper hardware then connect the brake lines and connect the e-brake line as well. Use the needle nose pliers for connecting the clip with the pin to hold the e brake in place.
[b]Step 10 – You’re ready to bleed the system. You will need to use a small maybe 6” adjustable crescent wrench for this. I have learned to always bleed the system farthest from the Master Cylinder, so I begin with the Rear passenger side, then Driver Rear side, then go to the front and begin with the Passenger side and finally the Driver side. If you use the hand vacuum pump, simply connect the tubing to the bleed nipple once you’ve loosened it. Begin pumping until you see fluid flow through, there will be an appearance of bubbles and this is normal. So long as you have constant pressure on the gauge, there is no air in the system. The pressure gauge will normally read around 20-30 lbs of pressure make sure you maintain this for a good 10 seconds or so to get as much air out and more brake fluid in. Once you get enough fluid through tighten the nipple back up tight. Get a buddy to assist with monitoring the brake fluid reservoir.
Since I have an EX model the MC is a 15/16ths and is the same as the DA. I believe other 4dr models may be different, what does this mean? I don’t have any need for the 40/40 proportioning valve but for other models this may be required as the brake systems are different.
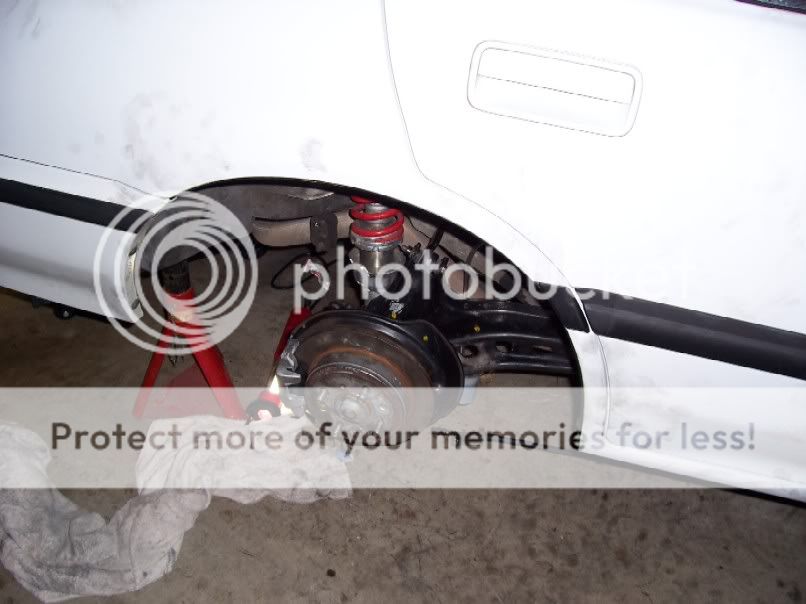
You’re done, lower the car and admire your work. Don’t get too wild you will need to adjust the e-brake line. Take a 12mm open ended wrench and go on a slow drive with the car to adjust the tension. If you adjust it too much the brakes will bind and you will cause the motor to labor with the added pressure. If so undo the tension and test it again.
Also make sure that when you make a test run of the brakes themselves to monitor the tension. For some replacements of these there have been times with the brake booster loading extreme pressure causing the rear brakes to lock up. There are write ups on Honda-Tech which will show you how to do this.

Some thanks to UNKNOWN MEMBER for selling a great donor swap to me from his DA.
Thanks to Ralph, and Steve-O for helping me out with the parts and brake bleed.
and other H-T'ers for giving such great advice.
***DISCLAIMER***
If I forgot something please let me know and I'll make the corrections. Please use common sense when performing this kind of work. any mistakes you make aren't mine this has been developed to use as a reference not a "this is how it should be done, so do it my way".
Thanks for reading and good luck.
Modified by EF4_Anthony at 7:11 PM 8/11/2005
Modified by EF4_Anthony at 7:12 PM 8/11/2005
Modified by DA9_DAD at 8:28 AM 12/20/2007
Modified by DA9_DAD at 8:29 AM 12/20/2007
Stock 1991 CIVIC RTA’s (Rear Trailing Arm) will be replaced with 1990 DA RTA’s. There’s another option if you want, and that is to remove only the disc brake unit and e-brake from the DA RTA and bolt them onto the CIVIC RTA, let me know if your able to get the older Torx screws (T45) off either of the RTA’s without stripping them (mine aren’t but after trying to give them a few tries it felt as though the metal was about to give, so I stopped and just went with this option) If you have the power tools or hookups to get to a shop then take all your stuff there and get it done and in half the time, too. Otherwise, for us who cannot afford power tools, here’s what you’ll need.
Oh yeah before I forget…Bushings. I’ve heard many stories with the Energy Suspension (ES) bushings that they pop out well, I will be a test guinea pig and will figure this out for myself. I have read many posts to say that they’ve never had a problem with their ES bushings, this after having them in for at least a year or more…so that’s good so far. Another thing I’d recommend you do before the installation, I didn’t do it but will later is to install a Zerk fitting. Polyurethane is a great material, but when it rains they begin to squeak and it’ll sound like your driving an old beat up truck. Whereas rubber fittings are maintenance free. You decide.
Lets begin. You’ll need the following items to start the installation of your project. ES says to get 3 ˝” washers from your favorite hardware store...I went to Home Depot, Loewe’s and ACE hardware, could not find that size. So I improvised, don’t ask how I came up with this idea but it worked very well. Go to the electrical aisle and pick out 4, 3 ˝” round electrical housing plates, it will have a partially punched center. While at Ace I picked up 5” X5/8ths” bolt and nut, along with 2 fender washers as they are called for extra support. Using these will come in after you remove the older bushings. Please note that you can use any lubricant available. You’ll need plenty of it. Also 2 open ended adjustable crescent wrenches and 2 std. “-“ screwdrivers. Costs for supplies if you have tools = <$5.00
To remove the old bushings you will need the following items. A really good drill, a minimum of 3” cup steel bristle brush bit, and a propane torch…FIRE!! FIRE!!
Costs = <5.00 for the bit. Home Depot torch = $10-12.00. Drill = your choice.
STEP 1.
This is what the RTA will look like when you’ve burned the hell out of the bushings. Be careful of the rust proof coating on the arm, because of the heat this stuff will get very soft and will wipe away, don’t remove any of it. <u>This whole process takes about 1 hr on each side.</u> Costs for DA RTA, got mine for $120.00.
STEP 2
Once you’ve smoothed out all of the rubber from the pin and bushing cylinder you’ll end up with a smooth as a babies butt surface. So now let’s get those bushings on. OK so now you’ll need to grab the bolt, nut and all the tools as I indicated on the first pic. To load the bushing you’ll need to prep the RTA first with ES lube, use the whole tube. Next place the bushing on the outside of the RTA (rotor side), place 2 of the “aftermarket” washers on top then the fender washer and finally the screw. Slide the other 4 items from the bottom and start cranking until you see the bushing begin to slide itself in. It will go in at an angle. Now slow down the cranking once you get about ľ of it into the cylinder. Here’s the critical part and I’ll explain more on this on the next photo. Pretend you are installing a tire onto your bicycle rim; only things are opposite each other. The rim is the bushing and tire is the Cylinder. Take the 2 screwdrivers and with the flat-side place them in between the cylinder and bushing, space them equally apart. Next flip the screwdrivers up at the same time, also while hold the bushing (otherwise get a friend to help) you’ll notice that the remainder of the bushing will begin to tuck into the cylinder. Once you get everything in simply apply some pressure with your hand on top of the bushing, remove the screw drivers and it should slide all the way through the other end. That’s it. This is was made easy for you as it cost me a bushing by trial and error…being a noob at this the first try didn’t go so well, while I was tourqing on the bushing I figured that all of the lube that was used would allow it to go in easily, well with all of the pressure that’s put on, the cylinder with its thin wall acted like a cutter and split off the piece of bushing that wouldn’t go in, see pic of bushing below. Cost for bushings = $40.00 (80.00 for me) – eBay. Estimated time for this step is approx 10 min. each side.
Step 3-Optional
OK, the bushings are in. Now let’s look at the brake assy, if you have the money and unless the brake rotors aren’t warped and pads aren’t worn too thin, take the advantage of buying these items before you install the brake assy. I don’t have the cash so I’ll just put some estimated cost on here from eBay. (Hawk rear brake pads w/free shipping - $35.00) (rear rotors – after market blanks = w/shipping $49.00 or cross drilled Brembo’s w/shipping $90.00). I may buy the pads because the ones I have are getting there (found some from ebay made by Verto – They are either European or S.A. but anyway they worked out very well. Semi Metallic and only spent $11.00 complete.
Step 4 – Optional
Painting your Brake assy. I bought 1 can of Hi temp. brake paint. I’m going with Cast Aluminum for that stock look. I took that same cup brush and drill and cleaned off all of the brake dust and grime from the assy. I’m also going to apply the paint to the outside of the rotors to prevent rust, will also do the same for the front rotors, too. This is all very easy and since I removed the brake assy. from the RTA’s first this will look first class.
Cost for paint = $7.99 per can. Total time about 2 hrs. for all 4 rotors.
Step 5 – Optional but recommended – Replacing the Brake Lines.
<FONT COLOR="red">This part is important please read.</FONT>
Now of course I know you will be doing this and most of you will buy the steel braided lines. However, since I don’t do a lot of road racing or Auto-X, stock will do just fine. A friend of mine whom I bought these lines from (see pic below) told me that CIVIC SI brake lines would be a direct bolt on, and even the junk yard I went to said that the Brake line that I have is the right length. However, after looking at the brake lines on the DA and comparing them with the CIVIC SI, these are two totally different designs. The DA brake line has 2 mounting points, where as the CIVIC SI has only 1.
So at this point I can only say that the 4dr’s will require the DA brake line. The Hatch backs I don’t know, you will have to check that out for yourself.
Step 6 – Installation of the Rear Trailing Arms
Take the time to make sure you have the following items before you begin. I thought a lot about safety and so should you…ya I know blah blah blah.
You will need these tools and equipment to get the job done quickly and easily.
equipment
1. 2+ ton floor jack
2. 4 very durable jack stands
3. Safety glasses….I’m telling you, get them, even though they may look stupid.
4. Portable shop light.
5. If you have a creeper or stool those will help.
6. Hand held brake bleeding vacuum pump. (Sears has them for $40.00) it’s a great investment and you can do it with one person, actually they lie because you need someone to watch the reservoir from emptying. You should replace the fluid once every few years I believe anyway. BUY IT!!
7. Brake fluid catch can. ($4.00, I got mine from Sears).
8. Work gloves, you know the ones NASCAR teams use.
Tools
For the tools I used ˝ “ drive, 6 point sockets (if you use the 12 point your mostly going to strip bolts that have never been removed) and ratchet wrench.
1. 10mm open end socket wrench. This is a must to undo the brake line.
2. 10,12,14,17 and 18mm sockets.
3. Breaker bar very handy when removing bolts and just for leverage.
4. Needle nose pliers
5. 1 standard “-“and 1 Phillips “+” screwdriver.
6. Wire snips.
E-BRAKE REMOVAL – In Car
OK, now before you lift the car, go into your back seat area and remove the e-brake and shifter housing. Release the parking brake and unbolt the two bolts that are holding the e-brake lines. Then remove the two lines from the e-brake cradle. Now here is something that you may have to do, I didn’t as I think I got lucky. There are 3 plastic plugs that are at either end and at the center edge of the bench seat. Take your wire snips and without cutting the head off but simply use them for leverage to lift them out from the floor. Doing this will allow you to fold over the carpet enough to get your hands through to route the cables.
E-BRAKE REMOVAL – out of car
This is probably the hardest part of the whole changeover, because you have to get underneath the car. Start by removing the 3 bolts hold the cable in place. There is one on the RTA and two on the underbody. Next you will need to remove the Heat Shield, there are 4 bolts to this, Yank out the heat shield and put all of your bolts onto the shield for safe keeping. Next there are 3 bolts holding the rubber boot and metal housing to hold the two cables in place once you’ve unbolted the metal housing give a good yank at the cable and out they come. You can now remove the cable from one side and then the other from the rubber housing.
[b]
Begin with unbolting the hard brake line and lift it out from the flex line, immediately plug in your brake fluid catch can to the hard line. Remove the clip that is holding the flex brake line to the mounting bracket, and then pull it down and out.
REMOVAL OF THE RTA
Begin by removing only the following bolts on the diagram below. If you remove the Compensator bolt that is attached to the frame of the car you’re in for a lot of trouble. For some reason I believe there may be floating items that allow for Toe adjustment and if it’s removed, serious work will have to be done to correct it. So this means if you haven’t taken the compensator arm off from your donor parts then do so. <u>Also, don't use the DA compensator arm as it is about a ˝” longer from the Civic C-arm</u>. If you use the DA C-arm you will create huge Toe out at the wheels.
COMPARISON OF CIVIC & DA LCA (Lower Control Arm)
Use the Civic LCA, not the DA. Using the DA will cause way too much camber and put undo stress on the suspension. The Civic LCA is on the left.
COMPARISON OF THE CIVIC & DA RTA.
As you can see both arms are similar but not exactly the same.
Step 7 Bolting the RTA’s back onto the car.
You can choose how you want to rebolt everything back. I did it in this pattern as it seemed to be easier. Begin with the Compensator bolt, secondly the UCA, Next the LCA, then the 2 RTA bolts then finally the strut.
Step 8 – Replacing the E-brake cables – See Removal of E-Brake lines and perform everything in reverse order.
Step 9 - Replace the Caliper hardware then connect the brake lines and connect the e-brake line as well. Use the needle nose pliers for connecting the clip with the pin to hold the e brake in place.
[b]Step 10 – You’re ready to bleed the system. You will need to use a small maybe 6” adjustable crescent wrench for this. I have learned to always bleed the system farthest from the Master Cylinder, so I begin with the Rear passenger side, then Driver Rear side, then go to the front and begin with the Passenger side and finally the Driver side. If you use the hand vacuum pump, simply connect the tubing to the bleed nipple once you’ve loosened it. Begin pumping until you see fluid flow through, there will be an appearance of bubbles and this is normal. So long as you have constant pressure on the gauge, there is no air in the system. The pressure gauge will normally read around 20-30 lbs of pressure make sure you maintain this for a good 10 seconds or so to get as much air out and more brake fluid in. Once you get enough fluid through tighten the nipple back up tight. Get a buddy to assist with monitoring the brake fluid reservoir.
Since I have an EX model the MC is a 15/16ths and is the same as the DA. I believe other 4dr models may be different, what does this mean? I don’t have any need for the 40/40 proportioning valve but for other models this may be required as the brake systems are different.
You’re done, lower the car and admire your work. Don’t get too wild you will need to adjust the e-brake line. Take a 12mm open ended wrench and go on a slow drive with the car to adjust the tension. If you adjust it too much the brakes will bind and you will cause the motor to labor with the added pressure. If so undo the tension and test it again.
Also make sure that when you make a test run of the brakes themselves to monitor the tension. For some replacements of these there have been times with the brake booster loading extreme pressure causing the rear brakes to lock up. There are write ups on Honda-Tech which will show you how to do this.
Some thanks to UNKNOWN MEMBER for selling a great donor swap to me from his DA.
Thanks to Ralph, and Steve-O for helping me out with the parts and brake bleed.
and other H-T'ers for giving such great advice.
***DISCLAIMER***
If I forgot something please let me know and I'll make the corrections. Please use common sense when performing this kind of work. any mistakes you make aren't mine this has been developed to use as a reference not a "this is how it should be done, so do it my way".
Thanks for reading and good luck.
Modified by EF4_Anthony at 7:11 PM 8/11/2005
Modified by EF4_Anthony at 7:12 PM 8/11/2005
Modified by DA9_DAD at 8:28 AM 12/20/2007
Modified by DA9_DAD at 8:29 AM 12/20/2007
 08-09-2005, 01:59 PM
#5
Senior Member
Thread Starter
iTrader: (4)
Join Date: Dec 2004
Location: Diamond Bar, Ca.
Posts: 2,536
Likes: 0
Received 0 Likes
on
0 Posts
<TABLE WIDTH="90%" CELLSPACING=0 CELLPADDING=0 ALIGN=CENTER><TR><TD>Quote, originally posted by EL Vap133 »</TD></TR><TR><TD CLASS="quote">Wow, that's a very good write-up.  </TD></TR></TABLE>
Thanks Mr. Mod dude. sorry for taking a lil too much space on the server. But I hope this helps to answer many questions.
</TD></TR></TABLE>Thanks Mr. Mod dude. sorry for taking a lil too much space on the server. But I hope this helps to answer many questions.
Trending Topics
08-10-2005, 05:36 PM
#8
Honda-Tech Member
<TABLE WIDTH="90%" CELLSPACING=0 CELLPADDING=0 ALIGN=CENTER><TR><TD>Quote, originally posted by EL Vap133 »</TD></TR><TR><TD CLASS="quote">Wow, that's a very good write-up. </TD></TR></TABLE> Holy damn, FAQ land!!!
</TD></TR></TABLE> Holy damn, FAQ land!!!
08-11-2005, 05:13 PM
#10
Senior Member
Thread Starter
iTrader: (4)
Join Date: Dec 2004
Location: Diamond Bar, Ca.
Posts: 2,536
Likes: 0
Received 0 Likes
on
0 Posts
<TABLE WIDTH="90%" CELLSPACING=0 CELLPADDING=0 ALIGN=CENTER><TR><TD>Quote, originally posted by Don »</TD></TR><TR><TD CLASS="quote"> Props man good chit!!!</TD></TR></TABLE>
*
<TABLE WIDTH="90%" CELLSPACING=0 CELLPADDING=0 ALIGN=CENTER><TR><TD>Quote, originally posted by EL Vap133 »</TD></TR><TR><TD CLASS="quote">Wow, that's a very good write-up. </TD></TR></TABLE>
*
<TABLE WIDTH="90%" CELLSPACING=0 CELLPADDING=0 ALIGN=CENTER><TR><TD>Quote, originally posted by CRXTOAD »</TD></TR><TR><TD CLASS="quote">Nice Job man....props to you! </TD></TR></TABLE>
*
<TABLE WIDTH="90%" CELLSPACING=0 CELLPADDING=0 ALIGN=CENTER><TR><TD>Quote, originally posted by drdisco69 »</TD></TR><TR><TD CLASS="quote">Excellent pictures. </TD></TR></TABLE>
Alright Mods...I think you should up my percentage now (from the 98%) for such a good contribution to the boards as you can see from these great responses.
&
Make this one a sticky or lock it so every one in EF land can see it without having to search endlessly.
Props man good chit!!!</TD></TR></TABLE>*
<TABLE WIDTH="90%" CELLSPACING=0 CELLPADDING=0 ALIGN=CENTER><TR><TD>Quote, originally posted by EL Vap133 »</TD></TR><TR><TD CLASS="quote">Wow, that's a very good write-up.
</TD></TR></TABLE>*
<TABLE WIDTH="90%" CELLSPACING=0 CELLPADDING=0 ALIGN=CENTER><TR><TD>Quote, originally posted by CRXTOAD »</TD></TR><TR><TD CLASS="quote">Nice Job man....props to you! </TD></TR></TABLE>
*
<TABLE WIDTH="90%" CELLSPACING=0 CELLPADDING=0 ALIGN=CENTER><TR><TD>Quote, originally posted by drdisco69 »</TD></TR><TR><TD CLASS="quote">Excellent pictures. </TD></TR></TABLE>
Alright Mods...I think you should up my percentage now (from the 98%) for such a good contribution to the boards as you can see from these great responses.
&
Make this one a sticky or lock it so every one in EF land can see it without having to search endlessly.
08-12-2005, 05:51 AM
#11
Junior Member
Join Date: Sep 2004
Location: blue ridge mountains, southern va, usa
Posts: 236
Likes: 0
Received 0 Likes
on
0 Posts
Awsome writeup, only thing I disagree with is the comment about the lcs's . The DA are longer, but If I remember correctly from when I swaped my lca's to mount a sway bar, they were longer by only by 1-2mm.I'm not lowered so the ammount of negative camber it caused wasn't enough to worry about. I have yet to put on my rear disk setup(that I've had for around 9 months), and your writeup has got me motivated to do it....props to you.
Modified by DpSyChO at 7:11 AM 8/12/2005
Modified by DpSyChO at 7:11 AM 8/12/2005
08-12-2005, 03:10 PM
#13
Senior Member
Thread Starter
iTrader: (4)
Join Date: Dec 2004
Location: Diamond Bar, Ca.
Posts: 2,536
Likes: 0
Received 0 Likes
on
0 Posts
<TABLE WIDTH="90%" CELLSPACING=0 CELLPADDING=0 ALIGN=CENTER><TR><TD>Quote, originally posted by DpSyChO »</TD></TR><TR><TD CLASS="quote">Awsome writeup, only thing I disagree with is the comment about the lcs's . The DA are longer, but If I remember correctly from when I swaped my lca's to mount a sway bar, they were longer by only by 1-2mm.I'm not lowered so the ammount of negative camber it caused wasn't enough to worry about. I have yet to put on my rear disk setup(that I've had for around 9 months), and your writeup has got me motivated to do it....props to you. </TD></TR></TABLE>
That's exactly the kinda feedback I'm looking for. I have mine dropped at least 2.25" that may be the reason why I don't think its going to work. However, you may want to re-think about the suspension angle and the amount of stress it puts on. In fact do this yourself when you remove your drums off, put the DA LCA on and then just connect the strut without the bolt, you'll notice that there will be some added degree of angle more than you did with stock, now imagine when the car is down, thats just IMO. Believe me I'd rather go with the DA LCA so I can use a sway bar. But I guess that's why there are rear camber kits...HMMMMMM
****
HEY HEY SOMEONE BUY MAHATMA'S REAR DISC SWAP..
</TD></TR></TABLE>That's exactly the kinda feedback I'm looking for. I have mine dropped at least 2.25" that may be the reason why I don't think its going to work. However, you may want to re-think about the suspension angle and the amount of stress it puts on. In fact do this yourself when you remove your drums off, put the DA LCA on and then just connect the strut without the bolt, you'll notice that there will be some added degree of angle more than you did with stock, now imagine when the car is down, thats just IMO. Believe me I'd rather go with the DA LCA so I can use a sway bar. But I guess that's why there are rear camber kits...HMMMMMM
****
HEY HEY SOMEONE BUY MAHATMA'S REAR DISC SWAP..
08-12-2005, 03:54 PM
#14
Junior Member
Join Date: Sep 2004
Location: blue ridge mountains, southern va, usa
Posts: 236
Likes: 0
Received 0 Likes
on
0 Posts
<TABLE WIDTH="90%" CELLSPACING=0 CELLPADDING=0 ALIGN=CENTER><TR><TD>Quote, originally posted by EF4_Anthony »</TD></TR><TR><TD CLASS="quote">That's exactly the kinda feedback I'm looking for. I have mine dropped at least 2.25" that may be the reason why I don't think its going to work. However, you may want to re-think about the suspension angle and the amount of stress it puts on. In fact do this yourself when you remove your drums off, put the DA LCA on and then just connect the strut without the bolt, you'll notice that there will be some added degree of angle more than you did with stock, now imagine when the car is down, thats just IMO. Believe me I'd rather go with the DA LCA so I can use a sway bar. But I guess that's why there are rear camber kits...HMMMMMM
****
HEY HEY SOMEONE BUY MAHATMA'S REAR DISC SWAP.. </TD></TR></TABLE>
Are you talking about the angle difference when from viewed from the rear?
****
HEY HEY SOMEONE BUY MAHATMA'S REAR DISC SWAP..
</TD></TR></TABLE>Are you talking about the angle difference when from viewed from the rear?
08-12-2005, 04:34 PM
#15
Honda-Tech Member
Join Date: Jul 2002
Location: Fortress of Wangatude, USA
Posts: 359
Likes: 0
Received 0 Likes
on
0 Posts
I've had my rear disc swap since August of 2003 and have yet to put it on. You've helped to convince me. Good write up.
08-12-2005, 05:09 PM
#16
Senior Member
Thread Starter
iTrader: (4)
Join Date: Dec 2004
Location: Diamond Bar, Ca.
Posts: 2,536
Likes: 0
Received 0 Likes
on
0 Posts
<TABLE WIDTH="90%" CELLSPACING=0 CELLPADDING=0 ALIGN=CENTER><TR><TD>Quote, originally posted by DpSyChO »</TD></TR><TR><TD CLASS="quote">
Are you talking about the angle difference when from viewed from the rear?</TD></TR></TABLE>
Yes // ---- \\ <---Camber Angle
Are you talking about the angle difference when from viewed from the rear?</TD></TR></TABLE>
Yes // ---- \\ <---Camber Angle
08-12-2005, 05:12 PM
#17
Senior Member
Thread Starter
iTrader: (4)
Join Date: Dec 2004
Location: Diamond Bar, Ca.
Posts: 2,536
Likes: 0
Received 0 Likes
on
0 Posts
<TABLE WIDTH="90%" CELLSPACING=0 CELLPADDING=0 ALIGN=CENTER><TR><TD>Quote, originally posted by b18apwr »</TD></TR><TR><TD CLASS="quote">I've had my rear disc swap since August of 2003 and have yet to put it on. You've helped to convince me. Good write up.</TD></TR></TABLE>
Justin, at your age of 104...you might wanna take it slow....lol
I'm glad I can bestow a lil inspiration to all of you guys.. It makes me feel real good that I did this write up..
Justin, at your age of 104...you might wanna take it slow....lol
I'm glad I can bestow a lil inspiration to all of you guys.. It makes me feel real good that I did this write up..
 08-12-2005, 05:48 PM
#20
Junior Member
Join Date: Sep 2004
Location: blue ridge mountains, southern va, usa
Posts: 236
Likes: 0
Received 0 Likes
on
0 Posts
<TABLE WIDTH="90%" CELLSPACING=0 CELLPADDING=0 ALIGN=CENTER><TR><TD>Quote, originally posted by EF4_Anthony »</TD></TR><TR><TD CLASS="quote">Yes // ---- \\ <---Camber Angle</TD></TR></TABLE>
The difference isn't severe enough for me to worry about, but your right, shock angle does affect effectivness:

found at: http://www.4x4review.com/feature/shock-genius.asp
The difference isn't severe enough for me to worry about, but your right, shock angle does affect effectivness:
found at: http://www.4x4review.com/feature/shock-genius.asp
08-12-2005, 07:26 PM
#21
Honda-Tech Member
Join Date: Jul 2002
Location: Fortress of Wangatude, USA
Posts: 359
Likes: 0
Received 0 Likes
on
0 Posts
<TABLE WIDTH="90%" CELLSPACING=0 CELLPADDING=0 ALIGN=CENTER><TR><TD>Quote, originally posted by EF4_Anthony »</TD></TR><TR><TD CLASS="quote">Justin, at your age of 104...you might wanna take it slow....lol </TD></TR></TABLE>
Ha! I forgot that's what my profile says. I've got a $100 89 4dr beater that I've been meaning to put these on. I bought a complete running 90 teg and swapped the engine into my CRX. All the brakes (MC, booster, all four discs) will eventually make it on the 4 door. I just can't ever get motivated to work on that car.
</TD></TR></TABLE>Ha! I forgot that's what my profile says. I've got a $100 89 4dr beater that I've been meaning to put these on. I bought a complete running 90 teg and swapped the engine into my CRX. All the brakes (MC, booster, all four discs) will eventually make it on the 4 door. I just can't ever get motivated to work on that car.
08-12-2005, 07:38 PM
#22
Senior Member
Thread Starter
iTrader: (4)
Join Date: Dec 2004
Location: Diamond Bar, Ca.
Posts: 2,536
Likes: 0
Received 0 Likes
on
0 Posts
<TABLE WIDTH="90%" CELLSPACING=0 CELLPADDING=0 ALIGN=CENTER><TR><TD>Quote, originally posted by DpSyChO »</TD></TR><TR><TD CLASS="quote">
The difference isn't severe enough for me to worry about, but your right, shock angle does affect effectivness:
found at: http://www.4x4review.com/feature/shock-genius.asp </TD></TR></TABLE>
Wow I've never seen that diagram, pretty simple. I'll have to rethink about putting the DA LCA's...and add a camber kit.
08-12-2005, 07:59 PM
#23
Senior Member
Thread Starter
iTrader: (4)
Join Date: Dec 2004
Location: Diamond Bar, Ca.
Posts: 2,536
Likes: 0
Received 0 Likes
on
0 Posts
<TABLE WIDTH="90%" CELLSPACING=0 CELLPADDING=0 ALIGN=CENTER><TR><TD>Quote, originally posted by b18apwr »</TD></TR><TR><TD CLASS="quote">
Ha! I forgot that's what my profile says. I've got a $100 89 4dr beater that I've been meaning to put these on. I bought a complete running 90 teg and swapped the engine into my CRX. All the brakes (MC, booster, all four discs) will eventually make it on the 4 door. I just can't ever get motivated to work on that car.</TD></TR></TABLE>
Justin, you need a pit crew to get your chit done.. lol.
08-12-2005, 09:12 PM
#24
Member
Join Date: Nov 2004
Location: Madison, WI, United States of America
Posts: 1,296
Likes: 0
Received 0 Likes
on
0 Posts
good writeup, however, i have one "bone to pick" so to speak. the arms are actually the same length from the ends of the outer bushings, which is what affects camber. your camber will be the same. however, it's the inner one that's closer to the center, which will effectively lower your rear spring rates and shock stiffness.
hold on, i'll find you a pic.
nice writeup, though.
EDIT-> here's a pic, borrowed from vegaskurt, but what the hell, i posted in that topic too.

from this topic https://honda-tech.com/zerothread?id=1293930
hold on, i'll find you a pic.
nice writeup, though.
EDIT-> here's a pic, borrowed from vegaskurt, but what the hell, i posted in that topic too.
from this topic https://honda-tech.com/zerothread?id=1293930
08-12-2005, 09:21 PM
#25
Senior Member
Thread Starter
iTrader: (4)
Join Date: Dec 2004
Location: Diamond Bar, Ca.
Posts: 2,536
Likes: 0
Received 0 Likes
on
0 Posts
<TABLE WIDTH="90%" CELLSPACING=0 CELLPADDING=0 ALIGN=CENTER><TR><TD>Quote, originally posted by bagpipe goatee »</TD></TR><TR><TD CLASS="quote">good writeup, however, i have one "bone to pick" so to speak. the arms are actually the same length from the ends of the outer bushings, which is what affects camber. your camber will be the same. however, it's the inner one that's closer to the center, which will effectively lower your rear spring rates and shock stiffness.</TD></TR></TABLE>
Thanks....You know what, just for the hell of it all. I'm going to replace 1 stock LCA for a DA on 1 side and leave the other side stock. Then I'll tak a pic and I'll see if there is a difference in Camber angle.
Thanks....You know what, just for the hell of it all. I'm going to replace 1 stock LCA for a DA on 1 side and leave the other side stock. Then I'll tak a pic and I'll see if there is a difference in Camber angle.