
DIY- How to Fix, AC power transistor
 07-13-2007, 09:01 PM
#1
Junior Member
Thread Starter
Join Date: Mar 2007
Location: UAE
Posts: 305
Likes: 0
Received 0 Likes
on
0 Posts
Disclaimer:
User is presumed to have a fair level of mechanical or auto electrical skill in doing this DIY. The author shall not in any way be held responsible for any damage resulting from user’s fault or failure to follow the suggested steps proposed by the author. It’s the user’s responsibility to research thoroughly on the project and validate this DIY.
This DIY based on the three items that I repaired before so I presumed that once the AC blower on your EM/ES is not working the AC power transistor might be the cause of the problem. IF IT HAPPENS THAT THE REPAIR ISN'T SUCCESSFUL, THERE MIGHT BE ANOTHER PART THAT NEED TO BE FIXED. Please refer to your local dealer or reputable mechanic for further diagnosis.
Tools and Materials:
• Philips screwdriver
• a Tweezer
• Soldering iron and lead set.
• 1ohm 1/4 watt resistor
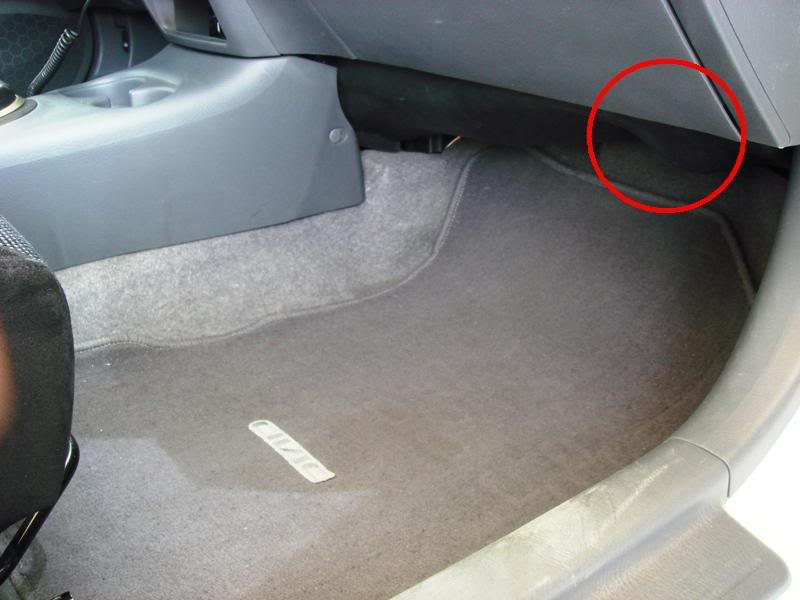
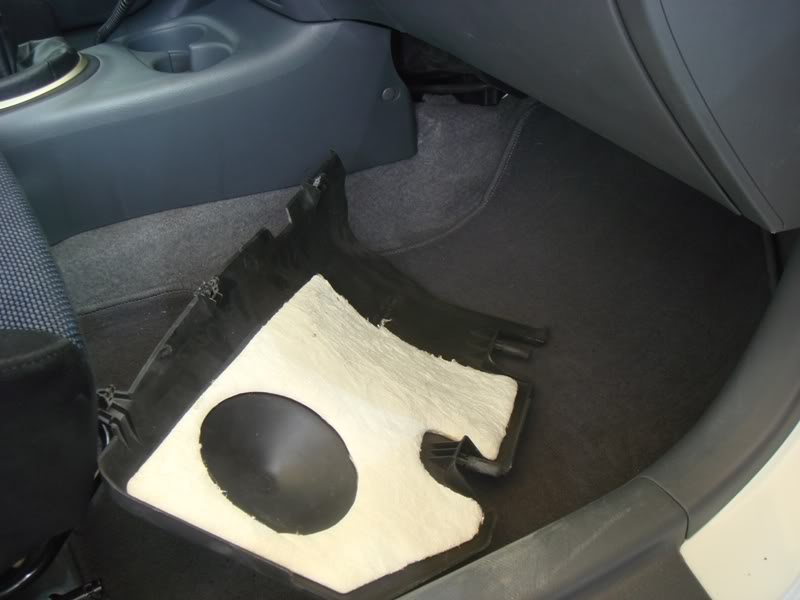
You will find the AC power transistor module here.
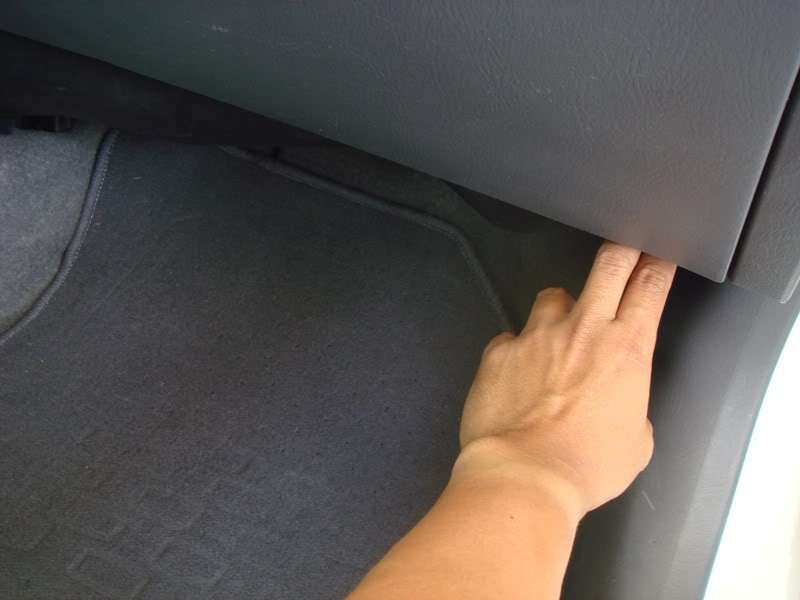
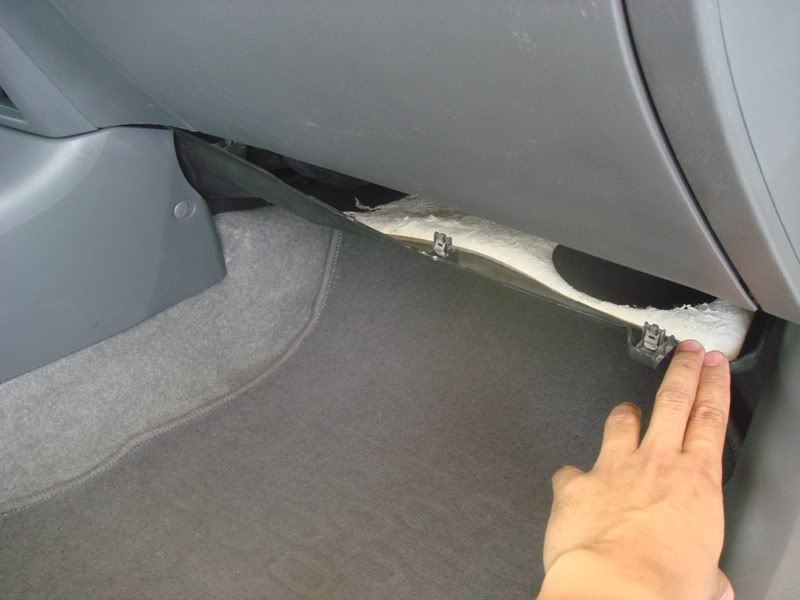
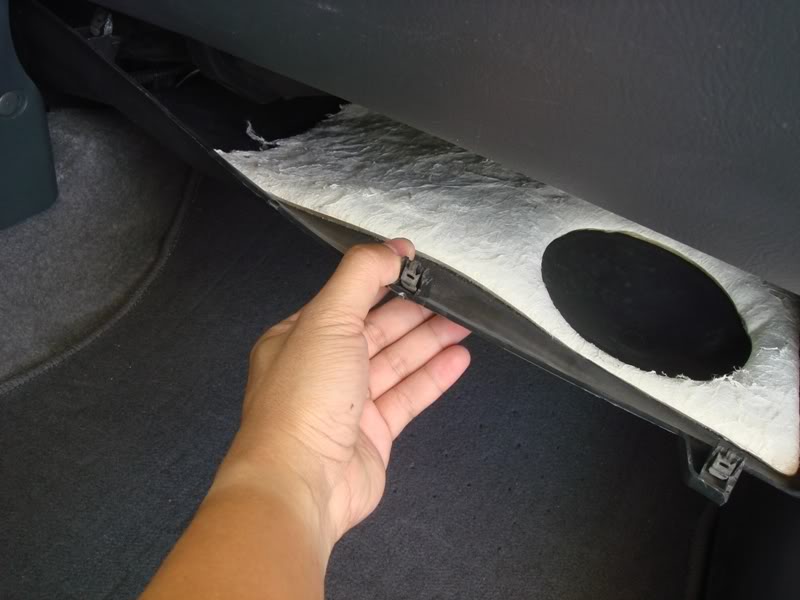
Removing the AC blower cover isn't that difficult, see the pics below.
The defective part.
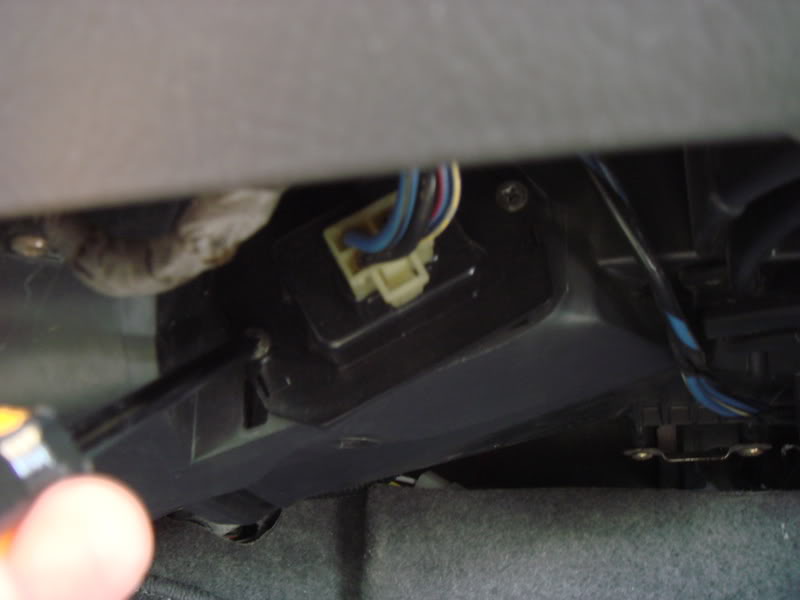
Remove two screws.

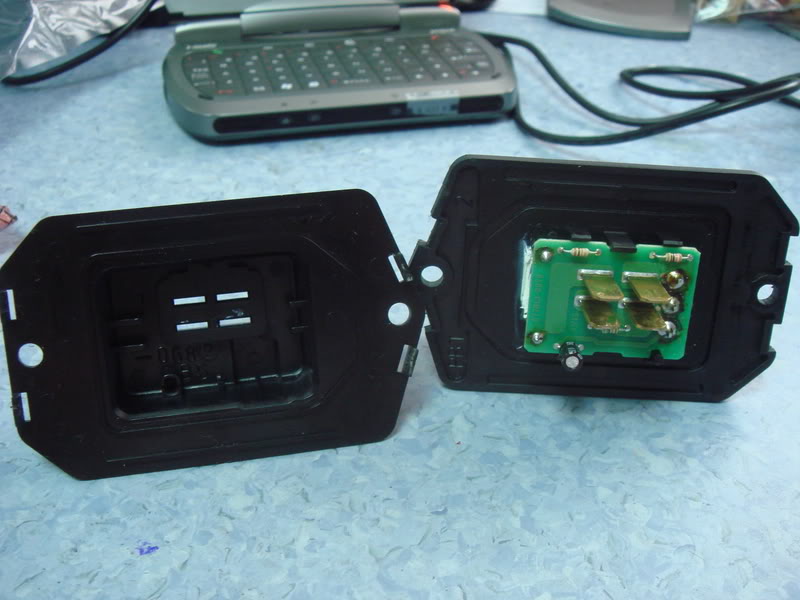
Now release the lock to remove the AC power transistor module from the connector.
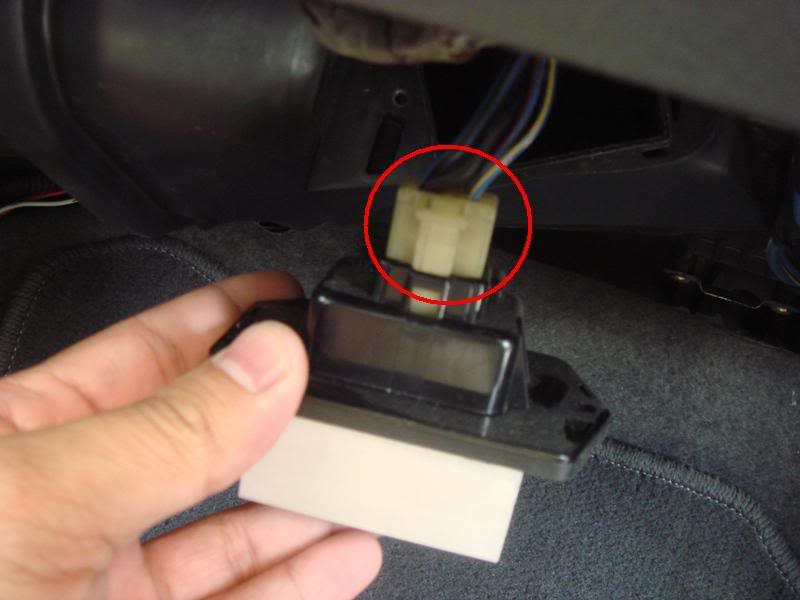
Notice the heatsink, the power transistor itself and the thermistor are attached to it.
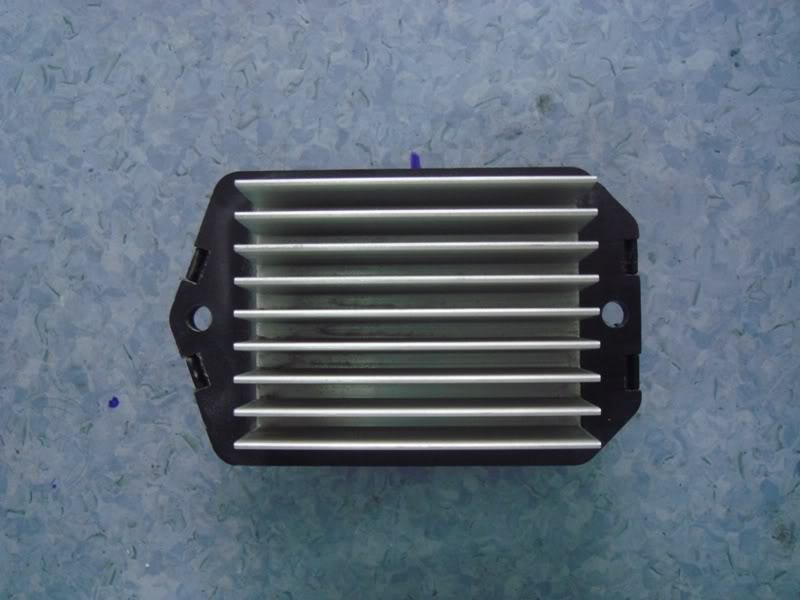
Using the tweezer release the hooks to open it. refer to below pics.

That's the thermistor its a PTC(positive temperature coefficient-the resistance increases with increasing temperature) check with DMM it must be shorted or have at least 0 to 2 ohm resistance depending on the temperature of the heatsink.

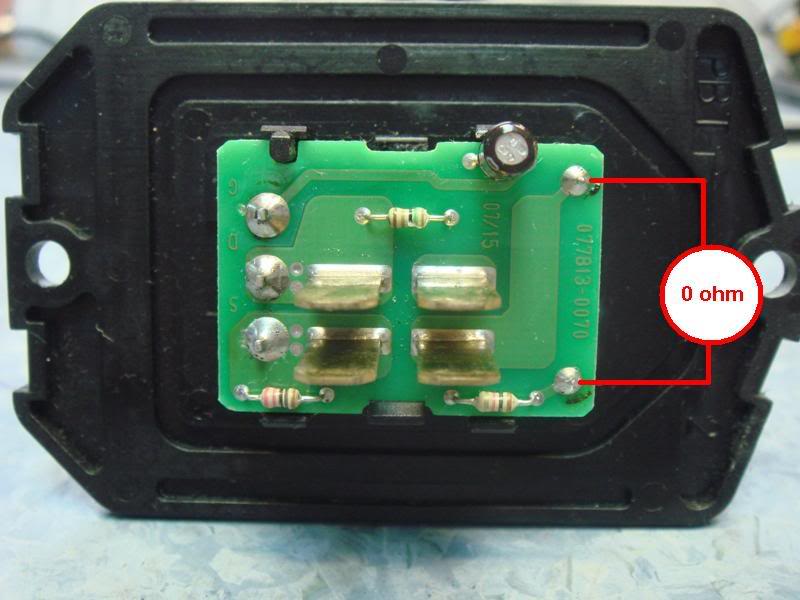
If it's open or no resistance at all, replace it with a new one, or solder a 1 ohm resistor in parallel with the thermistor as shown.
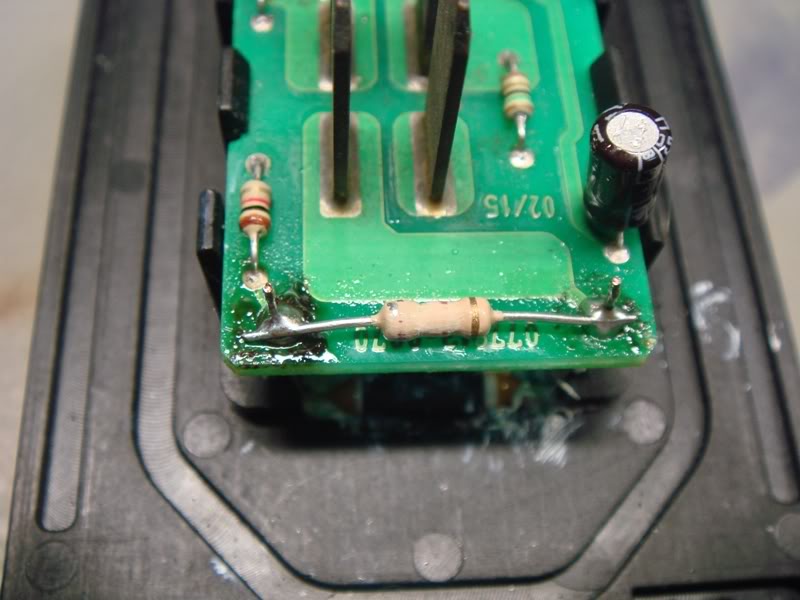
Assemble in the reverse order of removal and re-install the power transistor.
Hope you like it .
.
One of a happy fella who tried already this DIY: https://honda-tech.com/zerothread/2036600
User is presumed to have a fair level of mechanical or auto electrical skill in doing this DIY. The author shall not in any way be held responsible for any damage resulting from user’s fault or failure to follow the suggested steps proposed by the author. It’s the user’s responsibility to research thoroughly on the project and validate this DIY.
This DIY based on the three items that I repaired before so I presumed that once the AC blower on your EM/ES is not working the AC power transistor might be the cause of the problem. IF IT HAPPENS THAT THE REPAIR ISN'T SUCCESSFUL, THERE MIGHT BE ANOTHER PART THAT NEED TO BE FIXED. Please refer to your local dealer or reputable mechanic for further diagnosis.
Tools and Materials:
• Philips screwdriver
• a Tweezer
• Soldering iron and lead set.
• 1ohm 1/4 watt resistor
You will find the AC power transistor module here.
Removing the AC blower cover isn't that difficult, see the pics below.
The defective part.
Remove two screws.
Now release the lock to remove the AC power transistor module from the connector.
Notice the heatsink, the power transistor itself and the thermistor are attached to it.
Using the tweezer release the hooks to open it. refer to below pics.
That's the thermistor its a PTC(positive temperature coefficient-the resistance increases with increasing temperature) check with DMM it must be shorted or have at least 0 to 2 ohm resistance depending on the temperature of the heatsink.
If it's open or no resistance at all, replace it with a new one, or solder a 1 ohm resistor in parallel with the thermistor as shown.
Assemble in the reverse order of removal and re-install the power transistor.
Hope you like it
.One of a happy fella who tried already this DIY: https://honda-tech.com/zerothread/2036600

 07-17-2007, 09:03 AM
#4
<TABLE WIDTH="90%" CELLSPACING=0 CELLPADDING=0 ALIGN=CENTER><TR><TD>Quote, originally posted by jivi »</TD></TR><TR><TD CLASS="quote">Thanks mate, i hope the moderator will keep this in the DIY section. thanks. </TD></TR></TABLE>
Added.
Added.
07-17-2007, 09:21 AM
#5
Grace Under Pressure
Join Date: May 2006
Location: The Fugitive Motel
Posts: 2,519
Likes: 0
Received 0 Likes
on
0 Posts
<TABLE WIDTH="90%" CELLSPACING=0 CELLPADDING=0 ALIGN=CENTER><TR><TD>Quote, originally posted by toyomatt84 »</TD></TR><TR><TD CLASS="quote">
Added.</TD></TR></TABLE>
Good stuff.
Added.</TD></TR></TABLE>
Good stuff.
10-24-2008, 01:32 PM
#7
Join Date: Apr 2008
Posts: 10
Likes: 0
Received 0 Likes
on
0 Posts
are you sure thats only a 1ohm resistor?? in the picture the strips look a different color. 1ohm resistor should have brown black and black shouldnt it?
Trending Topics
12-17-2008, 11:37 AM
#9

Thought I would drop a resistor chart in here to prevent confusion.
I honestly can't tell from the pictures what the values are.
For four band, ignore the 3rd digit, so 1 ohm is brown black gold.
You have to write ten then multiply by .1 to get 1
I think when I rip mine apart tonight, I want to figure out the value for the PTC Thermistor. It should be available from Newark Electronics, DigiKey, Jameco. Lol, though not much can beat the price of a resistor.
01-09-2009, 07:38 AM
#10
Junior Member

Join Date: Jan 2009
Posts: 1
Likes: 0
Received 0 Likes
on
0 Posts
The original piece is a thermal fuse, not a resistor and is embedded in silicon compound (2-amp, 114 degrees Celsius). It needs to make a tight contact with the transistor. Although a jumper or a 1-ohm resistor would work as a temporary solution, it is safer to replace it with a similar part because it carries a feedback signal to the main A/C control system.
See my previous post http://townhall-talk.edmunds.com/direct/view/.f0ff5e3/14
See my previous post
01-09-2009, 09:01 AM
#11
Thanks for the update.
I've been negligent as I did get a hold of the Service Manual, much easier to troubleshoot from.
I ran the diagnostics on the HVAC control assym. ( turn fan off, hold recirc and rear defrost down, turn ignition to II (two) release recirc and defrost. The DTC blinked 12 which narrowed it to the fan control transistor.
I then jumpered the fan plug side of the transistor to function check the fan motor. Note: the plug diagram is backwards from what you would think. Idiot check yourself by looking for the heavier gauge wire or pay attention to the wire colors Blue w/ black and Black.
I was able to find a cross on the Toshiba transistor to NTE 2920, MCM.com who I live near had it for around $13, and the thermal fuse was around $1.00
This was AFTER I purchsed the whole assembly from Honda Parts for $70 and broke the new one.(Amazingly enough Honda Parts was cheaper than Auto Zone by $10.)I didn't mount the transistor assembly back into the duct work and it over heated due to lack of airflow. (Change cabin air filter to prolong speed control lifespan)
BTW the new Honda OEM assembly had the thermal fuse positioned on the longer side of the circuit board, but electrically the same, just different than the picture above.
LMAO at myself since I had Electronic Circuits in college, and know better.
I put it to use and repaired at board level. I am not sure about the feed back portion since I didn't study how they set up the transistor in the circuit, though the thermal fuse did appear to lead from the source drain back to the gate via some glue resistors etc...
Last edited by civicguy02; 01-09-2009 at 09:08 AM.
The following users liked this post:
 01-10-2009, 03:04 PM
#13
Junior Member

Join Date: Jan 2009
Location: london
Posts: 3
Likes: 0
Received 0 Likes
on
0 Posts
hi i had a simalar problem my heaters suddenly stopped working a couple of days ago, i followed your step by step guide and it solved it, the resistor worked fine,
it got dark so i didnt put the resistor back in the right place left it in the footwell, used heaters on low setting just to get to work the next day, (didnt put glove box back or carpet etc, by the time i got to work 10mins away where i was going to put the transistor back properly the speed went to maximum and i couldnt turn the heaters off, the switch made it go faster at max but in off position it wouldnt turn off.
i pulled over and removed the fuse, touched the transistor and it was very hot, let it cool down for an hour an tried it again, still the heaters wouldnt turn off when the switch was replaced, i have now taken the transistor out again and all looks fine no burns stc, meaters good aswell
any ideas please help rather cold in the car and the screen steams up lol.
thanks for your help cheers alex,
honda civic type r 2002
01-12-2009, 07:39 AM
#14
When you say you metered the transistor, did you test source to gate, drain to gate?
If not review this link http://www.allaboutcircuits.com/vol_3/chpt_5/3.html
I would bet you fried the transistor when it ran hot, I had the same problem and assumed that huge heat sink would be enough. The circuit board is marked with the source drain gate, just pay attention to the orientation.
The transistor is a Toshiba 2SK2313, you'll just see the K2313 part on the transistor case.
DigiKey has the exact part http://parts.digikey.com/1/parts/101...b-2sk2313.html
MCM Electronics has the NTE2920 cross in stock, fit was tight since the leads were slightly different, but it worked.
http://www.mcmelectronics.com/product/NTE2920
Did you run the diagnostics for the HVAC?
As a temporary fix you can jumper the fan side on the plug blue/black strip & black wire.
I used spade lugs, and 8 Gage, I think.
9 AWG is good for 64 amps, 8 AWG is good for 73 AMPS, since the fuse is 40 AMP you should be safe.
Jordan, this might be easier on shipping for you to purchase from.
http://www.littlediode.com/component...ansistor_.html
If not review this link http://www.allaboutcircuits.com/vol_3/chpt_5/3.html
I would bet you fried the transistor when it ran hot, I had the same problem and assumed
that huge heat sink would be enough. The circuit board is marked with the source drain gate, just pay attention to the orientation. The transistor is a Toshiba 2SK2313, you'll just see the K2313 part on the transistor case.
DigiKey has the exact part http://parts.digikey.com/1/parts/101...b-2sk2313.html
MCM Electronics has the NTE2920 cross in stock, fit was tight since the leads were slightly different, but it worked.
http://www.mcmelectronics.com/product/NTE2920
Did you run the diagnostics for the HVAC?
As a temporary fix you can jumper the fan side on the plug blue/black strip & black wire.
I used spade lugs, and 8 Gage, I think.
9 AWG is good for 64 amps, 8 AWG is good for 73 AMPS, since the fuse is 40 AMP you should be safe.
Jordan, this might be easier on shipping for you to purchase from.
http://www.littlediode.com/component...ansistor_.html
Last edited by civicguy02; 01-12-2009 at 10:43 AM.
01-12-2009, 08:41 AM
#15
Junior Member
Join Date: Jan 2009
Location: london
Posts: 3
Likes: 0
Received 0 Likes
on
0 Posts
thanks for the reply, i am goin to meter the transistor in a while, only thing it is on the botton of the board which i have tried to remove from the heat sink, all i metered before was the resistors, looks like i gotta use a soldering iron to remove the board from the sink as it defo aint coming out easily at the mo
01-12-2009, 10:41 AM
#16
You'll need a solder sucker, or solder wick to get all of the solder off. I suffered with the wick, as I couldn't find where the hell my $$$ rework station got packed off to.
Once all the solder is off the legs of the transistor and thermal fuse, the board pops off. underneath, the transistor case is screwed into the heatsink, there is a clip between the screw head and the transistor that holds the thermal fuse in place. Don't wipe all the white thermal grease off, unless you have more to apply.
Good luck with it.
05-14-2009, 01:28 PM
#20
New User

Join Date: May 2009
Location: Gahanna, Ohio
Posts: 2
Likes: 0
Received 0 Likes
on
0 Posts
Thanks for putting me down the right path.
DIY fixed my RSX-typeS by soldering a finishing nail across the poles.
A similar article for RSX here.
http://forums.clubrsx.com/showthread.php?p=25389338
DIY fixed my RSX-typeS by soldering a finishing nail across the poles.
A similar article for RSX here.
http://forums.clubrsx.com/showthread.php?p=25389338
05-31-2009, 07:46 AM
#21
Honda-Tech Member
Join Date: May 2005
Location: Buffalo NY/Fort Bragg NC
Posts: 1,368
Likes: 0
Received 0 Likes
on
0 Posts
So what must be wrong for this check/repair to work? My hvac doesnt work period.. fans or ac or nothing turns on. could this be the culprit?
06-01-2009, 08:15 AM
#23
Honda-Tech Member
Join Date: May 2005
Location: Buffalo NY/Fort Bragg NC
Posts: 1,368
Likes: 0
Received 0 Likes
on
0 Posts
Strangely enough, I bought a wirebound 1ohm transistor and tried this (didn't actually bolt heatsink back inside car it was just hanging) and it didn't work. I'm very stumped.
 08-07-2009, 12:47 PM
#25
Honda-Tech Member

Join Date: Mar 2009
Posts: 13
Likes: 0
Received 0 Likes
on
0 Posts
the a/c wont give me any cold air at all...
Got my gas refilled...still the same, no cold air.
-took it to a mechanic who filled in the gas said that, the air compressor switch is broken
-took it to another mechanic and he told me that its the compressor thats broken
-took it to get it fixed at another mechanic for reasonable price and he said its the switch
so basically i have no clue what to believe and not to believe...how would i know if its the air conditioner compressor switch thats broken or its the compressor itself. ???
my airconditioner button and light inside does turn on. but just doesnt give any cold air.