
My Budget EJ1-GSR Track Day Build
 07-10-2013, 08:45 AM
#26
Honda-Tech Member
Thread Starter


As you can see I had to space the bracket down a bit to clear the lip on the bumper, or you could just notch the bumper. Hope that helps!

The following users liked this post:
07-10-2013, 08:51 AM
#27
Honda-Tech Member
Thread Starter
07-19-2013, 05:20 AM
#30
Honda-Tech Member
iTrader: (1)
Join Date: Aug 2008
Location: north, nj, usa
Posts: 37
Likes: 0
Received 0 Likes
on
0 Posts
thats a really nice setup, i question the side exit tho. it heats up that one tire not to mention any oil and mist that may be coming from the engine can get onto your contact patch
08-01-2013, 02:12 AM
#31
Honda-Tech Member
iTrader: (1)

Join Date: Mar 2009
Location: diamond bar
Posts: 309
Likes: 0
Received 0 Likes
on
0 Posts
It was actually quite easy. If you take your bumper off you'll see a 6mm bolt (10mm head) facing up that attaches the fender to the fender stay, I believe. I simply made an approx 100 degree bracket that uses that existing bolt hole and to it I attached the nutplate seen in the picture below. Then drilled a hole in the bumper and installed the shorter of the two sizes (the silver one) quarter turn fastener in it.
As you can see I had to space the bracket down a bit to clear the lip on the bumper, or you could just notch the bumper. Hope that helps!
As you can see I had to space the bracket down a bit to clear the lip on the bumper, or you could just notch the bumper. Hope that helps!
08-01-2013, 02:42 AM
#32
Honda-Tech Member
Thread Starter
08-01-2013, 12:18 PM
#33
Honda-Tech Member
Thread Starter
So, I went back to the track this past weekend. For those of you who have read through my build log and helped me through the first round of problems at the track, specifically the oil pressure loss in long left corners, here's an update for you.
THE CAR RAN GREAT!
Here's what I changed.
1- The oil pump was a bit scoured once I took it apart to inspect, so replaced with a new OEM GSR pump.
2- Made my own breather/catch can loosely based off the Endyn setup. OE Prelude block vent fittings, -10 nylon AN hose, -10 AN fittings at the catch can to make it easier to service, and the typical Moroso catch can. I routed the lines so it could drain back, completely deleted the stock black box, and topped the catch can with a big filter. This setup seemed to work really well on track and allowed me to run at least a full quart overfilled.

3- Changed from the 10W30 Mobil Super conventional oil I was using before to Mobil 1 Syn 15W50, about 6.5 quarts of it!
4- Added a Stack electronic oil pressure gauge inside the car.

Unfortunately, once I dug into the engine to replace the oil pump I found what I was expecting, the main bearings were a bit hurt...

So I had the crank polished, slapped a new set of ACL Race main and rod bearings, cleaned the crap out of every oil passage possible, etc... After the rebuild and the first heat cycle I drained the oil, it came out as clean as could be. Check the VTEC solenoid screen as well, no debris either. So fingers crossed it seems totally good now.
I also finally got around to making my super fancy roll bar! It's constructed of .095" wall 1-5/8" DOM tubing. Just slightly beefier than the minimum NASA spec for my weight class of 2,000-2,500 lbs which requires 1.5" .095" wall DOM. Still only weighs maybe 60 lbs or so, well worth the weight penalty IMO! I elected to make just a "B" pillar-back roll bar instead of a full cage, since I don't have any plans to wheel-to-wheel race the car yet.
I had some typical Honda floor cancer, so I made the base plates about as large as the rules allow (maximum 100 sq inches) and also had them attach to the vertical surfaces of the bulkhead to spread the load across multiple planes.
My boss TIG welding like a contortionist LOLOL

Seeing as how it's my first roll bar I think it turned out pretty well. I opted to go with the "X" shaped support bars coming off the main hoop to add a bit more torsional rigidity. Also obviously put a harness bar and diagonal in there. It doesn't limit seat travel for either seat, which is nice. And I have the satisfaction of doing it all myself, not to mention the material only cost about $300, and since it's welded it should be a bit sturdier than a bolt-in roll bar.


And here it is from the trunk view. The tube at the bottom runs between the strut towers and should help to stiffen the structure a bit more.

Once again, thanks for all of your help! Here's some video from the track day. Not my best laps, just the only session I was happy with how the camera angle turned out. FWIW my previous fast lap was a 1:23.9 around Putnam Park, this time around I did a 1:22.1 in my first session!
THE CAR RAN GREAT!
Here's what I changed.
1- The oil pump was a bit scoured once I took it apart to inspect, so replaced with a new OEM GSR pump.
2- Made my own breather/catch can loosely based off the Endyn setup. OE Prelude block vent fittings, -10 nylon AN hose, -10 AN fittings at the catch can to make it easier to service, and the typical Moroso catch can. I routed the lines so it could drain back, completely deleted the stock black box, and topped the catch can with a big filter. This setup seemed to work really well on track and allowed me to run at least a full quart overfilled.
3- Changed from the 10W30 Mobil Super conventional oil I was using before to Mobil 1 Syn 15W50, about 6.5 quarts of it!
4- Added a Stack electronic oil pressure gauge inside the car.
Unfortunately, once I dug into the engine to replace the oil pump I found what I was expecting, the main bearings were a bit hurt...
So I had the crank polished, slapped a new set of ACL Race main and rod bearings, cleaned the crap out of every oil passage possible, etc... After the rebuild and the first heat cycle I drained the oil, it came out as clean as could be. Check the VTEC solenoid screen as well, no debris either. So fingers crossed it seems totally good now.
I also finally got around to making my super fancy roll bar! It's constructed of .095" wall 1-5/8" DOM tubing. Just slightly beefier than the minimum NASA spec for my weight class of 2,000-2,500 lbs which requires 1.5" .095" wall DOM. Still only weighs maybe 60 lbs or so, well worth the weight penalty IMO! I elected to make just a "B" pillar-back roll bar instead of a full cage, since I don't have any plans to wheel-to-wheel race the car yet.
I had some typical Honda floor cancer, so I made the base plates about as large as the rules allow (maximum 100 sq inches) and also had them attach to the vertical surfaces of the bulkhead to spread the load across multiple planes.
My boss TIG welding like a contortionist LOLOL
Seeing as how it's my first roll bar I think it turned out pretty well. I opted to go with the "X" shaped support bars coming off the main hoop to add a bit more torsional rigidity. Also obviously put a harness bar and diagonal in there. It doesn't limit seat travel for either seat, which is nice. And I have the satisfaction of doing it all myself, not to mention the material only cost about $300, and since it's welded it should be a bit sturdier than a bolt-in roll bar.
And here it is from the trunk view. The tube at the bottom runs between the strut towers and should help to stiffen the structure a bit more.
Once again, thanks for all of your help! Here's some video from the track day. Not my best laps, just the only session I was happy with how the camera angle turned out. FWIW my previous fast lap was a 1:23.9 around Putnam Park, this time around I did a 1:22.1 in my first session!
Last edited by Erturbo; 08-06-2013 at 04:50 AM.
08-01-2013, 05:02 PM
#34
Honda-Tech Member
Very nice man! Always great to have lots of hard work pay off with a successful weekend at the track. Putnam is no longer a home track to me  but I already miss it. Quite a few of my friends were up there as well and I'm sad that I couldn't make it.
What kind of GPS top speed are you seeing before T1, out of curiosity? I'm curious how much the extra power and less weight (compared to me) amounts to on the front straight alone. I know that video didn't have your best laps but I can definitely see how it gets down into the 21's. Not many FWD cars are in that realm at Putnam.
but I already miss it. Quite a few of my friends were up there as well and I'm sad that I couldn't make it.What kind of GPS top speed are you seeing before T1, out of curiosity? I'm curious how much the extra power and less weight (compared to me) amounts to on the front straight alone. I know that video didn't have your best laps but I can definitely see how it gets down into the 21's. Not many FWD cars are in that realm at Putnam.
08-01-2013, 06:19 PM
#35
Honda-Tech Member
Thread Starter
Very nice man! Always great to have lots of hard work pay off with a successful weekend at the track. Putnam is no longer a home track to me but I already miss it. Quite a few of my friends were up there as well and I'm sad that I couldn't make it.
What kind of GPS top speed are you seeing before T1, out of curiosity? I'm curious how much the extra power and less weight (compared to me) amounts to on the front straight alone. I know that video didn't have your best laps but I can definitely see how it gets down into the 21's. Not many FWD cars are in that realm at Putnam.
but I already miss it. Quite a few of my friends were up there as well and I'm sad that I couldn't make it.What kind of GPS top speed are you seeing before T1, out of curiosity? I'm curious how much the extra power and less weight (compared to me) amounts to on the front straight alone. I know that video didn't have your best laps but I can definitely see how it gets down into the 21's. Not many FWD cars are in that realm at Putnam.
I was using the popular app "Harry's Laptimer Pro" for lap times, plus double-checking with a stopwatch on the video, and I'd assume the GPS speed data is fairly accurate... But that being said the app is only showing my top speed as 106.2 mph. If you watch the speedo on the video it touches 110-115 nearly every lap, but who knows if that's accurate either. I'd like to eventually get a MyChron which I'd assume is more accurate, but for now I'm just going off what the app says. But 106 mph seems pretty slow. FWIW the engine didn't quite feel like it was pulling as crisply as I'd expect down the straight, might need to put it back on the dyno with my AFC and fine-tune it.vIt definitely felt like it took a long time to pull through 4th gear, especially considering it's a short ratio ITR gearbox. Plus I have some aero stuff in the works which should hopefully reduce drag at the back and prevent the air becoming trapped in the rear bumper which I've always heard is a huge air brake on these EGs.
Long story short: I was expecting the car to be doing 120 or maybe even a bit more. I guess that's a good thing considering I'm already turning some pretty respectable times!
08-01-2013, 07:04 PM
#36
Honda-Tech Member
I would strongly recommend an Aim Solo opposed to the MyChron or other options. The GPS data (both speed and lap times) are about as accurate as any solution out there right now, and it's significantly cheaper and more portable than a typical race dash. Comparing my Solo lap times to what I get from the AMB transponder is usually within a hundredth or so.
I would agree though that something seems off with your data. My stock 212k mile LS motor with LS trans is getting me up to 106-107 mph assuming I have a strong exit on 10. And I'm 2,600-2,640 lbs total with me in the car. I know that Honda speedos are typically off by a decent margin at these speeds, especially with aftermarket tire sizes, but I would assume you are definitely in the 110+ range. Anyways, just curious You must be hauling out there no doubt.
I would agree though that something seems off with your data. My stock 212k mile LS motor with LS trans is getting me up to 106-107 mph assuming I have a strong exit on 10. And I'm 2,600-2,640 lbs total with me in the car. I know that Honda speedos are typically off by a decent margin at these speeds, especially with aftermarket tire sizes, but I would assume you are definitely in the 110+ range. Anyways, just curious
You must be hauling out there no doubt.

 08-06-2013, 04:35 AM
#42
Honda-Tech Member
Thread Starter
Thanks man! I'm fairly certain I would've gotten there, but I spent the whole afternoon giving joyrides to crew members of the iMoto racing team! They were parked right next to me in the paddock, prepping after the Indy race and ended up testing a new driver on Sunday (who BTW got down to a 1:17.9, thought he would've gone faster) in one of their GrandAm Mazdaspeed 3's. As it turns out, a few of the guys on the team had never even been around a race track! So I was happy to give them their first experiences out there at speed. They had a fantastic time and spent the rest of the weekend geeking out over some of the stuff on my car HAHA. I even borrowed their fender roller, as I started rubbing my RR with a 200 lb passenger on board.
08-06-2013, 05:17 AM
#43
Honda-Tech Member
Thread Starter
Here are a couple more things I've done to the car that I had previously forgotten to take pictures of.
I resisted the urge to install this until I had the roll bar in the car for fear of being thought of as "ricey", but I've always appreciated panoramic mirrors when you're trying to see what's behind you through a sea of roll bar tubing. It's just the cheap one, purchased through HRPWorld I believe for around $30. I REALLY liked having this at the track.

The battery that was in the car when I got it seemed like it was doing well for the 200 miles or so of street driving I had done before I went to the track, but of course Murphy's Law kicked in and after the first couple sessions it was turning over very slowly during cranking. Still showed good voltage, it would just drop too much under load. So I researched the popular Oddessey PC680/Braille lightweight alternatives and found the Deka ETX20L, which is the battery Braille repackages and sells for like $300. I paid $100 for this one from O'Reillys locally! It weighs I believe 15 lbs, about 10 lbs lighter than the stock battery which is already a small one by most standards. It's a gel cell so can be mounted any orientation, plus is safer in the event of a crash. IIRC it has around 680 CCAs, more than enough to turn over my stock compression engine, and since it's not a daily driver I can keep it on a trickle charger as needed. I obviously had to shorten the battery tie down bolts and crimp/solder some new terminals in place, but that is the easy part!

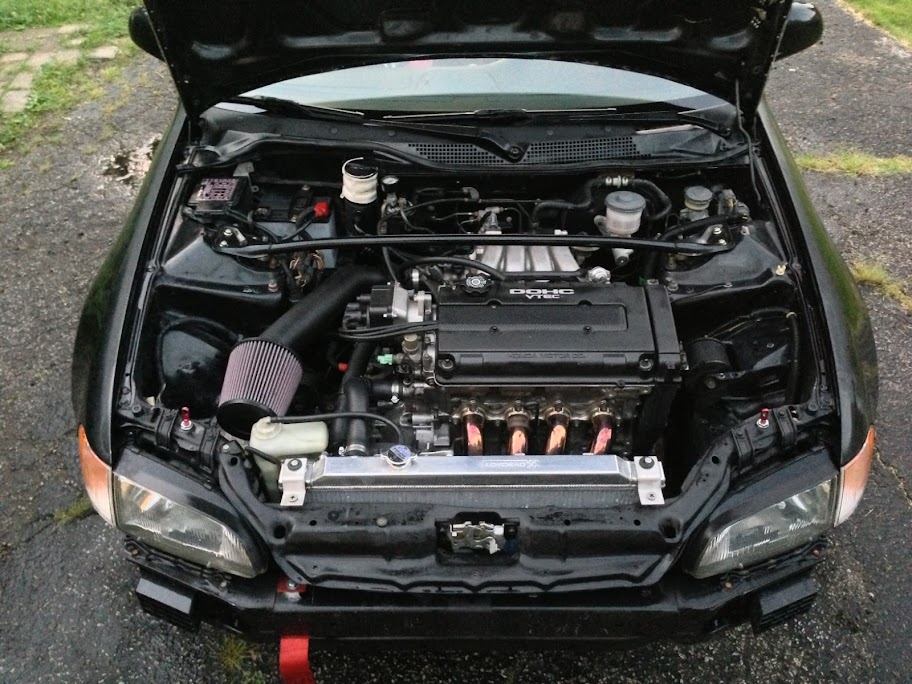
And here is the current state of the engine bay with the catch can mounted as high as possible and the new, much smaller, battery.
Post trackday bath. I can't wait to finally get the exterior of this thing looking as good as the underside! Full gloss white paint (Plastidip) job coming soon!

And, of course, I had to add a little National Championship flair... Also shown at the top of the rear window is the beginning of my collection of tracks visited in this car.

I resisted the urge to install this until I had the roll bar in the car for fear of being thought of as "ricey", but I've always appreciated panoramic mirrors when you're trying to see what's behind you through a sea of roll bar tubing. It's just the cheap one, purchased through HRPWorld I believe for around $30. I REALLY liked having this at the track.
The battery that was in the car when I got it seemed like it was doing well for the 200 miles or so of street driving I had done before I went to the track, but of course Murphy's Law kicked in and after the first couple sessions it was turning over very slowly during cranking. Still showed good voltage, it would just drop too much under load. So I researched the popular Oddessey PC680/Braille lightweight alternatives and found the Deka ETX20L, which is the battery Braille repackages and sells for like $300. I paid $100 for this one from O'Reillys locally! It weighs I believe 15 lbs, about 10 lbs lighter than the stock battery which is already a small one by most standards. It's a gel cell so can be mounted any orientation, plus is safer in the event of a crash. IIRC it has around 680 CCAs, more than enough to turn over my stock compression engine, and since it's not a daily driver I can keep it on a trickle charger as needed. I obviously had to shorten the battery tie down bolts and crimp/solder some new terminals in place, but that is the easy part!
And here is the current state of the engine bay with the catch can mounted as high as possible and the new, much smaller, battery.
Post trackday bath. I can't wait to finally get the exterior of this thing looking as good as the underside! Full gloss white paint (Plastidip) job coming soon!
And, of course, I had to add a little National Championship flair... Also shown at the top of the rear window is the beginning of my collection of tracks visited in this car.
08-06-2013, 06:55 AM
#45
Honda-Tech Member
Thread Starter
I had previously installed quick-release eyelets into the rear seat belt receptacle mounting holes, and had the shoulder harnesses clicked into these. Since I added the rollbar and harness bar I just passed the shoulder belts over the harness bar, to correct the angle a bit, and connected them to the same location. I realize the ideal scenario would probably be to either just loop and terminate them at the harness bar or weld the eyelets to the harness bar, I just ran out of time to make any big changes like that before the track day. Suggestions?
08-06-2013, 07:07 AM
#46
Honda-Tech Member
Join Date: Nov 2001
Location: Playing in the sandbox
Posts: 2,761
Likes: 0
Received 2 Likes
on
2 Posts
Gotcha... the part of the mounting that looks "sub-optimal" is the outside belt on each side. Looks like it's sliding laterally across the harness bar due to the bend, right? A couple options that spring to mind: #1- cross the shoulder harnesses or #2- get some harness guides that attach to the harness bar.
http://www.turnermotorsport.com/p-14...lars-pair.aspx
Depending on where the eyelets are mounted, the harness guides may not work that well and the harness could potentially "jump" over the guide in an impact. I've also seen folks take small gauge wire and weld a permanent "loop" over the top of the harness belt and thereby make it captive.
Crossing the belts would probably be the easiest option though. Double check the manufacturer suggestions on when it's ok to cross the belts. IIRC, Schroth has a min length guideline before the suggest crossing the belts but I suspect that you'd be ok doing it.
Just my $0.02 and whatnot.
08-06-2013, 09:12 AM
#47
Honda-Tech Member
Thread Starter
Gotcha... the part of the mounting that looks "sub-optimal" is the outside belt on each side. Looks like it's sliding laterally across the harness bar due to the bend, right? A couple options that spring to mind: #1- cross the shoulder harnesses or #2- get some harness guides that attach to the harness bar.
http://www.turnermotorsport.com/p-14...lars-pair.aspx
Depending on where the eyelets are mounted, the harness guides may not work that well and the harness could potentially "jump" over the guide in an impact. I've also seen folks take small gauge wire and weld a permanent "loop" over the top of the harness belt and thereby make it captive.
Crossing the belts would probably be the easiest option though. Double check the manufacturer suggestions on when it's ok to cross the belts. IIRC, Schroth has a min length guideline before the suggest crossing the belts but I suspect that you'd be ok doing it.
Just my $0.02 and whatnot.
http://www.turnermotorsport.com/p-14...lars-pair.aspx
Depending on where the eyelets are mounted, the harness guides may not work that well and the harness could potentially "jump" over the guide in an impact. I've also seen folks take small gauge wire and weld a permanent "loop" over the top of the harness belt and thereby make it captive.
Crossing the belts would probably be the easiest option though. Double check the manufacturer suggestions on when it's ok to cross the belts. IIRC, Schroth has a min length guideline before the suggest crossing the belts but I suspect that you'd be ok doing it.
Just my $0.02 and whatnot.
Good lookin' out!
08-06-2013, 09:47 AM
#48
Honda-Tech Member
Join Date: Nov 2001
Location: Playing in the sandbox
Posts: 2,761
Likes: 0
Received 2 Likes
on
2 Posts
Cool deal.
PS
On the H&N tangent... try on the different options and get the one that fits best. HANS is the typical go to but don't pass over DefNder/NecksGen and the Rage type products from Safety Solutions/Simpson. Depending on build, seat, etc some will work better than others. Also consider offset and side impacts into the equation as this is where HANS typically performs lower than the other options (unless you're upgrading to a halo/winged seat).
08-06-2013, 12:34 PM
#49
Honda-Tech Member
Join Date: Nov 2008
Location: SF Bay Area, USA
Posts: 327
Likes: 0
Received 0 Likes
on
0 Posts
If you end up using the bolt on shaft collars, then the price including shipping thru McMaster Carr might be better. They're listed at http://www.mcmaster.com/#shaft-collars/=ny84a6 and then go to the Clamp-On Shaft Collar section, and then to Two-Piece Camp-On Shaft Collars, then choose the material and size you need - I used the aluminum ones on my car. - Jim
08-06-2013, 01:39 PM
#50
Honda-Tech Member
If you end up using the bolt on shaft collars, then the price including shipping thru McMaster Carr might be better. They're listed at http://www.mcmaster.com/#shaft-collars/=ny84a6 and then go to the Clamp-On Shaft Collar section, and then to Two-Piece Camp-On Shaft Collars, then choose the material and size you need - I used the aluminum ones on my car. - Jim
Would black oxide steel work for this? It seems a decent amount cheaper than the aluminum ones, especially with needing 4 of them.