Honda Accord: How to Replace Front and Rear Shocks
Regardless of which shocks you want to install, the process is no different. So whether you choose to replace your shocks with OEM or high performance aftermarket assemblies, this guide will go over how it is done.
This article applies to the Honda Accord (1990-2002).
There are a number of reasons why you would want to replace your shocks. They are one of the components that take a lot of abuse. You might want new ones for enhanced performance, maybe they have already blown, or you suspect that they're really old and in need of a replacement. Regardless of the reason, the process is still the same. So if it's time to replace your shocks, don't worry too much because it was bound to happen at least once.

Materials Needed
- Jack and jack stands
- Breaker bar
- Sockets (12, 14, and 17mm), extension, and ratchet
- 17mm box wrench
- 6mm Allen wrench
- Hammer
- Rubber mallet
- Flat head screwdriver
- Torque wrench
- Spring compressor
- WD-40 or PB blaster
Step 1 – Jack the car up
- Place the jack stands in their respective positions by the pinch welds of the car.
- Loosen the lug nuts.
- Jack the car up, and carefully lower it onto the jack stands.
- Completely undo and remove the lug nuts. Set the wheels aside.
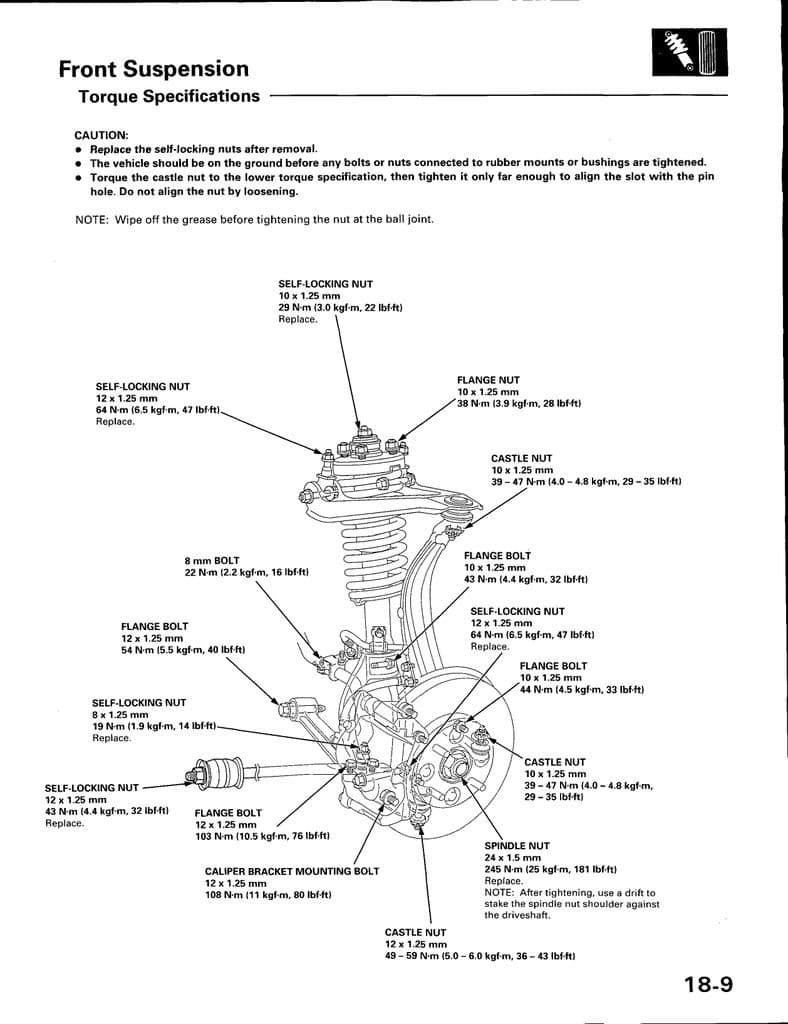
Figure 1. Diagram of front suspension including the torque specs. 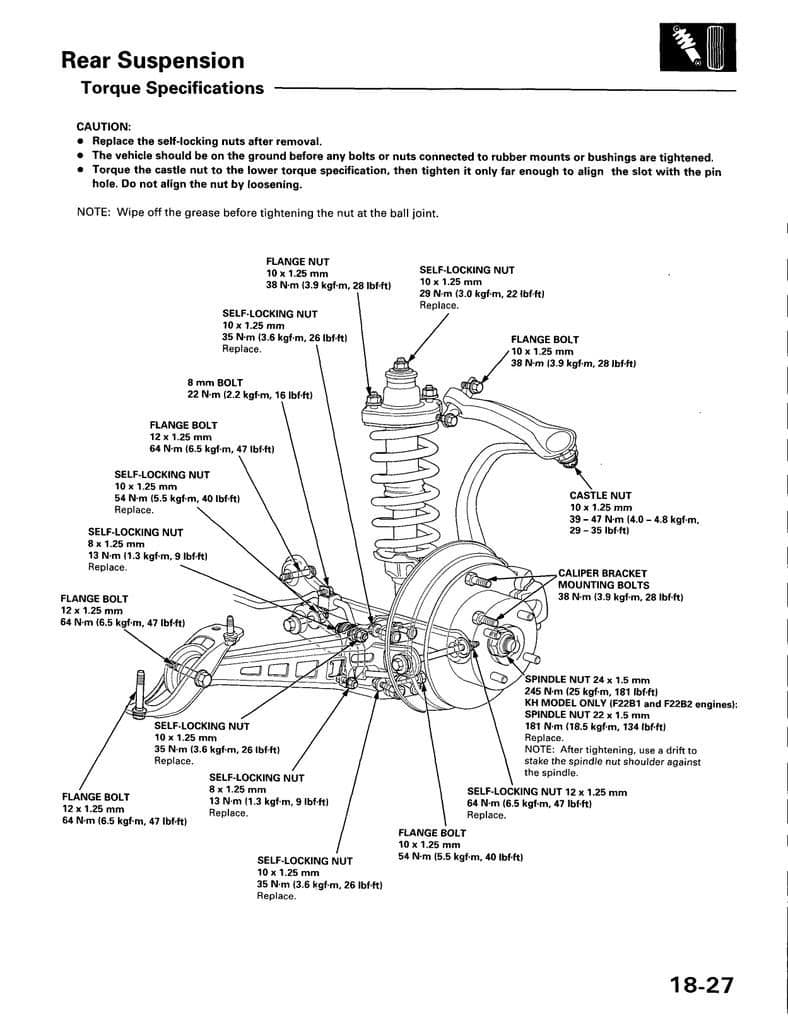
Figure 2. Diagram of rear suspension diagram including the torque specs.
Pro Tip
If you are planning to replace the front shocks only, you can choose to raise just the front of the car and lay it down on jack stands. The same applies if you are planning to replace only the rear shocks.
(Related Article: How to Jack Up Your Accord - Honda-Tech.com)
Step 2 – Gain access to top mount bolts
Steps 2 to 5 apply to the replacing the rear shocks.
- Unlock the trunk.
- Then, insert your car key into the keyhole above the rear seats and turn clockwise.
- Pull the tab in the trunk, and fold the rear seats down to access the two bolts of the rear shock tower mounts. These bolts hold the rear shocks in place.
- With a flat head screwdriver, pop off the plastic, circular caps from each triangular panel behind the rear seats.
- With the flat head screwdriver again, remove the plastic screws on the floorboard of the trunk.
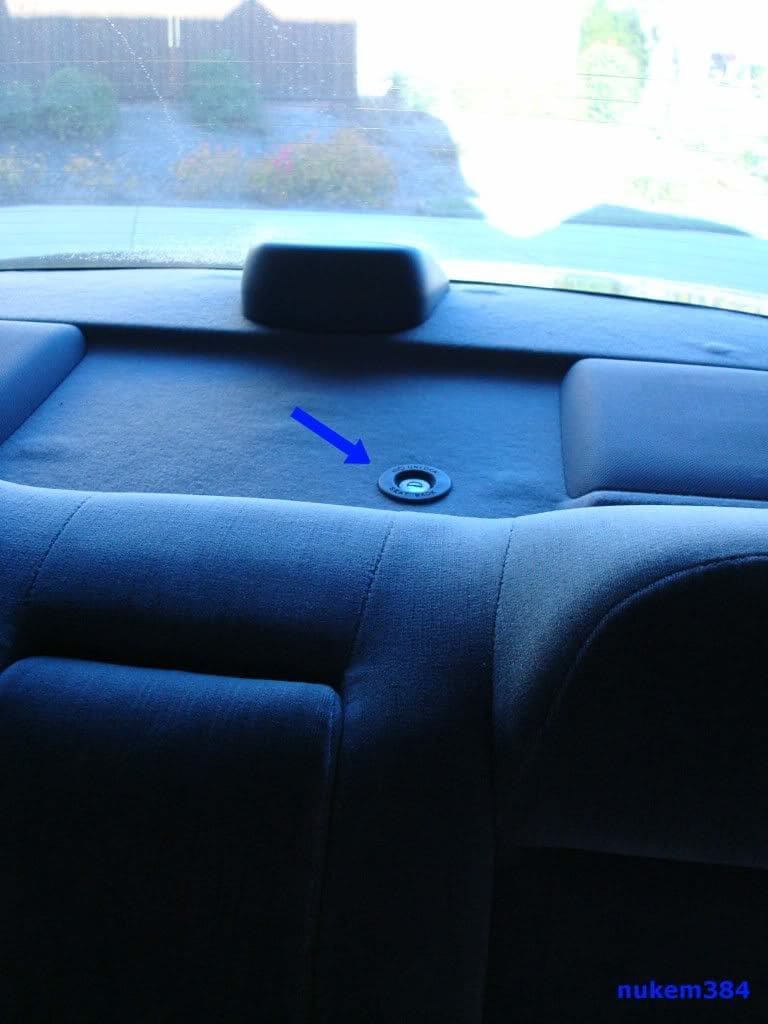
Figure 3. Use your car key to lower the rear car seats. 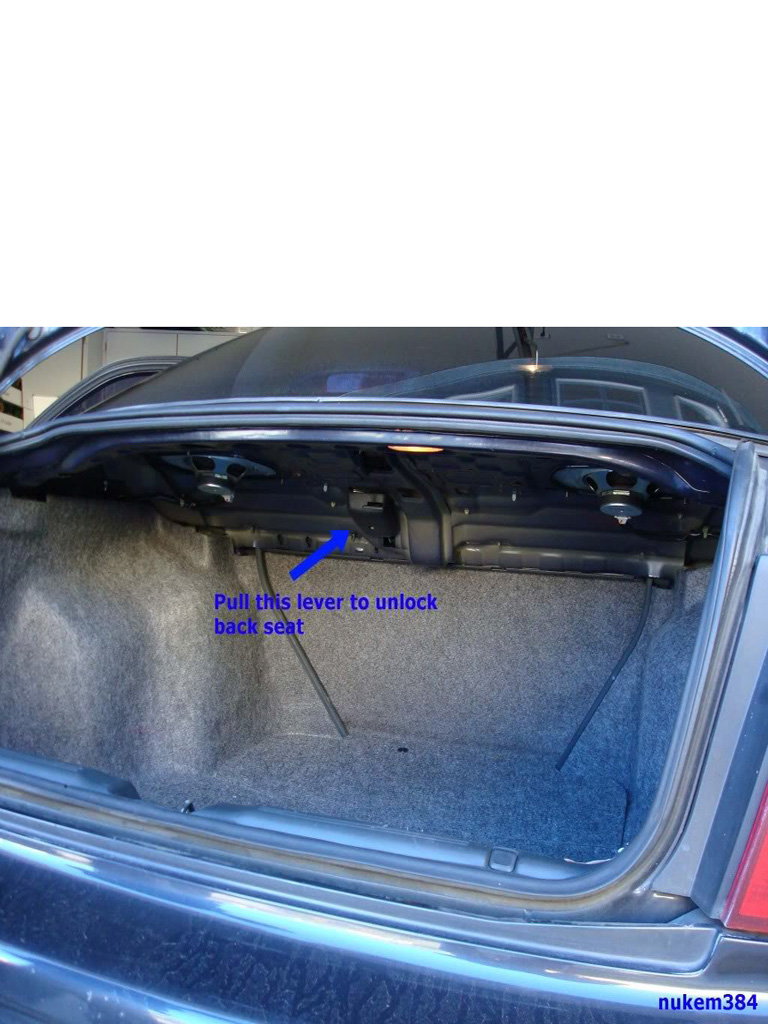
Figure 4. Pull lever in the trunk to fold the rear seats down. 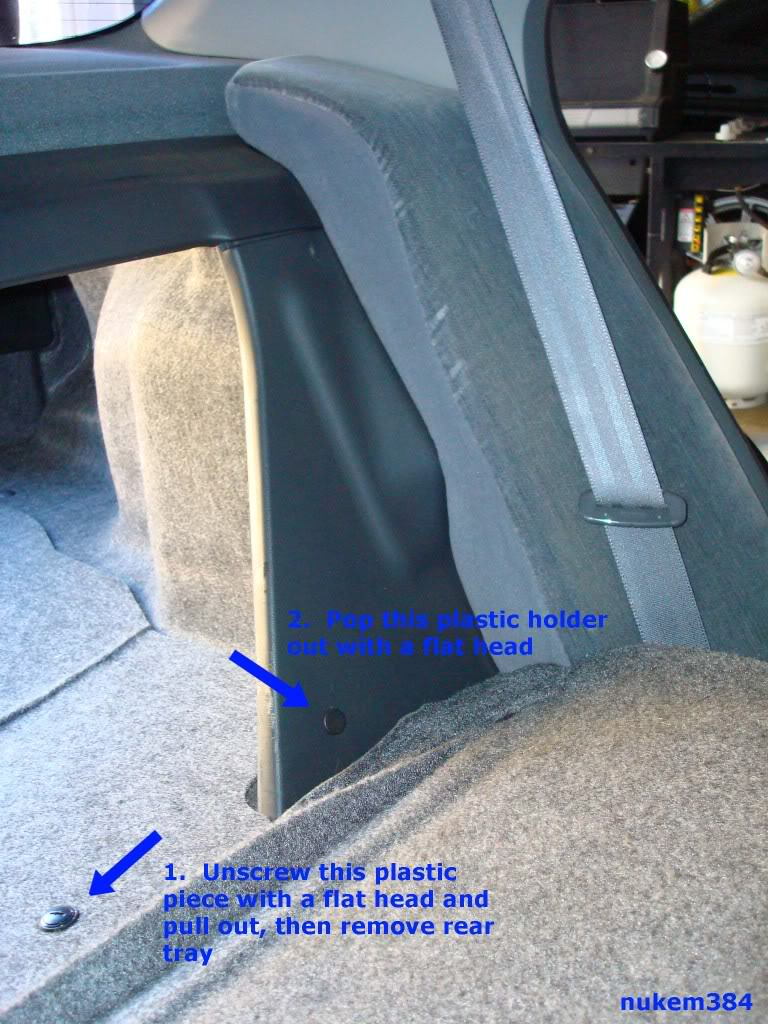
Figure 5. Remove plastic caps and screws from the panels and floorboard.
- Pull back on the panels until the metal clips detach.
- Using a ratchet, extension, and 14mm socket, remove the two bolts behind each of the removed panels.
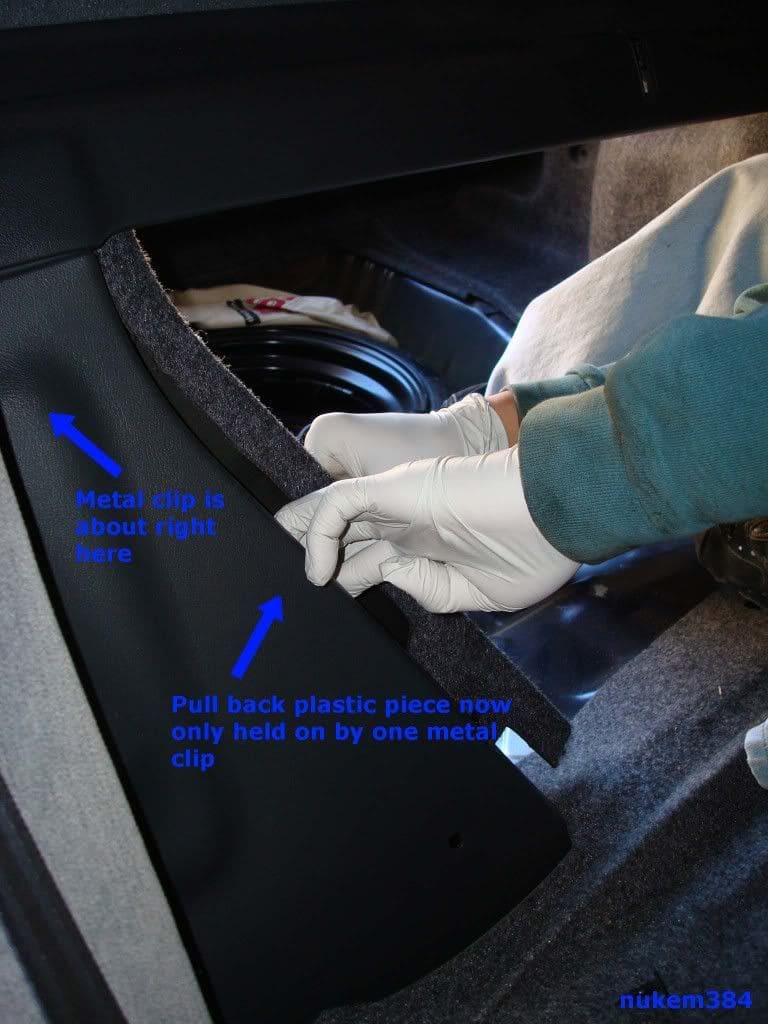
Figure 6. Pull back and remove the plastic panels. 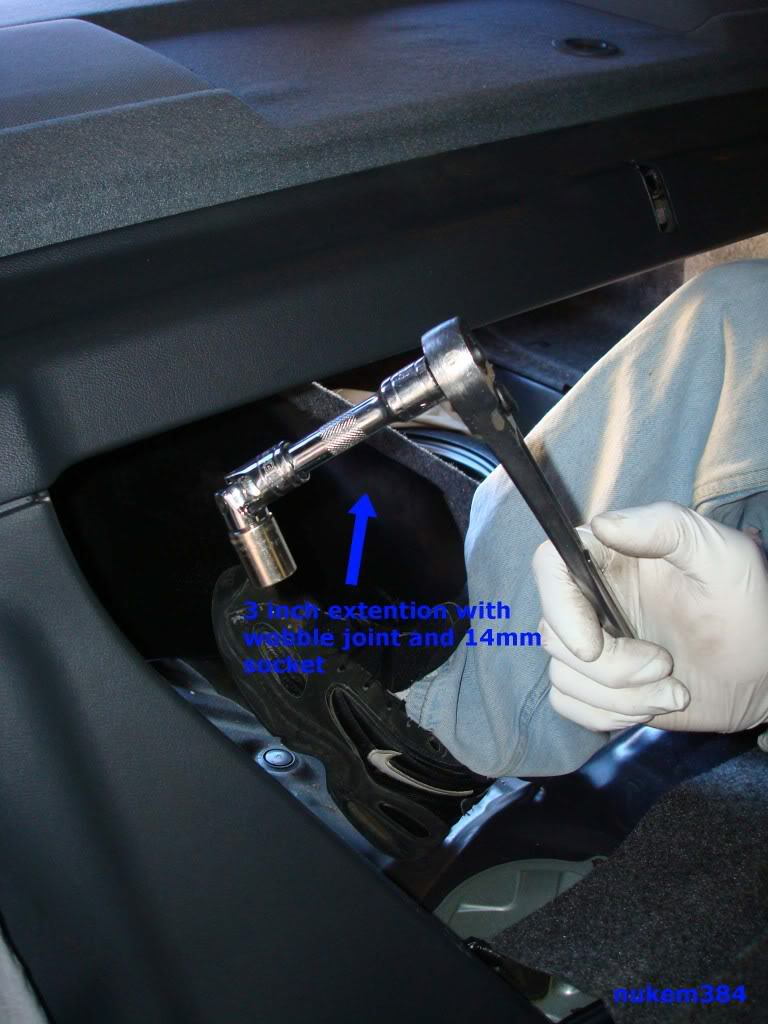
Figure 7. Remove two bolts behind each panel with a 14mm socket. 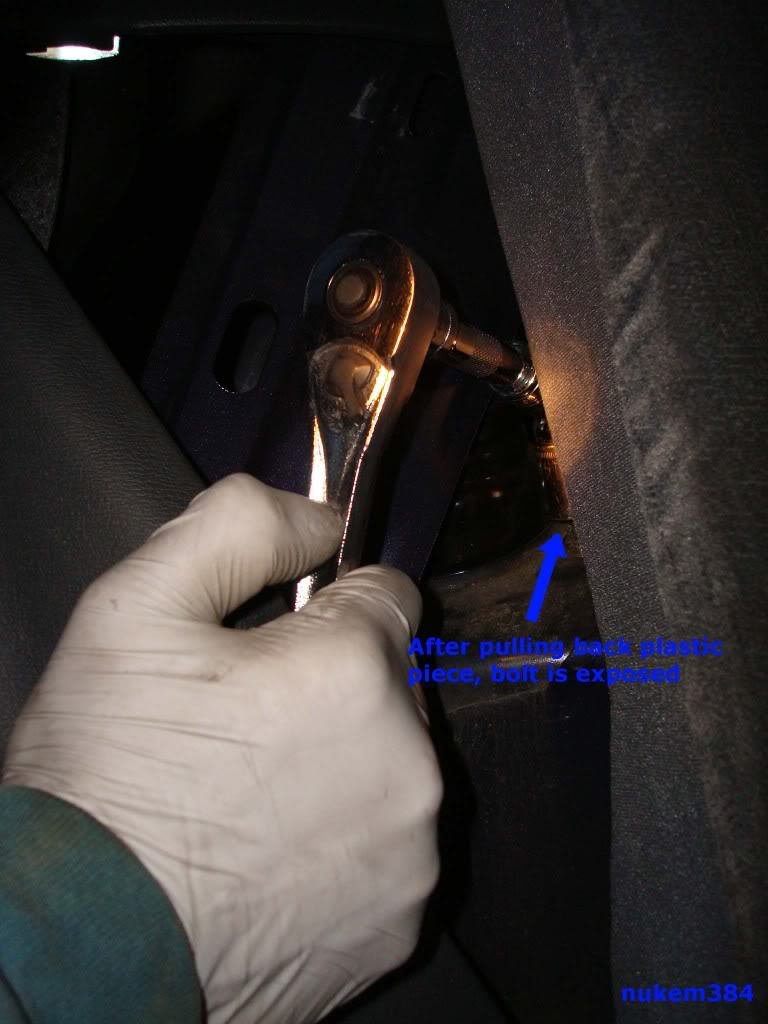
Figure 8. Use a ratchet extension as the bolts may be difficult to access.
Step 3 – Remove the shock bolts
Steps 3 to 5 apply to the shocks from one side of the suspension. Repeat these steps with the other side.
- With the breaker bar and 17mm bolt, loosen the bolt connecting the shock to the lower control arm. The bolt will be extremely tight.
- Once it's loose, remove the bolt as far back as you can. It might not be easy to completely remove it.
- Use a rubber mallet to pound out the bolt from its threaded end.
- Then, remove the shocks from underneath the wheel well.
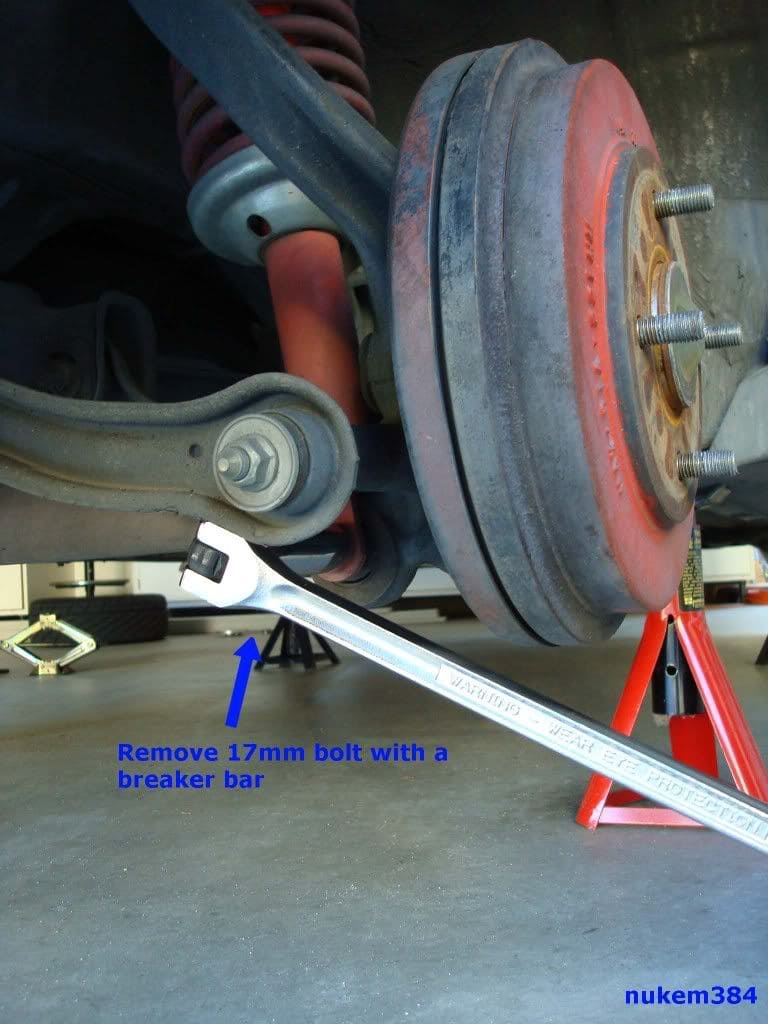
Figure 9. Use a breaker bar to loosen the bolt. 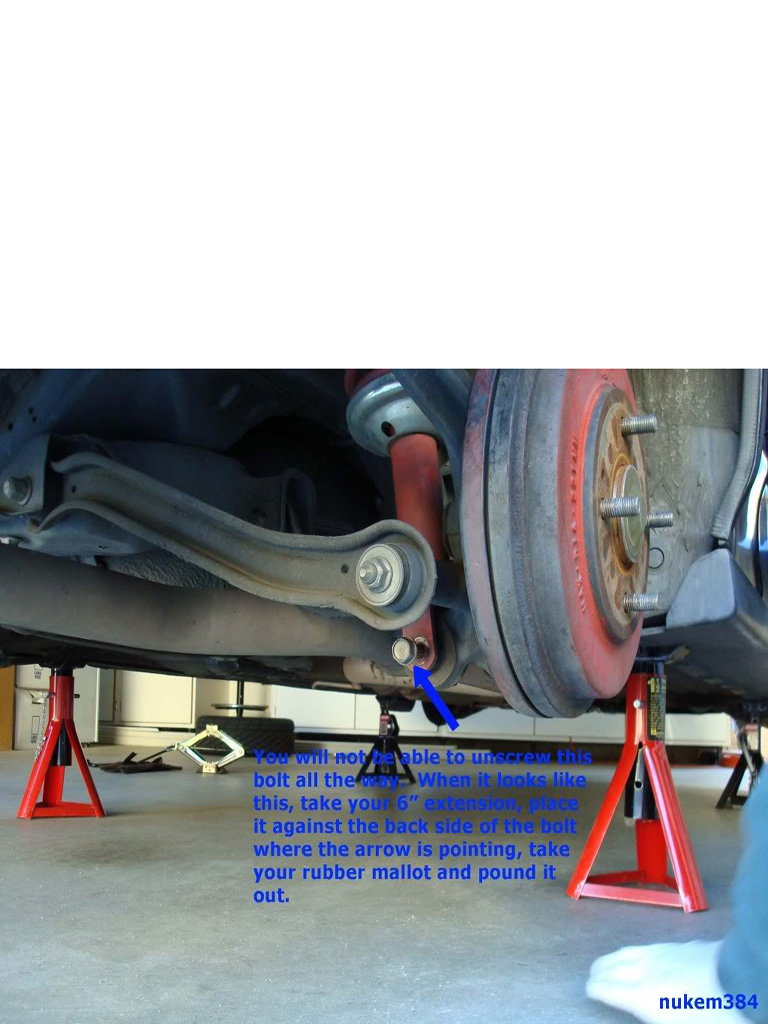
Figure 10. Use a rubber mallet to completely remove the bolt.
Pro Tip
Before attempting to loosen the bolt, you could also spray WD-40 on both sides of the bolt, and let it sit for a few minuets.
Step 4 – Remove spring from the shock body
Follow this step if you are installing new or old springs with a separate set of shocks.
- Compress the spring with a spring compressor. Be sure to follow the manufacturer's instructions when using it.
- With a 17mm box wrench and 6mm Allen wrench, undo the bolt from the top shock mount.
- Carefully decompress the spring, and disassemble the shocks.
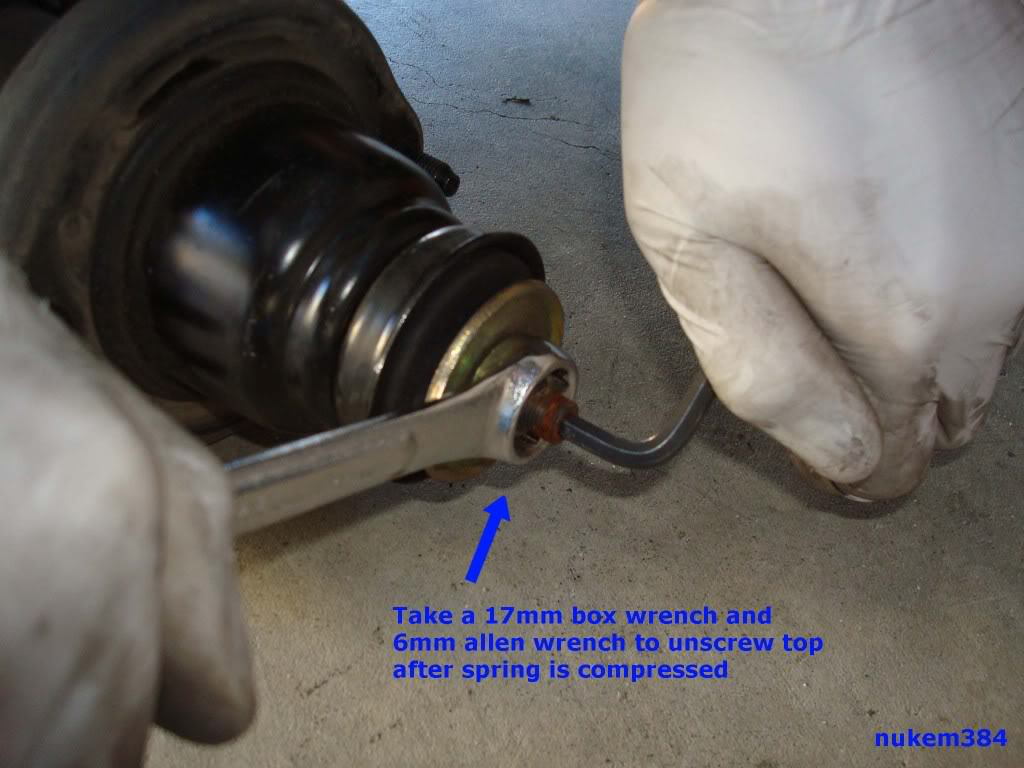
Figure 11. Use a box and Allen wrench to remove the shock mounts. 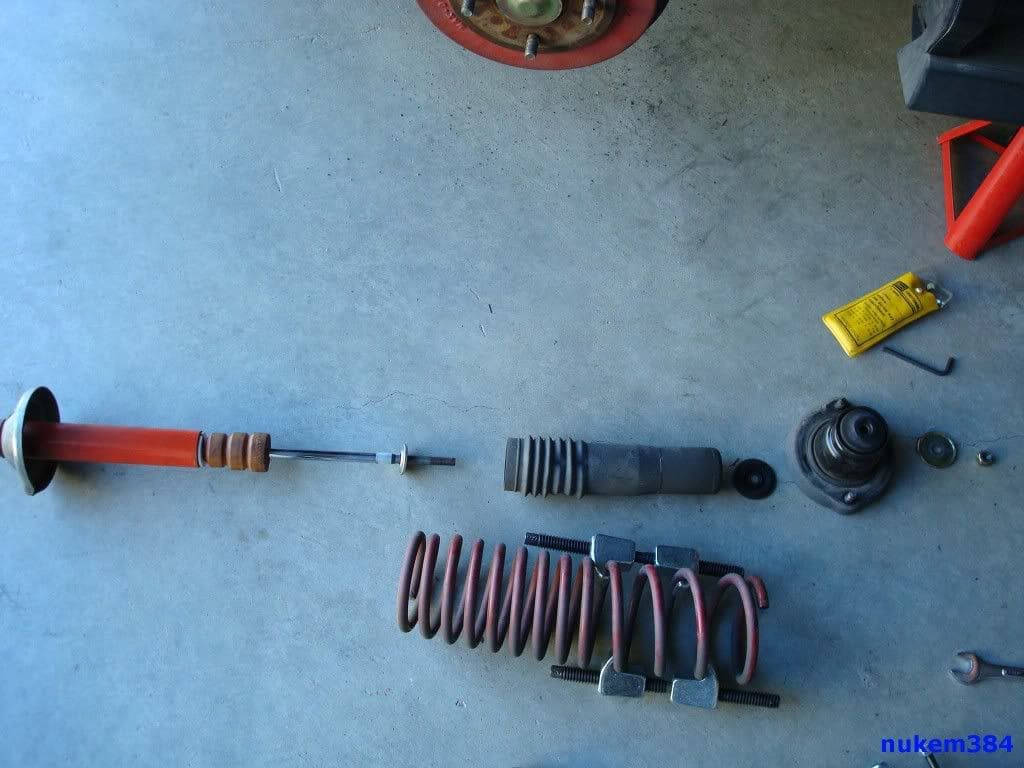
Figure 12. Disassemble the shock and spring assembly.
Pro Tip
If your aftermarket shocks don't come with certain parts, you can reuse your stock pieces. If you have to reuse your stock bump stops, you should cut about one inch off of it for more travel with the aftermarket shocks, but no more than one inch. You do not need to do this if you're installing OEM shocks.
Step 5 – Install the new springs and shocks
Follow this step if you are installing new or old springs with a separate set of shocks.
- Compress the new spring with the spring compressor. Make sure to properly set the spring onto the spring perch, so that the end of the coil is against the curve.
- Screw the bolt back on top with the 17mm box wrench and 6mm Allen wrench.
- Put the assembled shock back in the wheel well, and loosely fasten the the two 14mm bolts from inside the trunk.
- Have a friend step on the drum brakes, while you place the shock's lower fork onto the lower control arm.
- Then, force a screwdriver through the lower holes to line them up.
- Insert the 17mm bolt, and pound it in with the rubber mallet until it cannot move in any farther.
- Use the socket wrench to further tighten the bolt.
- Finally, tighten all the bolts to their proper torque specs, and repeat this process with the other side.
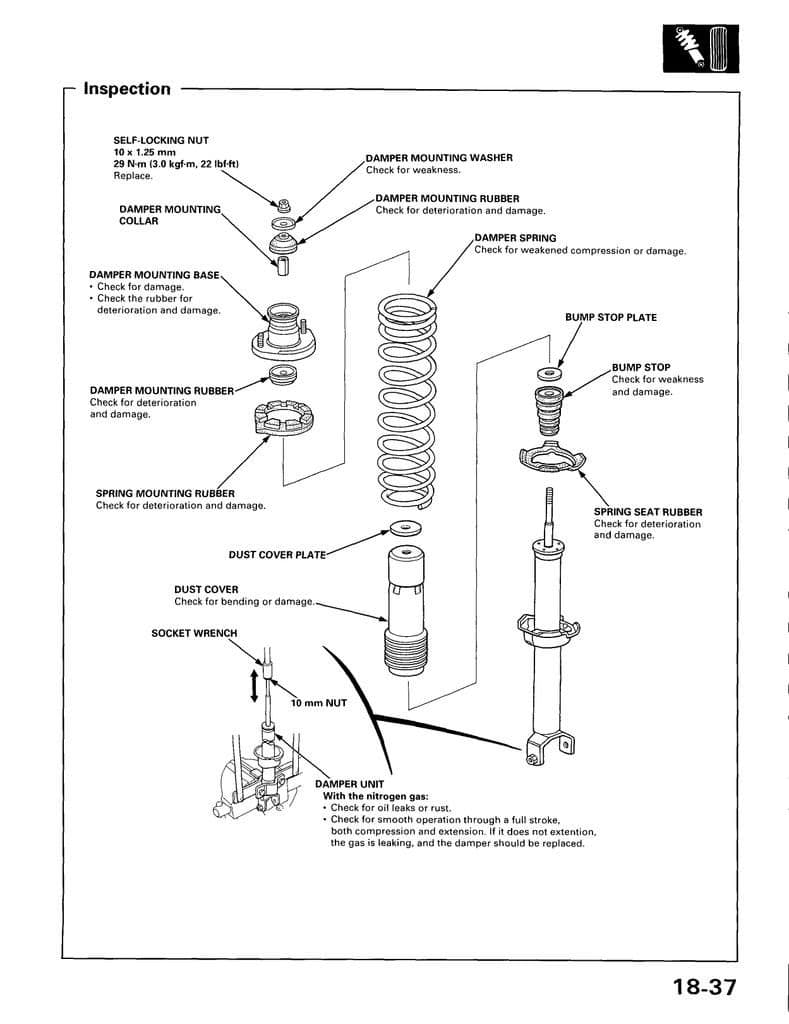
Figure 13. Diagram for an Accord's rear shock assembly. 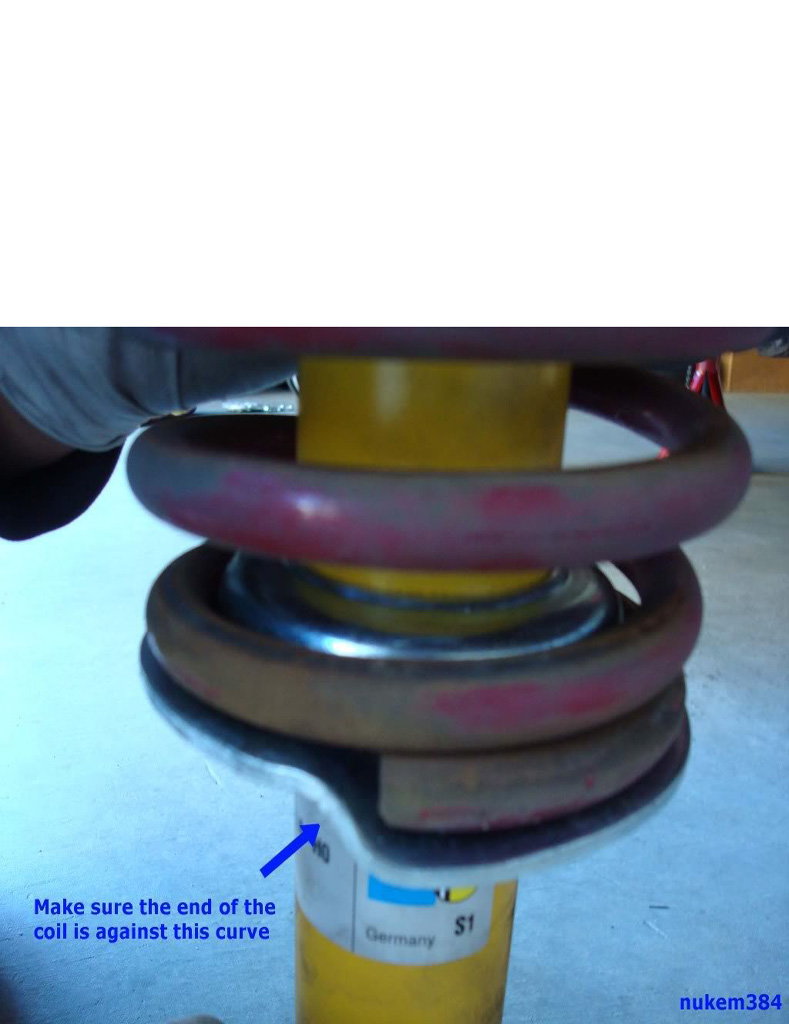
Figure 14. Properly set the spring onto the spring perch. 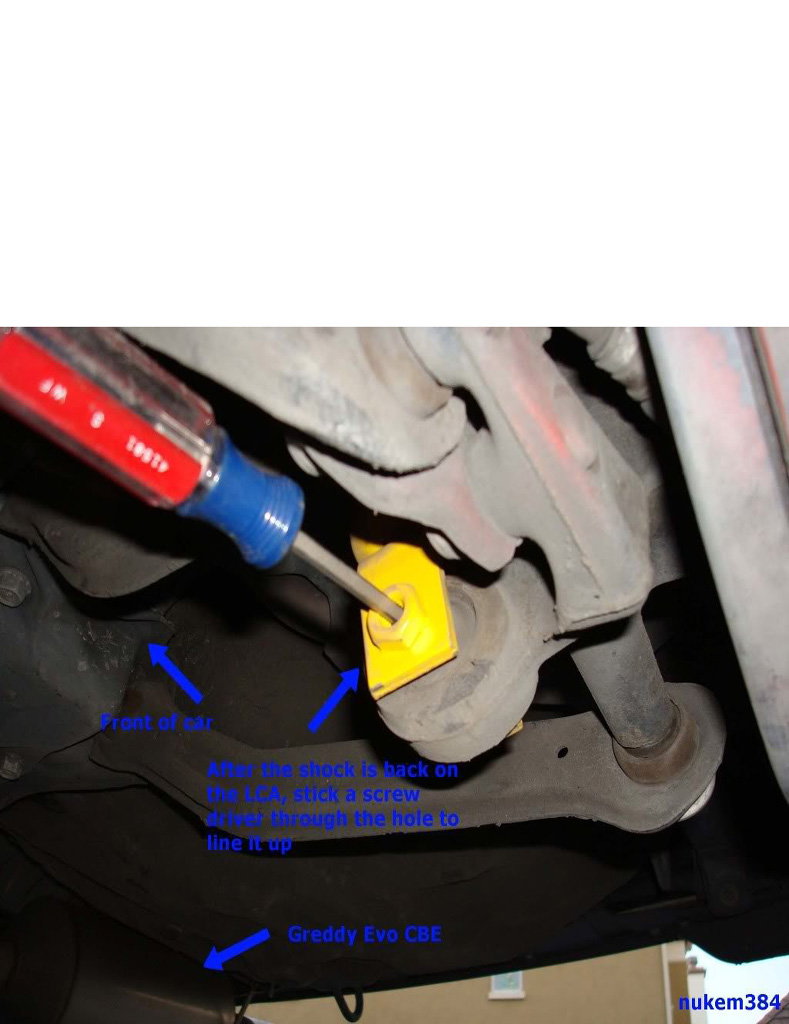
Figure 15. Use a screwdriver to line up the holes of the shocks and lower control arms.
Step 6 – Remove the front shocks
The remaining steps refer to replacing the front shocks.
- With the 12mm socket, remove the two bolts that attach the brake line to the brake line's bracket on the shock.
- Next, with the 14mm socket, remove the pinch bolt that secures the shock to the fork.
- To remove the bolt that connects the shock fork to the front lower control arm, attach the breaker bar with the 17mm socket and the socket wrench to opposite ends of the bolt. You may also want to spray some WD-40 on the bolt before loosening it.
- Remove the three 14mm bolts of the shock mounts located under the hood.
- Finally, pull the complete shock and spring assembly out.
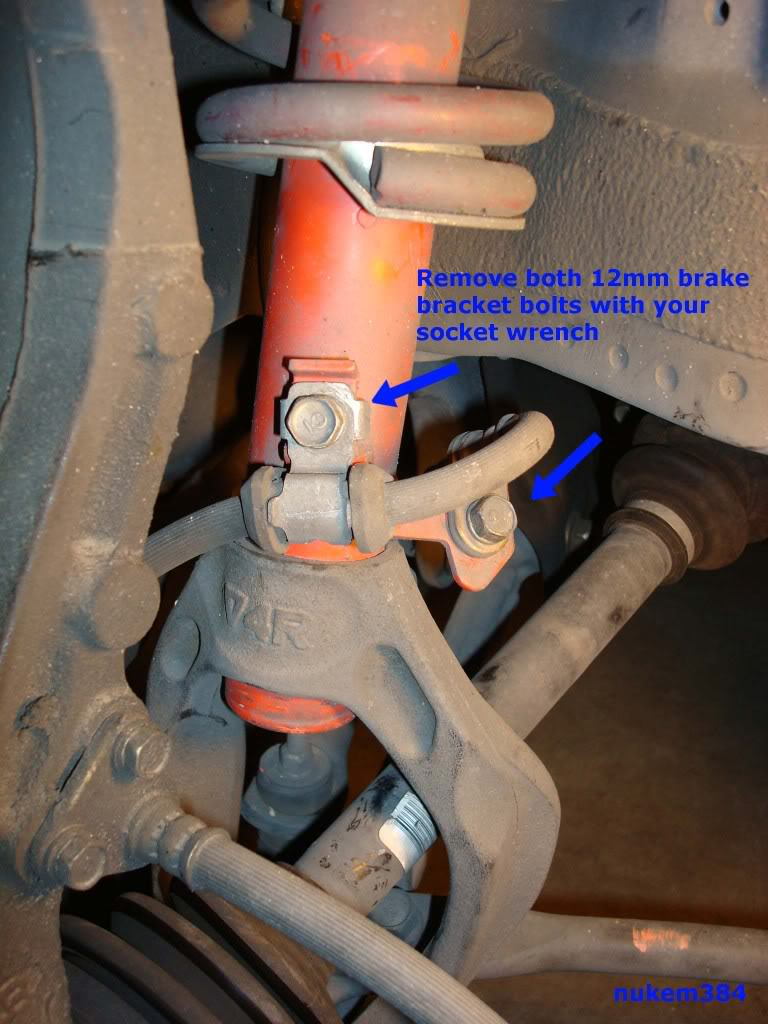
Figure 16. Remove the two small brake bracket bolts. 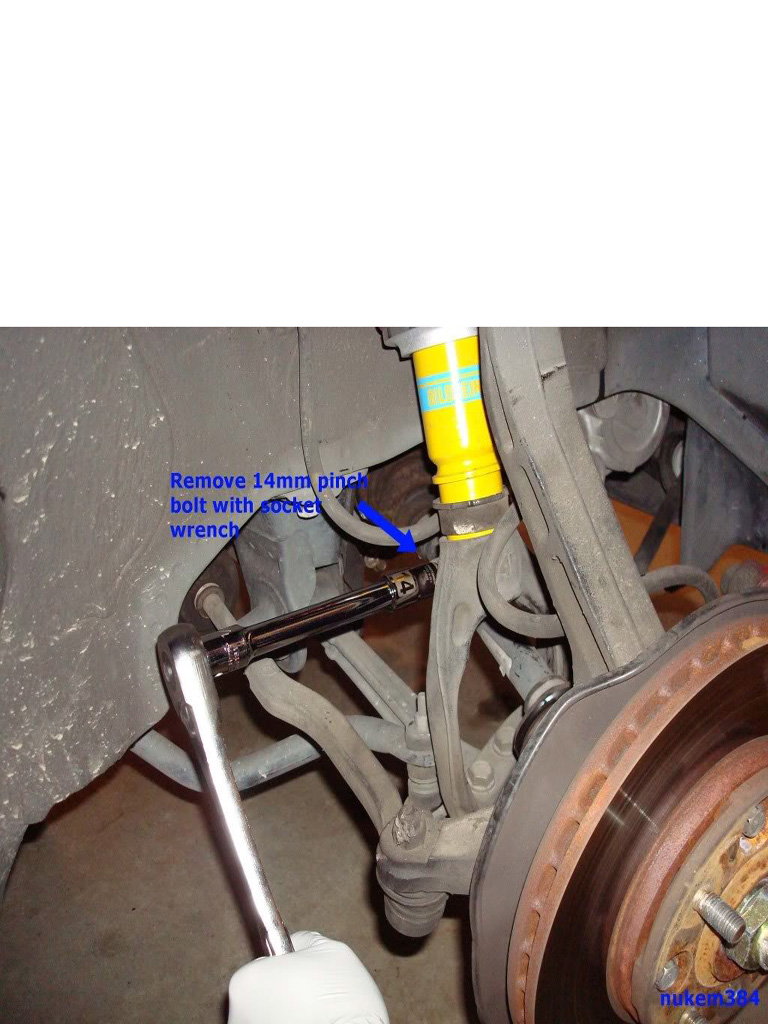
Figure 17. Remove 14mm pinch bolt that secures the shock to the fork. 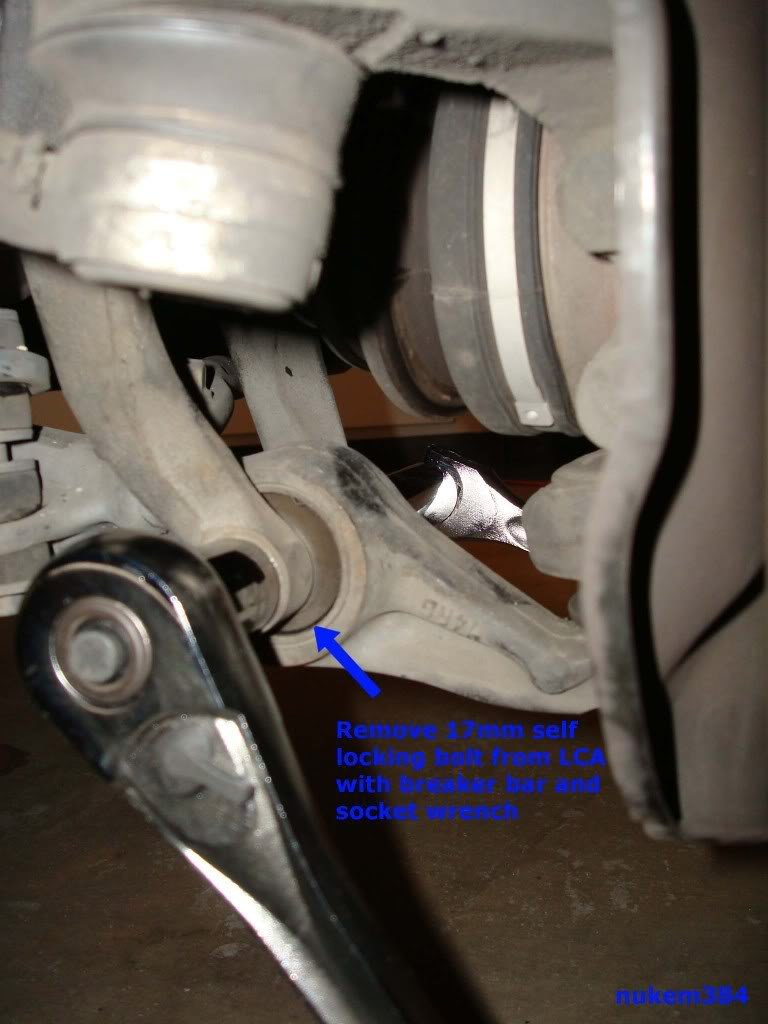
Figure 18. Remove bolt connecting the shock fork to the lower control arm. 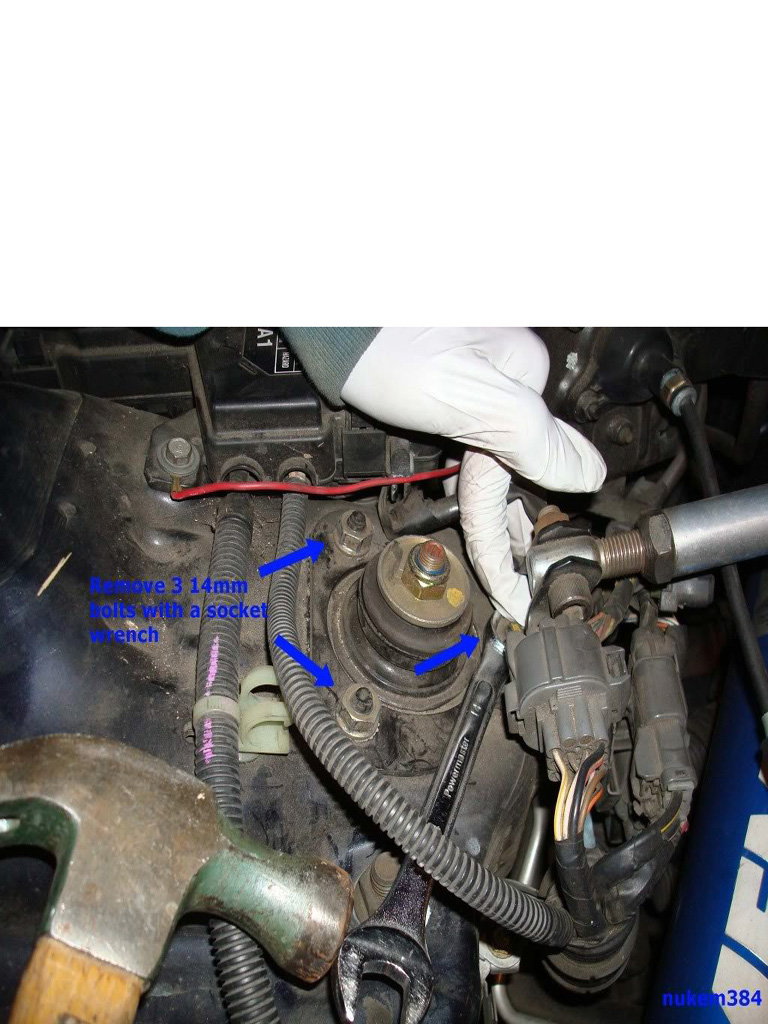
Figure 19. Remove three bolts from the front shock mounts.
Step 7 – Separate spring from the shock
Removing the springs from the front shocks is the same process as with the rear shocks.
- Compress the spring with a spring compressor. Be sure to follow the manufacturer's instructions when using it.
- With the 17mm box wrench and 6mm Allen wrench, undo the bolt from the top shock mount.
- Carefully decompress the spring, and disassemble the shocks.
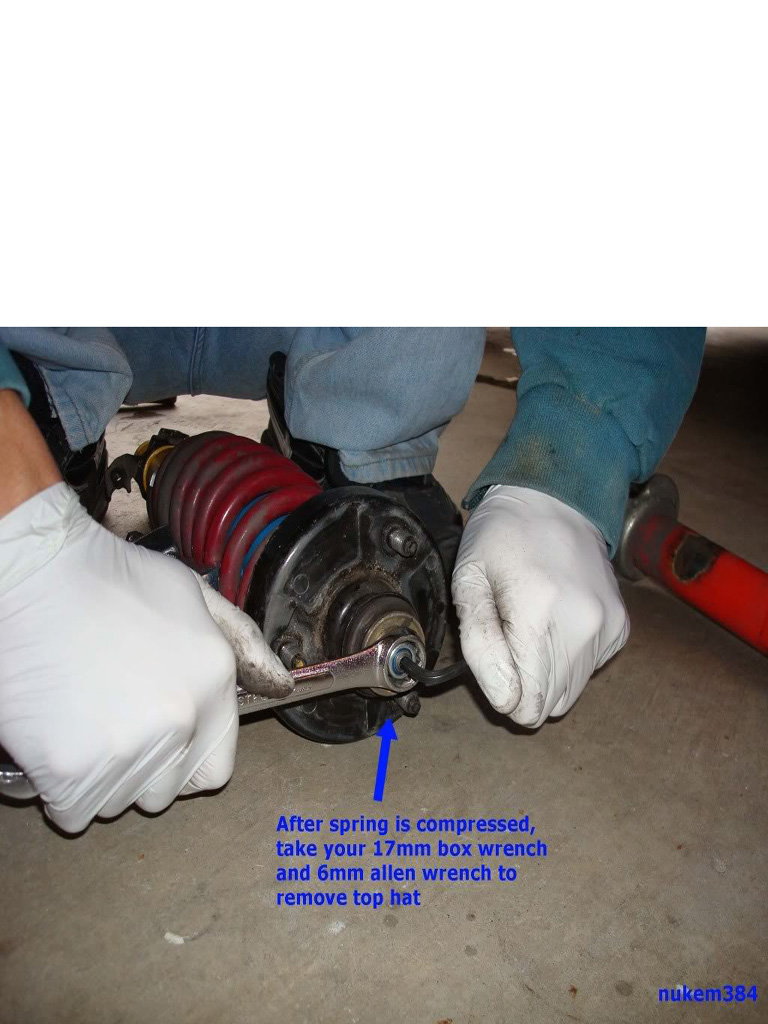
Figure 20. Use a spring compressor to remove the spring. 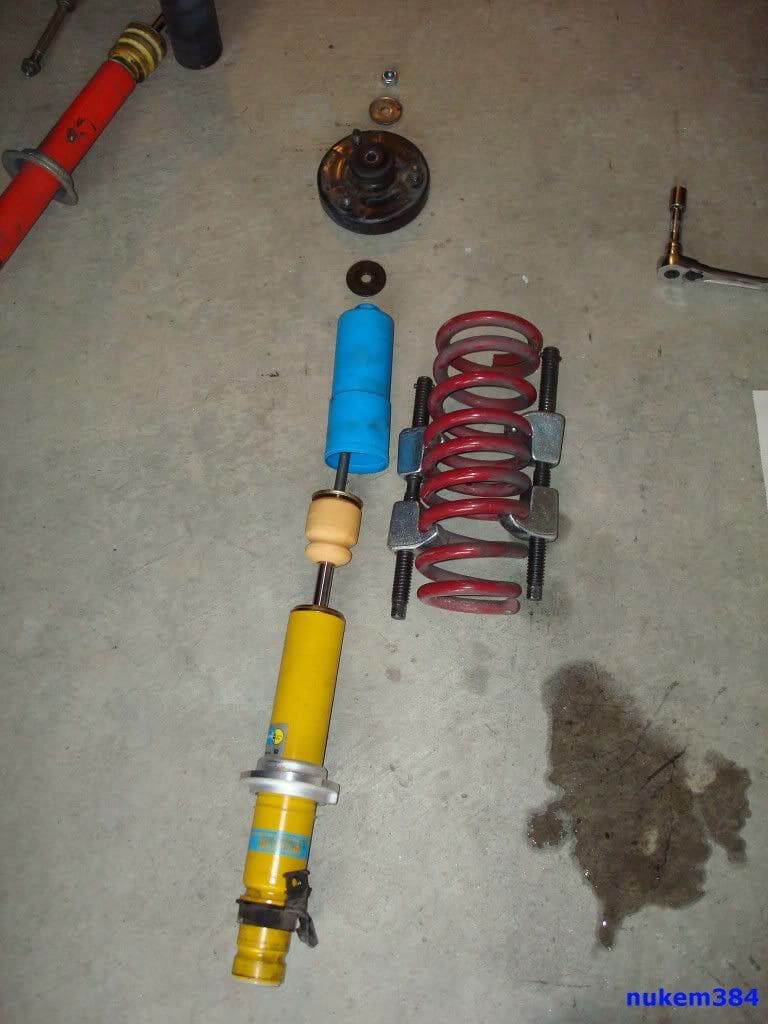
Figure 21. Disassembled front shock and spring assembly.
Pro Tip
As with the rear shocks, you can reuse any stock parts that are not included with your new OEM or aftermarket shocks.
Step 8 – Attach spring to the new shock
Follow this step if you are installing new or old springs with a separate set of shocks.
- As with the rear shocks, compress the spring and re-install the top hat with the 17mm box wrench and 6mm Allen wrench.
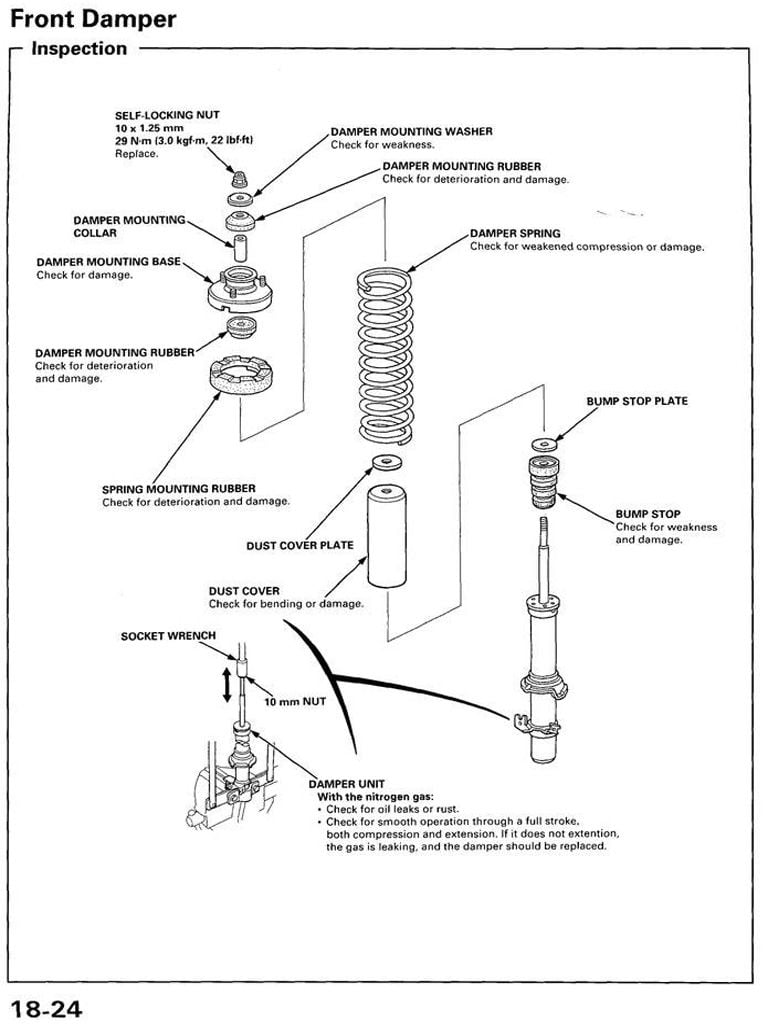
- Refer to Figure 22 to make sure you properly assembled all of the components.
- Make sure the spring is sitting properly on the spring perch with the end of the coil against the curve.
- After the top hat is installed, carefully remove the spring compressor.
Step 9 – Install the new shock assembly
Re-install the front shocks and springs in the reverse order you took them off.
- Place the new shock assembly into the wheel well with the notch facing the engine bay.
- First, fasten the three shock mount bolts under the hood, but don't fully tighten them yet.
- With the screwdriver, align the shock fork with the front lower control arm and insert the 17mm bolt.
- Insert and secure the pinch bolt, as well as the brake line bracket bolts.
- Then, tighten all of the bolts to their proper torque specs.
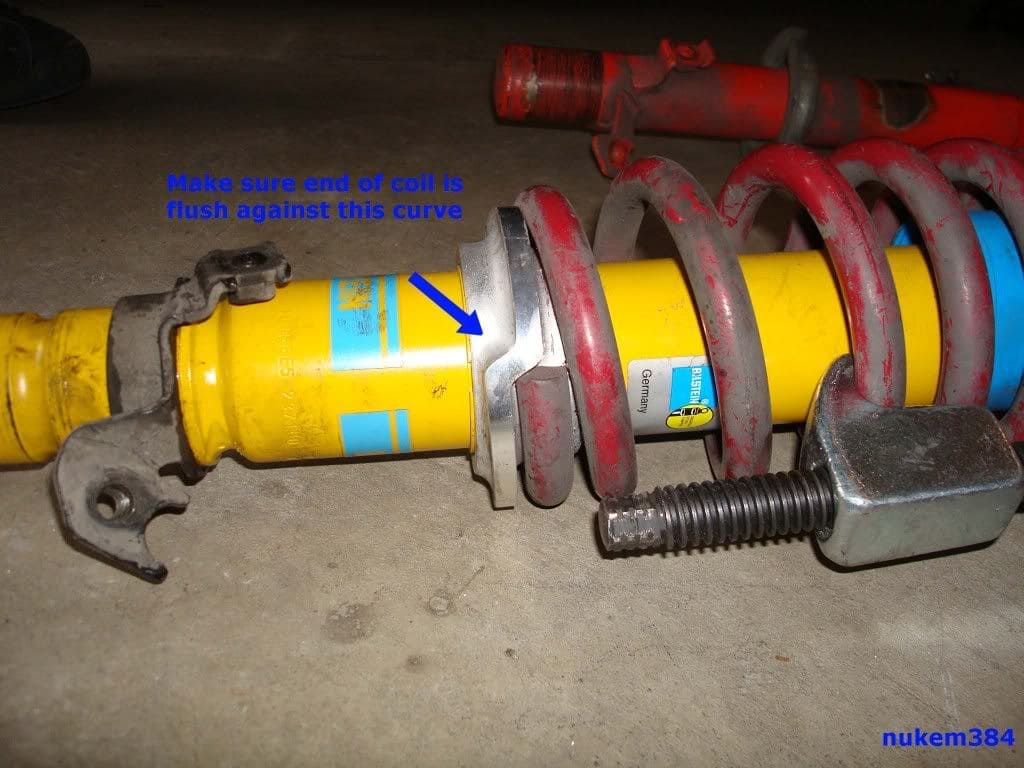
Figure 23. Assemble the new shock and spring. 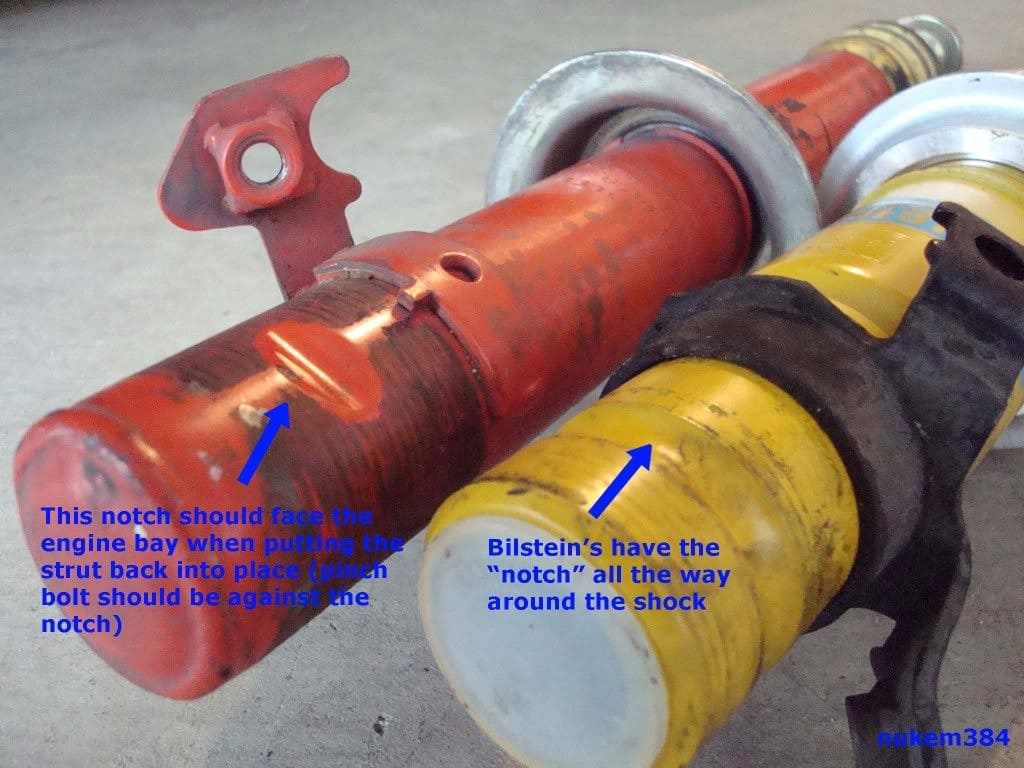
Figure 24. The shock notches should always face the engine bay.
Pro Tip
Remember to get your car aligned after doing a major suspension modification such as this one. You will wear out your tires very quickly if the wheels aren't aligned.
(Related Article: How to Align Your Tires - Honda-Tech.com)
Featured Video: Front Shock Replacement
Related Discussion
- Accord Shock Replacement - Honda-Tech.com